[How To] Configure Parental Controls In Windows 7

computer lock

[Photo credit: Flickr]

Are you worried about your kids misusing your PC ? Want to impose some restrictions on how they use the computer, when they use it and what programs they use ?

Windows 7 has some excellent in-built parental controls under the control panel settings. Here is a tutorial on how to configure and use the parental controls in Windows 7 to the perfection to control your child’s activity on the computer. You must first set up another account (Type: Standard user) .

Steps:

1. Go to start menu and type “Parent’ in the search bar. Click on the first result under the “Control Panel” section.

Parental controls in start menu search result

2. Click on the account for which you want to setup parental controls. Please note that you can’t apply parental controls to an administrator account, so that’s why you need to create a new account of “standard user” type to perform this step.
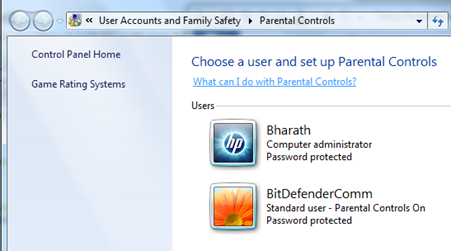
Parental controls home screen

3. Select the first radio button (“On, enforce current settings”). Now you have enabled the parental accounts for the user account.
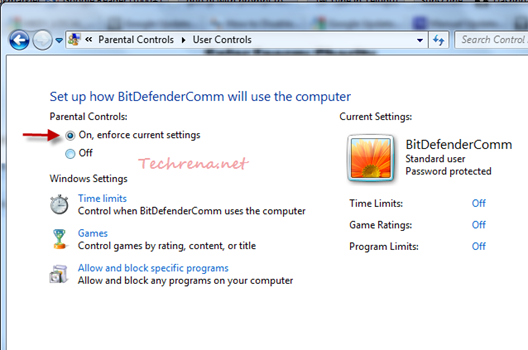
Enforce parental controls
Now you can configure the parental controls for various categories:

Setting Access Time Limits:

You can set the time of the day during which the user (your kid) can access the computer from “Tome limits” section. You can check or uncheck the time blocks (as hours) in the time grid under this section to allow or block the access during particular time of the day. Usually you may restrict the access to the PC during school hours and night times as shown in the screenshot below:
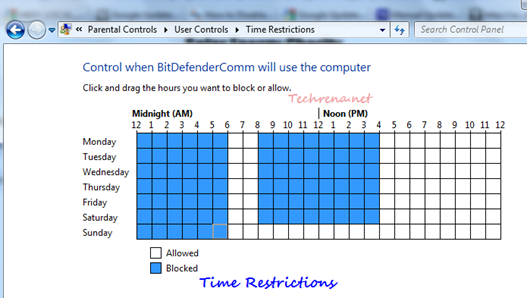
Time restrictions in parental controls windows 7

Game Controls:

You can either restrict the user account from playing all the games or you may also specify which games can be played using that account. Click on “Games” to set these controls. You can block games based on their rating (Early childhood, every one, everyone 10+, teen, mature etc.)
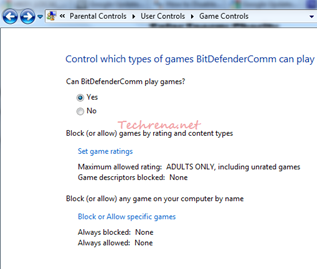
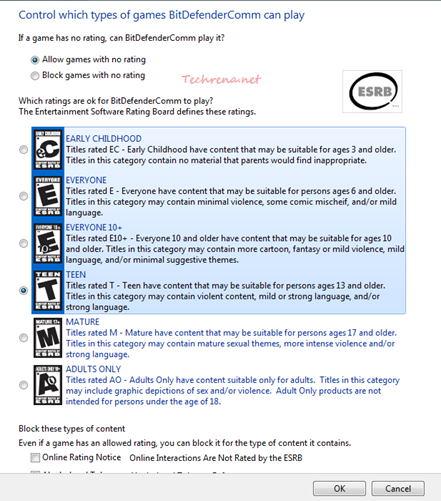
Game controls under parental controls windows 7

game restrictions in parental controls

Block Specific Programs:

Click on “Allow and block specific programs” to set which programs can be run by the user. You can select from the list of applications installed on the computer.
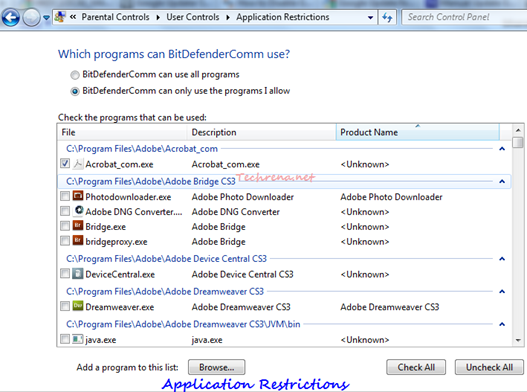
application restrictions under windows 7 parental controls

If you have liked this tutorial, you can subscribe to our RSS feed via Email to receive more updated Windows 7 tutorials.

Detect And Download Missing And Outdated Drivers Automatically With Driver Easy

Back in April, we had posted about a software called “Device Doctor” which automatically searches your PC for outdated drivers and downloads them automatically. But it can’t find the missing drivers in your system automatically.

It is very essential to install all the drivers from the resource CD that you have got from your PC manufacturer to make your system run smoothly without problems. But in case you loose the CD, it’s going to be very difficult to search and find each and every driver from the “Device Manager” in Control panel and download the corresponding drivers. In such situations, here is the software called “DriverEasy” that comes to rescue for us.

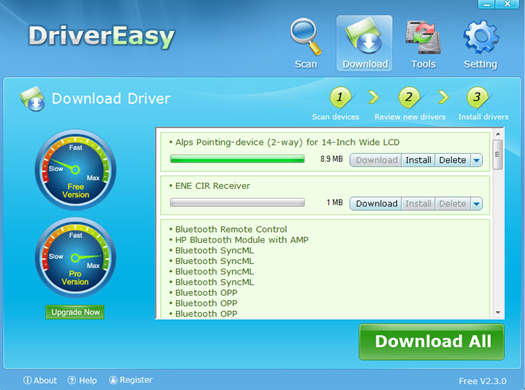
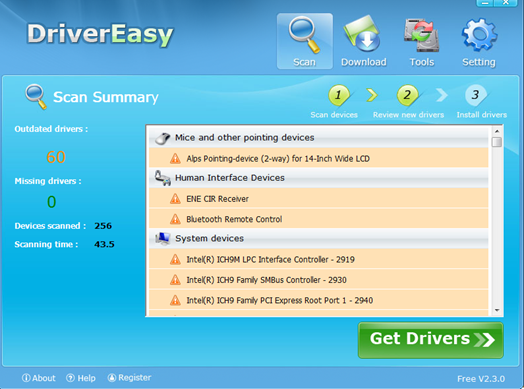
Just download (yeah, it’s free) the DriverEasy software from the link given below this post, install and run it on your system. It then performs the driver search on your PC and shows you the number of outdated drivers and the number of missing drivers found.

Driver Easy scan summary

Driver easy software download driver

You can now either choose to download each of the missing or outdated drivers or you may also download all the drivers at once click.

Download DriverEasy (1.20 MB)

HP Swing Motion Controller Debuts In India

HP official logo

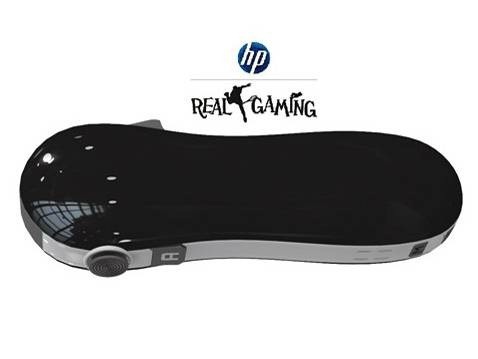
Hewlett-Packard (HP), the world’s largest personal computer maker, has just announced the launch of their new HP Swing motion sensor gaming controller in India.Swing will allow uses to play action games on their PC by detecting the player’s body movements much like Nintendo Wii.The player needs to move as per the game instead of the usual way of just pressing the buttons.

HP Swing can be used to play lifelike action sports games like tennis, pool and bowling.

Hp swing console
HP Swing will only be bundled with HP Pavilion desktop PCs.The device is coming together with seven games.The device has inbuilt CUDA technology which offers enhanced viewing experience for the users.

HP Swing is only available with HP Pavilion Desktop PCs stating from Rs.29,900.

Gaming market in India is almost confined to PCs.Not too many would have heard about the likes of PlayStations or Xbox.Never the less, this is a good move by HP, we have to wait and see how it will be received by the PC game lovers in India..

How To Install or Upgrade Your Laptop’s RAM (Physical Memory)

techrena logo

With the increasing technology day by day, our computers, laptops and every equipments are becoming obsolete. I bought my Laptop with 1GB RAM and 100 GB Hard Disk at a price with which I can buy a fully featured Tablet PC now.

So to deal with the developing technology, we need to upgrade our PCs and laptops to fit and to support the currently available software and operating system. I felt its high time that Techrena dot Net give you a tutorial to upgrade the most basic and most needed hardware upgrade –your Laptop’s Physical Memory or RAM (Random Access Memory).

What You Need to Upgrade your RAM?

  • Find out the type of RAM your Laptop PC Supports ( DDR1, DDR2, DDR3, SD, etc.)
  • Find out the Maximum amount of memory size your Laptop Supports( 2GB, 4GB, 8 GB, etc.)
  • Buy a suitable RAM for you Laptop PC
  • A suitable screwdriver (Mostly Philips Type)

How a Laptop RAM Looks Like?

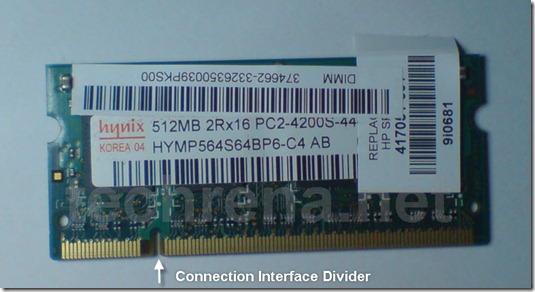
Laptop RAMs are smaller in size as compared to Desktop RAMs. A HYNIX made 512MB DDR2 RAM is shown below. As you can see it has a connector for the RAM slot in your laptop and it has a divider. This divider is to indicate the correct side while connecting it.

Click on the images to enlarge

512MB RAM

Opening your Laptop Ram Container:

Shutdown your computer and disconnect all the cables and wirings. Turn your Laptop over, be careful and keep a protection under the laptop.

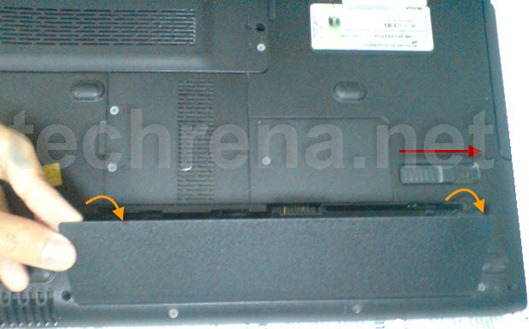
Now Remove your Laptop battery. To remove release the lock and pull the battery out.

Remove the battery

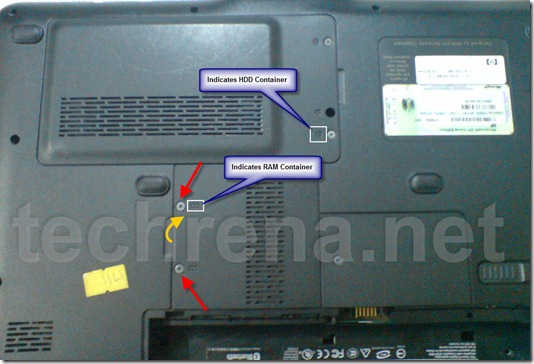
Now see which section contains the RAM in your laptop. Do not confuse with the other device containers. With a suitable screwdriver, start unscrewing the screws in the section which contains the memory devices. See the image below:

Open Container Screws

Removing the old RAM (not required if empty slot is available):

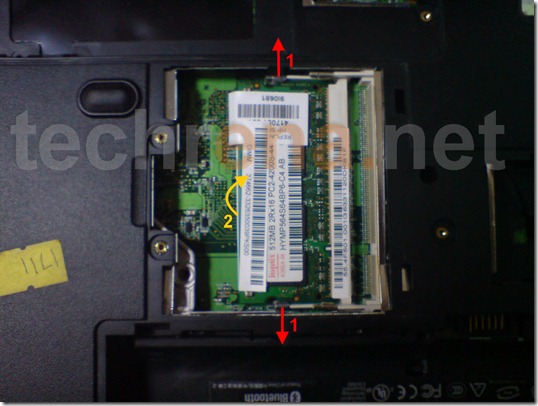
After opening the cover of the RAM container section, you need to remove the old RAM which needs to be replaced. Note that many laptops have more than one RAM slot. Which means that if you have an empty slot you can put the new one in the empty one. This will add your new RAM size to your old one.

First pull out the RAM holder as shown, the Device will come out automatically. Take it out smoothly.

Remove Old RAM

Installing a New RAM:

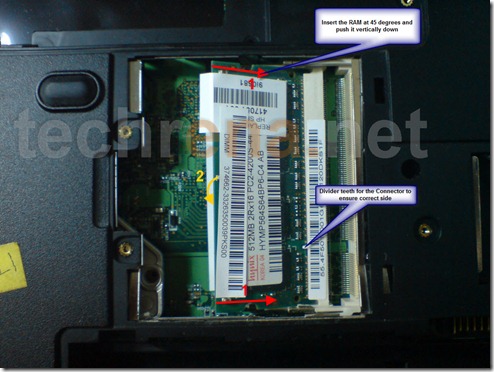
Before inserting the new one, find out the correct side to which you need to connect to. Slide in the Device smoothly to the slot. Most RAM slots need to insert the device in 45 degrees and push it vertically down after it has been inserted fully into the slot. Refer the image below:

Install New RAM

Now place the covers and screw it back. Place the battery back to the battery slot. Power it up and start the computer.

Installation of RAM has been successfully completed and you can check the Physical Memory at:

Right Click on My Computer—> Properties—> Memory or

Task Manager –> Performance—> Total Physical Memory

Important:

  • Do not try any forceful methods to remove the screws or devices.  If anything is not getting removed, do contact a professional.
  • Be careful while installing the new device. Make sure you insert it correctly and firmly.
  • The above tutorial is based on HP DV1502 TU Model. It may be different in your case.

Disclaimer: This tutorial is for your information only. Techrena dot Net is not responsible for any damage in property or lives resulting from the use of the information given here. You are responsible for all the actions you take.

Create Shutdown Shortcut for Windows XP, Vista, Windows 7 on Desktop

Learn How to add/create a desktop Shortcut to Shutdown / Turn off your Windows computer.

Shortcuts are meant for making life easier. We all know how to add shortcuts to our favorite programs on desktop.Now let’s see how to add a desktop shortcut for “Shutdown”,  which when double clicked will shutdown your system.

Important: For those who are using Windows 7 please refer the NOTE given below (Please Scroll Down)

Steps:

1.Right Click on your desktop select New>>Short cut

2.Now a “Create Shortcut” window pops out which will ask you to type the location of the item (in our case it is “shutdown.exe”).

create shortcut for shutdown -www.techrena.net

3.Type the following code :%windir%\System32\shutdown.exe –s in the textbox.

[As you can see we are trying to locate an .exe file called shutdown.exe which when executed will shutdown the computer].

After entering the above code, click Next

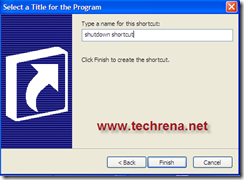
4.Now the window will ask you to select a title for the program give it a name whatever you like “Shutdown Shortcut” and click on the Finish button

give shutdown shortcut a name

5.The new shortcut will appear on your desktop.

shutdown shortcut without icon

You may change the icon of the shortcut so that it’s easier for you to identify the shortcut.[In the image, I’ve used a “Power Off” icon for the same ]

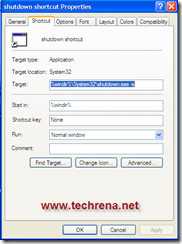
shutdown shortcut properties changin icon of the shutdown shortcut

You are done  now. You may also go for advanced options like adding –f or –t after –s in the textbox area.

If you use –f it’ll immedialtely closes all running applications and shutdown without any warning

if you use –t you can specify the time after which you want your system to be Turned off.

for example you may give like %windir%\System32\shutdown.exe -s -t 100 which will trun off your system after 100 seconds.[a message will appear as shown].

Note:You may also use command prompt to shutdown your system.The same code as in the above can be typed as shutdown.exe -s -t 100 and you’ll still get the same turning off message.Once it has started the only way to stop it is using the command prompt again.Use shutdown.exe –a to stop your scheduled turn off.

The above process has been posted with the Windows XP as the base OS,  the same process can also be applied to Windows Vista based systems.

NOTE: For those who are using Windows 7 download the zip file below which contains the shortcut to Shutdown. Extract the file and place the shortcut where ever you want.

Download: Windows 7 Shutdown Shortcut.zip

Size: 850 Bytes

Contains 1 file: Shut Down Windows.lnk