Gmail Emerges As No.1 Email Service in India

Google’s Gmail has probably officially took the honour for their outstanding features provided to the users allowing Gmail to takeover it’s rival Yahoo mail as the top email service provider site in India.

According to an online audience measurement and analytics organization ViziSense, Gmail has managed to get 18.2 million users in India to use its services at a growth rate of 2.82 % in September 2009 and 6.63 % in the previous month August 2009.

The classic Yahoo mail India, which continued to stay at No.1 till the last month had to settle with No #2 position with a negative growth of -7.69 % and with 16.8 million users approximately.

Gmail overtake Yahoo mail India

Yahoo Mail which dominated as the most popular email service in India is loosing ground to Gmail .But for the big internet company which has recently launched ‘It’s You’ campaign in India to attract more users, this news may not be so encouraging .

Probably it’s time for us to say- “Wake Up Yahoo !! ” 🙂

Gmail’s New Option ‘Email a Task List’

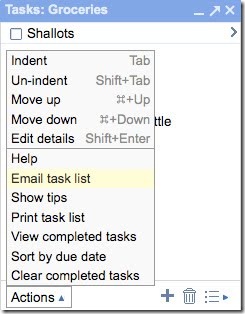
Gmail has recently added a new option to the Tasks inside Gmail that lets you email your tasks to your friends 🙂

This option is available inside the ‘Actions’ menu of  ‘Tasks’.(Check out the screen shot below)

Email a Task List gmail

If you click on it, new window will be opened (Mail composing mode) with your tasks being included in the message body.

Google Now Lets You Recover Password Through SMS

Some times we go so mad that we even forget our account password :), no one is exception.

google account password recovery Then we have to go through the difficult tasks of verifying our DOB, or secret security questions etc.
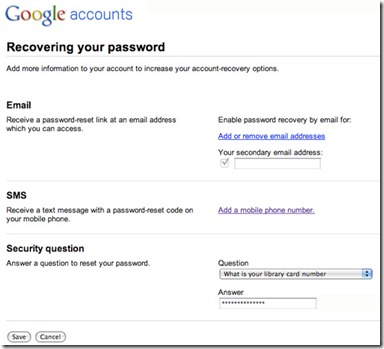
Google thought about it, and has added a new option which allows users to recover their Google account password through SMS [Text Message].

How to Enable This Feature?

Just sign into your Google account and as shown in the above screen shot, click on ‘Change Password Recovery Options’.Just enter your mobile number in the required filed to avail this feature.

account password recovery

[image:Official Gmail Blog Post]

Gmail Adds Automatic Message Translation Feature

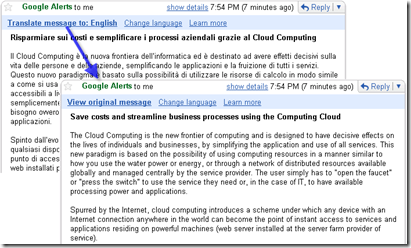
Search Engine giant Google has just announced one more interesting feature (actually a Labs launch) which lets you instantly translate Gmail messages to language which you feel comfortable reading.

The new Automatic Message Translation is currently between 41 languages.This feature as Google says is mainly to woo the multi-national companies that use Gmail as their native email provider.

gmail auto translation screen shot

if your entire company uses Gmail, email communications between people in your company can take place in the language that’s most comfortable for them – each person can write messages in their native language and the recipients can translate the messages into their respective native languages.

This new Gmail feature is powered by Cloud Computing. To enable this feature in your Gmail, simply go to “Labs” tab under “Settings” within your Gmail and enable “Message Translation.”. And  for some reasons if you find the translation to be awkward,  you can quickly revert back to the original message just by clicking “View original message”.

How To Find IP Address of the Sender In Gmail Message Headers

Tracing IP address of the email sender in Gmail:

Finding out the IP address of the sender is the first step that you may have to do if you want to the find the information about the person who has sent you the mail.This IP address information will normally be included in the email headers.

Let’s see how to find the sender’s IP address in the email message headers in case of Gmail:

1.Log in to your Gmail account.

2.Open the email message for which you want to find headers.

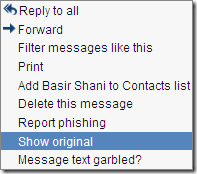
3.Click the down arrow next to reply in the right hand side of the message.(refer the image shown below)

show original message headers in Gmail

4.Select the “Show original” from the list.

Now a the original message with full headers will open up in a new tab/window.

Now search for the string using CTR+F  “Received: from” from bottom to up.The first one that you find (from the bottom) should have the IP address of the sender and it should like like the one shown below.

  Received: from [202.47.69.86] by web76702.mail.sg1.yahoo.com

So here, the IP address of the sender is 202.47.69.86, and using Who is Look up, it can be easily found out that the email has been originated from Indonesia in this case.

However this method (to trace IP )  doesn’t work for the emails that are sent from another Gmail account.

Inserting Images in Gmail made easy

Adding Inline Images in Your Gmail

Gmail labs today has announced a feature which allows Gmail users (Only those who enable this feature in Lab Features under Gmail) to insert images while composing mail in Gmail.It was a major development at Gmail but nobody has any idea why Google hasn’t enabled this feature by default to all Gmail users.Anyway take a look at how actually you can add images in your mails.

First Click on the tiny Gmail Labs button in Green towards left-hand side of your browser.[If you have already been using Labs features, else you have to go to Settings>>Labs]

Click on Gmail labs button in Green

Then a list of Gmail labs features available will be shown to you.Look for the following feature called “Inserting Images”

enable inserting images lab feature in Gmail

Now enable that feature.

Start composing a mail now, in your rich text editor, now you may find a small image button which allows you add images (see in picture).

Click on Insert image button in your rich text editor

Now you can either upload image from your desktop

Adding image from computer web URL

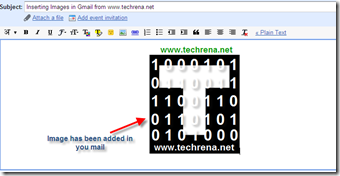
That’s it now your image will appear in your mail (see the sample image in picture)

image added in Gmail looks like this one

Note:The recipients may not the images in your mail as by default Gmail will not display images from mails so as to to prevent from spam.So the recipient must either click on “Display Images Below” or “Always Display images from…” to see the images that you have inserted in the mail.

This is the latest improvement at Gmail after last week’s addition of Five Indic Languages in Mail composer.

Gmail Goes Desi – Adds Five Indian Languages To The Mail Editor

Composing Gmail in Hindi, Telugu, Tamil, Malayalam or Kannada made easy.

There was a time when Indian users had no option to send a mail in their own language, and later few software’s like Baraha had made it easier the task,and after sometime Google had come up with fantastic Google Indic Transliteration tool, an online translator which automatically translates the words that you type in English to the five Indian languages, and later extended to other Google services like Blogger, Orkut, iGoogle .Now Google finally thinks that it’s time to add this feature to the users of Gmail in India.

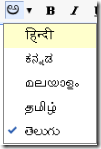
The Gmail editor (composer) much like other editors such as Blogger editor will also have an option to choose the language from the drop down listgmail 5 different indian languages choice (currently five Indian languages Hindi, Kannada, Malayalam, Telugu and Tamil are available) to compose mail in that particular language.
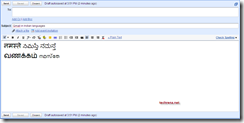
gmail compose in 5 inidc languages -www.techrena.net

This is a really cool feature for Indian Gmail users and I’m sure they gonna love it.

Also check out:How to export Gmail contacts

Exporting Gmail contacts to another Gmail account

How to export contacts from one Gmail account to another?

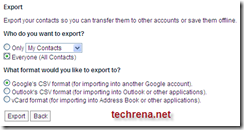
Gmail has made it very easy for users to transfer or export contacts from one Gmail account to another Gmail account.Just follow the following steps to export your contact list from one Gmail account to another Google account or to just save them as Outlook’s CSV format (for importing into Outlook or other applications) or vCard format (for importing into Address Book or other applications).

1.Log in to your Gmail account,from where you want to transfer contacts.

2.Click on the ‘Contacts’ link in the left hand side.

3.Now find the links ‘Import Export Print’ at the right hand side of your browser

Exporting Gmail contacts to another Gmail account

4.Click on the ‘Export’ link

Choose the contacts you want to choose (You may choose all contacts or contacts by group).Choose the following option under the export file format.

Exporting Gmail contacts to another Gmail account as CSV

Google’s CSV format (for importing into another Google account).

5.Download window will pop up download the CSV file and then open your new Gmail account to which you want to transfer the contacts and use ‘import’ option and upload your contacts CSV list.

That’s it check your cotacts in your new Gmail account.Isn’t it simple??