[Download] Google Earth 6

Google has just released the Google Earth 6 with entirely new and surprise addition of features. The virtual 3D earth application from Google, boasts of 3D trees and a much improved version of the Street View. Google Earth 6 packs virtual 3D images of tress in locations all over the world. A blog post at the Official Google Earth Blog reports that there are as many as 80 million trees added in this version. To enable the trees in your Google Earth, just select the Trees checkbox inside the 3D Buildings layer option and tick against it.

Google earth 6 trees


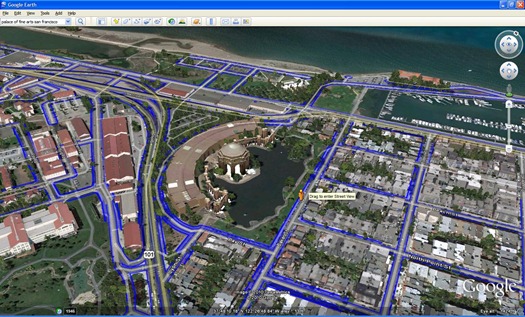
The 2-year old Street View in Google Earth is now fully integrated. This means that you can directly enter the street view all the way from the space. You can either zoom in until the Street View gets enabled automatically or you can drag and drop the peg-man icon (yellow man icon standing in the street) to enter into the Street View for your desired street.

Integrated street view in Google earth 6

Start Downloading Google Earth 6 for Windows, Mac or Linux right away from the below links:

Offline Installer [13.37 MB]

Online Installer

Google’s Spam Report Extension For Chrome

Google chrome extensions logo

Now you can improve the search results in Google more easily by reporting spam websites to Google by installing the newly released “Google Webspam Report” extension in your Google Chrome browser. While Google folks are very proud that they have released such an useful extension for the users, the majority on the users front are of the opinion that Google should release such an add-on for the Firefox browser too (including me Smile).

The extension is considered as a pretty useful for the most webmasters and Google users, who really hate the spam websites on the internet. Of course, you can report any website for spam from this page include within the Google webmaster tools. You need to be logged into your Google account to report the sites for spam (both via the extension and via the GWT).

Google report spam in search results

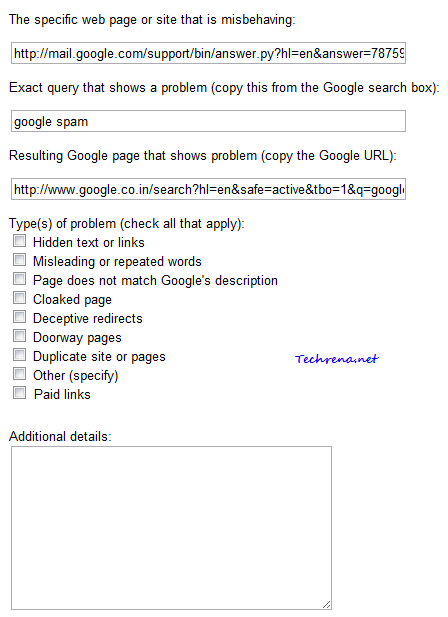
Upon installing this extension, will add a “Report spam” link beneath the all the pages in the search results.  Clicking on which will directly take you to Spam report form.

Google spam report form

Install Google Webspam Report in Chrome.

[Tip] Using Goo.gl URL Shortener Without Google Toolbar

Google URL Shortener logo

Google’s goo.gl URL Shortener is now available for public via the website Goo.gl. Google released the Goo.gl URL shortener service (along with Youtu.be URL shortener) in December 2009. According to a blog post on Google Social Web blog and another post by Matt Cutts, Goo.gl URL shortening service was initially launched for the requirement of Google’s staff in their products. But it has quickly got into popularity and even some pretty good browser extensions have come in (here’s one for Chrome). Until now the service was available via Google Toolbar alone. Not anymore!  You don’t need any external add-ons or extensions or workarounds to use this service now. This is now available for public use via the website.

Google URL Shortener

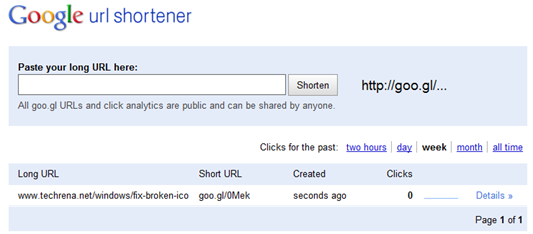
To shorten any URL, go to goo.gl, enter your and click Shorten. The good thing about this is, much like Bit.ly, Goo.gl will also show you the analytics of the links that you have shortened, provided you have signed into your Googe account. Without signing in, you can still shorten the links but you can’t keep track of the clicks coming from that particular short URL.

As you can see in the screenshot, the dashboard will show you the list of links that you have shortened using this too. It will also show the number of clicks received along with a “Details’ link, clicking on which will take you to the detailed analytics of your links.

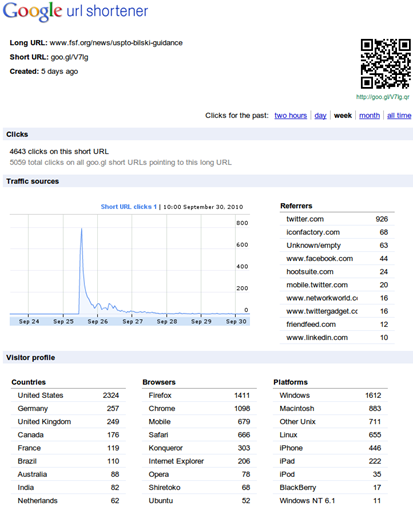
goo.gl analytics stats

The analytics shows you the clicks received against a time line, the top traffic referrers, the countries from where the visits came, the browsers used, the Operating systems (or the platforms) used etc.

You can also generate a unique QR code exclusively with Google’s URL shortener. Which looks something like this:

QR code

The only thing that might disappoint is the inability to choose custom URLs that is very much possible with the market leader in this sector, Bit.ly.

Go and give it a try at Goo.gl.

[Tip] Locking Google SafeSearch For Better Parental Control

A simple Google search can give you access to a wide range of information which sometimes may even included the content that is not appropriate for your age. For the same reason, Google has “SafeSearch” feature to filter out content that may not be enjoyed by the users of all age groups.

But the SafeSearch settings aren’t kind of that hack-proof stuff. It’s even easier for your kid to change turn the SafeSearch off without much effort. One way you can ensure your kid browsers search through SafeSearch only is to lock the SafeSearch option for a particular browser.

Let me guide you to lock the Google SafeSearch settings for any specific browser. Follow the steps:

1. Go go any Google search results page.

2. Click on the “Search settings” link present at the top right corner of the page.

Search Settings link in Google

3. You will now be taken to the Google Preferences page, where you can find different sections like Interface Language, Search Language, SafeSearch Filtering, Number Of Results etc.

Focus on the “SafeSearch Filtering” section.

4. You will find a “Lock SafeSearch” link at the bottom of the three options.

Lock SafeSearch

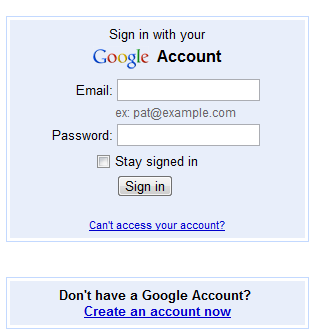
5. When you click on the “Lock SafeSearch” link, you will be asked to log into your Google account. Provide your credentials and proceed to the next step.

Google sign in page

6. When you proceed, you will be shown a warning about locking SafeSeach. Just click “Lock SafeSearch” to proceed further.

SafeSearch Filtering

Progress for locking safesearch

The SafeSearch will be locked across all Google domains, meaning all the country specific Google sites included.

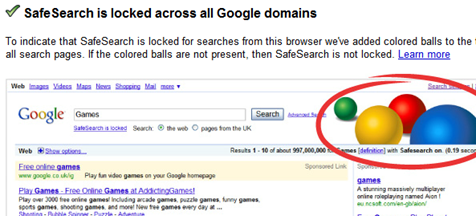
7. A message will appear saying “SafeSearch is locked across all Google domains” will be displayed along with a text that tells you that colored balls have been added to all the search pages, denoting that SafeSearch is locked.

SafeSearch locked success

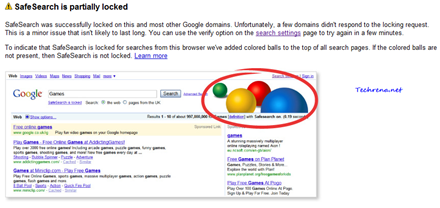
Sometimes you may get messages like “SafeSearch is partially locked”. This happens so when some of the Google’s domains don’t respond to the request sent to them from your browser. This is a minor issue and will be fixed automatically when you try the same after sometime.

SafeSearch locked partial

That is it. You have now locked the SafeSearch settings for one browser. This would still work even if you log out of your Google account.

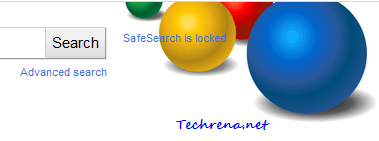
From now on, a group of colored balls will appear on search results page, to let you know that Safe search is being locked.

colored balls Google

However, this isn’t hack-proof either. As these are stored via cookies, deleting all the browser cookies will change the settings again. Also you need to setup this kind of SafeSearch lock for all the browsers that you use. Read : additional parental controls to restrict your children from using applications and other settings on your Windows 7 machine.

[Tip] Disable Threaded View In Gmail

Gmail logo

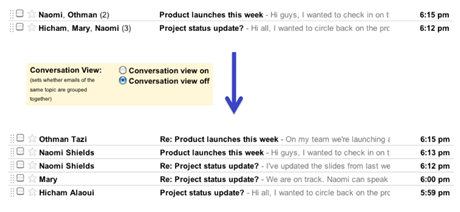
Gmail’s conversation view is without any doubt, one of the key factors that has helped Gmail emerge as the most used web based email program on the internet. While the normal users like us enjoy related email messages being grouped into threaded conversation messages thus making your inbox not to be cluttered with mails, but there have always been some people who don’t like this feature, as they like the traditional or classic way of email, the one with unthreaded messages. For those minority uses, who still want to see their mails in the traditional format, without the threaded conversation view, Google has just added the feature that lets you enable or disable this feature for their accounts.

threaded and non-threaded in gmail

Follow the steps to disable the conversation view in your Gmail:

1. Log into your Gmail account.

2. Click on the “Settings” link on the top right corner. Alternatively, you can click on this link once you are logged in, this will directly take you to the Gmail settings page.

Settings link in Gmail

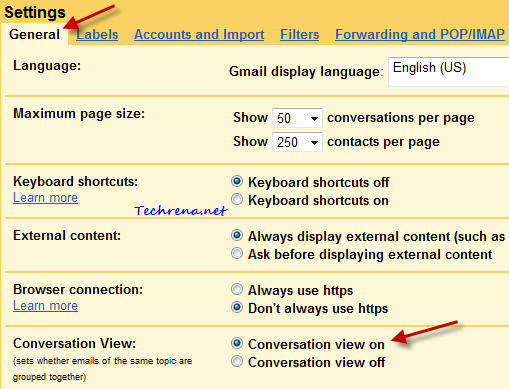
3. Under the “General” tab, find

Gmail settings for conversation view

4. By default, the conversation will be set on. To disable the threaded conversation, select “Conversation view off” button and click “Save changes” button.

Conversation view off

From now on, you won’t see the email messages being threaded to form conversation view. So any reply or related message that you get to a particular mail will be shown with the corresponding symbols as the case with any other classic email clients (for instance you will get RE:.. for any reply you get to the mail that has been sent by you).

[How To] Change The Favicon In Blogger

Change default favicon in Blogger

If you have landed here while searching for changing the favicon in blogger, this itself is a indication that you know something about the favicons. Even though I assume that you know a bit about favicons, let me quickly introduce the concept of “favicon” :

Favicon (pronounced fav-eye-con) is the short name for “favorites icon” and is otherwise called as a shortcut icon. It is a 16×16 (most common) or 32×32 pixel square icon that is shown next to the URL of any webpage in a browser that supports tabs like Firefox, Google Chrome, Opera or Internet Explorer 7/8 etc. It is also shown in bookmarks or favorites, when you bookmark (in Firefox, Chrome or Opera) or when you add a site to favorites (in Internet Explorer). Many websites use well designed favicons as branding for their site and it also enables their site to be distinguished from other sites easily.
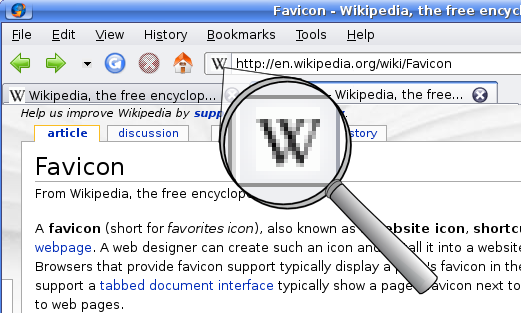
Wikipedia Favicon

If you are using Blogger blog, you might have already noticed that Blogger shows default favicon Blogger faviconnext to the URL of your blog as shown here:

blogger favicon example

Usually if you want to change the favicon of a website, you need to upload the new favicon file to the root folder of the website and the new favicon appears in your website immediately. But it’s not the same case with Blogger. As the user doesn’t have control over the files hosted on Blogger, the only way you can change the favicon in a Blogger blog is to upload that favicon to a free image host that supports uploading of .ico formats and then tell the Blogger to use this favicon instead , by specifying it in a short code inside the HTML source code of your blog template. Let’s look into the step-by-step guide on how to get this done.

Steps:

1. Design an attractive favicon for your site using many online favicon generators online. I’m quoting a few such tools here:

favicon.cc

favicon.co.uk

antifavicon.com

iconj.com

2. Once you have designed and downloaded the favicon on to your desktop, you need to upload it to a host site where you have access to upload the favicon file and retrieve it later. I suggest you try some image hosting sites that allow the uploading of .ico files. Iconj.com mentioned in the above list supports uploading and hosting your .ico files as well.

3. Now note down the URL of the file located on the image host.

4. Login to blogger.com and go to your dashboard. Click on the “Design” tab under your dashboard.

design link in blogger dashboard

5. Now click on “Edit HTML” tab found under the “Design” tab.

Edit Html under design in blogger

6. Find the <head> and </head> lines in the HTML code.

7. Copy the following code:

 <link href='http://www.your-icon-url' rel='shortcut icon' /> 
 <link href='http://www.your-icon-url' rel='icon' />

Replace “www.your-icon-url” in the above code with the actual URL pointing to the new favicon file of your site. Example:

<link href='http://www.techrena.net/favicon.ico’ rel='shortcut icon'/>
<link href='http://www.techrena.net/favicon.ico’rel='icon'/>

8. Paste the modified code anywhere in the HTML code, but it should be placed after the <head> and before </head> section [Tip: Use Ctrl + F to find these lines] in the HTML code. Click “Save Template” to save the changes to the code.

favicon code in blogger html design

9. The new favicon may take some time to appear in your browser. You may not see it until your browser clears its local cache. To see the new favicon instantly, try Ctrl + F5. If it doesn’t show up, try opening your blog in another browser and you will see the change

New favicon

If you liked this post, you might also want to read our earlier exclusive posts about Blogger : How to verify Blogger blog in Webmaster tools, Blogger title tweaks for SEO and swapping Blogger blog title and post title.

[Download] Google Chrome 6 (Stable) Offline Installer

google chrome logo

Google Chrome has recently celebrated it’s second birthday and it’s has been a great journey so far for the most simplest browser in the world. Google is all proud to release Google Chrome 6 stable version of the browser. The latest version available as of the time when this post is written is 6.0.472.53.  Stable version of the Google Chrome 6 can be downloaded now from Google.com/chrome.
Google Chrome 6 poster

Google Chrome 6.0.472.53 includes the following new features and updates:

  • New Updated User Interface
  • Form Autofill
  • Extensions and Autofill data Sync
  • http:// will not be shown in the address bar
  • “Go” button Chrome_go_buttonhas been removed
  • Increased speed

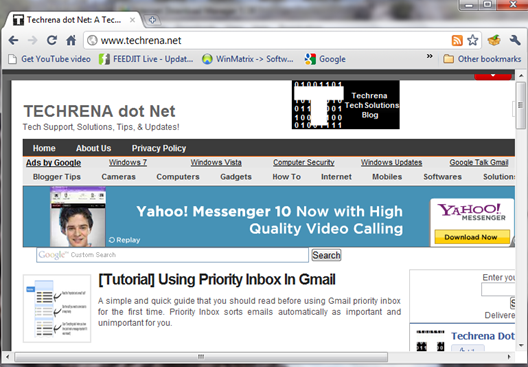
Screenshots:

Google Chrome 6 screenshot

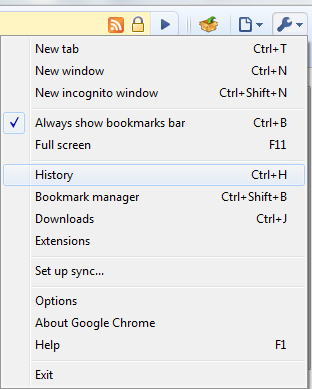
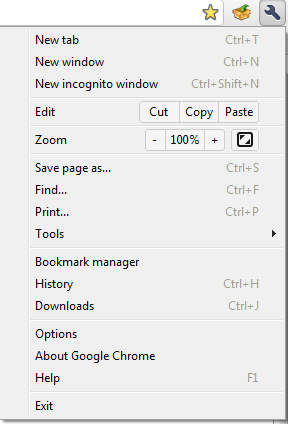
Settings comparison: Google Chrome 5 Vs Google Chrome 6

Chrome 5 settingsChrome 6 settings

Download Google Chrome 6.0 Full Offline Installer:

Even though this new version can be easily downloaded from the Google chrome online installer which automatically downloads and installs Chrome on your Windows and Mac, at times offline installer is what you want to use it on the other computers without needing to download again and again.

We have found a link for the Google Chrome 6 (Stable) standalone offline installer which is 19.52 MB in size. Use the direct download link included below to download it.

Google Chrome 6.0 Offline Installer

[Tutorial] Using Priority Inbox In Gmail

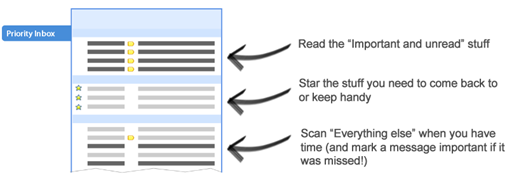
Gmail priority inbox overview

Google has just launched this brand new “Priority Inbox” feature inside their popular email service Gmail. The above an illustrative image taken from the official Gmail blog shows the quick overview of the what this new feature has to offer for you. If you are one of those who gets thousands of emails most of which are “not really” important, Gmail’s priority inbox lets you organise them in a better way by showing the emails that you should probably be reading first in a sorted manner based on your priority and on Gmail’s knowledge of picking the important mails based on your reading over the time. Without wasting much time, lets get straight into the details on making it ready for the first time for your inbox.

Steps:

Find “New! Priority InboxBeta” link in red at the top right corner of your Gmail inbox window.

New priority inbox

When you click on the link, a window with a video pops up, quickly go through the video to get to know about this new feature or you may totally skip it as well.

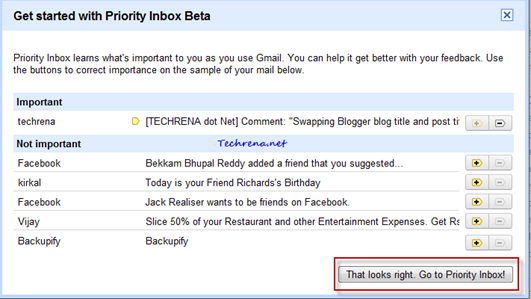
Click on “Try it now!” link at the bottom of the video and you will be shown a initial configuration window.Priority inbox beta getting started

The window will show some of your mails that Gmail thinks as “Important” or “Not Important”. If any one of the mails are shown in the wrong category, you can tell the Gmail it by clicking on the appropriate buttons : click on minus sign Priority minus signin case if the mail is wrongly placed in the “Important” category and click on plus signPriority plus signif there is any wrong mail in the “Not Important” category.

Once you have done the required changes, click on the “That looks right. Go to Priority Inbox!” link at the bottom of the window. Be patient until priority inbox gets activated for you.

Activating Priority inbox

Priority inbox first use

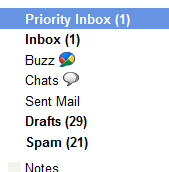
Here you go…Priority inbox has been activated and a new “Priority Inbox” label appears just above the classical “Inbox” label inside your Gmail.

Priority inbox label

And here’s how your new priority inbox should look:

Gmail Priority inbox look

It will have three sections: “Important and unread”, “Starred” and “Everything else”. You can still click on Priority plus and minus signsat the top of your mail to train Gmail work smart in choosing the important and unimportant mails for you.

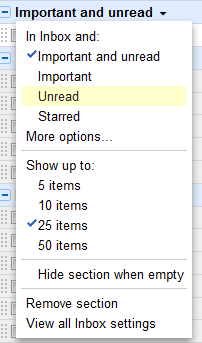
You can still customise your inbox from the pop-up window that appears when you click on any of the sections mentioned above. For instance, if you click on the down arrow present next to “Important and unread” label, you will see the following set of options:

Priority inbox pop-up options

Let us know your feedback on the new Gmail priority inbox through your comments.

[Tip] Google Talk And Google Buzz Text Formatting Tips

gtalk

Google Talk is quickly overtaking the Yahoo and MSN when it comes to instant messaging (IM). Lots of people are using Google Talk either through their native desktop version or the Gmail version of the talk client. With many features like video chat made available to the users, Google Talk is one IM client that has gained lot of popularity among the users. But not so many option to format text unlike Yahoo Messenger and other IMs is a let down for Gtalk users. But Google talk do have some lesser known  formatting styles that are in my honest opinion sound a bit difficult to implement as these have to be used manually by typing rather than to be able to select by a mouse click like in other popular IMs. Here we are listing down all the possible styling tips that you can use while you do a chat with your friends in Google talk.

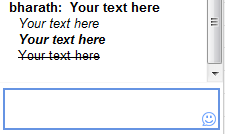
Google talk text formatting

Tip 1: Use Bold Text

To make your text bold during your chat, enclose the text inside “*” (asterisks)

*Your text here*= Your text here

Tip 2 : Use Italic Text

To italicize the any text just enclose it in “_” (underscores)

_Your text here_ = Your text here

Tip 3: Use Bold + Italic Text:

Use

_*Your text here*_ = Your text here

Tip 4:  Use Strikethrough Text

To strikethrough a text in your chat, enclose the text inside “-“ (dashes)

-Your text here- = Your text here

Bonus Tip: The good thing here is that you can use all the above tips in your Google Buzz too.

Google hasn’t yet made the underline font feature available to the Gtalk users. However, you can suggest the Google Talk team to activate this feature.

If you are an excessive Google Talk user, you will definitely find all the above tips handy.

[How To] Use Google Multiple Sign-In Feature

Google Mutiple sing-in

If you use Google products a lot and that too with different logins (may be one for personal use and other for business purpose etc.), you would be knowing there’s absolutely no way to use both accounts on the same browser. Until recently you need to go through some workarounds or use another browser and keep switching between the two windows often. Times have changed, Google has listened to users like you and enabled this glorious multiple sign-in feature for selected Google products.

You wouldn’t even be knowing that such a feature exists until you open your Google account settings page. This tutorial explains you how to enable and use Google multiple sign-in feature for your account.

To begin with, visit Google account settings page,

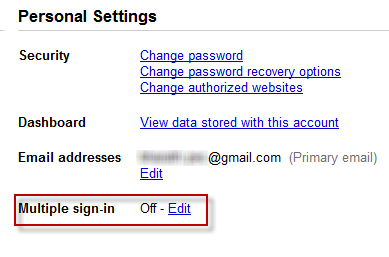
Google account personal settings

Find a “Multiple Sign-in” tab under your personal settings, by default this feature would be set to “Off”, click on the “Edit” link to change the multiple sign-in settings.

You will be taken to multiple sessions page,

multiple google accounts enable

You need to read and understand the four aspects listed there (as shown in the screenshot) before adding a “check” to each one after which you can enable the Google multiple accounts feature. After you checked the each option, the “save’ option would be enabled. Click on it to save the settings and enable the multiple sign-in feature.

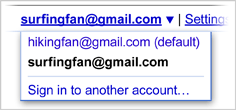
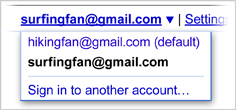
Now the Google multi-login feature gets enabled for you. Open any multiple sign-in supported Google product page(ex: Gmail) and you can figure out a drop down menu next to your Google account username. Click on it to see “Sign in to another account” link and click on it.
multilogin menu sample

You can sign in up to two additional accounts (so in essence, you can simultaneously access up to three Google accounts, while the first being your default account) and you can also open the same product in multiple tabs with different tabs.

Please note that the multiple sign-in option is currently available to only few products listed below and also it is not fully supported for use with Offline Gmail and calendar , for the same reason you wouldn’t want it to enable yet if you use offline Gmail.

Multiple-sign in feature supported Google products:

  • Code
  • Calender
  • Gmail
  • Reader
  • Sites
  • Voice
  • Docs

If you want to use multiple sing in with other products, you still need to either use tricks like using private browsing mode in supported browsers or use another browser as you have been doing all through.