[How To] Password Protecting Excel Workbook

Microsoft Excel logo

Welcome back readers, it’s been a while since we posted any tutorial. It’s been a hectic year for me and I’m glad that finally I could find some time to write a yet another tutorial.

Microsoft Office suite does provide all of us with the most brilliant productivity tools that would foster our business/professional growth through their vast line up of dedicated software.

And the Microsoft Excel is a vital part of the office suit which often finds its regular usage among business organizations, educational institutions, government offices, and all other locations where the emphasis will be on storing some important data.

Having known the vital role that the Microsoft Excel plays in the business process, it would really be a big blunder on part of the users who use Excel if they don’t learn the security aspects related to the software. To make sure the data stored in a Excel sheet is opened or used by a competent authorised party, the creator of the Microsoft Excel sheet should take care of certain security measures which are incorporated within the Excel suite.

Any Excel worksheet can be secured in two ways:

1) Protecting the entire worksheet (asks password when the file is opened)

2) Protecting the data inside the worksheet (file can be opened but password will be required to view the worksheet elements)

The second type of the protection is perhaps the most widely known as the option for the same is available within the workbook menu items.

In this tutorial we are concerned with protecting the entire workbook rather than the individual elements inside the worksheet. The reason why anyone would need this kind of protection is simple: they don’t want others to see the worksheets in the first place.

Protecting the Excel Workbook:

Step 1: Open the the Excel workbook for which you want to add password protection.

Microsoft Excel Menu Info options

2. Click on the “File” menu item. Locate “Info’ heading under the “File” menu and click on it.

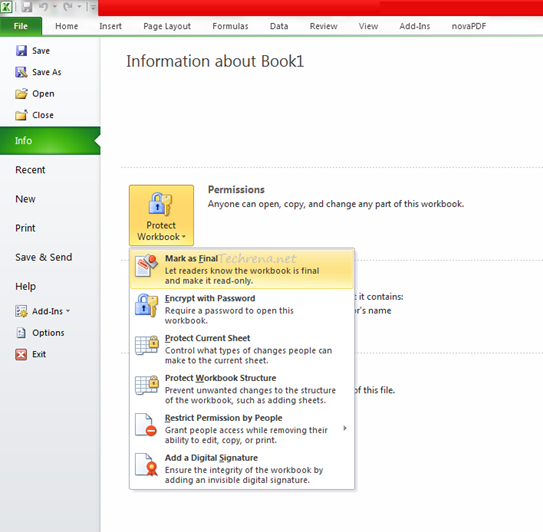
3. Under the “Info” sections, you will have three options: Permissions, Prepare for Sharing and Versions. Click on the item “Permissions” (on the “Protect Workbook” dropdown item).

4. You will be presented with various options. You need to click on the second item on the list i.e, “Encrypt with password”.
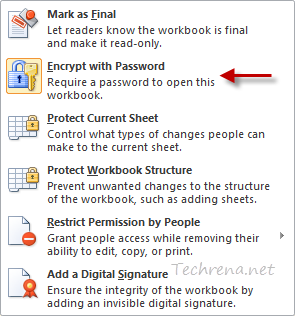
Encrypt Excel workbook with password

5. It will then ask you to enter a password for encrypting the workbook. You may need to reenter the password to affect the change.
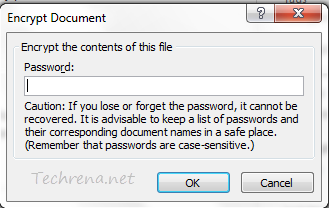
Encrypt Excel document with password

6. Save the workbook and try to open again. It will now show this kind of message and asks you to enter the password.
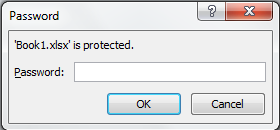
Excel Workbook password open

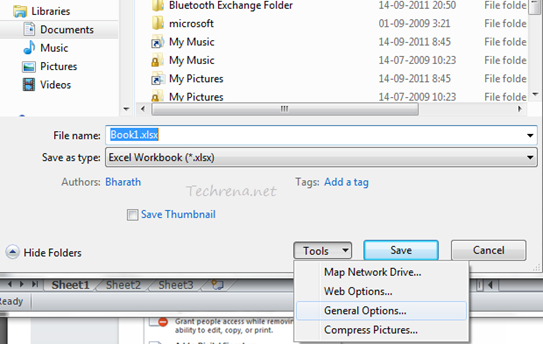
The same result can be achieved by a slightly different step. Click on the “Save As” button under the “File Menu”. It will now take you to the choosing the location window. Click on “Tools” dropdown menu on the left of the “Save” button.

Under the “Tools” dropdown menu, choose “General Options”.

general options tools save as in Excel

It will now ask you to enter a password that needs to be entered to open (or ‘modify’) the workbook.
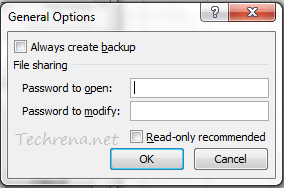
General options open Workbook in Excel

Once entered and saved, the workbook becomes password protected and the same needs to be entered on each instance when trying to open the workbook.

Note: This tutorial is based on Microsoft Excel 2010 earlier version and may not be suitable for earlier versions.

Covert Word Documents To PDF Using Google Docs

These days, most of the users including organizations prefer to save or export their office documents created using various Office suites like Microsoft Office or OpenOffice etc. as PDF (Portable Document Format) files. This is because when you save it in other typical document formats, some of the elements in the document may not render properly when you open it with Office suit other than the one using which it is made, so it may not look the same on all the computers running on different platforms or using different types of office suits. There are plenty of tools available both online and offline to export the documents into PDF format. In fact, we had earlier written about how to covert Word and Excel documents into PDF using Microsoft Office 2010.

Now let’s me introduce you a not-so-known feature in Google Docs that lets you save any document as PDF.

1. Upload your Word document to Google Docs.

2. Open the document and you click on the “File” in the menu bar.

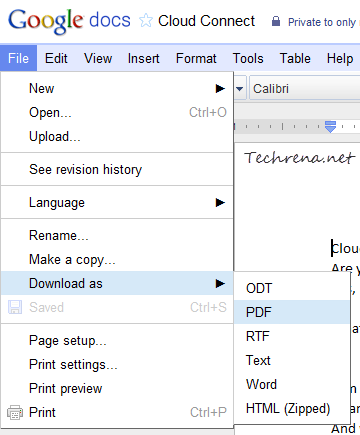
3. Under File > Download as ; choose PDF to save the document as PDF and download to your computer.

Google docs download as PDF option

Sync Microsoft Office To Google Docs

Office Google Docs Sync

Google Docs has got into much fame because of its cloud based approach it has adopted. Advantage with cloud based services (when it comes to working on documents in particular) is that you can increase your productivity by means of collaboration, meaning that all of your project mates can work on the document simultaneously syncing each others’ piece of work on the same document collectively to complete the document. Google Docs is very much about increasing the work efficiency by offering collaboration. What if this kind of collaboration comes to the world’s most popular office suit, the Microsoft Office? It can’t get any better, right?

Yes, Google is now offering a plugin called Google Clod Connect for Microsoft Office which lets you collaborate with other editors of your Office document, directly from the Microsoft Office. The plugin allows you to quickly share, backup and sync Microsoft Word, PowerPoint and Excel documents with other co-workers. If the co-workers also install this plugin, they can also directly work from their MS Office document and it will be synced automatically with the other workers.

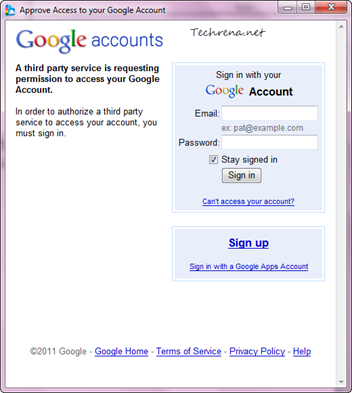
>> Once you download and install the plugin, a new toolbar will be added to your Microsoft Office document. Click on the “Login” button to sign in with your Google account.

Google cloud connect toolbar

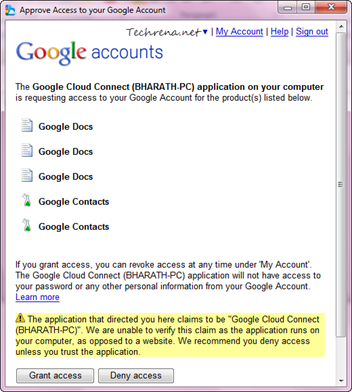
Approve access to Google account

Approve access Google account settings

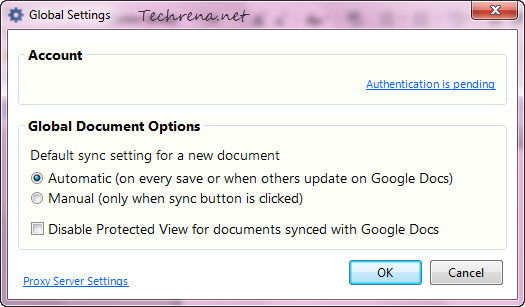
>> You can also choose the default sync settings for a new document:

Global settings for google cloud connect

>> And once you have granted the permissions, you will see a green “Success” icon

Login success cloud connect icon

inside your Office document. You can now work on your document simultaneously with other workers directly from the Microsoft Office.

Google cloud connect toolbar options

Watch the below video to see how the plugin works in Microsoft Office.

[via]

Convert .doc To .docx Using MS Word 2010

Word 2010

Ever since Microsoft has introduced Microsoft Office 2007, .docx format replaced the classical .doc format which was used with MS Office 2003 on Windows XP based systems. But then, considering the fact that some of the users still use MS Office 2003 and Windows XP on their machines. If you have created a .doc format office document with earlier versions of MS Office, you might want to convert it to the newest .docx format. Here are the steps that you should follow to convert a document into Office Word 2007/2010 :

Steps:

1. Open the .doc format document in Microsoft Word 2010.

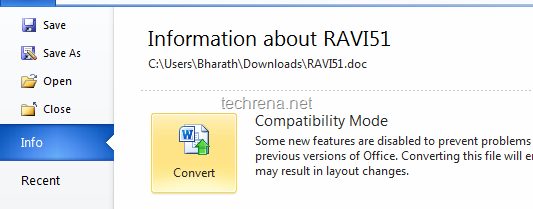
2. Click on the File from the menu. Under the Info tab, you can find a option to “Convert”

Convert Doc to DocX in Word 2010

3. Click on the Convert button to start the conversion process, you will be prompted warning window saying that the layout of the document may change if you convert the document to newest format. Click on “OK” to continue.

Microsoft Word 2010 convert

You can now save the document and it will be automatically converted to the .docx format.

Microsoft & Facebook Launch Document Sharing Service Docs.com

With the advent of internet, day-to-day life is becoming much simpler.Would you have ever thought of creating office documents  without even installing a Office software like Microsoft Office or Open Office.Thanks to the wide number of document sharing websites like Scribd, SlideShare and the most popular Google Docs which lets you create documents on the cloud and share them with the world.

Now a similar alternative service is coming up from Microsoft in association with Facebook.

microsoft docs homepage

Microsoft’s new document sharing website docs.com lets you create Office documents and share them with your friends in Facebook, courtesy Office Web Apps and the Facebook Connect.

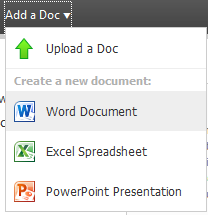
add document in Microsoft docs

You can upload Word documents, PowerPoint presentation & Excel spreadsheets etc., to Docs.com similar to the way do it in other online documents sharing websites like Google Docs.But Facebook integration helps you to share these documents with your friends.You can also grant viewing and editing rights to your selected Facebook friends so that they can edit your documents online, thus making collaboration easier (such collaboration also exist in Google Docs, if you can remember).

Your friends can discover the documents that you shared in the updates just like they discover your photos or videos that you have shared. You can also discuss with your friends about a doc via comments just like you would do with a status update or photo.

You just need a Facebook account to start with.You don’t need to install Office 2010 or you don’t need a Windows Live ID either.Doc.com service is still in private beta though you can use your Facebook account to get notification as soon it becomes publicly available.

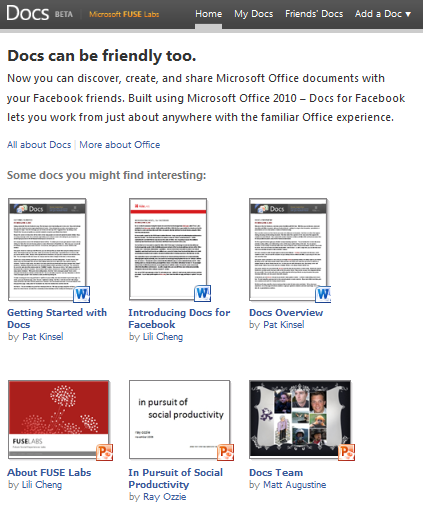
docs for facebook beta

Videos:

Getting Started For Docs

Docs for Facebook – Overview