[How To] Block A Contact From Sending Emails To You In Gmail

Block email from sender

Sometimes you receive dozens of mails from someone whom you don’t really know personally (spammers) or there may also be instances where in you don’t want to receive mails from your ex girlfriend / boyfriend etc. Whatever may be the reason, if you wish to block a particular sender from sending an email to you in Gmail, this guide is for you!

Fact: Before beginning the guide, let me make it clear that Gmail as such doesn’t have a default mechanism to block messages from specific addresses or domains. As described in the Gmail help section, the only way to block such emails is to create a filter to route all such unwanted email messages to Trash.

Steps:

1. Sign in to your Gmail account.

2. Open the email message that you have received from the unwanted sender.

3. Towards the right hand side, click on the small down arrow next to the “Reply” button

4. Choose “Filter messages like this” from the options menu.

Filter messages like this option inside gmail

5. The “From” field automatically gets filled by the email address of the sender from whom you received the unwanted mail. Making sure that the field has been filled, click “Next Step” to proceed to the next step.

Creating filter in Gmail

6. You will see the possible actions for the filtered messages. The options are “Skip the Inbox (Archive it)”, “Mark as read”, “Start it”, “Apply the label: ”, “Forward it to: ”, “Delete it”, “Never send it to Spam”, “Always mark it as important”, “Never mark it as important”. As you to trash all the message from that sender, the best option here would be “Delete it”.

Gmail filter advanced settings

You may also choose to apply the filter to already existing conversations as well. When all is set, click “Create Filter” button.

7. The filter is now successfully configured. Once it is created, review the filter settings from the “Filters” tab under the “Settings”.

gmail filter created

All done now! Should the above sender send you any email message in future, it automatically gets deleted without showing up in your inbox. Please note that if the same sender starts  from another email address, you need to repeat all the steps starting from the beginning. If you reach a stage where in you loose patience for all the harassment by the sender, you can always complain about it to the Cyber Police in your locality.

Share Files With Your Pals Instantly With Ge.tt

Gett logo

Ge.tt, is a new file-sharing service with a difference. With Ge.tt, not only you can share your files instantly but you can also share the link with your friends immediately without needing to wait till the upload gets over. You can share the links in real-time with your friends over Facebook, Twitter and email. This innovative web-app doesn’t use any additional plugins and is as simple as it can get.
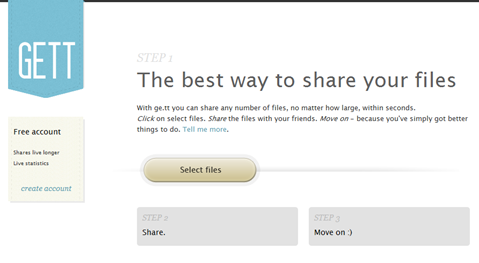
Select files in Gett

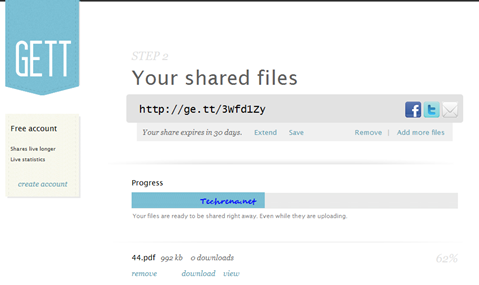
To get started with Ge.tt, head over to the homepage. Creating an account is not mandatory, Ge.tt still keeps you files on the server for a period of 30 days. But by signing up for an account, you can extend the time till which the files reside over the server. Click “Select Files” button and start uploading (you can also drag-and-drop in supported browsers). Wait for a while till the shortened link for your shared file appear. You can see that the download URL for the shared file appears even while the uploading of the file is still under progress.

Shared files in Gett

When you share the download link with your friend, he can also see the status of the file upload and the advantage here is that he can immediately start downloading the files before the whole uploading process could even get finished. On the other end, you can go on adding as many files as you can after you share one file and all these files will instantly appear to your friend at the other end without even refreshing the page. Ge.tt doesn’t clearly mention any limits for the size of the file being uploaded, but they do have rules for the nature of the files that are allowed to be uploaded.

Checkout, Ge.tt

[Tip] Run Program As Administrator Right From The Start Menu In Windows 7

If you are using Windows 7, you might well be knowing by now that you can easily start any program from Start Menu by simply searching for it there. The problem here, which many of us aren’t aware is that when you a program in this fashion, it doesn’t start with administrator rights. There may be times where in you need to start a program for instance a command prompt with elevated rights, otherwise you might receive errors such as “The requested operation requires elevation” etc. Thankfully, there’s a little lesser-known trick available in Windows 7 to execute a program directly from the Start Menu search or quick search run box as administrator. Here is how you can do it:

1. Go to Start Menu, type the name of the program that you want to run in the search box. I’m going to run Command Prompt window as administrator so, in my case, I need to type “cmd” in the search box.

Cmd start menu search

2. Now, when you see the required program in the search results, you tend to hit enter to run it.

CMD start menu search result

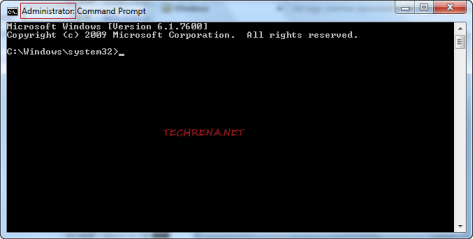
Instead, press Ctrl + Shift + Enter to run the program with elevated (administrator) rights. Click “Yes” when you are asked by UAC to run the program. That’s it! The program runs in administrator mode:

CMD as admin in Windows 7

Note: You can always right-click on the search box results and choose “Run as administrator” to run the program as an administrator as well.

Run CMD as admin from start menu search results

Also learn how to Always Run A Program As An Administrator By Default.

[Tip] Quickly Resize Desktop Icons In Windows 7 & Vista

If you were used to Windows XP for long time and then shifted to the newer versions of Windows like Windows Vista or Windows 7, one thing you will find a bit annoying the default big size desktop icons that eat most of your computers desktop. Fortunately Windows has made it easier for the users to choose the size of the icons on your desktop. There are plenty ways available to resize the size of the desktop icons in your Windows 7 and Windows Vista based PCs. We’ll discuss a few of them here:

Desktop icon resize

1. Easy: Using Mouse Wheel:

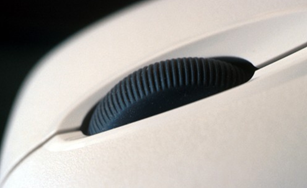
mouse-wheel

This the easy and hassle free way to resize your desktop icons which many of us aren’t aware of. Just hold down the CTRL button on your keyboard, press left button on your mouse initially and then move the scroll button of your mouse to resize the desktop icons as well as icons inside any folder.

2. Usual Method: Right-click Context Menu

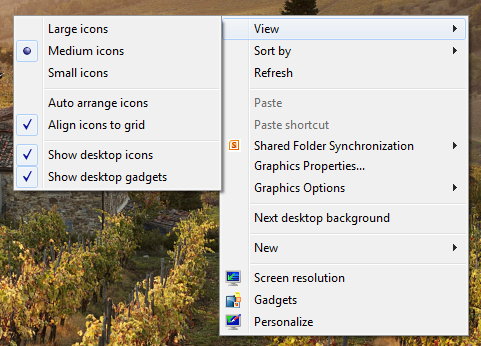
Right-click on your desktop, under “View” list, you can choose resize your desktop icons to small, medium and large icons.

View context menu on desktop

The second method is most common and  majority of the Windows 7 users might be aware of this. However the first method is pretty much simple and handy, highly recommended !!

[Tip] Download Your Entire Facebook Data

facebook logo

What’s the point of any service where you don’t have control over the data you add through it? This is the first and foremost point that every user considers before using any service and the service provider must be up to it to provide users with full control over their data. Being the most widely used social networking website on the internet, Facebook is no exception. Facebook has recently added a provision through which the users can download their entire personal information that you have posted on Facebook including messages, Wall posts, photos, status updates and profile information etc. You can download all this data with a single click.

Follow these steps to download all your information on Facebook:

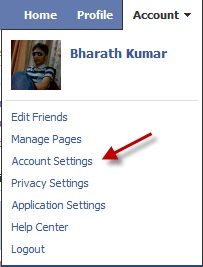
1. Login to Facebook and click “Account Settings” under Account.

Facebook account settings

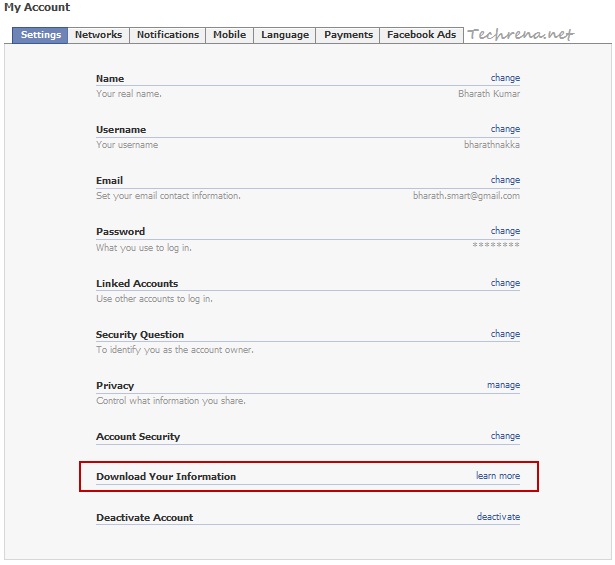
2. Locate “Download Your Information” in the Settings tab and click “learn more” link present right next to it.

Download Your Information in fb account settings

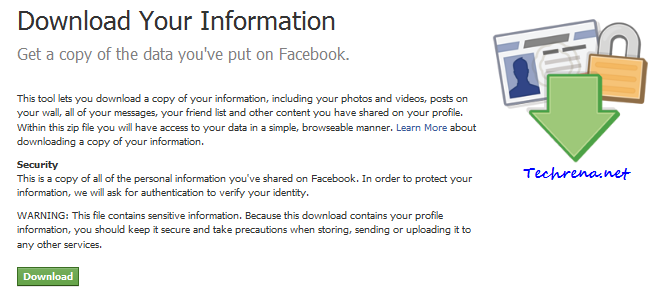
3. In the next page, you will receive a brief message about what the tool exactly going to do along with a brief warning message. Click on the green “Download” button to proceed to the next step.

Download Your Information warning in facebook

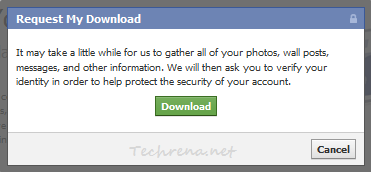
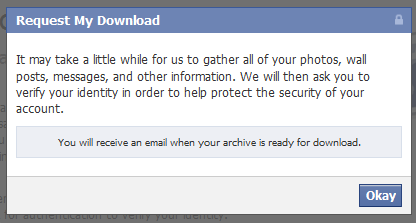
4. A pop-up window (“Request My Download”) appears now. The window tells you to wait till Facebook gathers all your photos, wall posts, messages and other information. Click on the Download button again to proceed.

Request my download window in facebook

Request my download window in facebook

5. It may take a little while for Facebook to gather all your information and you will eventually receive a mail containing a download link for the zip file containing your Facebook account information.

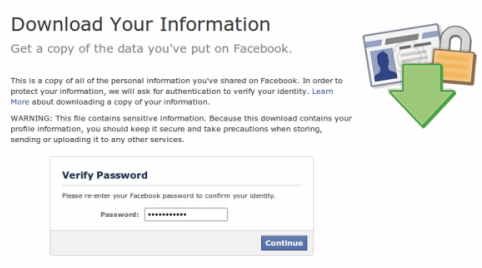
You need to verify your identity by entering your account password before you can download the zipped file.

Download your information fb verification

In the next page you should see a download button along with showing information about the size of the file you are about to download. Download the .zip file and unzip to see the contents of it. You should see sub-folders like photos, html along with index.html and readme files.

6. You are done with downloading your information from Facebook!

Watch the below to video to follow the above steps:

[Tip] Enable High Quality Video Chat In Gmail

Gmail logo new

If you use Gmail video chat for making video calls to your friends, you might be pleased to know that the Google has announced a enhancements to the video quality in Gmail video chats.

Gmail video chat quality used to be very poor particularly when you switch the video to full screen mode. The new enhancements are available as a labs feature and will not be enabled by default. For this video enhancement to work, the other party with whom you are chatting must also have enabled this feature.

gmail video chat before after

Follow these steps to enable high resolution for video chat in Gmail.

Steps:

1. Open Gmail and Login with your Gmail account

2. Click on the little green labs icon towards the right top corner of the screen, next to your username. Alternatively you can open this Gmail Labs Settings link.

gmail labs settings

3. Scroll down the window until you find “Video chat enhancements” tab and choose “Enable” against it.

Gmail Video chat enhancements

4. Click “Save Changes” button to save the settings.

You can always revert back to the default video quality settings at any time by simply choosing “Disable” option for “Video chat enhancements” under the labs settings as shown in the step 3.

[How To] Disable Auto Sleep Mode In Windows 7

Windows 7 power options

If you have recently purchased a new computer (laptop in particular), there is a setting which you need to look at is the “Power Options” found under the Control Panel. By default, the power options would be set to make your computer go to sleep mode automatically after being idle for a defined amount of time. It would be really annoying when the laptop goes into sleep mode without your attention when you let your laptop run a program in the background (like downloading a big file from internet) and go away from it. Even though it is not advisable to change the advanced settings of a power plan, we can safely change these basic settings like  “Turn off the display”, “Put the computer to sleep” etc. Follow these steps:

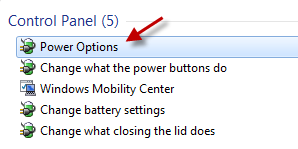
1. Type “power options” in the Start menu search and open “Power Options” result from the Control Panel section.

Power options start menu search result

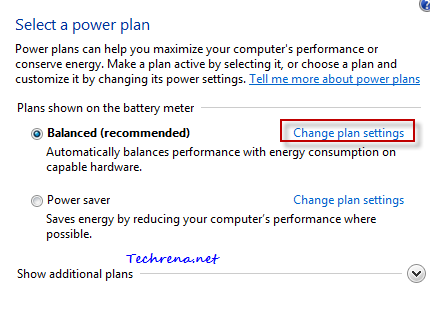
2. Click on “Change plan settings” found right next to your current power plan.

Power options window

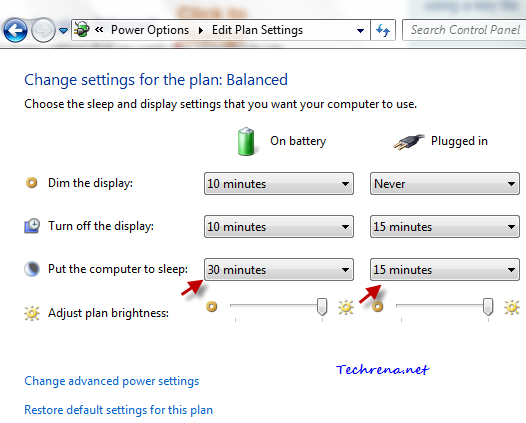
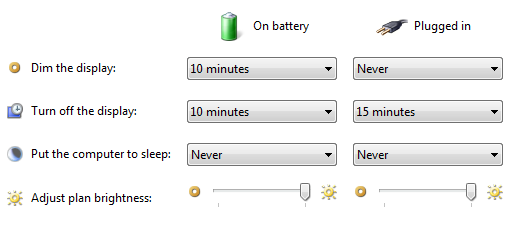
3. You will see the default settings for when to “dim the display”, when to “turn off the display” and when to put the computer to sleep.

Power plan default settings

Change the settings to your convenience, you can try setting “Put the computer to sleep” option to “Never” to disable the auto sleep mode completely (preventing your computer from going to sleep mode automatically).

Editing plan settings in power options

Click Save changes button once you are done with it and that’s it! You have now successfully turned off the auto-sleep mode in Windows 7.

[Tip] Open Google Page Automatcially With Every New Tab In Firefox

firefox logo

I got this idea when one of my friends asked me how to automatically Google.com when a new tab is opened. I dug into it as is it indeed pretty useful not just for me, but majority of other Firefox users who wants to see Google.com page automatically whenever they open new tabs.

So here we want to open a default website (be it homepage or google.com for instance) each time we hit the new tab. Firefox by default shows a blank page whenever a new tab is opened. Unfortunately Firefox doesn’t have an in-built provision for achieving this, so we have to go through workarounds. Here is the easiest way in which you can set such a feature in Firefox.

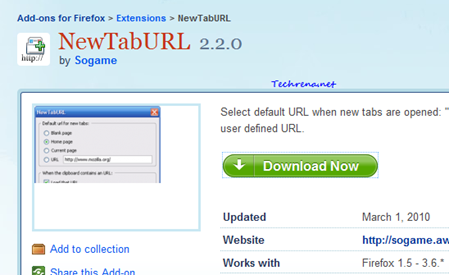
1. Install NewTabURL extensions from the Firefox add-ons gallery.Restart your Firefox.

NewTabUrl install

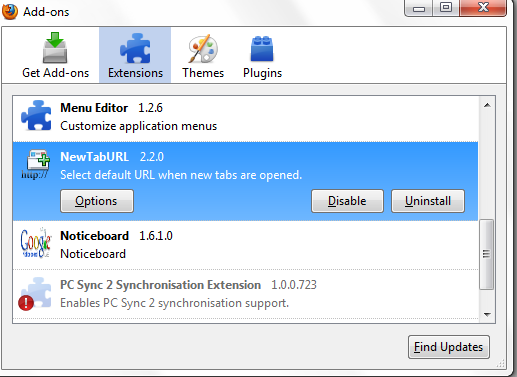
2. Go to Tools> Add-ons and find “NewTabURL” in the list under “Extensions” tab. Click “Options” to configure options for the add-on.

NewTabURL extensions page

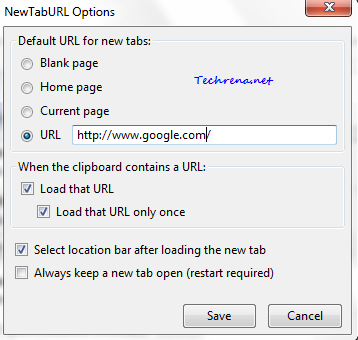
3. In the Options window, enter the URL (ex: http://www.google.com/) in against URL option or you can even set Home page as the default URL to open with new tabs. Click Save to save the changes.

NewTabURL options

Now when try opening a new tab in Firefox and it should load the URL that you had chosen while configuring the options. Isn’t it that simple ?

Other Firefox add-ons offering similar feature: New Tab Homepage, Tab Mix Plus

[How To] Select Multiple Files Using Check boxes In Windows 7

Windows 7 logo

What do you do when you want to select multiple files at once in Windows ? Traditionally, we have been accomplishing this task by holding down CTRL or SHIFT keys while selecting the files to select multiple files at once. Even though we have got used to this, yet there can be instances when we accidentally click on the blank space resulting in deselecting all the items that you gathered with much effort. Our hand or keyboard may tease you at times, causing these type of annoyances, but a mouse cannot. That is why many people prefer to use mouse over keyboard particularly when doing this kind of multi-selection.

Keeping this in mind, the folks at Windows 7 development team included a pretty nice option to select multiple items using check boxes (this kind of selection method is incrementally getting popular with smartphone devices now!) using a mouse without needing to hold any key on the keyboard. By default, this options would be turned off in Windows 7 and Windows Vista. Follow the steps to learn how to select multiple items all at once in Windows 7 (and Vista)  using the check boxes:

Steps:

1. Open Windows Explorer (Or use Windows + E shortcut).

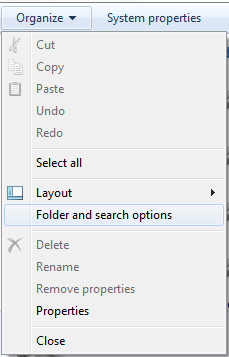
2. Click on Organize button to expand it’s dropdown menu items. Select Folder and search options.

Organize button in explorer

Folder_search_options_win7

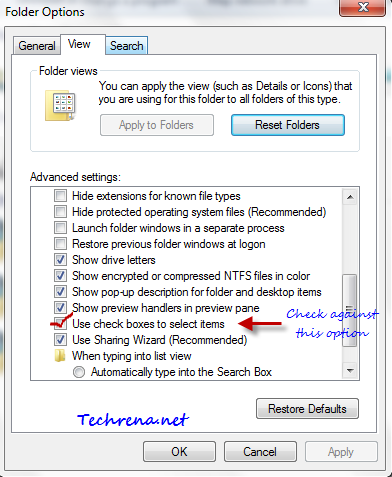
3. Go to View tab in the Folder Options window. Scroll until you find “Use check boxes to select items”. Just check against this option.

Checkboxes option in folder options

use check boxes option selected

4. Click OK to apply the changes to Folder Options and close the window.

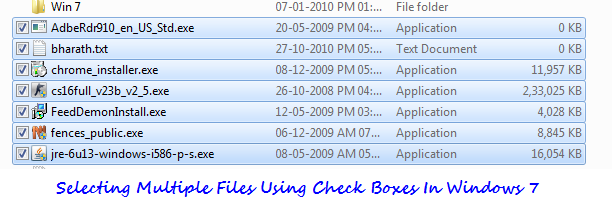
5. Now go to any explorer window and you will now be able to select multiple files using the check boxes:

select multiple files with check boxes

[How To] Remove Favorites From Windows 7 Explorer

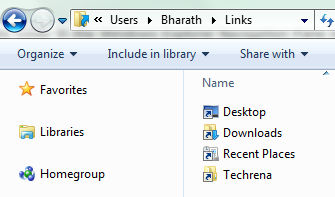
Windows 7 Navigation pane shows Favorites folder, which contains links to your favorite folders on the computer. You can add any folder to the Favorites simply by dragging the folder to the Favorites in the Windows 7 explorer or even by placing the shortcut to that particular folder in the following locations:

C:\Users\(Username)\Links

favories links folder

However, if you don’t use them much, you might want to remove this from the Windows Explorer.

Steps:

1. Press Start button + R to open the run dialog box. Type “regedit” in the text filed and press OK to open the Registry Editor.

2. Navigate to the following path in the Registry Editor:

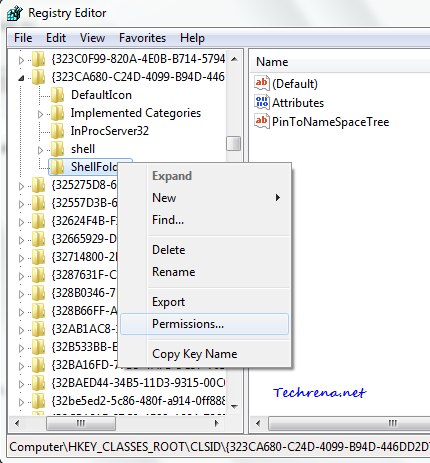
HKEY_CLASSES_ROOT\CLSID\{323CA680-C24D-4099-B94D-446DD2D7249E}\ShellFolder

3. Right-click on “ShellFolder” and select Permissions [Since you need special permissions to change the DWORD value of “Attributes”].

ShellFolder permissions

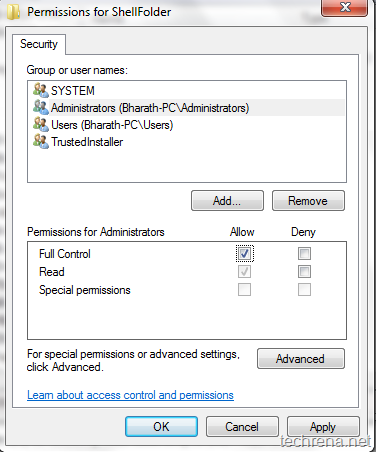
4. A new window will open up. Select Administrators from the user names and check against the Allow option on the right to the Full Control click OK to apply changes and close the window.

ShellFolder permissions options

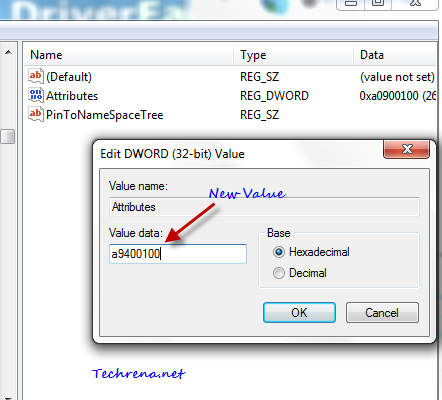
5. Double click on the Attributes and change the Value data field to a9400100 from the default value of a0900100.

Modifying DWORD value to remove Favorites from Windows 7

6. Click OK and close the Registry Editor.

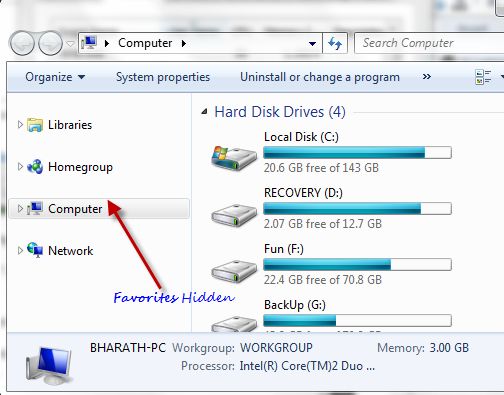
7. Restart the Windows Explorer (Go to Task Manager, end explorer.exe, then go to File > New Task, type explorer and click OK).You should now see the change, the “Favorites” in Navigation pane would disappear from the explorer.

Favorites disabled in Windows 7 navigation pane

If you want to get “Favorites” back, just go back to the step 5 and change the DWORD value data back to a0900100.

Related: You might also want to disable the entire Navigation pane in Windows 7 explorer.