[How To] Rebuild Icon Cache To Fix Broken Icons

Sometimes when you install some program, and place its shortcut somewhere on the desktop or Start Menu, the icon of the program might appear broken (display incorrect icons) in your Windows 7. As you can see in the following screenshot:

Program icon broken in Windows 7Program icon broken in Windows 7 taskbar

It is very annoying to see such broken icons for any programs. Not only that they confuse you what program is it, particularly when you pin such a program to the taskbar. Follow this step-by-step guide to fix the broken or missing icons and show the original icons of the program, works in Windows 7 and Windows Vista.

Steps:

1. Close all the folder windows that are currently open in the Windows Explorer.

2. Launch the Task Manager either by using CTRL + SHIFT + ESC or by right-clicking on the taskbar and choosing “Start Task Manager”.

start task manager

3. Go to the processes tab, find “explorer.exe” in the list. Right-click on it, choose end process.

End explorer process

4. Go to File >  choose New Task (Run..) from the menu.

Run new task in Windows Task manager

5. In the Create New Task dialogue box, type “cmd” and click OK to open the Command Prompt window.

Create new task in task manager

6. Type the following commands* one by one in the Command Prompt (Press “Enter” after each command).

IconCache rebuild commands

CD /d %userprofile%\AppData\Local
DEL IconCache.db /a
EXIT

IconCache command prompt

7. Again go to the Task Manager, launch “New Task” from the File Menu. Type “Explorer” in the text filed and hit enter.

Explorer from Create New Task in Task Manager

Your icons should appear fine now.

Background:

This method actually rebuilds the icon cache. The first of the three commands is used to go into the directory C:\Users> username> AppData> Local. The second command will delete the hidden IconCache.db file. And then we restart the explorer.exe process to rebuild the deleted IconCahce file.

You can alternatively, set the Folder Options > Views and change the settings to Show Hidden files and then delete the IconCache.db to the Recycle bin and restart the explorer.exe process.

[Tip] Remove Username From Windows 7 Start Menu

User name in the start menu

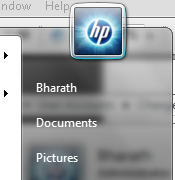
Windows users might be knowing well that the Start Menu in Windows shows a username of the user currently logged on to the computer, now matter how many user accounts your Windows has. For some reasons, if you want to remain anonymous by removing your username from the Start Menu, here is the step-by-step guide of what you need to do if you are using either Windows 7 or Windows Vista.

Steps:

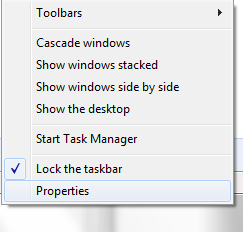
1. Right click on the taskbar and select “Properties”.

Taskbar right click menu

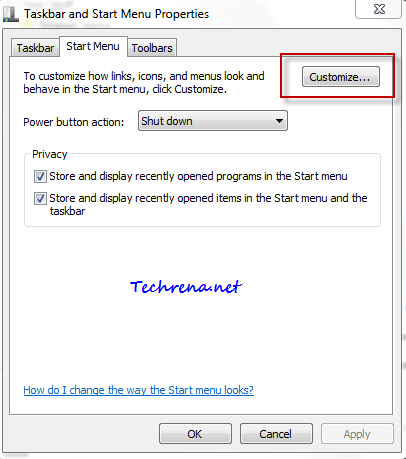
2.Taskbar and Start Menu Properties” window opens up. Go to the “Start Menu” tab in the window. Click on the “Customize” button.

Taskbar and start menu properties

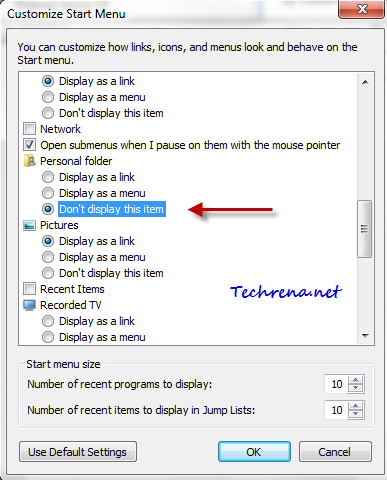
3. Another window “Customize Start Menu” opens up. Scroll the window down until you see “Personal folder” section. By default, “Display as a link” option would be selected. Now as you want to remove your username from the Start Menu, select the last option “Don’t display this item”, Click OK to save the settings.

Customize start menu

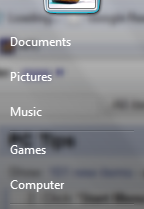
4. Click on the Apply button on the Taskbar and Start Menu Properties and click “OK” to close the window. Now your username will be delisted from the Start Menu as shown here:

No username on the start menu

You are done. Just check “Display as a link” whenever you want to revert back to the default settings to show your user account name back on the Start Menu.

[How To] Clean Up Context Menu In Internet Explorer

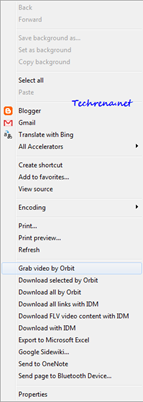
IE context menu mess up

We have earlier covered how to clean up unwanted items in context menu in Windows Explorer and for Firefox. Now in this tutorial let me take you through the process of removing items from right click context menu in Internet Explorer.

Internet Explorer is by far the most widely used browser in the world. And the IE lovers worldwide are excited by the release of new beta version of IE9. So we thought this might be the right time to post some tips on tweaking Internet Explorer.

Context menu in Internet Explorer consists of two sections:

1) Accelerators (only for IE8 & IE9)

2) Menu extensions

1) Accelerators:

Accelerators are webpage specific and they will have their own action set up based on the webpage data. These have become a part of IE since the release of Internet Explorer 8. Some examples for Accelerators in IE8 & IE9:

  • Blog with Blogger
  • Email with Windows Live
  • Define with Google Dictionary
  • Translate with Windows Live

Accelerators in Internet Explorer

If you don’t use these Accelerators much, follow the steps outlined below to disable them:

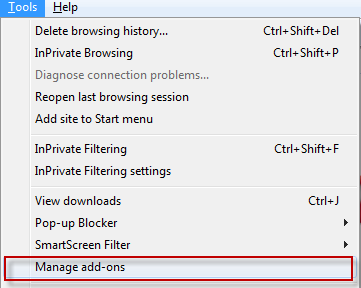
1. Go to Tool > Select Manage Add-ons

Tools menu in Internet Explorer

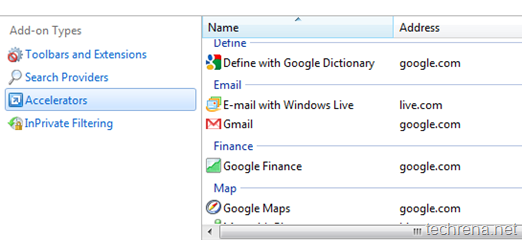
2. Under the “Add-on Types”, click on Accelerators tab on the left hand side pane. You will the full list of Accelerators available.

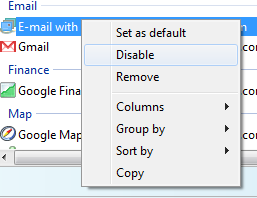
3. Right click on the Accelerator that you want to disable and choose “Disable”.

disable accelerator in IE

You may also want to disable or remove other unneeded toolbars and add-ons by clicking on “Toolbars and Extensions”.

2) Menu Extensions:

Menu extensions are stored in the Windows registry and these are present in all versions of Internet Explorer, not just IE8 & IE9.

Examples for Menu Extensions many include:

  • Download with IDM
  • Send to OneNote
  • Send page to Bluetooth Device..

To disable unnecessary Menu Extensions, follow these steps:

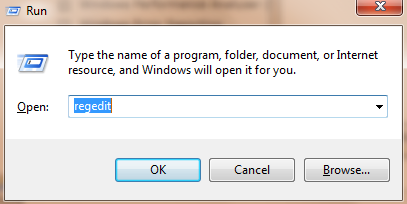
1. Press Start button + R to open the run command bar. Type “regedit” and press OK.

regedit run command

2. Navigate to the following path in the registry editor:

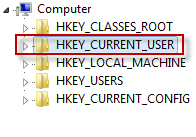
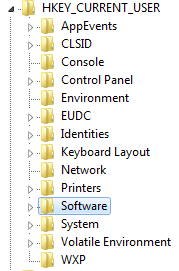
HKEY_CURRENT_USER> Software> Microsoft> Internet Explorer> MenuExt

HKCU in regedit

HKCU expanded in regedit

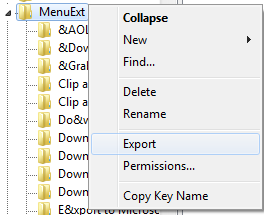
3. Right click on MenuExt folder and choose “Export” and save a copy as the backup, to be on the safe side in case something goes wrong.

MenuExt export

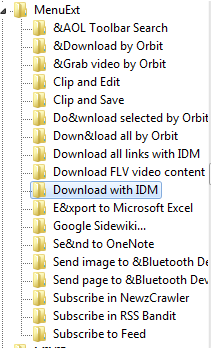
4. Collapse the “MenuExt” folder and start deleting the items that you don’t need:

MenuExt items

5. Close the registry editor and restart the Internet Explorer to see the changes.

That is it. If you wonder “why do I need to mess up with registry editor? Isn’t there any freeware available?” ; Yes, there’s a freeware (actually IE add-on) called ToolbarCop which will remove the unnecessary items from the IE context menu with a few clicks.

[Tip] Disable “This device can perform faster” Message In Windows 7

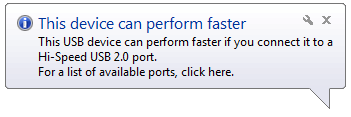
This device can perform faster

Sometimes when you insert an older flash drive or any other drive into USB port of your PC, a message may appear saying “This device can perform faster”. This message appears because there are two USB standards namely USB 1.1 and USB 2.0, the later one being the standard that supports high speed performance with USB devices.

But it may seem annoying when this notifications pops up each and every time you connect the flash drive to the USB port. If you don’t want to see this message anymore, follow these steps below to completely disable this notification:

For Windows XP Users:

device_can_perform_faster_xp

1. When you see the balloon message, just click on it and it will open a new window:

USB host controller properties

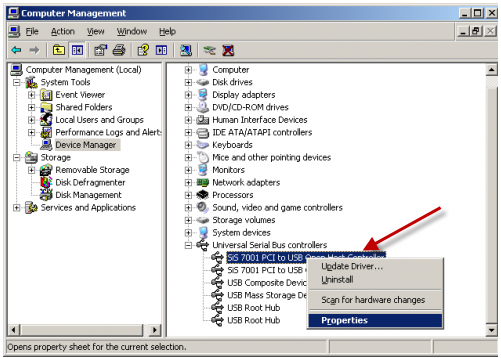
Alternatively, you can open the same window in a different way. First right click on My Computer > Select Manage > and Computer Management window will open up:

computer management in windows xp

right click on the USB device that is connected and click “Properties”, you will still land on the same window. But by this way, you can even disable settings for the other USB ports as well.

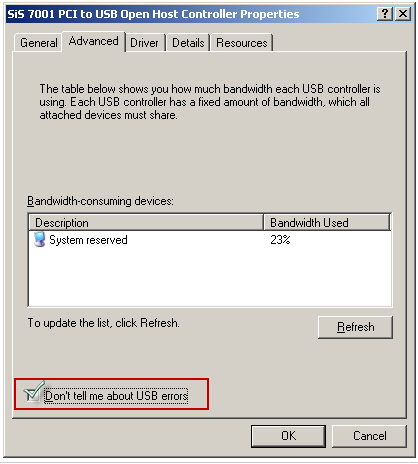
2. Now check against “Don’t tell me about USB errors” and click OK.

You will no longer see the remainder balloon when you connect this device to the USB port

For Windows 7 and Windows Vista Users:

When it comes to Windows 7, the newest Windows OS has got better option than disabling USB errors. In Windows 7, you can choose not to notify even if the device attached to the USB port can perform better.

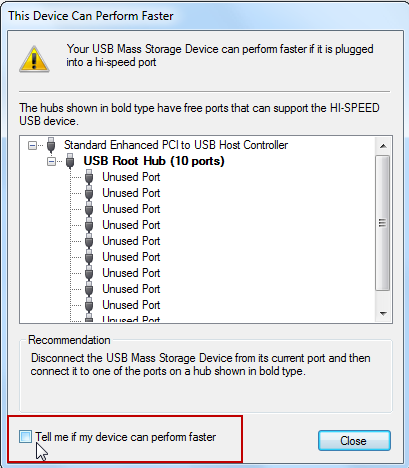
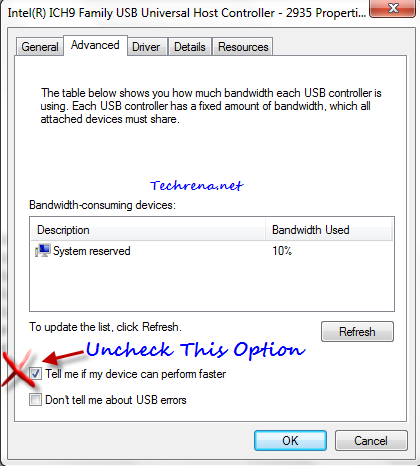
Click on the balloon message, it will show a window listing all available USB 2.0 ports. Uncheck “Tell me if  my device can perform faster” option at the bottom and click Close.

This device can perform faster options in Windows 7

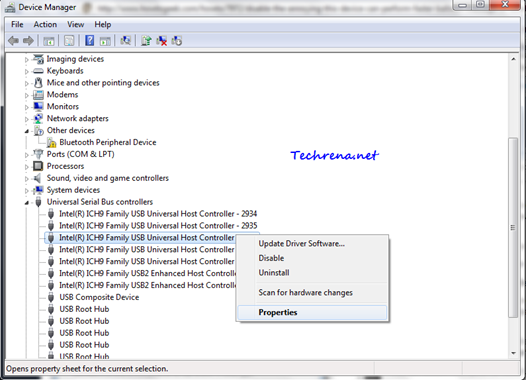
Alternate method: You can disable this option for other USB ports also via Device Manager > Universal Bus Controllers,

Device Manager and USB controllers

right click on the USB port and select properties.

Now go to Advanced in the properties window. Uncheck against “Tell me if my device can perform faster” option and click OK.

USB_host_controller_properties_win7

From now on, you won’t see the balloon notification message when you connect a USB drive into your computer.

[Download] Windows 7 Hotfix Update KB2028560

kb2028560 update

Microsoft has released an important hotfix update KB2028560 for Windows 7 and Windows 2008 server. This particular update is intended to provide performance improvements for the graphics platform (i.e to improve the performance of DirectX 11 in Windows 7 & Windows Server 2008 R2). This update also addresses the issue with Windows Live products when you have installed the Windows Internet Explorer 9 beta or preview build version on your computer. Instead of uninstalling IE9 when you face issues with Live products, I suggest you to download and install this hotfix and it should solve the issue for you. In fact Microsoft has also said that this update KB2028560 must be installed in order to support features in “upcoming release of an IE 9 platform preview build”.

Although the update is supposed to be an update for DirectX 11, it only includes files that are related to DirectX 10.1, DirectWrite and Direct2D. The gamers who have installed this update have reported no major improvements in DirectX 11 though they seem to have noticed a good fps increase in DirectX10 or DirectX10.1 based games.

KB2028560 Download Link:

Windows 7 (Windows6.1-KB2028560-v2-x86.msu- 1.4 MB) – Validation required

[Download] Internet Explorer 9 Beta

Internet explorer 9 beta

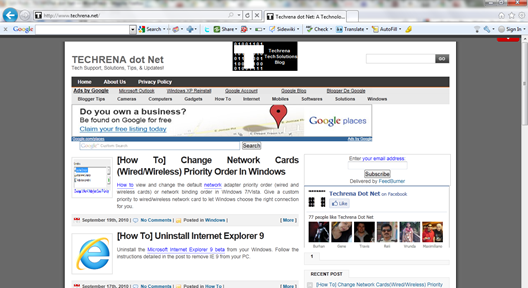
Microsoft has made the public beta of Internet Explorer 9 available for download. It has been a year-and-half since the release of Internet Explorer 8 and the internet world has since been eagerly waiting for the next version of the world’s most widely used browser.

IE 9 is available for download for users using 32-bit or 64-bit versions of either Windows Vista or Windows 7 only. Windows XP users won’t be able to install this version of the Internet explorer.

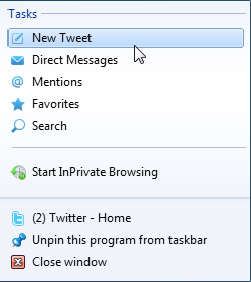
IE9 integrates perfectly well with Windows 7. With IE 9, users can easily pin their favorite websites to the taskbar with custom jump lists for each site. For instance, when you pin “Twitter” to the taskbar in IE 9, you will see the following jump lists which will directly take you to whatever page you want to see on Twitter (like direct messages, @ mentions, search etc.). This might well be a handy one specially when you pin sites like Gmail etc.

Twitter jump lists in IE 9

IE9 screen shot

There are a lot more features to speak about, for the same reason Microsoft has launched an official website beautyoftheweb.com dedicated to the Internet Explorer 9. For a full list of features, see what’s new in IE 9. IE 9 is available in many languages, choose the one as per your choice based on your current Windows language or simply whatever language in which you want to see IE 9 from the download links below.

Download:

Direct Download Links: Windows 7        32-bit 64-bit [Link expired]

Windows Vista 32-bit 64-bit [Link expired]

Note: Please note that Internet Explorer 9 will be installed as a Windows update and if you want to uninstall it in future, read How to uninstall IE 9.

[How To] Find The MAC Address Of Your Computer

what is my mac address

Media Access Control address (wiki: MAC address), also known as physical address or hardware address is a unique identification number assigned to each of your local network adapters or network interface cards like Ethernet card, Wireless LAN card, Bluetooth device etc.

As said earlier, MAC address is unique for each of the network adapters and will not match MAC address of any other device in the world. MAC address will generally be in the form “xx-xx-xx-xx-xx-xx” (12-digit alphanumerical). The address will tell many things about the network adapter card installed in your PC. The first six digits of the MAC address belong to the manufacturer of that adapter card. Of late, MAC address are sometimes used to register your computer to your ISP.

An example for such MAC address may be of the following three forms:

0C:60:76:42:0A:3B” or “0C-60-76-42-0A-3B” or “0c6076420a3b

Here the first six digits “OC6076” denote that it is being manufactured by the vendor, a Taiwan based Hon Hai Precision Ind. limited.

[Tip: Use online MAC Address Decoder to find details about your network card after find out the MAC address following this tutorial.]

Now get into the details of how to find the MAC address for network adapters in your computer. Before proceeding, you should know that the MAC address can only be traced if that network adapter is being enabled and connected to a network.

Finding MAC Address in Windows [Windows 7 or Vista]:

You find physical address of your computer’s network adapter in the following methods:

Method ONE:

  • Open the  “Network and Sharing Center” from the Control Panel
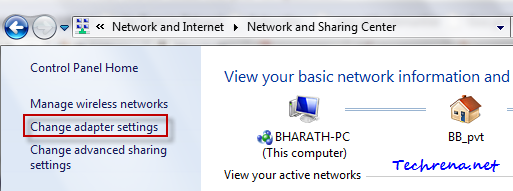
  • Click on “Change adapter settings

network sharing change adapter settings link

  • Now all your Network connections will be shown in the window. Those that are in grey denote that that particular network connection is currently disabled. The adapters which are currently enabled will be shown in blue. The network adapter or connection which is enabled but not connected to any network right now will be shown with a “X” mark below it.
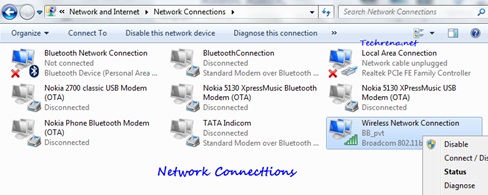
network connections list

  • Right-click on the Network connection for which you want to find out the MAC or physical address. Select Statusoption from the popup. The network connection status window will open up. Click on the “Details” tab in the status window.
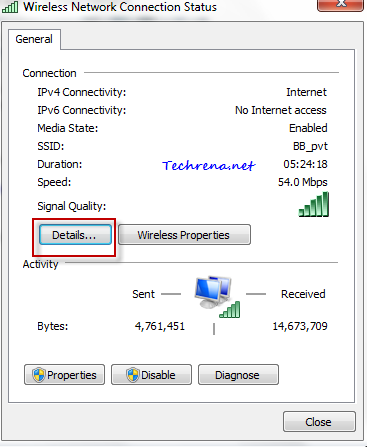
Wireless network connection status

  • In the “Network Details” window, you will see the physical address as marked in the screenshot.
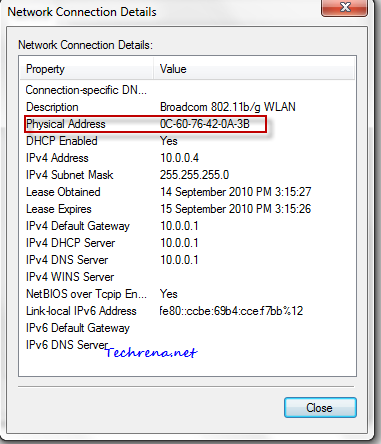
Physical address Network connection details

Method TWO:

Using the “ipconfig” command:

Go to Start menu(press windows start button) and type “cmd” in the search box and open cmd.exe from the results.

Cmd in start menu search

cmd.exe from start menu in programs

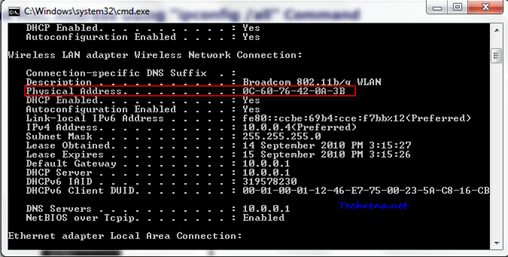
Type “ipconfig/all” (without quotes) and press enter.

ipconfig command

Physical address using ipconfig command

The command prompt window will show you the full list of your network adapters and their properties. Adapters that are disabled will be shown as “Media disconnected” against them. Carefully scroll the window to find the network connection for which you want to trace the physical (MAC) address (that is enabled and connected). While scrolling the window ignore all the network connections that are shown as “Media disconnected”. In my case I want to find the MAC address for my wireless network connection which is currently enabled is connected to a network. So I have scrolled the window until I could find the properties for Wireless LAN adapter and figured out the Physical address. Note down the MAC address value listed against the Physical Address (Right-click on the window, choose Mark select the physical address value and press “Enter” to copy the value to the clipboard) it as highlighted in the above screenshot.

Method THREE:

Using the getmac command:

Open the command prompt window as shown in the previous method and type “getmac” (without quotes) and press enter. Notice the MAC address of the device listed under “Physical Address” for the adapter that has not been marked as “Media disconnected” under “Transport Name”.

getmac command

You will find the mac address of the devices that are connected as well as disconnected.

Finding The Physical Address on a Mac OS X:

1. Click on the Apple Menu > Select System Preferences.

2. Select Network tab under the Internet & Network.

3. If you are connected to a wireless network, select “AirPort” from the drop down next to “Show” tab. The AirPort ID shown there is your physical address for that wireless adapter.
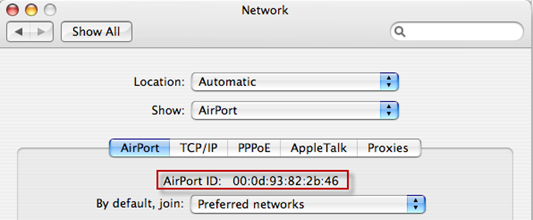
AirPort id in mac

4. If you are connected via a wired connection, select “Built-in-Ethernet” from the drop down under “Show” tab. The Ethernet ID shown there is the MAC address of your Ethernet card.
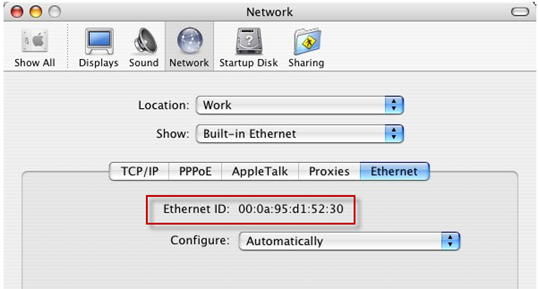
Ethernet id in mac osx

Finding MAC Address in Linux or in any UNIX based systems:

1. Launch the Terminal and type ifconfig and press enter.
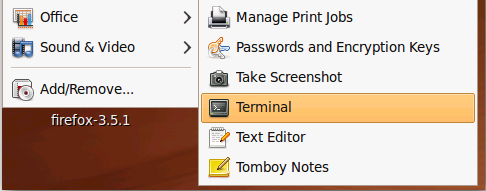
Terminal in linux

2. Now you will be shown the MAC address next to HWaddr (shortcut for Hardware address) as shown:
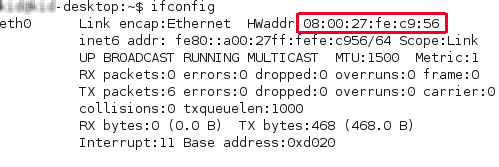
ipconfig command in linux

Alternatively, you may also type “/sbin/ifconfigsbin/ifconfig in linuxin the console and press Enter. You may need to provide credentials if you get “permission denied” error, by using su –c “/sbin/ifconfig” ifconfig in linuxin the console.

These are the ways you can find the MAC address without using any external software. However, there are many third party programs available to do the same, you may also use them to find our MAC address.

BTW, do you know that you can actually change the MAC address (read spoofing MAC post) to show a dummy number instead of the actual value? If you liked this post, do take time to read our earlier tutorials.

[How To] Change User Account Picture In Windows 7

This is very basic, easy and straight forward Windows 7 tutorial, intended for the Windows 7 beginners.

User account pictue in Windows 7

You might have noticed that whenever you go to Start Menu or Welcome or logon screen of your Windows 7 PC, you will be shown with some thumbnail picture next to your Windows user account. Windows randomly chooses the account profile picture for you which you can change anytime though. Just follow the below steps to quickly change your user account picture in Windows 7.

1. Click Start Menu and click on your user account profile at the top.

user account in start menu

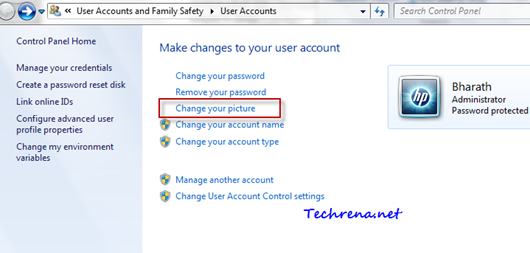
2. It will open the User account manager under control panel. Find and click on “Change your picture” link in this window.

Change your user account picture

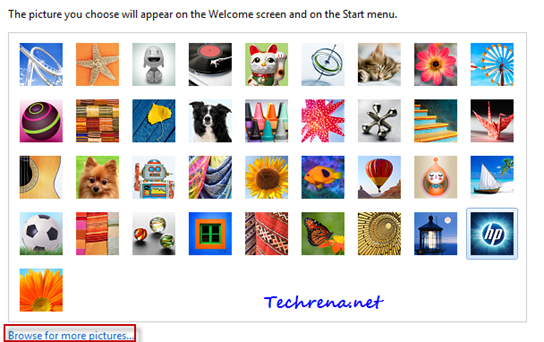
3. You will now be asked to choose your account picture. You can either select one from the handful of preloaded images listed there or you may also browse your computer for more pictures. Click on “Browser for more pictures..” link at the bottom of the window to select a picture from your computer.

Change your user account picture

4. Click on change picture to finish the process and you are done with changing your user account picture.

Although this tutorial is written keeping Windows 7 in mind, the procedure still remains the same for older versions of Windows like Windows Vista and Windows XP.

[Tip] Remove System Volume Information Folders

System Volume Information: Is it really a virus?

Myth: System Volume Information is a virus and it suddenly appears in your Windows XP computer and it doesn’t let you open its contents. It may have virus or suspicious files within it.

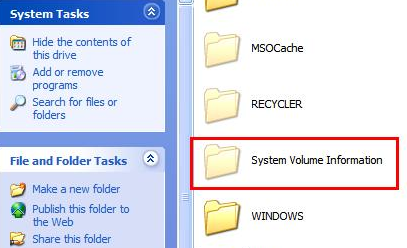
System Volume Information in Windows XP

Fact: System Volume Information (and even “Recycler”) folder is a standard Windows folder. System Volume Information folder stores the restore points data and the Recycler folder belongs to the Recycle bin. So first up, you don’t need to delete them and treat them as virus. These files do exist in later versions of Windows too. Here’s the proof: (Windows 7 screenshot)

System value information folder in Windows 7

These are system folders and are hidden by default. They will show up once you change the settings under “Folder Options’ to show the hidden system files and folders.

Thankfully Windows (Vista, Windows 7) doesn’t give you access to this folder so that averts any probable mess up if at all you access them and change the files inside it. Having said that , a virus can work around this and gain access to this folder to corrupt the restore points and create some .exe files inside it.

So to remove (actually to hide) the folder, just change the settings back in the folder options to not to show hidden system files and folders. However if you still insist on removing the System Volume Information completely (highly not recommended), here’s what you have to do:

Windows XP:

1. Right-click on My Computer and select Properties.

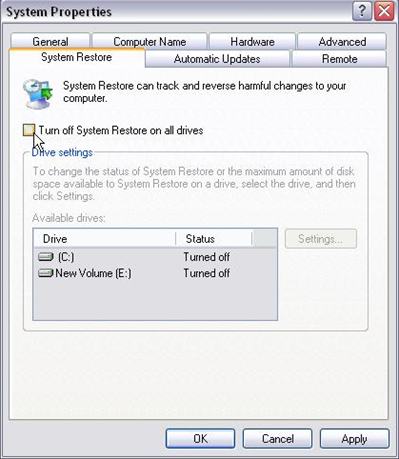
2. Click on the System Restore tab.

3. Click the Turn off System Restore on all drives check box and click OK.

Turn off System Restore

Windows 7 & Vista:

Read the How to disable System Restore in Windows 7 post written here at Techrena.

[How To] Make Older Programs Compatible With Windows 7

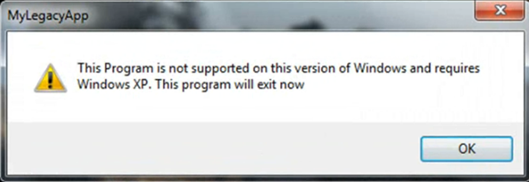
program not supported in Windows 7

Many users still use Windows XP and not upgrading it to the Windows 7, the one reason that we can think of is that they are worried about their favorite programs that they run in Windows XP without any issues might fail to run smoothly in Windows 7. While this may be true to some extent but the truth is that Windows 7 does offer a way to run these kind of programs.

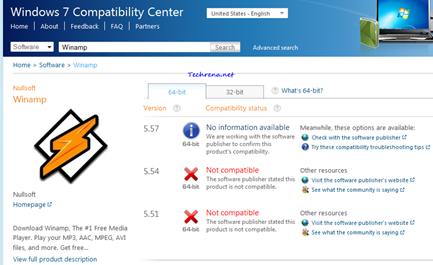
It is always suggested that you check the compatibility of the program that you want to run, at Windows 7 Compatibility Center.

Windows 7 compatibility center program check

Let us look at the alternatives that let us run older software in the newer Windows 7:

1. Run the latest version of the software: It sounds straightforward and easy, the fact that almost all the software makers who produce programs intended for Windows XP upgrade their versions to make them compatible with Windows 7. Hence you should always find the latest version of the software before you decide to run it on your Windows 7 machine.

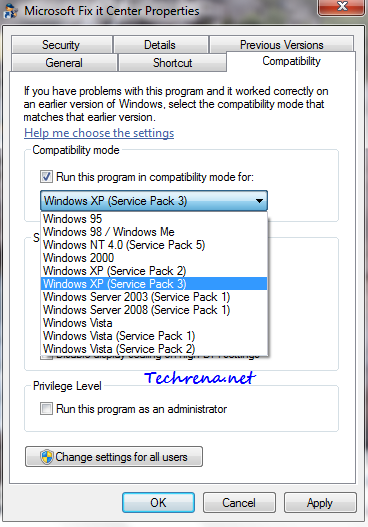
2. Using Compatibility Mode: As I said earlier, Windows 7 does have compatibility mode to run programs in compatibility mode for all the way back to Windows 95 to the Windows Vista (Service Pack. You can easily run any Windows XP based program using this feature in Windows 7.

Run windows xp compatibility mode in Windows 7

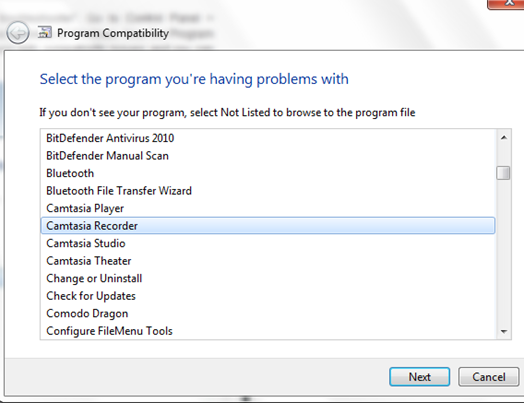
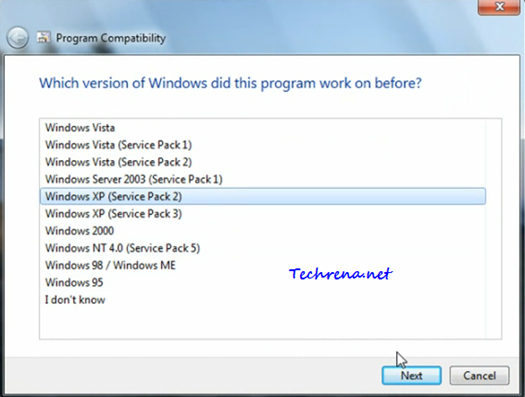
3. Another alternative is to use “Program Compatibility troubleshooter”. Go to Control Panel > Troubleshooting > Click “Run programs made for previous versions of Windows. Now the Program Compatibility wizard opens up and scans for the programs with compatibility issues and you can then select the program for which you want to changes in compatibility settings.

Program Compatibility wizard

Program compatibility in Windows 7

4. Using Windows XP inside Windows 7: Consider this option if all the above alternatives discussed fail. You can use Windows XP along with your Windows 7 in two ways: 1) Install Windows XP in another drive and dual boot it with Windows 7 2) Use Windows 7 Virtual PC and Windows XP mode in your Windows 7 PC.