Microsoft Security Bulletin MS10-035 (KB982381)

Internet explorer logoWindows Update

Microsoft has released security belle tin MS 10-035 as part of the 10 security bulletins released for the monthly security update cycle.

MS10-035 is coming up with a critical security update KB982381 that resolves vulnerabilities reported in Internet explorer (versions 6, 7 and 8), out of which five are privately reported vulnerabilities and one is publicly disclosed vulnerability.  The most severe vulnerabilities could allow remote code execution on the users computer if he just visits a specially crafted WEB page in Internet Explorer.

Update Applies to:

Name: Cumulative Security Update for Internet Explorer

Internet Explorer 6,7 and 8 for Windows 2000, Windows XP, Windows Server 2001, Windows Vista, Windows Server 2008 and Windows 7.

Download Links:

Here are the direct download links for the update KB982381.Click on the links to download the corresponding update files.

IE8 on Windows 7 x64 (15.4 MB) x86 (7.8 MB)
IE8 on Windows Vista x64 (17.8 MB) x86 (9.2 MB)
IE7 on Windows Vista x64 (14.6 MB) x86 (7.6 MB)
IE8 on Windows XP x64 (39.9 MB) x86 (4.8 MB)
IE7 on Windows XP x64 (36.6 MB) x86 (8.8 MB)

Change Drive Letters In Windows 7

Change drive letter post image

Windows automatically assigns letters to drives by default. Most users are happy with the letters that Windows chooses and they don’t complain about it. But for some reasons, if you didn’t like a letter assigned by Windows to one your new drives, you might want to step-in and select your desired letter for that drive instead of the one chosen by Windows 7. Here is a tutorial on how you can accomplish it.

Please note that you must be logged on as an administrator to perform the steps mentioned below.

Steps:

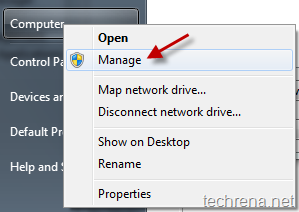
1. Right-click on “Computer” and click on “Manage” to open “Computer Management”.

Windows 7 Computer management shortcut

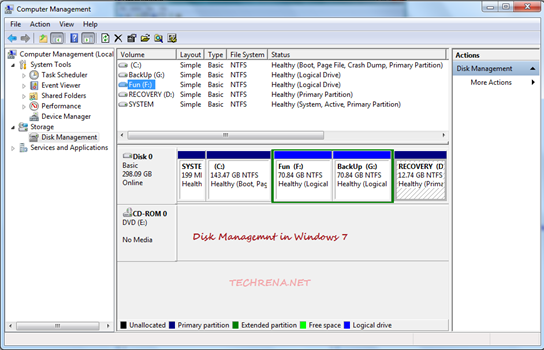
2. In the Disk Management windows, click “Disk Management” under the section “Storage”.

Windows 7 Computer management

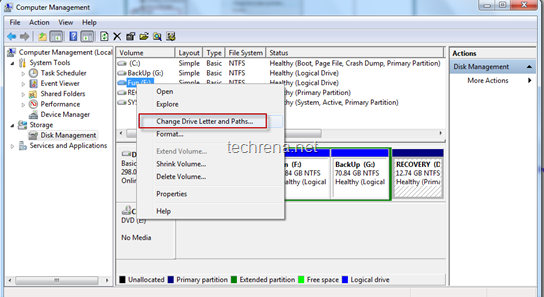
3. Right-click on the drive or partition that you want to change, and then select “Change Drive Letter and Paths”.

Windows 7 Disk management

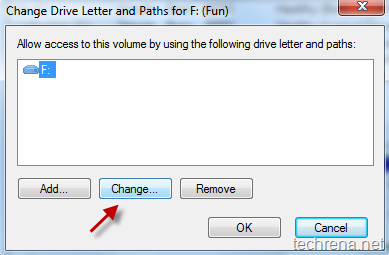
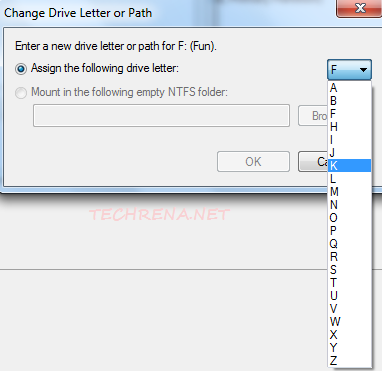
4. Click on Change and then click “Assign the following drive letter” and select the drive letter that you want.

Change Drive letter and paths

Change Drive letter and paths selection

Similarly if you want to remove a drive letter, click “Remove” in the previous step and click Yes to confirm.

Close the Computer Management window and checkout the changes that you have made.

How To Open IE In Private Browsing Mode By Default

Internet explorer logo

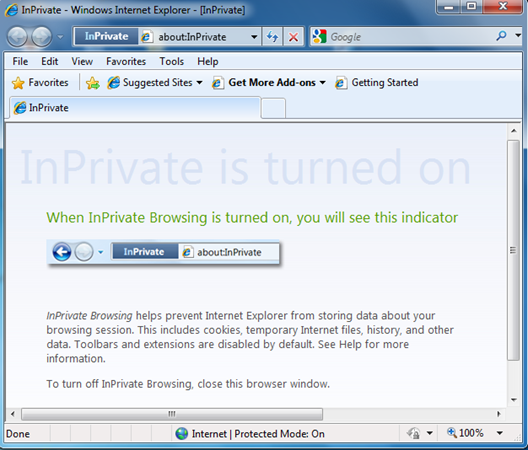
In Private Browsing Mode IE

Private browsing mode” is idle for those who don’t want other users on the same computer to see sites that he had visited and other information. In private browsing mode, the browser will not store your browsing details in cookies or in browsing history.

But for some reasons this private browsing mode is hidden in the browser windows and is not that easy to access (even though you can use a keyboard shortcut to open it, I’d still want a better way) this mode. Even if we create a desktop shortcut for Internet Explorer, it’ll only create a shortcut for normal browsing mode, not the private mode. But here’s a tutorial for you which explains you how to add a private browsing mode desktop shortcut.

1. Create a desktop shortcut as you would do normally.

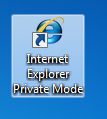
IE private mode shortcut

[I just renamed the shortcut to “Internet Explorer Private Mode” to reflect its purpose]

2. Right-click on the shortcut now and you will be under “Shortcut” tab by default. You can find a field “Target” under the Shortcut tab.

3. Append the following string to the target location present in the filed:

-private

Now the string will look like:

IE private mode shortcut

"C:\Program Files\Internet Explorer\iexplore.exe" -private

4. Click OK to save the settings.

You can now use this shortcut to start Internet Explorer in “Private Browsing Mode” by default.

Windows 7:

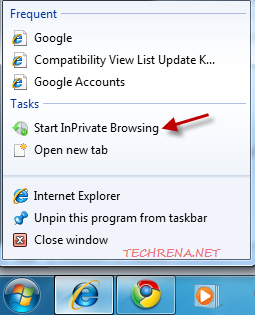
If you are using Windows 7, you need not worry about going through all the above listed steps to create a shortcut as Windows 7 by default will have a shortcut to start InPrivate Browsing. Just right-click on the IE shortcut present in the taskbar and choose “Start In Private Browsing option” from the list.

Windows 7 IE start inPrivate Browsing

How To Fix “The Requested Operation Requires Elevation” Error

Windows 7 logo

While executing some commands in Windows 7 (or Windows Vista) command prompt, you may see some error message like

The requested operation requires elevation

This may also appear sometimes when you are installing some older applications in your Windows 7.

In my case the above error popped in while I was trying to run a “netstat –b” command from the Windows 7 command prompt. You may also end with the same error if you try to other commands like “ipconfig /flush” or “ipconfig /release” etc.

requested operation requires elevation error

This error arises so because, some programs like this need to be run with elevated privileges even though you did turn off UAC (User Account Control). However, there is a simple solution available for this, all you need to do is that run the command prompt with administrative (elevated) privileges.

Solution:

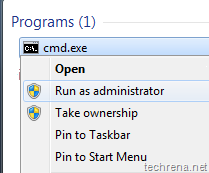
To solve this error, go to Start > Type cmd in the search box, you will the result cmd.exe under programs. Right-click on it and select Run as administrator.

run_cmd_administrator_1

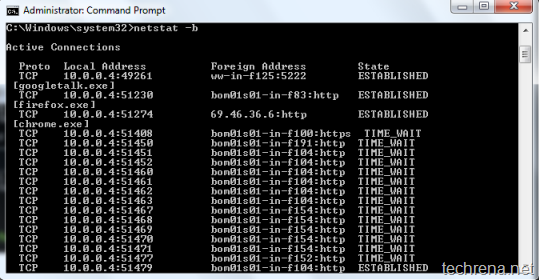
Now run the same command and you will no longer get any error messages and the command gets executed in the right manner.

Command prompt with elevated administrator rights

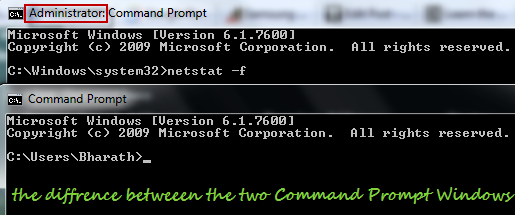
If you are wondering so as to how to find whether you are running the command prompt with Administrator privileges or not, use the following hint:

If you are running command prompt as an admin, you will see the word “Administrator” in the CMD window title. Checkout the following screenshot, which depicts the difference between the two CMD windows.

Difference between the command prompt windows

Microsoft Update For Silverlight June 2010 KB982926

Windows update

A new update KB982926 is available for Microsoft Silverlight. This new update is actually a new build of the new version that is an upgrade to the earlier version of Silverlight offering fixing many issues identified the earlier versions (as many as 7 issues have been fixed in this update). This update has been categorised as “important” by Microsoft.

Update for Microsoft Silverlight (KB982926)

This update to Silverlight improves security and reliability, and adds a variety of performance and functional enhancements including support for web-conferencing, printing support and improved support for video, networking and rich internet applications. This update is backward compatible with web applications built using previous versions of Silverlight.

Download file size: 6 MB

Direct download link: Microsoft Silverlight

Open Command Prompt From Any Folder In Windows 7

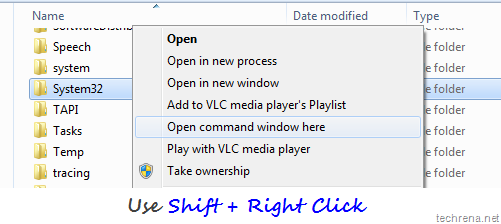
Open command window here option in Windows 7 using shift plus right-click

Last month we have written about how to copy the path of a file or folder to clipboard in Windows 7. And now, here is another handy tip for Windows 7 users to open command prompt in any folder. This requires no extra software to be installed. It’s actually s built-in feature that many of us don’t really know.

Use Shift + Right-Click on any folder and you will find an option “Open command window here”.

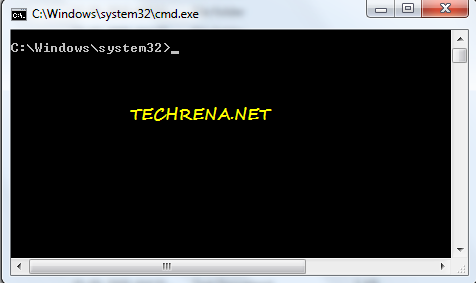
Click on the option to open command prompt window in that particular folder

Command prompt opened in folder

This is an especially useful time saver when you use command prompt a lot to execute commands or for performing some tweaks in Windows.This trick also works in Windows Vista.

If you know more tips like this, you can let us know through your comments.

Download Microsoft Remote Desktop Connection Manager

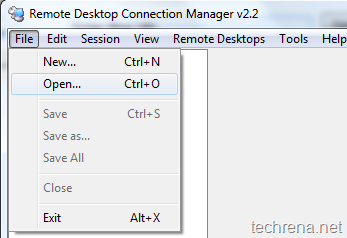
Remote Desktop manager

Remote Desktop Connection Manager (RDCMan) is a small program from Microsoft intended to manage your multiple remote desktop connections effectively.

With RDCMan, you can easily manage several labs when you need access at regular intervals to each machine in the lab (ex: as in a data center).It  is more or less similar to the built-in MMC Remote Desktops snap-in, but RDCMan is more flexible.

Supported OS: Windows 7, Windows Server 2003, Windows Server 2008, Windows Vista.

Download:

File Size: 789 KB

Download Link (RDCMan.msi)

Automatically Log On To A User Account In Windows 7

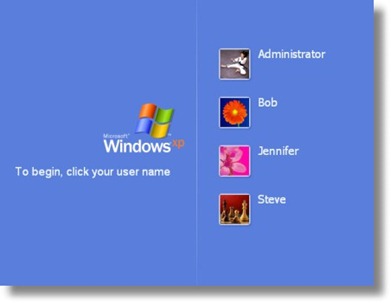
Windows welcome screen with multiple user accounts

Windows 7 by default will ask you to select your user account manually from welcome screen (log on screen) to log on to that particular account. If you have multiple user accounts, but use only one main account most of the time, you may want to save some time by letting your Windows automatically logged on to your default account rather than choosing the account manually.

This tutorial helps you to enable “Automatically Log on” feature in your Windows 7. Follow the steps outlined below to enable this feature on your Windows 7 system.

Steps:

1. Click on Start button, enter netplwiz in the search box and hit the Enter key, or open the netplwiz from the results under Programs category. This will open Advanced User Accounts section from the Control Panel items.

Windows_search_netplwiz

Windows_search_netplwiz_results

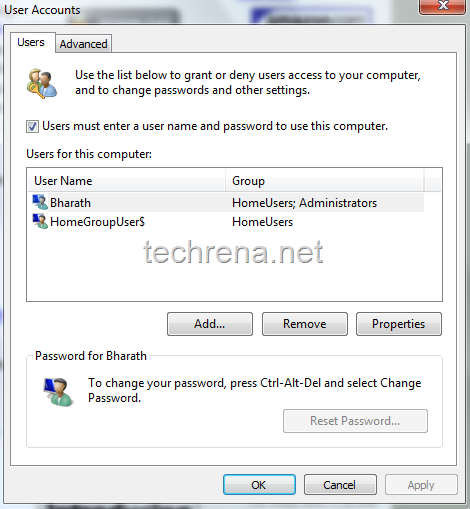
2. The Users tab may look like as shown in the below screenshot :

Windows user accounts

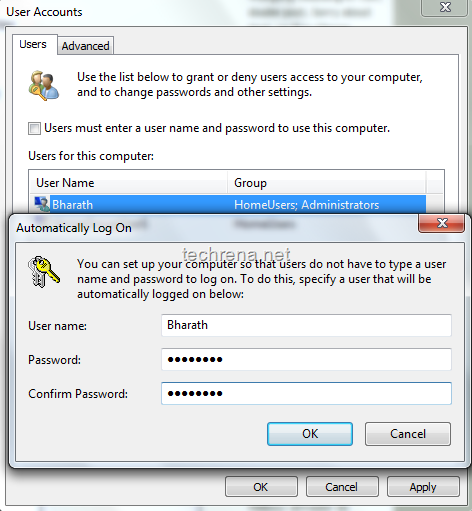
3. Now uncheck “Users must enter a user name and password to use this computer” and click Apply. You will be asked to confirm user name and password.

You can set up your computer so that users do not have to type a user name and password to log on. To do this, specify a user that will be automatically logged on below:

Just leave the password field blank if the user account doesn’t have a default password associated with it.

Automatically log on in Windows 7

4. Click OK and close the window.

From now on, you will be automatically logged on to Windows without manually selecting the user account.

For more tips on Windows 7, you can subscribe to Techrena.net’s RSS feed via email.

Note:

This method works well on Windows 7 as well as on Windows Vista.

You may not want to select this on a public computer for security concerns.

Create Hibernate Shortcut For Windows

hibernate windows

Previously we have posted about how to create shutdown desktop shortcut for Windows.If you have liked it but want similar desktop shortcut to Hibernate the Windows too, go ahead and follow the steps outlined below.

Steps:

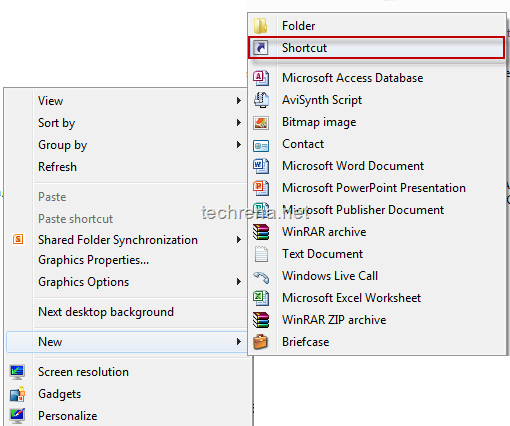
1. Start creating a new desktop shortcut by right-clicking on the desktop and selecting “Shortcut” from the context menu.

create new shortcut

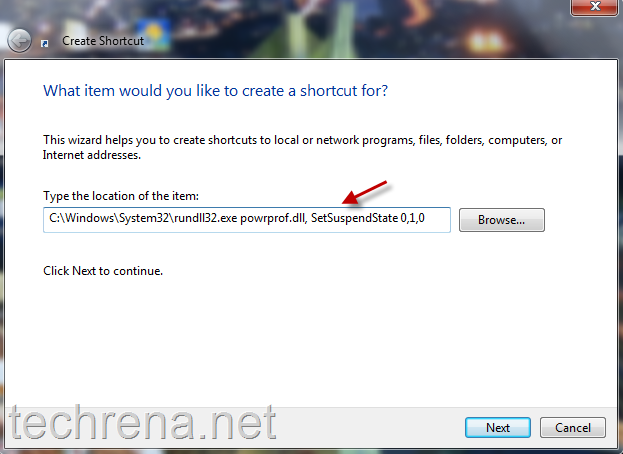
2. In the next step, you will be asked to type the location of the item for which you want to create shortcut.

Just type

C:\Windows\System32\rundll32.exe powrprof.dll, SetSuspendState 0,1,0

notepad_command

in the space and click Next

setup shortcut for hibernate

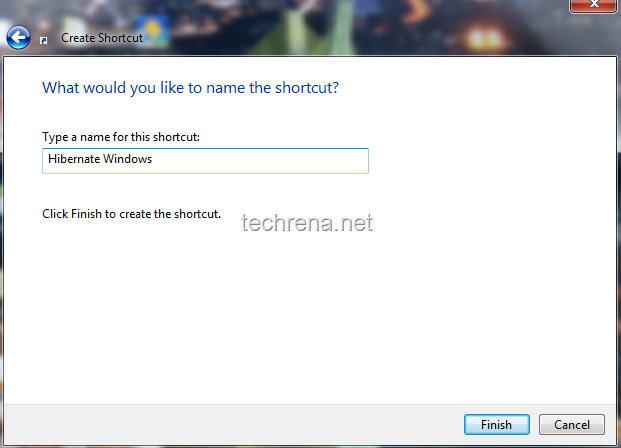
3. In the next step give your desired name for the shortcut like “Hibernate Windows” or “Shortcut for Hibernation” or whatever you like.Click Finish to finalize the wizard.

rename hibernate windows shortcut

4. Now you can find the shortcut for Hibernating windows as shown below.

Hibernate windows shortcut

5. You can now start using the desktop shortcut for hibernation created above or you can go for customizing the icon of the shortcut to match its purpose.

Use the following path to look for icons

%SystemRoot%\system32\SHELL32.dll

icons_notepad_scriptchange shortcut icon

Choose the suitable icon and now you are done with creating the shortcut.

customize Hibernate windows shortcut icon

This tutorial has been tested on a Windows 7 machine and worded fine.You may also want to read about how to enable and disable the Hibernation in Windows.

Compatibility View List Update For Internet Explorer 8 – KB982632

Internet explorer logo

A new update KB982632 available for download for systems running Windows operating system.

This new update targets Internet Explorer 8 compatibility view list.Compatibility View List update helps the browser to load the websites designed for older browsers better in the Internet Explorer 8.To use this update effectively, you should select “Include updated website lists from Microsoft” option under Compatibility View Settings in Internet Explorer.

Windows Update

Download KB982632:

The update KB982632  was released on May 25, 2010 for systems running Windows 7, Windows Vista, Windows XP and Windows Server 2003.

Windows 7 – Windows6.1-KB982632-x86.msu

Windows Vista – IE8-Windows6.0-KB982632-x86.msu

Windows XP – IE8-WindowsXP-KB982632-x86-ENU.exe

Also read about the latest update KB981793