Disable Write Protection On USB Disk Drive

windows 7 usb logo

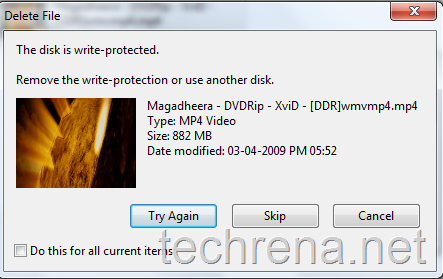
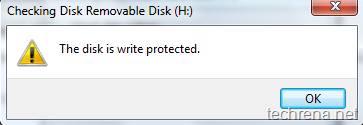
If you have an USB disk drive (Mass storage/ flash drive), sometimes you might have faced problems while copying (writing) data to your USB disk with either of the following error messages being returned.

“The disk is write protected.

The media is write-protected.

Remove the write-protection or use another disk.”
the disk is write protected

write protected usb disk

This means that your USB disk drive is write-protected so you will not be able to download the files from the USB disk nor you will be able to copy the files into the USB drive.

There is a registry hack available to disable or remove this write-protection on the USB disks and flash key drives.

1. Open registry editor via regedit run command.

2. Navigate to the following key:

HKEY_LOCAL_MACHINE \ SYSTEM\  CurrentControlSet \ Control

write_protection_reg_key

3. Create a new key named as StorageDevicePolicies.

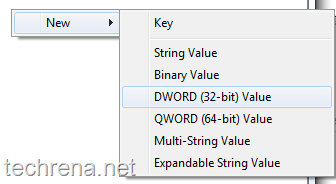
4. Right-click on the right side pane, select DWORD (32-bit) value naming it as WriteProtect.
edit DWORD value

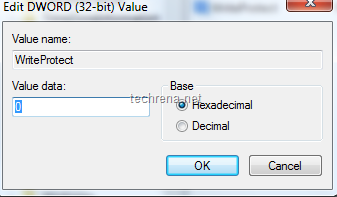
5. Double click on WriteProtect, and set its Value data to 0 (for removing write protection).
edit DWORD value

You may also be interested in reading reset windows password using USB.

Note:

As you are working with registry editor, it is always recommended that you save a backup of your registry.

If you want to disable write access to USB disk drive (flash drive), just set the WriteProtect value data to 1.

Microsoft Windows Update KB981793

Windows logo

Microsoft has released update KB981793 (on Monday, 24th May 2010) for Windows (including Windows 7) systems categorized as “Important update” for all Windows running computers titled as May 2010 cumulative time zone update for Windows operating systems.

DST worldwideWindows 7 clock

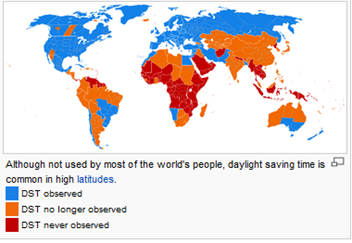
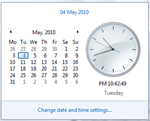
This latest update addresses the fix for changes in various time zone data to accommodate recent changes to daylight saving time (DST) in several countries since the last Windows cumulative time zone update KB931667 and adjusts your computer clock according to the changes.

DST changes since the last Windows cumulative time zone update:

Fiji, Morocco, Pacific SA, Paraguay – DST change

Bangladesh – Cancelled DST

Syria – Created a new UTC +2 Damascus time zone

The Update is available for the following Operating Systems:

Windows XP (SP2 & SP3) –

Windows Server 2003

Windows Vista or Windows Server 2008

Windows 7 or Windows Server 2008 R2

This updates installs the files Tzchnage.dll, Tzchnage.exe, Updspapi.dll in case of Windows XP and Windows Server 2003; Tzres.dll, Tzupd.dll.mui & Tzupd.exe for Windows Vista and Windows 7 based systems.

KB981793 Direct Download Links:

Windows 7

Windows Vista

Windows XP

[How To] Copy A File Or Folder Path To Clipboard Without Any Software

Windows7_Logo

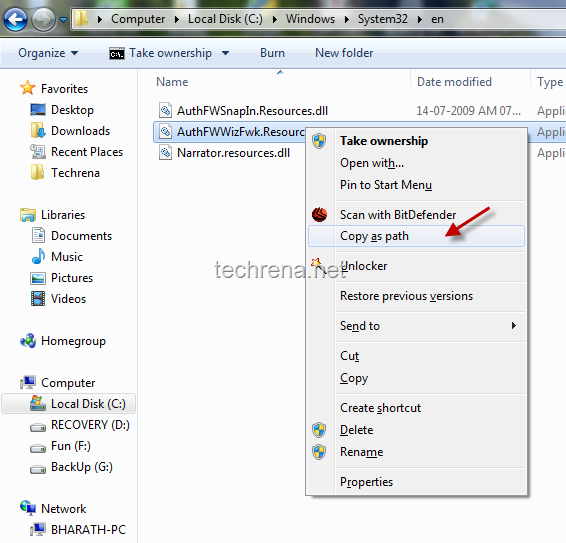
Are you using any third party software or any registry hack to copy the path of any file or folder in windows? Do you know that Windows 7 allows you to copy the full path of any file right from the context menu itself? Here’s how you can do this:

Use Shift + Right-Click on any file or folder and you will find “Copy as path”.

Copy as path in windows

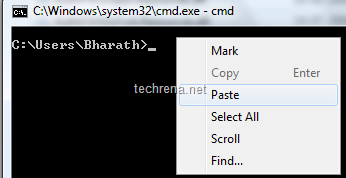
You can now use the copied file path from the clipboard anywhere including in a command prompt DOS window:

paste file path in cmd

file path copied in cmd

This is very helpful if you are using some commands via the Windows command prompt (DOS windows) that needs the full path of the files on which the DOS commands are used.

Hope this tip helps you.You may also subscribe to our RSS feed via email for more tutorials under Windows 7.

Add Or Remove Items From Windows Context Menu

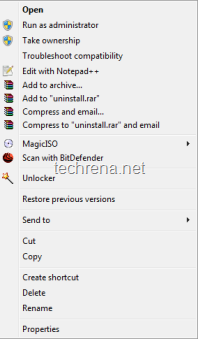
messy windows context menu

Context Menu appears when you right-click on any Windows folder or a file.When you install programs, it is very common that they fight with each-other to occupy the content menu.This context menu list will just keep on increase as you install new programs in your PC.But it is very unlikely that you use all such programs from the context menu, then why have it there? It is very annoying in such cases and you might want to get rid of all such menu items.Read on to get the possible solutions..

Using Registry Editor:

You need to find two items in registry editor which pops up by typing Regedit in your run command area.

In the registry editor, find the following items:

HKEY_CLASSES_ROOT\Directory\shell

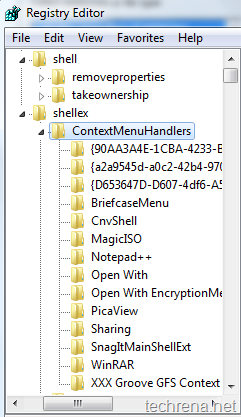
HKEY_CLASSES_ROOT\Directory\shellex\ContextMenuHandlers

Shell Context Menu Handlers in regedit

As shown in the above diagrams, you will find most of your context menu items under shellex, which you can edit to hide or disable.

Regedit shell context menu handlers

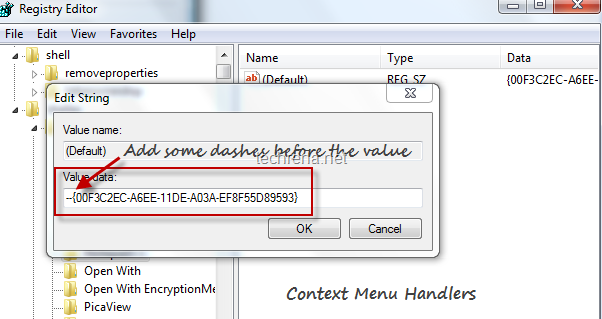
To hide any context menu item, just right click on the key> choose Modify data?> just add some dashes before the Value data filed, this will hide that particular item for appearing in the context menu handlers.

Well, working with registry values is always going to be dangerous particular if you edit some other key values instead of the correct one.So I always prefer using simple programs available for obtaining the same result in a easier way.

ContextEdit:

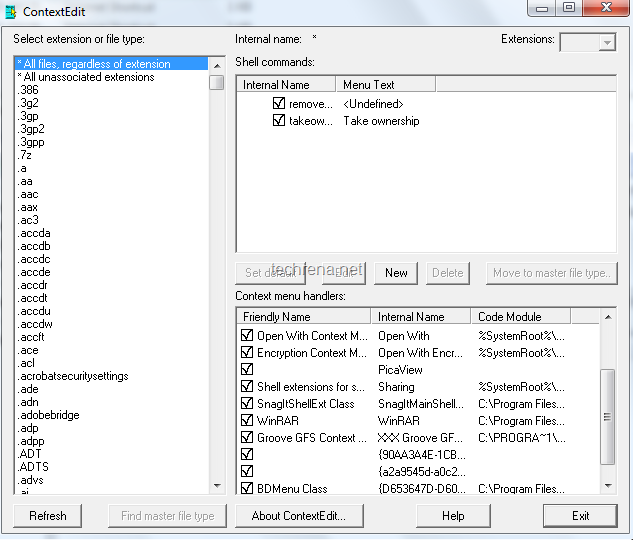
ContextEdit displays list of static context menu handler items that appear when you right-click on any folder or file.You can easily disable them by unchecking against it.

ContextEdit

Download ContextEdit (487 KB)

FileMenu Tools:

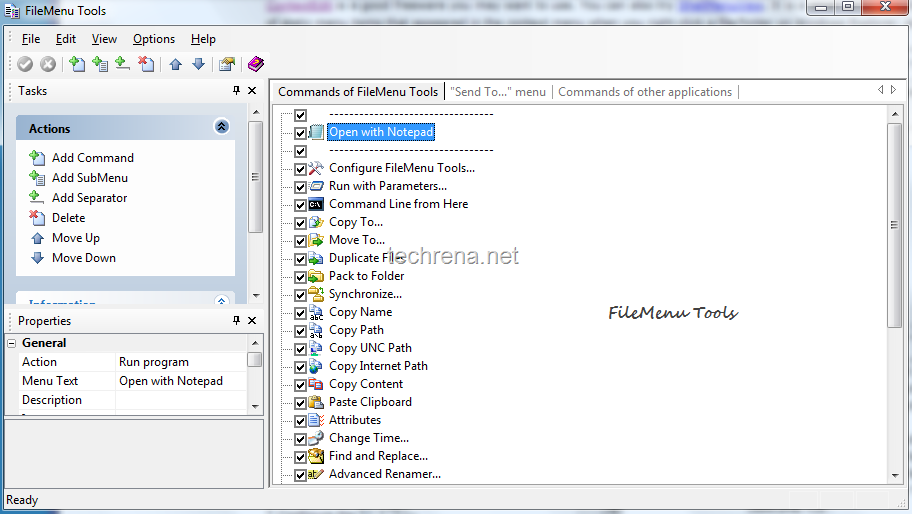
FileMenu Tools, is another great free utility which allows you add, delete or manage the context menu items, you can even choose move a particular context menu item down (or up).

FileMenu tools

Download FileMenu Tools (7.4 MB)

[How To] Disable or Enable Registry Editor In Windows 7

regedit

With viruses trying to attack your system and change the registry, why don’t we try disabling the registry editor now itself before the viruses do it?

Yes, this question is a clear one and why don’t you disable the registry editor by yourself before someone changes your registry and mess with your computer.

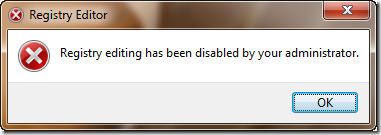
regedit_disabled Well we have a lot of methods to disable or enable the registry editor. Some of the easiest ones are given here.
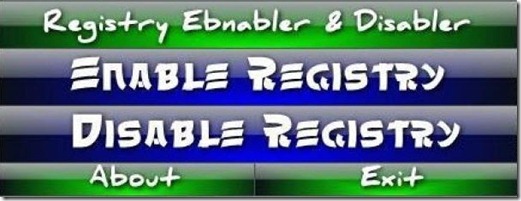
1. Disable or enable Registry Editor using Registry Enabler & Disabler 3

Registry Enabler & Disabler 3 is a freeware which can be used to enable or disable Windows Registry editor. It is a safe program.

Download: Registry Enabler & Disabler 3

Size: 276 KB

Registry_Enabler_Disabler_3

By using this program, you can directly enable or disable the Windows registry editor.

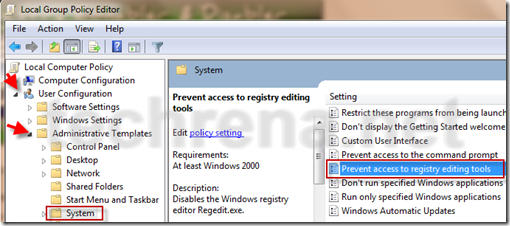
2. Disable or enable Registry Editor using Local Group Policy Editor

Press Start + R and type gpedit.msc and press Enter.

In the Local Group Policy Editor go to the location:

User Configuration—> Administrative Templates—> System

Under System, find Prevent access to registry tool. Double click on it and set Enabled to disable access to registry editor.

disable_registry_editor

Set it to Disabled to enable access to Registry Editor.

Note: Local Group Policy Editor which is not available in Home versions of Windows

3. Enable Registry Editor Using VBS script.

This method is given in techrena.blogspot.com. To read more visit:

How to enable Registry Editor (REGEDIT)

You can subscribe to our RSS feed via email for more tutorials under Solutions.

Download Microsoft Windows Malicious Software Removal Tool KB890830

microsoft Windows Malicious Software Removal Tool

The Microsoft Windows Malicious Software Removal Tool May 2010 edition is available for download now. This tool can detect and remove prevalent malicious software like Blaster, Sasser, and Mydoom.

It is advisable that everyone who uses Windows to install this update. This Update is applicable to Windows 2000, Windows 7, Windows Server 2003, Windows Vista, and Windows XP.

Windows Malicious Software Removal Tool – May 2010 (KB890830)

Download size: 1.2 MB (Through Windows Update)

Update type: Important

After the download, this tool runs one time to check your computer for infection by specific, prevalent malicious software (including Blaster, Sasser, and Mydoom) and helps remove any infection that is found. If an infection is found, the tool will display a status report the next time that you start your computer. A new version of the tool will be offered every month. If you want to manually run the tool on your computer, you can download a copy from the Microsoft Download Center(Link Given Below), or you can run an online version from microsoft.com. This tool is not a replacement for an antivirus product. To help protect your computer, you should use an antivirus product.

You may need to restart your computer for this update to take effect.

Manual Download from Official Microsoft Site:

Download size: 9.7 MB

Download: Click Here (From Official Site) – Update: Link expired

Also read about Windows Malicious Software Removal Tool KB890830 for April 2010, and you may also want to read about other updates released by Microsoft in May 2010: KB978542, KB978213.

Microsoft Windows Security Update KB978542 (Bulletin MS10-030)

Windows Update

Microsoft has released a new critical security bulletin “Microsoft Security Bulletin MS10-030” on May 11, 2010 addressing vulnerability in Outlook Express and Windows Mail that could allow remote code execution (KB978542) for Windows XP, Windows Vista and Windows 7.

outlook express logo

This new windows security update KB978542 addresses a privately reported vulnerability in Microsoft Outlook Express, Windows Mail & Live Mail which could allow remote code execution if the mail client user visits a malicious e-mail server setup by the attacker.Then the attacker may successfully exploit this vulnerability to gain the same rights as that of the mail client user, this could be even worse if the client user has administrator user rights.

Security Update KB978542 Rating:

Microsoft Outlook Express – Critical

Windows Mail – Critical

Windows Live Mail –  Important

Update Type: Important

Date Published: May 11, 2010

Download and Install this important security update to keep your Windows up-to-date.

KB978542 Direct Download Links:

Windows 7 x64 – Windows6.1-KB978542-x64.msu (3 MB)

Windows 7 32-bit  – Windows6.1-KB978542-x86.msu (1.8 MB)

Windows Vista – Windows6.0-KB978542-x86.msu (1.8 MB)

Windows Vista x64 – Windows6.0-KB978542-x64.msu (3 MB)

Windows XP –  WindowsXP-KB978542-x86-ENU.exe (1.3 MB)

For more details on this bulletin, read MS10-030

This critical update is part of Microsoft’s Patch Tuesday (May 11, 2o1o) patches.Read about MS10-031.Also read about previously released bulletin from Microsoft, MS10-018

[How to] Repair Install Windows XP without Data Loss

Have you ever faced any problem like ntldr file missing during the start up of Windows XP? During the cases of critical Windows file gone missing or corrupt, Windows will not Boot and hence cannot start. What will you do in such case where your data is at stake?

There may be many solutions available, but repairing Windows using the Windows XP setup CD will be the best. In repair install your data will be intact and no data loss will occur if everything goes right.

If you install a new copy of Windows then some of your data will be lost.

What is Windows XP repair Install?

In Repair install, all the Windows files and registries will be copied to your Hard drive from the Windows XP installation CD. The installed program files and personal data on your hard drive will not be affected in most cases.

How to perform Windows XP repair Install?

Requirements:

Your Windows XP installation CD and key

Follow the steps below:

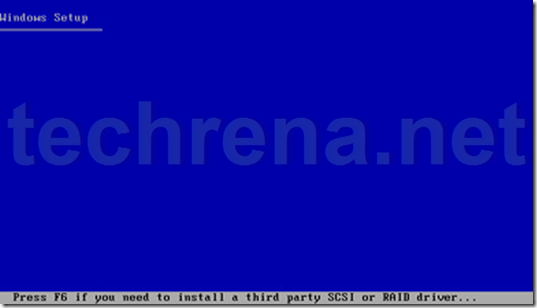
1. Insert the Windows XP CD to your Optical Drive and Start your computer.

Make sure that the computer boots from the installation CD. If it is not booting from the CD try changing your boot options in the BIOS.

While booting from the CD, press any key to start the process.

boot_from_xp_cd

Xp_setup

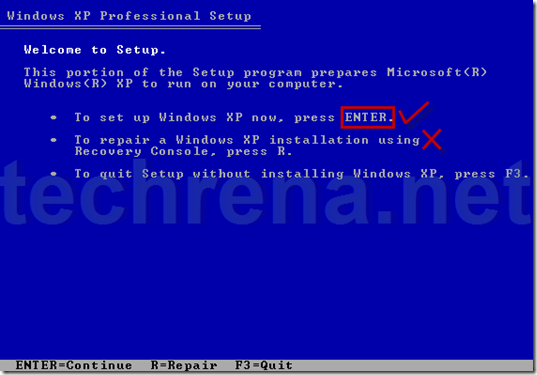
2. Press ENTER to set up Windows XP.

Do not press R. It will start, Recovery Console which is not desirable.

Welcome_ro_setup

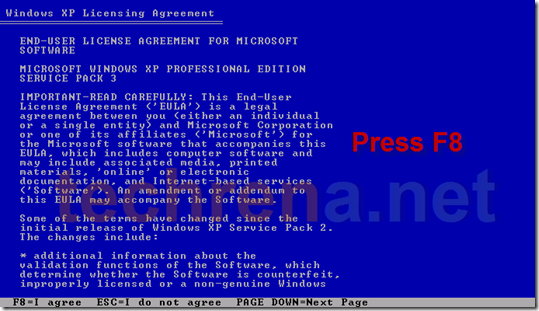
3. Press F8 to Agree the License Agreement.

F8_agreement

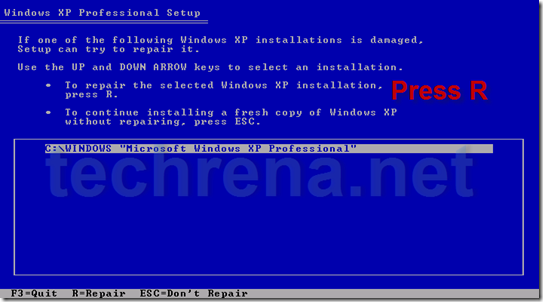
4. Press R to start the recovery install

Select the currently installed Windows XP location which you want to repair. Press R to repair the installation.

repair_xp

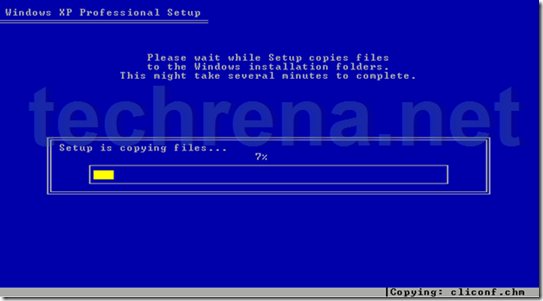
Now it will copy the files.

copying_files

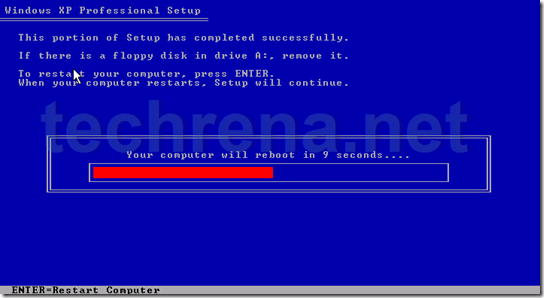
5. Press ENTER to reboot or else wait until it reboots by itself

Setup will continue after restart.

reboot

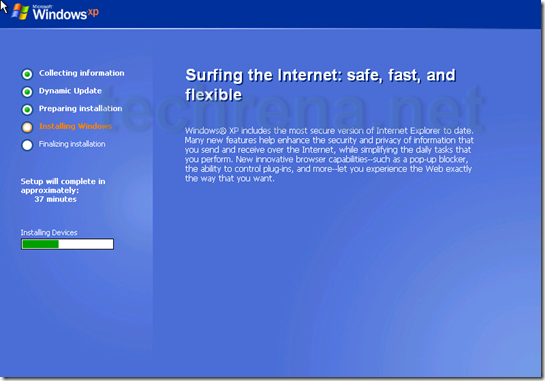
6. Do not boot from the CD after start up

After booting up from your hard drive it will continue installation. Follow the normal installation process.

installing_windows

After successful installation, your computer will restart once again. It may take some time during the first startup.

first_boot

Now your desktop should be accessible. In case of any problem do leave a comment.

You can subscribe to our RSS feed via email for more tutorials under Windows.

Tip: Close All Your Open Applications At Once In Windows

Windows logo

Are you the one who extracts the most of the multitasking from your computer by simultaneously opening too many applications and switching back to one another.But when it comes to closing all application, it’s a bit difficult to close the each application one by one , isn’t it?

What about closing all the open application windows at once with a single click ? Yes, that’s what the tiny program “CloseAll” from ntwind has too offer.

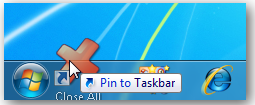
Just download the latest version of CloseAll from the links given at the bottom of the post and extract it to the program files (C:\Program Files\) on your hard disk.For easier access drag the CloseAll.exe to your desktop or Quick Launch Bar pin to the taskbar in your Windows 7.

CloseAll drag to taskbar

Now just click on this shortcut to close all application windows that are currently open.You calso make use of the advanced option to exclude certain programs to be closed by CloseAll, by adding a exclusion list,

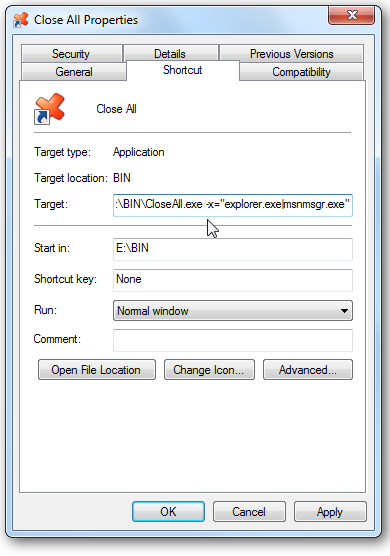
to add a simple exclusion list, go to the CloseAll shortcut properties and go to Shortcut tab, find Target under this tab.Add -x="app-to-exclude.exe": for example:

-x="explorer.exe|firefox.exe|msnmsgr.exe"

CloseAll properties

Click OK and save the settings.So now if you click CloseAll, all application windows except the Windows Explorer, Firefox and MSN Messenger will be closed.

Download CloseAll (Zip file, 36 KB)

Speed Up Windows Boot Up and Startup Using gpedit and DPS

In Windows PC, slow boot up and slow startup is one of the major problem we face. During the starting of Windows, it may take a lot of time to come to the logon screen and then to the desktop. This kind of problem is common in PCs which are older and a lot of programs are running.

One method we have already posted to speed up your Windows PC is by using MSCONFIG. Here, we will be solving the slow boot up problem using Windows Boot Performance Diagnostics of Diagnostic Policy Service(DPS).

Diagnostic Policy Service (DPS) will detect Windows Boot Performance problems and attempt to determine their root causes. These root causes will be detected and corrective actions will be taken to solve the problems.

Follow the steps below to enable Windows Boot Performance Diagnostics.

1. Open Local Group Policy Editor

Press Start + R and Type gpedit.msc and press Enter. Incase of

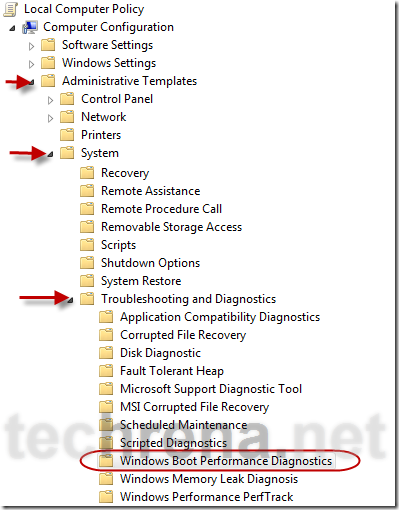
2. Go to Windows Boot Performance Diagnostics

In the Left Pane of  Local Group Policy Editor go to the location:

Computer Configuration—>Administrative Templates—>System—>Troubleshooting and Diagnostics—>Windows Boot Performance Diagnostics

Windows_Boot_Diagnostics

3. Open Configure Scenario Execution Level of Windows Boot Performance Diagnostics

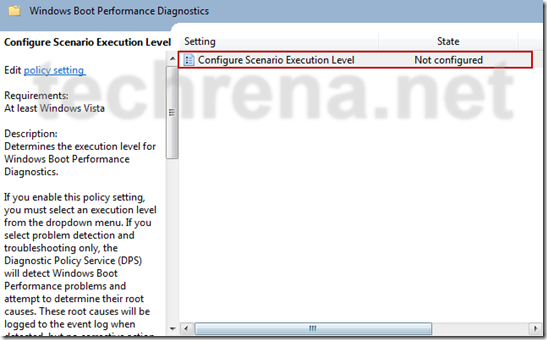
Now in the right pane Double Click on Configure Scenario Execution Level.

Configure_Scenario_Execution_Level

4. Enable Windows Boot Performance Diagnostics

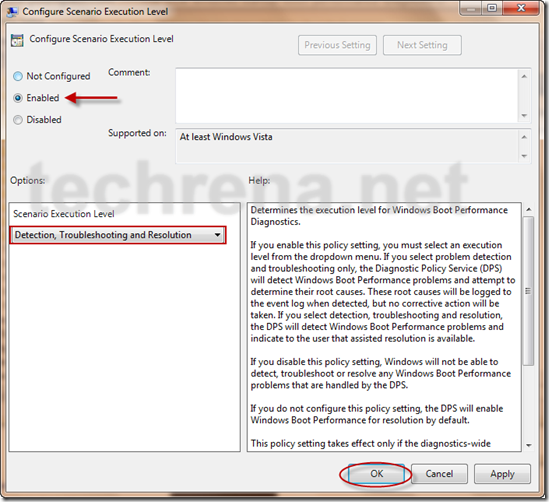
Now Click on Enable and Select Scenario Execution Level as Detection, Troubleshooting and Resolution. Click OK

Enable_Windows_Boot_Diagnostics

If you select Detection and Troubleshooting only then  the root causes will be logged to the event log when detected, but no corrective action will be taken.

Now Windows Will Diagnose your Startup problems and try to fix them for a faster boot and startup.

Important Notes:

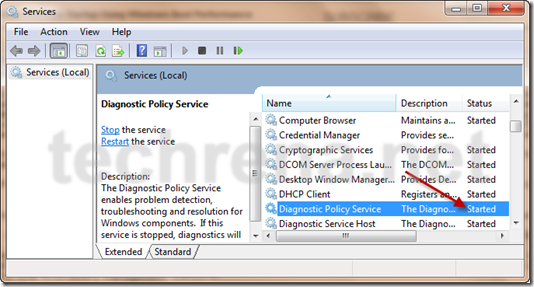
Note 1: Windows Boot Performance Diagnostics is a part of the Diagnostic Policy Service(DPS). So DPS should be running in your computer in order to successfully diagnose the problems. To check whether the service is running or not, Press Start + R and Type services.msc. Check out for Diagnostic Policy Service.

services

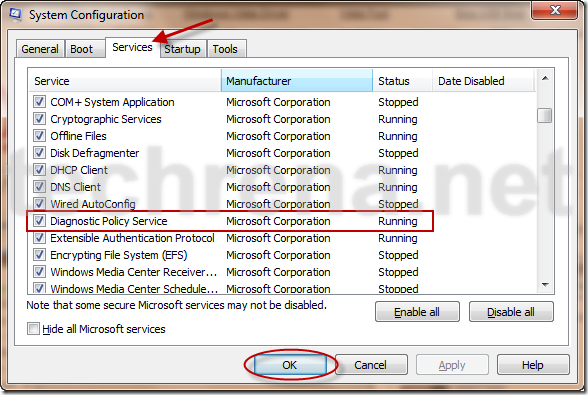
Incase if it is not started, you have to start it using MSCONFIG. To do that, Press Start + R and Type msconfig. Go to Services tab and Check Diagnostic Policy Service. Press OK.Note 1:

msconfig

Note 2: This service is available only in Windows Vista and Windows 7. And Local Group Policy Editor (gpedit.msc) may be available only with versions like Professional or higher.

You can subscribe to our RSS feed via email for more tutorials under Windows.