Google Apps Marketplace Officially Launched

Google apps marketplace logo

Google has launched new Google Apps Marketplace, that lets the Google Apps users to install third party  cloud apps that integrate directly with Google Apps.

This is a new new online store for integrated business applications that makes it easier for the Google Apps users and the software providers to do business in the cloud.

Acc to a blog post in Google official blog, there are more than 50 companies selling applications covering wide range of businesses.Google Apps customers can easily discover, deploy & manage cloud apps with this Google Apps Marketplace.

Visit Google Apps Marketplace page to install the apps that you may need for your company’s domain.

At present, most if the apps are coming with a subscription fee (most of them), but there are still some free and worthy apps available (also available are trail based apps, that provide you a free trail of their service for some period and later you pay to continue using their services),

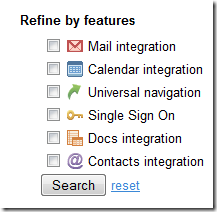
refine by filters Google Apps

(free apps like Gbridge, offering Free instant VPN for everyone! in the organisation- Support Windows folder sharing and remote printing, as well as Windows Remote Desktop through RDP protocol).

While searching, using “Refine by features” will confine the results matched to only the feature that was selected

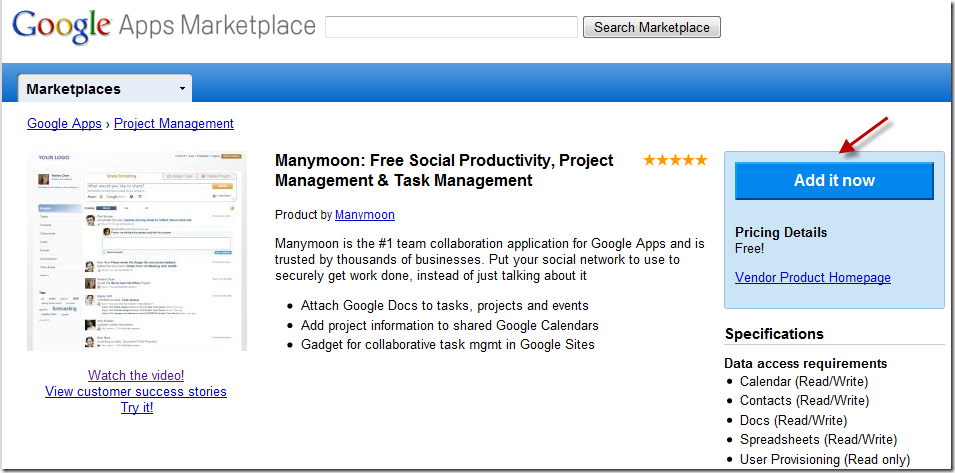
Add apps from Marketplace to your Google Apps

Watch Google App Marketplace Introduction/Overview Video:

Install Google Apps Marketplace tools for your Google Apps account and let’ us know the application that you liked most in Google Apps Marketplace through comments.

Install Windows 7 or Vista Using Bootable USB Disk Drive

Installing an operating system to computers that don’t have an optical drive has been a problem. For example, if we want to install Windows 7 in netbooks like ASUS Eee PC, Dell Mini Netbooks, Acer Aspire One, HP Mini 1000 etc. , then we need to use a bootable pen drive to install it. With the release of the full version of Windows 7 and its gaining popularity, many people have decided to go for Windows 7 over Vista.
windows7_logo

Well the method given here is one of the easiest techniques known which does not need any kind of download and the clear screen shots have been given. The advantage of using this method is that, the whole process of installation finishes in lesser time than installing via an DVD.This method will also work for Windows Vista Installation. But if you want to install Windows XP using a flash drive then you can refer to this post: Install Windows XP from USB Disk Drive. Now lets Start.

Requirements:

1. A USB Drive of minimum 4GB space

2. Windows 7 installation DVD or ISO file (Back Up will also do)

Before starting, plug in your USB drive into your system.

Step 1: Open Command Prompt as Administrator. ( Press Start + R, then type cmd and Press Ctrl + Shift + Enter OR In the Start menu type cmd and Press Ctrl + Shift + Enter )

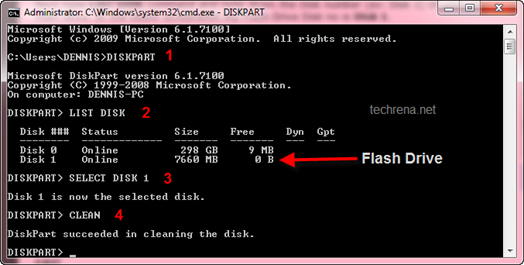
Step 2: After opening Command Prompt, Type the two commands below:

DISKPART

LIST DISK
Windows 7 install from usb

Step 3: Now you can see the disks present in your system. See the disk number for your drive. In my case the number is Disk 1. Enter the Commands below replacing the disk number with yours.

SELECT DISK 1

CLEAN

CREATE PARTITION PRIMARY

SELECT PARTITION 1

ACTIVE
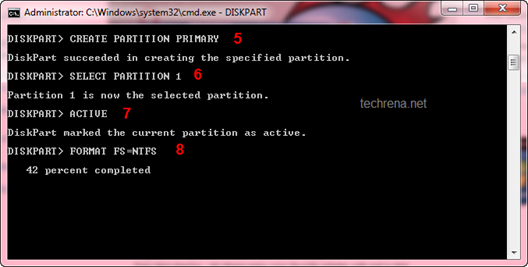
Windows 7 install from usb

Step 4: Now we need to format the disk and then exit. It may take few minutes. Type the commands one by one:

FORMAT FS=NTFS

ASSIGN

EXIT
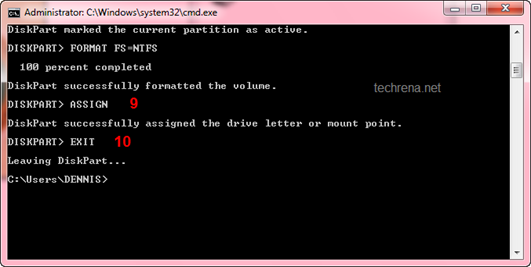
Windows 7 install from usb

Step 5: Now insert your Windows 7 DVD to your Optical Drive or Mount your ISO file in the Virtual Drive(you can use Virtual Clone Drive ). Note the Drive letter of your DVD Drive and USB Flash Drive. Type the commands below, in the Command Prompt replacing the drive letters as yours. In my case they are I and J.

I:

CD BOOT

BOOTSECT.EXE /NT60 J:
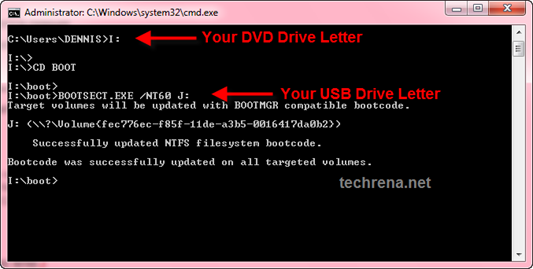
Windows 7 install from usb

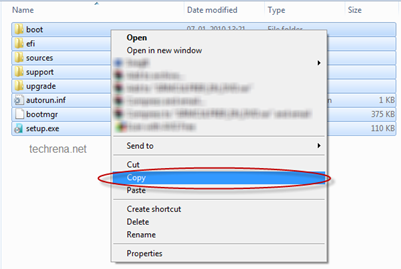
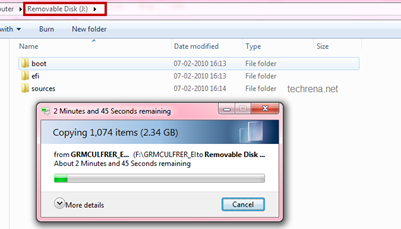
Step 6. Now copy all your Windows 7 DVD contents to the USB flash drive.

Windows 7 install from usb Windows 7 install from usb Windows 7 install from usb

Step 7: Now your USB Drive is bootable. You can restart your computer and boot from the USB drive. In order to boot from your flash drive, you have to change the boot menu. Many computers have DELETE, F10, F2, F12, ESC keys as Boot menu key (the boot menu key information is usually displayed during Start Up). In the boot menu Select USB Diskette on Key and boot it from the USB.
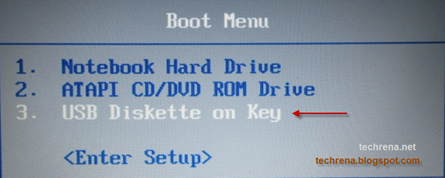
Windows 7 install from usb

Now the Windows 7 installation will boot,  follow the instructions to install.

Do comment if you face any problem while executing the method.

Note:

1. If you have the installation file as a back up in your hard drive( not in the form of an ISO) then, in Step 5 execute the BOOTSECT.EXE command by changing the directory in the command prompt(use CD command) to the folder where your installation files are present.

2. You can use Microsoft USB DVD Download Tool as an alternative to this method.

3. This method will not work for Windows XP. If you want to install it then refer this post: Install Windows XP from USB Disk Drive

BSNL EVDO Card 3.1 Mbps Unlimited @ Rs 750 !! (Up To March 31)

BSNL India logo

BSNL EVDO 3.1 Mbps Unlimited plan only @ 750 Rs, Hurry up (Till March 31, 2010 only):

BSNL (Bharat Sanchar Nigam Ltd.) has taken a very big step forward towards offering high speed internet at an affordable rate to the  internet users in India.BSNL today has announced 3.1 Mbps unlimited plan under its EVDO card at rupees 999 INR 750 INR.

This comes as a real good news for all those who are eagerly waiting for such an unlimited plan at affordable price (Rs. 750).BSNL EVDO is the best option if you want to get high speed wireless broadband in India, though there are private firms operating in this arena, their services level do not match up to the state owned BSNL.But the twist here is that this is a promotional offer and valid for post-paid activations till March 31, 2010.Existing prepaid would get the unlimited data usage plan at Rs 650.

BSNL has also launched another plan but this time in Pre-paid, data usage priced at 5 Paise per 100 KB i.e Rs. 1 for 1 MB of usage.

BSNL EVDO Banner

BSNL EVDO Post-Paid TARIFF [As seen in BSNL website]

Sl.No FMC* (in Rs.) Monthly free usage (in GB)
1 199 0.5
2 299 1
3 449 2
4 649 5
5 999 Unlimited

[*] FMC – Fixed Monthly Charge

Summary (Rs 750 unlimited EVDO card plan)

Plan Type: Postpaid

Price : Rs. 750

Data usage : Unlimited

Pros:

Affordable (at Rs. 750)

Free all India roaming

Cons:

High price if the EVDO router (Rs. 21,000, no rental option)

Unlimited plan only in Postpaid connection

Being a promotional offer [It’ll be Rs. 999 again after March 31, 2010]

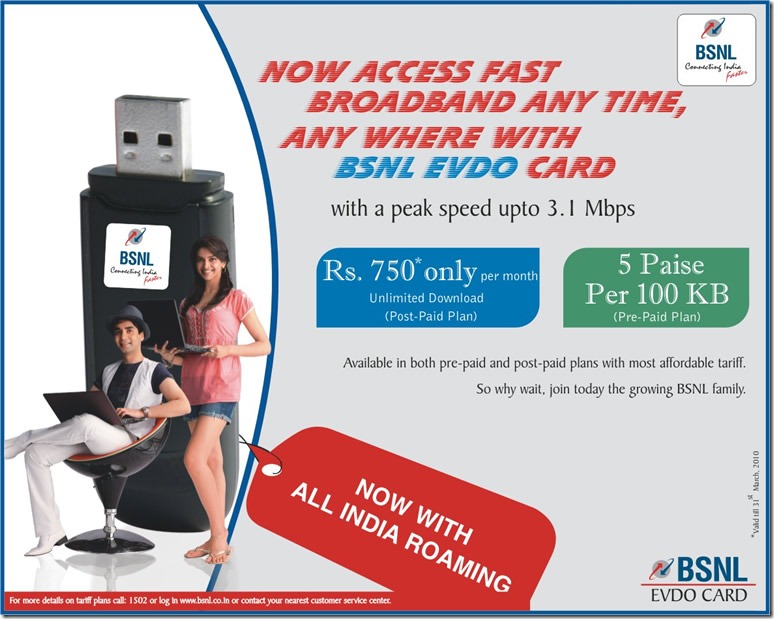
BSNL EVDO Ad:[Click to see larger size image]

BSNL_EVDO_Card 750 plan

Google Adds Sidewiki Claim, Fetch As Googlebot Mobile in Webmaster Tools

Google Webmaster Tools logo

In an update to Webmaster Tools Labs, Google has added two new features to under labs features.

New features:

  • Fetch as Googlebot-Mobile
  • Create your Sidewiki page owner entry

Fetch as Googlebot-Mobile:

Fetch as Googlebot-Mobile as the name suggests, lets you fetch any page in your claimed website, as it’d appear to the mobile version of the Googlebot (XHTML/WML or CHTML Googlebot Mobile).

[Read how to Use Fetch as Googlebot to find malicious hacks in a website]

You can access this under Labs > Fetch as Googlebot section from your Google Webmaster Tools (GWT)

Fetch As Google Bot Mobile

Sidewiki Page Owner Entry:

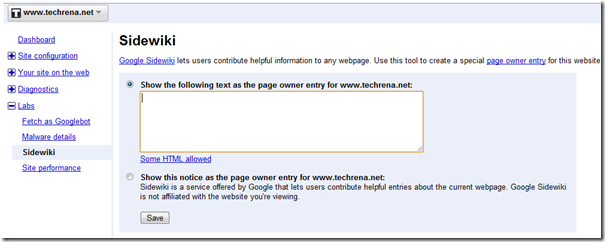
This feature I guess is of no value to the webmasters right now, according to me.It is just last week that Google has announced about replacing Google Sidewiki with star bookmarks.Many users have already been migrated from Sidewiki to Star bookmarks, at present only Google Toolbar has Sidewiki option.Only Google should know the logic behind this new feature.Given that Sidewiki itself is a failure, this really doesn’t interest you much right now.

Sidewiki entry in Webmaster Tools

Never the less, good features, especially ‘Fetch as Googlebot mobile’ (may be bad timing for the Sidewiki entry, should have been launched earlier)

IPL 3rd Edition (IPL 2010) Schedule

IPL 2010 logo

The IPL extravaganza is about to start in 3 more days.The 3rd edition of the Indian Premier League (IPL 2010) will start with the first day/night match between Deccan Chargers and Mumbai Indians at Mumbai(initially, the venue was Hyderabad, later shifted to Mumbai because of the ‘T’ allegations).There would be 60 matches in total this year starting from March 12, 2010.Most of them being Day/Night matches The final would be held at Mumbai on April 25, 2010.

We had already covered about how to watch IPL 3 matches online.And now for all your IPL fans out there, we are here with the official schedule of the IPL 3/ IPL 2010 version.

IPL 2010 Schedule / Fixtures:

Date Match Time (IST) Venue
March 12 DC x KKR 8 PM Mumbai
March 13 Mumbai x Rajasthan 3 PM Mumbai
Punjab x Delhi 8 PM Mohali
March 14 KKR  x Bangalore 4 PM Kolkata
Chennai x DC 8 PM Chennai
March 15 Rajasthan x Delhi 8 PM Ahmedabad
March 16 Bangalore x Punjab 4 PM Bangalore
KKR x Chennai 8 PM Kolkata
March 17 Delhi x Mumbai 8 PM Delhi
March 18 Bangalore x Rajasthan 8 PM Bangalore
March 19 Delhi x Chennai 4 PM Delhi
DC x Punjab 8 PM Cuttack
March 20 Rajasthan x KKR 4 PM Ahmedabad
Mumbai x Bangalore 8 PM Mumbai
March 21 DC x Delhi 4 PM Cuttack
Chennai x Punjab 8 PM Chennai
March 22 Mumbai x KKR 8 PM Mumbai
March 23 Bangalore x Chennai 8 PM Bangalore
March 24 Punjab x Rajasthan 8 PM Mohali
March 25 Mumbai x Chennai 8 PM Mumbai
March 26 Rajasthan x DC 8 PM Ahmedabad
March 27 Punjab x KKR 4 PM Mohali
Bangalore x Delhi 8 PM Bangalore
March 28 Rajasthan x Chennai 4 PM Ahmedabad
DC x Mumbai 8 PM Mumbai
March 29 Delhi x Kolkata 8 PM Delhi
March 30 Mumbai x Punjab 8 PM Mumbai
March 31 Chennai x Bangalore 4 PM Chennai
Delhi x Rajasthan 8 PM Delhi
April 1 KKR x DC 8 PM Kolkata
April 2 Punjab x Bangalore 8 PM Mohali
April 3 Chennai x Rajasthan 4 PM Chennai
Mumbai x DC 8 PM Mumbai
April 4 KKR x Punjab 4 PM Kolkata
Delhi x Bangalore 8 PM Delhi
April 5 DC x Rajasthan 8 PM Nagpur
April 6 Chennai x Mumbai 8 PM Chennai
April 7 Rajasthan x Punjab 4 PM Jaipur
KKR x Delhi 8 PM Kolkata
April 8 Bangalore x DC 8 PM Bangalore
April 9 Punjab x Mumbai 8 PM Mohali
April 10 DC x Chennai 4 PM Nagpur
Bangalore x Kolkata 8 PM Bangalore
April 11 Delhi x Punjab 4 PM Delhi
Rajasthan x Mumbai 8 PM Jaipur
April 12 DC x Bangalore 8 PM Nagpur
April 13 Mumbai x Delhi 4 PM Mumbai
Chennai x Kolkata 8 PM Chennai
April 14 Rajasthan x Bangalore 8 PM Jaipur
April 15 Chennai x Delhi 8 PM Chennai
April 16 Punjab x DC 8 PM Dharmasala, HP
April 17 Bangalore x Mumbai 4 PM Bangalore
KKR x Rajasthan 8 PM Kolkata
April 18 Punjab x Chennai 4 PM Dharmasala, HP
Delhi x DC 8 PM Delhi
April 19 KKR x Mumbai 8 PM Kolkata
April 21 Semi-Final 1 8 PM Bangalore
April 22 Semi-Final 2 8 PM Bangalore
April 24 3rd Place Play-off 8 PM Mumbai
April 25 Final 8 PM Mumbai

[*]

Chennai – Chennai Super Kings

DC – Deccan Chargers

KKR – Kolkata Knight Riders

Bangalore – Royal Challengers Bangalore

Punjab – Kings XI Punjab

Rajasthan – Rajasthan Royals

Mumbai – Mumbai Indians

Delhi – Delhi Daredevils

We hope IPL 3rd season enthrals you !

LG GS290 aka LG Cookie Fresh Announced

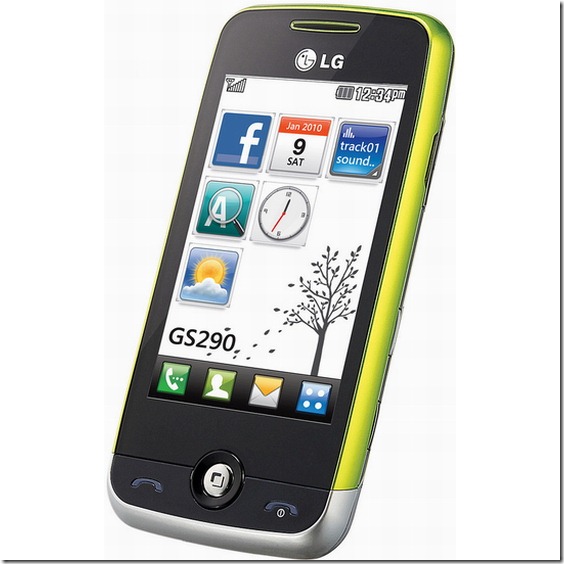
LG has just officially announced LG GS290 (LG Cookie Fresh GS290).

Last week we have covered about LG Cookie Pep GD510 launch in India, LG has announced another Cookie phone, called LG Cookie Fresh aka LG GS290.LG announced about this in their Korean official website.

LG Cookie fresh is touchscreen phone, with 2 megapixel camera, 3 inch WQVGA touchscreen display,the phone also boasts of a 3.5 mm audio-out earphone jack, “cartoon UI”, Push e-mail service, inbuilt social networking direct access applications (Facebook, Twitter etc.).

The phone lacks 3G and only sports a 2 MP camera compared to LG Cookie Pep and LG Cookie Plus.

LG Cookie Fresh GS290 picture

Brief list of specifications*:

Brand Name LG GS290
aka
LG Cookie Fresh
Camera 2 Megapixels
Max res:1600×1200 pixels
Audio Playback formats eAAC, MP3, WAV
Network EDGE, GSM
3G ? No
Connectivity Bluetooth v2.0 with A2DP
MicroUSB
Colors Red, blue, pink, purple, light green, silver

The LG Coolie fresh (& Cookie Plus) will be launched in Europe from this month in lots of color variations (mentioned in the above table).LG is also planning to sell these two models in more than 50 countries by the end of this year.

Price*:

No official word yet.But expect Cookie fresh to be cheaper than LG Cookie Plus/Cookie Pep phone.

[*] The specifications list and price list will be updated as soon as the phone gets launched officially.

Moderate and Reply to Comments on WordPress Blog From Your Desktop

Moderating Comments in your Blog is also another workload for bloggers with the increase of spammers and spam comments everywhere. Yes you would have installed plugins to block spam comments. But some of the comments may slip in anytime. Or if the comment is offensive or is violating your policies you need to spam or remove those comments manually.

Another Important thing is that if you want to reply to a comment, then it will take no time and the commenter who needs a reply will be quite impressed if you reply as soon as it is commented.

The overhead of finding the comments one by one and moderating them is a big headache. Now in order to help you solve this problem, WordPress presents the Desktop Comment Notifies for Windows. Just install and configure your blog settings, the comments will be notified in your desktop as soon as it is posted.

Try this exciting Desktop Comment Notifier by WordPress and help yourself to regulate, all the comments live.

To start Download WordPress Comment Notifier from the link below:

Download WP Comment Notifier

Size: 3.30 MB

File: wp-comments-notifier-setup.0.11.exe

After downloading, Install it on your PC:

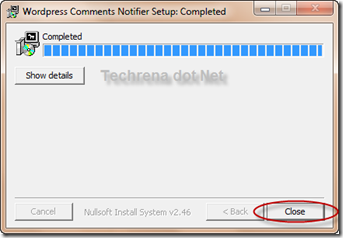
Wordpress_Comments_notifier

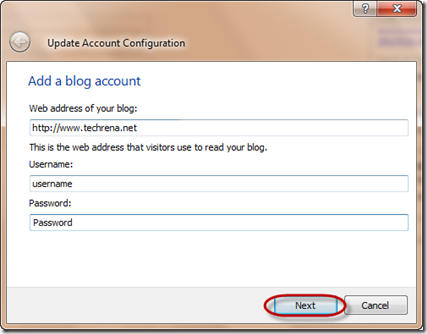
Open wp-notifier and Update your Blog settings. Enter your blog URL, Username and Password. Do not forget to put http://

Update_Blog_Account

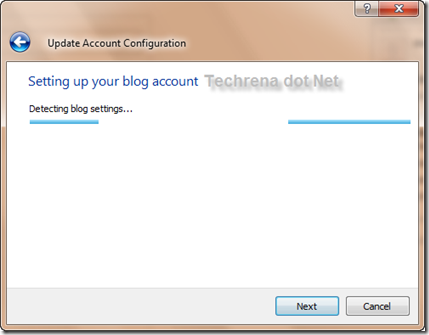
Detect_blog_Settings

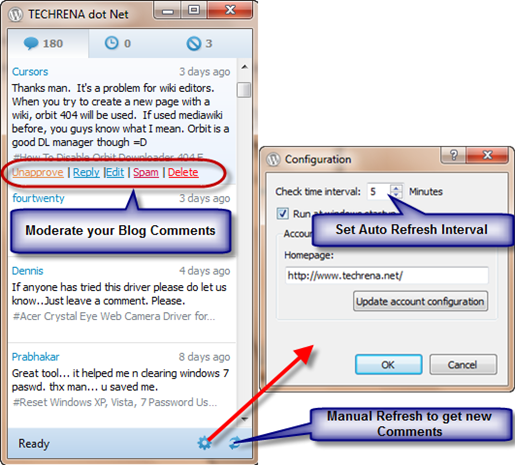
After successful Configuration you can see the Comments on your Blog. you can approve or unapprove, delete, spam, reply, edit a comment. You can set the frequency which it updates the Comments list from your blog. The Frequency is 5mins by default.

Moderate_Wordpress_Comments_from_Desktop

Now you can easily monitor all the comments you are getting live.

Vodafone Launches App Store In India, Crosses 10000 Downloads Already !

Vodafone_Logo

Vodafone Essar India (earlier known as Hutchison Essar) has just announced that it’s newly launched mobile application store has crossed 10000 downloads.According to Vodafone, the app store service has been operational since Feb 15, 2010.

In an announcement dated 5th March 2010, the company has announced that the app store was initially launched on 15th February 2010, without any promotion or media release.Now after receiving relatively good number of downloads (10k downloads in 22 days), Vodafone has decided to reveal the world about the existence of its app store service in India.

The application store is available to customers through data enabled handsets. Customers can send a message APP to 111 (toll free) and also access the store through the portal Vodafone live! by clicking a link on the home page. Over 15% of applications are available free of charge while the majority of paid applications are priced in the range of Rs. 5 to Rs. 30.

So as you can see in the above excerpt, to access the app store, the users can simply type APP and send a message to 111 (toll free Vodafone no).The store has over 800 applications in the categories: Entertainment, Utility, Finance, Social Networking, Games, etc. consisting of both Indian and international apps as well.You can explore all the free available apps (around 15%) before you can buy paid applications which costs you from Rs 5  to Rs 30.

Install IIS Server in Windows 7

Internet Information Services (IIS) is a set of Internet based services from Microsoft. The services provided currently include FTP, FTPS, SMTP, NNTP, and HTTP/HTTPS. In Windows 7 the IIS program is already present, but it is not enabled or turned on by default when you install Windows 7.

It is now very easy to install IIS in Windows 7, without requiring to download anything. You just need to enable the Service in Control Panel.

Here we have given how to enable IIS feature in Windows 7.

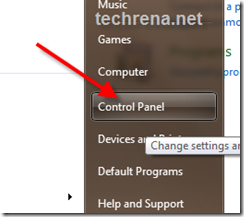
Step 1: Open Control Panel. Click on Start and click on Control Panel.

open control panel

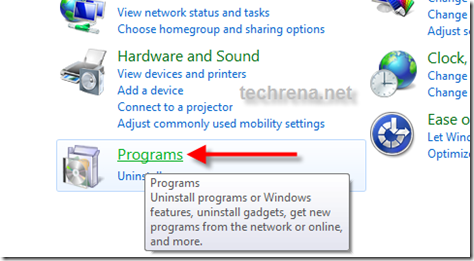
Step 2: In Control Panel look for Programs and click to open it.

programs in control panel

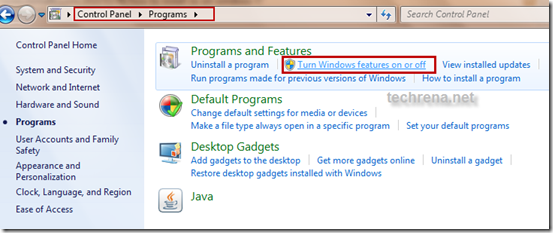
Step 3: In programs under Programs and Features you will find Turn Windows features on or off. Click on it. It will display the List of available Windows services.

Turn Windows features on or off

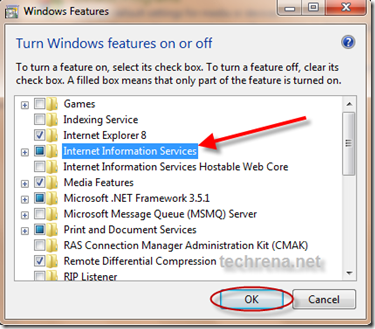
Step 4: Check the check box in Internet Information Services and Press OK. It may take some time to turn it on.

Windows features

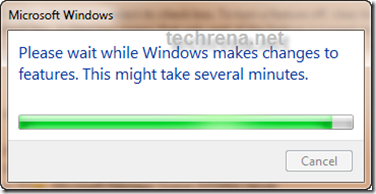
Changing Windows features

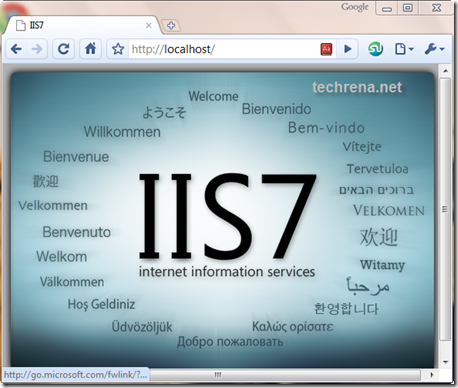
Now after successful installation Of IIS7 you can type http://localhost/ in your browser to check. It should display the IIS7 home page as shown below.

IIS7

Now as you have successfully installed IIS in your Windows you can start using the service.

Watch Oscars 2010 Online Live Streaming- The 82nd Annual Academy Awards

Oscras 2010 logo

82nd Annual Academy Awards, March 7th, 2010

Here comes the biggest event of Hollywood (or may be the biggest event of world cinema), March 7, 2010 brings yet another evening filled with the most wonderful actors & actresses around the globe, and the lovely Oscar Red carpet.

The 82nd annual academy awards ceremony is going to start in few hours at 3PM ET (6PM PT) at the Kodak Theatre in Hollywood, Los Angeles, California..The most interesting battle in this years Oscars event would be in the best picture category where 10 films are competing for the best movie made in 2009 (Avatar, The Blind Side, District 9, An Education, The Hurt Locker, Inglourious Basterds, Precious, A Serious Man, Up, Up in the Air).

And another category of interest is Best direction category (nominees: Avatar, The Hurt Locker, Inglourious Basterds, Up in the Air, Precious) where Avtar director James Cameroon and his ex-wife , Hurt Locker director Kathryn Bigelow are competing for the award.

Oscars 2010 awards

If you are way from home for some reasons, but don’t want to miss the live actions of Oscars 2010 and Oscars 2010 Red carpet online, here is the embedded player that broadcasts the event live (via livestreaming.com).

The live feeding will start from 6PM EST (3 PM PST) on March 7, 2010.You can also try the alternative links given below the player.

Watch LIVE Action- The Red Carpet Coverage:

Alternative Links:

Oscars official website Red Carpet live coverage (ABC) [Update: Link expired]

Livestream.com official Oscars live feed

Apart from these, AP is partnering with Facebook to bring live webcast to Facebook users.

MTV is doing their bit by spoofing the Oscars event.( I guess you may watch it during the breaks 🙂 )

Click Here to Subscribe to our RSS Feeds for Latest Updates