[Tip] Disable Startup Sound In Windows 7

To begin with, why would anyone want to disable the startup sound (also known as welcome sound) in Windows 7? Well, I don’t have an exact answer, but I’m sure somebody wants to do it just for the sake of experiment or just to learn how to do it. If you are bored of hearing the routine sound everyday when you start your PC, you might either want to disable the start up sound or you might want to change the soundtrack that Windows plays during startup. While we cover the changing start up sound part in another post, let us guide you through the details about how to disable (turn off) Windows startup tone in Windows 7.

Steps:

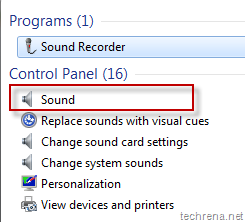
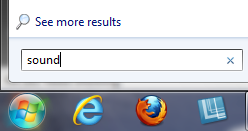
1. Go to start menu and type “Sound” in the search field.

sound_start_menu_search

2. Open “Sound” item from the results in “Control Panel” section.

sound_search_results_control_panel

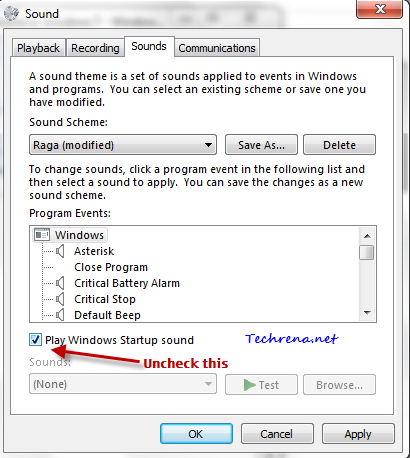
3. Go to “Sounds” tab in the sound settings window.

Sound in control panel

Uncheck against “Play Windows Startup sound”.

4. Click Apply and then click OK to close the settings window.

windows_startup_sound_disable

That is all you needed to do. Windows 7 startup music will no longer be played while booting your Windows 7 from now on. To enable the startup sound playback during the system boot again, just check against “Play Windows Startup sound” and save settings.

[How To] Turn Off Facebook Group Notifications

facebook logo

We have just covered a tutorial on how to get started with the Facebook revamped groups features. Even though they are good if we consider the fact that you will get notifications whenever a member of your group perform actions like someone ‘Adds you to a Group’, ‘Posts on the wall of one of your group’, ‘Makes you group admin’ etc. But if the group that you have joined has huge number of active users and this can generate too many annoying notification mails. If you want to get a way around to block all these annoying notifications from groups, follow this step-by-step guide:

Disable Notifications For Individual Groups:

1. Go to the group page for which you want to turnoff notifications.

2. Click “Edit Settings” button Edit settings of groupfound on the top left.

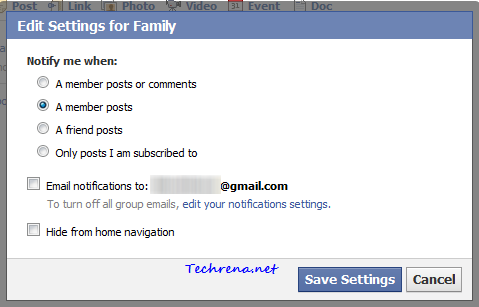
3. In the popup window, uncheck “Email notifications to:..” and click “Save Settings”.

Edit group settings

[You can also visit this groups notifications settings page to quickly disable settings for individual groups.]

This will stop all notifications being delivered to your email for that particular group.

Disable Notifications For All Groups:

If you think that you have had enough with the annoying notifications and want to disable all such notifications from all the groups for which you are a member, follow these instructions:

1. Go to this Facebook notifications page. (You can also get to this page via > Account> Account Settings and choose “Notifications’ tab.

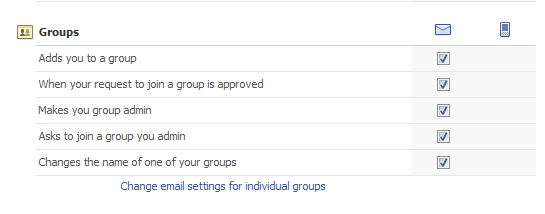
2. Under the groups section, you will find “Groups” section displaying all your current notification preferences.

Edit groups notification settings

Uncheck against all the options to completely disable notifications from all the groups you are part of.

That is it. You will no longer receive notifications from Facebook groups.

[Download] Security Update For Microsoft Silverlight KB978464

Microsoft Silverlight logo

Microsoft has issued the security update KB978464, dedicated to solve the issues with Microsoft Silverlight.

The update KB978464 contains the file “runtime\Silverlight.3.0.exe”. From this it can be said that the update actually is intended for the Microsoft Silverlight version 3. But the latest version of the product is Silverlight 4. You might need to check the version of Microsoft Silverlight installed on your computer. If you have the latest version on your computer, the update will fail to install saying “A newer version is already installed”.

Download the update from the link below to install it in case if you haven’t got the latest version of the Silverlight. This update has been released as part of the bulletin MS10-060 and applies for Microsoft Silverlight for Windows as well as for Macintosh computers(only for Mac OS X 10.4.11 (Leopard) or later versions running on an Intel-based Macintosh computer).

Supported Operating Systems: Mac OS X, Windows 7, Windows Vista, Windows X, Windows XP Service Pack 2, Windows Server 2008 & Server 2008 R2.

Download KB978464 (File Size: 4.7 MB)

[Tip] Find The Version Of Microsoft Silverlight Installed On Your Browser

Microsoft Silverlight is a web application framework developed by Microsoft. This framework is intended for developing interactive client side web applications. It gets installed as a browser plug-in and runs the applications that are developed using this Silverlight framework. It was initially introduced in 2006 as a competitor to Adobe Flash technology. Silverlight 3.0 was released in 2009 and the most recent version Silverlight 4.0 was released in early 2010.

Installing Silverlight is as necessary as to install Adobe Flash on your computer. Websites developed based on Microsoft Silverlight will not render properly. However Silverlight nowadays gets installed smoothly, many times you might not even have noticed that it was installed on your PC. However, it is always a good practice to be aware of the version of the Silverlight installed on your computer. You can do it in many ways, let’s see all the possible methods to check the version of Silverlight:

1. Checking Silverlight Version Online:

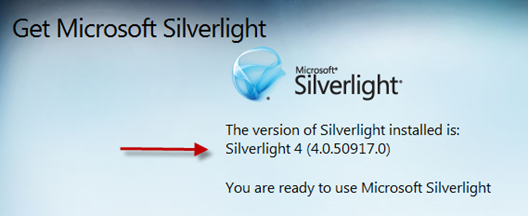
Point your browser to http://www.microsoft.com/getsilverlight, and wait a few seconds until the page shows the version of Silverlight installed as shown:

Silverlight version check web

As you can see, the page shows that I have Silverlight 4 (4.0.50917.0) installed on my computer.

2. Checking Through Registry Editor:

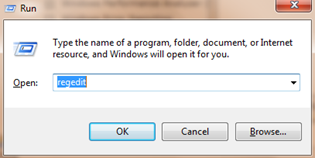
Press Start Button + R to open Windows Run too. Type “regedit” and press OK to open the Registry Editor.

regedit via run command

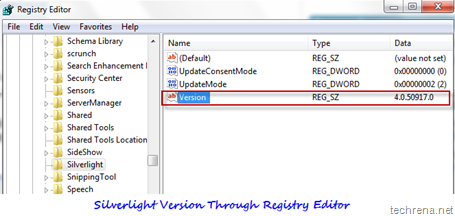
Go to

 HKEY_LOCAL_MACHINE> Software> Microsoft> Silverlight

and look for the entry “Version” on the left pane. Note down the data value shown against it. It is the version of the Microsoft Silverlight installed on your computer.

Silverlight version via regedit

As you can see, Registry Editor is also showing the version of the Silverlight as 4.0.50917.0, which is also the same as we got using the first (web) method.

3. From The Installation Folder:

Go to the folder where Silverlight got installed. Usually this will be located at:

C:> Program Files> Microsoft Silverlight

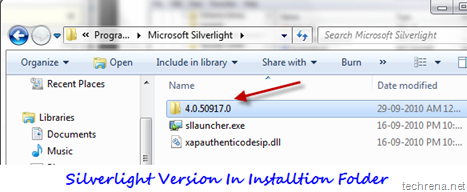
You will find a folder in this directory, whose name is the version of the Silverlight installed:

Silverlight version check through installtion folder

And again, as you can see the folder’s name is 4.0.50917.0, which once again confirmed that I indeed have the Silverlight version 4.0.50917.0 installed on my computer.

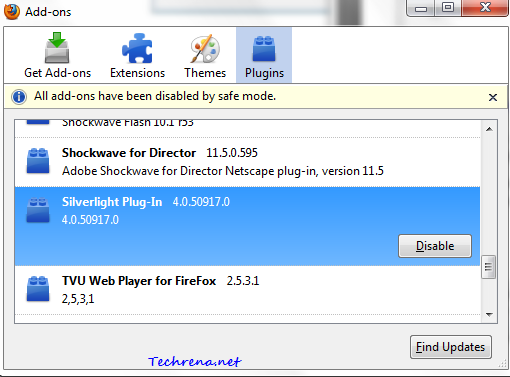
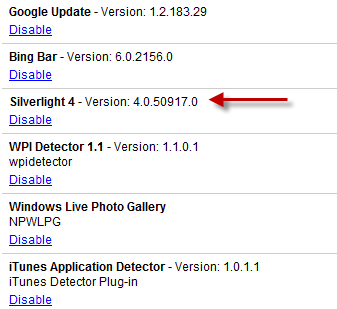
If you still need more ways to find out, you can check the version of the Silverlight installed under the browser plugins: (Firefox, Chrome..)

Firefox:

Go to Tools > Add-ons  and click “Plugins” tab.

Silverlight version installed through firefox

In Google Chrome:

Type about:plugins in the address bar to see all the plugins installed. Look for Silverlight entry in the list:

Silverlight version chrome

If you liked this post, you might also want to check the version of the .NET framework installed on your computer.

[How To] Getting Started With New Version Of Facebook Groups

facebook logo

Facebook has recently announced the revamped Facebook Groups feature, giving you more control over the group interactions that you would like to make. Suppose you are just back to home after a holiday and you want to share the wonderful photos that you had taken during your trip to your other members of the family via Facebook. Unfortunately whatever photos or other media you share was visible to your entire friends in Facebook. With the launch of new version of Facebook Groups, you can create groups for your family, club or work etc. Once you have created the groups, you can select content that you share to be visible to only a particular group of people. This is not exactly a new concept, something of this sorts already exists in Google’s Orkut. But with Facebook groups, users can make a group chat, email subscriptions for updates from the group, collaboration features etc.

Let’s see how to get started with Facebook groups:

1. To create a group, you can visit facebook.com/groups. Alternatively, you can find groups link on the left sidebar along with “Game Requests”, “Application Requests” etc.
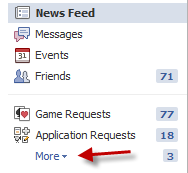
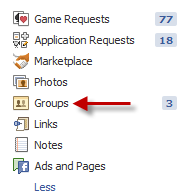
Facebook Groups link hiddenFacebook groups link in sidebar

2. Click on Create a group link to start creating a new group.

Create a Group link in Facebook

3. Give the new group a name (suggestions: Family, Work, Club etc.). You can add members from your friends list. Just type the name of the person that you want to add to the group, Facebook will automatically suggest people from your Facebook friends list who possess that name. You can add as many people as you can in the Members field.
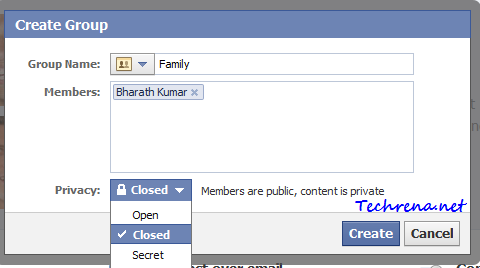
Create Facebook Group

And beneath the Members section, you will have “privacy” settings for your group. There would be three options to choose from: Open, Closed and Secret.

Open: If you set your group privacy setting to Open, it means that anyone on Facebook can view the Group and its content and can join the same. The group will also appear in search results.

Closed: If a group is set to “Closed” under privacy settings, it means that anyone in Facebook can view the name and members of that group but can’t view its content. Only members of the group will have access to its content. These groups can be found in Search results though (content will not appear in results).

Secret: Secret groups can’t be found in searches. And it’s absolutely invisible to non-members of the group. Non-members can’t even see the name of the group, its members list and of course the content as well.

By default, Privacy will be set to “Closed”. You can always change it to any of the above three options discussed.

Click on “Create” button to finish creating the group.

4. Now that you have created a group, go to the groups tab, click on the group that you have just created and click “Edit Admin Settings”.
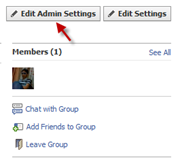
edit admin settings in facebook group

Basic Information:

You can now edit the basic information like Description and Email address for your group here:
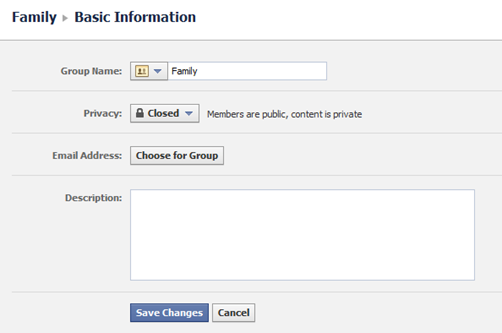
Basic information facebook group

If you want a special email address for your group, click on “Choose for Group” next to the “Email Address” tab, these email addresses end with @groups.facebook.com. You can choose an email address depending on the availability.
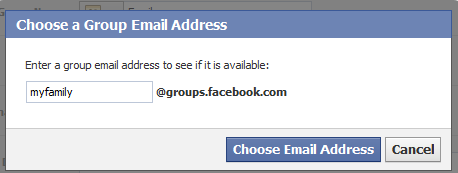
Choose group email address Facebook

Profile Picture:

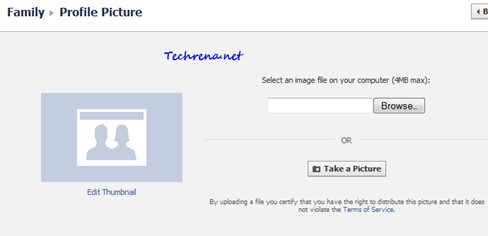
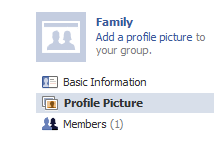
To add a profile picture to your group, click on the “Profile Picture” link on the left sidebar:
Facebook profile pic link

Profile Picture in facebook group

You can either upload a picture from your computer or take a new snapshot using your webcam.

Sharing Content:

You can share a text post, link, photo, video, event or a document with the members of your group. Go to the your group page and these options will be listed below the group name.Facebook content share with group

Group Chat:

group chat in facebook

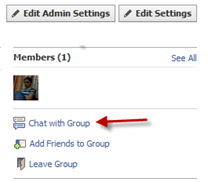
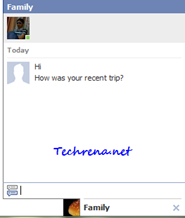
Clicking on “Chat with Group” option will let you chat with the members of the group.
Facebook group chat demo

Leave The Group:

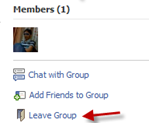
Finally if you want to unjoin from the group, just click “Leave Group” link that can be found under the group page.
Leave group link in Facebook

[Tip] Swap Stop And Refresh Button Position In IE9

IE9 beta logo

We have been covering a lot of articles about Internet Explorer 9 beta which is refreshingly new and offering seamless integration with Windows 7. In this post, we have come up with a tutorial on how to move the Stop and Refresh button to the left of the of the address bar in IE9.

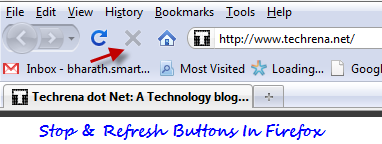
Internet Explorer until now used to show the Stop and Refresh buttons on the immediate right to the address bar. The same has been followed in IE9 as well. But Microsoft was smart this time and decided to give the users the flexibility of choosing the position of these button in their IE9. You might very well be knowing that Mozilla Firefox and Google Chrome does show these Stop and Refresh buttons towards the left of the address bar (immediate left before the address bar), as shown here:

Firefox:

stop and refresh in firefox

Chrome:

Refresh button in chrome

[In Google Chrome, you will only see either one of the Stop or Refresh buttons at any instant. While the page is loading, Stop button is shown and the Refresh button takes its place as soon as the page gets loaded completely.]

If you are an avid user of Firefox and Chrome and want these Stop And Refresh buttons in the same as way as in Firefox and Chrome, follow the instructions shown:

IE9 stop and refresh button intial position

Steps:

1. Open the Internet Explorer 9

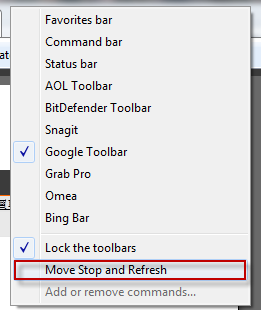
2. Right-click on the IE9 tab bar and choose “Move Stop and Refresh”.

Move stop and refresh in IE9

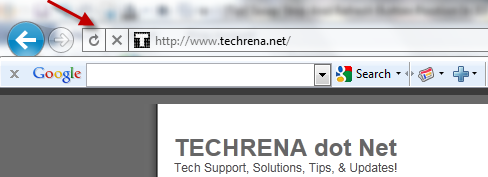
3. That is it! You can now see the Stop and Refresh buttons appearing towards the left of the address bar as shown:

stop and refresh right of the address bar in IE9

It’s that easy! For more tips on IE9 and Windows, subscribe to Techrena.net feeds via Email or follow @techrena or become a fan of Techrena.net at facebook.com/techrena.

[Download] DirectX 11 For Windows 7 & Vista

After releasing DirectX 10 for Windows Vista, Microsoft has released its successor DirectX 11 with Direct3D 11 keeping Windows 7 gamers in mind.

DirectX 11 for Windows 7

DirectX include the APIs like DirectDraw, DirectMusic, DirectPlay, DirectSound. The “X” in DirectX denote all these APIs. DirectX 11 (with Direct3D 11) for Windows 7 boasts of many feature improvements over its predecessor and promises to provide rich gaming experience for Windows users.

The new features in DirectX 11 include:

>> Tessellation: Tessellation in simple terms is like tiling of a plane. With tessellation, higher dimensions images etc. are possible. This is implemented on the GPU.
>> Multi-Threading: With the help of Multi-threading in DirectX 11, developers can take the full advantage of the power of multi-core processors.

>> DirectComputer: This feature besides from improving graphics, can also improve the day-to-day tasks that the users accomplish on their PCs like video editing using Windows Movie Maker in Windows 7 etc.

Although Windows 7 will not have any compatibility issues with games that use older versions of DirectX (like DirectX 9 or DirectX 10 etc.), the new features in DirectX 11 will appeal to the PC gamers a lot.  If you are looking for DirectX 11 based cards from the graphics manufactures, you can visit the links for: ATI DirectX 11 & nVidia DirectX 11. Find the download links for DirectX 11 (DirectX2D 11) for Windows 7 and Windows Vista below.

Download Direct3D 11:

Windows 7 Direct3D 11 (DirectX 11) Web Installer

DirectX 11 SDK

[Tip] Change The Registered Owner And Organization Name in Windows 7

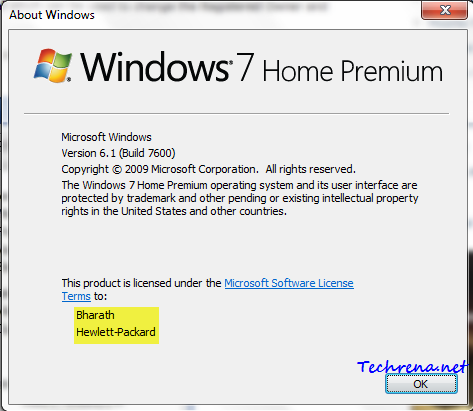
When you are installing Windows 7 or Windows Vista, you will be prompted to enter your name and your organization name during the setup. Once you have given that, the Windows will be registered on the names that you had provided during the Windows initial setup. To see the current Windows owner name and organization name according to Windows, type “Winver” in the Start Menu and launch the windowsver.exe program.

Winver from start menu programs

About Windows

As you can see in the above screenshot, my Windows has been registered with my name and the Organization name (manufacturer name here).

This will show up even when you open any native Windows application and click “About”. For example, “About Notepad” from the Notepad application also will lead to the same window as shown above.

Unfortunately, Windows 7 or Vista do not provide a native support to change this data after the installation process. But then, we have the pretty useful Registry Editor , through which we can tweak this to whatever we like. Follow the steps written below carefully to to perform this editing.

Warning: As always, working with Registry Editor can be extremely dangerous. Do make a backup of the registry . Even a small mistake can lead to utter disorder of the OS.

Steps:

1. Press Start + R and type “regedit” in the text filed and press OK. Accept the User Account Control (UAC) prompt and proceed to the next step.

regedit run command

2. Navigate to the following path in the Registry Editor:

HKEY_LOCAL_MACHINE> SOFTWARE> Microsoft> Windows NT>  CurrenVersion

Reg_key_win_owner_name

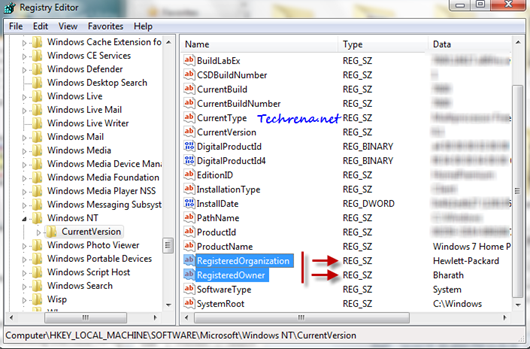
3. Find two registry key entries “RegisteredOrganization”, “RegisteredOwner” in the left pane (see the screenshot below).

regedit owner and organization

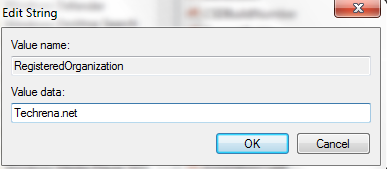
4. Change the data values against “RegisteredOrganization” and “”RegisteredOwner”  to whatever you like:

Edit owner and registered owner info

That is it. You can again open the Winver command to see if the change has happened.

[Tip] Change Default Action For The Power Button In Windows 7

change power button action

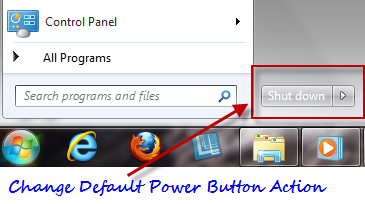
In Windows 7 and Windows Vista, when you open the start menu, you can find the power button being displayed at the bottom of the start menu. This has been placed at the similar position where you find “Log Off” and “Turn off Computer” buttons in Windows XP. By default this power button will have “Shit down” option for Windows 7 and “Sleep” option in case of Windows Vista. But according to your usage and need, you can change the default action for this power button. This article explains you how to change the default action for this power button, with reference to Windows 7 (also works on Windows Vista).

Steps:

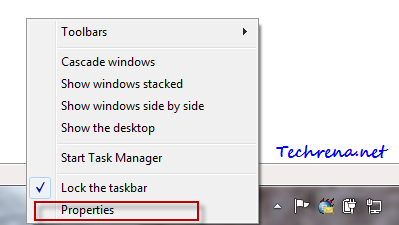
1. Right click on the Task bar and choose “Properties”.

taskbar and start menu properties link in right-click

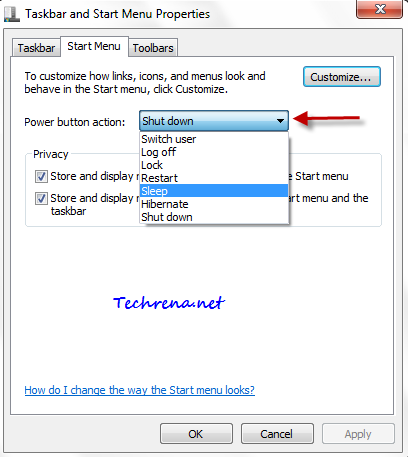
2. Click on “Start Menu” tab in the Taskbar and Start Menu Properties Window

Start menu tab in taskbar and start menu properties

3. Choose your desired action for the power button from the dropdown menu. You can choose an action from the following:

Shut down, Switch User, Log Off, Lock, Restart, Hibernate

Power button action in start menu properties

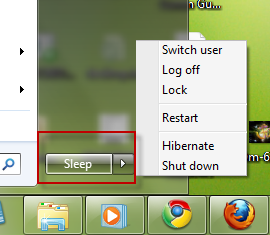
4. Click on “Apply” to save the settings and click “OK” to close the window. Go and check back the Start Menu, the action for the power button should have changed to what you chose in the previous step.

Power button action

[Tip] Prevent Programs From Changing Default Search Engine In IE9

IE9 beta logo

Once you have set a default search engine in your browser, it should remain as it is, right ? But it’s not always like that some programs can easily change your default search engine in your default browser just by adding some keys to your windows registry. It has always been a big problem. Imagine like you install a program like Yahoo Messenger (changes default search engine to Yahoo) or Windows Live Essentials (changes default search to Bing), are just examples of such programs. Even though many of these programs do prompt you when they are going to change your browser (Internet Explorer here), we can hardly notice it as it’ll be asked during the program installation and most of the time we does this in a hurry without exploring all the options provided during the installation.

In this post, I’m going to guide you about how to prevent programs from changing your default search engine in case of the Internet Explorer 9.

1. Open the Internet Explorer.

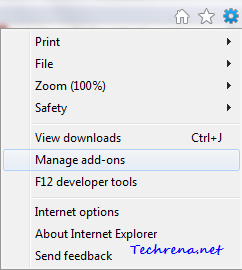
2. Click  on Tools icontools in IE(Found on the top right corner of the window).

3. Select “Manage add-ons” from the menu items.

Tools menu IE9

Alternative you can access the same settings from the “Tools” sections in the IE9 menu bar.

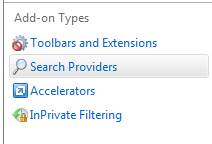
4. In the Manage Add-ons window, click “Search Providers” in the left pane.

Manage addons in IE9 left pane

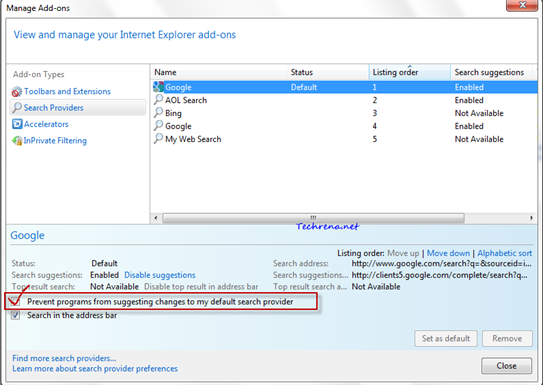
5. Select your default search engine (Google in my case), you will find an option “Prevent programs from suggesting changes to my default search provider”. Check against it and close the window.

Manage Search Providers in Manager Add-ons IE9

That is it. Now your default search engine in IE9 (& IE8) can’t be changed by any program. You might also want to read how to change the address bar search provider in Firefox.