[Tip] Enable HTTPS In Twitter

Twitter logo

Enabling and using HTTPS mode for websites that require logins is pretty much important particularly if you are accessing the internet via unsecured public Wi-Fi connections.  Understanding how important it is for users to use HTTPS, we have earlier covered several articles explaining how to enable HTTPS mode for Facebook and Gmail. Now it is Twitter’s turn. Twitter has just added an option to enable HTTPS mode for everyone who uses the site. Until now, to use HTTPS on Twitter, users had to visit https://twitter.com/ manually. Thankfully it’s automated now with a simple option. Let’s get into details about how to turn on the secure HTTPS mode for your Twitter account.

Steps:

1. Login to your Twitter account and click on the “Settings” which can be found by clicking on the dropdown arrow next to your account name (if you are using the new Twitter). You may also use the direct Twitter account settings page link to get onto the page.
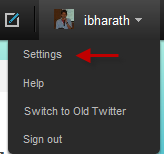
Twitter settings link

2. Scroll down to the bottom of the page and locate the HTTPS settings:

Twitter-https

Check against “Always use HTTPS” and click Save button
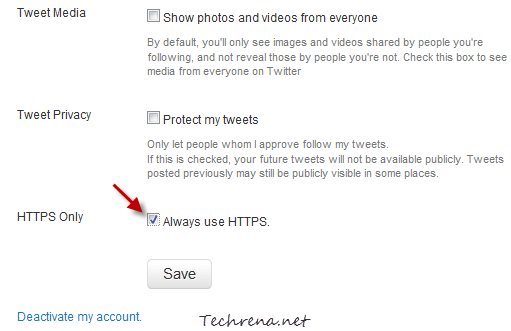
Twitter https settings

That is it. You have now enabled the HTTPS mode for your account. Twitter from now on, will send and receive data from its servers using secure HTTPS. So now you can just use Twitter on any public Wi-Fi hotspots without worrying much about eavesdroppers. If you are using Twitter app on iPhone and iPad, this has already been enabled for you so you do not need to adjust this setting.

Don’t forget to follows us at @techrena (even better if you follow me @ibharath !)

Download Internet Explorer 9 Final Now

IE9 logo

Microsoft’s Internet Explorer 9 has moved out of beta and the final version is now available for download for Windows 7 and Windows Vista based computers. Internet Explorer 9 looks sleek with minimalistic design, no toolbars, without any toolbars. As we have covered earlier, there is no search bar in IE9 and it has been integrated to the address bar adopting the popular move that was earlier taken by Google Chrome. Changing the default search engine in IE9 is quite easy as well. All you have to do is enter your search query and choose the search engines that have added to IE9.

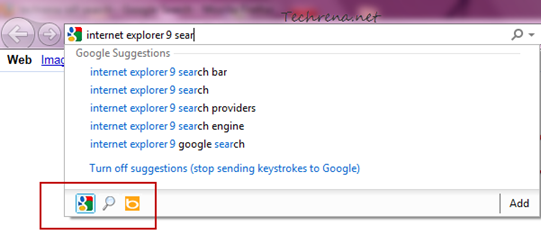
IE9 Search Engine address bar

When it comes to speed, IE9 is neck-to-neck with Google Chrome 10 (without considering Firefox 4, equations may change when the final version of Firefox 4 releases). New tab page in IE9 has also been revamped to show most frequently sites along with their favicons and the frequency of visit to them. What’s more? If you use Windows Phone 7, you will soon have hands on mobile version of IE9 on your device.


Download IE9 Final:

Windows IE9 download

The final version of IE9, Internet Explorer 9 RTM (build number 9.00.8112.16421.110308-0330) is available for public download for Windows 7 and Vista and Windows Server 2008 R2. However, IE9 is not available for Windows XP users as Microsoft chose not to develop Windows XP version of the IE9. Find the direct download links for the standalone offline installer of IE9 after the break.


Windows 7 (32-bit) (17.3 MB)

Windows 7 (64-bit) (34.7 MB)

Windows Vista (32-bit) (17.2 MB)

Windows Vista (64-bit) (34.5 MB)

IE9 Product Guide (PDF – 28 MB)

[Tip] Enable Gmail Smart Labels

Gmail smart labels

Gmail has just added new “Smart Labels” feature to its labs section that helps you to ‘classify’ and ‘organize’ your email messages. Gmail users already have features like ‘filters’, ‘labels’ and ‘Priority Inbox’ (launched last year).

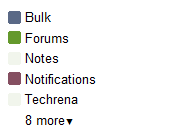
Smart Labels works this way: Smart Labels automatically organizes your mail into Bulk, Notification and Forum messages (labeled as ‘Bulk’, ‘Notifications’, ‘Forums’ respectively). All the newsletters and other promotional messages would under the ‘Bulk’ label. All your social networking notifications, credit card statements etc. would go with the ‘Notifications’ label and finally all the email messages coming from online groups or forums that you have joined would go with the ‘Forums’ label.

Enable Smart Labels In Gmail:

Smart Labels is available as Gmail Labs feature. To enable this for your Gmail account, go to Mail Settings > Labs, locate “SmartLabels” and choose “Enable” radio button against it. Click “Save Changes” button to save your settings.

You should now see the new labels in your inbox.

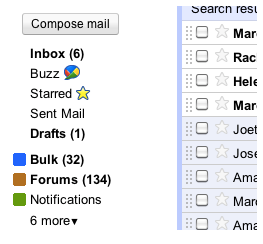
Gmail smart labels inside inbox

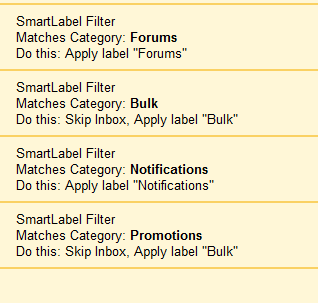
If you have been using Gmail filters, you must find really easy to edit these new Smart Labels as well. To edit any of the Smart Labels (Bulk, Forums or Notifications), just visit “Filters” tab under your Gmail settings and you can edit these labels as you do with usual filters.

Gmail Smart Labels in filters

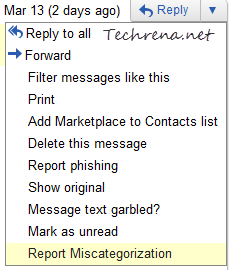
In case you feel any email message is wrongly labeled, you can report it by hitting the dropdown menu next to the message and choosing “Report Miscategorization”.

Miscategorization Smart labels

Search Subtitles Faster With TinySubs

TinySubs realtime search

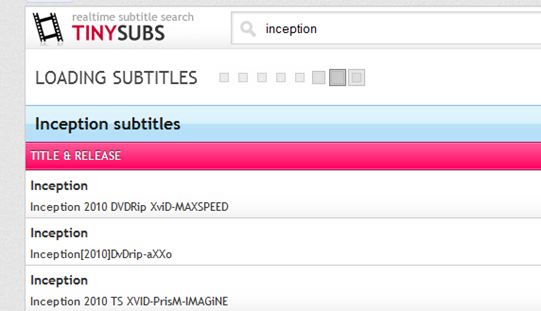
If you are searching for a subtitles to watch a a foreign language film and still not able to find it, try TinySubs.com next time, it should do the work for you. TinySubs.com is a dedicated search engine for subtitles and  fetches the results in realtime. But TinySubs doesn’t host any files on its serves, it only searches for the subtitles from the host sites.

TinySubs screenshot

The usage is simple as you do with most other search engine, just enter the name of the movie to be searched, choose the language and hit enter. You should now be presented with the results listing all the subtitles it found with details including the actual site where the subtitle files are hosted, the language of the subs and whether they are “1-CD versions” or “2-CD versions”.

To try the real-time subtitles search, visit TinySubs.com

For quicker access, you can also try the TinySubs add-on for Firefox.

Found via LifeHacker

[Download] Adobe Flash Player 10.3 Beta

Flash-logo

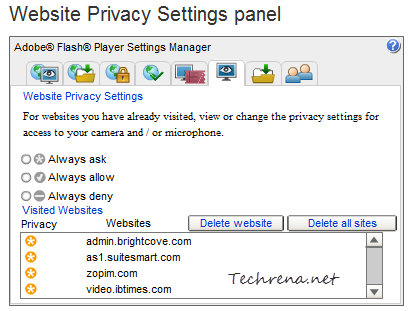
Adobe has just released the Adobe Flash Player 10.3 Beta with the addition of few features that have been sought for long time by users. Flash 10.3 beta is coming with settings related to changing your privacy, flash storage etc. The new version also brings the native integration of Flash native control panel with that of Mac’s System Preferences and Control Panel in Windows 7. Until now users had no option to delete their flash storage (also known as flash cookies) data using their browser. They had to either visit Adobe online Settings Manager or use some third party software.

Adobe Flash Website Privacy Settings Panel

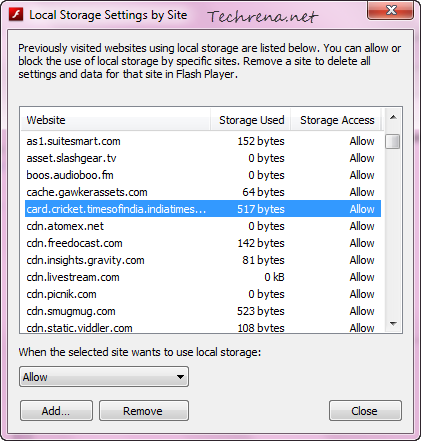
But starting from Flash Player 10.3, users can access the Flash local storage within their web browser (It’ll be first available for Firefox 4 users followed by IE8 and finally to Safari and Chrome users).

Adobe Flash Local Storage Settings

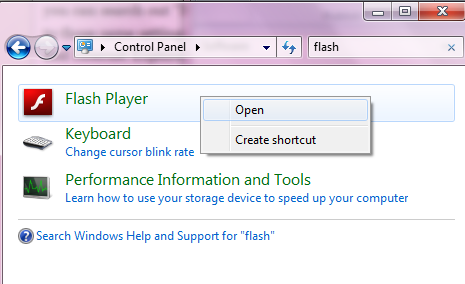
Another new feature that is bundled with Flash Player 10.3 is the introduction of Native Control Panel for Windows, Mac and Linux. You can find the Flash Player settings right from the Control Panel in Windows 7 or System Preferences in Mac OS X (search for “flash” for the settings) :


Flash Player control panel

Other improvements include auto-update notification for Mac OS, “Acoustic Echo Cancellation” for developers to improve communication in Flash Player.

I can’t see all the new features listed in the release notes being implemented in most of the browsers as now. But we can expect Adobe to roll out them very soon. If you are using Flash Player 10.2 or earlier versions, you can now download the Adobe Flash Player 10.3 beta from the following direct links:

Direct Download Links:

Active-x for Internet Explorer in Windows (3 MB)

Plug-in for other browsers (2.9 MB)

Plug-in for Mac OS X (6.1 MB)

Plug-in for Linux (5.3 MB)


You might also want to learn how to install these beta versions of Adobe Flash Player in Google Chrome by reading: Make Google Chrome to Use Flash Player 10.2 (works well for 10.3 as well).

[Download] Firefox 4 RC Now

Firefox 4 RC

After releasing numerous minor beta releases of Firefox 4, Mozilla has now officially released the Firefox 4 first Release Candidate (RC1) version which is now available for download. Firefox 4 RC1 will have all the features that have been previously included in the beta releases of Firefox 4 like fresh new UI, Firefox button, app tabs, Firefox Sync, hardware accelerated graphics (Windows and Mac), multitouch support (Windows 7 only), JägerMonkey JavaScript engine etc.. Firefox 4 is said to be more than six times faster than the previous releases (Learn more about Firefox 4 RC features here).

Firefox 4 RC screenshot

While we wait for the official release notes for Firefox 4 RC, you may hit the following direct links to download the Firefox 4 Release Candidate 1 installer for your computer (Windows / Mac / Linux).

Firefox 4 RC Direct Download Links:

Windows [12 MB]

Mac OS X [26.8 MB]

Linux [13.2 MB]


You can also try this tip to install both Firefox 3 and Firefox 4 on the same computer.

[Tip] Get Rid Of The Ask Toolbar

Ask toolbar

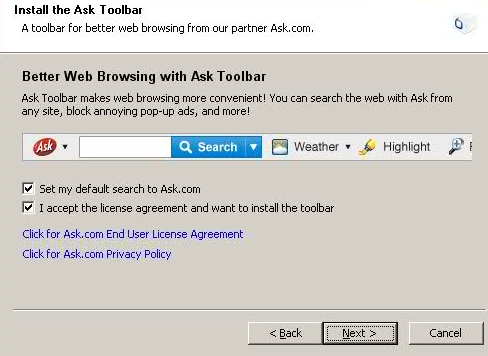
Ask.com, the popular search engine distributes a browser toolbar to make it easier for users to access features of the search engine by integrating it to the browser. But the Ask toolbar is often criticized as it bundles with many freeware and gets installed in your system without you even having a clue about when it got into your computer. It is often bundled with freeware that we install daily and the toolbar setup would normally appear during the installation phase when most of the users don’t pay much attention as they just want to get done with the installation of the software.

Ask toolbar install

And that is it, the toolbar comes and sits on the top of your browser (mostly in the Internet Explorer). It could even get worse because of the fact that Ask toolbar once installed, it also changes the homepage and default search engine( of course, to Ask.com and Ask search respectively).

This could be very annoying to many users who don’t use the Ask search engine as they are now forced to use the Ask as their default search engine for everything you search on the browser and not just that, the presence of the Ask toolbar can make your browser (Internet Explorer, Firefox or any other browser) much slower. If you are deliberate to get rid of the infamous Ask toolbar, follow the steps mentioned in this tutorial.

You can remove the Ask toolbar in many possible ways.

#1 Uninstalling Right From The Browser:

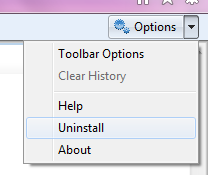
This is the simples of all the available options to remove the toolbar. Just click on the “Options” dropdown button menu in the Internet Explorer and you will see an option to uninstall it as shown:

Ask toolbar uninstall option

#2 Uninstalling From The Control Panel:

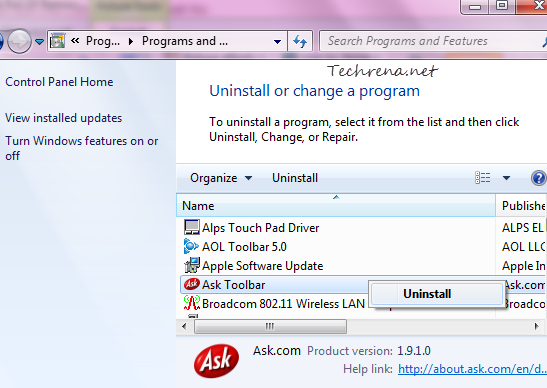
Ask toolbar control panel uninstall

You can also uninstall the Ask toolbar in the more traditional way like you do in the case of most other software. Go to Control Panel > Programs > Programs and Features, locate the Ask toolbar in the list and double-click on it to uninstall the toolbar.

#3 Using Ask Toolbar Remover

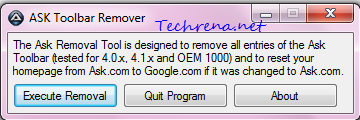
While the above two methods can do the trick for you without needing to install any other program, you may also install small third-party software called “Ask Toolbar Remover” to achieve the desired result. Just download the program from the link added below and click “Execute Removal” and it will do the work for you.

Ask Toolbar Remover

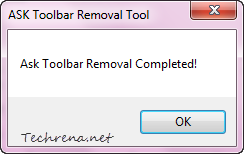
Ask Toolbar removal tool operation

Download Ask Toolbar Remover

[How To] Enable Sharing Files And Folders In Windows 7


Windows 7

Well most of us are aware how to enable network files and folder sharing in Windows XP. It was comparatively easier in Windows XP performing this procedure. Windows 7 has more secure features with network user groups, password protected sharing etc.

Sharing Folders and Files in Windows has been very useful where you can access files in some other computer in the same network. Another advantage is the data transfer rate is very much higher than other connections like USB. In a wired LAN the speed has reached 1Gbps. With these speeds you can transfer data quite faster than before.

The process of sharing folders and files is as follows:

Step 1:

Go to the Control Panel location given below. You can copy and paste it in your address bar.

Control Panel\Network and Internet\Network and Sharing Center\Advanced sharing settings

network and sharing center

Step 2:

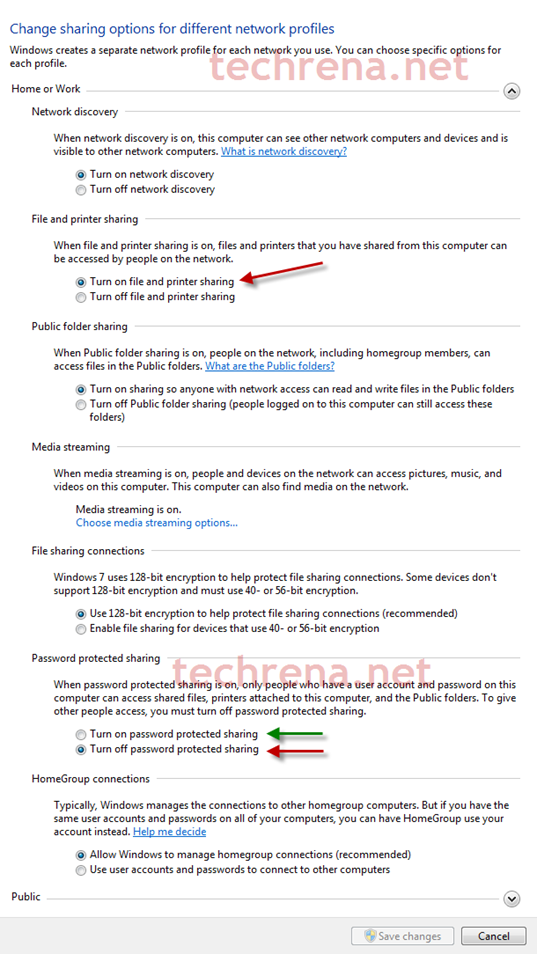
Select the specific group profile you want to share your files with. For example I have selected Home. Change the settings as shown in the picture below and save the changes.

network and sharing advance settings

For the password protected sharing, you can select any. If you select Password protect on, you need to use our username and password to access the files.

Step 4:

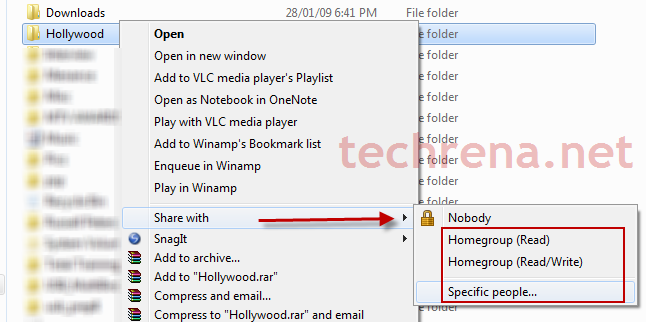
Now go to the folder you want to share, right click on it and select Share with. You can select the people you want to share.

share a folder to share

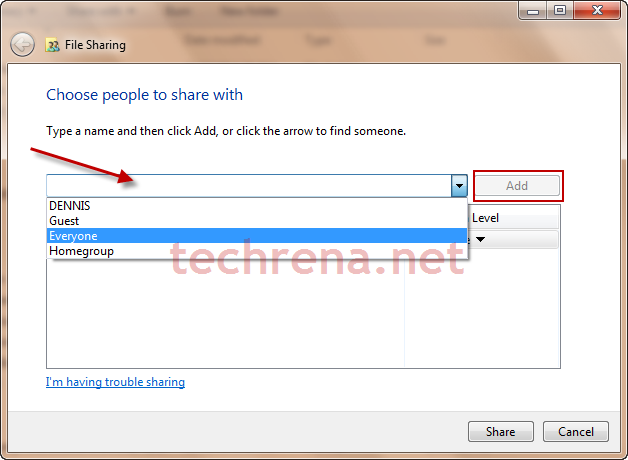
If you select Specific people, you need to select and add the Computer Name.

file sharing

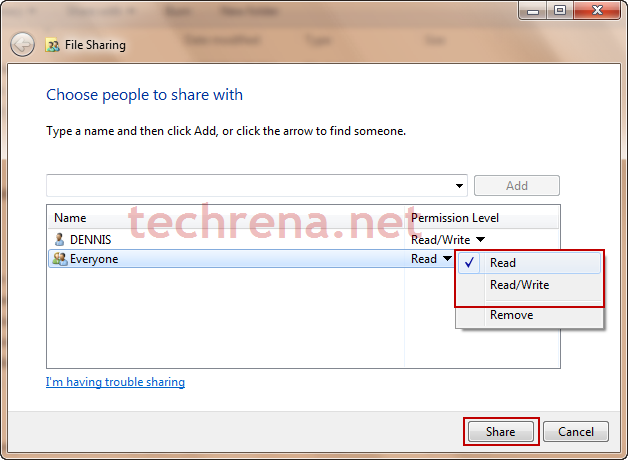
You can also change the Permissions for the people who wants to access your folder.

file sharing permissions

Step 5:

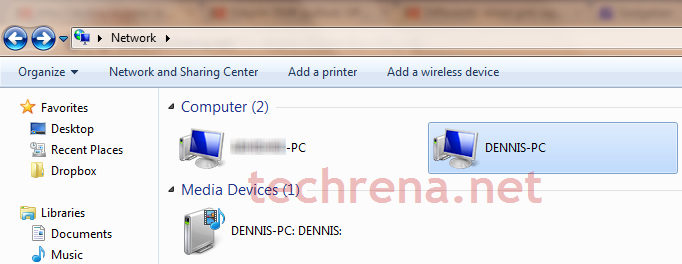
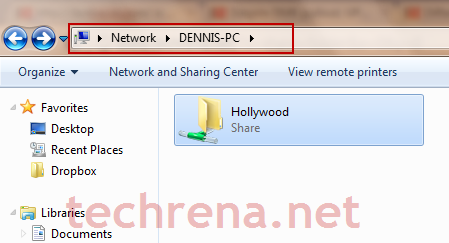
Now you can check in the computer who wants to access your files. Go to Computer->Network. Your computer name should be visible.

network discovery

Open your computer name and the folder(s) you shared should be visible. Now you can perform what you want according to the permission you have given.

open system in a network

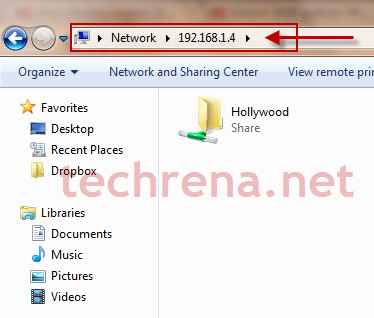
If you can’t find your computer name in the Network, you can use your IP address to access the files.

You should know your IP to perform this. For example, type: \\192.168.1.4 in the address bar.  That is my IP. Your IP will be different. See the Notes below to view your IP.

use ip to open network computer

Now the sharing has been completed and the data can be shared.

Important Notes:

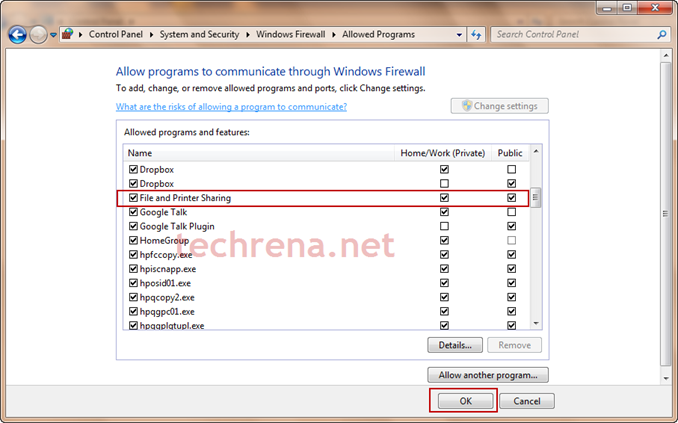
1. Firewall. If you have Windows Firewall enabled you should have allowed File and printer sharing. To allow, go to: Control Panel\System and Security\Windows Firewall\Allowed Programs

Check the File and Printer sharing Check Box.

file and printer sharing firewall

If you have a third party Firewall installed, you need to check these settings there.

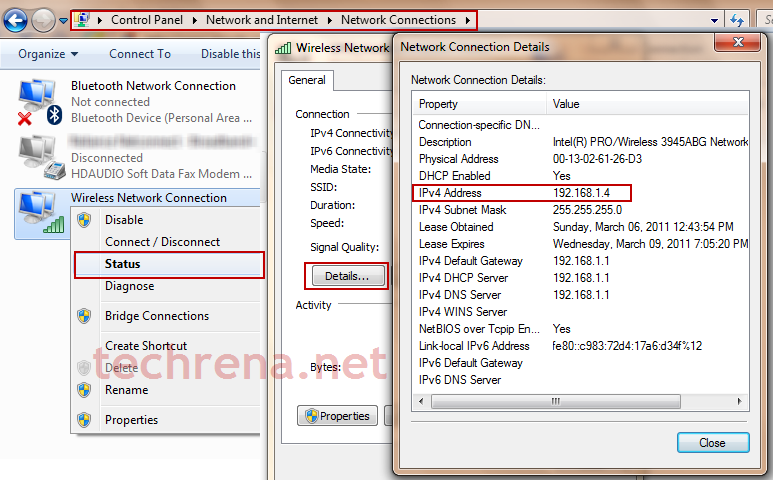
2. IP Address. To find out your IP Address, please go to this location:

Control Panel\Network and Internet\Network Connections. Right click on the Adapter you are using for sharing. Select Status. Then go to Details.

view ip address

If the Host and the Client does not have a same Level of IP and profile, you may no be able to access each other. To change the IP Address Follow: Change IP Address of Your Network Adapters in Windows 7.

The IE6 Countdown

IE6 dead

It’s the father of all the modern day browsers. It’s the one that most of us had used one time or the other. It’s the one that has stood as a synonym to “Internet” in the minds of the internet users. Not a very hard one to guess, Yes, it is the Internet Explorer 6 (or IE6 as they call it).

Even though how good it was in the olden days, we must all agree that the days of IE6 are over. We had earlier covered in a post about a design firm based in Denver conducting funeral for the IE6 by launching a website dedicated for the same. Now Microsoft, the company which developed the IE6 has taken the initiative kill its own product. This could well be the last nail the IE’6’s coffin.

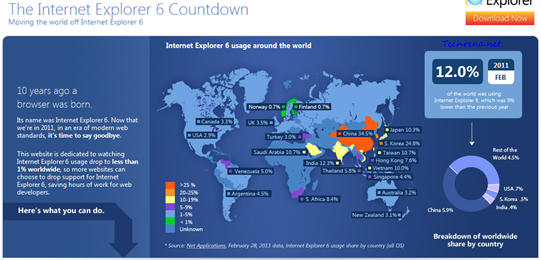
Microsoft has launched a website IE6countdown.com with the aim of “watching Internet Explorer 6 usage drop to less than 1% worldwide”. The Redmond company has no issues is saying that “It’s time to say goodbye” for what has been a 10-year long journey for IE6. The company also advises users to not to let their friends and acquaintances use Internet Explorer 6.

IE6 countdown

Microsoft has also published a worldwide usage map of Internet Explorer 6 and it is stupefying to know that IE6 still has a total share of 12% around the globe. Even though most of the countries could drop their IE usage to a reasonable level of below 5%, the issue is with the Asian countries. As you can see, China tops the IE6 users with a staggering 34.5% usage followed by South Korea with 24.8%. Finland and Norway are the only countries with less than 1% of IE6 usage.

This is a good initiative from Microsoft and we at Techrena.net, do support the initiative to the fullest. We urge our readers not to use IE6 ever and not to let others use it. Please take your time to explain if you find someone at internet cafes or homes using the age old browser on their PCs. Visit the IE6 countdown site to learn more.

Using Google Recipe Search Feature

Google search recipes left-hand panel

Are you having hard time trying to figure out the best recipe that could be cooked with the available items in your kitchen and within limited amount of time to serve your guests who came for a visit to your home? Wish you had a magic wand in your hands? Well, here is it! May not be a wand but just the right tool which could help you in preparing your recipes, the tool is ‘Google Recipe View’, a new search feature currently available for the users in the United States and Japan. Google’s Recipe view is a new search filter that has been added to the existing filters on the left-hand panel.

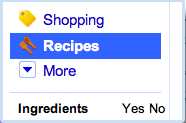
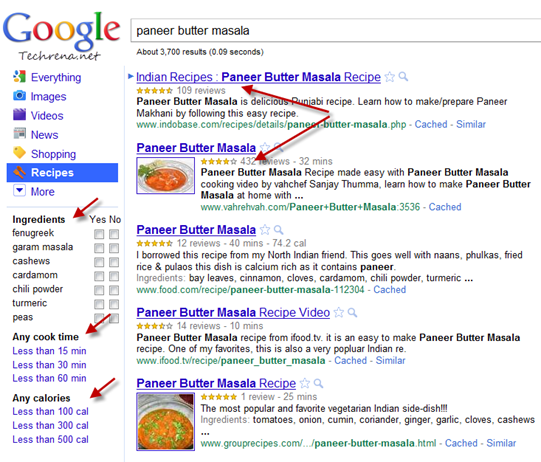
To use this feature, go to Google.com, (Google.com/ncr for users located outside the US and Japan) and type a recipe for which you want to get the information hit the search button and then click on the “Recipes” link in the left-hand panel. You will immediately get the results for the concerned recipe along with ratings so that you make you decide on which one to go for.

Google recipe search results

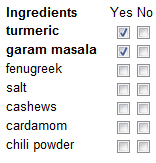
Closely look at the options in the left-hand panel in the results. You can narrow down the recipe search results by choosing the ingredients that you want to include or exclude:

Google Recipe search ingredients

And if you are in rush for time, you can also get the recipe results that help you to cook the recipe in quick time:

Cook time filter in Google recipe search

You might also keep an eye on the amount of the calories that your recipe would serve to your guests. Fortunately there are filters available to narrow down your recipe search results based on the calorie count as well :

Calories filter google recipe search results

Give it a try, I’m sure you will find this pretty useful. Non-US and Non-Japan users can also get try the direct Google Recipe View landing page.

[via] Official Google blog