[Download] Windows 7 Update KB979538

Microsoft has just released a new update KB979538 to address issues with Windows 7 while using a USB video device. The issue may include unexpected shutdowns or bluescreens while using the USB video device.

KB979538

The issues with USB video devices arise because of a race condition in the USB Video driver when the device is unloaded. If you didn’t know, Microsoft had already released a Hotfix to solve the issue for those Windows 7 machines that were severely affected by the issue. But now Microsoft has decided to release a software update that can be applied to all the Windows 7 machines irrespective of the issue with the USB Video device being small or severe.

Find the download link below to download the Windows update file called “Windows6.1-KB979538-x86.msu”, 336 KB in size. Restart the computer after installing this update.

Download KB979538

Disable Internet Explorer First Run Welcome Screen Pop Up

When you install Internet Explorer 8 or IE9 and launch it for the first time (or even when you reset the settings), you might have noticed the Set Up Windows Internet Explorer 8 (applies to Internet Explorer 9 as well) screen (Tour and RunOnce) appears asking you to go through a few steps to change the configuration of the search and accelerator settings.
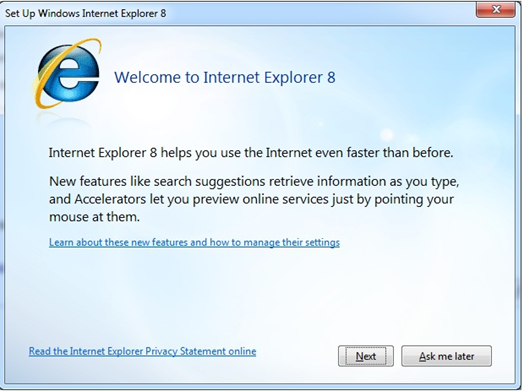
IE8 Set Up Welcome Screen

You might not want to see this popup every time you install IE (IE8 or IE9) or reset settings in IE. Unfortunately Microsoft hasn’t made it easier to disable this initial set up. However there are workarounds to achieve the same.

In this post, I’ll discuss about different methods to disable this initial set up popup:

Method-1: Using Group Policy Editor:

If you are using Professional, Ultimate or Enterprise versions of Windows 7 or Vista, you can tweak Group Policy Editor (gpedit) to disable the initial set up for Internet Explorer 8/9.

1. Press Start button + R and type “gpedit.msc” in the text field and press Enter to launch the Group Policy Editor.

2. In the left pane, expand User Configuration, then find and expand Administrative Templates, next find Windows Components under it and expand it. Then finally find “Internet Explorer”, click on it.

So the path would be: User Configuration> Administrative Templates> Windows Components> Internet Explorer

4. On the right pane, find “Prevent performance of First Run Customize settings” and double click on it. A new settings window will open up.
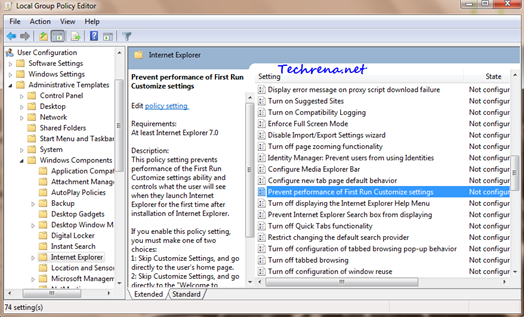
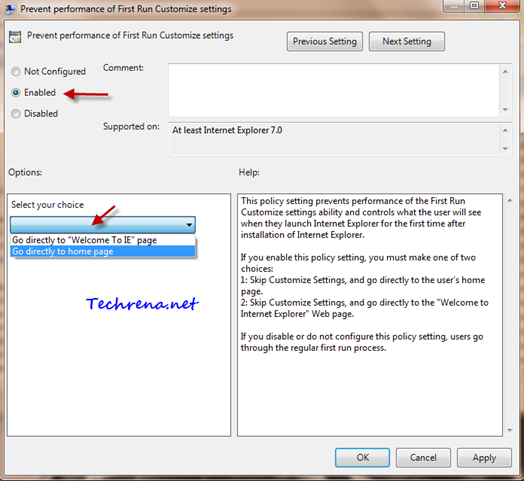
IE settings in GPEDIT

Prevent Performance of First Run Customize settings

5. Set the value to “Enabled” and then go for the options section. You will have two options from the dropdown menu:

i. Go directly to “Welcome To IE” page

ii. Go directly to home page

Select the first option (i) to skip the IE first run Customize Settings and go directly to your home page.

Select the second option (ii) to skip the IE first run Customize Settings and and go to the “Welcome to Internet Explorer” page directly.

6. Click Apply to save the settings then click OK and close the Group Policy Editor window.

Method-2: Using Registry Editor:

Warning: Using Registry Editor to modify Registry settings without much knowledge is deemed dangerous as it may cause some serious problems. Proceed to the Registry Editor at your own risk.

1. Press Start button + R to open run command dialog box. Type “regedit” and press OK to open the Registry Editor.

2. Before we work further, save a backup of the Registry Editor. Go to File > Export and save the .reg somewhere on your Hard disk or USB disk drive.

3. Navigate to the following path carefully in the Registry Editor:

HKEY_LOCAL_MACHINE\>Software\>Policies\>Microsoft\>Internet Explorer\>Main

4. Right click on the right pane and select New > DWORD (32-bit) Value.
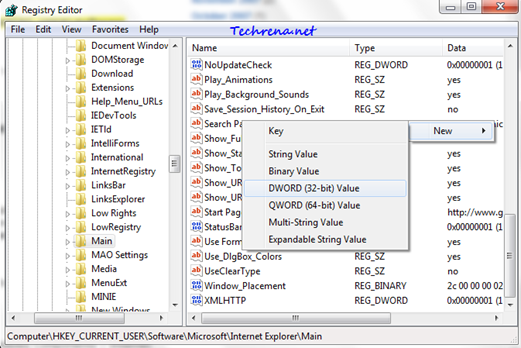
IE8 regedit

5. Give it a value DisableFirstRunCustomize as shown:

DisableFirstRunCustomize

6. Now right-click on it and choose “Modify”.

DisableFirstRunCustomize modify

7. Modify its DWORD (32-bit) Value to “1” from “0” and click OK.
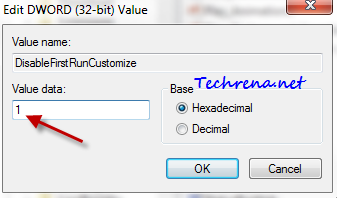
DisableFirstRunCustomize edit DWORD

8.Exit the Registry Editor.

Note: If you follow the Group Policy Editor method, the settings will be applied to all the users accounts, where as if you follow the Registry Editor method, the settings will effect only the currently logged in user account.

WordPress.com To Be The New Blogging Platform For Windows Live Users

Windows_Live_WordPress

So here is some big news, Windows Live Spaces is dead ! All the Windows Live Spaces users (bloggers) will now be shifted to the WordPress.com, which is going to be the default blogging platform for all Windows Live users.

This was announced by Dharmesh Mehta, Director of the Windows Live Product Management at the TechCrunch Disrupt.

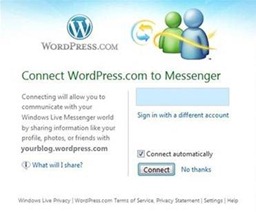
All the existing users need to upgrade their current Windows Live Spaces blogs (there are 30 million of them !) to WordPress.com. This collaboration means that you can use Messenger Connect, to share your blog content with friends over Windows Messenger, each new post will be sent via notification to your friends in Windows Messenger.

WordPress and Windows Live Messenger

The migration may be a bit tricky as it changes your current URL and redirects it to the new WordPress.com URL (there won’t be significant traffic loss though). You can start the migrating process right now at the moment by visiting your Live Space blog. For more information about, read the official post from Windows Live Blog.

[Tip] Change The Default Menu Bar Position In Internet Explorer

Internet explorer logo

If you are using Internet Explorer 7, 8 or even the latest IE9 beta, you might have noticed the change in position of the menu bar from IE or even from other browsers like Firefox, which shows the menu bar above the address bar. Of course, even though there’s no harm when the menu bar is at the top or beneath the address bar, but given the fact that you might have been accustomed to using it at the top. Here we have come up with a small tweak involving registry editor, which can change the position of menu bar in the Internet Explorer.

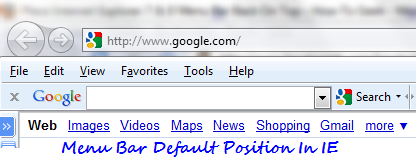
Default menu bar position in IE:

menu bar position in IE

As you can see the menu bar is located beneath the address bar (location bar) in the Internet Explorer. Follow the steps mentioned below to change its position:

Steps:

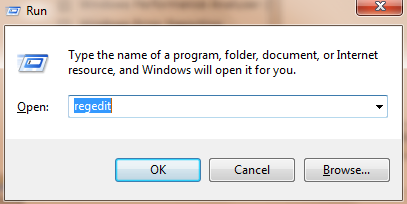
1. Press Start button + R to open the run command bar. Type “regedit” and press enter.

regedit run command

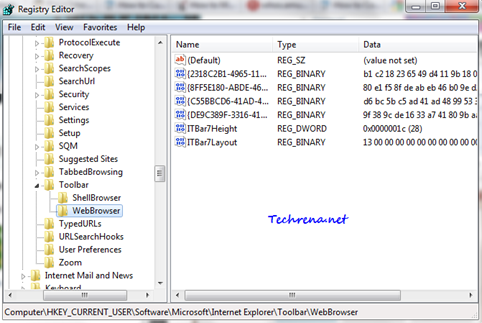
2. In the registry editor, navigate to the following path:

HKEY_CURRENT_USER> Software> Microsoft> Internet Explorer> Toolbar> WebBrowser

Registry Editor webbrowser

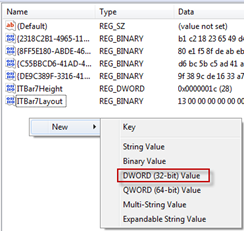
3. Right-click on the right hand side pane and select “New > DWORD (32-bit) Value“.

New DWORD

4. Give the DWORD value ITBar7Position:

ITBar7Position

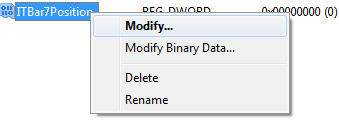
5. Right click on ITBar7Position and choose “Modify”.

Modify DWORD ITBar7Position

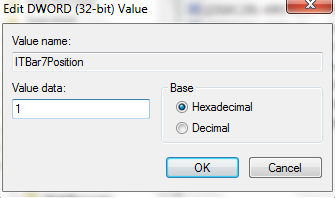
6. Enter “1” under the value date filed instead of “0” and click OK. Close the Registry Editor.

Editing DWORD Value Data

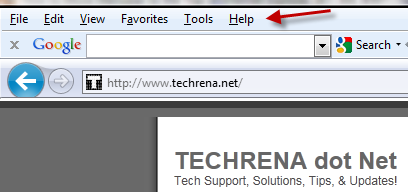
You are done with the tweaking. Open Internet Explorer now and you should see the IE menu bar being moved to top like this one:

Menu bar at top in IE

Warning: If you are a novice user of Windows and doesn’t know much about Registry Editor, stay away from this tweak. A wrong edit at the wrong place in Registry Editor can make your Windows corrupt. Always take a backup of the registry editor before working with it (use File > Export > save location).

[How To] Disable Access To Control Panel In Windows 7

control panel restriction

If your computer is used by many of your friends or family members etc., you might want to restrict access to Control Panel of your Windows 7 (or Windows Vista) so that they won’t mess up with it. Disabling access to control panel means that they won’t be able to modify the default settings of the programs installed and other settings as well.

Here is the step-by-step by guide to disable Control Panel from your Windows 7. It not only disables access to the Control Panel, it’ll also remove shortcuts present for Control Panel in places like Start Menu etc. I’m going to discuss two ways in which you can do it. While the first method only works for Professional, Enterprise or Ultimate editions of Windows 7 or Windows Vista.

Method-I: Using Group Policy Editor

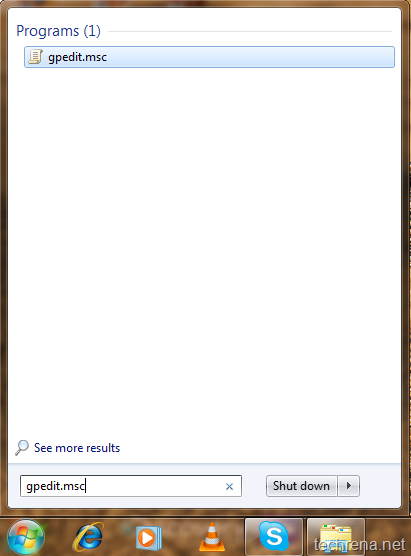
1. Open start menu and type “gpedit.msc” in the search box and open the Group Policy Editor from the results:

Gpedit start menu

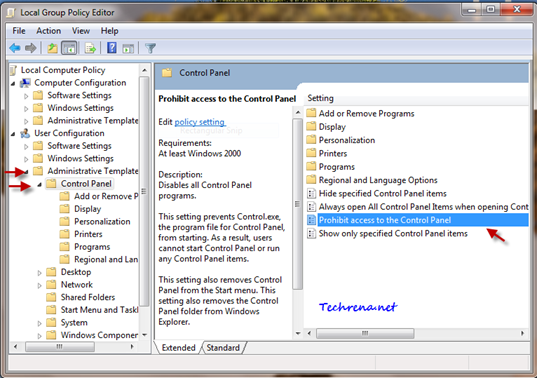
2. In the Group policy editor, expand “User Configuration” and find “Control Panel” under “Administrative Templates” as shown in the screenshot below:

Local Group Policy Editor

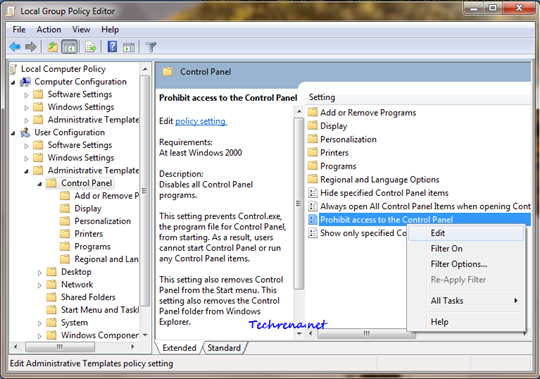
3. Find the “Prohibit access to the Control Panel” entry in the right hand side of the window. Either double click on it or right-click and choose “Edit”.

Control panel in Gpedit

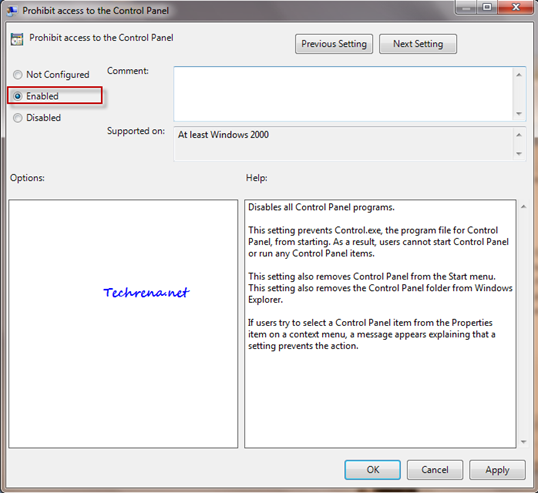
4. Choose the option “Enabled” under “Prohibit access to Control Panel” as shown here.

prohibit access to control panel

Click “Apply” and then choose “OK” to close the window.

5. Now your Control Panel will get disabled and you can’t even find the link for the same in the Start Menu. Check it yourself:

control panel missing from the start menu

When you try to open it by searching it in start menu, you will get an error:

This operation has been cancelled due to restrictions in effect on this computer. Please contact your system administrator.

Control panel start menu

control panel restriction error

Method- II: Using Registry Editor:

This method works on all versions of Windows 7 & Windows Vista. But this involves a bit of editing the values in registry editor. If you are not acquainted with the Registry Editor much, we strongly advise not to implement this.

1. Press Start + R to open the run command. Type “regedit” and click OK.

regedit run command

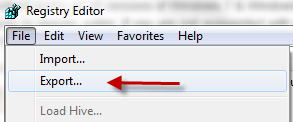
2. First take a backup of the registry editor just to be on the safe side. Go to File > Export and save a backup on your computer.

Regedit export backup

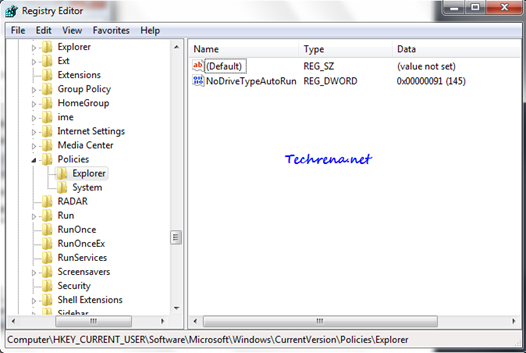
3. Now navigate to the following path in the registry editor:

HKEY_CURRENT_USER > Software > Microsoft > Windows> Current Version> Policies> Explorer

Regedit explorer

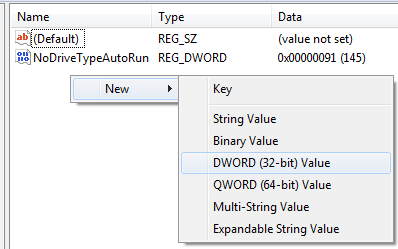
4. Right click on the right hand pane and select “New > DWORD (32-bit) Value

Regedit_explorer_new_key

Give it a value “NoControlPanel”.

NoControlPanel

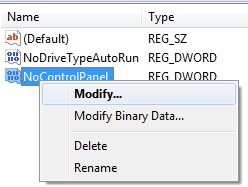
Right-click on the new value NoControlPanel and choose “Modify”.

NoControlPanel modify value

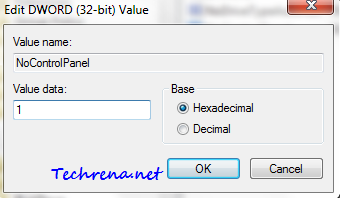
Change the Value Data filed value to “1” from “0” and click OK.

Edit dword value

Close the registry editor and restart your computer and check back. When you check back after rebooting your PC, you will find that the Control Panel is disabled and also is not listed in the Start Menu as shown in the first method.

If you want to enable the Control Panel again, just choose ‘Disabled" (third option) in the step 4 of the first step. In case of the second method, just delete the "NoControlPanel" DWORD Value and the Control would be back once your reboot your system.

Disabling Control Panel is just not enough to restrict users using your PC, If you want to setup advanced controls on your computer, read how to setup parental controls in Windows 7 .

[Alert] Orkut Affected By ‘Bom Sabado’ Worm, Stay Away For Now

orkut logo

If you are an avid Orkut user, you might be aware of this new worm which has just been discovered. This XSS (cross-site scripting) attack was allegedly initiated in Brazil, where the social networking site has the most of users than any other country in the world.

The worm hijacks the user account and sends spam scraps to all those in the user’s friend list. The scraps just contain the words “Bom Sabado” with some links attacked to it, clicking on which the receiver’s profile will also get hacked. The worm adds some unrelated communities to the infected accounts and currently thousands of such attacks have been reported.

Bom Sabado virusBom Sabado worm communities

The word “Bom Sabado” stands for “Good Saturday” in Portuguese, the official language of Brazil.

Tip: If you notice that your account has been affected by this worm/virus, logout from your account, clear your browser cache and cookies and then sign back in, then change your password and secret question for the Orkut/Google account. If you account stands good and no traces of hijacking are found, just stay away from Orkut until the engineers fix the issue.

[Tip] Remove Username From Windows 7 Start Menu

User name in the start menu

Windows users might be knowing well that the Start Menu in Windows shows a username of the user currently logged on to the computer, now matter how many user accounts your Windows has. For some reasons, if you want to remain anonymous by removing your username from the Start Menu, here is the step-by-step guide of what you need to do if you are using either Windows 7 or Windows Vista.

Steps:

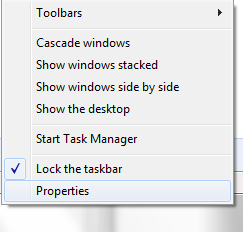
1. Right click on the taskbar and select “Properties”.

Taskbar right click menu

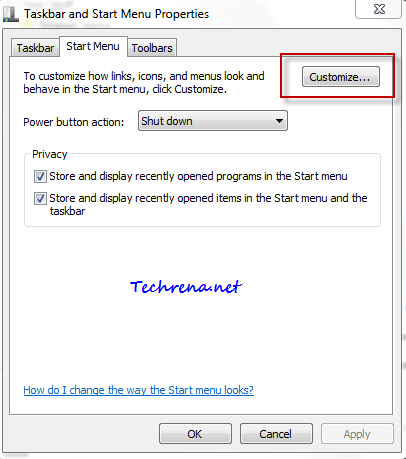
2.Taskbar and Start Menu Properties” window opens up. Go to the “Start Menu” tab in the window. Click on the “Customize” button.

Taskbar and start menu properties

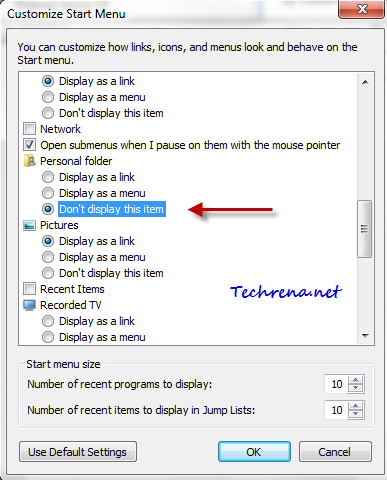
3. Another window “Customize Start Menu” opens up. Scroll the window down until you see “Personal folder” section. By default, “Display as a link” option would be selected. Now as you want to remove your username from the Start Menu, select the last option “Don’t display this item”, Click OK to save the settings.

Customize start menu

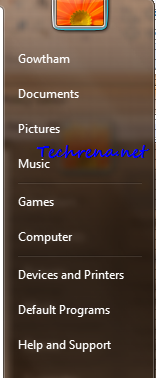
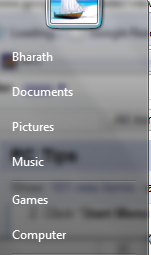
4. Click on the Apply button on the Taskbar and Start Menu Properties and click “OK” to close the window. Now your username will be delisted from the Start Menu as shown here:

No username on the start menu

You are done. Just check “Display as a link” whenever you want to revert back to the default settings to show your user account name back on the Start Menu.

[Tip] Change Default Download Location In IE9

IE9 downloads

As promised earlier, we have come up with another tip for the new Internet Explorer 9 users. Internet Explorer 9 (as it is only compatible on Windows 7 and Vista) by default stores the files downloaded to %windir%/Users/Username/Downloads (C: > Users> Username> Downloads is the most common path). But you might want to keep all the downloads through Internet Explorer to a different folder other than the default “Downloads” folder. Follow the steps given below to get this done:

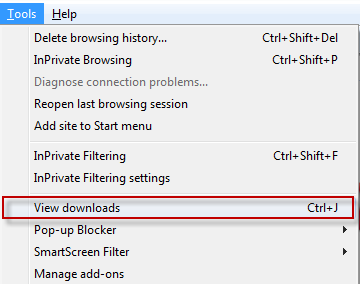
1. Open Internet Explorer 9 and hit Ctrl + J to launch the “View Downloads” window. Alternatively, you can open the same via Alt > Tools > View Downloads from the Tools menu.

Tools menu options in IE9

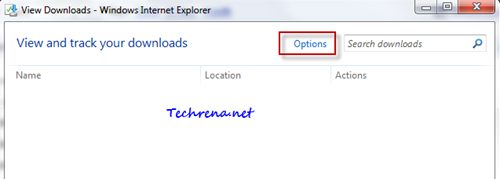
2. In the View Downloads window, click on “Options”.

View Downloads in IE9

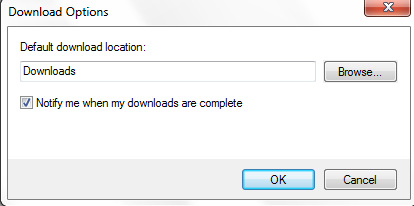
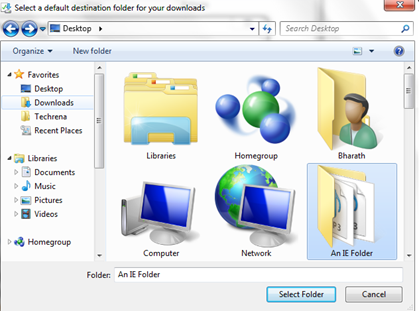
3. In the “Download Options“ window, change the default folder by browsing and selecting a custom folder. Click OK once you have chosen the desired folder.

Download options in IE9

Select download folder for IE9

4. Click OK and close the “Download Options” window and “View Download” window.

[How To] Clean Up Context Menu In Internet Explorer

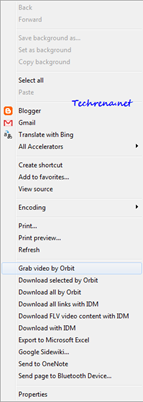
IE context menu mess up

We have earlier covered how to clean up unwanted items in context menu in Windows Explorer and for Firefox. Now in this tutorial let me take you through the process of removing items from right click context menu in Internet Explorer.

Internet Explorer is by far the most widely used browser in the world. And the IE lovers worldwide are excited by the release of new beta version of IE9. So we thought this might be the right time to post some tips on tweaking Internet Explorer.

Context menu in Internet Explorer consists of two sections:

1) Accelerators (only for IE8 & IE9)

2) Menu extensions

1) Accelerators:

Accelerators are webpage specific and they will have their own action set up based on the webpage data. These have become a part of IE since the release of Internet Explorer 8. Some examples for Accelerators in IE8 & IE9:

  • Blog with Blogger
  • Email with Windows Live
  • Define with Google Dictionary
  • Translate with Windows Live

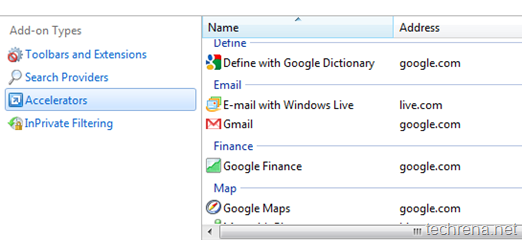
Accelerators in Internet Explorer

If you don’t use these Accelerators much, follow the steps outlined below to disable them:

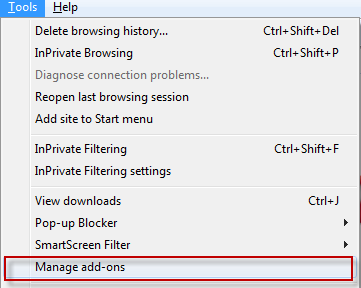
1. Go to Tool > Select Manage Add-ons

Tools menu in Internet Explorer

2. Under the “Add-on Types”, click on Accelerators tab on the left hand side pane. You will the full list of Accelerators available.

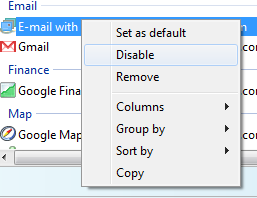
3. Right click on the Accelerator that you want to disable and choose “Disable”.

disable accelerator in IE

You may also want to disable or remove other unneeded toolbars and add-ons by clicking on “Toolbars and Extensions”.

2) Menu Extensions:

Menu extensions are stored in the Windows registry and these are present in all versions of Internet Explorer, not just IE8 & IE9.

Examples for Menu Extensions many include:

  • Download with IDM
  • Send to OneNote
  • Send page to Bluetooth Device..

To disable unnecessary Menu Extensions, follow these steps:

1. Press Start button + R to open the run command bar. Type “regedit” and press OK.

regedit run command

2. Navigate to the following path in the registry editor:

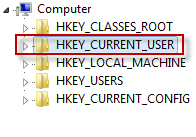
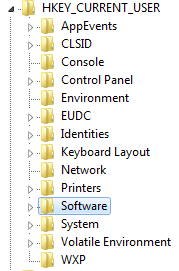
HKEY_CURRENT_USER> Software> Microsoft> Internet Explorer> MenuExt

HKCU in regedit

HKCU expanded in regedit

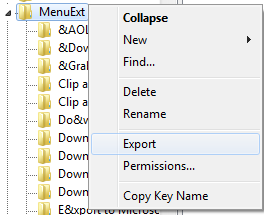
3. Right click on MenuExt folder and choose “Export” and save a copy as the backup, to be on the safe side in case something goes wrong.

MenuExt export

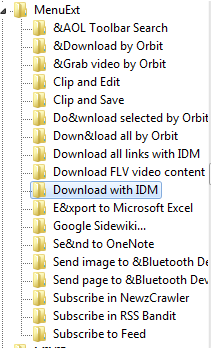
4. Collapse the “MenuExt” folder and start deleting the items that you don’t need:

MenuExt items

5. Close the registry editor and restart the Internet Explorer to see the changes.

That is it. If you wonder “why do I need to mess up with registry editor? Isn’t there any freeware available?” ; Yes, there’s a freeware (actually IE add-on) called ToolbarCop which will remove the unnecessary items from the IE context menu with a few clicks.
[Download] VLC Media Player For iPad

VLC player for iPad

Do you own an iPad ? Love watching movies on your iPad? iPad is a great device to watch movies. But the problem till now was that Apple has limited iPad to play only MP4 files and its own Quick Time format files. If you want to watch any movie which is not either MP4 or a Quick Time files, you need to go through the long and cumbersome conversion process. This is true for the popular DivX and AVI format files too. When all the upcoming devices are coming up with a support to play the files in this format, Apple’s stubbornness to stick to those two file formats has often been criticized. But thanks to Video LAN team, they have worked hard to make an iPad app which enables the users to play videos in almost-all formats.

VLC media player iPad screenshot

With the VLC Media player app, iPad users can play those popular AVI or DivX format files without any problems but some minor issues may arise if you choose to play formats like Real media files or MKV files etc.

Download VLC Media Player App from iTunes