Tikona WI-BRO Broadband Plans And Tariffs

Tikona logo

Tikona Wireless Broadband Service (WI-BRO) :

Tikona, is the new entrant into the fastest growing broadband networks in India.But Tikona is completely different from other current broadband services because Tikona sets up access point through towers (for wireless access) on each and every apartment / building where it’s services are required.Thus all the users in that locality (with in the wireless access point accessible range) can enjoy Wireless Broadband with the help of a modem supplied and installed by Tikona digital networks team.This means that if you have a laptop and if your building is Tikona access point enabled, you can have the freedom of surfing the internet sitting any where in your house.

Tariffs:

Limited usage plans (All offer speeds at 2 Mbps):

These are circuit breaker plans (with bill limit)

Details
CB299
CB449
CB549
CB999
CB1249
Monthly Plan Charges (Rs.)
299
449
549
999
1249
Free Usage (MB)
1000
1500
2500
5000
7000
Charge beyond Free Usage (Rs./MB)
1
0.8
0.8
0.8
0.8
Circuit Breaker Deposit – One time (Rs.)
300
500
500
1000
1500
Guaranteed Max Bill Amount (Rs.)
599
949
1049
1999
2749
MBs Consumed till Maximum Bill Amount
1300
2125
3125
6250
8875

Unlimited Plans:

Unlimited plans are the plans that most users look for in any broadband service.Tikona is offering unlimited plans starting from Rs. 499 /- (150 Kbps) the maximum speed under UL plans is 1000 Kbps which you get if you take UL 1249 plan.

Fun Unlimited Plans:

These are special plans that provide internet surfing at 2 Mbps for first 400 MB of usage in FUL 799 plan, 200 MB in FUL 599 and 100 MB in FUL499 plan respectively every month.

Details
FUL799
FUL599
 
FUL499
Monthly Plan Charges (Rs.)
799
599
499
 
Download Speed (Kbps)
600
300
150
 
Installation Charges (Rs.)
500
500
500
 

Other Unlimited Plans:

These UL plans offer varying speeds at day and night.Night surfing speed gets almost doubled in each of these plans.

Details
UL1249
UL899
 
UL649
Download Speed
600 Kbps
300 Kbps
150 kbps
 
Download Speed (22:00 – 10:00) hours
1000 Kbps
600 Kbps
300 kbps
 
Monthly Plan Charges (Rs./Month)
1249
899
649
 
Installation Charges (Rs.)
500
500
500
 

Premium UL plans:

Details
FMC2499*
UL4999
FMC1499*
UL2999
Download Speed
2Mbps
2Mbps
1Mbps
1Mbps
Monthly Plan Charges (Rs./Month)
2499
4999
1499
2999
Installation Charges (Rs.)
500
500
500
500

[*]FMC 1499 and FMC 2499 have usage limits of 15 GB and 50 GB per month respectively, while other plans have unlimited usage limit.

Note: Modem installation charges for all the above plans would be Rs. 500 /-

Toll Free Number : 1800 20 94276

via Tkiona

Install Windows XP Mode Without Hardware-Assisted Virtualization (HAV)

Windows XP and Windows7

Microsoft has announced a small but significant update to its own “Windows XP Mode” (or Windows Virtual PC), a feature that has been incorporated in Windows 7 to let the users of this new operating system take advantages of the older applications that still require Windows XP, by running them inside “Windows XP Mode”.Until now, this XP Mode has only been supported by processors having virtualization technology known has Hardware-Assisted Virtualization (HAV).

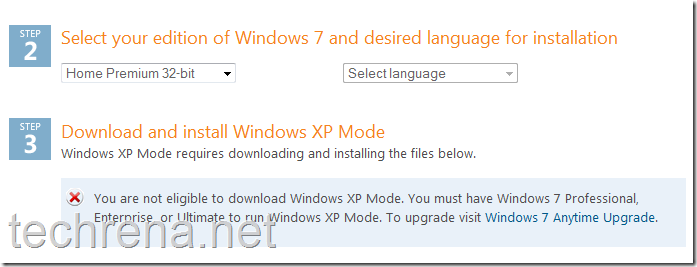
However, Windows XP Mode works only on Windows 7 Professional Enterprise, or Ultimate versions of Windows 7.

This update has been announced in Windows 7 blog, also they have made clear that Windows XP Mode will continue to make use of Intel VT and AMD-V like hardware virtualization technologies.

Windows XP Mode will no longer require hardware virtualization technology to run. This change makes it extremely easy for businesses to use Windows XP Mode to address any application incompatibility roadblocks they might have in migrating to Windows 7.

To install Windows XP mode in your PC with Windows 7 Professional or higher version, download the update from here (update KB977206 ).

Windows 7 Home users need not worry about the lack of support for their OS, as there are hacks available over the internet to install Windows XP mode in Windows 7 Home PCs (Home Basic and Home Premium) too.Hopefully we’ll cover one such hack in the upcoming posts.So stay tuned and subscribe to this blog’s RSS feeds.

Windows XP Mode download Not Eligibe

Tip: You can use VMware player to install Windows XP Mode in any computer running Windows 7.

Disable Annoying “This Program Might Not Have Installed Correctly” Alerts

Windows logo

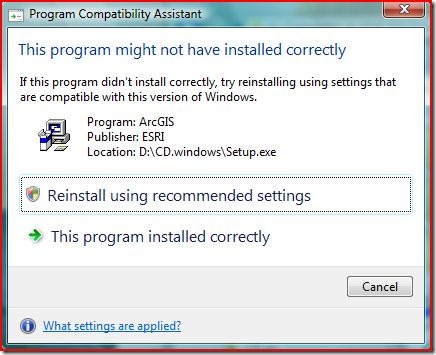
Program Compatibility Assistant is a service first introduced in Windows Vista and being continued in Windows 7.This service is intended to notify users when an installed program has some compatibility issues with the current operating system.Hence we see frequent Program Compatibility Assistant messages “This Program might not have installed correctly”.

If you install programs frequently (particularly when you install old versions of the programs) then you might be sick of these dialogue boxes and may want to disable these notifications.

This program might not have installed correctly error in Windows vista and Windows 7

There alerts are caused by a service called Program Compatibility Assistant (PCA) Service or PcaSVC in short.So stopping this windows service forever by changing the startup type to “Disabled” should serve the purpose.Follow these simple steps :

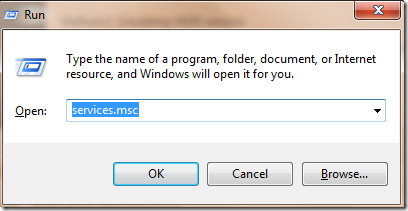
1. Press Windows + R button to start WIndows Run command.Type “services.msc” in the filed and click “ok”.

windows_run_command_services.msc

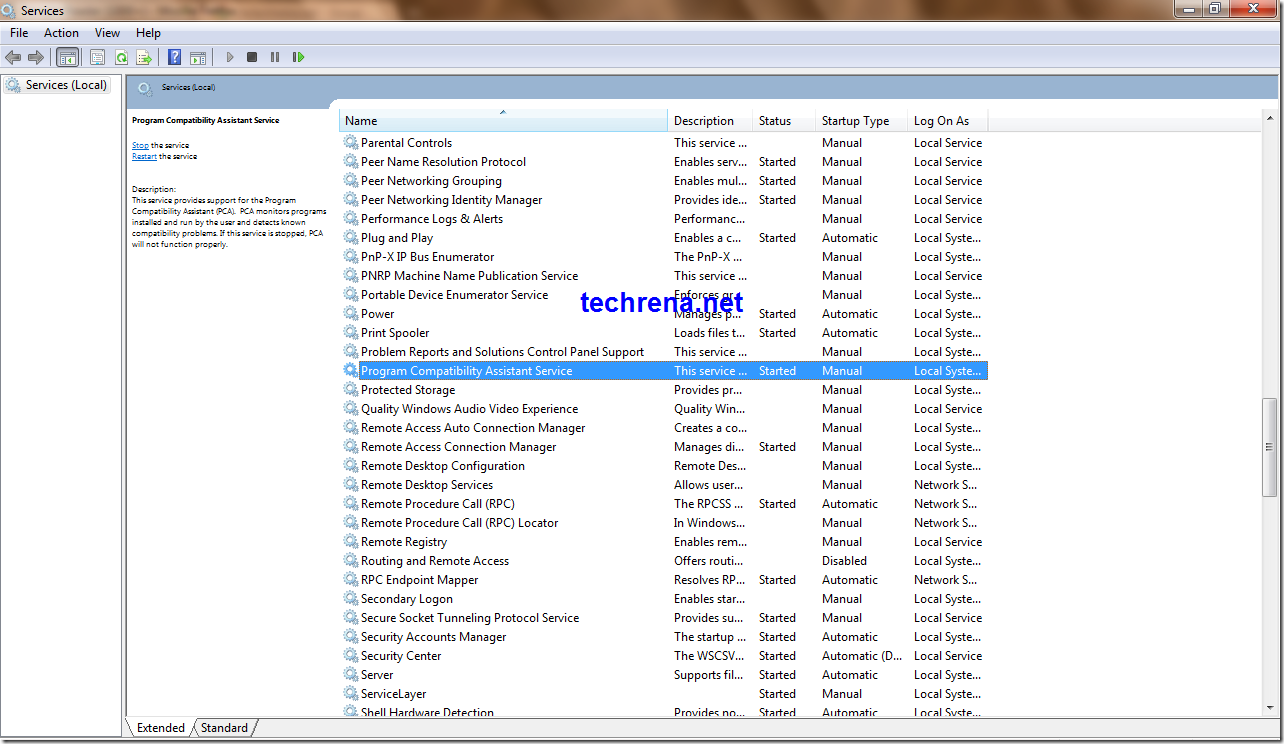
2. The Services window opens up.Find the service called “Program Compatibility Assistant Service” in the list.

Program Compatibility Assistant Service In Windows Services

Right click on the Program Compatibility Service and choose “properties” from the menu.

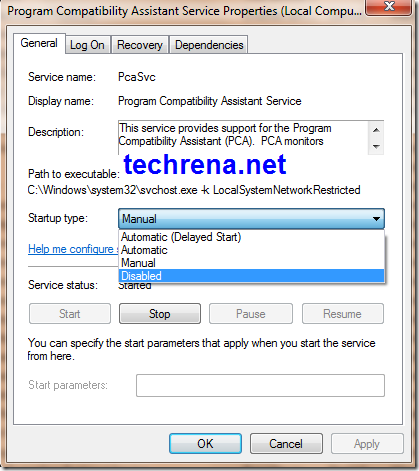
3. In the properties dialogue box, change the startup type to “Disabled” and click “Ok” to save the settings.

Program Compatibility Assistant Service Properties Window

It is that simple !! Now you have disabled the PCA service and no more annoying Program compatibility alerts for you.

Complete Tutorial: How To Disable Windows Error Reporting In Windows 7 ?

Microsoft Windows 7 Official Logo

Windows Error Reporting (WER), a technology (previously known as Dr. Watson),developed by Microsoft lets you report post-error debug information to the developer of the particular application that has just crashed or stopped responding.Windows Error Reporting has been introduced as a Windows service from Windows XP and is being continued in the later versions Windows Vista and Windows 7.By default, this Error Reporting service will be started automatically.

However for some reasons like you may get annoyed by frequent error reporting alerts or for privacy concerns etc., you may want to disable or stop Error Reporting in your Windows operating system (here it is Windows 7).If you are not sure how to stop Error Reporting in Windows 7, please do follow the steps outlined below:

Method-1: Using Action Center

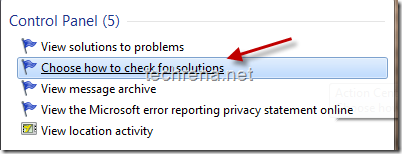
1.Type “wer” in the Start menu search bar.Check the results obtained for this search in control panel (refer to the screen shots).

type wer in start menu

start menu search choose how to check solutions

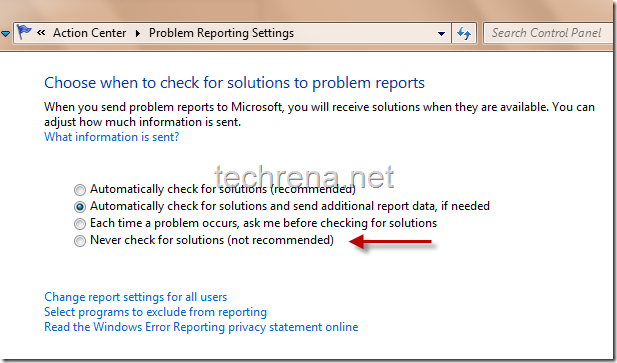
2.Click on the “Choose how to check for solutions” item in the search results.It will open up the “Problem Reporting Settings” under Windows Action Center.

problem reporting settings action center windows7

3. By default the first or second option (“Automatically check for solutions”) will be selected by your Windows.If you want Error reporting to be disabled, select the last option “Never check for solutions” for completely disabling it or select the third option “Each time a problem occurs, ask me before checking for solutions” for moderating the error reporting alerts.Click “Ok” button down the window once you have selected your option.

Method-2: Disabling WER service

Windows Error Reporting Service function:

“Allows errors to be reported when programs stop working or responding and allows existing solutions to be delivered. Also allows logs to be generated for diagnostic and repair services. If this service is stopped, error reporting might not work correctly and results of diagnostic services and repairs might not be displayed.”

We’ll try to achieve the same previous settings result but this time via disabling the Windows Error Reporting(WER) service.To do this, follow..

1. Press Windows button + R to open the Windows Run command.Type “services.msc” in the run command bar and hit ‘OK’.

windows run command services.msc

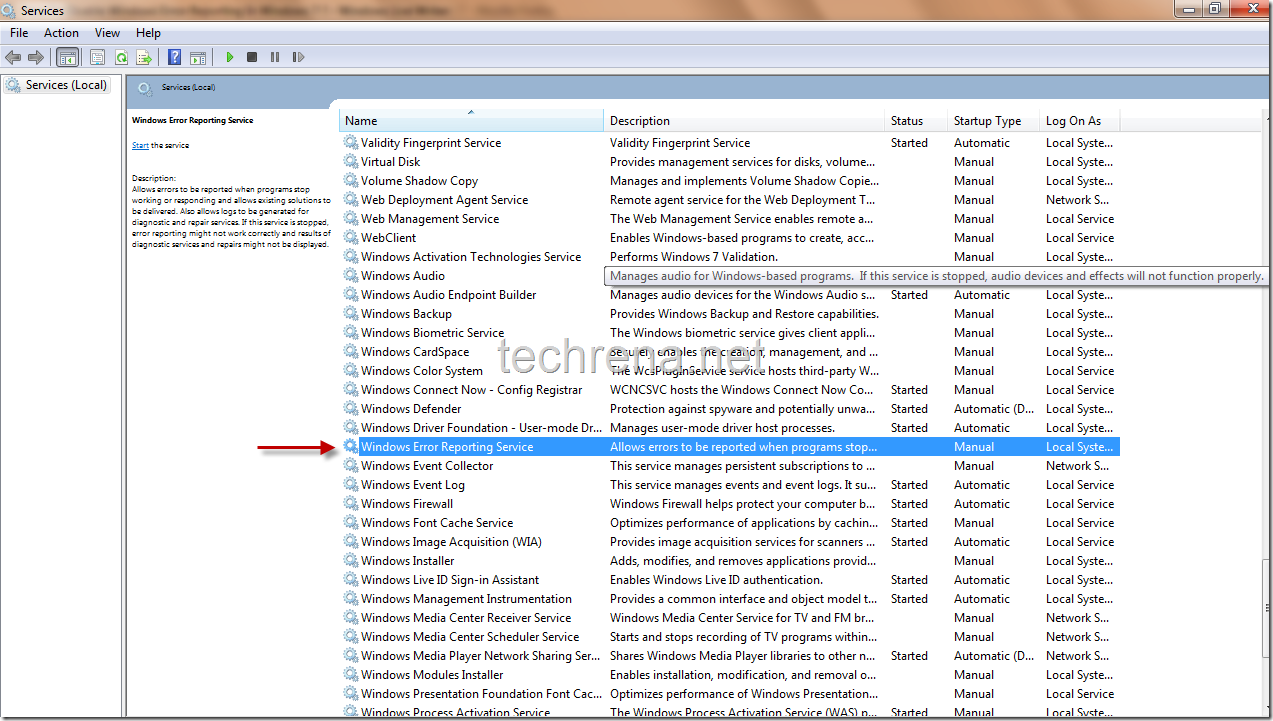
2. It will open up Services window, where you can see list of all the services that are currently available on your Windows.Find “Windows Error Reporting Service” in this list.

Windows Error Reporting Service

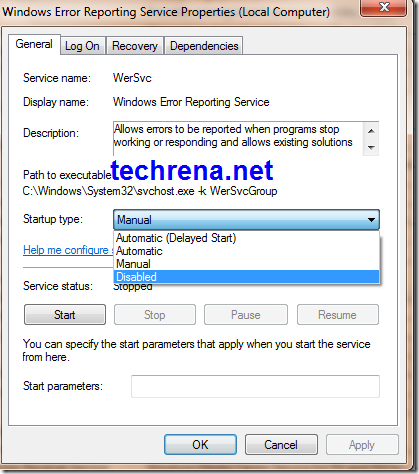
3. Right click on the Windows Error Reporting Service and choose “Properties’ that should open a new properties window.The startup type will be either in “Automatic” or “Manual” by default.To completely disable the service choose “Disabled” and press ok.

Windows Error Reporting Service Properties

That’s it, now you have disabled the Windows Error Reporting Service successfully.

Method–3: Using Registry Editor

Warning: Changing registry values without much knowledge will dump your entire Windows Operating system.Change them at YOUR OWN RISK.

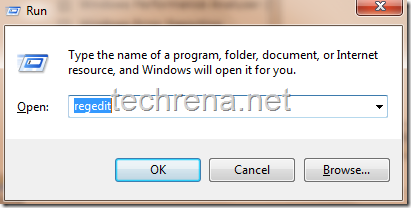
1. Type Windows + R as in the previous case to open Windows run command.Type “regedit” in the command bar.

regedit run command

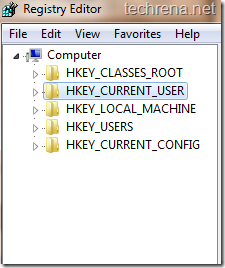
2.It will open up the Registry Editor window which will look like this.It contains three folders like navigable sub keys:

HKEY_CLASSES_ROOT ,

HKEY_CURRENT_USER,

HKEY_LOCAL_MACHINE,

HKEY_USERS,

HKEY_CURRENT_CONFIG.

Registry editor windows 7

HKEY_CURRENT_USER is the one we want.Click on it to expand the sub registry key.

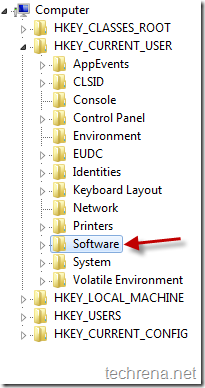
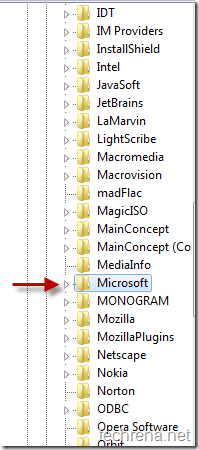
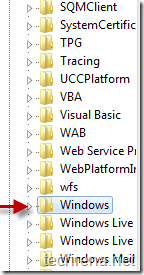
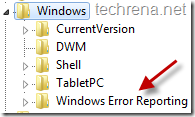
3. Navigate to HKEY_CURRENT_USER\Software\Microsoft\Windows\Windows Error Reporting sub key using the following screen shots carefully.

regedit HKCU navigation

regedit HKCU navigation 2 regedit HKCU navigation_3

regedit_HKCU_Windows_Windows_Error_Reporting_key

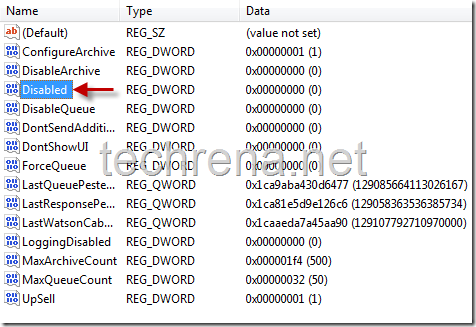
4. In the Dword list, find the registry entry by name “Disabled” (highlighted in the screen shot).By default the Date value of this dword will be “0” meaning that it is enabled.

Disabled dword in WER subkey

Right click on the “Disabled” DWORD and choose “Modify”.In the value data filed, change its value to “1” instead of “0”.Click on to reflect the changes.

Now you have successfully disabled WER.


You may also want to read our previous guides on A-Z of Installing Windows 7, Installing Windows 7 on USB stick, Activating Windows 7, Resetting Windows 7 password (when you forget it and unable to retrieve it), Creating desktop shutdown shortcut in Windows 7,Enabling GOD mode in Windows 7, Partitioning hard disk in Windows 7 , Restoring previous versions of files in Windows 7, Install and Run Windows XP in Windows 7 Using VMware Player and much more..

Feel free to leave a comment here if you find problem somewhere in following these methods.

Amayeta SWF Encrypt 4.x Free License Key Giveaway

swf encrypt version 4.0

Amayeta SWF Encrypt is a popular Flash Actionscript Encryption tool to encrypt and protect Adobe Flash SWF files from various ActionScript decompilers and other hackers.The version of the software which we are talking about in this post is version 4.x (4.0 or later ).If you are interested in SEF Encrypt version 6.0, you may read the features listed below:

SWF Encrypt 6 features:

  • Encrypt, Obfuscate 7 Protect your Flash 6, 7, 8, 9 and 10 SWF Movies
  • Updated for Flash 10/CS4, Flex 2/3 and ActionScript 1/2/3
  • Dense Actionscript Obfuscation
  • No Actionscript Line Limit
  • Available for Windows & Mac OSX

Download SWF Encrypt 6.0 trial

Steps:

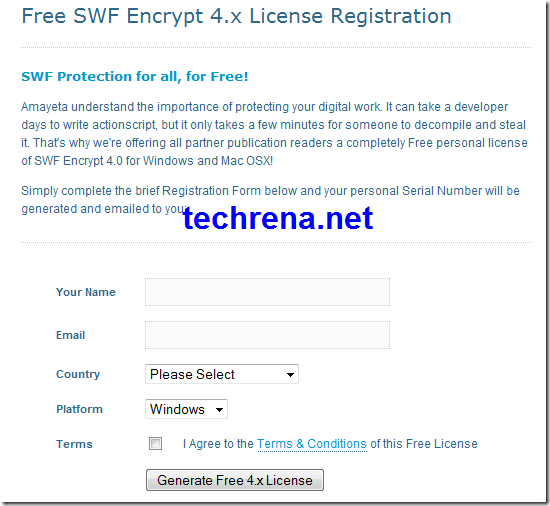
1.Visit Amayeta promotional offers page, enter your details in the registration form available in that page, select the platform as ‘Windows’  (See the screenshot below) and click ‘Generate Free 4.x License’ button.

SWF Encrypt registration page

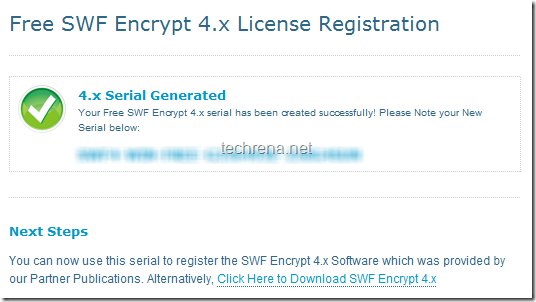
2.Now you will see your free SWF Encrypt 4.x License Registration serial (see the screenshot).Note down or copy the serial number and store it in a safe place for future reference.Then click on the link “Click Here to Download SWF Encrypt 4.x” just below your serial number.

SWF Encrypt Licence registartion

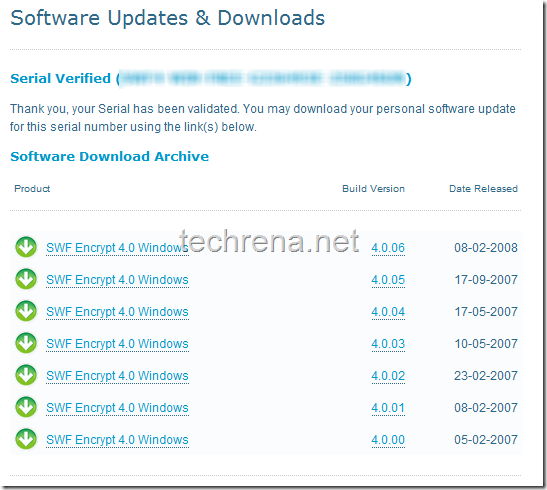
3.You’ll be now taken to download page, where you can see all variants of SWF Encrypt 4.0 version (SWF Encrypt 4.x in general).Download any version for example, you can download SWF Encrypt 4.0.06 from this direct link.

SWF Encrypt 4.0 download page

4.Install the downloaded file and enter the license key you have got.Enjoy the software !!

Google-Certified Ad Networks Made Available For All Publishers

adsense-logo

As a website publisher we always want more number of advertisers to compete for a slot in our website, the higher the competition the more beneficiary it would be for us.What if advertisers from different ad networks compete for a ad slot in your site ? It would be great, isn’t it ? Adsense , from now on will provide this platform.

Google Adsense has just announced the expansion of Google-certified third-party ad networks to all the Adsense publishers (which was initially available to the publishers in North America and Europe.

How To Allow / Block Google Certified Ad Networks In Adsense ?

allow-block-Google-certified-ad-networks

Google-certified-ad-networks-in-adsense

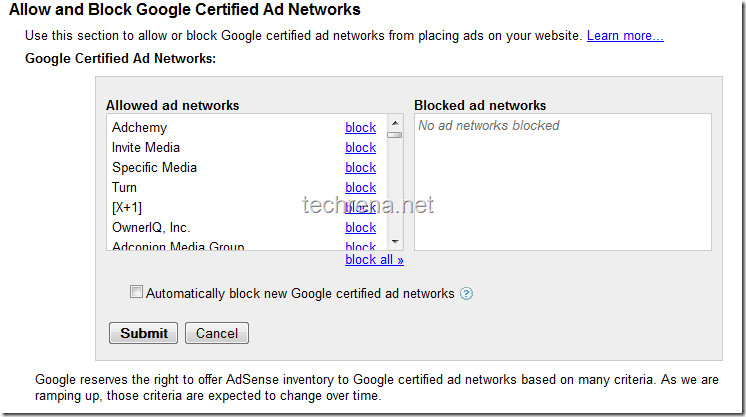
Just visit Ad Review Center under Adsense Setup tab in your Adsense, find this option Allow and Block Google Certified Ad Networks, and click “Change” to see the whole list of ad networks currently allowed for your website.You can find option to block each ad network individually or choose “block all” option to completely block all the ad networks.Check out the list of currently Google certified ad networks available.The list is huge but it will only get bigger as Google says that they are continually adding new ad networks which the publishers can see in their Ad review centre.

List of Google-certified ad networks currently supported in Adsense:

Adchemy
Invite Media
Specific Media
Turn
[X+1]
OwnerIQ, Inc.
Adconion Media Group
Adtegrity.com
AudienceScience Inc.
Dapper Inc.
Dedicated Media
FetchBack
LucidMedia
NetSeer Inc.
NextAction
QuinStreet, Inc.
ReTargeter
RichRelevance, Inc.
Teracent Corporation
ValueClick, Inc.
Aggregate Knowledge
Atrinsic
Brand.net
BrightRoll
Chitika
Collective Media
CPM Advisors, Inc
DataXu
Datran Media
Dotomi
Efficient Frontier, Inc.
InterCLICK
Media6Degrees
MediaMath
OpinMind
Quantcast Corporation
Rocket Fuel Inc.
Semantic Sugar, Inc.
Sooth Software Corporation (dba AdBuyer.com)
TellApart
Traffic Marketplace
Triggit
Acxiom Corporation
Advertise.com
Ad Pepper
AdReady
AOL Inc
Xtend Global Media LTD
Goodway Group
Innovation Interactive
Cyberplex, Inc
Didit
Announce Media
Media Innovation Group
VivaKi
AppNexus
Epic Advertising
AccountNow, Inc.
People Media, Inc
Bizo
EchoSearch
MaxPoint Interactive
Mpire
Pinnacle Dream Media
Pulse 360
Radius Marketing Inc.
Reply! Inc.
Criteo Europe
Criteo UK
Infectious Media
The Exchange Lab
Mixpo
Mexad
Adpepper Germany
ClickDistrict NL
DSNR
Hurra Germany
Criteo US
Cossette Communications
Pennyweb, Inc. (DBA Ybrant Digital)
Spongecell
OpenX Technologies
Red Aril, Inc.
Redux Media Inc.
ShareThis, Inc.
HTTPool
DQ&A
Mediaplex
Veremedia
ValueClick International Ltd
Struq Limited

Zemana AntiLogger 1.9.2.188 With 1 Year Full Version License Key Give Away

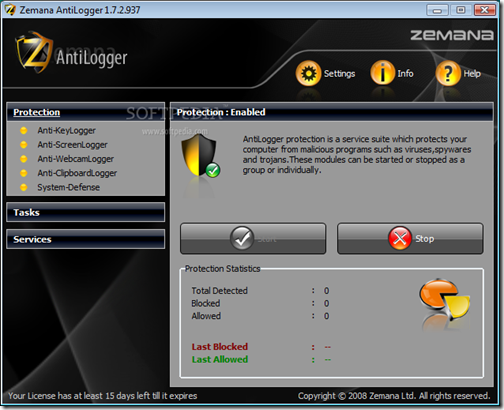
Zemana Anti-Logger basically provides protection against evil keyloggers and also deals with different kinds of malwares, protecting your net banking passwords, and your private chats and emails.

Zemana AntiLogger includes the following modules : Anti-SSL Logger, Anti-WebCam Logger and Anti-ClipBoard Logger

Zemana-AntiLogger-sshot1

Key features of Zemana AntiLogger

· Anti-SSL Logger Module that provides protection against SSL Logger
· Anti-WebCam Logger that provides protection against WebCam Logger
· Anti-Key Logger Module that provides protection against Key Logger
· Anti-Screen Logger that provides protection against Screen Logger
· Anti-Clipboard Logger that provides protection against ClipBoard Logger
· System Defence Module that protects your system

Zemana AnitLogger is now available as a free download with 1 year full license.If you purchase it, it would cost you $34 normally.But as part of promotional offer, Zemana is giving away full free 1 year Zemana AntiLogger license key that doesn’t require any registration, and doesn’t include hidden costs or bundles of third-party software.

How To Avail The Offer?

Just follow these simple steps:

Download Zemana AntiLogger (Free download, current version 1.9.2.188; AntiLogger_SOFTPEDIA_1.9.2.188.exe)

Install the Zemana program and restart your computer and follow the on-screen instructions for activating the product for 1 year full license

Download YouTube Videos Using YouTube Bookmarklet

youtube-logo

You must have read our earlier post about how to save YouTube or any flash videos from temporary internet file to your hard disk drive as FLVs.

Now, Trevor of How-To-Geek has come up with a mush simpler solution for downloading YouTube videos that doesn’t require installing any browser plugins, or any video grabbing softwares.

All you need is small Bookmarking script as looks like the one given below:

Get YouTube video – (Drag into your bookmarks- currently working to make it work)

Get YouTube video

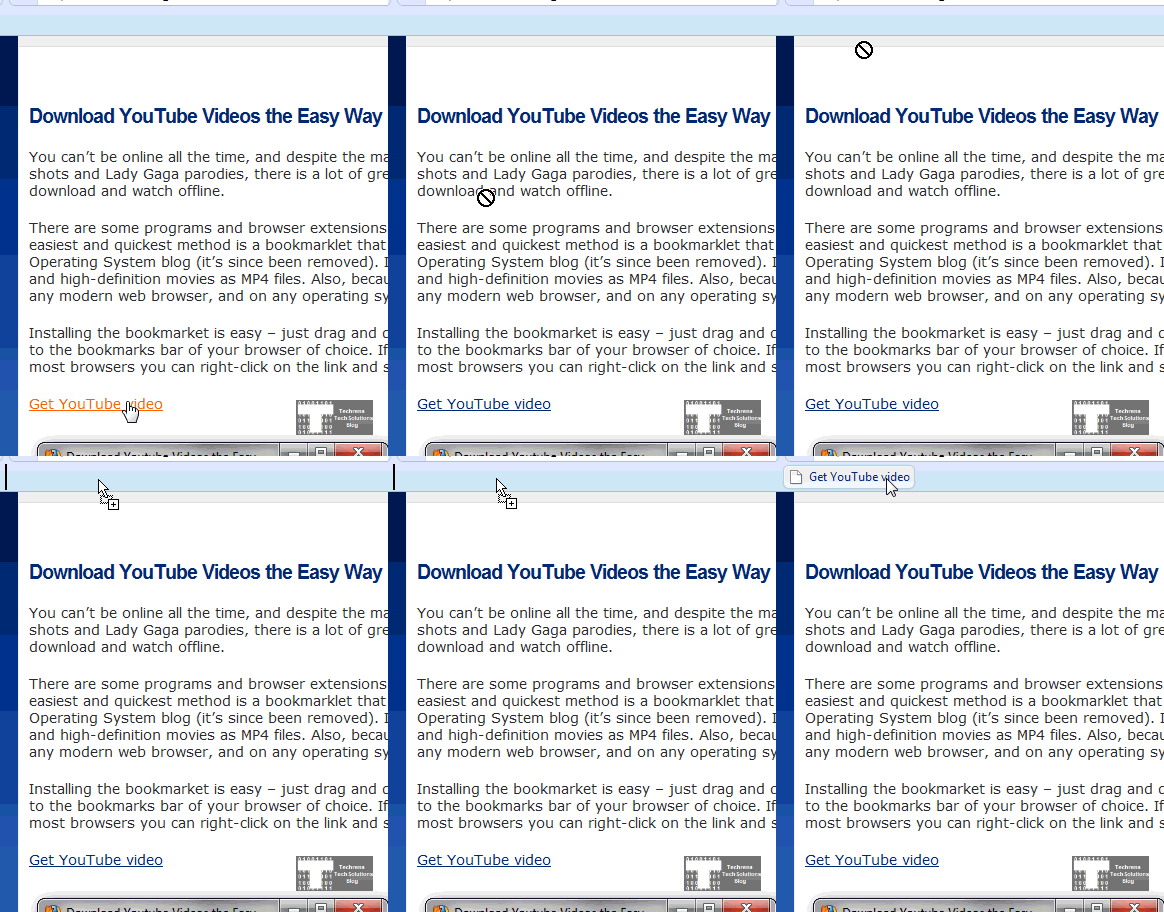
Drag this YouTube Bookmarklet grab script into your bookmarks (see the animated image below)

YouTube bookmark animation

Now open any YouTube video, and find a small links below the User profile, you can find two links in this particular case “Standard MP4” and “HD 720p”.

Watch the below video to see the overview of the whole process.

Video: YouTube Bookmarklet

The advantage of using this process is that you need not install any buggy extensions for your browser to get this feature.Also it saves time by giving a direct download link for any YouTube video.

Thanks Trevor for the tip !!

New In Buzz: Inbox Notifications Control & Easy-To-Find “Mute” Link

Google buzz Official logo

Ever since Google has launched Buzz sometime ago in last month, many voices have been raised over the privacy concerns for which at one stage Google had no other option but to reply.

Now after just surpassing the first month of the Google Buzz, Google has once again modified a feature to give users more control about Buzz posts coming in your Gmail inbox.

1.Until now, Google used to send all your buzz posts (in which you participate) directly to your inbox for better and faster accessibility.But now you have been offered the options in your buzz settings to choose which buzz posts should reach your inbox.

Visit your Buzz settings tab in your Gmail settings page,

Find “Send buzz posts to my inbox when:”

  • People comment on my posts
  • People comment on posts after I comment on them
  • People comment to posts after I am @replied on them

Select the proper option according as you wish (see the below screen shot)

Buzz-settings-Gmail

2. You’ll be notified why a particular buzz post has been sent to your inbox and also “Mute” link that you can easily find in the message.

On the top of your each post in inbox, you will see a message explaining why a particular posts ahs been there in your inbox, it’s more like a Facebook / Orkut feature, telling Mr. X has commented on your post , or you have been @replied, etc.

You can also find the “Mute from inbox” link just to left side of the explanation message that stops subsequent comments taking the conversation back again to  your inbox.

buzz-inbox-settings-example

Google says that it’s the first of the series as part of the noise reduction @ Buzz

If have liked this, you may also read our previous posts about Google Buzz counter for your website and Google Buzz desktop Apps.

How To Auto Refresh A Web Page In Google Chrome ?

Google Chrome logo

If you have following our blog posts regularly, you must have read about the post we have written on ‘How to Auto Refresh a Web Page in Firefox’ using ReloadEvery add-on for Firefox.

Now let’s see how the same feature can be implemented in case of Google Chrome browser.

By saying auto refresh or auto reload, what we mean is that the page should automatically refresh itself at regular intervals of time.

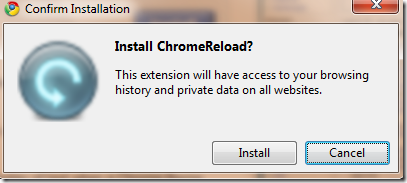
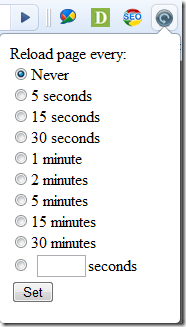
Thanks to ChromeReload extension for Google Chrome, developed by nick.lothian.The extension when installed provides the users with options for selecting various time interval for auto-reload.

install-chrome-reload-plugin

The reload interval may be from 5 seconds to 30 minutes or you can specify your own time interval in seconds if you want to enter custom reload rate for the web page.

chrome-reload-time-options

Download ChromeReload extension for Chrome.