Solve YouTube Rebuffer Problem When You Switch To Full Screen Mode

YouTube video resolutions

YouTube lovers on slower internet connection are very much disappointed by a recently changed settings that went into live in the video sharing site. The new settings (known as Auto HD) force the video to re-buffer from the beginning when you switch to full screen mode when watching a video. Just imagine a situation where you load a full video in normal mode in 360 pixels resolution. Now you wanted to watch it in full screen, the video switches from 360p to 480p automatically and starts buffering from the starting point again! Very annoying, isn’t it? Not so much when you are on a high speed internet connection, but if you are on a slow connection, you have every reason to feel so. Though YouTube doesn’t really offer any fix for this, we have few tricks which can solve this issue for you.

Method-1: Changing Settings In Your YouTube Account

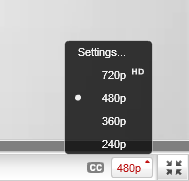
Click on the “Settings..” link found atop when you click on the video resolution (240p, 360p etc.) button.
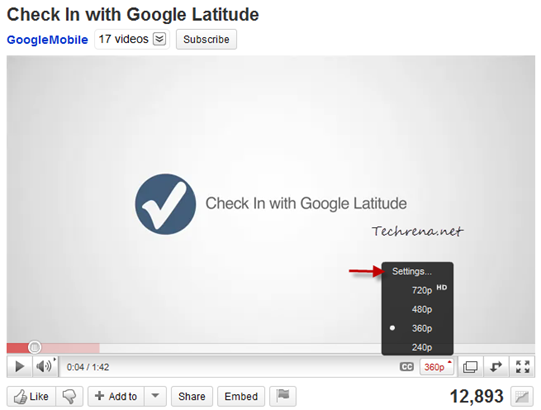
YouTube video resolution settings

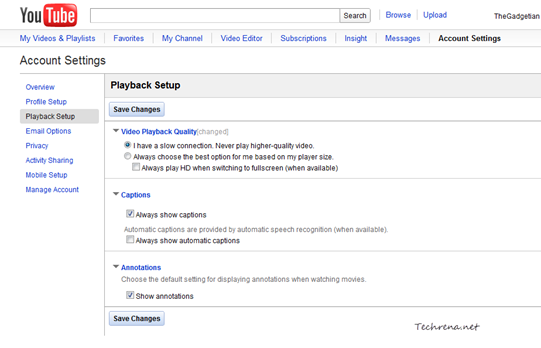
If you are already having an YouTube account, sign in to the account and go to your YouTube account settings page, where you’ll find settings for “Video Playback Quality”. Choose the first option “I have a slow connection. Never play higher-quality video.” and click the “Save Changes” button at the bottom of the page.

YouTube video playback quality settings in account

Now, videos will never get into the higher resolution mode when you switch to the full screen mode. On the downside, this method only works when you play the videos while you are logged into your YouTube account.

Method-2: Using GreaseMonkey Script

Install GreaseMonkey add-on for Firefox and restart your browser. If you are on Google Chrome you need not install any extension.

Install this GreaseMonkey script (YouTube Auto Buffer & Auto HD & Remove Ads) in your Firefox or Chrome browsers and it will take care of the rest. Now test the script by playing and switching any YouTube video into full screen. The problem should have been fixed now!

[Tip] Change Microsoft Security Essentials Update Frequency

Microsoft security essentials logo

Microsoft Security Essentials is easily one of the top free antivirus / anti-malware products available for Windows. If you are already using Microsoft Security Essentials, you might be aware that the program regularly checks for updates at least once in 24 hours. No problems with this setting as long as you are connected to internet and your PC is on most of the time. But at times you miss out on updates when your computer or laptops is not switched on or in sleeping mode or experiencing some internet connections issues. If your computer is not able to download updates when the regular MSE update check happens, the next update check will only happen after 24 hours. In such cases, the best thing to do is to check for updates manually. But you might also want to tweak the settings so that the program checks for updates more often.

Follow the steps to learn how to do it using task scheduler:

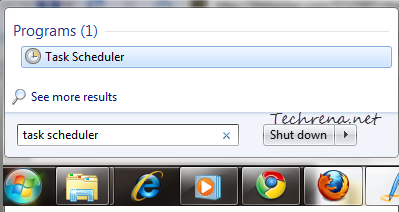
1. Type “task scheduler” in the Start Menu and open the “Task Scheduler” from the results under the Programs section.

Task Scheduler from Start Menu

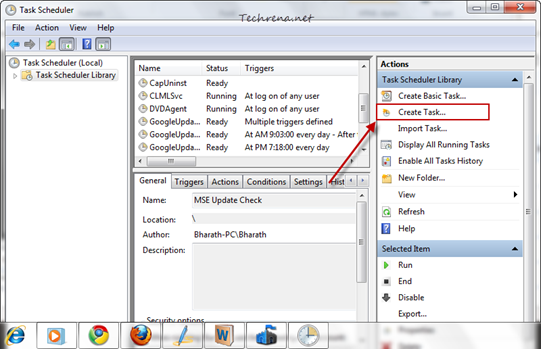
2. In the Task Scheduler, click on the “Create Task…” link on the right-hand side pane.

Task scheduler options

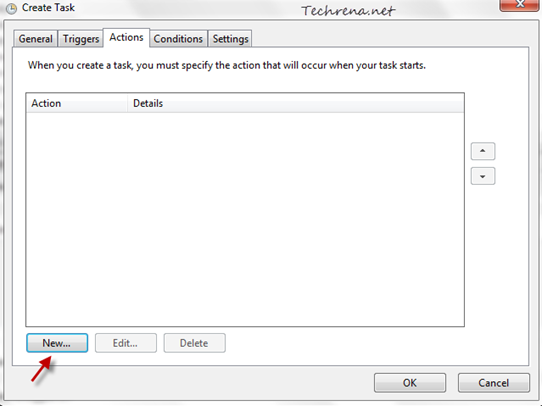
3. Give the task a name under the “General” tab, then click on the “Actions” tab. Click on the “New..” button under the Actions tab.

new-action-task-scheduler

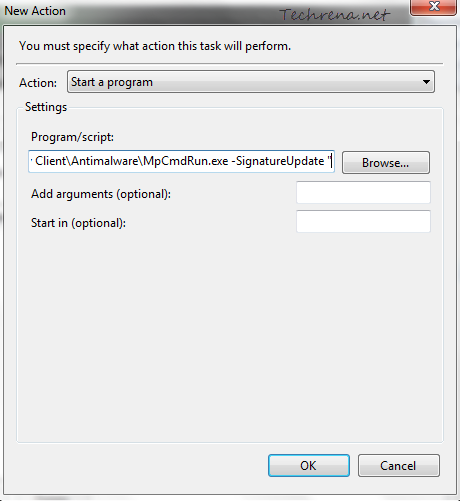
Browse the MpCmdRun.exe (Microsoft Essentials command line client) file. Usually it sits inside the Microsoft Security Client > Antimalware folder. In my case this where I found it:

"C:\Program Files\Microsoft Security Client\Antimalware\MpCmdRun.exe

It may vary depending upon your Windows version and the location where you chose to install it. Now select the file and add a “-SignatureUpdate’ to the program path so that it looks like

"C:\Program Files\Microsoft Security Client\Antimalware\MpCmdRun.exe -SignatureUpdate "

new action program path in task-scheduler

Tip: You may also specify the “-SignatureUpdate” in the arguments field instead of embedding it in the program path.

Click OK once you are done.

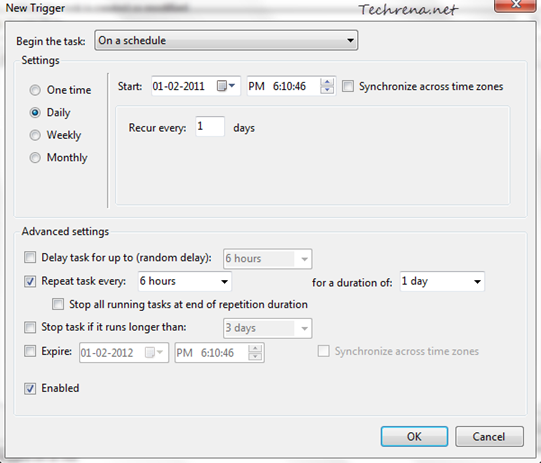
4. Then go to “Triggers” tab, under the settings tab, select “Daily” and then set the values for “Repeat task every” field (like 5 hours or 6 hours etc.) and click OK.

new trigger in task schedule

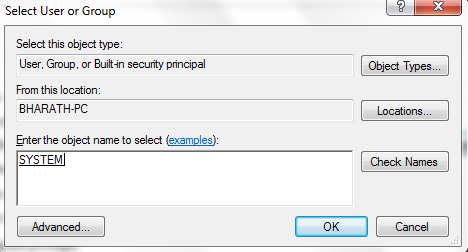
5. Now go back to the “General” tab and click on the “Change User or Group..” under the Security Options. Type “SYSTEM” as the object name and click OK.

system-user-task-scheduler

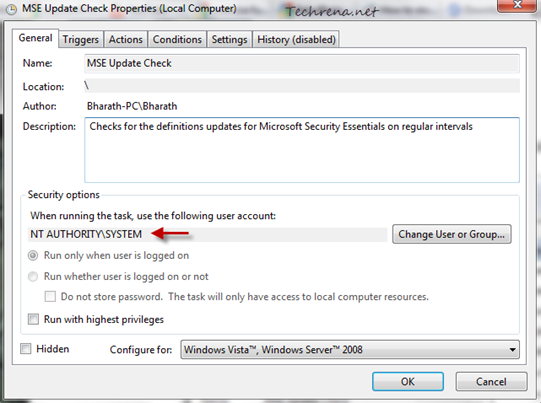
Now we have set the task to run on “System” user account

MSE update check task scheduler properties

That is it! You are done with configuring the update checks settings for the Microsoft Security Essentials.

[via]

[Tip] Delete Windows 7 Log Files The Easy Way

Windows logo

Maintaining is a Windows PC isn’t a cakewalk. You often need to take time to remove all the clutter from your Hard drive in order to make the Windows run more smoother and efficient. PC experts often advise that you should do such maintenance tasks in a regular manner to get the most out of your current operating system.

In this post, we are going to talk about the Windows log files. Windows log files keep a record of various activities of your PC.  These include list of errors/exceptions, internet browsing history etc. Even though they don’t create a problem but with time these logs grow bigger in size and thus reducing the amount of free space on your hard disk. Most of these logs are not essential and you can safely delete them manually or using clean up utilities. Windows 7 has inbuilt utility “Disk Cleanup” to delete these log files. You can also make use of third party programs like “CCleaner’ to perform the same task. However, even after performing clean ups, there would still be some traces of these log files left on your disk. In such cases deleting the log files manually would be a better option. Let’s see how to delete the Windows 7 log files manually.

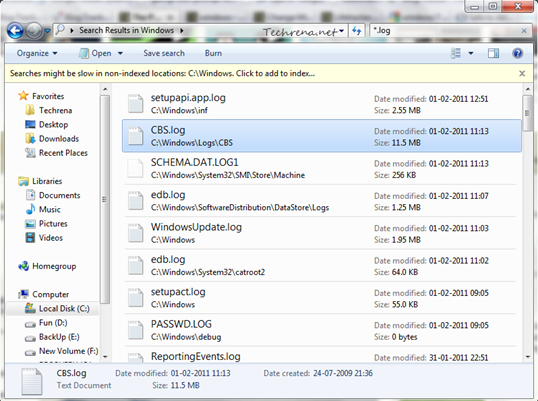
>> Go to your Windows folder (usually at C:\ Windows, that’s where all the logs are stored!, where ‘C’ is the Windows installation drive) in the windows explorer and type “*.log” in the search box at the top right corner of your window and hit enter. The results comprise of all the log files stored in the “Windows” folder. Delete the all the log files by selecting them.

Log files in windows folder

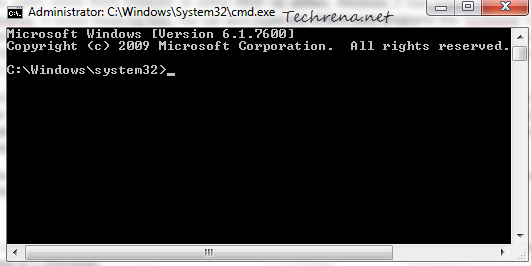
>> This can also be done using a command prompt. Type cmd in the Start Menu search box and use CTRL + SHIFT + Enter to open the command prompt with elevated rights (administrator mode).

Command Prompt Administrator mode

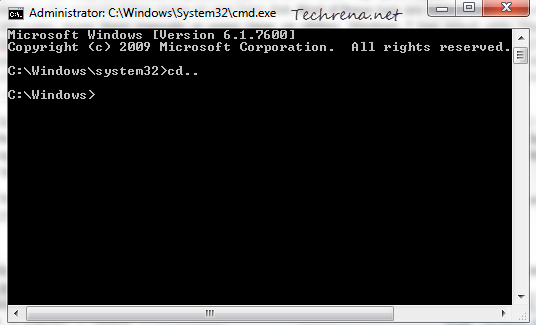
By default, command prompt would start from “C:\Windows\system32”. We need to go one folder down to C:\Windows. For this type “cd..” hit and press enter.

Windows folder in Command Prompt

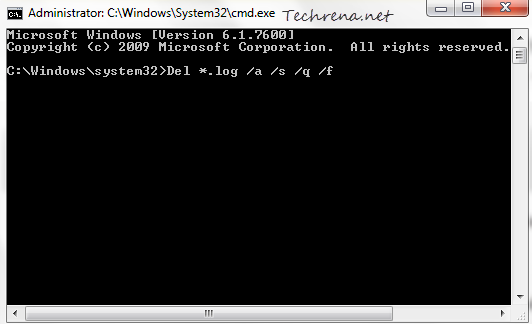
Now that we are in the “Windows” folder, we are just one command away from deleting all the log files. Type


Del *.log /a /s /q /f

in the command prompt and press enter. Now all the Windows log files will be deleted in few minutes.

Delete log files in Windows from Command prompt

In the command, “a” stands for selecting all the log files,

“s” for deleting all the files inside sub folders

“q” for skipping the Yes/No prompts before deleting the files

and        "f” for forcibly removing the files

[Tip] Get Imagery Update Alerts For Your Favorite Places In Google Maps And Google Earth

Follow your world imagery update Google Earth

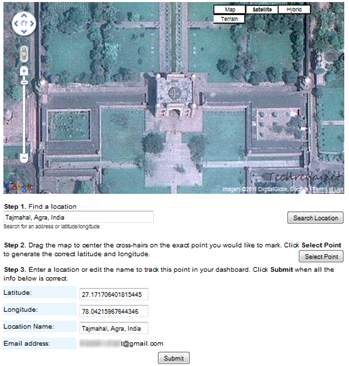
We all love to  follow our favorite places our hometown, our college, places where we used to play with our friends etc. on Google Earth and Google Maps. But we don’t really know when the imagery in these applications gets updated. Wouldn’t it be good if we get notified as and when there is an update in the imagery? Google has just done that! They have released a new app, called “Follow Your World” which lets you track of your favorite places in Google Maps and Google Earth and lets you notify any physical changes in your corresponding subscriptions.

To get started, visit the Follow Your World homepage, set your location for which you want to get imagery update (you can manually search and locate it or you can do it through longitude and latitude values). Scroll down and you will see your email address to which these updates will be delivered, check the details and click the “Submit” button when you are done.  You will receive email whenever there is a physical change in the imagery of the places that you have subscribed. As Google Maps and Google Earth make use of the same imagery, you can then see the changes in both the products.

Check USB Flash Drives For Errors With H2testw

usb flash drive

Portable flash memory storage devices like USB flash drives (pen drives) and SD cards are in increasing demand these days, owing to their simple usage and portability. This has also lead to foray of many fake devices resembling the actual ones. They even outdo the original in looks but it is while using it actually only that you would come to know it is fake. A good USB flash drive should both read and write the data. But the fake device would fail either in writing or reading data from the device.

But until now there is no way to detect these corrupted devices. However, there is a small freeware (Windows only) that checks for write/read errors in storage media like USB flash drives, memory cards, hard drives and network cards for errors.

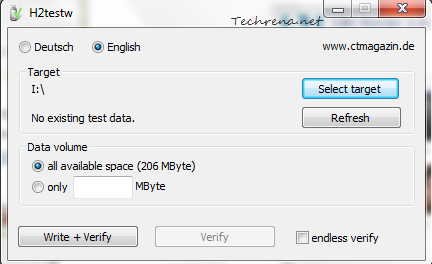
The usage is pretty much simple: Just download the H2testw zipped file, extract and run H2testw.exe. Select the target, the drive which you want to check for errors. Choose the amount of available space for which you want to verify the disk and hit “Write + Verify” button. You might want to free up the occupied space by formatting the device and choose the “all available space” option under the Data Volume section for more precise check.

H2testw

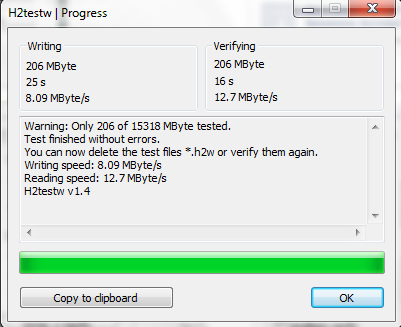
H2testw scan complete

Even if you have some files on your drive before running the scan, the files won’t be damaged or altered by the program if the drive is not malfunctioning. The program will create a “.h2w” file whose file size would be equivalent to the data volume you chose while scanning, You can manually delete these files after the tests are completed. If you click on “Verify” which would be enabled after the initial test, the option actually uses these .h2w files instead of running all over from the beginning again, so harm in deleting these files created by the program.

Download H2testw

If you have got a USB flash drive (pen drive), learn how to install Windows 7 from your USB stick.

[Tip] Know The File Size Before You Download It In Firefox

Firefox logo

Knowing the file size before you could actually start downloading it is good practice as you can plan your work accordingly. For instance if you want to download a relatively bigger file, you might want to postpone it to later without interrupting your current work. Most of the sites especially download portals always show the information about the size of the file before the download. However it is not the same case always. There are times when you download a file and come to know about its size only after the actual downloading begins in Firefox.

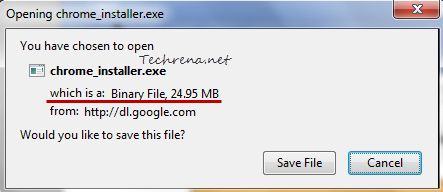
Thankfully there is a Firefox ad-on called “Show File Size” that allows us to view the file size information before you download it. Once installed, the extension show information like the type of the file and the size of the file you are downloading it in a separate row just below the name of the file row in the download window as shown:

firefox file download size

It is a basic, lightweight extension (just 4KB !) that just serves the purposes justifying the name. Show File Size add-on works fine with Firefox 3.6 to Firefox 4 versions.

Install Show File Size

[Download] Firefox 4 Beta 10

Firefox 4 beta

We have a new beta release for Firefox 4 available for download. Firefox 4 Beta 10 has been released with minor improvements.

The improvements in the beta 10 version include better compatibility and stability improvements of Adobe Flash on Mac OS X, improvements in the browser memory usage, support for graphics driver blacklist.

For more details about the improvements in this version, read the Firefox 4 b10 release notes.

While we are nearing the final polished version of the Firefox 4, Mozilla is requesting users to send their feedbacks as much as they can. To provide a feedback to Mozilla, you can either click on the “Feedback” button present at the top right corner of the browser or alternatively, you can enter this feedback page and share your feedback. If you ate on Mac OS X, download the beta update and watch some videos to see the Flash performance improvements.

Download Firefox  4 Beta 10

[via]

Chrome Gmail Desktop Notifications For Email And Chat Messages

gmail desktop notifications sample

We always want to get notified for new emails (read Gmail), right? Probably because we can’t always stay online or even if we are online, we just can’t keep the Gmail window open and keep looking at it. That’s why there are so many services out there offering these kind of email alerts (both offline and online). We had earlier covered how you can get free Gmail SMS alerts whenever a new email arrives. When you are online you can just install one of those widely available desktop notification application to get alerted for new emails and chat messages.
But, wait! Google has listened to us, Google has recently integrated the desktop notifications for email and chat conversations into Gmail. But the catch? You should use Google Chrome to make this thing work. The Gmail desktop notifications is based on HTML5 and even though the most of the modern browsers support HTML5, it’s just available for Chrome! But as a Gmail fan, I would like to see this feature extended to other browsers in near future. Okay, lets get into the details about how to enable the desktop notifications in Gmail if you are using Google Chrome.

1. Login to your Gmail using Google Chrome.

2. Click on the Settings link found towards the top right corner of your inbox.

Gmail settings link

3. Under the General tab, locate the settings for “Desktop Notifications”.

4. Choose the right options for you. You can get notifications for both chat messages as well as usual email messages or for just important mails.

Gmail desktop notifications settings

5. Click the Save Changes button once you are done.

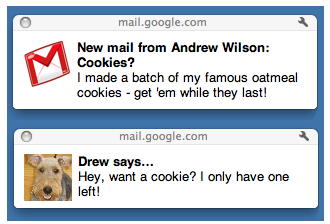
Gmail desktop email alert

That’s it! You will get the notifications for  new emails or chat messages like the one shown above. In case, if you want to turn these desktop notifications off for your Gmail account, select the respective options in the step 4. Note that desktop notifications isn’t available for Google Apps users yet.

[via] Official Gmail blog

[Tip] Edit The Firefox Maximum And Minimum Zoom Levels

Firefox logo

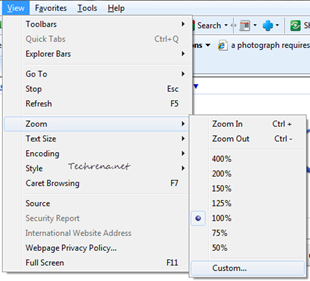
Readability level is one of the important aspect the modern day browsers stress upon. Different users need different readability levels for various elements on a webpage. The browsers let users to zoom in or zoom out of any webpage and adjusting them according to their comfort. Hence all the browsers including the Internet Explorer, Mozilla Firefox, Google Chrome, Opera etc. have incorporated the settings for adjusting zoom levels into the menu settings making them easily accessible. Firefox zoom levels range from a maximum zoom in level of 300% to a minimum zoom out level of 30%. While these are satisfactory for most users, there would still be some users who want to zoom in a page for more than 300% in order to see a particular element of a page like text, image or vide to more precisely, at which they feel comfortable reading it. Some people like web developers would want to zoom out to a level more than 30% to just see how all the elements in a web page are fitting into the screen. Whatever may be the reason, you need to have a choice. Internet Explorer allows you to enter a custom zoom level as you can see in the following screenshot:

Internet Explorer zoom levels

You can edit the Firefox default zoom levels via the about:config settings. Follow the steps to configure your Firefox.

1. Type about:config in the Firefox address bar and hit Enter.

About:config in the Firefox address bar

2. Accept the warning and continue.

Firefox this might void your warranty alert

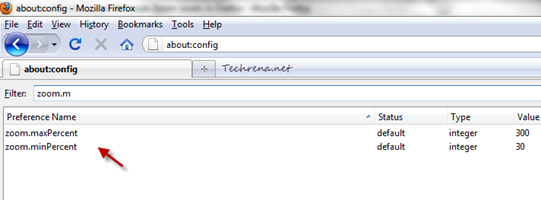
3. Now search for “zoom.maxPercent’ and “zoom.minPercent”. Both of these should appear as soon as you enter “zoom.m” as search string.

Max and min zoom level settings in Firefox

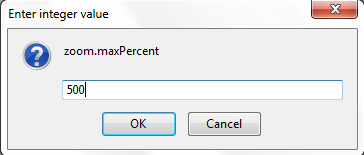
4. Double-click on each item to change the default values. For instance, you can change the maximum zoom percent to 500 from the default value of 300 p.c. Similarly you can edit the default value for minimum zoom out level as well.

Changing Firefox zoom levels

Click OK when you are done. Restart your Firefox for the changes to take effect.

[Tip] Lock Your Desktop With Transparency

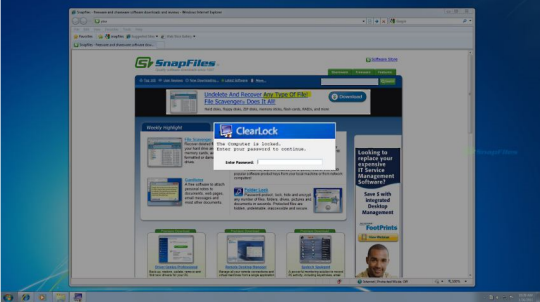
We, all the Windows users are very much used to the famous Windows + L shortcut to lock the computer when we are moving away from the system. This is just fine and serves the purpose. I have just come across a small Windows freeware that lets you lock your computer while keeping a transparent layer of your desktop screen at the background.

So you would still see the the desktop as it is, the same way as it appears if it had not been locked. But the only catch is that you need to provide the password to actually get into the system. Thus you may even tease others by allowing a sneak peek at your desktop while not allowing them to enter into it.

ClearLock screen

Download the ClearLock from the link that I have added below and run it. It will ask your for a password. When you confirm the password, the screen gets locked.

Download ClearLock [Link: Official site]

via [Digital Inspiration]