[Tip] Disable ‘Recently Closed Tabs’ In Firefox

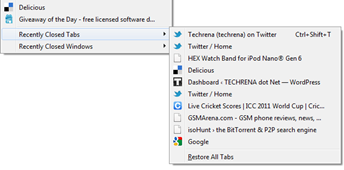
Firefox recently closed tabs

Firefox lets users to quickly reopen few of the recently closed tabs for quicker access. Even though the users can go to the history and access all of the webpages that were accessed or closed previously, the “Recently Closed Tabs” that appears under the “History” menu item is surely a timesaver for many of us. But yes, there are people who don’t like this feature. You can always configure Firefox to not to remember any of your recently closed tabs or manually configure it to remember certain number of the recently closed tabs. Here is what you have to do:

1. Type about:config in the address bar and hit enter.

2. A warnings message will be shown, accept that you would be careful while working the about:config entries.

about:config firefox warning

3. In the “Filter” filed, type the following text code and look for an entry which exactly matches with it.

browser.sessionstore.max_tabs_undo

About:config settings in Firefox

4. Double click on the entry. By default it will hold a value “10”, meaning that it will remember and show the last ten recently closed tabs. Here we want none. So change the value from 10 to 0.
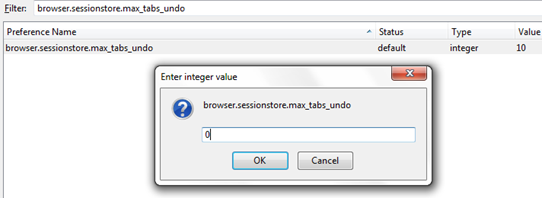
Change number of tabs closed undo setting

That is it! Firefox will no longer remember your recently closed tabs. If you have entered any other non-zero value, Firefox will let you see that many number of the most recently closed tabs.

[How To] Backup And Restore Windows 7 Sticky Notes

sticky-notes-windows-7

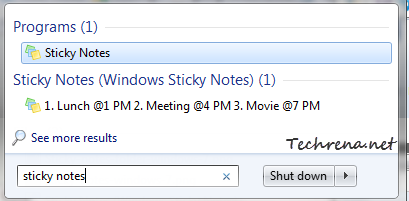
Sticky notes in Windows is a fastest way to quickly take a note or add quick reminders, the easy way. You can easily add a new sticky note by searching for “sticky notes” in the Start Menu and by launching the Sticky notes application.

Launch sticky notes from start menu

If you use sticky notes much, you might want to save and backup them so that they can be restored and used on another computer. Follow these below steps to learn how you can do this.

Steps:

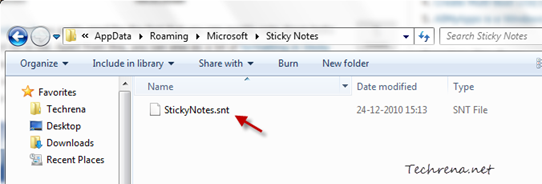
1. Navigate to the following folder in your explorer:

C:\Users\<username>\AppData\Roaming\Microsoft\Sticky Notes\StickyNotes.snt

Where <username> is the your Windows user account name through which you are logged on.

2. You need to enable the option to show hidden files and folders in order to see the “AppData” folder and  StickyNotes.snt file in your explorer.

Sticky-notes-folder-windows-7

3. Now you just need to copy the above file to another external media like USB flash drive or external Hard disk, to save the backup and later move it to the same folder (mentioned in step-1) of the target PC where you want to see these sticky notes.

You can use this tip to restore your sticky notes on a new computer or on the same computer when you reinstall your Windows 7 copy replacing the older installation.

[Download] Firefox 4 Beta 8

Mozilla has released the 8th version of the Firefox 4 beta few days back. As Mozilla had earlier finalized the features list for final version of Firefox 4, this Firefox 4.0b8 build doesn’t come with new features but have few feature improvements over the earlier beta release. The major improvements are:

>> Improved Firefox Sync,

>> Refined add-on manager

>> Speed, functionality and stability improvements to WebGL

Firefox 4 beta 8

To know about all the improvements in Firefox 4 Beta 8, read the release notes. Firefox 4 beta 8 has more than 1400 bug fixes listed.

Download Firefox 4 Beta 8 [7.7 MB]

[How To] Use The Reliability History In Windows 7

Windows 7 has many lesser-known features and “Reliability Monitor” is one such feature. Reliability Monitor, a handy tool for diagnosing when a particular event was first occurred. It usually monitors five types of events:

>> Application failures

>> Windows failures

>> Miscellaneous failures

>> Warnings

>> Information

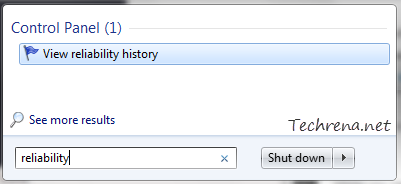
To see the Reliability History for your Windows, go to Start Menu and type “reliability” in the search box and click “View reliability history” from the results under “Control Panel” section.

reliability history in start menu

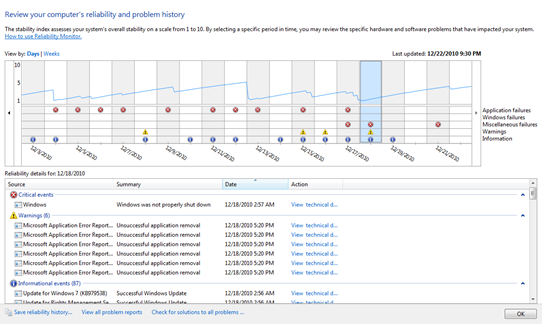
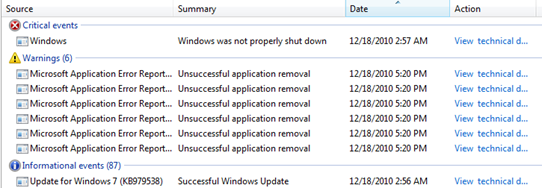
You will see a graph divided into weeks (or days) showing the all the different types of events that are recorded.

reliability monitor

Critical errors are displayed with critical error in windowsicon , Warnings with warning in windowsand information messages with information icon in windows.

While you can safely ignore the information messages, you should look deeply into the critical errors and warnings. If you are encountering any serious issue with your Windows, and decide to trouble shoot it, the first place you should visit is this as you can get an idea of exactly when the problem has started. The monitored events mostly include processes that stopped working, errors when windows was not properly shut down, unsuccessful application installations and driver installations etc.

Events in reliability history

Check solution for a critical event

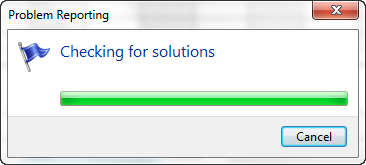
You can right-click on any critical event to check for a solution for that event. If you are connected to internet Windows will automatically look for a solution and will save it in the Windows 7 action center.

Checking for solution in Windows 7

If you view the technical details of the problem, you will get some important details like error code for the issue with which is pretty much useful in troubleshooting the problems.

Reliability monitor and reliability history is also available in Windows Vista.

Do you use this tool much? How far has this tool been useful to you? Do let us know though comments..

Make Phone Calls From Gmail For Free All Through 2011

Gmail logo small

If you are located in US and Canada, Google has some very good news for you. You can now make free phone calls to all your pals till the end of 2011. When this feature was launched initially in August 2010, Google said that it would offer free phone calls service to the U.S. and Canada till the rest of 2010. According to a recent blog post at Official Gmail blog, the free service has been extended through 2011.

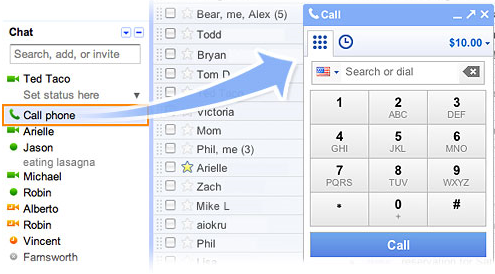
gmail phone call free

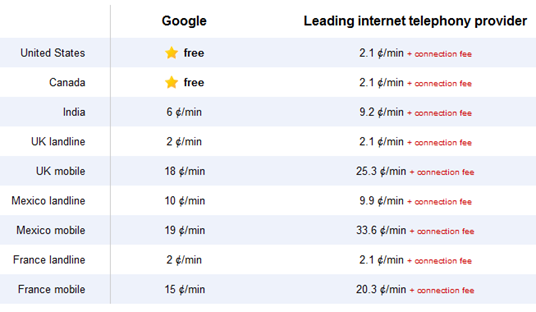
To get started with calling phone numbers in Gmail, get the Gmail voice and video chat plugin click on the “Call Phone” that appears at the top of your chat list and you will see the dial pad. You can either dial the phone number or enter a contact name to start a voice phone call. If you have a Google Voice phone number, you can even display it as the outbound caller ID and receive calls made to this number inside Gmail as well. It may not be as good as other leading VOIP solutions like Skype but still a decent one.While calls to the U.S. and Canada are free, calls to phones outside the United States are charged as per the following rates list.

gmail phone call rates

For more information, go visit gmail.com/call.

[How To] Change Computer Name In Windows 7

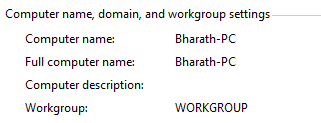
Computer name domain and workgroup settings

Computer names are pretty much useful to distinguish different computers when you are on a network with too many computers connected it. You would normally choose this computer name during the initial installation. Or if your system came with a pre-installed version of Windows 7 or Windows Vista, chances are that your manufacturer might have chosen a crappy computer name. It is always a good practice to have a unique computer name which is more descriptive so that you can easily identify your computer over others in the network.

Changing a computer name was relatively easy in Windows XP. When it comes to Windows 7 and Vista, you need to get through a couple of windows before you can land at the correct settings window. Here are the steps.

Steps:

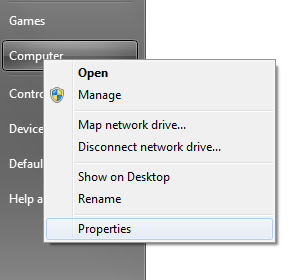
1. Go the Start Menu, right-click on the “Computer” and click “Properties”.

Computer right-click context menu from Start Menu

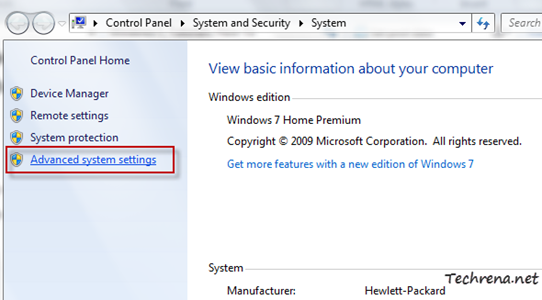
2. Click on the “Advanced system settings” link on the left hand side pane.

System settings in control panel

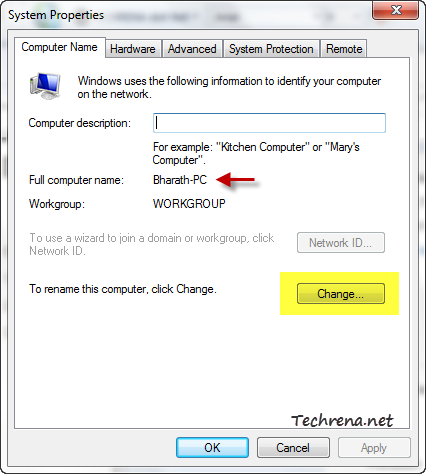
3. Go to the “Computer Name” tab in the System Properties window.

Computer Name in System Properties

Note: In Windows 7 you can also arrive at the above settings window from the “Computer name, domain, and workgroup settings” from the step 2.

change settings in system control panel

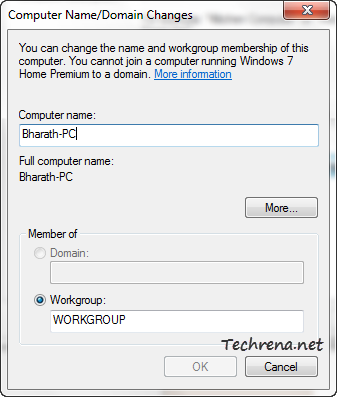
4. In the next dialog box, you can change your computer name and the workgroup membership of your computer.

Computer name and domain changes

Click OK to close the window and apply the changes. You must restart your system for the full changes to take effect.

[Download] Microsoft Security Essentials 2.0

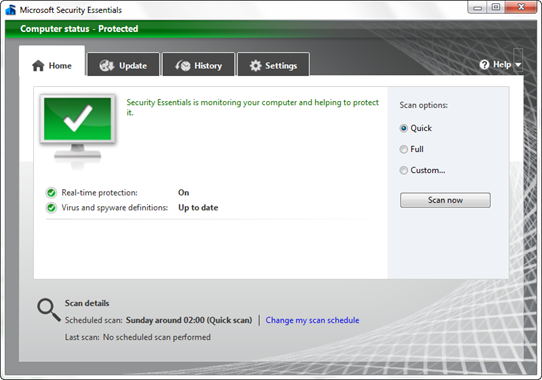
Microsoft security essentials

Microsoft Security Essentials 2.0 has just got out of beta and is available for public download. One good reason to use this antivirus and anti-spyware program is that it is coming from the Microsoft folks and even that too for free! If you are already using an earlier version of the Security Essentials, you don’t need to download the software again. Just run the program and it should automatically update itself to the latest version.

Microsoft security essentials v2

Microsoft Security Essentials runs very smoothly and efficiently in the background taking up very lesser amounts of your CPU resources.

Features of Microsoft Security Essentials 2.0 :

  • Windows Firewall integration
  • Comprehensive malware protections
  • Free to download and use
  • Automatic updates
  • Network inspection system
  • Enhanced protection for web-based threats
  • Easy to use

Microsoft Security Essential keeps itself up to date by downloading updates automatically. As long as the program is in green, your computer is running fine and you can continue working on your PC without any worries. But when it turns to red, it means that your computer is at risk and the program will show you the steps that you can follow to keep your PC secure. The interface comes with a lot of settings giving you more control over the program.

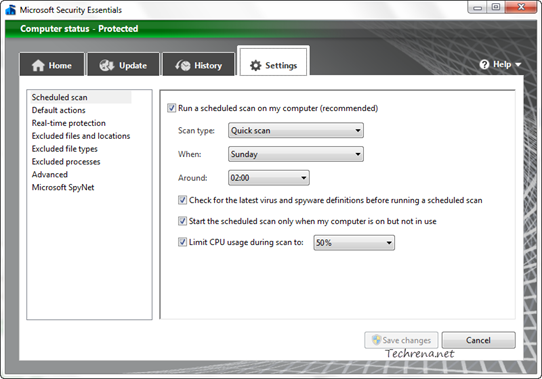
Microsoft security essentials v2 settings

You can configure various settings like:

# Scheduled scan

# Default actions

# Real-time protection

# Excluded files and locations

# Excluded file types

# Excluded processes

# Advanced

# Microsoft SpyNet

Download this free antivirus program from the following links. But please note that your PC must be running a genuine Windows to install Security Essentials.

Download Microsoft Security Essentials 2.0:

For x86 machines (7.5 MB)

For x86-64 machines (9.5 MB)

Supported OS: Windows 7, Windows Vista and Windows XP

[Tip] Restore Accidentally Deleted Contacts In Gmail

gmail logo

Have you accidentally deleted any contact in Gmail while syncing the contacts between various devices that you possess? Have you ever mistakenly deleted a wrong contact that had almost similar name to the contact that you wished to delete?

Yes, these sorts of things do happen now and then! But Gmail think-tank seems to be wary of these accidental deletions that happen to users like us. Gmail has announced highly useful “Restore Contacts” feature that lets you quickly recover contacts that you had previously deleted. With this, you can restore any deleted contact information deleted from your Gmail account in the past 30 days.

How To Use?


To use “Restore Contacts” feature in Gmail,

1. Login to your Gmail account.

2. Go to the Contacts page inside your Gmail.

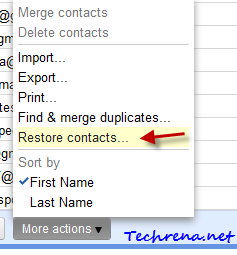
3. Click the “More Actions..” drop-down button and choose “Restore Contacts”.

restore contacts link under more actions in gmail

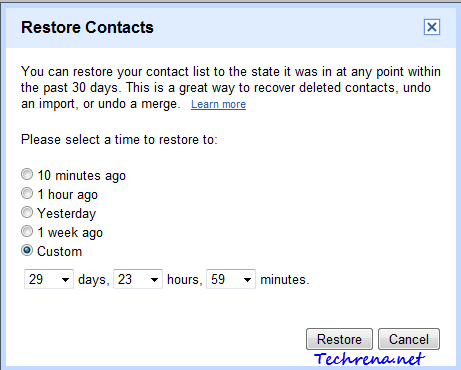
4. In the new “Restore Contacts” dialog box, choose the time stamp to where you want to restore your contacts. You can restore the contacts to any point within the past 30 days.

Restore contacts in gmail

When you restore the contacts to an earlier time frame, all the contacts added since then will be deleted. All the contacts that you had deleted will be back.

[Via] Official Gmail blog

[Download] Opera 11 Release Candidate 1 (RC)

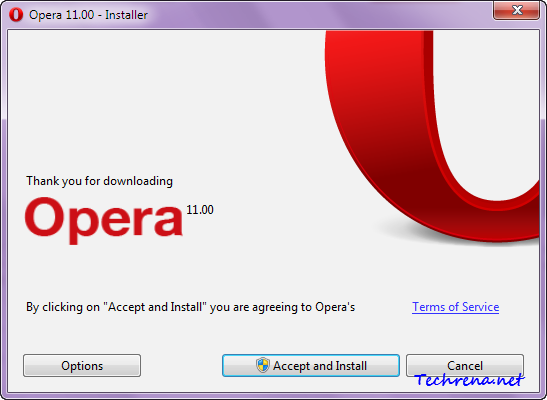
Opera 11 installer

Opera has achieved another landmark with the release of Opera 11 Release Candidate. Now that has come really quick. It was just less than a month ago that the Opera 11 Beta was released and now comes the RC version.

Opera 11 now supports adding extensions much like Google Chrome, where users can install extensions from Opera’s extensions catalog.  You don’t need to restart your browser while installing or uninstalling the extensions like you do in Google Chrome.  There are loads of other improvements. Take a look at some of them.

New features in Opera 11:

  • Tab stacking: Drag and drop a tab onto another to create a tab group.
  • Extensions support
  • Visual mouse gestures
  • Enriched HTML 5 support
  • Auto-update of extensions and Opera Unite apps
  • Google search suggestions
  • On demand loading of plug-ins
  • Enhanced email panel
  • Faster installation

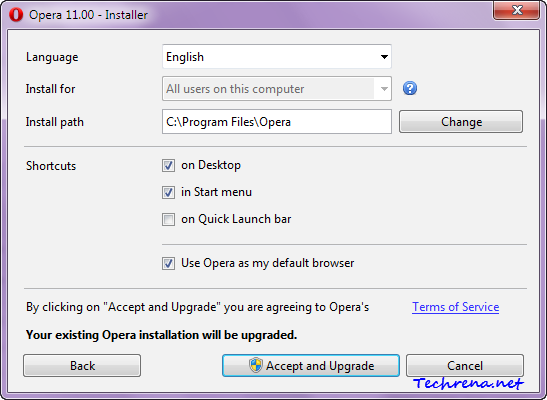
If you are installing Opera 11 with a stable version already being installed, you should note that the Opera 11 RC version gets installed in the same default installation folder as that of the stable version. To avoid this, click on “Options” in the installer window and change the settings.

opera 11 installer setup

Download the Opera 11 for your operating system from the below direct links:

Download Opera 11.00 Release Candidate 1 (RC 1):

Windows

Mac

Linux/FreeBSD

[Download] Microsoft December 2010 Security Release ISO Image

December 2010 security release iso

Microsoft has released the December 2010 Security Release ISO Image containing all the Windows security updates released via Windows Update on the December 14, 2010.

This ISO image file would be ideal for the administrators who need to download the each security update in different languages without using automatic programs such as Windows Server Update Services (WSUS). Download the ISO image file from the direct download link added below. This ISO image contains the following updates in all languages.

The DVD5 image consists of the following Windows updates:

KB2416472 / (MS10-070), KB2160841 / (MS10-077), KB979688 / (MS10-083),  KB2416400 / (MS10-090), KB2296199 / (MS10-091), KB2305420 / (MS10-092), KB2447961 / (MS10-094), KB2385678 / (MS10-095), KB2423089 / (MS10-096), KB2443105 / (MS10-097), KB2436673 / (MS10-098), KB2440591 / (MS10-099), KB2442962 / (MS10-100), KB2207559 / (MS10-101), KB2345316 / (MS10-102)

Supported OS: Windows 7, Windows XP Professional x64 & SP 3, Windows Vista (SP1, SP 2 & 64-bit SP 1), Windows Server 2008 (R2, SP 2), Windows Server 2003 (SP 2, SP 2 x64)

Download Dec’10 Security Release ISO (3.24 GB approx.)

Related: Update your Windows and Office software offline