Hide Most Visited Sites from New Tab in Google Chrome in Easy Steps

Google Chrome is a web browser developed by Google and based on the WebKit layout engine and application framework. It was first released as a beta version for Microsoft Windows on September 2, 2008, and the public stable release was on December 11, 2008. The name is derived from the graphical user interface frame, or “chrome”, of web browsers. In March 2009, Chrome became the world’s fourth most widely-used browser, with 1.23% usage. In spite of the increasing popularity, chrome lacks user customization and control in some of its features.

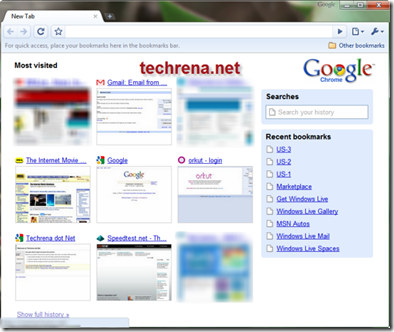
The most visited site of Google Chrome which is displayed while opening a new tab is not under our control, meaning that it will display the top most visited sites in the browser even if we do not want to display some of them as most visited. Most of the users need some privacy settings, like to display the sites which only the users want to display. But as we do not have this control in Google Chrome we are going for this custom technique by using Grease Monkey User Scripts. Till date Google Chrome lacks the feature of customizing the most visited page in new tab, even in the latest version 2.0.174.0 also.

Google Chrome Most Visited site New Tab

It is a simple process. Just follow the steps given below:

Step 1: Enable GreaseMonkey User Scripts in Google Chrome by following the Guide Enable GreaseMonkey User Scripts in Google Chrome

Step 2: Download the Java Script file given below: (Note: Right Click on the link and select Save link as)

Name: NoSpeedDial.user.js

Size: 500 Bytes

Download: http://www.techrena.net/downloads/Grease%20Monkey/NoSpeedDial.user.js

Step 3: After enabling Greasemonkey go to the location below in your computer and save the NoSpeedDial.user.js file in the User Scripts folder:

Windows XP Users:

Documents and Settings\%userprofile%\Local Settings\Application Data\Google\Chrome\User Data\Default\User Scripts

Example: C:\Documents and Settings\DENNIS\Local Settings\Application Data\Google\Chrome\User Data\Default\User Scripts

Windows Vista and Windows 7 Users:

Users\DENNIS\AppData\Local\Google\Chrome\User Data\Default\User Scripts

Example: C:\Users\~User Name~\AppData\Local\Google\Chrome\User Data\Default\User Scripts

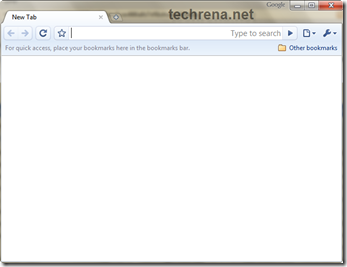
That’s it. Now when you open Google Chrome then you will not find any Most Visited Sites. It will simply show a Blank Page. Even If you click New Tab or Press Ctrl + T then it will show blank page only. No Most Visited sites

important:

1. It is compulsory for you to enable GreaseMonkey User Scripts, otherwise the method will not work.

2. This method will work for Google Chrome Version 2.0 or higher. If you are running a older version then Download the new one and Update it here Download Google Chrome Web Browser

Enable GreaseMonkey User Scripts in Google Chrome

GreaseMonkey in Google Chrome

Greasemonkey is a Mozilla Firefox add-on that allows users to install scripts that make on-the-fly changes to most HTML-based web pages. As Greasemonkey scripts are persistent, the changes made to the web pages are executed every time the page is opened, making them effectively permanent for the user running the script. Earlier versions of Google Chrome did not support Greasemonkey. But from the new version of Google Chrome 2.0, we can make it support Greasemonkey. Greasemonkey can be used for adding new functions to web pages like downloading videos form YouTube or removing the most visited sites from new tab in Google Chrome.

To Enable User Scripts follow the steps given below:

Step 1: Go to the location below in your computer:

Windows XP Users:

Documents and Settings\%userprofile%\Local Settings\Application Data\Google\Chrome\User Data\Default

Example: C:\Documents and Settings\DENNIS\Local Settings\Application Data\Google\Chrome\User Data\Default

Windows Vista and Windows 7 Users:

Users\%userprofile%\AppData\Local\Google\Chrome\User Data\Default

Example: C:\Users\DENNIS\AppData\Local\Google\Chrome\User Data\Default

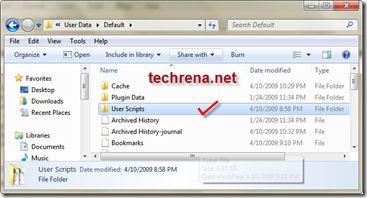
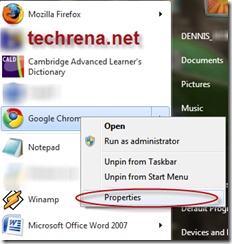
Step 2: In the Default folder Create a new folder and name it as User Scripts. User Scripts FolderStep 3: Now find the shortcuts of Google Chrome in the Start Menu, Taskbar or your Desktop. Right click on it and select properties.

Google Chrome Properties

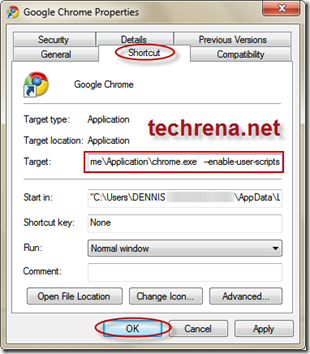
Step 4:  In the Properties Window go to Shortcut tab and add

--enable-user-scripts

by giving a space after chrome.exe” in the Target text box. Select OK. It is shown below.

Enable Greasemonkey user scriptsNow you can simply save your Grease Monkey scripts in the User Scripts folder that you have created.

For a small test download the script given below in the User Scripts directory

To download Right click and Select Save Link As:

https://techrena.net/downloads/Grease%20Monkey/test.user.js

You should see a Hello World! dialogue when you open Google Chrome from the Start menu or Desktop shortcut. Don’t forget to delete the script after the test has been successfully completed.

Important:

1. GreaseMonkey Scripts will work on Google Chrome 2.0 or higher. To download the new version visit  Download Google Chrome Latest Version

2. You should perform Step 3 for all the Google Chrome shortcuts you have, either in Desktop, Taskbar, or Start Menu.

3. User scrips will be enabled only if you open Google Chrome from a shortcut where you have preformed “Step 3”.

4. For removing a particular Greasemonkey addon, just delete the corresponding user.js file from the User Script folder.

UPDATE on Feb 4, 2010: Google Chrome 4 now officially supports GreaseMonkey User Scripts

Enable Hide Inactive Icons Tray Using Registry in Windows

Many of the Windows XP, Windows Vista or Windows 7 users usually find that the Auto Hide Inactive Icons tray from the taskbar has stopped working or it is missing inspite of  enabling it from the control panel or the taskbar properties. This problem is very common. May be after reboot it may work again, but for some systems the tray may never come up. This tray will hide the inactive and unnecessary icons from the taskbar. So many people like this feature. Making it work again is what we are talking about here.

See the images below where one is not having hide inactive Icon tray and another one is having it:

missing hide Icon tray hide Icon tray On

Enabling the Inactive icon tray consists of changing only a single registry. Its an easy process. There are two methods given below. Both the methods needs registry editing to be enabled. If your Registry editing has been disabled by the administrator then visit: How to enable Registry Editor (REGEDIT) to enable it.

Method 1: Using Elevated Command Prompt

Step1: Copy the whole command from the table below:

REG ADD HKCU\Software\Microsoft\Windows\CurrentVersion\Explorer /t REG_DWORD /v EnableAutoTray /d 1 /f

Step 2: Open a Command Prompt (Press Start + R, type cmd and Enter). Paste the command you had copied into the Command Prompt. In order to paste in Command Prompt right click and select paste.

View Enable Auto Tray using Command Prompt Image

Step 3: Press Enter to execute the command. It should execute successfully.

Step 4: Log Off your computer and Log On again. Now your Hidden Icon tray will be working.

Method 2: Using Registry Editor

Step 1: Open a Registry Editor(Press Start + R, type regedit and Enter)

Step 2: Go to the registry key path given below:

HKEY_CURRENT_USER\Software\Microsoft\Windows\Current\Version\Explorer

View Hide icon key ImageStep 3: In the Right Side of the registry editor see for the value EnableAutoTray. [If you are not able to find it, create a new value with the same name. To create a, value right click anywhere on the right pane and select New DWORD. Change the Name to EnableAutoTray(Press F2 for name change)]. Double click on EnableAutoTray and change the value to 1.

View new hide icon tray Value ImageView Enable AutoTray New Value Image View Enable Auto Tray Registry value Image Step 4: Now close the editor and log off your computer. Log On and you will find your tray is working.

Congratulations you have enabled your Auto Hide Inactive Icons.

Note:

1. Log Off means complete logging off the computer not Locking the computer like pressing Start+L.

2. Restarting the computer will also work after the performing the procedure.

3. If you change the Value as 0 the it will disable the Tray.

4. This method works for windows XP, Vista and 7.

Reset Windows XP, Vista, 7 Password Using USB Drive or CD

A lot of methods are available to recover or reset the Windows password. The famous Ophcrack is used for recovering the password. Even i have posted about using Ophcrack. But the problem is that its bulky in size. We need to download a file of size 500MB to recover the password. So I thought why to recover a lost password, instead why cant we simply reset or delete the password using a 3 MB file open source program.  That is what this post is about. I have not found any other method simpler than this one, it resets your password in the blink of an eye.

The method uses an open source program called Offline NT Password & Registry Editor. We can use a USB Disk Drive (Pen Drive) or burn a bootable CD for this method.

Follow the Steps below:

Step 1: Download the cd080802.zip file from the link below and extract it. It contains an ISO file.

Size: 3.15 MB

http://pogostick.net/~pnh/ntpasswd/cd080802.zip (Updated Working Link 13-01-10)

Step 2: Burn the ISO file to a CD. If you are using a USB drive, then mount the cd080802.iso file to a virtual drive. Open the Virtual Drive and Copy all the contents to your USB disk. If any error comes while copying just skip the file. Now to make the USB Drive Bootable open a Command Prompt(Press Start + R, Type cmd and enter) and type the following commands:

Sl. No.

Command:

Action:

1

j:

Enter

2

syslinux.exe –ma j:

Enter

Here j is my drive letter, you should enter your own drive letter.

View Commands Image

Step 3: Now start the System which you want to reset the password by putting the CD or the USB in the Computer. While start up you have to make sure that it boots up from the correct device i.e. from the CD or the USB. In order to do this go to your BIOS settings and change the boot order as CD or the USB drive as the first option. Or if you know the Boot menu key then press it and Boot from the correct device.

Note: Step 4 to Step 8 takes a very less amount of time. No need to worry!

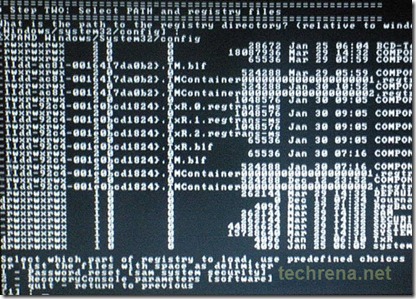
Step 4: After booting from the CD or the USB, press enter to continue the boot process. In the first step it will automatically select the disk where your windows is installed. Simply press enter to continue. In the Second Step it Will select the path and registry files. Select 1 for password reset (It will select 1 by default, just enter).

View Select Path Image

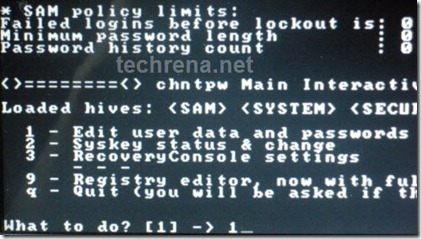
Step 5: Now after selecting the paths, It will ask “What to do?” Simply press enter as it will automatically select 1 for Edit User Password.

View Select Edit Password Menu Image

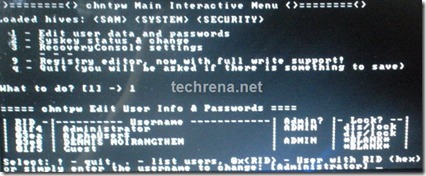
Step 6: It will show a list your system usernames and their password status. Now enter the username whose password you want to reset. It is case sensitive so, be careful and type what you see in the users list. (If the user is Administrator just press enter as it has already selected Administrator by default otherwise enter the correct username)

View Select User Menu Image

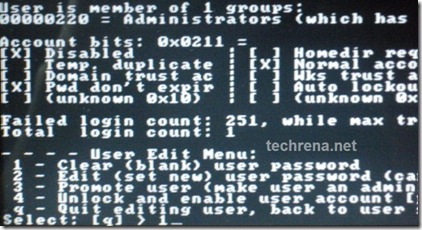
Step 7: It will show you User Edit Menu. Select 1 to clear the user password.

View User Edit Menu Image

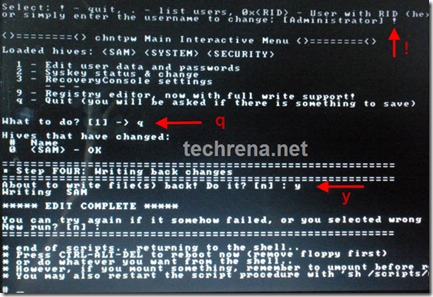
Step 8: It will clear the password. Now Enter “!” to quit from the User select menu. It will again ask “What to do?”. enter “q” to quit. Now in step four it will ask you to write the files or not. Enter “y” to write the files. It will write the files back. Now Simply press enter when it asks for “New run?” as it has selected no by default. The password reset has been successfully completed. Press the power button.

View the Final Step Imge

Now start the computer and you will find that it is not asking for password for the user you had selected. That’s it, you are done.

Important:

1. This method will remove your password not recover. If you do not want to reset the password, you can recover it. Visit: http://techrena.blogspot.com/2009/03/windows-password-recoverycrack-windows.html for password recovery.

2. The method has been tested for windows XP, Windows Vista and Windows 7 and all resulted in success.

3. This is for information purposes only. We are not responsible for any damages or illegal acts resulting from this information.

4. The information provided here should be used for legal purposes only.

5. USB Disk method will not work if your motherboard or BIOS does not support USB booting.

Windows 8 DownloadFeatured Post:

How to Download Windows 8 Pro ISO from Microsoft and Install it to any computer with Upgrade key

Download the newly released Windows 8 Pro 32 or 64-bit version from Microsoft

Missing Folder, File Names in Windows Explorer | Enable it in Single Step.

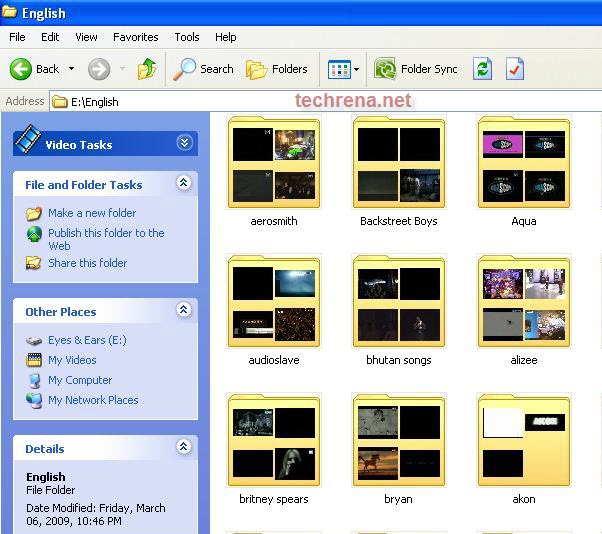
Have you ever faced any problem like if you view your folders in Thumbnail Mode then your Folder or file Names are missing and are not displayed. This is a very common problem for Windows Users. When I encountered this problem first I thought some virus has infected my system. But after finding the solution I laughed at myself. You can enable or disable it in a single step.

The missing Folder Names Window looks like as in the image below:

View Missing Folder Names Iamge

Note: This problem is different from Missing Folders in Explorer where hidden files and folders cannot be seen. To solve this problem See How to Show Hidden Files and Folders

Step 1: Now Go Up or back to the parent folder which contains the folders or files that does not display names. Select the parent folder, hold down Shift key and open the folder.

View Enable Folder Names Image

For my case the parent folder is English.

Now you will see the folder and file names. Its that easy.

View Folder Names Displayed Image

By performing the same process again you can disable the Folder or file names in Thumbnails View.

Hope this Solves the Missing Folder and file Name problem in thumbnail view.

Important:

1. This is a functionality of Windows to given more Space to the Thumb images instead of the Folder or file names.

2. This method works in Windows XP and Windows Vista. I don’t think this problem is seen in Windows 7

Change MAC Address or Physical Address Using Registry Editor (regedit) in Windows

Many people have a wrong conception that changing MAC Address of a computer is not possible or it requires a complex software. But it is not true. Changing MAC or Physical address of your computer is very simple. MAC (Media Access Control) address, Ethernet Hardware Address (EHA), hardware address, adapter address or physical address is a quasi-unique identifier assigned to most network adapters or network interface cards (NICs) by the manufacturer for identification. If assigned by the manufacturer, a MAC address usually encodes the manufacturer’s registered identification number. Although intended to be a permanent and globally unique identification, it is possible to change the MAC address on most of today’s hardware, an action often referred to as MAC spoofing.

Now getting to the point we can change MAC by using your Windows Registry Editor. The method has been successfully tested in different Wired Ethernet Adapters, Wireless Adapters etc.

Follow the steps below and your MAC will be changed in seconds:

Step 1: Open Registry Editor (Press Start + R, Type regedit and Enter). If you get a message like “Your Registry Editor Has Been Disabled By Your Administrator” then you need to enable it. To Enable Registry Editor Visit: How to enable registry Editor

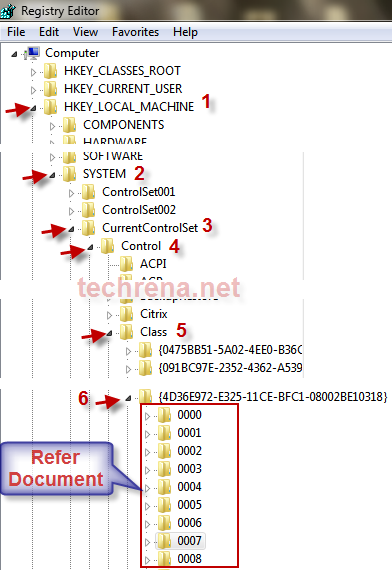
Step 2: After opening Registry Editor successfully, see the left pane of your registry editor. You can find a series of registry keys. You have to follow the path as:

HKEY_LOCAL_MACHINE\System\CurrentControlSet\Control\Class\{4D36E972-E325-xxxx}

For the last key search for the red highlighted part in your Editor. You can refer the image below:

View Change MAC using Regedit Image

Step 3: After opening the last Key you will see a set of keys like 0000, 0001, 0002 etc. You have to open each key and search for values which corresponds to your network adapter. For example, I have an Intel(R) PRO/100 VE Network Connection. So in the right side of the editor i found a value which is containing this name. This is how we identify the key for the network adapter. For me i got the key in 0007.

View Find your Network Connection Image

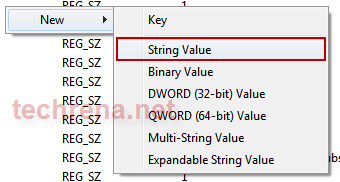
Step 4: Now search for the value NetworkAddress inside the key you have found. If you cant find it right click and create a new String Value of the name NetworkAddress.

View New String Value Image

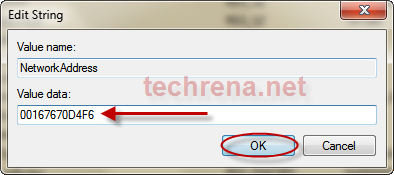
Step 5: Now change the value as your MAC Address. After Changing the value you can close Registry Editor.

View Change Value ImageView MAC Value Changed Image

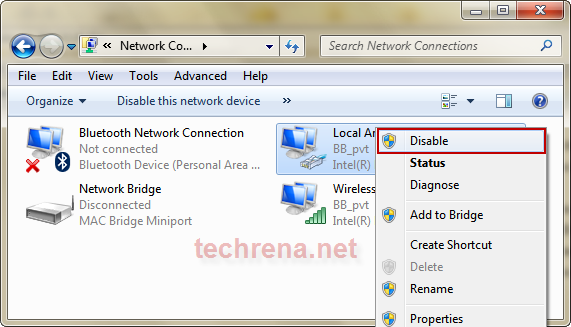
Step 6: Now Go to Network Connections and Disable your Adapter. Right Click and select Disable

View Disable LAN Image

After it is disabled Double click on the Network Adapter and it will Enable it.

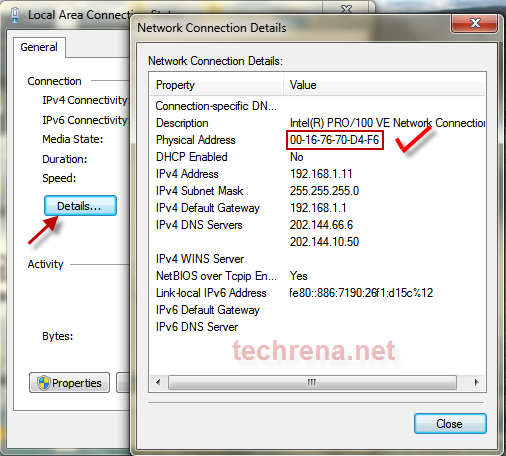
Step 7: Now go to status of the Adapter and Check The MAC address.

View Check MAC Address Image

You will find your desired MAC Address. Now you have changed your Physical Address successfully.

Important:

1. This method Will not work for Windows Network Bridges.

2. If you keep an invalid MAC address value then your Adapter will not function properly.

Install Windows XP from USB Disk Drive

Installing Windows XP from a USB drive(pen Drive) has been an issue with less number of ideal solutions available. Here we have given a solution which is easy to follow and which works. The reason why should anybody want to install Windows from a USB drive is that using a bootable CD is always been a problem. Sometimes our CD ROM may not work. Some mini laptops like Asus Eee PC may not have CD ROMs where installation is possible only through USB or an external Drive. One of the main reason why we were interested in this topic is that in the current trend Using a CD is considered primitive. A USB drive is much more easy and more portable. Hence why should anybody not want to carry their Installation files in a bootable USB drive and why would anybody rely on a CD which is easily damageable by rough handling.

The method given here is tested successfully for Windows XP 32 bit installation with SP2 and SP3. It may work with other versions of Windows like Vista and Windows 7 but we have not tested it yet.

[Update: Refer to this guide on How To Install Windows 7 or Vista Using Bootable USB Disk]

Requirements:

1. A USB Drive of minimum 2GB

2. Windows XP installation CD (Back Up will also do)

The method consists of two parts and one file download (around 499KB). We will have touse tools like PeToUSB to format your pen drive and copy the Windows XP installation files to the USB Disk using usb_prep8.cmd. Then we will boot up from the USB Drive and prepare for installation. After the process is completed your XP install is ready for the process.

Now we will start the process:

Step 1: Download the File from the link given below:

Size: 499KB

Name:  usb_boot_prep_xp.zip

http://www.techrena.net/downloads/usb_boot_prep_xp.zip

Password: techrena.net

Step 2: Extract the usb_boot_prep_xp.zip file in your C drive. It will give you two folders named bootsect and usb_prep8. Plug in your USB drive to your computer and put the Windows XP CD also.

Step 3: Go to the usb-prep8 folder and double click usb_prep8.cmd file. Press any key to continue.
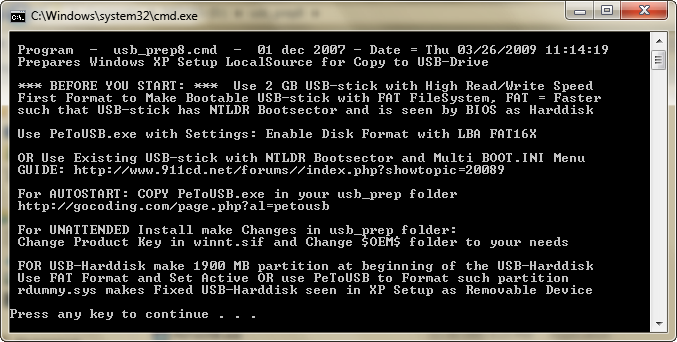
View Sart usb_prep8 Image

Step 4: Now it will open PeToUSB. Format your USB drive using it. Select the options as in the image below. Note that after formatting do not close the PeToUSB or the cmd console.
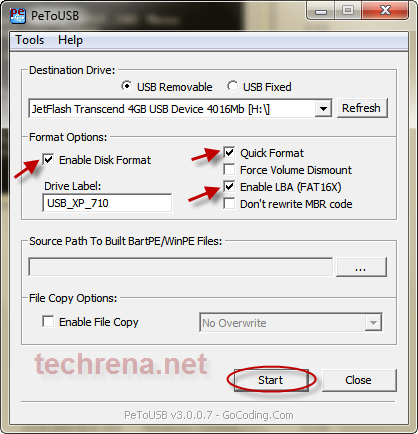
View Format Using petousb Image

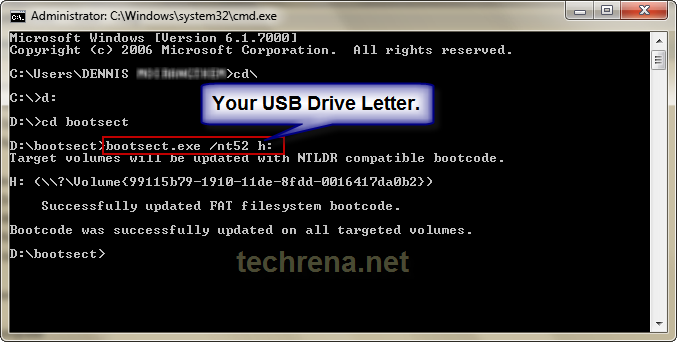
Step 5: Now open a new cmd console manually (press Start+L, type cmd and enter). And type the following command in the commands prompt. Note that you should type your own USB drive letter instead of ‘h’.

Sl. No. Command: Action:
1 cd\ Enter
2 cd bootsect Enter
3 bootsect.exe /nt52 h: Enter

View Bootsect command Image

I had copied the folder in D drive. So the image will be somewhat different with the actual display of your console. Don’t worry copy the folder in your C drive only. Now close this cmd console but not the other one.

Step 6. Close PeToUSB. Now the usb_prep8.cmd console will continue. Select 1 to set the source location. Select the CD ROM containing the XP CD.
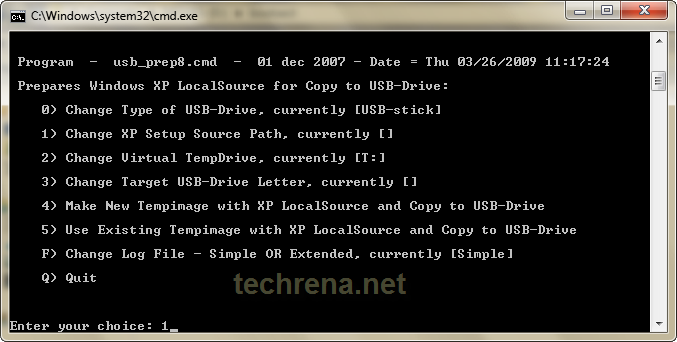
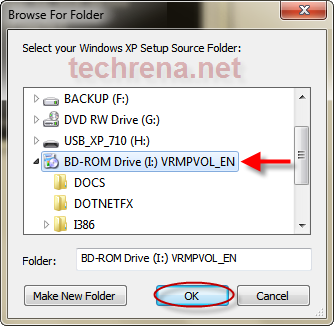
View Select 1 in usb_prep8 Image

View Select Source Image

Step 7: If you have a drive called T in your computer then check option 2 to change it to any letter which is not present. Otherwise no need to change. Select 3 to set the destination drive. Enter your USB Drive letter as shown below:
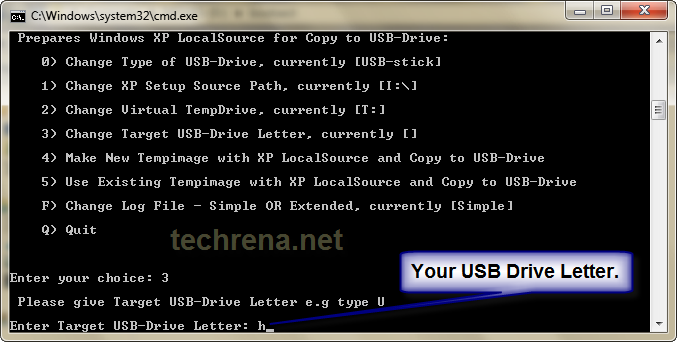
View Select USB Drive Image

Step 8: Now select choice 4 as we don’t have any Tempimage previously. It may ask you to delete the existing tempimage. select Yes.View Delete Tempimage Image
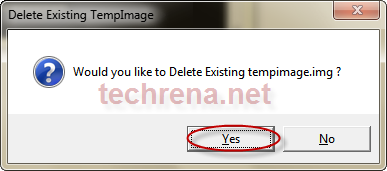
Step 9: It will ask you to format the T drive. Enter y and it will format your temp drive. Press any key to continue. Now it will start copying the XP files to the tempdrive.

Step 10: After the completion of the file copy process Press any key to continue. Now it will ask you to copy the files to your USB drive or not. Select Yes.View Copy to USB drive Image
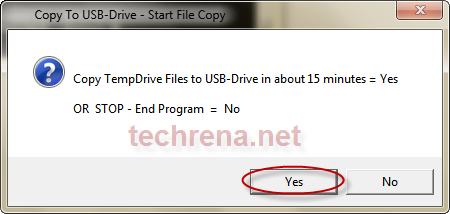
Step 11: During the copy process it will ask whether to change migrate.inf file or not. Is you are using a USB stick then Select Yes. If you are using a USB hard drive then Select No. View Change Migrate Image
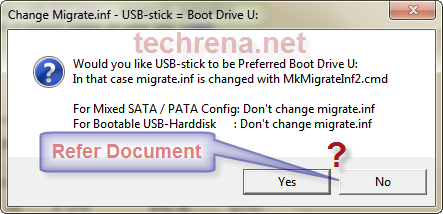
Step 12: After the successful completion of copying the files to your USB drive it will ask whether to unmount the Virtual temp drive or not. As you do not need it Select Yes.View Unmount Virtual Drive Image
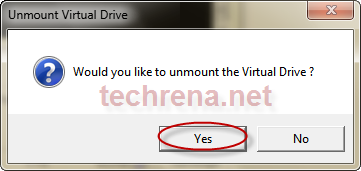
Step 13: After the successful completion of the process close the cmd console. Now your pen drive is ready for the installation process.

Step 14: Plug in the USB drive to the computer you want to install XP. While start up make sure that you set the first boot choice as your USB drive. To do this you have to enter to the bios and change the boot order to USB Disk as the first choice. For entering to BIOS  press the BIOS setup key while start up. This key is usually seen in the screen in the boot screen. For most of the systems it is DEL key. For HP and Compaq it is F10 etc. Go to the boot configuration tab and change the boot order.

Step 15: While booting up from the USB it will ask you to choose between GUI and TXT mode of setup. Select TXT mode for now.
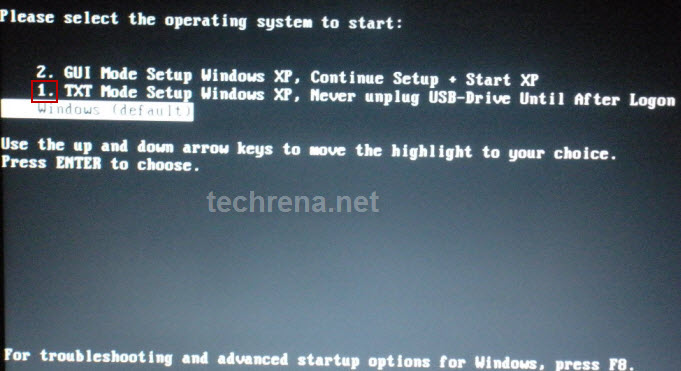
View Select TXT MODE Image

Step 16: Follow the onscreen instructions. It is same as the usual setup process. In the partition selection screen do not select you USB drive for install. And if you are installing in a new RAW hard disk then your USB Drive will be the C drive. Now first create a new partition and format your HDD using the setup. And again restart the process from step 15 by Quitting the current Install(Press F3). Then you should get your HDD partition as C drive. Continue your installation.
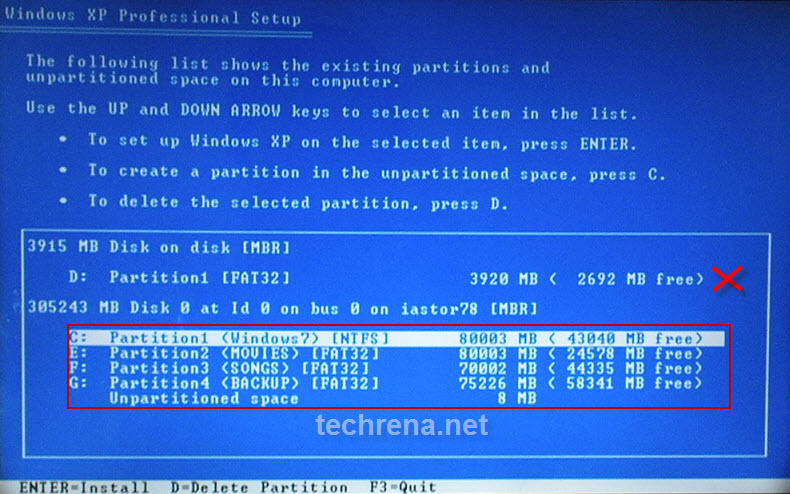
View Select Partition Drive Image

Step 17: Now it will copy a set of files to the hard disk. It usually takes lesser time than a CD ROM installation. After the process it will ask for reboot. Press Enter to reboot immediately.
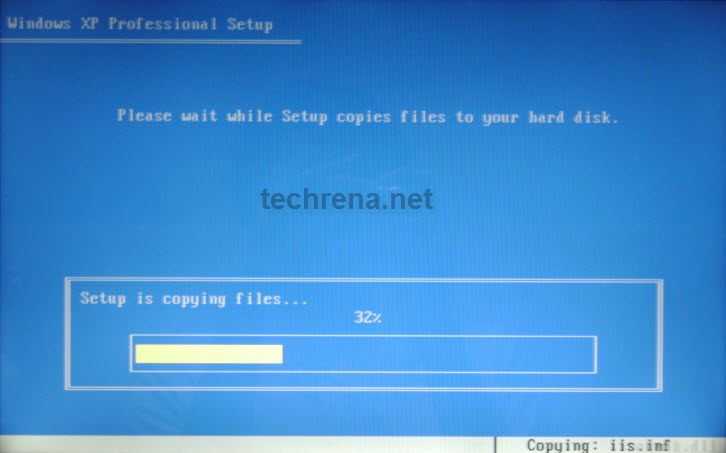
View Copying Installation Files Image

Step 18: Now while start up select the GUI mode of setup to continue setup.
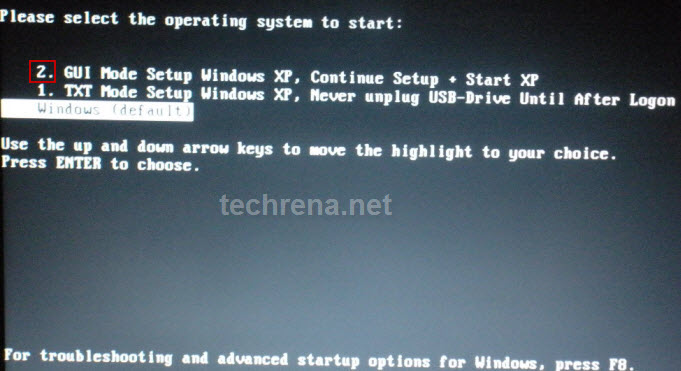
View Select GUI mode setup Image

Now you can continue your usual setup process. Follow the onscreen instructions carefully. After the setup process which usually takes 39 minutes, it will restart. Now boot from your Hard drive not the USB drive. Again use BIOS settings to make this happen.

Congratulations you have successfully installed Windows XP via a USB Drive.

Important:

1. You can copy the contents of your pen drive if you want for future use. To use in future just format your USB drive with FAT, run the commands given in Step 5 and simply copy paste the files you had saved earlier. No need to run the whole process again.

2. While unmounting the Virtual Temp Drive T, it may fail and ask you to try again. Select No. And  when it asks you to Force unmount select yes.

3. This Method is for informational purpose only and should not be used for Software Piracy and illegal practices.

4. We are not responsible for any loss or damage resulting from this information.

5. This method will not work if your motherboard or your BIOS does not support USB booting.

6. This method is an implementation of the guide given in  http://www.911cd.net/forums//index.php?showtopic=20089. And PeToUSB is a property of http://gocoding.com/page.php?al=petousb

Featured Post:
 

Install Windows 7 or Vista Using Bootable USB Disk Drive


Install Windows 7 or Vista Using Bootable USB Disk Drive

Install Windows 7 or Vista to your computer using a flash drive easily following the guide given here in few minutes. No download or software required and clear steps are given.