Install Windows 7 or Vista Using Bootable USB Disk Drive

Installing an operating system to computers that don’t have an optical drive has been a problem. For example, if we want to install Windows 7 in netbooks like ASUS Eee PC, Dell Mini Netbooks, Acer Aspire One, HP Mini 1000 etc. , then we need to use a bootable pen drive to install it. With the release of the full version of Windows 7 and its gaining popularity, many people have decided to go for Windows 7 over Vista.

windows7_logo

Well the method given here is one of the easiest techniques known which does not need any kind of download and the clear screen shots have been given. The advantage of using this method is that, the whole process of installation finishes in lesser time than installing via an DVD.This method will also work for Windows Vista Installation. But if you want to install Windows XP using a flash drive then you can refer to this post: Install Windows XP from USB Disk Drive. Now lets Start.

Requirements:

1. A USB Drive of minimum 4GB space

2. Windows 7 installation DVD or ISO file (Back Up will also do)

Before starting, plug in your USB drive into your system.

Step 1: Open Command Prompt as Administrator. ( Press Start + R, then type cmd and Press Ctrl + Shift + Enter OR In the Start menu type cmd and Press Ctrl + Shift + Enter )

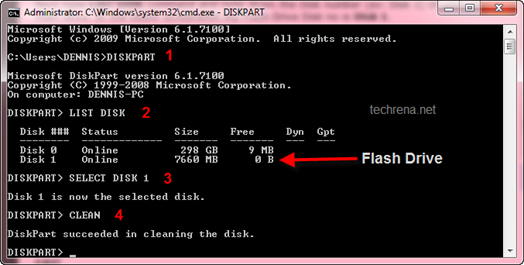
Step 2: After opening Command Prompt, Type the two commands below:

DISKPART

LIST DISK

Windows 7 install from usb

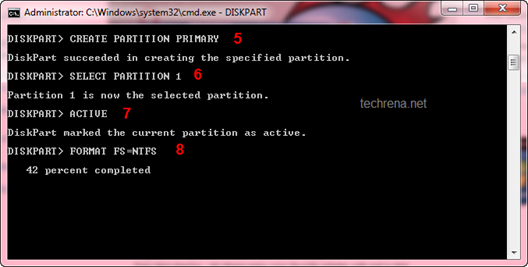
Step 3: Now you can see the disks present in your system. See the disk number for your drive. In my case the number is Disk 1. Enter the Commands below replacing the disk number with yours.

SELECT DISK 1

CLEAN

CREATE PARTITION PRIMARY

SELECT PARTITION 1

ACTIVE

Windows 7 install from usb

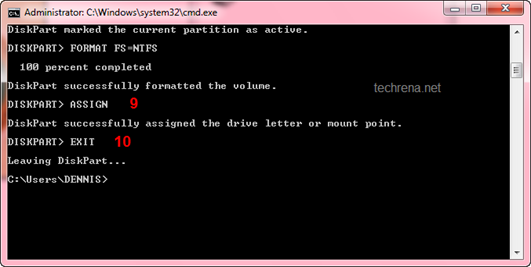
Step 4: Now we need to format the disk and then exit. It may take few minutes. Type the commands one by one:

FORMAT FS=NTFS

ASSIGN

EXIT

Windows 7 install from usb

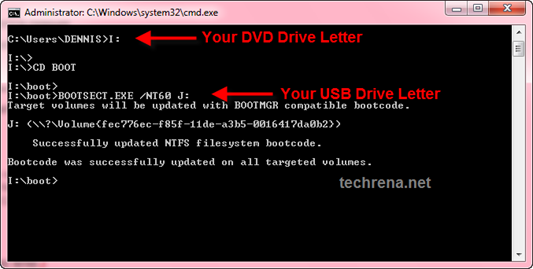
Step 5: Now insert your Windows 7 DVD to your Optical Drive or Mount your ISO file in the Virtual Drive(you can use Virtual Clone Drive ). Note the Drive letter of your DVD Drive and USB Flash Drive. Type the commands below, in the Command Prompt replacing the drive letters as yours. In my case they are I and J.

I:

CD BOOT

BOOTSECT.EXE /NT60 J:

Windows 7 install from usb

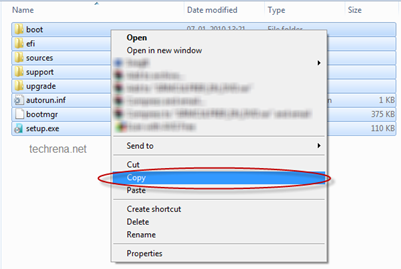
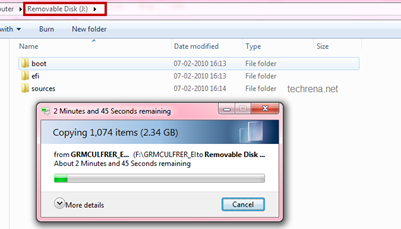
Step 6. Now copy all your Windows 7 DVD contents to the USB flash drive.

Windows 7 install from usb Windows 7 install from usb Windows 7 install from usb

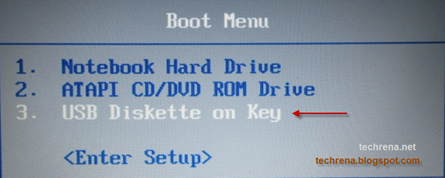
Step 7: Now your USB Drive is bootable. You can restart your computer and boot from the USB drive. In order to boot from your flash drive, you have to change the boot menu. Many computers have DELETE, F10, F2, F12, ESC keys as Boot menu key (the boot menu key information is usually displayed during Start Up). In the boot menu Select USB Diskette on Key and boot it from the USB.

Windows 7 install from usb

Now the Windows 7 installation will boot,  follow the instructions to install.

Do comment if you face any problem while executing the method.

Note:

1. If you have the installation file as a back up in your hard drive( not in the form of an ISO) then, in Step 5 execute the BOOTSECT.EXE command by changing the directory in the command prompt(use CD command) to the folder where your installation files are present.

2. You can use Microsoft USB DVD Download Tool as an alternative to this method.

3. This method will not work for Windows XP. If you want to install it then refer this post: Install Windows XP from USB Disk Drive

Moderate and Reply to Comments on WordPress Blog From Your Desktop

Moderating Comments in your Blog is also another workload for bloggers with the increase of spammers and spam comments everywhere. Yes you would have installed plugins to block spam comments. But some of the comments may slip in anytime. Or if the comment is offensive or is violating your policies you need to spam or remove those comments manually.

Another Important thing is that if you want to reply to a comment, then it will take no time and the commenter who needs a reply will be quite impressed if you reply as soon as it is commented.

The overhead of finding the comments one by one and moderating them is a big headache. Now in order to help you solve this problem, WordPress presents the Desktop Comment Notifies for Windows. Just install and configure your blog settings, the comments will be notified in your desktop as soon as it is posted.

Try this exciting Desktop Comment Notifier by WordPress and help yourself to regulate, all the comments live.

To start Download WordPress Comment Notifier from the link below:

Download WP Comment Notifier

Size: 3.30 MB

File: wp-comments-notifier-setup.0.11.exe

After downloading, Install it on your PC:

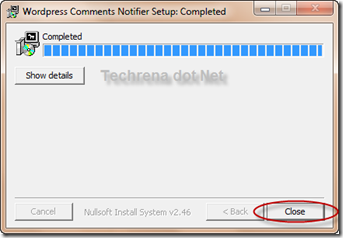
Wordpress_Comments_notifier

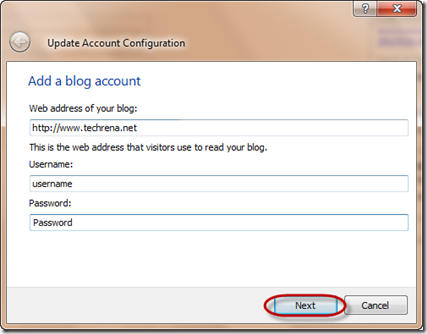
Open wp-notifier and Update your Blog settings. Enter your blog URL, Username and Password. Do not forget to put http://

Update_Blog_Account

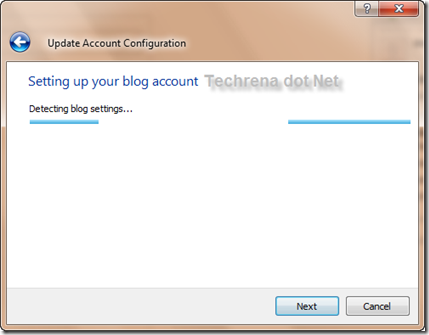
Detect_blog_Settings

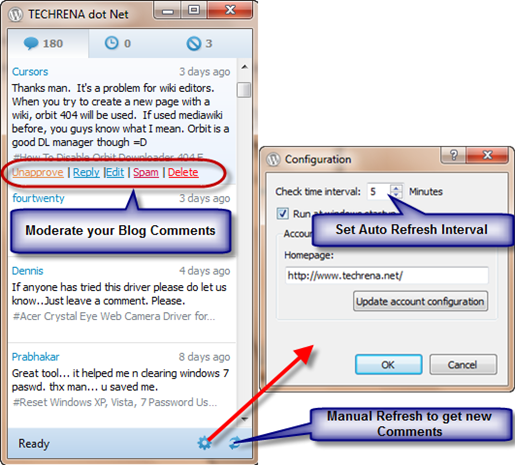
After successful Configuration you can see the Comments on your Blog. you can approve or unapprove, delete, spam, reply, edit a comment. You can set the frequency which it updates the Comments list from your blog. The Frequency is 5mins by default.

Moderate_Wordpress_Comments_from_Desktop

Now you can easily monitor all the comments you are getting live.

Install IIS Server in Windows 7

Internet Information Services (IIS) is a set of Internet based services from Microsoft. The services provided currently include FTP, FTPS, SMTP, NNTP, and HTTP/HTTPS. In Windows 7 the IIS program is already present, but it is not enabled or turned on by default when you install Windows 7.

It is now very easy to install IIS in Windows 7, without requiring to download anything. You just need to enable the Service in Control Panel.

Here we have given how to enable IIS feature in Windows 7.

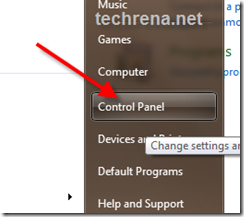
Step 1: Open Control Panel. Click on Start and click on Control Panel.

open control panel

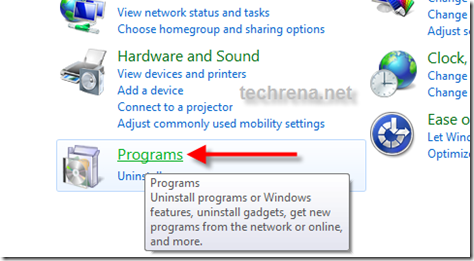
Step 2: In Control Panel look for Programs and click to open it.

programs in control panel

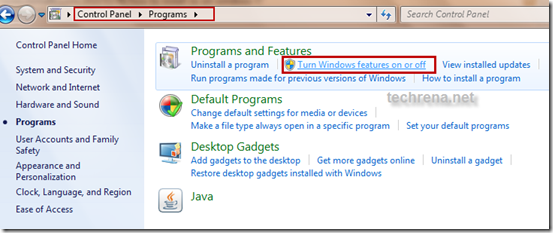
Step 3: In programs under Programs and Features you will find Turn Windows features on or off. Click on it. It will display the List of available Windows services.

Turn Windows features on or off

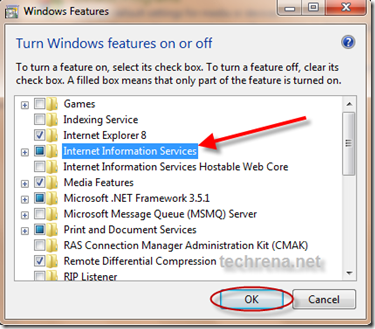
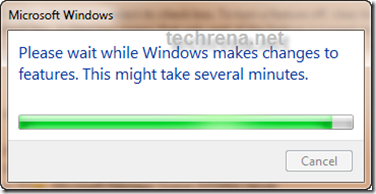
Step 4: Check the check box in Internet Information Services and Press OK. It may take some time to turn it on.

Windows features

Changing Windows features

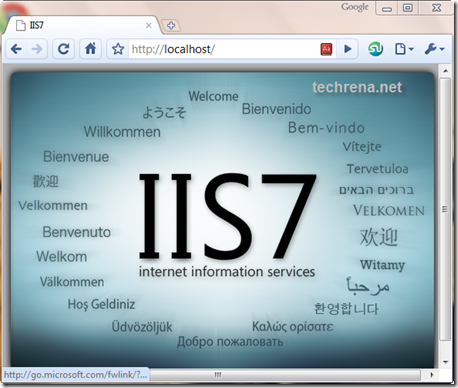
Now after successful installation Of IIS7 you can type http://localhost/ in your browser to check. It should display the IIS7 home page as shown below.

IIS7

Now as you have successfully installed IIS in your Windows you can start using the service.

Install and Run Windows XP in Windows 7 Using VMware Player

Windows XP has been the most famous and most useful operating system to its users till date. Well even if we are have to migrate to Windows 7, we will never forget the ability of Windows XP. There are a lot of programs which were supported by Windows XP but not in the later versions like Windows Vista and Windows 7. Now when we migrate to Windows 7, we will not be able to run such programs.

In order to solve the problem of incompatibility of software and drivers in Windows 7, we have been given the option of installing Virtual Windows XP using Microsoft Virtual PC. But the lone problem in this option is that the processor should support Virtual Machine.

Windowx XP and Windows 7

Here we have given a technique with which you will be able to run Windows XP in Windows 7 without any Virtual XP software or Virtualization Supporting Processor. Moreover you can use your own CD or ISO backup of Windows XP to create the Virtual Machine and no need of downloading the XP Virtual PC from Microsoft.

Requirements:

Windows 7 installed Machine

Minimum 1 GB RAM.

Minimum 4 GB Free Hard Disk Space

Windows XP backup either CD or ISO file

OR

If you have downloaded Microsoft Virtual XP Mode, then refer the instruction at Step 6.

Step 1: Download and Install VMware Player 3.0.1. The download Links are given below.

Size: 90.0 MB

Download VMware Player 3.0.1 from VMware

or

Download VMware Player 3.0.1 from FileHippo.com

Follow the normal instructions and install. Restart your computer after installation.

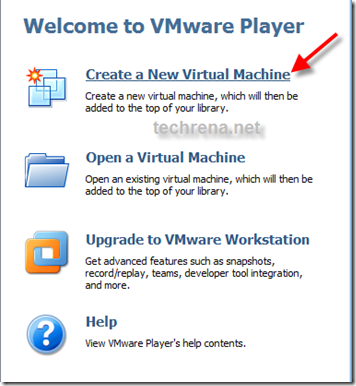
Step 2: Now we have to create a new Virtual Machine. Open VMware and click Create a New Virtual Machine as shown below.

VMware-New-virtual-XP-Machine

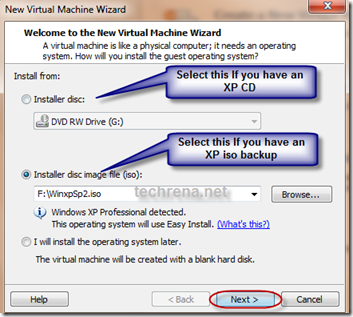
Step 3: Select the location from which you are going to create the new Virtual Machine. If you have a CD then select the drive. If you have a back up file in an iso, then you can select the file.

Select-disc-iso-XP-Machine

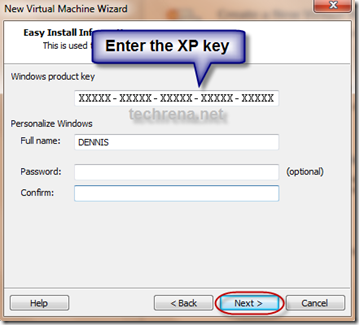
Step 4: Enter the Windows XP key and the user name and password.

Enter-key-XP-Machine

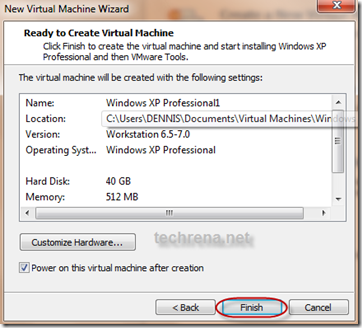
Step 5: Then you can set the location to be installed, maximum Disk space size and the RAM size. Follow the instructions normally. Finish the setup. It will continue to install Windows XP in your Virtual Machine.

3-6-2010 12-35-50 PM

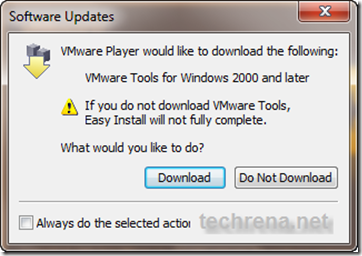
Optional Note: While installing the Virtual Machine it may ask you to download VMware Tools for Windows 200 or later. It is recommended that you download it or you can download it later also.

download-vmware-tools-for-Windows

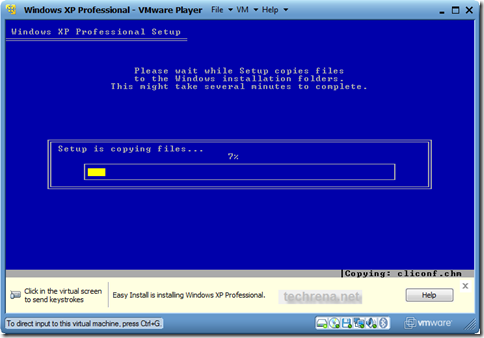
After that, the installation process will continue by itself and Windows XP will start.

Windows Xp installation

Windows Xp installation process

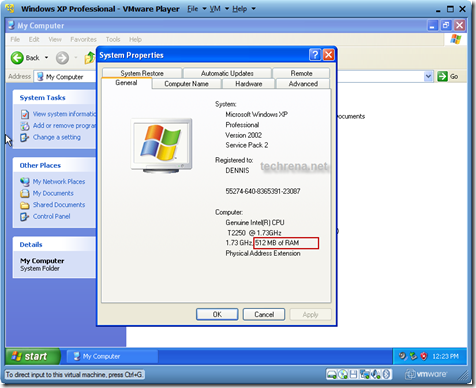
After successful installation Windows XP will start and you can see the System properties as shown below. 512 MB of RAM is set when installation(you can change the size in VM settings).

Virtual-xp-properties

Now, you have successfully installed Windows XP virtual PC using VMware player. In order to quit Windows XP you can simply shutdown and quit VMware player.

To start the Windows again in virtual mode, open VMware Player and Select Windows XP in the left pane and Click Play virtual machine.

VMware

Let us discuss some of the issues which should be known by the users.

How to Transfer Data to and from Windows XP virtual Mode?

As you are running two different machines drag and drop will not work if you have not installed VMware tools. Even if you can copy directly, it takes more time. You can either use a flash drive or Disc drive to transfer data between Windows 7 and XP virtual mode. But this is not the optimal way. You need to map network drive in Windows 7 which has been shared from Virtual XP.
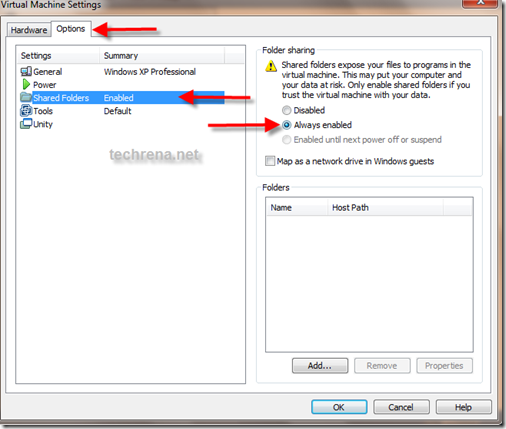
To enable file and folder sharing in Windows XP virtual Mode, you need to edit the settings. Click on Virtual Machine Settings as shown above to edit the settings.

Select Options and select Shared Folders. Set Always enabled and click OK.

VMware-settings-folder

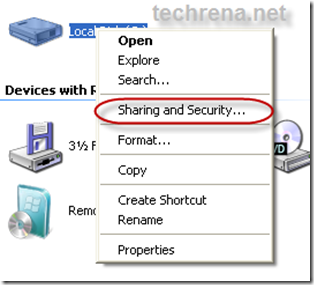
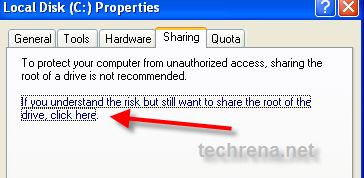
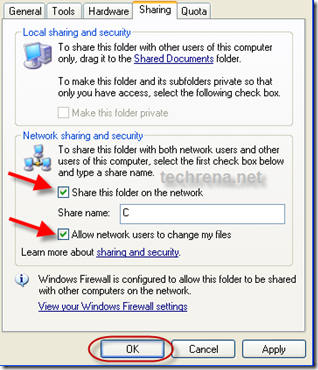
Now you need to share a folder with write permission as shown:

In Windows XP, right click on the folder or drive you want to share and select Share and Security. Do not forget to check Allow network users to change my files.

Share a folder in XP

share-folder-in-virtual-xp

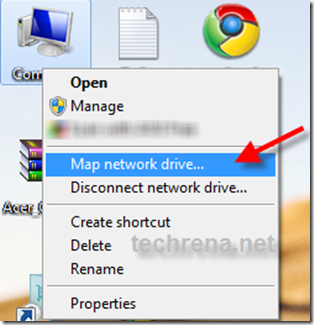
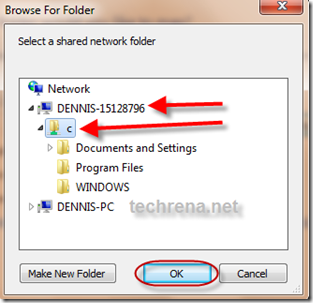
Now after sharing the folder in Virtual XP, you need to map the folder in Windows 7 as shown below:

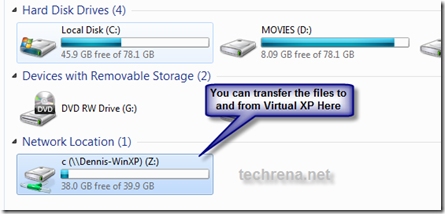
Right Click on My Computer and Select Map network drive. Under Network search for the folder you have shared in Virtual XP Machine and click OK.

set-virtual-drive-windowsset-virtual-drive-windows-7

virtual-drive-windows-7

You can copy or paste anything from or to the network location drive in Windows 7. This is how you can transfer files between Windows 7 and Windows XP virtual mode.

Removable Devices:

Now if you want to use a removable device like a flash drive, you can connect the device using the following setting:

VMware-set-devices

You need to disconnect the device from the host in order to connect to the Virtual machine.

Step 6. Running Microsoft’s Windows XP Virtual PC:

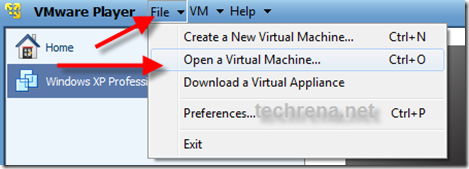
All the above installation is not done using the Microsoft’s Virtual  Windows XP PC. Above we used normal Windows XP installation CD. If you have downloaded Virtual XP PC from Download Windows XP Mode then,  install it on your PC and then you can open the Virtual Machine from the VMware Player as follows.

VMware-open-virtual-PC

Browse for the .vmx file in the folder you have installed the Virtual XP PC and  Click Open. You can run it.

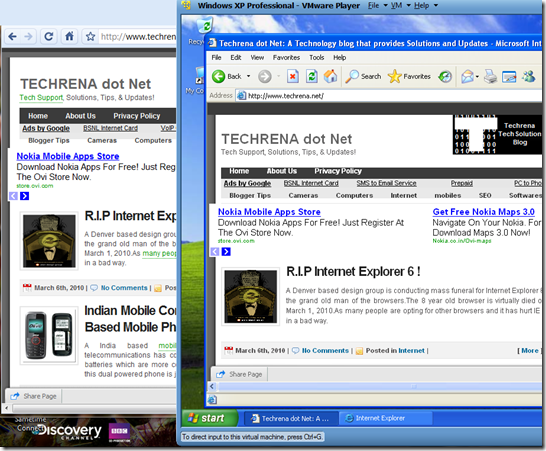
Finally, as you have successfully installed Windows XP Virtual PC in Windows 7 using VMware Player 3.0.1 you can enjoy the unbeatable features of Windows XP in Windows 7 also.

windows7-and-virtual-windows-xp

Note: No new Partition is created in your hard disk for the Virtual PC. Just a virtual disk file is created in your drive which will increase in size according to what you copy and install in your Virtual PC. The maximum size of this file is the size you have set as maximum disk size.

PS: If any problem occurs or if you are not able to follow the steps and instructions, please leave a comment below.

How to Find Your Location In Windows 7 Using Geosense

Geosense is a Windows Sensor that uses the Location and Sensors platform in Windows 7 accurately using IP lookup, WiFi and Cell tower triangulation positioning without the assistance of GPS hardware, enabling more practical location-based applications and scenarios on Windows 7.

Today most of the laptops are not equipped with GPS, so  the Windows 7’s new Sensors and Location platform is practically not much useful to the users. But with the help of Geosense, we can use this location sensor platform.

Geosense if free to download and it is available for  both 32 and 64 bit editions of Windows 7. Please note that Geosense will work only with Windows 7 editions having Location and Sensor platform. For example this functionality is not available for Windows 7 starter. All other higher editions have this feature.

Follow the instructions below to install and use Geosense For Windows.

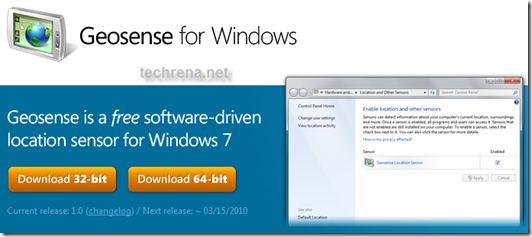
Step 1: Download Geosense For Windows from the link below. Select your compatible edition while download.

Click Here to Download Geosense for Windows

Download Geosense  for windows

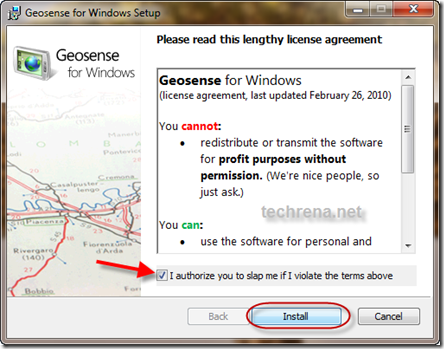
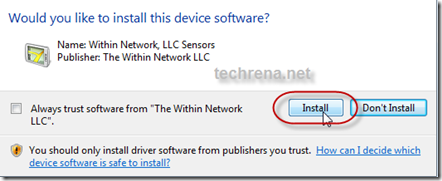
Step 2: Install Geosense for Windows. Accept the agreement, and accept to install the device.

install Geosense for windows

Allow install Geosense for windows

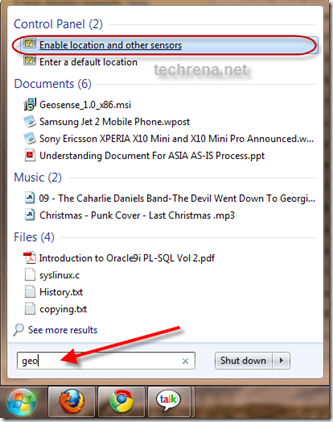
Step 3: After successfully installing the sensor, Click on Start button and type geo in the search box. Click on Enable Location and other sensors.

Open  Geosense for windows

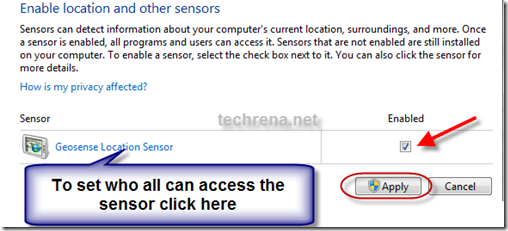
Step 4: Select the enabled Check Box and Apply.

enable Geosense for windows

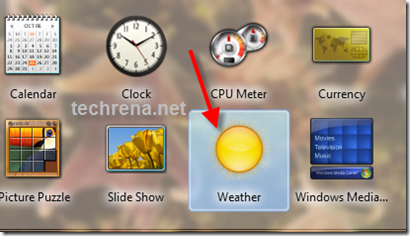
Step 5: Now on the desktop right click, and open Gadgets. Double click on Weather. You can see your location in the Weather gadget as shown.

Weather Gadget for windows 7

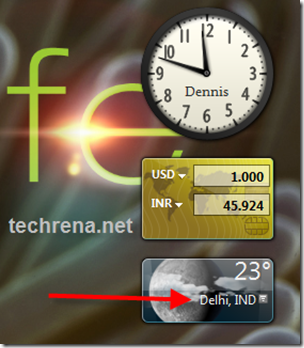
Once you have added the gadget, you can see the Location in the desktop Weather gadget as shown below. My location shown here in Delhi, India.

See location using Geosense for windows

But the location sensor displaying only the location in the gadget is not quite impressing. As there in not much of Location aware Windows 7 applications, Geosense has made a Google Maps Client Demo to make use of the sensor in a proper way. Hope that in near future we will be able to use this Windows 7 Location sensing feature in a proper way.

Motorola QUENCH/CLIQ XT With MOTOBLUR Android Smart Phone

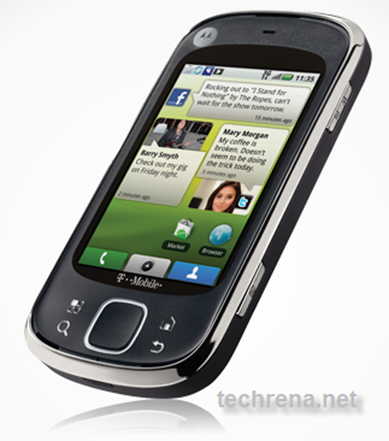
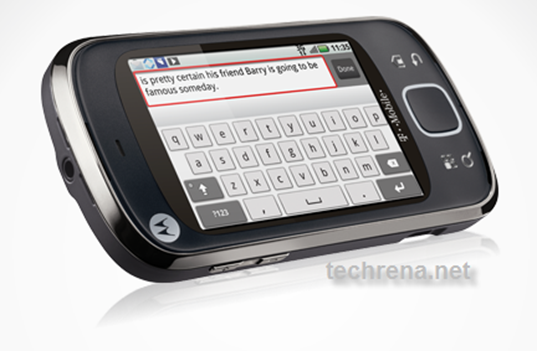
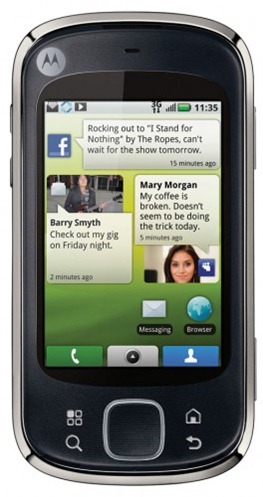
Motorola QUENCH with MOTOBLUR Smart Phone features with a full virtual QWERTY and front navigation touch pad. It has a 3.1 inch display and SWYPE technology for easy text input.

MOTOBLUR is Motorola’s  new service created to make phones more personal and socially smart using Android. With MOTOBLUR you can sync contacts, posts, messages, photos and much more from Facebook®, MySpace, Twitter®, Gmail™ and many more.

Motorola quench social networking

Motorola QUENCH with MOTOBLUR will be known as CLIQ XT with MOTOBLUR in the United States(US). A detailed description of the specifications are given below.

Full Specs:

Feature Description
Operating System Android™ 1.5
Camera 5 MP DIGITAL ZOOM LED Flash and Auto Focus
Network WCDMA 850/1900/2100 (for Global) WCDMA 900/1700/2100 (for US), GSM 850/900/1800/1900, HSDPA 7.2 Mbps (Category 7/8), EDGE Class 12, GPRS Class 12
Battery and Life 1420 mAh Li Ion, 6.5 hours Talk time , 13.5 days Standby time
Connectivity Bluetooth 2.0, 3.5mm Audio Jack, Micro USB 2.0,  Wi-Fi
Display 3.1 inch display 320 x 480 pixels (w x h), 65k TFT
Music AAC, AAC+,  AAC+ Enhanced,  AMR NB,  MIDI,  MP3,  WAV,  WMA v9
Video Playback – H.264, H.263, MPEG at 24fps at HVGA resolution; Capture – H.263, MPEG at 24fps at HVGA resolution
Memory Removable Micro SD card (included); Supports Up To 32GB MicroSD
Additional Feature MOTOBLUR (content delivery service) aggregates Facebook, MySpace, Twitter and Gmail; Syncs your work contacts, email and calendar
Location Service aGPS, Turn by Turn directions, Google Maps, E-Compass
Input Type Touch Screen, Virtual Keyboard, Android and SWYPE keyboards, Voice Commands
Weight and Dimension 123.5g, 59.4mm x 116.7mm x 12.3mm
Noise Reduction Dual microphones and noise cancellation technology

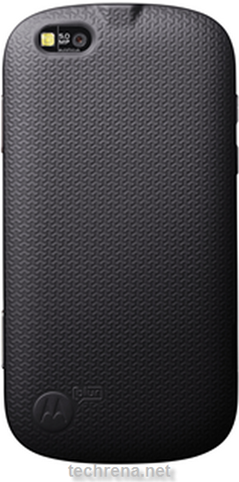
Motorola quench virtual qwerty

Motorola quench Motorola quench

Motorola QUENCH is also equipped with the new noise cancellation technology using dual microphone and mute call button facility.

Motorola QUENCH is expected to be released in the market next month.Price is not yet revealed. But the expected price is around $129 USD.

Install Google Dictionary in Google Chrome

Now a days we like a lot of things to be inbuilt. What about a inbuilt dictionary on your browser? Just double click on the word you want to know the meaning, zoom..the meaning comes up! This miracle is possible in Google Chrome installed with the Google Dictionary Extension.

The installation of Google Dictionary is very easy. It is just and extension in Google Chrome and takes very less time to install.

Google Chrome

See the steps below:

Step 1: Go to the Google Dictionary Extension link below from your Chrome Browser:

To Download Click Here

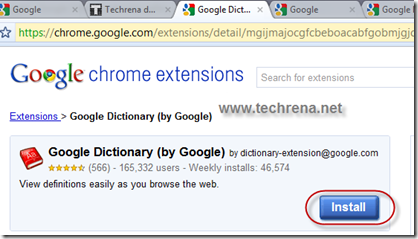
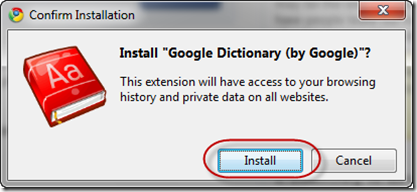
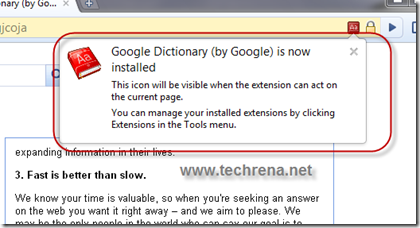
Step 2: Click on the Install Button. Click Install again to confirm. That is it, is installed. You can see the installation confirmation.

Google-dictionary-extension

Google-dictionary-install

Google-chrome-dictionary-extension-install

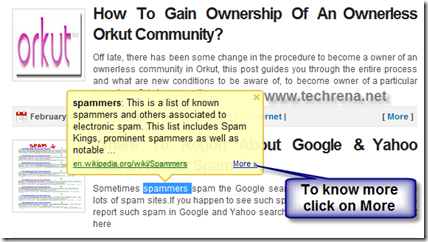
Now, while visit any website and if you find any word which you want to know the definition. Just double click on it. The meaning will be displayed. If you want to know more, click on More>>

Google-chrome-dictionary-extension

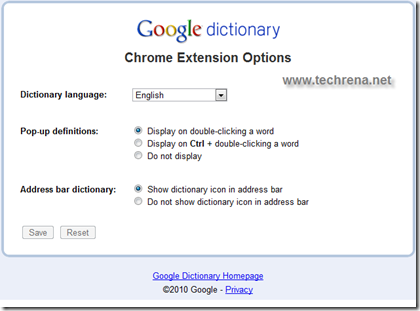
By default the settings will be to display the definition on double clicking the word. if you want to change the settings to the language see the steps below:

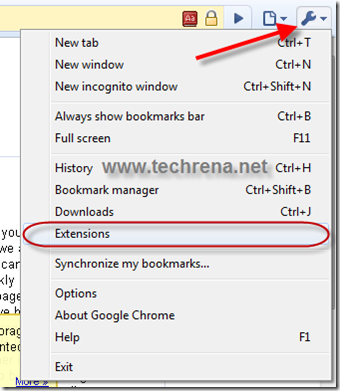
Go to Settings Tab and select Extensions.

chrome-extensions-tab

Click on options button.

chrome-extensions

Set the settings as you want.

Google-chrome-dictionary-extension-settings

This extension is a very useful one. You don’t even have to open the online or offline dictionary and search for the words. What you have to do is just double click.

Acer Crystal Eye Web Camera Driver for Windows 7

There has been a lot of problem for Acer Laptop users while migrating to Windows 7. But if you see almost all of the drivers inbuilt in Windows 7 can handle the drivers for most of the devices except for devices like the Web Camera.

Today, we have faced the same problem while trying to upgrade the Acer Aspire PC to Windows 7 from XP. While, all of the other drivers will work by default and some of the drivers like the Intel Graphics Accelerator, Ethernet drivers can be seen in the Windows Update list as optional Updates which can be downloaded and installed automatically.

The only problem I faced is with the Acer Crystal Eye Web Camera driver. I have almost tried all of the available drivers but none worked. Most of the forums provided solutions to use the SUYIN NB Cam drive:

C:\\Windows\\SUYIN NB Cam\\LiveCam.exe

This one works but it was not the perfect solution.

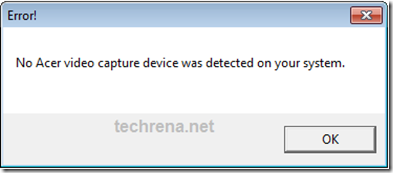
Most of the drivers and applications available gives the same error out:

No Acer video capture device was detected on your system

Acer Cam Problem

After a lot of trial and error finally i have found the perfect solution for this problem. I have got this Acer Camera Suyin v.5.2.5.3 which is made for Windows 7. After installing this, I restarted the system and it worked against all odds.

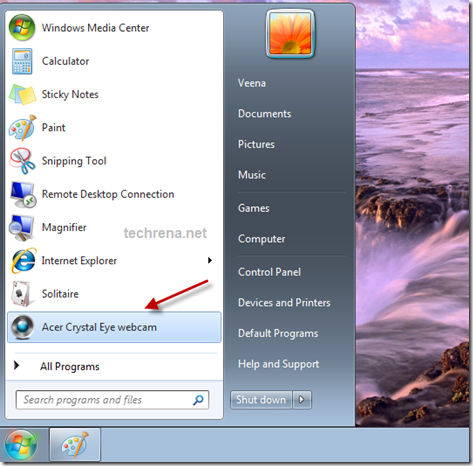
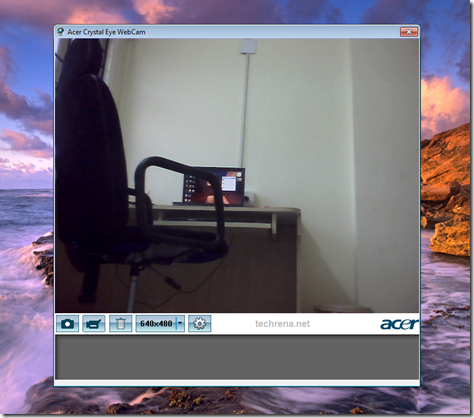
Download the Driver from the link below. Install it and restart the system. Once successfully done, start the Acer Crystal Eye webcam. It should work. No other drivers are required.

Download:

File: Acer_Camera_Suyin_v.5.2.5.3_Win7x86x64.zip

Size: 3.29 MB

Link: http://www.techrena.net/downloads/Acer_Camera_Suyin_v.5.2.5.3_Win7x86x64.zip

Screen Shots:

Acer Cam Driver Win 7

Acer Cam Crystal Eye Windows 7

We have tried this driver in Acer Aspire 5570Z and Acer Aspire 4925G and it worked successfully. I hope it will work for other models also. If any problem occurs, do comment.

Featured: Heard of the New Windows 8? You can download the Windows 8 Pro 32 or 64 Bit version from Microsoft and it is completely legit. Check out the details here.

Windows 8 Download

How To Create Profiles in Mozilla Firefox For Customized Browsing

In Mozilla Firefox we can create and use more than one profile.This is also another useful feature Firefox. Here we will see how to create new user profiles and use it to browse more efficiently pertaining to each user.

This feature will enable Firefox as an Operating software for the web where each user profile can be thought as a different user in the computer.

Firefox Logo

Benefit of Profiling in Firefox:

Each user can develop his/her own profile according to their preference and desire. But there is another concept of profiling. A single user can maintain different profiles for different purposes. For example, for using the browser for Social Networking, the profile setting can be made a bit relaxed and all the scripts allowed to run. If you are using the browser for secure internet banking, then you can create a new profile with strict settings like disallowing scripts and cookies.

Enabling User Profiling in Firefox is very Easy. Just follow the steps below:

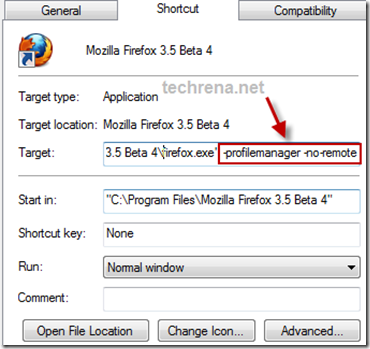
Step 1: Enable User Profiles in Mozilla Firefox Startup. To do this Just Create a different shortcut for Firefox and Right click on it. Select Properties and add the following in he Target.

-profilemanager -no-remote

Firefox profile manager

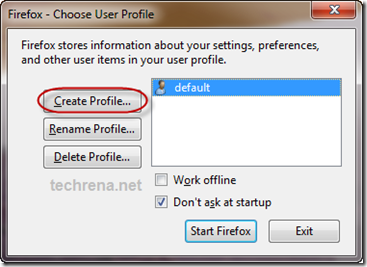
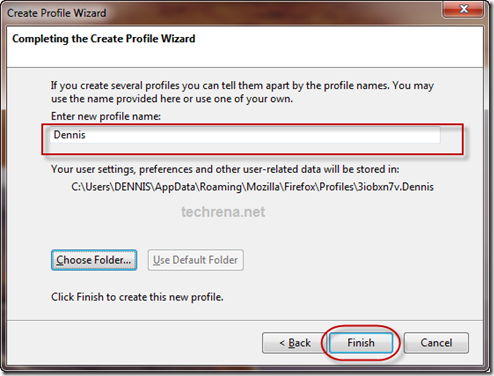
Step 2:  Create a user Profile: In order to create a user profile, open Firefox using the shortcut. Click on create profile button. Enter your profile name. Click on Finish.

Firefox profile create

Firefox profile naming

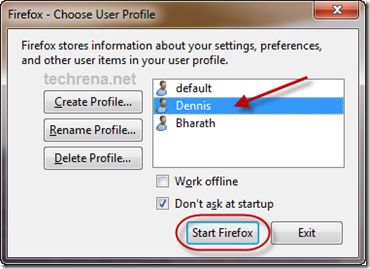
Step 3: Now open Mozilla Fire fox using the Created profile.

Firefox profiling

Now you can use your profile and customize the settings and preferences in the way you want your Firefox should behave.

Dell Mini 5 Tablet – The New Android Smart Phone

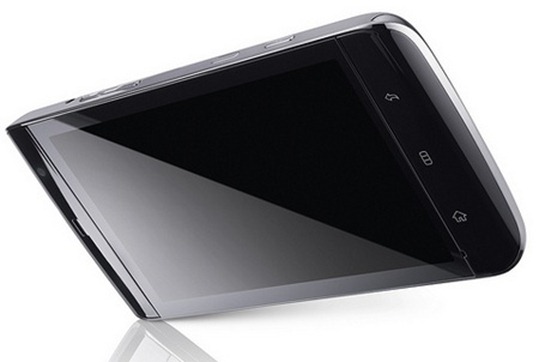
Dell is one of the leading computer manufacturers. It is planning to release its new tablet Dell Mini 5. The prototype of the tablet looks stylish, slim and is expected to be released later this year.

Dell Mini 5 is powered by a 1 GHz Snapdragon ARM microprocessor.The display is a full touchscreen which is 5 inches. It is equipped with two 5 megapixel dual-flash cameras.  It  supports 3G, Wifi, EDGE. This is a hybrid of tablet PC and a Smart phone. Some of the Known Main features are given below.

Dell Mini 5 Android Tablet

Specification:

Feature Description
Processor 1Ghz Snapdragon ARM processor
Operating System Software Android 1.6 Donut
RAM Memory 256 MB RAM, Extensible with micro SD Cards
Display 5 inches (13 cm), 480×854 Screen resolution
Touch Screen Multi touch, touch buttons, pressure sensitive and extremely sensitive touch.
Camera Two 5 megapixel dual-flash cameras
Network 3G, GSM, HSPA on WCDMA with EDGE
Connectivity WiFi ,Bluetooth
GPS Yes

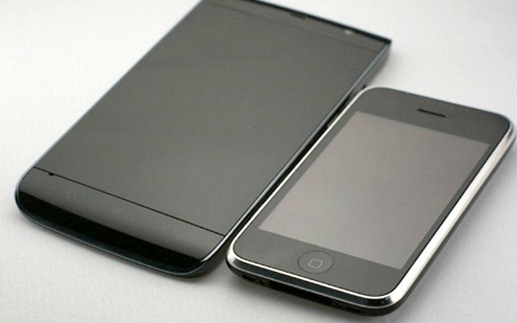
Dell Mini_5 Tablet and iPhone Compare the size with iPhone

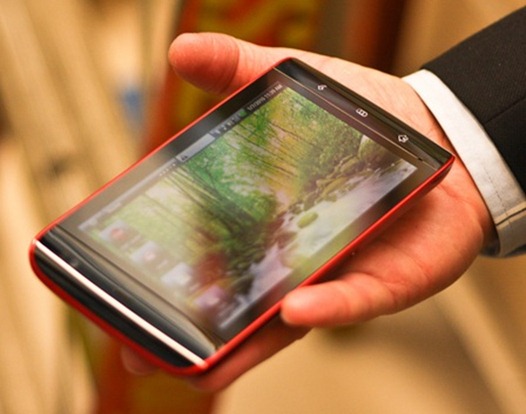
Dell Mini 5 Android Tablet Hands On

This is just the preview. A lot of features are hidden and we will come to know soon. This Hybrid concepts of Dell mini 5 will be released later this year and it is expected to cost at least $1000 (US Dollars) or Rs 46,000 (INR)

Update: Read about the leaked Dell Lightning