[How To] Change Desktop Icons For Computer And Recycle Bin

Windows 7 can show desktop shortcuts for any program (you can add as many as you can), but by default shows the following:

Computer, User file’s folder, Network, Recycle Bin (full), Recycle Bin (empty)

default desktop shortcuts

Windows shows some default icons for “My Computer” (Computer in Windows 7) and “Recycle Bin” and other shortcuts on the desktop as shown:

Computer icon in windows 7Recycle bin icon in windows 7

If you want to change these icons and add your own icons, follow these instructions:

Steps:

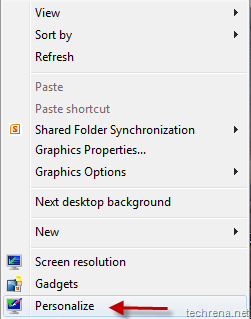
1. Right-click on empty space and choose “Personalize”:

Personalize in desktop context menu

2. A new Personalization window opens up. Click “Change desktop icons” link in the window.

change desktop icons shortcut in personailzation Windows 7

3. Select the item for which you want to change the desktop icon (example; Computer, Recycle Bin etc., ) and click on “Change Icon”.

desktop icon settings for computer

desktop icon settings for recycle bin

4. In the next step, choose an icon from the list of the icons available already or you can even browse for icons in your computer. You can also create your own icon using the many freeware software available on the internet.

change icon desktop icons

You are done! Check the desktop icon back and it should reflect the change as shown:

computer icon changed

You can change desktop icons for the any of the five items discussed at the beginning of this post. Mean while if you are facing problems with broken icons on your desktop, read this post to fix the broken icons.

[Tip] Show File Extensions In Windows 7 & Vista

Windows logo

Windows 7 hides the extensions of the files by default to keep t simple. However you can easily know the extension of any file just by looking at its icon. However, it may sometimes can get as bad as it can, suppose an attacker copies an .exe file to your computer and renames it as something catchy like “sensational-pic.jpg.exe”, now as Windows 7 doesn’t show the file extensions, all you will see is “sensational-pic.jpg” (.exe part would be hidden!)which might falsely lead you to think it as a picture and click it all just to run the whatever code the attacker has injected into the program.

And I guess I have convinced to find out a way to show the file extensions in your Windows 7 Smile. That’s why I’m writing a step-by-step tutorial to explain to show the file name extensions that had been set to be hidden by default.

Steps:

1. Open My Computer (Use Alt + E button).

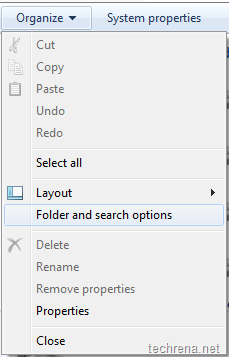
2. Click Organize button, select “Folder and search options from menu”.

Folder search options in windows 7

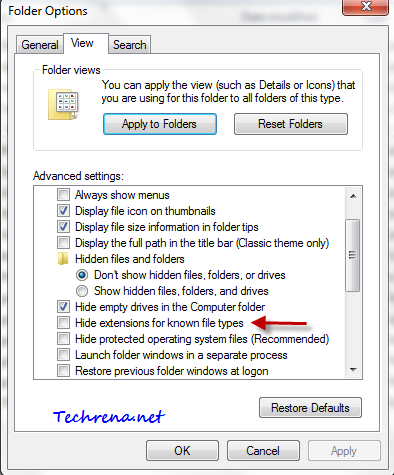
3. In the Folder Options window, go to “View” tab.

View tab in folder options

4. Under the View tab, uncheck “Hide extensions for known file types”.Hide extensions for known files under folder options

5. Click Apply to save the settings and then click OK to close the window.

Alright, you have now changed the settings to enable the file extensions. Here is what the change would be like:

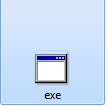
Before:

file_ext_disabled

Guess what type of file it is?

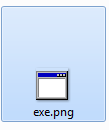
After enabling file extensions:

file_ext_before

It is an image file! It is evident after changing the settings to show the extensions for file types. The only problem that you might face is during renaming the file, except that you shouldn’t be having too many issues with these settings enabled. To hide the file extensions, just check against “Hide extensions for known file types” in the step 4.

[How To] Disable HomeGroup In Windows 7

HomeGroup is a new feature introduced in Windows 7 to share music, files and others between two or more Windows 7 computers through the network. But if you don’t have any other Windows 7 in your local network,  then you cannot use “HomeGroup” feature. You might want to disable the HomeGroup feature in such scenarios to save some resources that are currently being used for running HomeGroup services.

Here is a step-by-step guide on how to disable the HomeGroup feature in Windows 7.

Steps:

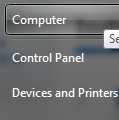
1. Open Start menu and click on “Computer”.

computer_link_start_menu

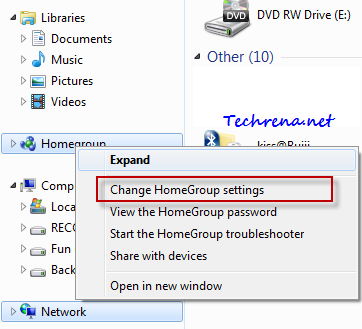
2. Right-click on “Homegroup” icon/link found in the side navigation bar.

Homegroup right-click my computer

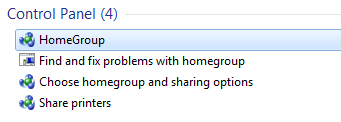
Alternatively, type “homegroup” (without quotes) in the Start menu and click “HomeGroup” item from the results under “Control Panel”.

Control panel homegroup result

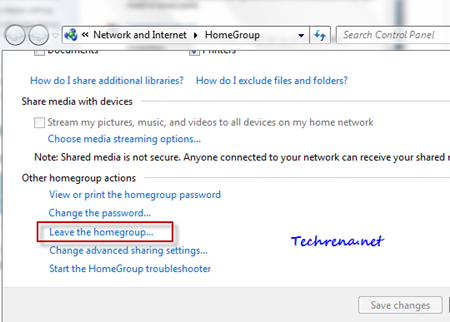
3. Click on “Leave the homegroup..” found under “Other homegroup actions”.

leave homegroup option in settings

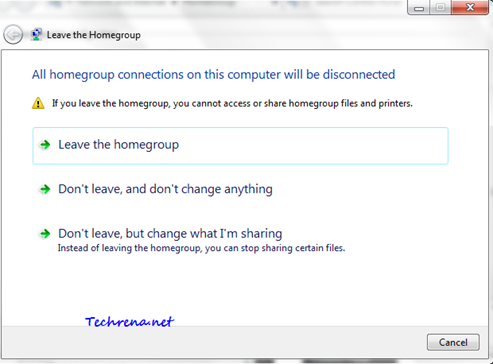
4. In the Leave Homegroup confirmation window, select the first option “Leave the homegroup

leave homegroup

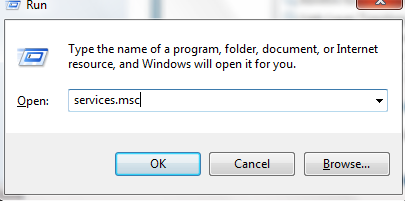
5. Press Start button + R to open RUN tool and type “services.msc” in the filed and press OK.

services.msc in run command

6. Locate  HomeGroup Provider and HomeGroup Listener in the services list.Homegroup listener and HomeGroup provider in services

7. Right-click on each of them and select Properties . Choose Disabled from the dropdown next to the Startup Type.

startup type disabled

8. Click Apply and then press OK to save and close the settings. Exit the Services and reboot your PC.

Now you have successfully removed HomeGroup feature and its processes in your Windows 7. If you check any explorer window after rebooting it, you will find that the “Homegroup” icon is gone as shown.

Homegroup icon missing

[Tip] Disable Startup Sound In Windows 7

To begin with, why would anyone want to disable the startup sound (also known as welcome sound) in Windows 7? Well, I don’t have an exact answer, but I’m sure somebody wants to do it just for the sake of experiment or just to learn how to do it. If you are bored of hearing the routine sound everyday when you start your PC, you might either want to disable the start up sound or you might want to change the soundtrack that Windows plays during startup. While we cover the changing start up sound part in another post, let us guide you through the details about how to disable (turn off) Windows startup tone in Windows 7.

Steps:

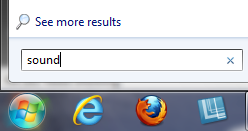
1. Go to start menu and type “Sound” in the search field.

sound_start_menu_search

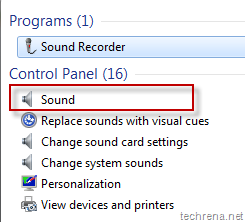
2. Open “Sound” item from the results in “Control Panel” section.

sound_search_results_control_panel

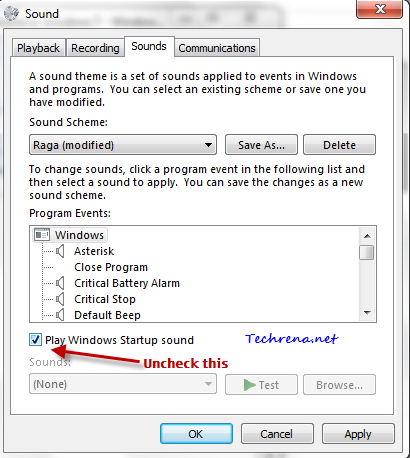
3. Go to “Sounds” tab in the sound settings window.

Sound in control panel

Uncheck against “Play Windows Startup sound”.

4. Click Apply and then click OK to close the settings window.

windows_startup_sound_disable

That is all you needed to do. Windows 7 startup music will no longer be played while booting your Windows 7 from now on. To enable the startup sound playback during the system boot again, just check against “Play Windows Startup sound” and save settings.

[How To] Getting Started With New Version Of Facebook Groups

facebook logo

Facebook has recently announced the revamped Facebook Groups feature, giving you more control over the group interactions that you would like to make. Suppose you are just back to home after a holiday and you want to share the wonderful photos that you had taken during your trip to your other members of the family via Facebook. Unfortunately whatever photos or other media you share was visible to your entire friends in Facebook. With the launch of new version of Facebook Groups, you can create groups for your family, club or work etc. Once you have created the groups, you can select content that you share to be visible to only a particular group of people. This is not exactly a new concept, something of this sorts already exists in Google’s Orkut. But with Facebook groups, users can make a group chat, email subscriptions for updates from the group, collaboration features etc.

Let’s see how to get started with Facebook groups:

1. To create a group, you can visit facebook.com/groups. Alternatively, you can find groups link on the left sidebar along with “Game Requests”, “Application Requests” etc.
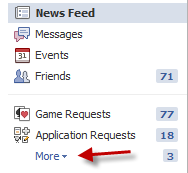
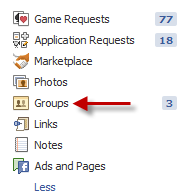
Facebook Groups link hiddenFacebook groups link in sidebar

2. Click on Create a group link to start creating a new group.

Create a Group link in Facebook

3. Give the new group a name (suggestions: Family, Work, Club etc.). You can add members from your friends list. Just type the name of the person that you want to add to the group, Facebook will automatically suggest people from your Facebook friends list who possess that name. You can add as many people as you can in the Members field.
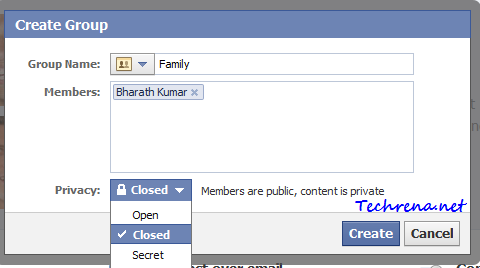
Create Facebook Group

And beneath the Members section, you will have “privacy” settings for your group. There would be three options to choose from: Open, Closed and Secret.

Open: If you set your group privacy setting to Open, it means that anyone on Facebook can view the Group and its content and can join the same. The group will also appear in search results.

Closed: If a group is set to “Closed” under privacy settings, it means that anyone in Facebook can view the name and members of that group but can’t view its content. Only members of the group will have access to its content. These groups can be found in Search results though (content will not appear in results).

Secret: Secret groups can’t be found in searches. And it’s absolutely invisible to non-members of the group. Non-members can’t even see the name of the group, its members list and of course the content as well.

By default, Privacy will be set to “Closed”. You can always change it to any of the above three options discussed.

Click on “Create” button to finish creating the group.

4. Now that you have created a group, go to the groups tab, click on the group that you have just created and click “Edit Admin Settings”.
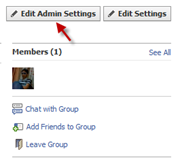
edit admin settings in facebook group

Basic Information:

You can now edit the basic information like Description and Email address for your group here:
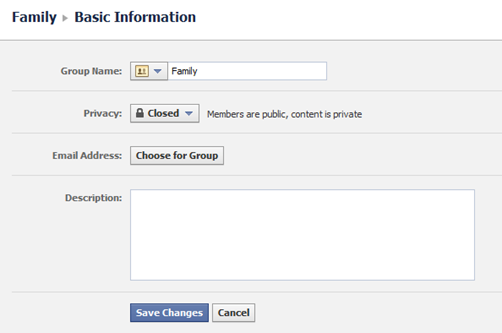
Basic information facebook group

If you want a special email address for your group, click on “Choose for Group” next to the “Email Address” tab, these email addresses end with @groups.facebook.com. You can choose an email address depending on the availability.
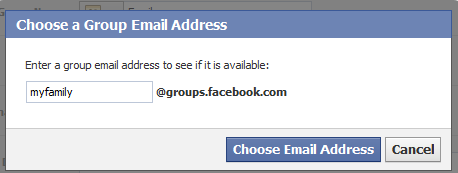
Choose group email address Facebook

Profile Picture:

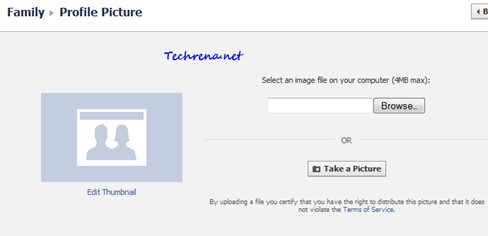
To add a profile picture to your group, click on the “Profile Picture” link on the left sidebar:
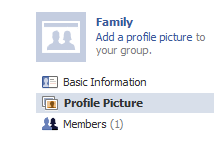
Facebook profile pic link

Profile Picture in facebook group

You can either upload a picture from your computer or take a new snapshot using your webcam.

Sharing Content:

You can share a text post, link, photo, video, event or a document with the members of your group. Go to the your group page and these options will be listed below the group name.Facebook content share with group

Group Chat:

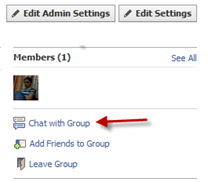
group chat in facebook

Clicking on “Chat with Group” option will let you chat with the members of the group.
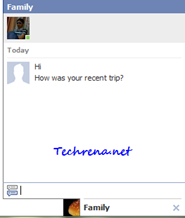
Facebook group chat demo

Leave The Group:

Finally if you want to unjoin from the group, just click “Leave Group” link that can be found under the group page.
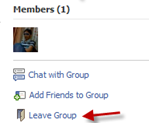

Leave group link in Facebook

[Tip] Swap Stop And Refresh Button Position In IE9

IE9 beta logo

We have been covering a lot of articles about Internet Explorer 9 beta which is refreshingly new and offering seamless integration with Windows 7. In this post, we have come up with a tutorial on how to move the Stop and Refresh button to the left of the of the address bar in IE9.

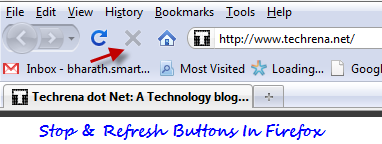
Internet Explorer until now used to show the Stop and Refresh buttons on the immediate right to the address bar. The same has been followed in IE9 as well. But Microsoft was smart this time and decided to give the users the flexibility of choosing the position of these button in their IE9. You might very well be knowing that Mozilla Firefox and Google Chrome does show these Stop and Refresh buttons towards the left of the address bar (immediate left before the address bar), as shown here:

Firefox:

stop and refresh in firefox

Chrome:

Refresh button in chrome

[In Google Chrome, you will only see either one of the Stop or Refresh buttons at any instant. While the page is loading, Stop button is shown and the Refresh button takes its place as soon as the page gets loaded completely.]

If you are an avid user of Firefox and Chrome and want these Stop And Refresh buttons in the same as way as in Firefox and Chrome, follow the instructions shown:

IE9 stop and refresh button intial position

Steps:

1. Open the Internet Explorer 9

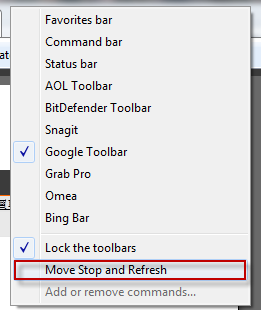
2. Right-click on the IE9 tab bar and choose “Move Stop and Refresh”.

Move stop and refresh in IE9

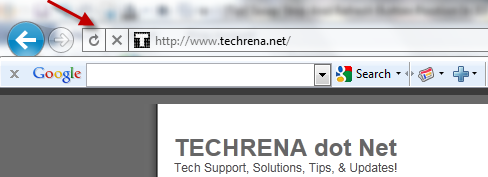
3. That is it! You can now see the Stop and Refresh buttons appearing towards the left of the address bar as shown:

stop and refresh right of the address bar in IE9

It’s that easy! For more tips on IE9 and Windows, subscribe to Techrena.net feeds via Email or follow @techrena or become a fan of Techrena.net at facebook.com/techrena.

[Tip] Prevent Programs From Changing Default Search Engine In IE9

IE9 beta logo

Once you have set a default search engine in your browser, it should remain as it is, right ? But it’s not always like that some programs can easily change your default search engine in your default browser just by adding some keys to your windows registry. It has always been a big problem. Imagine like you install a program like Yahoo Messenger (changes default search engine to Yahoo) or Windows Live Essentials (changes default search to Bing), are just examples of such programs. Even though many of these programs do prompt you when they are going to change your browser (Internet Explorer here), we can hardly notice it as it’ll be asked during the program installation and most of the time we does this in a hurry without exploring all the options provided during the installation.

In this post, I’m going to guide you about how to prevent programs from changing your default search engine in case of the Internet Explorer 9.

1. Open the Internet Explorer.

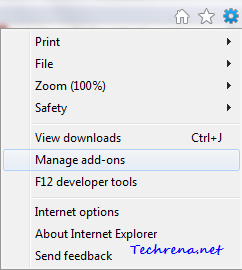
2. Click  on Tools icontools in IE(Found on the top right corner of the window).

3. Select “Manage add-ons” from the menu items.

Tools menu IE9

Alternative you can access the same settings from the “Tools” sections in the IE9 menu bar.

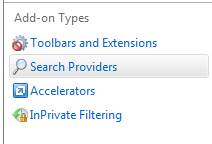
4. In the Manage Add-ons window, click “Search Providers” in the left pane.

Manage addons in IE9 left pane

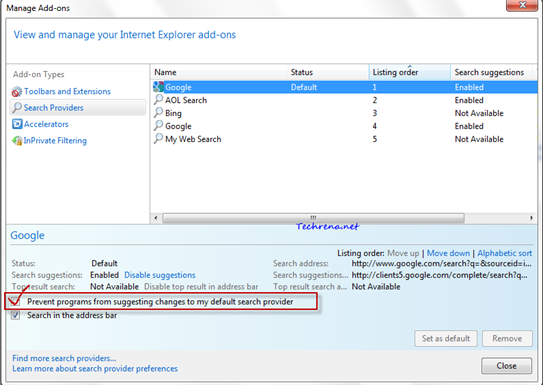
5. Select your default search engine (Google in my case), you will find an option “Prevent programs from suggesting changes to my default search provider”. Check against it and close the window.

Manage Search Providers in Manager Add-ons IE9

That is it. Now your default search engine in IE9 (& IE8) can’t be changed by any program. You might also want to read how to change the address bar search provider in Firefox.

[Download] Sony Memory Card File Rescue To Recover Deleted Data From MC

If you delete accidentally delete pictures (or even videos and other files) from your Sony Memory Card, and if you think that it’s very difficult to get them back, you are wrong. Here is one great recovery software from Sony, “Sony Memory Card File Rescue”. But Sony by default doesn’t ship this software disk to the customers who buy Sony memory sticks. The uses have to manually download the file from the internet to use it with their Sony memory cards.

This works well to recover deleted files from your memory card. For better recoverability, one shouldn’t copy or override other files to the card immediately after the accidental deletion.

The installer file MCFileRescue.exe (~13.7 MB) can be downloaded from the Sony’s website. The procedure for download is not very straightforward, requires you to go through a number of steps.

1. Go to this page and click on the “Download” button that appears toward the right-side.

2. You will be then taken to a new page, where you need fallout a form to proceed to the next level.

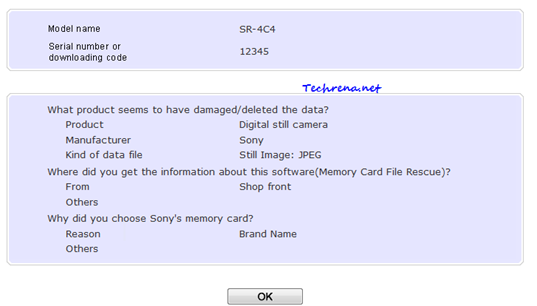
3. Here you will need to enter the model name and serial number of your memory card to be eligible to download the software.

>> The model name of the memory card might be of the following form:

MS*** –

SF-****

SR-***

USM****

Example:

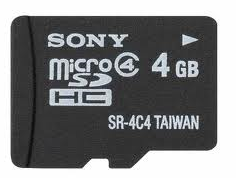
Sony MicroSD model name

The model name of the memory card (microSD type) shown in the above picture is SR-4C4.

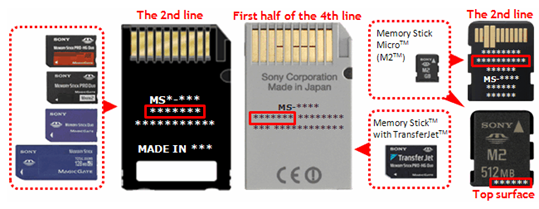
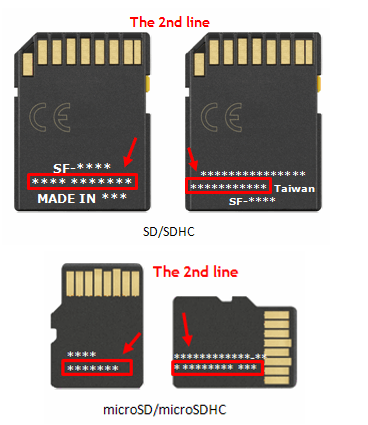
>> The next thing you need is the serial number of the memory card,  this can be found on the backside of your memory card as shown in the pictures (positioned at different places for different types of cards).

Sony Memory Card Serial numbers

Sony Memory Card Serial numbers in sd/sdhc

If you don’t want to go through this, just enter any 5 digits in the form and you should be able to download the file after entering the other details required in the submission form.

Sony Memory Card File Rescue download confirm

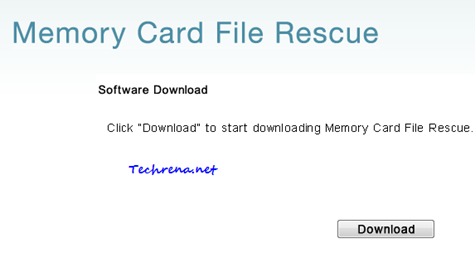
Memory Card File Rescue Download

4. Run the installer and let the software be installed on your pc. Run the program.

5. Select the drive to be scanned (i.e. the drive that contains memory card).

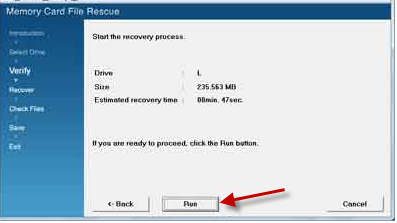
6. It’ll then show the size if of the files found and the time it’ll take to recover them.

7. Click on the “Run” button to start the recovery process. Do not remove the memory card while this action is in progress.

MCFR configuration

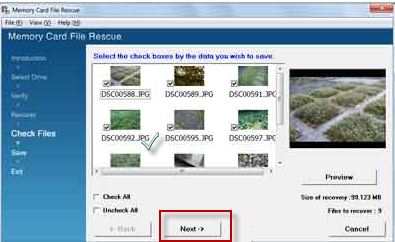
8. It will now show you the list of files that it has found. Select the check boxes against the data that you want t save or recover. Click on “Next” to continue.

Recover data using Sony Memory Card File Rescue

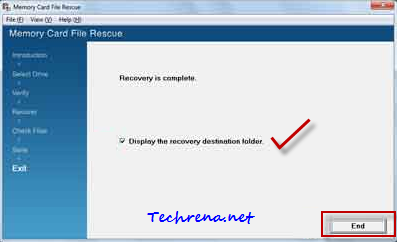
9. Provide the location on your computer, where you want to save the files that are to be recovered. Wait till the recovery process gets completed, after which you will receive a confirmation as shown:

MCFR recovery process successful

It can recover the files of the following formats:

JPG (DCF), MPEG-1, MP4, MP4 AVC file

Note:

1. If the device has been formatted using “Full Format” instead of “Quick Format’ in Windows, the data cannot be recovered from the memory card.

2. This is meant for use with memory cards manufactured by Sony, it can be used with memory card of other manufactures but there’s no guarantee that it will work in the desired manner.

[Tip] Clear Cookies And Cache For A Particular Domain In IE9

Internet Explorer 9

Microsoft’s latest innovation Internet Explorer 9 is slowly turning out to be the best ever browser that the Redmond based software giant has ever produced. With all the positive reviews creeping in from most of the users and experts, IE9 can now be viewed as the browser that will dominate the internet in the upcoming years. If you haven’t explored IE9 fully, yet there’s absolutely no reason why you should start doing it right away now.

There’s one useful feature in IE9 that most of us might not be aware of. Until now to delete cookies in the browser, we needed to delete the entire browser cache, in the same way, to delete cookies, we had to delete all the stored cookies. It’s not the same anymore with IE9. Thanks to IE9 developer tools, you can now clear cookies or clear cache for a particular single domain in Internet Explorer 9. It can be done if you follow the steps briefed below:

1. Open the Internet Explorer 9.

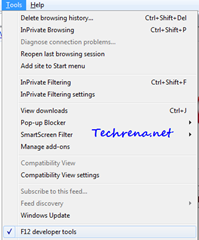
2. Press F12 to open the Developer tools. You may also access this via Tools (by pressing ALT) > F12 developer tools menu item.

Developer tools menu item

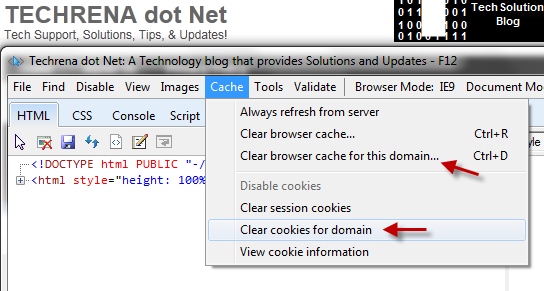
3. In the developer tools, you will see two options:

i) Clear cache for this domain

ii) Clear cookies for domain

Clear cookies and cache for this domain in IE9

These two options are very much handy especially if you are a developer.

[How To] Disable Access To Control Panel In Windows 7

control panel restriction

If your computer is used by many of your friends or family members etc., you might want to restrict access to Control Panel of your Windows 7 (or Windows Vista) so that they won’t mess up with it. Disabling access to control panel means that they won’t be able to modify the default settings of the programs installed and other settings as well.

Here is the step-by-step by guide to disable Control Panel from your Windows 7. It not only disables access to the Control Panel, it’ll also remove shortcuts present for Control Panel in places like Start Menu etc. I’m going to discuss two ways in which you can do it. While the first method only works for Professional, Enterprise or Ultimate editions of Windows 7 or Windows Vista.

Method-I: Using Group Policy Editor

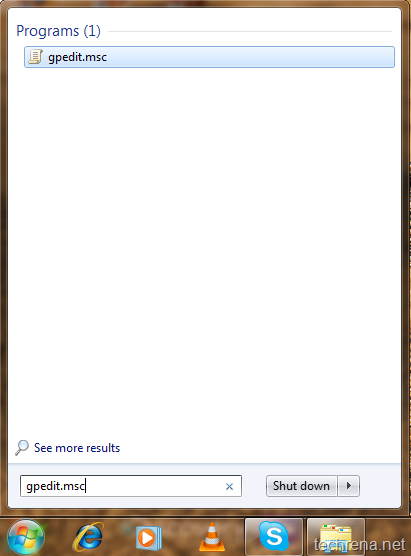
1. Open start menu and type “gpedit.msc” in the search box and open the Group Policy Editor from the results:

Gpedit start menu

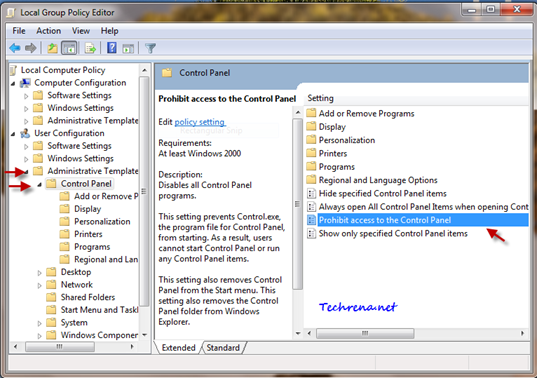
2. In the Group policy editor, expand “User Configuration” and find “Control Panel” under “Administrative Templates” as shown in the screenshot below:

Local Group Policy Editor

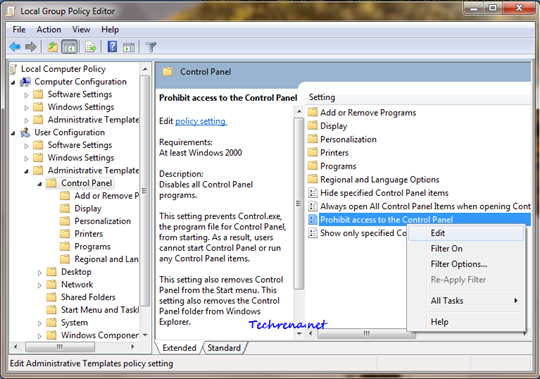
3. Find the “Prohibit access to the Control Panel” entry in the right hand side of the window. Either double click on it or right-click and choose “Edit”.

Control panel in Gpedit

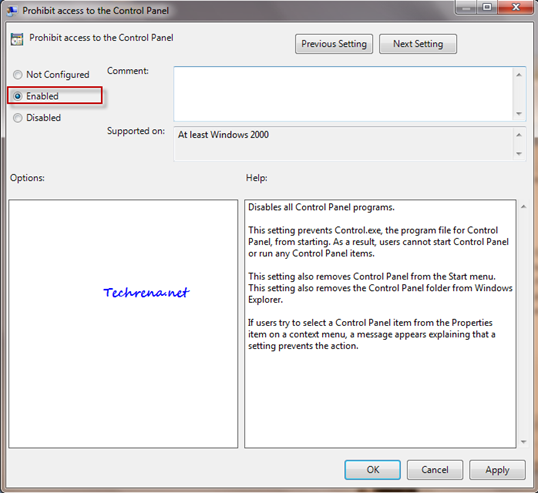
4. Choose the option “Enabled” under “Prohibit access to Control Panel” as shown here.

prohibit access to control panel

Click “Apply” and then choose “OK” to close the window.

5. Now your Control Panel will get disabled and you can’t even find the link for the same in the Start Menu. Check it yourself:

control panel missing from the start menu

When you try to open it by searching it in start menu, you will get an error:

This operation has been cancelled due to restrictions in effect on this computer. Please contact your system administrator.

Control panel start menu

control panel restriction error

Method- II: Using Registry Editor:

This method works on all versions of Windows 7 & Windows Vista. But this involves a bit of editing the values in registry editor. If you are not acquainted with the Registry Editor much, we strongly advise not to implement this.

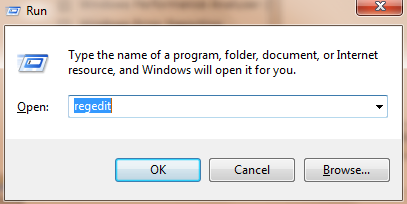
1. Press Start + R to open the run command. Type “regedit” and click OK.

regedit run command

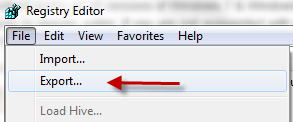
2. First take a backup of the registry editor just to be on the safe side. Go to File > Export and save a backup on your computer.

Regedit export backup

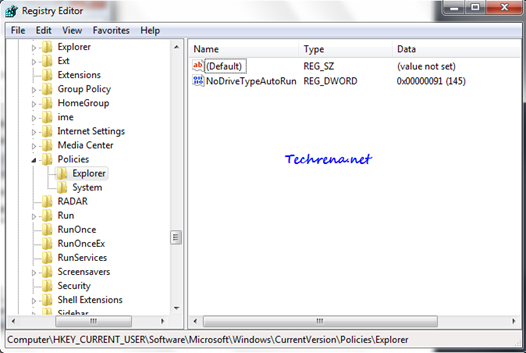
3. Now navigate to the following path in the registry editor:

HKEY_CURRENT_USER > Software > Microsoft > Windows> Current Version> Policies> Explorer

Regedit explorer

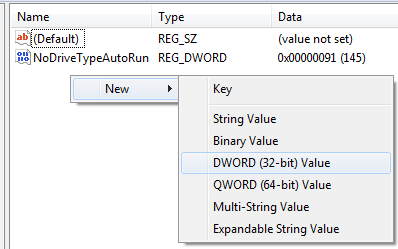
4. Right click on the right hand pane and select “New > DWORD (32-bit) Value

Regedit_explorer_new_key

Give it a value “NoControlPanel”.

NoControlPanel

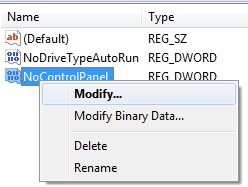
Right-click on the new value NoControlPanel and choose “Modify”.

NoControlPanel modify value

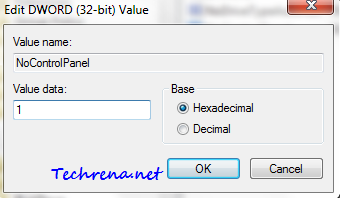
Change the Value Data filed value to “1” from “0” and click OK.

Edit dword value

Close the registry editor and restart your computer and check back. When you check back after rebooting your PC, you will find that the Control Panel is disabled and also is not listed in the Start Menu as shown in the first method.

If you want to enable the Control Panel again, just choose ‘Disabled" (third option) in the step 4 of the first step. In case of the second method, just delete the "NoControlPanel" DWORD Value and the Control would be back once your reboot your system.

Disabling Control Panel is just not enough to restrict users using your PC, If you want to setup advanced controls on your computer, read how to setup parental controls in Windows 7 .