Disable Internet Explorer First Run Welcome Screen Pop Up

When you install Internet Explorer 8 or IE9 and launch it for the first time (or even when you reset the settings), you might have noticed the Set Up Windows Internet Explorer 8 (applies to Internet Explorer 9 as well) screen (Tour and RunOnce) appears asking you to go through a few steps to change the configuration of the search and accelerator settings.
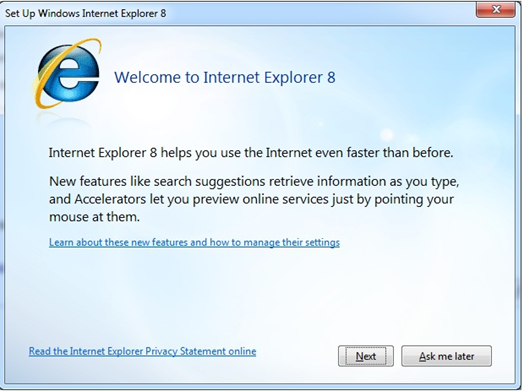
IE8 Set Up Welcome Screen

You might not want to see this popup every time you install IE (IE8 or IE9) or reset settings in IE. Unfortunately Microsoft hasn’t made it easier to disable this initial set up. However there are workarounds to achieve the same.

In this post, I’ll discuss about different methods to disable this initial set up popup:

Method-1: Using Group Policy Editor:

If you are using Professional, Ultimate or Enterprise versions of Windows 7 or Vista, you can tweak Group Policy Editor (gpedit) to disable the initial set up for Internet Explorer 8/9.

1. Press Start button + R and type “gpedit.msc” in the text field and press Enter to launch the Group Policy Editor.

2. In the left pane, expand User Configuration, then find and expand Administrative Templates, next find Windows Components under it and expand it. Then finally find “Internet Explorer”, click on it.

So the path would be: User Configuration> Administrative Templates> Windows Components> Internet Explorer

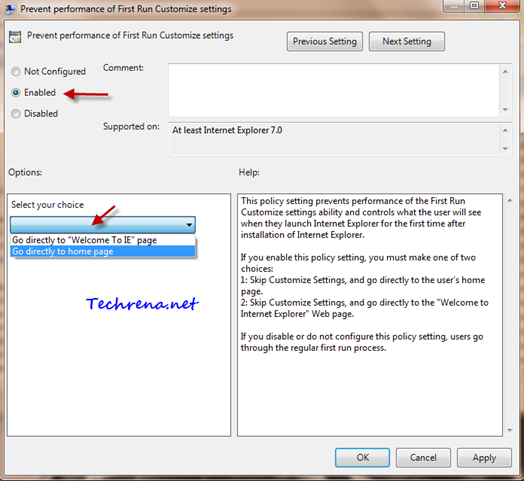
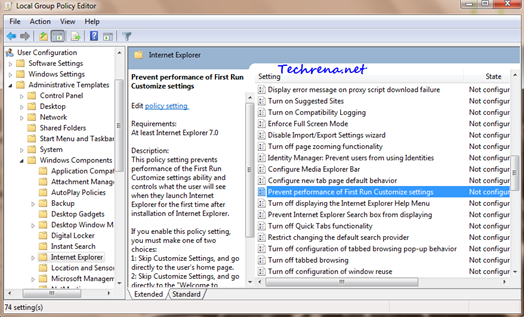
4. On the right pane, find “Prevent performance of First Run Customize settings” and double click on it. A new settings window will open up.

IE settings in GPEDIT

Prevent Performance of First Run Customize settings

5. Set the value to “Enabled” and then go for the options section. You will have two options from the dropdown menu:

i. Go directly to “Welcome To IE” page

ii. Go directly to home page

Select the first option (i) to skip the IE first run Customize Settings and go directly to your home page.

Select the second option (ii) to skip the IE first run Customize Settings and and go to the “Welcome to Internet Explorer” page directly.

6. Click Apply to save the settings then click OK and close the Group Policy Editor window.

Method-2: Using Registry Editor:

Warning: Using Registry Editor to modify Registry settings without much knowledge is deemed dangerous as it may cause some serious problems. Proceed to the Registry Editor at your own risk.

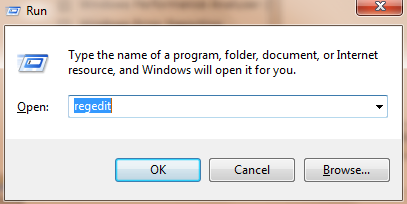
1. Press Start button + R to open run command dialog box. Type “regedit” and press OK to open the Registry Editor.

2. Before we work further, save a backup of the Registry Editor. Go to File > Export and save the .reg somewhere on your Hard disk or USB disk drive.

3. Navigate to the following path carefully in the Registry Editor:

HKEY_LOCAL_MACHINE\>Software\>Policies\>Microsoft\>Internet Explorer\>Main

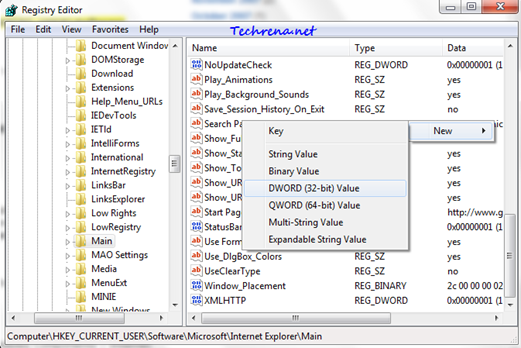
4. Right click on the right pane and select New > DWORD (32-bit) Value.

IE8 regedit

5. Give it a value DisableFirstRunCustomize as shown:

DisableFirstRunCustomize

6. Now right-click on it and choose “Modify”.

DisableFirstRunCustomize modify

7. Modify its DWORD (32-bit) Value to “1” from “0” and click OK.
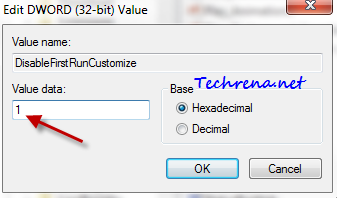
DisableFirstRunCustomize edit DWORD

8.Exit the Registry Editor.

Note: If you follow the Group Policy Editor method, the settings will be applied to all the users accounts, where as if you follow the Registry Editor method, the settings will effect only the currently logged in user account.

[Tip] Change The Default Menu Bar Position In Internet Explorer

Internet explorer logo

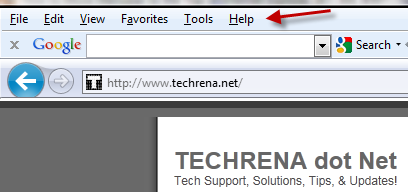
If you are using Internet Explorer 7, 8 or even the latest IE9 beta, you might have noticed the change in position of the menu bar from IE or even from other browsers like Firefox, which shows the menu bar above the address bar. Of course, even though there’s no harm when the menu bar is at the top or beneath the address bar, but given the fact that you might have been accustomed to using it at the top. Here we have come up with a small tweak involving registry editor, which can change the position of menu bar in the Internet Explorer.

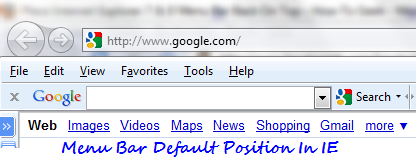
Default menu bar position in IE:

menu bar position in IE

As you can see the menu bar is located beneath the address bar (location bar) in the Internet Explorer. Follow the steps mentioned below to change its position:

Steps:

1. Press Start button + R to open the run command bar. Type “regedit” and press enter.

regedit run command

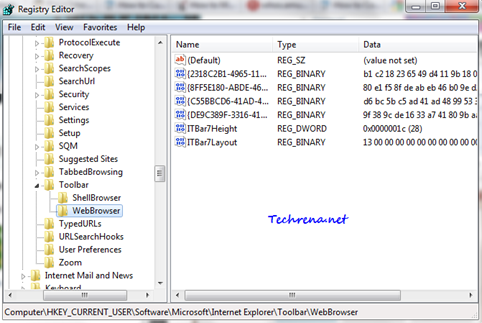
2. In the registry editor, navigate to the following path:

HKEY_CURRENT_USER> Software> Microsoft> Internet Explorer> Toolbar> WebBrowser

Registry Editor webbrowser

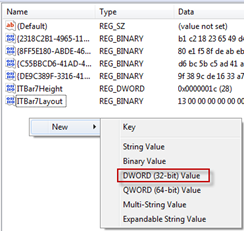
3. Right-click on the right hand side pane and select “New > DWORD (32-bit) Value“.

New DWORD

4. Give the DWORD value ITBar7Position:

ITBar7Position

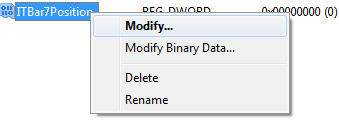
5. Right click on ITBar7Position and choose “Modify”.

Modify DWORD ITBar7Position

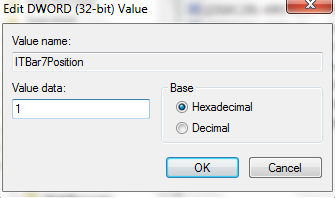
6. Enter “1” under the value date filed instead of “0” and click OK. Close the Registry Editor.

Editing DWORD Value Data

You are done with the tweaking. Open Internet Explorer now and you should see the IE menu bar being moved to top like this one:

Menu bar at top in IE

Warning: If you are a novice user of Windows and doesn’t know much about Registry Editor, stay away from this tweak. A wrong edit at the wrong place in Registry Editor can make your Windows corrupt. Always take a backup of the registry editor before working with it (use File > Export > save location).
[Tip] Change Default Download Location In IE9

IE9 downloads

As promised earlier, we have come up with another tip for the new Internet Explorer 9 users. Internet Explorer 9 (as it is only compatible on Windows 7 and Vista) by default stores the files downloaded to %windir%/Users/Username/Downloads (C: > Users> Username> Downloads is the most common path). But you might want to keep all the downloads through Internet Explorer to a different folder other than the default “Downloads” folder. Follow the steps given below to get this done:

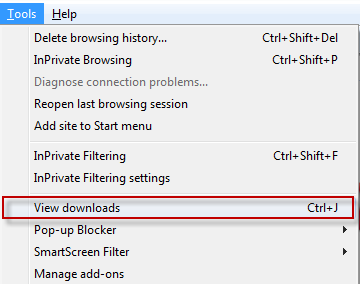
1. Open Internet Explorer 9 and hit Ctrl + J to launch the “View Downloads” window. Alternatively, you can open the same via Alt > Tools > View Downloads from the Tools menu.

Tools menu options in IE9

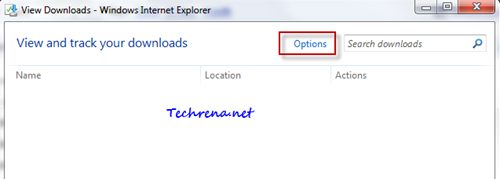
2. In the View Downloads window, click on “Options”.

View Downloads in IE9

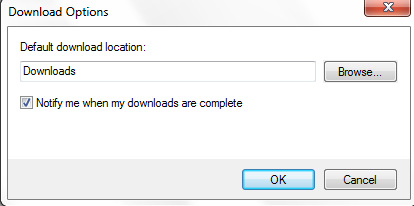
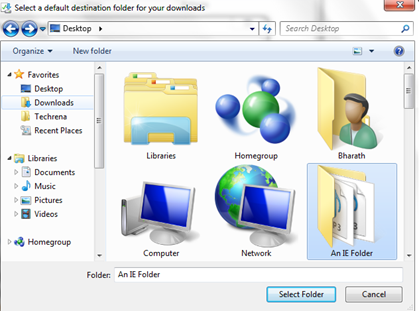
3. In the “Download Options“ window, change the default folder by browsing and selecting a custom folder. Click OK once you have chosen the desired folder.

Download options in IE9

Select download folder for IE9

4. Click OK and close the “Download Options” window and “View Download” window.

[How To] Clean Up Context Menu In Internet Explorer

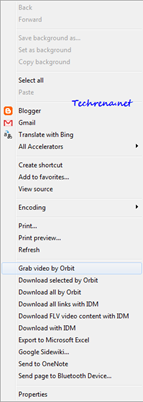
IE context menu mess up

We have earlier covered how to clean up unwanted items in context menu in Windows Explorer and for Firefox. Now in this tutorial let me take you through the process of removing items from right click context menu in Internet Explorer.

Internet Explorer is by far the most widely used browser in the world. And the IE lovers worldwide are excited by the release of new beta version of IE9. So we thought this might be the right time to post some tips on tweaking Internet Explorer.

Context menu in Internet Explorer consists of two sections:

1) Accelerators (only for IE8 & IE9)

2) Menu extensions

1) Accelerators:

Accelerators are webpage specific and they will have their own action set up based on the webpage data. These have become a part of IE since the release of Internet Explorer 8. Some examples for Accelerators in IE8 & IE9:

  • Blog with Blogger
  • Email with Windows Live
  • Define with Google Dictionary
  • Translate with Windows Live

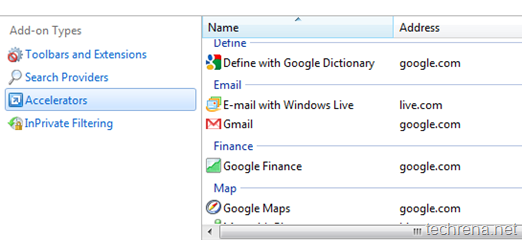
Accelerators in Internet Explorer

If you don’t use these Accelerators much, follow the steps outlined below to disable them:

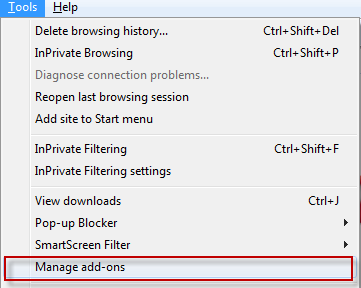
1. Go to Tool > Select Manage Add-ons

Tools menu in Internet Explorer

2. Under the “Add-on Types”, click on Accelerators tab on the left hand side pane. You will the full list of Accelerators available.

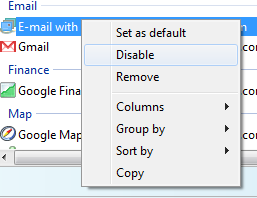
3. Right click on the Accelerator that you want to disable and choose “Disable”.

disable accelerator in IE

You may also want to disable or remove other unneeded toolbars and add-ons by clicking on “Toolbars and Extensions”.

2) Menu Extensions:

Menu extensions are stored in the Windows registry and these are present in all versions of Internet Explorer, not just IE8 & IE9.

Examples for Menu Extensions many include:

  • Download with IDM
  • Send to OneNote
  • Send page to Bluetooth Device..

To disable unnecessary Menu Extensions, follow these steps:

1. Press Start button + R to open the run command bar. Type “regedit” and press OK.

regedit run command

2. Navigate to the following path in the registry editor:

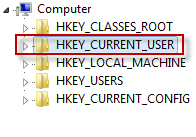
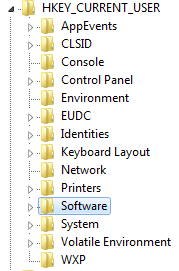
HKEY_CURRENT_USER> Software> Microsoft> Internet Explorer> MenuExt

HKCU in regedit

HKCU expanded in regedit

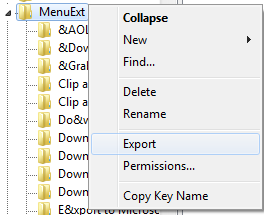
3. Right click on MenuExt folder and choose “Export” and save a copy as the backup, to be on the safe side in case something goes wrong.

MenuExt export

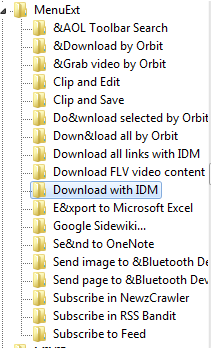
4. Collapse the “MenuExt” folder and start deleting the items that you don’t need:

MenuExt items

5. Close the registry editor and restart the Internet Explorer to see the changes.

That is it. If you wonder “why do I need to mess up with registry editor? Isn’t there any freeware available?” ; Yes, there’s a freeware (actually IE add-on) called ToolbarCop which will remove the unnecessary items from the IE context menu with a few clicks.

[Download] Internet Explorer 9 Beta

Internet explorer 9 beta

Microsoft has made the public beta of Internet Explorer 9 available for download. It has been a year-and-half since the release of Internet Explorer 8 and the internet world has since been eagerly waiting for the next version of the world’s most widely used browser.

IE 9 is available for download for users using 32-bit or 64-bit versions of either Windows Vista or Windows 7 only. Windows XP users won’t be able to install this version of the Internet explorer.

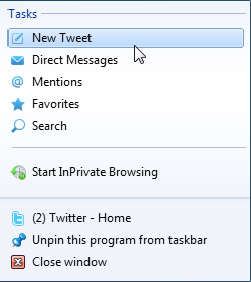
IE9 integrates perfectly well with Windows 7. With IE 9, users can easily pin their favorite websites to the taskbar with custom jump lists for each site. For instance, when you pin “Twitter” to the taskbar in IE 9, you will see the following jump lists which will directly take you to whatever page you want to see on Twitter (like direct messages, @ mentions, search etc.). This might well be a handy one specially when you pin sites like Gmail etc.

Twitter jump lists in IE 9

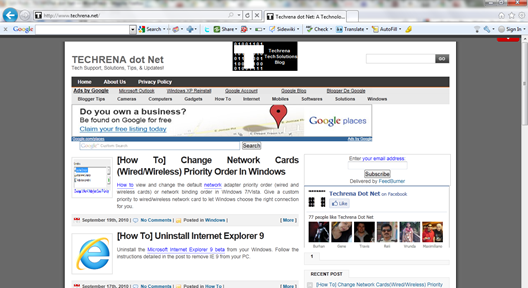
IE9 screen shot

There are a lot more features to speak about, for the same reason Microsoft has launched an official website beautyoftheweb.com dedicated to the Internet Explorer 9. For a full list of features, see what’s new in IE 9. IE 9 is available in many languages, choose the one as per your choice based on your current Windows language or simply whatever language in which you want to see IE 9 from the download links below.

Download:

Direct Download Links: Windows 7        32-bit 64-bit [Link expired]

Windows Vista 32-bit 64-bit [Link expired]

Note: Please note that Internet Explorer 9 will be installed as a Windows update and if you want to uninstall it in future, read How to uninstall IE 9.

[How To] Uninstall Internet Explorer 9

Internet Explorer 9

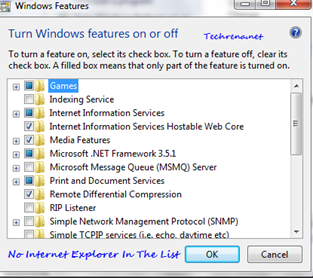
Recently I have downloaded and installed Internet Explorer 9 beta on my laptop to see what Microsoft is up to with their new browser. But since then I had problem while opening some programs like Windows Live Writer (it is the older version of WLW of course), which was getting crashed even before it could start. I was quite sure that the IE 9 could be the culprit and in fact an article at Windows support knowledge base suggested me that I was right. Ok, all I need to do is to uninstall the Internet Explorer 9 from my PC. I followed the usual routine: Control Panel > Programs> and clicked Turn Windows features on or off.

But I was rather surprised to see that there’s no Internet Explorer in the list !

IE 9 missing in Windows features

The fact is that when you choose to install Internet Explorer 9 beta, it’s going to be installed as an windows update. So if you want to uninstall this program, you need to uninstall from the installed windows updates list.

Steps:

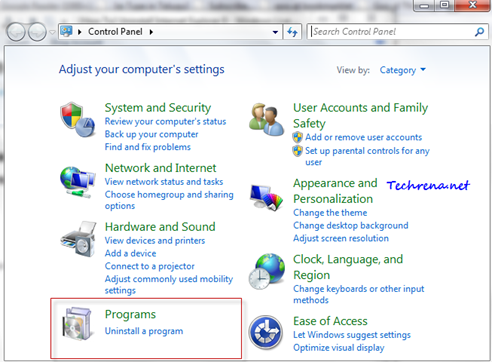
1. Go to Control Panel > Programs > Click “Uninstall a program”.

Uninstall program in control panel

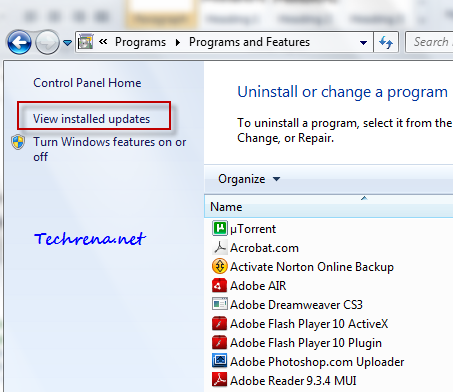
2. And yes, you don’t find it under the installed programs list. Click on “View installed updates” link.

Programs and features and installed updates

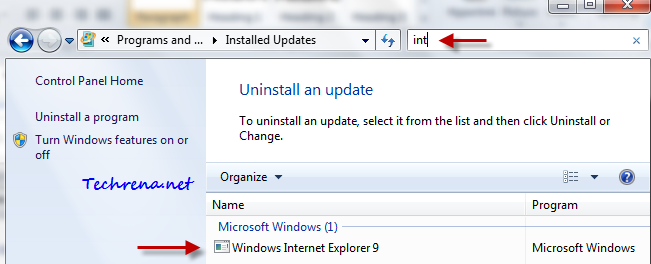
3. Now search for “internet explorer” in the installed updates list.

ie 9 uninstall

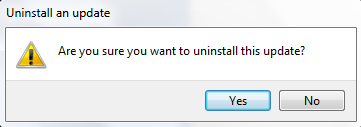
4. Just right-click and choose “uninstall” and accept the confirmation.

IE9_uninstall_confirm

Just restart the computer once the uninstallation is over and there you go, you have Internet Explorer 8 back on your PC instead of Internet Explorer 9.

This marks our 500th post at Techrena.net. To receive the updates from our site subscribe to Techrena’s RSS feeds via email.

Cumulative Security Update for Internet Explorer KB2183461

Windows Update

Cumulative Security Update for Internet Explorer KB2183461: [Released: August 10, 2010]

The security update KB2183461 fixes the issues addressed in the security bulletin MS10-053. This update applies to Internet Explorer with the operating systems Windows 7, Windows Vista and Windows XP.

Security update KB2183461 addresses issues that have been identified in Windows systems running Internet Explorer, that could allow an attacker to compromise the computer and gain control over it. Download and install the update to protect your system from this issue. If you have enabled automatic Windows Updates in your system, the computer should be able to download the updates by itself. If you haven’t enabled (not recommended) the Windows Updates on your Windows, you can download and install the update KB2183461 from the links given below . Choose the correct Operating system and the architecture of your OS (x86 or x64).

Download Links:

Windows 7 x86 (7.9 MB) x64 (6.2 MB)
Windows Vista x86 (9.2 MB) x64 (17.8 MB)
Windows XP x86 (3.4 MB) x64 (36.6 MB)

[How To] Block A Website Using Content Advisor In Internet Explorer

site blocked

Blocking certain websites that may not suit the audience mainly in the case of children or workers has always been one such compulsory feature. In case you haven’t spotted yet, there’s one such option in Internet Explorer too. Here are the steps to block any website in Internet Explorer using IE’s content advisor.

Steps:

1. Go to Tools > Internet Options in the Internet Explorer.

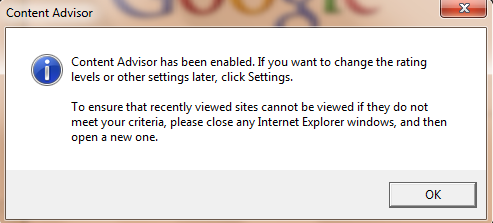
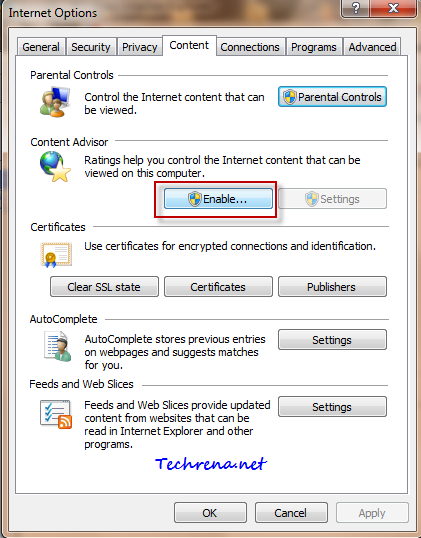
2. Go to “Content” tab under the Internet Options. Find “Content Advisor” under this tab. By default it would be set default. Click “Enable” option opposite to it.

Content advisor in Internet Options

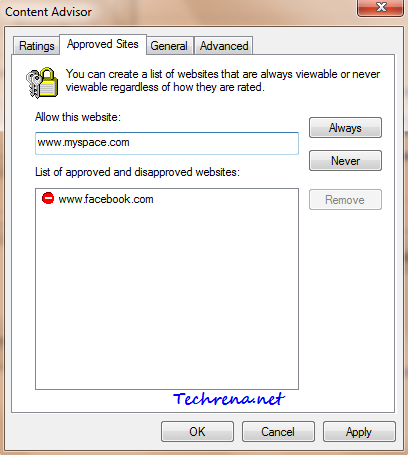
3. Go to “Approved sites” tab in the Content Advisor window. Type the URL of the website that you want to block in the text box and clock “Never” button. See the screenshot below:

Approved sites in Content advisor

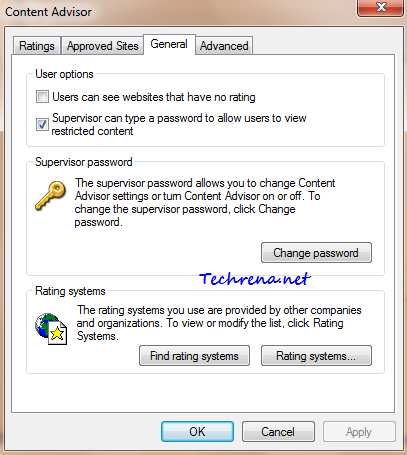
4. Click “Apply” once you are done and then go to “General” tab. Here you can choose whether to password protect the blocked sites that you added. Once configured, click “OK’ to close the window.

Content advisor General options

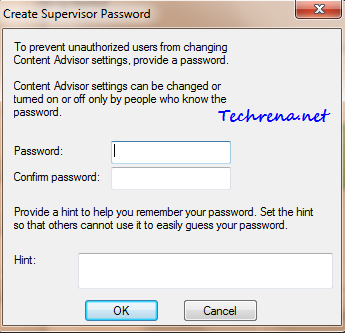
You will now be asked to enter the supervisor password for the content advisor settings.

5. Create a supervisor password and add a hint (recommended) which is helpful in case you forget the password in future. Close the window once you have done that.

Supervisor password for content advisor

Content Advisor settings done

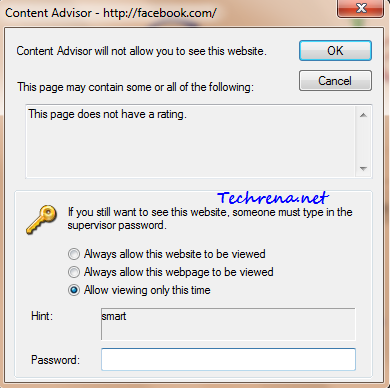
6. Now try to open any website that you have added in the block list. You will see the following prompt window, asking for you to enter the supervisor. User can view the website only if he knows the supervisor password.

Content advisor prompt window

7. You can disable the content advisor any time by clicking the “Disable” button under the “Content Advisor”. You will however need to authorized to do that by validating through the supervisor password.

For more tips on software, subscribe to Techrena’s RSS feeds via email.

How To Stop Internet Explorer To Stop Asking You To Remember Passwords ?

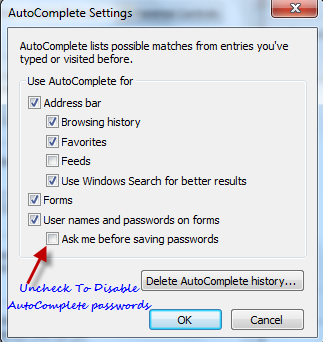
AutoComplete passwords

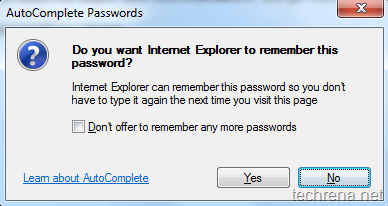
Microsoft Internet Explorer has a default “AutoComplete Passwords” feature that lets you save passwords for different login pages while browsing the internet. But if you are using a shared public computer with many users working on it, you might want to disable this feature for privacy concerns. Follow the steps below to make Internet Explorer stop asking for you to remember passwords.

Steps:

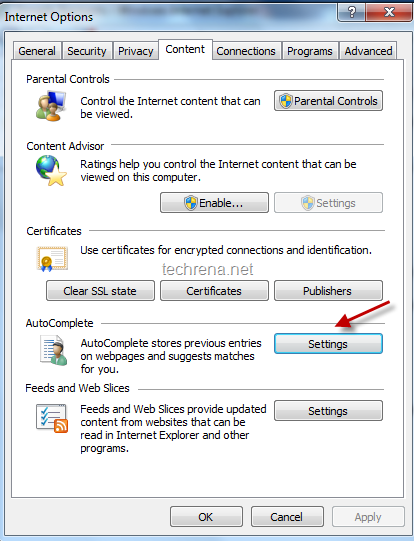
1. Go to Tools > Internet Options, switch to “Content” tab. Click on “Settings” under “AutoComplete” section.

ie content settings

2. Uncheck the “Ask me before saving passwords” option in the AutoComplete settings window.

AutoComplete settings

3. Click OK and close the settings window.

From now on, your Internet Explorer will not offer you the AutoComplete passwords dialogue. To re-enable this feature at any later time, just check the same option in the third step.

How To Open IE In Private Browsing Mode By Default

Internet explorer logo

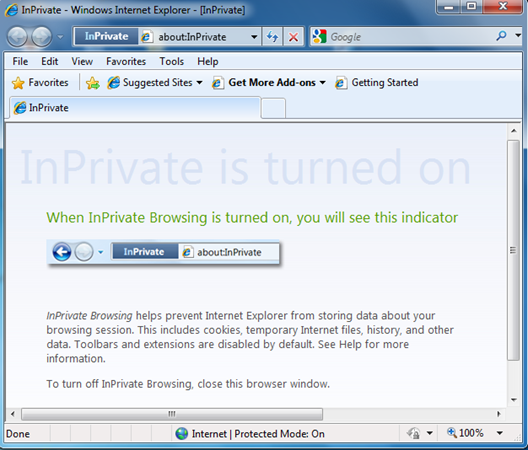
In Private Browsing Mode IE

Private browsing mode” is idle for those who don’t want other users on the same computer to see sites that he had visited and other information. In private browsing mode, the browser will not store your browsing details in cookies or in browsing history.

But for some reasons this private browsing mode is hidden in the browser windows and is not that easy to access (even though you can use a keyboard shortcut to open it, I’d still want a better way) this mode. Even if we create a desktop shortcut for Internet Explorer, it’ll only create a shortcut for normal browsing mode, not the private mode. But here’s a tutorial for you which explains you how to add a private browsing mode desktop shortcut.

1. Create a desktop shortcut as you would do normally.

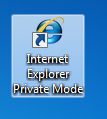
IE private mode shortcut

[I just renamed the shortcut to “Internet Explorer Private Mode” to reflect its purpose]

2. Right-click on the shortcut now and you will be under “Shortcut” tab by default. You can find a field “Target” under the Shortcut tab.

3. Append the following string to the target location present in the filed:

-private

Now the string will look like:

IE private mode shortcut

"C:\Program Files\Internet Explorer\iexplore.exe" -private

4. Click OK to save the settings.

You can now use this shortcut to start Internet Explorer in “Private Browsing Mode” by default.

Windows 7:

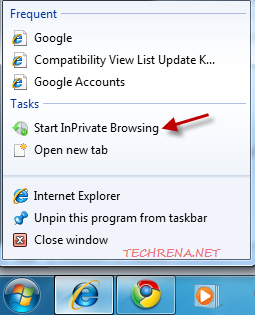
If you are using Windows 7, you need not worry about going through all the above listed steps to create a shortcut as Windows 7 by default will have a shortcut to start InPrivate Browsing. Just right-click on the IE shortcut present in the taskbar and choose “Start In Private Browsing option” from the list.

Windows 7 IE start inPrivate Browsing