Partition Hard Disk Drive in Windows 7 Using Disk Management

Creating and partitioning Hard Disk Drives have become very easy in Windows 7 and Vista with its inbuilt Disk Management. We do not need any third party software to create and format Disks in Windows 7. Previously we used to rely on software like Partition Magic etc. but now it has become very easy.

For those who are completely new to partitioning Disk drives, before starting the steps understand the following example:

If you have a drive, say C drive of 200GB and you want to partition it into two more drives, then you need to shrink C drive first. Suppose you have shrunk it to 100GB, then you will have 100GB of unallocated space. Now you can create new drives from the unallocated space, say first one for 60GB drive, and then you can create the second drive for 40GB. Totally you will have three drives now of 100, 60 and 40 GB respectively, after completing the process.

Follow the steps below to shrinking existing drives and creating new partitions in Windows 7.

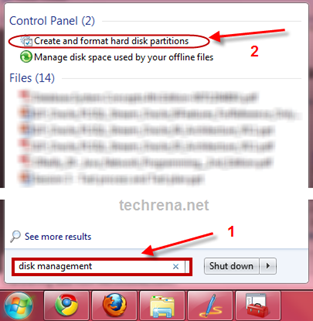
Step 1: Click Start and type DISK MANAGEMENT in the search box. Click “Create and format hard disk partitions” from the search results.

Hard Disk partition in Windows 7

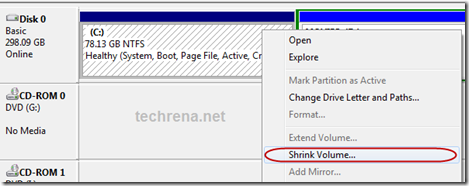
Step 2: After opening Disk Management successfully, you can see the existing drives in your system. Right click on the drive you want to shrink. Click on Shrink Volume. It may take few seconds to configure the available shrinkable volume.

Hard Disk partition in Windows 7

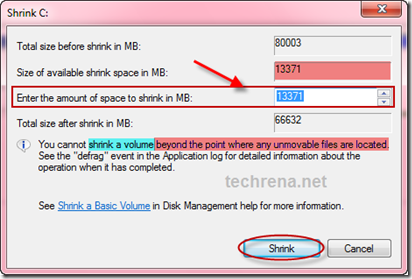
Step 3: Now type in the amount of space(in MB) you want to shrink. It should be less than or equal to the available shrink space. Then click Shrink.

Hard Disk partition in Windows 7

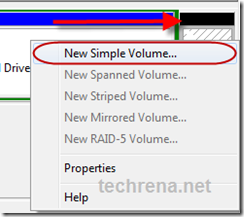
Step 4: After shrinking the volume, you will find a new volume in the right side labelled as Unallocated Space(the one with BLACK colored label). Right click on it, and select New Simple Volume.

Hard Disk partition in Windows 7

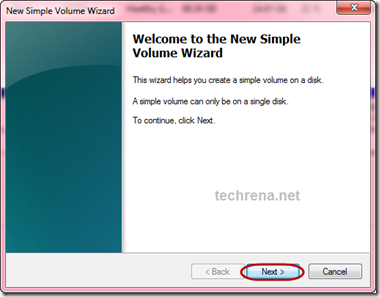
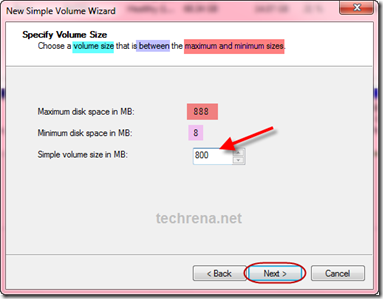
Step 5: Click next in the New Simple Volume Wizard. Then enter the size of the new partition you want to create. It should not exceed the maximum sizes.

Partition Disk Windows 7 e Hard Disk partition in Windows 7

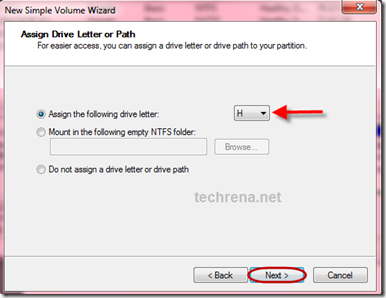
Step 6: Select the Drive letter you want to assign, then click next. Now, select the file system. Usually, we use NTFS(more common) or FAT32.  Type in the Volume label, then click next to format the partition.
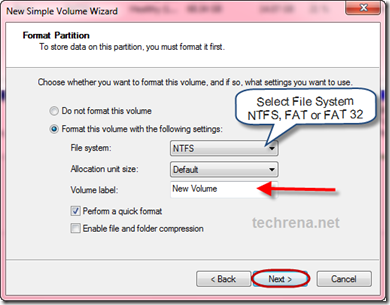
Hard Disk partition in Windows 7

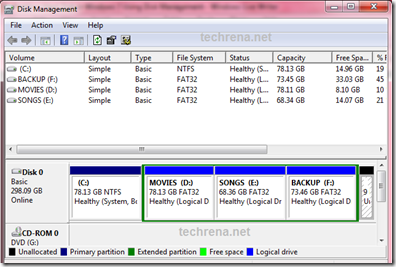
Hard Disk partition in Windows 7 After the formatting is done a new disk drive can be seen. That’s it you have successfully partitioned your hard disk drive. I have created four drives for my computer which is shown below:

Disk Management

Note: This steps will also work in Windows Vista but not in Windows XP.

How to turn off UAC in Windows 7 and Vista

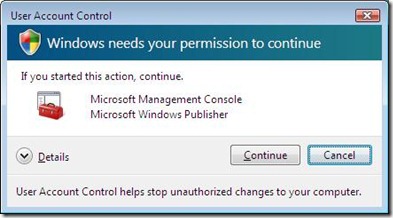
Are you getting annoyed of the permission dialogues like “Windows needs your permission to continue”?

If yes, you can easily disable these messages in Windows 7 and Vista.

This is a new security feature and can be controlled using the User Account Control(UAC) Settings.

The dialogue boxes looks like the one shown below.

You can follow the steps below and easily remove the messages every time.

Windows needs your permission to continue

If you are using Windows 7 then it is very easy.Follow the steps below:

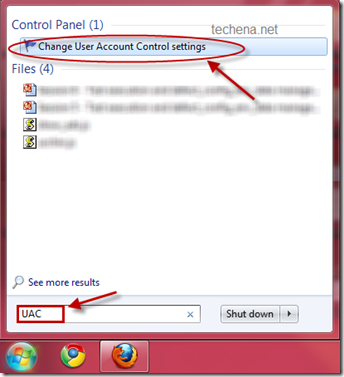
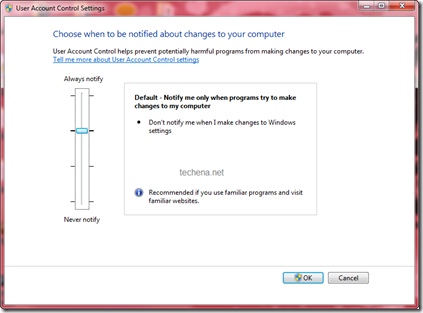
Step 1: Click Start Button. Type UAC in the search box of the Start Menu and press enter. You can see the UAC panel as shown below.

User Account Control from start menu

User Account Control Settings

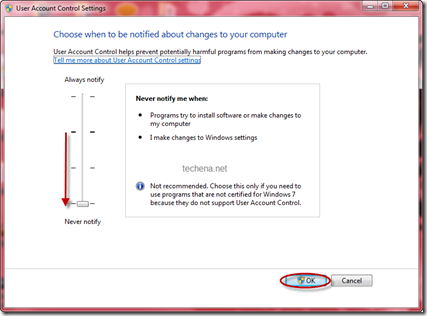
Step 2: Now drag the slide to Never notify and click OK.

User Account Control Never Notify

Now you can restart the computer and you will not see any more permission dialogues.

If you are using Windows Vista, then follow the steps below:

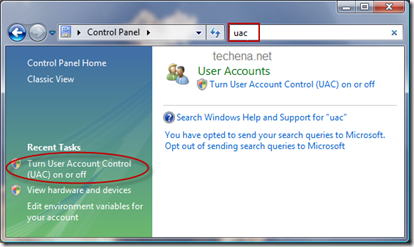
Step 1: Open Control Panel. Type UAC in the search box. Click the “Turn User Account Control (UAC) on or off” link in the left pane.

User Account Control panel

Step 2: Uncheck the “Use User Account Control (UAC)” checkbox and click OK.

User Account Control Check box

Now you can restart your Computer.

Note: Some functionalities like Windows Side Bar may stop working if you keep the UAC as Never notify. In that case you can refer this post to enable the sidebar: Enable Windows 7 Sidebar in easy steps

WInRAR 3.80 Free Licence Key Giveaway

Well, WinRAR is the best file archiving tool that I have ever used.WinRAR works well with RAR, ZIP archives and can also be used in unpacking ARJ,LZH,TAR,GZ,ACE,UUE,BZ2,JAR,ISO,EXE,7z, & Z archives.WinRAR started supporting Windows Vista from version 3.70 and the latest version WinRAR 3.90 support Windows 7 as well.

The WinRAR version for which you can get key through this process is ‘version 3.80’.The key obtained through this tutorial is absolutely legitimate and it is offered by a German tech magazine.

Follow These Steps:

  • Step 1: Download Winrar 3.80
  • Step 2: Visit this German proxy site, as the offer is valid only in German and hence we have to use proxy with German server and not any other proxy site like hidemyass.com.

Proxy site LINK

  • Step 3: Enter this URL ‘https://covermount.win-rar.com/pcwelt0310/’ in the form and hit  ‘GO’ button.
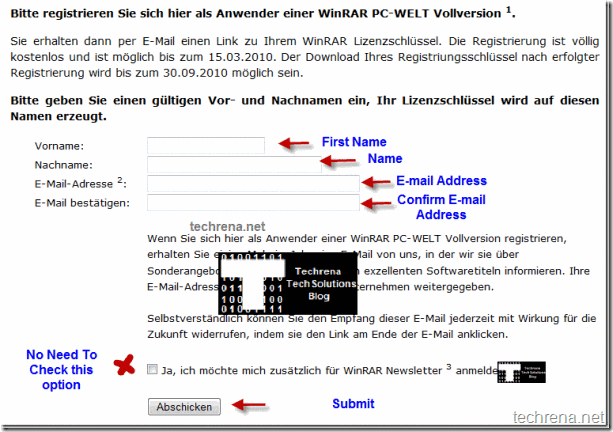
  • Step 4:  Now it’ll take you to the German website, scroll down to the registration form as shown in the screen shot

WinRar Free Licence Give away site Regsitration form in Germany

Checkout this image, which shows the same page in English if you are still finding it difficult to fill-in.

  • Step 5: Enter the your details in the form follow the above screen shot for reference and you can either check or uncheck the option below the form(that’s for subscribing to their newsletter) and click the button which reads “Abschicken” (which means ‘Submit’ in German).
  • Step 6: Check your email, and find the link similar to below:

https://covermount.win-rar.com/pcwelt0310/download.php?email=user@mail.com

[Your email address would be present in place of ‘user@mail.com’]

  • Step 7: Open the link in new tab and this open a webpage where you’ll find a download link:

Downloading WinRar key REG file

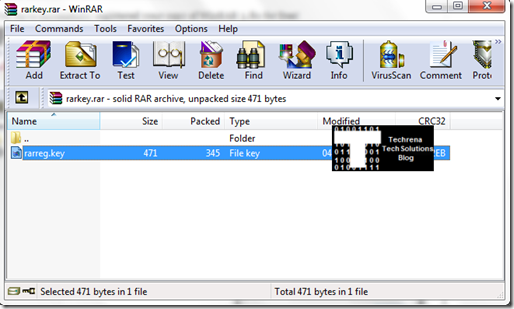
  • Step 8: You will be asked to download a file called “rarkey.rar” which contains rarreg.key which is the key that you wanted.

WinRAR key file in rarkey

Now double click the key file to install the key and now you have a full licensed WinRAR 3.80 version and this key is valid till 30.09.2010.

Leave a comment if you have any troubles while going through these steps.

Install Windows XP in Vista Installed Computers

Installing Windows XP in a computer which is installed with Windows Vista has been an issue. Some of the laptops which are pre-installed with Vista have problems downgrading to Windows XP. As many users are familiar with Windows XP and prefer XP to Vista, downgrading is needed.

If we simply insert the Windows XP Installation CD and try to install Windows, we get this error:

Setup did not find any hard disk in your computer.

Setup did not find any hard disk in your computer

This error is due to the AHCI Sata drivers which are not present in the Windows XP Setup CD.

This problem can be solved in two ways:

Method 1: (Disable Sata Native Support )

If your BIOS Setup has the Disable Sata Native Support option then it can be solved easily by disabling the feature. You can follow the Guide given here for performing this procedure:

How to install your own Windows XP in Laptops

Method 2: (Using nLited Installation)

Some of the laptops do not have the Disable Sata Native Support option. In that case the only way to install is to integrate the AHCI Sata drivers to your Windows XP installation disk. For this you need a freeware called nLite to integrate the components The full procedure and the sata drivers are given here:

Integrate your own drivers in the Windows installation CD using nLite

Once you have nLited your XP CD then it can be used for Computers which may be having sata support or not.

Enable Hide Inactive Icons Tray Using Registry in Windows

Many of the Windows XP, Windows Vista or Windows 7 users usually find that the Auto Hide Inactive Icons tray from the taskbar has stopped working or it is missing inspite of  enabling it from the control panel or the taskbar properties. This problem is very common. May be after reboot it may work again, but for some systems the tray may never come up. This tray will hide the inactive and unnecessary icons from the taskbar. So many people like this feature. Making it work again is what we are talking about here.

See the images below where one is not having hide inactive Icon tray and another one is having it:

missing hide Icon tray hide Icon tray On

Enabling the Inactive icon tray consists of changing only a single registry. Its an easy process. There are two methods given below. Both the methods needs registry editing to be enabled. If your Registry editing has been disabled by the administrator then visit: How to enable Registry Editor (REGEDIT) to enable it.

Method 1: Using Elevated Command Prompt

Step1: Copy the whole command from the table below:

REG ADD HKCU\Software\Microsoft\Windows\CurrentVersion\Explorer /t REG_DWORD /v EnableAutoTray /d 1 /f

Step 2: Open a Command Prompt (Press Start + R, type cmd and Enter). Paste the command you had copied into the Command Prompt. In order to paste in Command Prompt right click and select paste.

View Enable Auto Tray using Command Prompt Image

Step 3: Press Enter to execute the command. It should execute successfully.

Step 4: Log Off your computer and Log On again. Now your Hidden Icon tray will be working.

Method 2: Using Registry Editor

Step 1: Open a Registry Editor(Press Start + R, type regedit and Enter)

Step 2: Go to the registry key path given below:

HKEY_CURRENT_USER\Software\Microsoft\Windows\Current\Version\Explorer

View Hide icon key ImageStep 3: In the Right Side of the registry editor see for the value EnableAutoTray. [If you are not able to find it, create a new value with the same name. To create a, value right click anywhere on the right pane and select New DWORD. Change the Name to EnableAutoTray(Press F2 for name change)]. Double click on EnableAutoTray and change the value to 1.

View new hide icon tray Value ImageView Enable AutoTray New Value Image View Enable Auto Tray Registry value Image Step 4: Now close the editor and log off your computer. Log On and you will find your tray is working.

Congratulations you have enabled your Auto Hide Inactive Icons.

Note:

1. Log Off means complete logging off the computer not Locking the computer like pressing Start+L.

2. Restarting the computer will also work after the performing the procedure.

3. If you change the Value as 0 the it will disable the Tray.

4. This method works for windows XP, Vista and 7.

Create Shutdown Shortcut for Windows XP, Vista, Windows 7 on Desktop

Learn How to add/create a desktop Shortcut to Shutdown / Turn off your Windows computer.

Shortcuts are meant for making life easier. We all know how to add shortcuts to our favorite programs on desktop.Now let’s see how to add a desktop shortcut for “Shutdown”,  which when double clicked will shutdown your system.

Important: For those who are using Windows 7 please refer the NOTE given below (Please Scroll Down)

Steps:

1.Right Click on your desktop select New>>Short cut

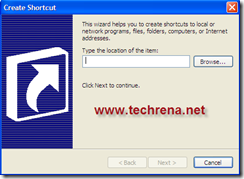
2.Now a “Create Shortcut” window pops out which will ask you to type the location of the item (in our case it is “shutdown.exe”).

create shortcut for shutdown -www.techrena.net

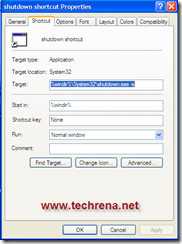
3.Type the following code :%windir%\System32\shutdown.exe –s in the textbox.

[As you can see we are trying to locate an .exe file called shutdown.exe which when executed will shutdown the computer].

After entering the above code, click Next

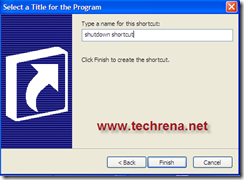
4.Now the window will ask you to select a title for the program give it a name whatever you like “Shutdown Shortcut” and click on the Finish button

give shutdown shortcut a name

5.The new shortcut will appear on your desktop.

shutdown shortcut without icon

You may change the icon of the shortcut so that it’s easier for you to identify the shortcut.[In the image, I’ve used a “Power Off” icon for the same ]

shutdown shortcut properties changin icon of the shutdown shortcut

You are done  now. You may also go for advanced options like adding –f or –t after –s in the textbox area.

If you use –f it’ll immedialtely closes all running applications and shutdown without any warning

if you use –t you can specify the time after which you want your system to be Turned off.

for example you may give like %windir%\System32\shutdown.exe -s -t 100 which will trun off your system after 100 seconds.[a message will appear as shown].

Note:You may also use command prompt to shutdown your system.The same code as in the above can be typed as shutdown.exe -s -t 100 and you’ll still get the same turning off message.Once it has started the only way to stop it is using the command prompt again.Use shutdown.exe –a to stop your scheduled turn off.

The above process has been posted with the Windows XP as the base OS,  the same process can also be applied to Windows Vista based systems.

NOTE: For those who are using Windows 7 download the zip file below which contains the shortcut to Shutdown. Extract the file and place the shortcut where ever you want.

Download: Windows 7 Shutdown Shortcut.zip

Size: 850 Bytes

Contains 1 file: Shut Down Windows.lnk