[Tip] Hide Your Facebook Updates From Specific People

Facebook logo

Facebook can be a place for lot of fun.  It has some annoyances too. It all depends on how you use it. Have you ever wondered whether you can post a private post or status update on your post that appears only to certain people and is hidden from other friends? Advanced users of Facebook might very well be aware of how to do this. But if you are relatively new user or never had a clue that such a feature existed in Facebook that allows to set a private post or status update on your wall, read the following guide to quickly learn how to do this:

1. Login to your Facebook account, and start post your status update. Click on the small “Padlock” button that is placed just before the “Share” button.
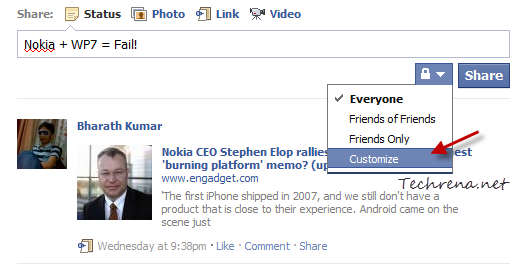
Facebook private status update

Click on the “Customize” button that appears in the dropdown menu list.

2. In the next window, you will be presented with privacy options for your current status update. As you want only specific people to see your status update, choose “Specific People” from the list under “Make this visible to”.
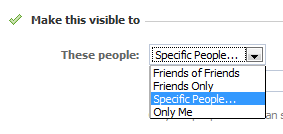
Facebook status update to specific people

3. You can either choose your friends from Facebook manually or you can create custom friends lists to choose from. To create a friend list quickly, go to your Facebook friends edit page and create a list with your specific friends. If you had already done that, you must now be able to choose a list by typing in the name of the list.

Facebook post visibility

4. Now your status update will only be visible to the people from your chosen list. Or if you want status update to be hidden from few selected friends of yours, you need to enter the names of those friends or friend list under “Hide this from” as in the previous case.
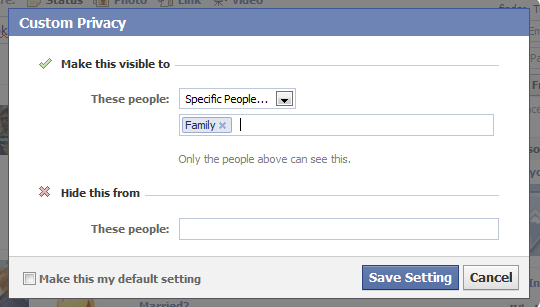
Facebook status update privacy

Click the “Save Setting” button once you are done. Your status update will now be visible to specific people or friends and will be hidden from other friends. You may also check the “Make this my default setting” option to set it as your default setting for other future updates.

[How To] Delete Cookies In Google Chrome

google chrome logo

This simple step-by-step guide is to teach how to delete individual browser cookies in the Google Chrome browser. Follow the steps carefully to clear or remove individual or all cookies in Chrome.

Steps:

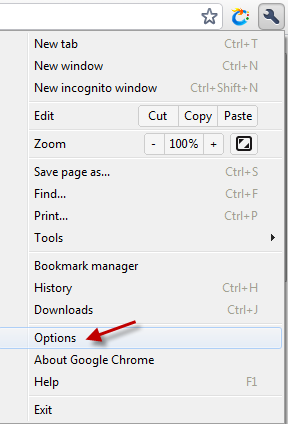
1. Click on the wrench icon Chrome wrench icon tools menu towards the left-hand side of the Chrome window and click “Options” from the list.

Chrome options in the Menu

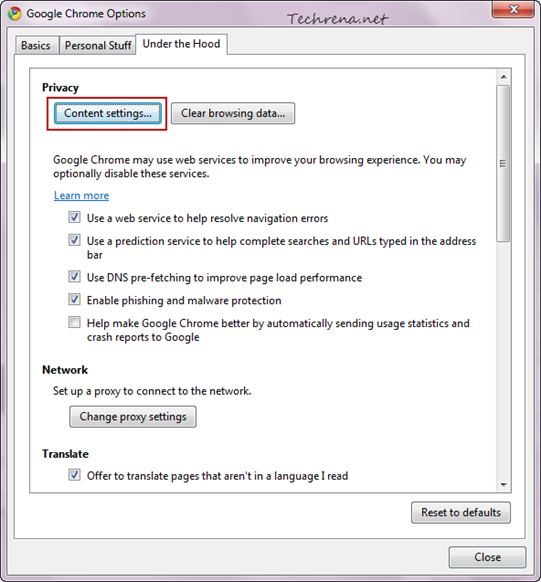
2. And in the “Under the Hood’” tab, click on the “Content settings..” button.

content-settings-chrome-options

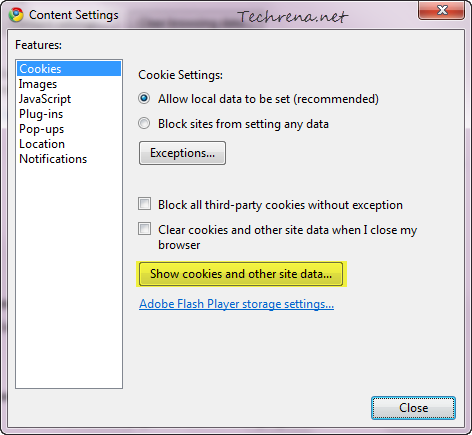
3. Click on the “Show cookies and other site data..” button.

Cookies settings in Chrome content settings

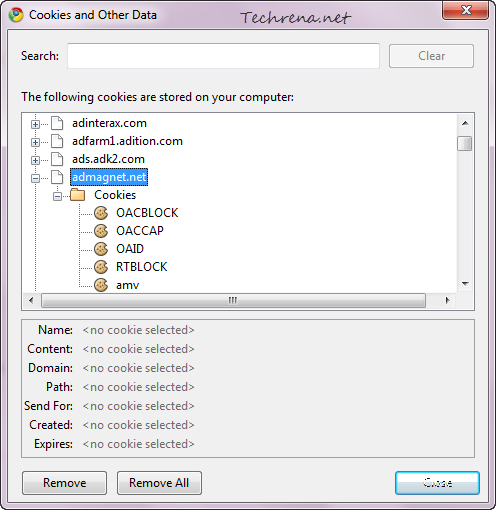
4. Now you will see all the cookies stored for different websites in Chrome

cookies-google-chrome

Select the cookies that you want to delete and click the Remove button delete that particular cookie. To delete all the cookies stored in your browser, click the “Remove All” button. The settings are almost similar on Chrome installed on other operating systems like Mac OS X, Linux etc.

Set Up Hotmail Email Aliases

Hotmail logo

An email alias is basically an alternate email address which is mapped to a original and used email address in order to save your email address from spam. If you ever have to share your email address but hesitant to do it for of the fear of spam, having an email address alias could be handy.

Most of the email services allow us to easily generate a dummy email alias by adding a “+” sign to your primary email address. For instance, if your email address is “myemail@hotmail.com” is your primary email address, you could always add a “+” sign to your ID to make it “myemail+newsletters@hotmail.com”. Even though this method works well, one big problem is that one can easily find out your actual primary email address from the structure of this kind of alternative email address. To solve this issue, Microsoft has started to let the users choose completely different set of email addresses as your aliases that can be used to receive emails into your primary email address without anybody knowing a detail about it. Google offers such email aliases for Google Apps user but not for Gmail users. Here is how you can setup an email alias for your Hotmail.

1. Open Hotmail email alias page and log into your Hotmail account using Windows Live ID.

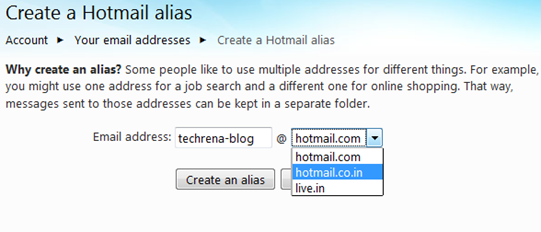
2. You will now be asked to choose an email alias for your existing email, and the it is subject to the availability i.e Hotmail checks whether the ID is available. Choose your desired ID and click “Create an alias” button .

hotmail alias

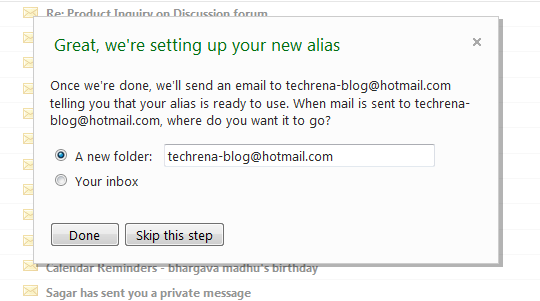
3. If the ID chosen is available, you will be taken to your inbox and will be asked to choose a folder for this alias. You can either choose to receive mails from this email alias directly to your inbox or you can create a new folder to direct the email messages to it.

Hotmail email alias setup

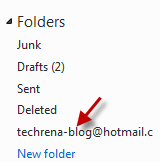
4. You are done. If you had chosen to create a new folder, it will appear in the left-hand side pane.

hotmail alias folder

You can create up to five aliases per year until you reach as many as fifteen aliases in your account.

[via] Windows Live blog

Search The Internet Right From The Windows 7 Start Menu

start menu internet search

Searching the internet is fun and it would more fun if it could be made easily accessible. We all by default use browsers to search (through the address bar, search box or using the search engine website) the internet. But the modern gadgets like Android phones, tablets and others are coming up with more quicker ways to search right from their home screens. In fact, you will find a Google search box on the homepage of most Android devices. Wouldn’t it be good if we have such quick access to any search engine like Google from our desktop? Of course we have few third party applications like Google Desktop to serve the purpose. If you are on Windows 7, you don’t even need any special software to achieve this. Windows 7’s Start Menu has integrated the web search feature right in it. Let’s see in detail, how to enable and search the internet directly from the Start Menu in Windows 7.
>> Method –1: Using The Registry Editor

This method works on all the different editions of Windows 7 as we make use of the Registry Editor that’s key ingredient of all the different editions of Windows 7.

1. Type “regedit” in the Start Menu and open the regedit.exe from the results under the “Programs” section.

2. Navigate to the following path in the registry editor:

HKEY_CURRENT_USER\Software\Policies\Microsoft\Windows\Explorer

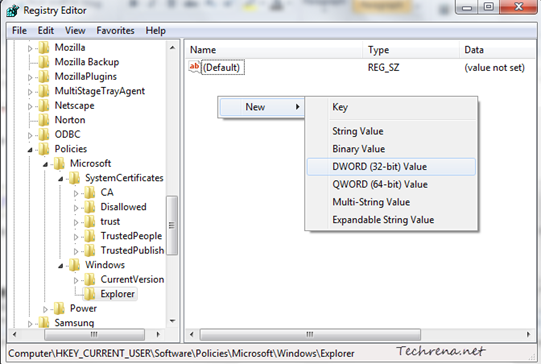
3. Right-click on the right-hand side pane and choose New > DWORD (32-bit) value and name it as “AddSearchInternetLinkInStartMenu”.

registry editor internet search from start menu key

Adding search internet link in the Start Menu

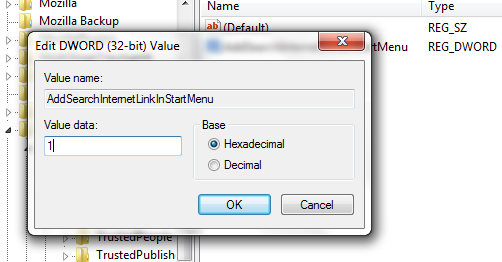
4. Now double-click on the DWORD and edit the “Value data” filed to “1” and click OK.

Adding search internet link in the Start Menu key value

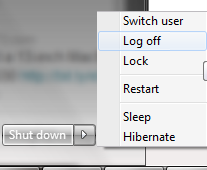
Now either log off from your user account and long back in or just restart the “explorer.exe” process from the Task Manager.

Log off link in the Start Menu

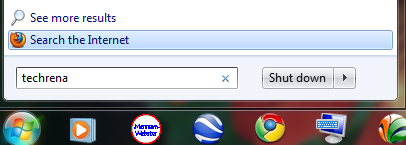
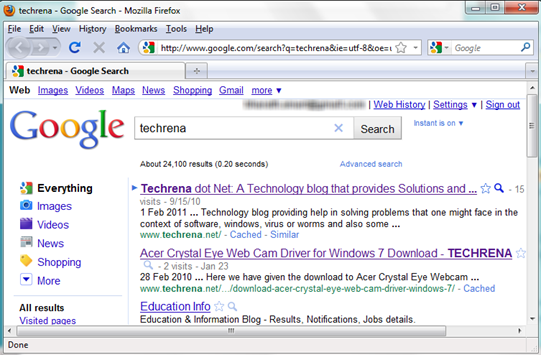
You can now search for anything in the Start Menu and you will see the “Search the Internet” option below the “See more results” link. Clicking on it would open your default browser (Firefox in my case) and search the web using your default address bar search engine for your browser (Google in my case).

Google search from start menu in Windows-7

To rollback or undo this change, just change the Value data back to “0” or completely delete the DWORD in the step 4.

>> Method- II : Using The Local Group Policy Editor

Local Group Policy Editor (GPEdit, as it is also known as) is not available in the Hone editions of Windows 7. So if you have Windows 7 Professional, Enterprise or Ultimate editions, you can go ahead with this tweak.

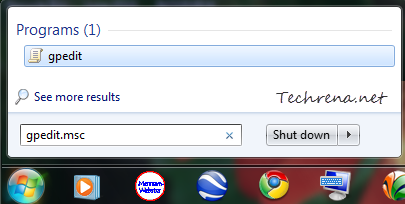
1. Type “gpedit” in the Start Menu search and open the “gpedit” from the results under the ‘Programs’ section.

gpedit from start menu search

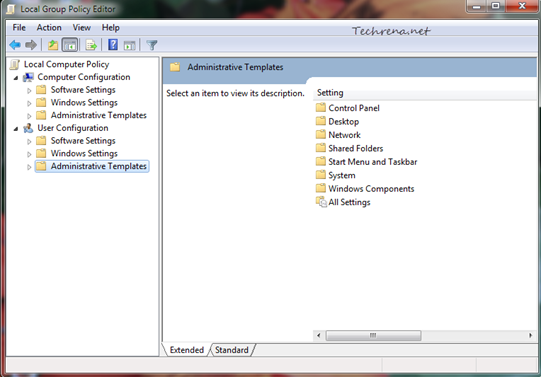
2. Local Group Policy Editor window will open up.

GPEdit overview

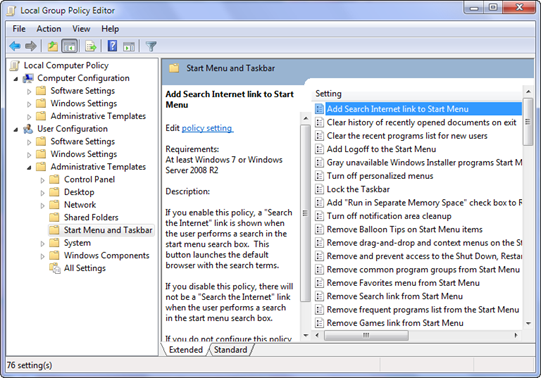
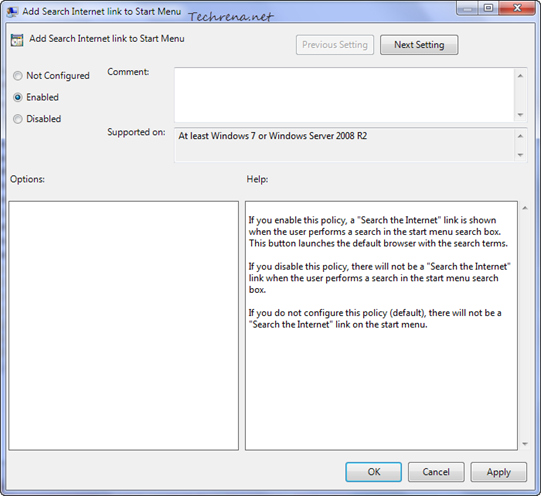
Scroll down to “User Configuration > Administrative Templates > Start Menu and Taskbar” and find “Add Search Internet link to Start Menu” entry in the list.

Search Internet Link to start menu in GPEDIT

3. Double-click on it to change the settings. Change the value to “Enabled” and click “OK” button at the bottom to save the settings and close the window.

Search Internet link to Start Menu settings

That’s it. As said in the earlier method, either log off and log back into your Windows user account or restart the explorer.exe process from the Task Manager to effect the change. Now you will find a link in the Start Menu itself to search the internet for your keyword/query as shown in the screenshot.

Solve YouTube Rebuffer Problem When You Switch To Full Screen Mode

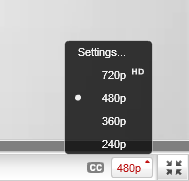
YouTube video resolutions

YouTube lovers on slower internet connection are very much disappointed by a recently changed settings that went into live in the video sharing site. The new settings (known as Auto HD) force the video to re-buffer from the beginning when you switch to full screen mode when watching a video. Just imagine a situation where you load a full video in normal mode in 360 pixels resolution. Now you wanted to watch it in full screen, the video switches from 360p to 480p automatically and starts buffering from the starting point again! Very annoying, isn’t it? Not so much when you are on a high speed internet connection, but if you are on a slow connection, you have every reason to feel so. Though YouTube doesn’t really offer any fix for this, we have few tricks which can solve this issue for you.

Method-1: Changing Settings In Your YouTube Account

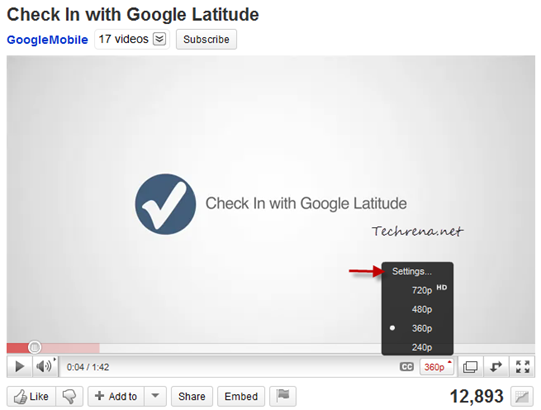
Click on the “Settings..” link found atop when you click on the video resolution (240p, 360p etc.) button.

YouTube video resolution settings

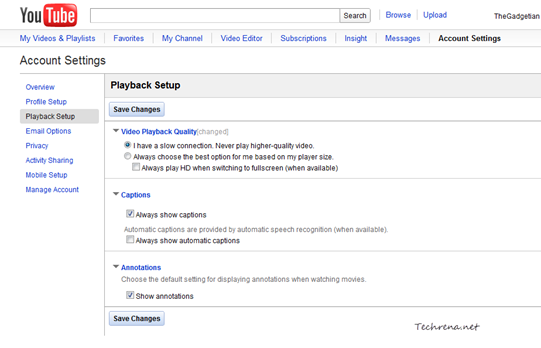
If you are already having an YouTube account, sign in to the account and go to your YouTube account settings page, where you’ll find settings for “Video Playback Quality”. Choose the first option “I have a slow connection. Never play higher-quality video.” and click the “Save Changes” button at the bottom of the page.

YouTube video playback quality settings in account

Now, videos will never get into the higher resolution mode when you switch to the full screen mode. On the downside, this method only works when you play the videos while you are logged into your YouTube account.

Method-2: Using GreaseMonkey Script

Install GreaseMonkey add-on for Firefox and restart your browser. If you are on Google Chrome you need not install any extension.

Install this GreaseMonkey script (YouTube Auto Buffer & Auto HD & Remove Ads) in your Firefox or Chrome browsers and it will take care of the rest. Now test the script by playing and switching any YouTube video into full screen. The problem should have been fixed now!

[Tip] Change Microsoft Security Essentials Update Frequency

Microsoft security essentials logo

Microsoft Security Essentials is easily one of the top free antivirus / anti-malware products available for Windows. If you are already using Microsoft Security Essentials, you might be aware that the program regularly checks for updates at least once in 24 hours. No problems with this setting as long as you are connected to internet and your PC is on most of the time. But at times you miss out on updates when your computer or laptops is not switched on or in sleeping mode or experiencing some internet connections issues. If your computer is not able to download updates when the regular MSE update check happens, the next update check will only happen after 24 hours. In such cases, the best thing to do is to check for updates manually. But you might also want to tweak the settings so that the program checks for updates more often.

Follow the steps to learn how to do it using task scheduler:

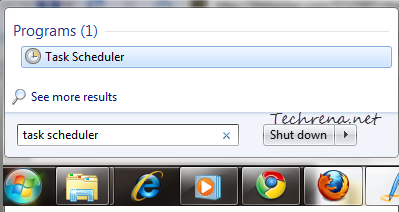
1. Type “task scheduler” in the Start Menu and open the “Task Scheduler” from the results under the Programs section.

Task Scheduler from Start Menu

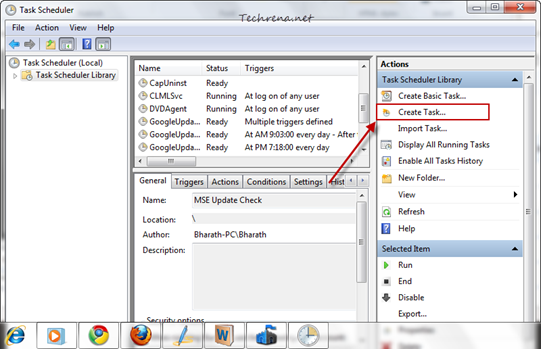
2. In the Task Scheduler, click on the “Create Task…” link on the right-hand side pane.

Task scheduler options

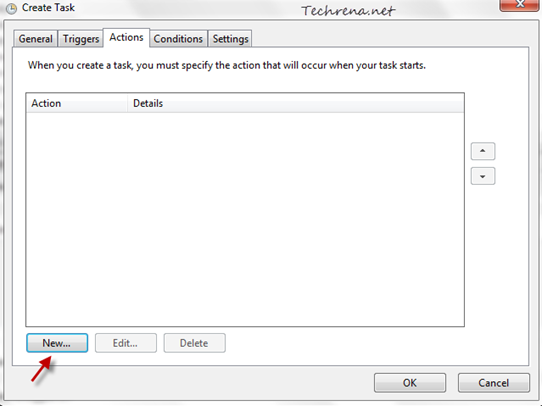
3. Give the task a name under the “General” tab, then click on the “Actions” tab. Click on the “New..” button under the Actions tab.

new-action-task-scheduler

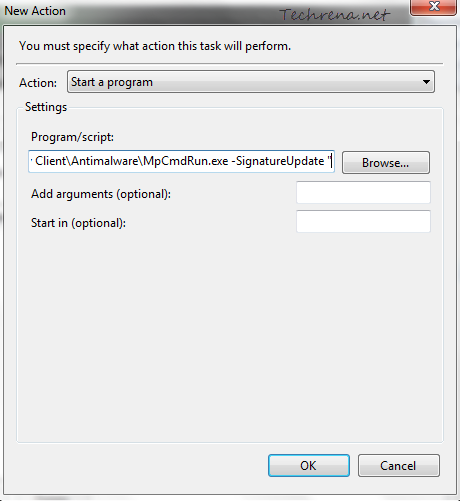
Browse the MpCmdRun.exe (Microsoft Essentials command line client) file. Usually it sits inside the Microsoft Security Client > Antimalware folder. In my case this where I found it:

"C:\Program Files\Microsoft Security Client\Antimalware\MpCmdRun.exe

It may vary depending upon your Windows version and the location where you chose to install it. Now select the file and add a “-SignatureUpdate’ to the program path so that it looks like

"C:\Program Files\Microsoft Security Client\Antimalware\MpCmdRun.exe -SignatureUpdate "

new action program path in task-scheduler

Tip: You may also specify the “-SignatureUpdate” in the arguments field instead of embedding it in the program path.

Click OK once you are done.

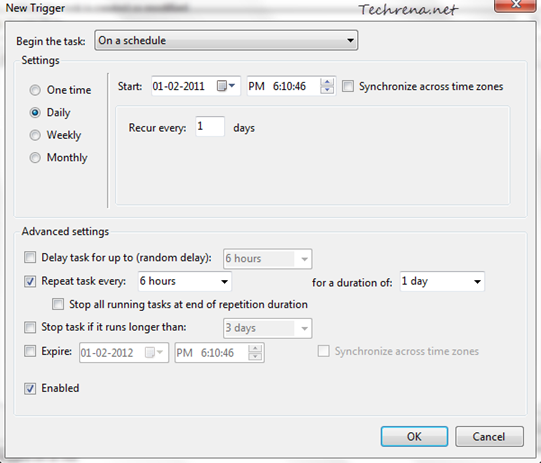
4. Then go to “Triggers” tab, under the settings tab, select “Daily” and then set the values for “Repeat task every” field (like 5 hours or 6 hours etc.) and click OK.

new trigger in task schedule

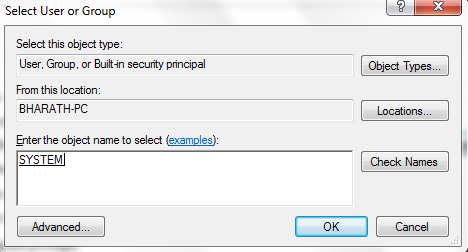
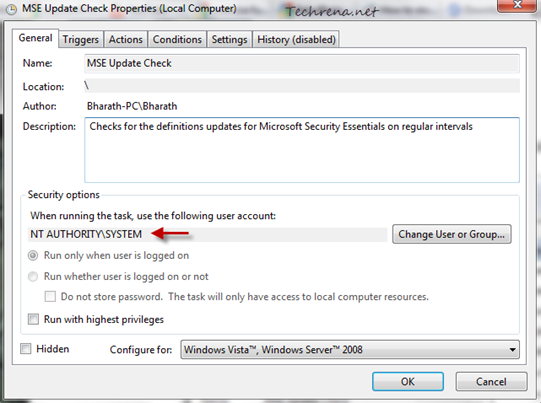
5. Now go back to the “General” tab and click on the “Change User or Group..” under the Security Options. Type “SYSTEM” as the object name and click OK.

system-user-task-scheduler

Now we have set the task to run on “System” user account

MSE update check task scheduler properties

That is it! You are done with configuring the update checks settings for the Microsoft Security Essentials.

[via]

[Tip] Get Imagery Update Alerts For Your Favorite Places In Google Maps And Google Earth

Follow your world imagery update Google Earth

We all love to  follow our favorite places our hometown, our college, places where we used to play with our friends etc. on Google Earth and Google Maps. But we don’t really know when the imagery in these applications gets updated. Wouldn’t it be good if we get notified as and when there is an update in the imagery? Google has just done that! They have released a new app, called “Follow Your World” which lets you track of your favorite places in Google Maps and Google Earth and lets you notify any physical changes in your corresponding subscriptions.

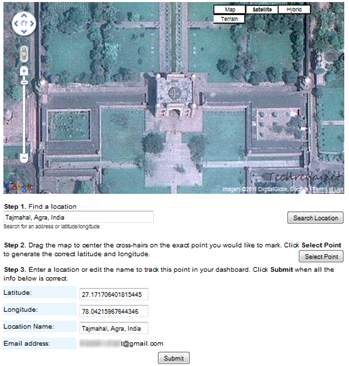
To get started, visit the Follow Your World homepage, set your location for which you want to get imagery update (you can manually search and locate it or you can do it through longitude and latitude values). Scroll down and you will see your email address to which these updates will be delivered, check the details and click the “Submit” button when you are done.  You will receive email whenever there is a physical change in the imagery of the places that you have subscribed. As Google Maps and Google Earth make use of the same imagery, you can then see the changes in both the products.

[Tip] Know The File Size Before You Download It In Firefox

Firefox logo

Knowing the file size before you could actually start downloading it is good practice as you can plan your work accordingly. For instance if you want to download a relatively bigger file, you might want to postpone it to later without interrupting your current work. Most of the sites especially download portals always show the information about the size of the file before the download. However it is not the same case always. There are times when you download a file and come to know about its size only after the actual downloading begins in Firefox.

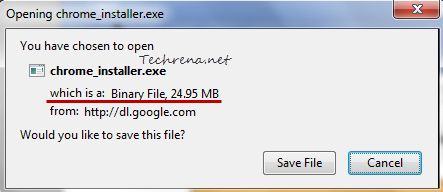
Thankfully there is a Firefox ad-on called “Show File Size” that allows us to view the file size information before you download it. Once installed, the extension show information like the type of the file and the size of the file you are downloading it in a separate row just below the name of the file row in the download window as shown:

firefox file download size

It is a basic, lightweight extension (just 4KB !) that just serves the purposes justifying the name. Show File Size add-on works fine with Firefox 3.6 to Firefox 4 versions.

Install Show File Size

[Tip] Edit The Firefox Maximum And Minimum Zoom Levels

Firefox logo

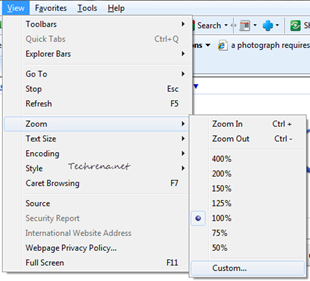
Readability level is one of the important aspect the modern day browsers stress upon. Different users need different readability levels for various elements on a webpage. The browsers let users to zoom in or zoom out of any webpage and adjusting them according to their comfort. Hence all the browsers including the Internet Explorer, Mozilla Firefox, Google Chrome, Opera etc. have incorporated the settings for adjusting zoom levels into the menu settings making them easily accessible. Firefox zoom levels range from a maximum zoom in level of 300% to a minimum zoom out level of 30%. While these are satisfactory for most users, there would still be some users who want to zoom in a page for more than 300% in order to see a particular element of a page like text, image or vide to more precisely, at which they feel comfortable reading it. Some people like web developers would want to zoom out to a level more than 30% to just see how all the elements in a web page are fitting into the screen. Whatever may be the reason, you need to have a choice. Internet Explorer allows you to enter a custom zoom level as you can see in the following screenshot:

Internet Explorer zoom levels

You can edit the Firefox default zoom levels via the about:config settings. Follow the steps to configure your Firefox.

1. Type about:config in the Firefox address bar and hit Enter.

About:config in the Firefox address bar

2. Accept the warning and continue.

Firefox this might void your warranty alert

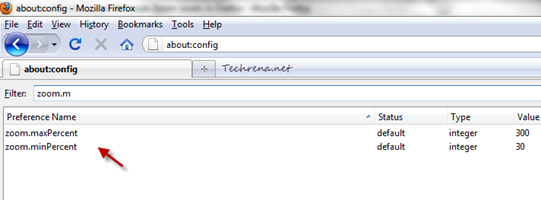
3. Now search for “zoom.maxPercent’ and “zoom.minPercent”. Both of these should appear as soon as you enter “zoom.m” as search string.

Max and min zoom level settings in Firefox

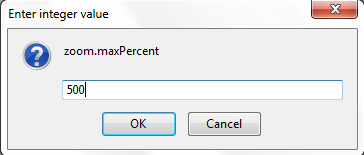
4. Double-click on each item to change the default values. For instance, you can change the maximum zoom percent to 500 from the default value of 300 p.c. Similarly you can edit the default value for minimum zoom out level as well.

Changing Firefox zoom levels

Click OK when you are done. Restart your Firefox for the changes to take effect.

[Fix] “Windows Setup could not configure Windows on this computer’s hardware” Error

Windows 7 logo

When you are installing Windows 7 or Windows Server 2008 R2 on an advanced 512-byte emulation
(512e) format disk drive that is configured to emulate like a RAID disk will most likely encounter the following error:

Windows Setup could not configure Windows on this computer’s hardware.

Microsoft has now addressed this issue in a dedicated KB article, suggesting a possible resolution.

According to Microsoft, the issue can be fixed with either of the two methods mentioned here. Follow these suggested solutions before installing the Windows 7 or Windows Server 2008 R2.

>> Method-1: Downloading The Appropriate Drivers For Hard Disk

Download the latest drivers for your hard disk drive (32-bit or 64-bit) from the Intel website and copy them to a flash drive or burn onto a CD or DVD and then use the media during the Windows 7 or Windows Server 2008 R2 setup phase.

>> Method-2: Changing The BIOS Settings

Warning: Working with BIOS settings could lead to a serious problem with your computer if you apply incorrect settings. Use this option at your own risk.

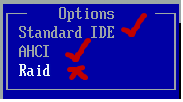
Open the BIOS settings by pressing the appropriate key just after your turn on the computer, and under the SATA Configuration (hard drive setting) to either AHCI or IDE. That is it, you don’t need to install the driver that you got through the method-1.

Hard disk drive SATA BIOS settings

[Via] Windows KB article