[Tip] Change Microsoft Security Essentials Update Frequency

Microsoft security essentials logo

Microsoft Security Essentials is easily one of the top free antivirus / anti-malware products available for Windows. If you are already using Microsoft Security Essentials, you might be aware that the program regularly checks for updates at least once in 24 hours. No problems with this setting as long as you are connected to internet and your PC is on most of the time. But at times you miss out on updates when your computer or laptops is not switched on or in sleeping mode or experiencing some internet connections issues. If your computer is not able to download updates when the regular MSE update check happens, the next update check will only happen after 24 hours. In such cases, the best thing to do is to check for updates manually. But you might also want to tweak the settings so that the program checks for updates more often.

Follow the steps to learn how to do it using task scheduler:

1. Type “task scheduler” in the Start Menu and open the “Task Scheduler” from the results under the Programs section.
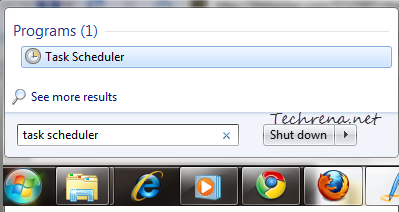
Task Scheduler from Start Menu

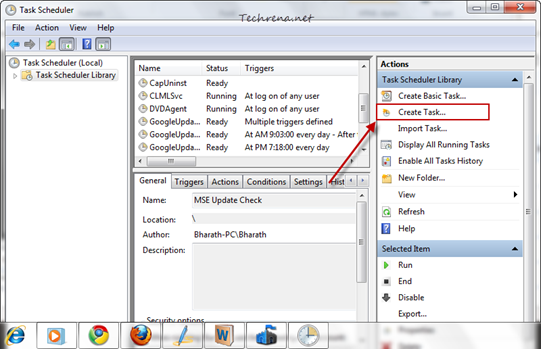
2. In the Task Scheduler, click on the “Create Task…” link on the right-hand side pane.

Task scheduler options

3. Give the task a name under the “General” tab, then click on the “Actions” tab. Click on the “New..” button under the Actions tab.
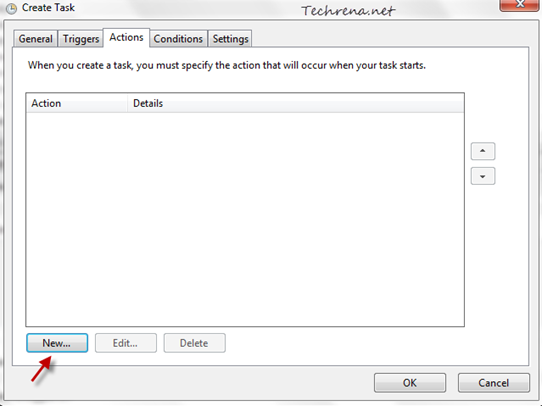
new-action-task-scheduler

Browse the MpCmdRun.exe (Microsoft Essentials command line client) file. Usually it sits inside the Microsoft Security Client > Antimalware folder. In my case this where I found it:

"C:\Program Files\Microsoft Security Client\Antimalware\MpCmdRun.exe

It may vary depending upon your Windows version and the location where you chose to install it. Now select the file and add a “-SignatureUpdate’ to the program path so that it looks like

"C:\Program Files\Microsoft Security Client\Antimalware\MpCmdRun.exe -SignatureUpdate "
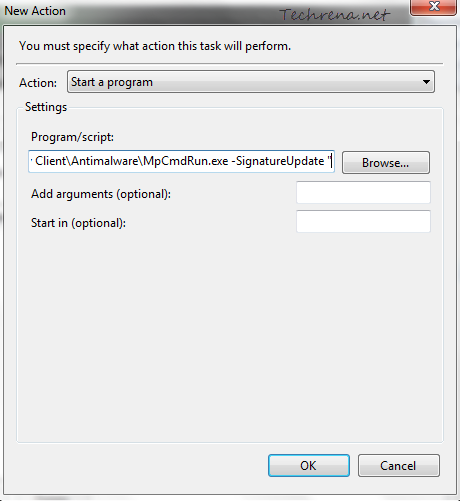
new action program path in task-scheduler

Tip: You may also specify the “-SignatureUpdate” in the arguments field instead of embedding it in the program path.

Click OK once you are done.

4. Then go to “Triggers” tab, under the settings tab, select “Daily” and then set the values for “Repeat task every” field (like 5 hours or 6 hours etc.) and click OK.
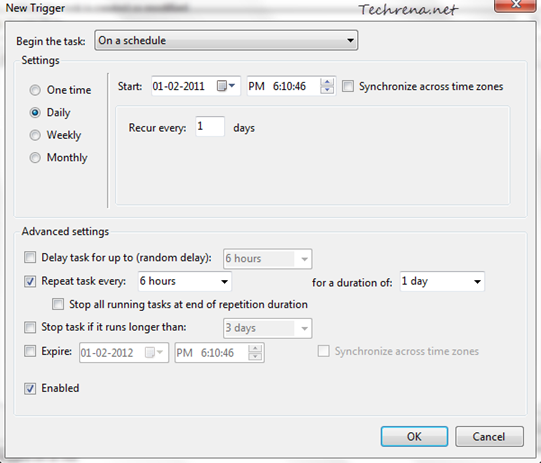
new trigger in task schedule

5. Now go back to the “General” tab and click on the “Change User or Group..” under the Security Options. Type “SYSTEM” as the object name and click OK.
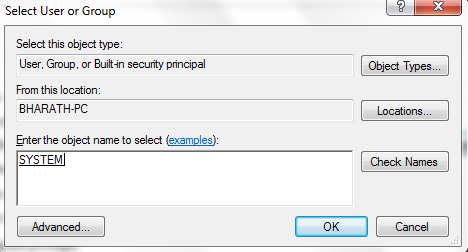
system-user-task-scheduler

Now we have set the task to run on “System” user account
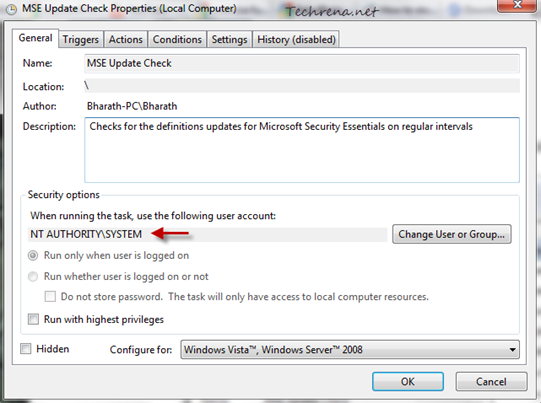
MSE update check task scheduler properties

That is it! You are done with configuring the update checks settings for the Microsoft Security Essentials.

[via]

[Tip] Delete Windows 7 Log Files The Easy Way

Windows logo

Maintaining is a Windows PC isn’t a cakewalk. You often need to take time to remove all the clutter from your Hard drive in order to make the Windows run more smoother and efficient. PC experts often advise that you should do such maintenance tasks in a regular manner to get the most out of your current operating system.

In this post, we are going to talk about the Windows log files. Windows log files keep a record of various activities of your PC.  These include list of errors/exceptions, internet browsing history etc. Even though they don’t create a problem but with time these logs grow bigger in size and thus reducing the amount of free space on your hard disk. Most of these logs are not essential and you can safely delete them manually or using clean up utilities. Windows 7 has inbuilt utility “Disk Cleanup” to delete these log files. You can also make use of third party programs like “CCleaner’ to perform the same task. However, even after performing clean ups, there would still be some traces of these log files left on your disk. In such cases deleting the log files manually would be a better option. Let’s see how to delete the Windows 7 log files manually.

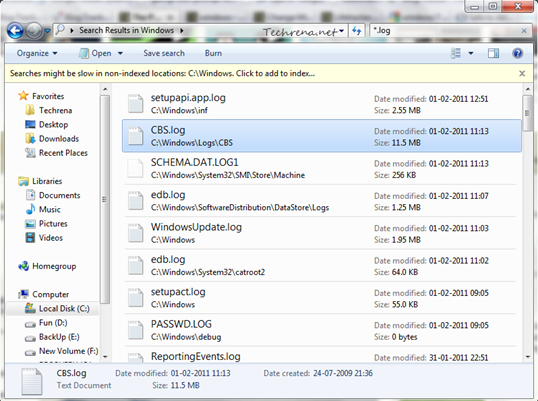
>> Go to your Windows folder (usually at C:\ Windows, that’s where all the logs are stored!, where ‘C’ is the Windows installation drive) in the windows explorer and type “*.log” in the search box at the top right corner of your window and hit enter. The results comprise of all the log files stored in the “Windows” folder. Delete the all the log files by selecting them.

Log files in windows folder

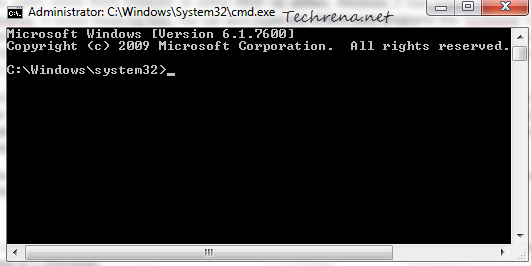
>> This can also be done using a command prompt. Type cmd in the Start Menu search box and use CTRL + SHIFT + Enter to open the command prompt with elevated rights (administrator mode).

Command Prompt Administrator mode

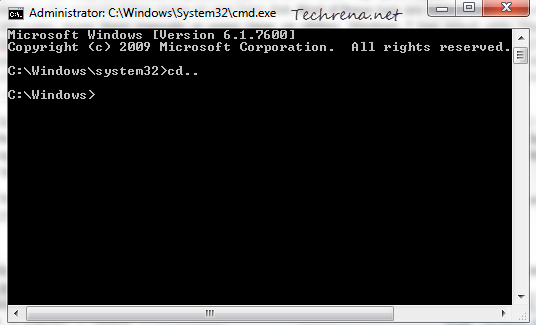
By default, command prompt would start from “C:\Windows\system32”. We need to go one folder down to C:\Windows. For this type “cd..” hit and press enter.

Windows folder in Command Prompt

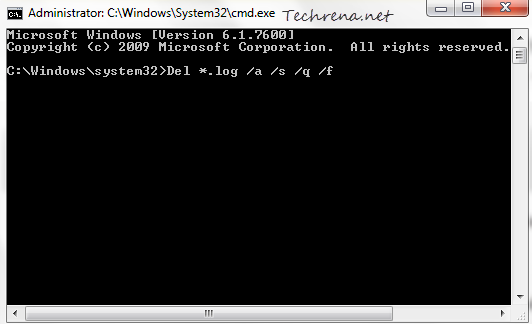
Now that we are in the “Windows” folder, we are just one command away from deleting all the log files. Type


Del *.log /a /s /q /f

in the command prompt and press enter. Now all the Windows log files will be deleted in few minutes.

Delete log files in Windows from Command prompt

In the command, “a” stands for selecting all the log files,

“s” for deleting all the files inside sub folders

“q” for skipping the Yes/No prompts before deleting the files

and        "f” for forcibly removing the files

[Tip] Get Imagery Update Alerts For Your Favorite Places In Google Maps And Google Earth

Follow your world imagery update Google Earth

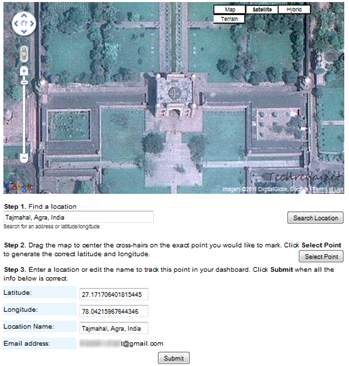
We all love to  follow our favorite places our hometown, our college, places where we used to play with our friends etc. on Google Earth and Google Maps. But we don’t really know when the imagery in these applications gets updated. Wouldn’t it be good if we get notified as and when there is an update in the imagery? Google has just done that! They have released a new app, called “Follow Your World” which lets you track of your favorite places in Google Maps and Google Earth and lets you notify any physical changes in your corresponding subscriptions.

To get started, visit the Follow Your World homepage, set your location for which you want to get imagery update (you can manually search and locate it or you can do it through longitude and latitude values). Scroll down and you will see your email address to which these updates will be delivered, check the details and click the “Submit” button when you are done.  You will receive email whenever there is a physical change in the imagery of the places that you have subscribed. As Google Maps and Google Earth make use of the same imagery, you can then see the changes in both the products.

[Fix] “Windows Setup could not configure Windows on this computer’s hardware” Error

Windows 7 logo

When you are installing Windows 7 or Windows Server 2008 R2 on an advanced 512-byte emulation
(512e) format disk drive that is configured to emulate like a RAID disk will most likely encounter the following error:

Windows Setup could not configure Windows on this computer’s hardware.

Microsoft has now addressed this issue in a dedicated KB article, suggesting a possible resolution.

According to Microsoft, the issue can be fixed with either of the two methods mentioned here. Follow these suggested solutions before installing the Windows 7 or Windows Server 2008 R2.

>> Method-1: Downloading The Appropriate Drivers For Hard Disk

Download the latest drivers for your hard disk drive (32-bit or 64-bit) from the Intel website and copy them to a flash drive or burn onto a CD or DVD and then use the media during the Windows 7 or Windows Server 2008 R2 setup phase.

>> Method-2: Changing The BIOS Settings

Warning: Working with BIOS settings could lead to a serious problem with your computer if you apply incorrect settings. Use this option at your own risk.

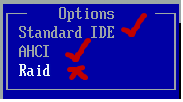
Open the BIOS settings by pressing the appropriate key just after your turn on the computer, and under the SATA Configuration (hard drive setting) to either AHCI or IDE. That is it, you don’t need to install the driver that you got through the method-1.

Hard disk drive SATA BIOS settings

[Via] Windows KB article

[How To] Create A Shortcut To “Safely Remove Hardware”

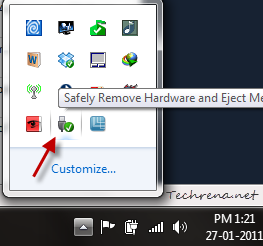
What do you do to remove your plugged in USB device like flash drive? You need to move your mouse to the system tray and locate the small USB icon “Safely Remove Hardware and Eject Media” (in case of Windows 7 and Vista) and click on it and confirm that you want to remove or stop a particular USB device.

Safely-remove-hardware-media-tray

But even though it is simple, it is often tiresome as you need to expand the arrow in the tray and locate the small icon (Windows 7). This where you wish you had a shortcut at some other easily accessible place. A desktop shortcut for this “Safely Remove Hardware” dialog would be much more handy. If you are like me, get to know how to create a Safely Remove Hardware shortcut in Windows 7 and Vista by following these steps.

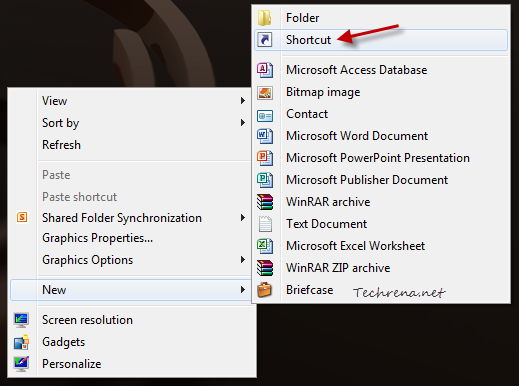
1. Right-click on your desktop, choose New > Shortcut.

New shortcut on desktop

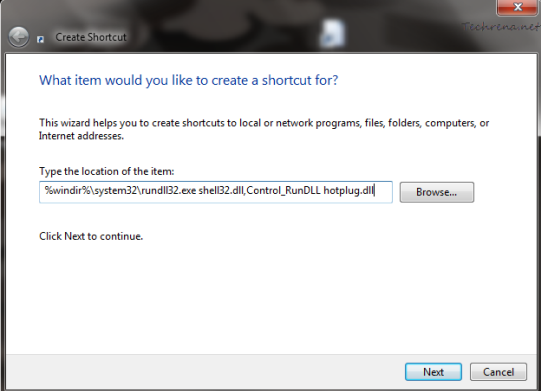
2. In the next window, paste the following code in the “location of the item”

%windir%\system32\rundll32.exe shell32.dll,Control_RunDLL hotplug.dll

Safely remove hardware shortcut code

Click the “Next” button to continue to the next step.

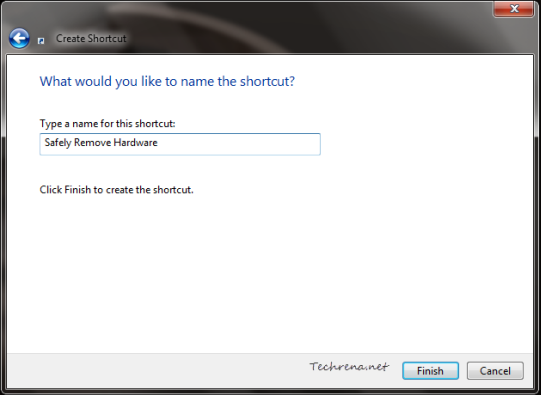
3. Give the shortcut a meaningful name and click the “Finish” button to complete the setup.

Shortcut name

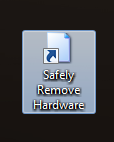
4. The new shortcut icon appears on your desktop.

Safely remove hardware shortcut

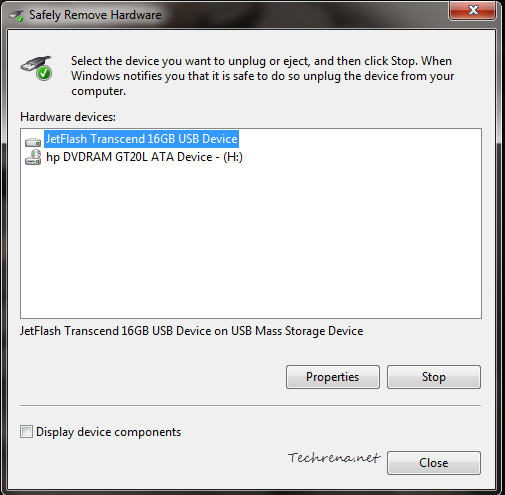
If you have plugged in the USB flash drive, double-click on the shortcut icon to see if it works. It should open the Safely Remove Hardware window, showing you the list of currently plugged in devices (USB and non-USB as well).

Safely remove hardware window

Select the particular device that you want to unplug or remove and click the “Stop” button to stop the device.

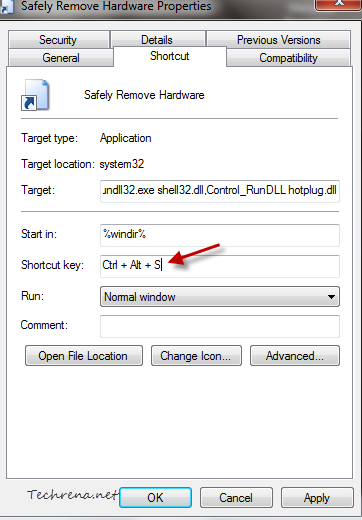
The advantage with this kind of shortcut trick is that you can choose to have a shortcut key setup for even more quicker access.

To assign a shortcut for the Safely Remove Hardware shortcut, just right-click on the shortcut and choose a unique keyboard key combination to assign as hotkey.

Safely remove hardware shortcut key

[How To] Disable System Beep Sounds In Windows 7

Windows system beep sounds turn up when your perform some invalid action (ex: pressing a wrong key or clicking or choosing a invalid button on window etc.) or when some error dialog appears. The beep sound also appears when you are using volume control.

(Click the Play button to listen to the sound; requires QuickTime Player plugin)

While the use of such beep sounds can be dated back to olden days when computers didn’t have sound cards but just built-in speakers producing various beep sounds to notify the troubleshooters help diagnosing the issues. Well, the times have changed, even though the desktops and laptops ship with internal speakers producing beep sounds, they are hardly useful when you are using advanced operating systems like Windows 7 as we have more sophisticated diagnosing mechanism to troubleshoot the OS issues. Too many beeps, you would easily get annoyed. Follow these steps to disable the system beep sounds in Windows 7.

This can be done in either of the two ways:

>> Method-1:

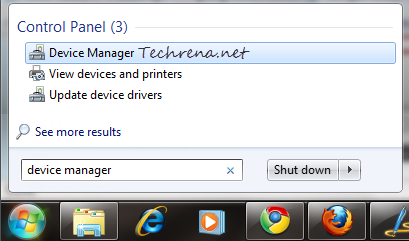
1. Type “device manager” in the Start Menu search box and open the Device Manager from the results under “Control Panel” items.

device-manager-start-menu-search

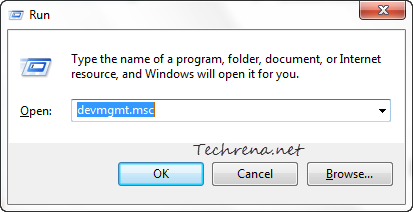
Alternatively, press Windows key + R to open the Run command. Type “devmgmt.msc” and hit enter to open the Device Manager.

device management run command

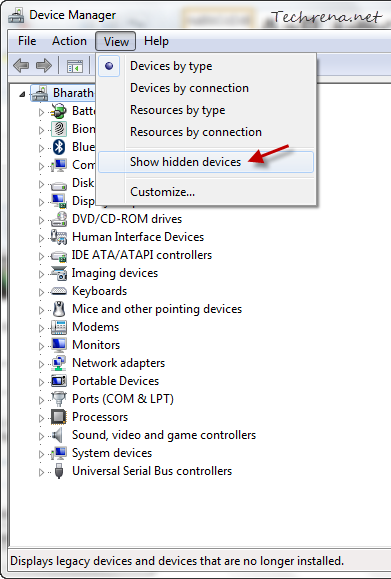
2. From the Device Manager window, choose “Show Hidden Devices” under “View” menu.

Show hidden devices in Device Manager

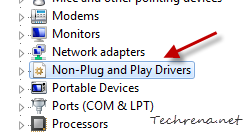
3. Scroll down the list until you find “Non-Plug and Play Drivers” and click on it to expand.

Non-Plug and Play Drivers in Device Manager

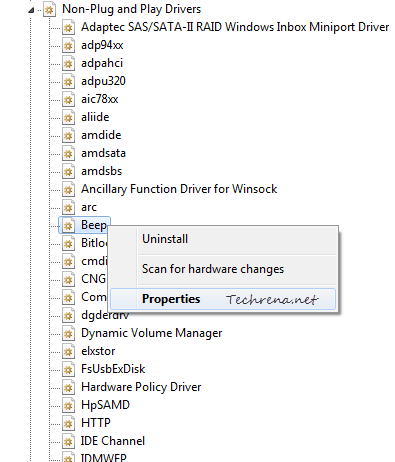
4. Right-click on the Beep item and choose Properties.

beep sound in device manager

Warning: Do not click “Uninstall” as the option will completely remove the beep sounds from your Windows 7, you might find it hard to reinstall the same again.

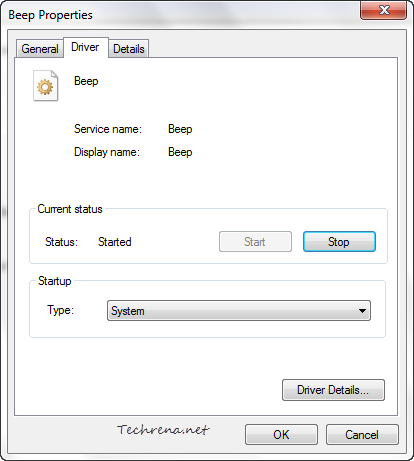
5. In the Beep Properties, click on the Driver tab

beep properties driver

From the Start up type, choose “Disabled” from the list.

Click OK to apply and save the settings. You need to restart the system for the changes to take effect. To enable the beep sounds again, just choose “System” from the list in the step-5.

>> Method-2:

We can also achieve our desired result from the Control Panel, let’s see how to do it.

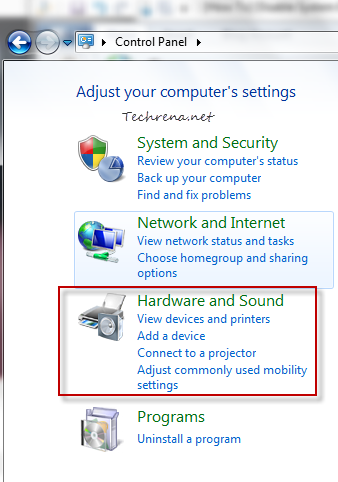
1. Open the Control Panel and click on the Hardware and Sound item link from the list.

Hardware and sound section in Control Panel

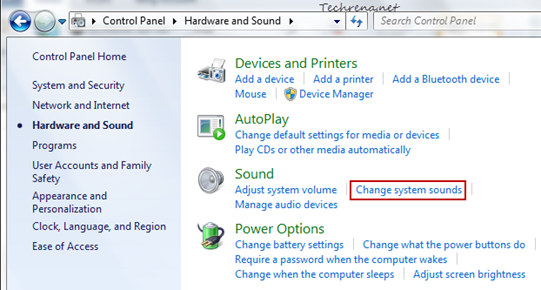
2. Click on the Change system sounds link under the “Sound”.

hardware and sound in control panel

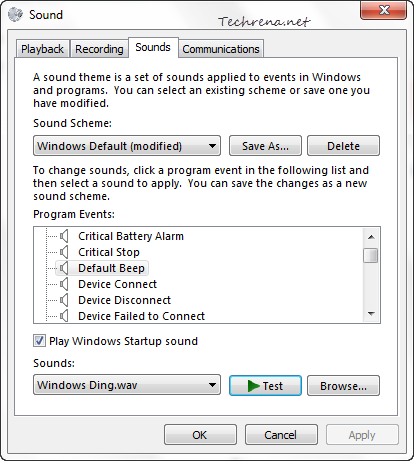
3. Under the Sounds tab, scroll down to find “Default Beep

Sounds in Control Panel setting

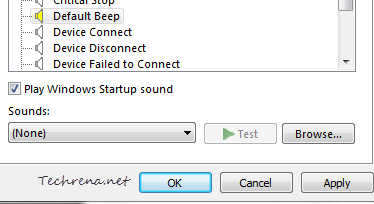
Choose “None” from the list under Sounds and click OK to save the settings.

Default Beep sound settings

You are done! But please not note that these are the settings for current sound scheme for your Windows 7. In future if you change the settings, the default beep sound may be enabled again automatically. Hence we suggest you to use method-1 if you completely want to disable the internal speakers system beep sound.

[Tip] Voice Search For Google Chrome

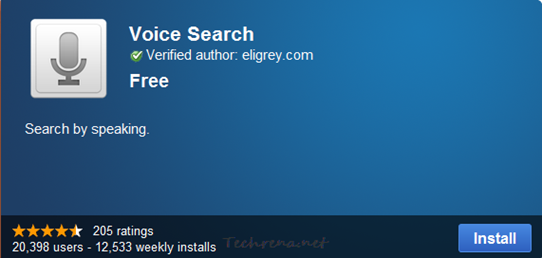
Voice Search for Google Chrome is a useful extension that lets you to quickly search the web using your voice input.

Voice search Google Chrome extension

Google Voice search feature is nothing new, Google has been offering this feature for various Android, iOS and other smartphones for a while but I don’t why they haven’t really tried getting this handy feature for PC users. The extension of course is not built by Google. You need to have a built-in or an external microphone to use this feature. The extension comes with preloaded search engines like Google, Yahoo, Bing, WikiPedia, Wolfram|Alpha, DuckDuckGo, YouTube etc. The extension also integrates a speech button into all the HTML5 search input boxes. Just enable your microphone say a word like for instance “Sony Ericsson Arc” just add the search engine name before your query, like “Google Sony Ericsson Arc” to search in Google.

Google Voice search for Chrome

This is experimental feature and the voice input may not be accurate. Also, English is the only supported language for now. The extension is also missing a keyboard shortcut to activate the voice search. Though the extension is not so impressive but it is a good start, we hope Google comes out with an official app for Chrome, until then try using this.

Install Voice Search for Google Chrome [from Google Chrome web store]

[How To] Enable The Details Pane In Windows 7 Explorer

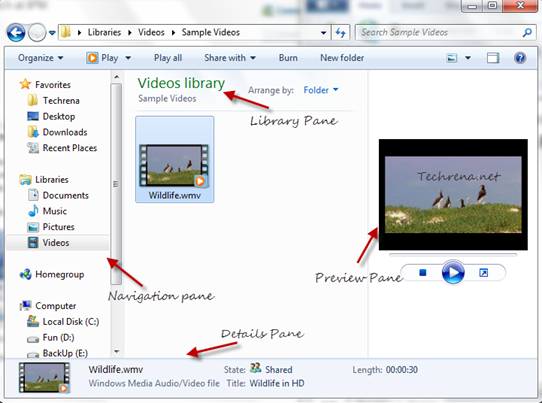
Windows 7 explorer panes

Unlike the earlier Windows versions, the Windows Explorer in Windows 7 has been revamped a bit to make it appealing to the users. Any Windows Explorer window in Windows 7 can have at least 3 panes i.e., Navigation Pane, Preview Pane and Details Pane. For Library folder, there would be an additional pane called Library Pane which would be displayed at the top just below the address bar.

For now, we are concerned about the Details Pane. It is the pane that appears at the bottom of the window and displays the important information about the file or folder selected. While it is enabled by default in Windows 7 and Vista, some may find it missing in their explorer windows. In case it is disabled, this is how you can enable the Details Pane again:

Steps:

1. Open any Windows Explorer window.

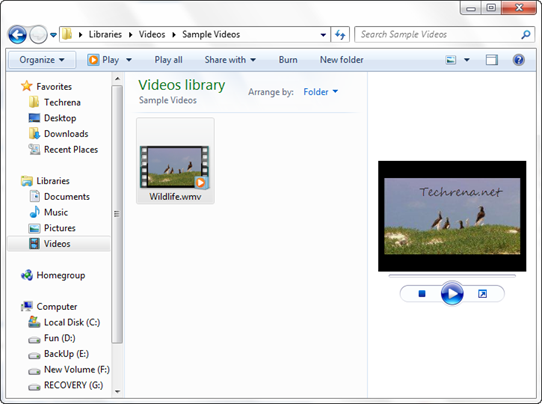
No navigation pane in Windows 7

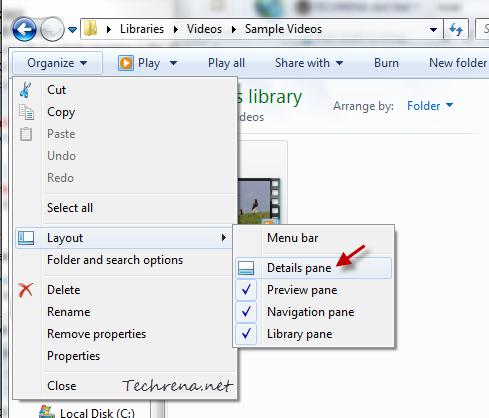
2. Click on the Organize button and from the drop down menu, roll over to the “Layout” and select “Details pane

Details pane in Windows 7 explorer settings

3. You should now see the Details Pane at the bottom of your Windows Explorer window as shown in the screenshot.

CTRL + Tab Tabs Preview Feature In Firefox

Firefox ctrl-tab feature

Firefox has changed a lot since the inception of the Firefox 3.6. A lot of features have been added since then. One such feature is previewing the opened tabs. We have already discussed how to enable all tabs preview in Firefox 4. Now  let’s see how to enable the other variant of tabs preview feature, the Ctrl + Tab tabs preview (similar to Windows 7’s Alt + Tab preview) in Firefox 3.6 or later versions. Ctrl + Tab preview is disabled by default and if you hit Ctrl + Tab without enabling this, you can just switch the tabs. With Ctrl + Tab preview enabled, you can actually see the preview of tabs which would be very much useful. Follow the steps to enable the same.

Steps:

1. Type about:config in the Firefox address bar and hit Enter.

2. Accept the warning message and proceed to the Firefox about:config page.

About:config Firefox warning

3. Type the following code in the filter and find the boolean key with the same name.

browser.ctrlTab.previews

ctrl-Tab preview firefox setting

4. By default, the value for this key would be set to “false”, meaning that the tabs preview feature has been disabled. As we want to enable this, just double click on the boolean entry to change its value to “true”.

That’s it! Just hit CTRL + Tab key to preview the thumbnails of all the tabs opened in a current Firefox page as shown in the first screenshot. Just change back the value to “false” in the step-4 to disable the tabs preview feature.

[How To] Add RSS Feed Autodiscovery To Your Site

Almost every website offers updates via RSS feeds these days. This is the fastest way to notify the readers about the updates in the site. When it comes to blogs, blogging platforms like Blogger, WordPress etc. enable RSS feeds by default and the RSS feed autodiscovery would also be enabled in most cases. But at times what can happen is the tiny code that enables the RSS autodiscovery may go missing and the RSS feed can’t be discovered automatically.

How to find whether RSS autodiscovery is enabled?

Just open your website or blog in the browser (Firefox or Internet Explorer).

Firefox:

If the RSS feed icon RSS feed iconappears in the address bar, your site has RSS autodiscovery enabled.

RSS feed icon in firefox

If you don’t see the RSS feed icon, it means that RSS autodiscovery is disabled.

No RSS icon in Firefox

Internet Explorer:

The RSS feed button will be in bright color when your site has RSS autodiscovery:

rss feed icon in IE

The feed icon will be greyed out when feed autodiscovery is not enabled:

No RSS disocery in IE

Clicking on the icon will show the available subscription options.

Enable RSS Autodiscovery:

Just add the following code to your site header to enable the RSS autodiscovery:

<link rel=”alternate” type=”application/rss+xml” title=”Site Feed” href=”Your Feed URL” />

In general, if you are using Feedburner, the code would look like:


<link rel="alternate" type="application/rss+xml" title="Feedburner Feed" href="http://feeds.feedburner.com/feedburner-id" />

Replace “feedburner-id” with your Feedburner ID.

If you are using WordPress, add the following code to your header.php file.

<link rel="alternate" type="application/rss+xml" title="RSS 2.0"href="<?php bloginfo(‘rss2_url’); ?>" />

Header edit for RSS autodiscovery

Just refresh your site after adding the code and you should now see the RSS autodiscovery being enabled: