[Tip] Remove System Volume Information Folders

System Volume Information: Is it really a virus?

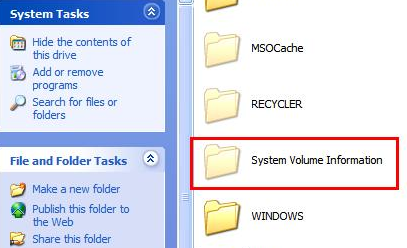
Myth: System Volume Information is a virus and it suddenly appears in your Windows XP computer and it doesn’t let you open its contents. It may have virus or suspicious files within it.

System Volume Information in Windows XP

Fact: System Volume Information (and even “Recycler”) folder is a standard Windows folder. System Volume Information folder stores the restore points data and the Recycler folder belongs to the Recycle bin. So first up, you don’t need to delete them and treat them as virus. These files do exist in later versions of Windows too. Here’s the proof: (Windows 7 screenshot)

System value information folder in Windows 7

These are system folders and are hidden by default. They will show up once you change the settings under “Folder Options’ to show the hidden system files and folders.

Thankfully Windows (Vista, Windows 7) doesn’t give you access to this folder so that averts any probable mess up if at all you access them and change the files inside it. Having said that , a virus can work around this and gain access to this folder to corrupt the restore points and create some .exe files inside it.

So to remove (actually to hide) the folder, just change the settings back in the folder options to not to show hidden system files and folders. However if you still insist on removing the System Volume Information completely (highly not recommended), here’s what you have to do:

Windows XP:

1. Right-click on My Computer and select Properties.

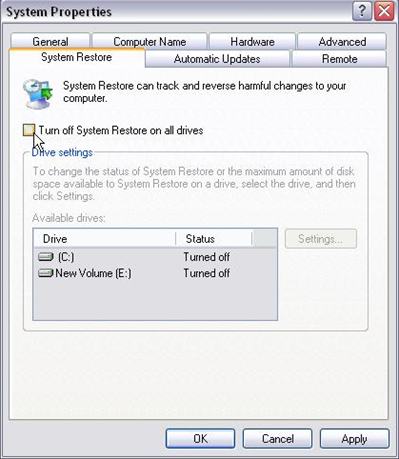
2. Click on the System Restore tab.

3. Click the Turn off System Restore on all drives check box and click OK.

Turn off System Restore

Windows 7 & Vista:

Read the How to disable System Restore in Windows 7 post written here at Techrena.

[How To] Remove The “Test Mode” Watermark From Windows 7

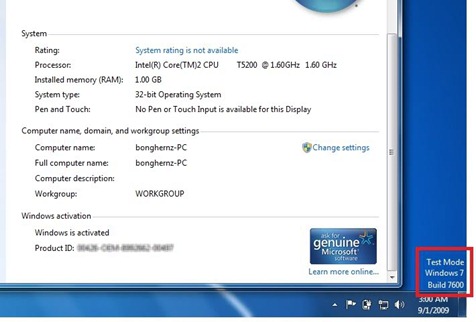
Test Mode Windows 7 Watermark

Legitimate Windows 7 users who are using the original and activated copies of Windows 7 versions are lately getting kind of weird “Test Mode Windows 7 Build 7600” watermark/message on the bottom right corner of their desktop just above the time zone area in the taskbar. This is really annoying as it appears suddenly anytime, users hardly knowing anything about the reason why it’s being showed up.

This message may appear when you follow one of the methods to disable driver signature checking in Windows 7. While implementing the method you may accidentally use the following commands

bcdedit.exe -set loadoptions DDISABLE_INTEGRITY_CHECKS

bcdedit.exe -set TESTSIGNING ON

and these commands are found to cause this problem. Having known the cause of the problem, we just need to do the reverse (enable “Integrity_checks” and set “Testsigning” off). Let’s see the full solution to disable this message on your Windows.

Solution:

1. You need to first run the command prompt as an administrator before you could proceed to the next steps. Refer to this old post at Techrena to know how you can run the command prompt program as an administrator.

2. In the command prompt window type the following command

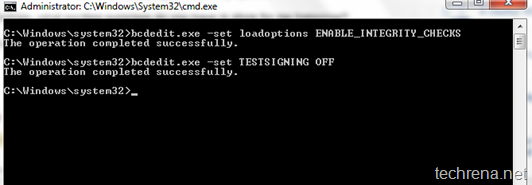
bcdedit.exe -set loadoptions ENABLE_INTEGRITY_CHECKS

and press enter and you must see “the operation completed successfully” message

now enter the following command and hit Enter again

bcdedit.exe -set TESTSIGNING OFF

and again you should get the same above success message. Refer to the screenshots posted below:

removing test mode cmd

3. Reboot your Windows and see the changes, the “Test Mode Windows 7 Build 7600” watermark disappears. That’s all.

[How To] Make Older Programs Compatible With Windows 7

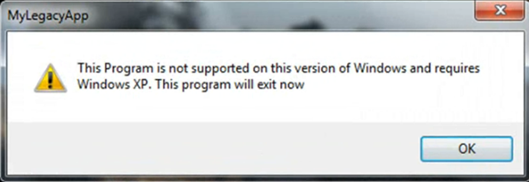
program not supported in Windows 7

Many users still use Windows XP and not upgrading it to the Windows 7, the one reason that we can think of is that they are worried about their favorite programs that they run in Windows XP without any issues might fail to run smoothly in Windows 7. While this may be true to some extent but the truth is that Windows 7 does offer a way to run these kind of programs.

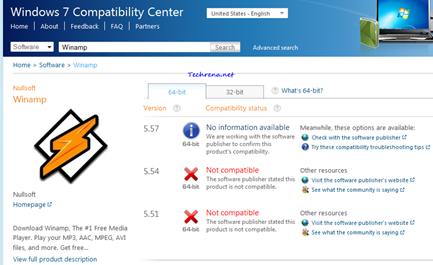
It is always suggested that you check the compatibility of the program that you want to run, at Windows 7 Compatibility Center.

Windows 7 compatibility center program check

Let us look at the alternatives that let us run older software in the newer Windows 7:

1. Run the latest version of the software: It sounds straightforward and easy, the fact that almost all the software makers who produce programs intended for Windows XP upgrade their versions to make them compatible with Windows 7. Hence you should always find the latest version of the software before you decide to run it on your Windows 7 machine.

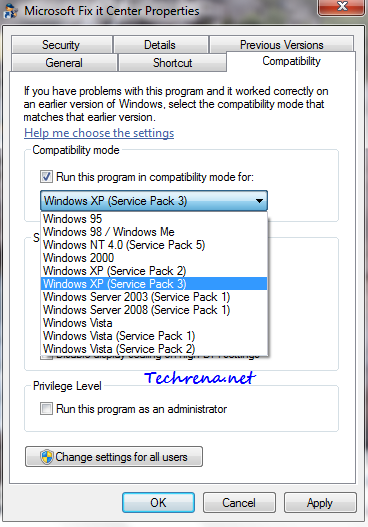
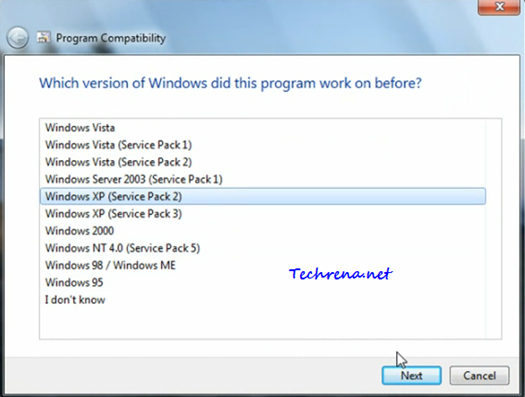
2. Using Compatibility Mode: As I said earlier, Windows 7 does have compatibility mode to run programs in compatibility mode for all the way back to Windows 95 to the Windows Vista (Service Pack. You can easily run any Windows XP based program using this feature in Windows 7.

Run windows xp compatibility mode in Windows 7

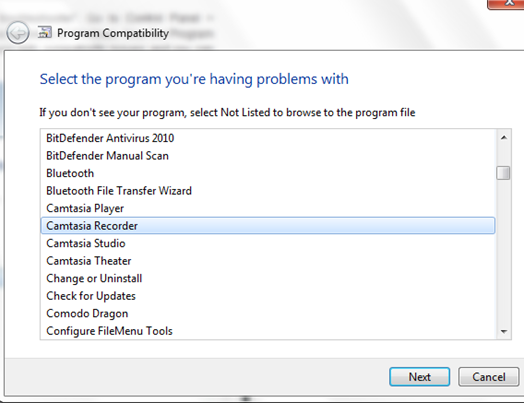
3. Another alternative is to use “Program Compatibility troubleshooter”. Go to Control Panel > Troubleshooting > Click “Run programs made for previous versions of Windows. Now the Program Compatibility wizard opens up and scans for the programs with compatibility issues and you can then select the program for which you want to changes in compatibility settings.

Program Compatibility wizard

Program compatibility in Windows 7

4. Using Windows XP inside Windows 7: Consider this option if all the above alternatives discussed fail. You can use Windows XP along with your Windows 7 in two ways: 1) Install Windows XP in another drive and dual boot it with Windows 7 2) Use Windows 7 Virtual PC and Windows XP mode in your Windows 7 PC.

[Tip] Create A Lock Down Computer Shortcut

Lockdown my PC

We have previously covered how to create desktop shortcuts for shutdown and hibernation here at Techrena. Many readers of our site found them to be useful. We thought like when we could have shortcuts for shutting down and hibernation, why can’t we have shortcut for locking the computer user ? To begin with, if you don’t know yet, there is a much simpler Win + L (press Start key while holding “L” button your keyboard) shortcut already available to do the same and is easier as well.

We are just writing this tip to let you know that you can create shortcut for locking down your computer as well. It’s up to you to use this or the most preferred Win + L short key. Follow the steps below to add the shortcut to your desktop.

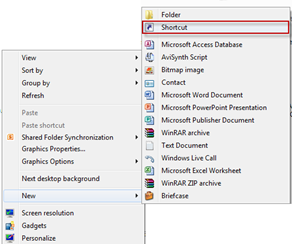
1. Right-click on your desktop (on any blank area) and select New > Shortcut.

create new shortcut

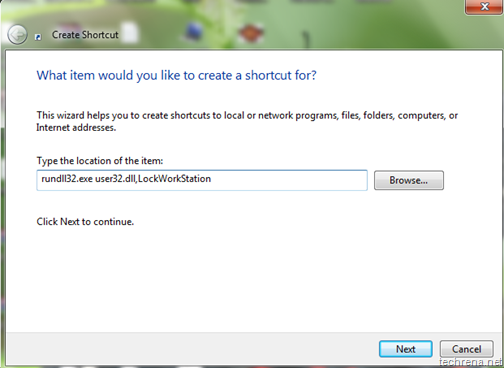
2. Type rundll32.exe user32.dll,LockWorkStation in the “Type the location of the item” filed in the window and click next.

Type shortcut location

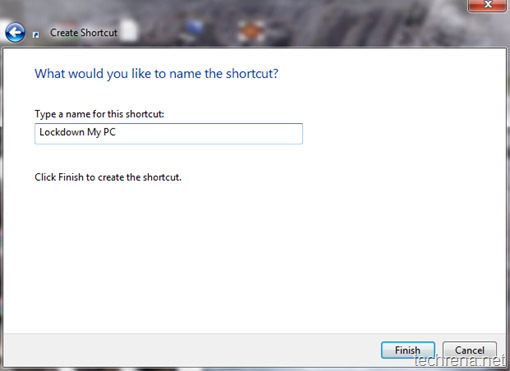
3. Give a name to the shortcut (something like Lockdown My PC) and click “Finish” to complete the setup.

Lockdown shortcut name

4. Now the shortcut for locking down your computer appears on desktop. You can even customize it by adding some colourful icon to it.

Lockdown shortcut on desktop

Clicking on it will lockdown the computer. This works well on Windows XP, Windows Vista and even on Windows 7. You need to login back to your computer by providing your credentials if you need to unlock it again. Of course I still prefer to use Win + L shortcut (to which I got used much to) than this, anyway it’s always good to explore and find new things, even if they had alternatives Smile.

Cumulative Security Update for Internet Explorer KB2183461

Windows Update

Cumulative Security Update for Internet Explorer KB2183461: [Released: August 10, 2010]

The security update KB2183461 fixes the issues addressed in the security bulletin MS10-053. This update applies to Internet Explorer with the operating systems Windows 7, Windows Vista and Windows XP.

Security update KB2183461 addresses issues that have been identified in Windows systems running Internet Explorer, that could allow an attacker to compromise the computer and gain control over it. Download and install the update to protect your system from this issue. If you have enabled automatic Windows Updates in your system, the computer should be able to download the updates by itself. If you haven’t enabled (not recommended) the Windows Updates on your Windows, you can download and install the update KB2183461 from the links given below . Choose the correct Operating system and the architecture of your OS (x86 or x64).

Download Links:

Windows 7 x86 (7.9 MB) x64 (6.2 MB)
Windows Vista x86 (9.2 MB) x64 (17.8 MB)
Windows XP x86 (3.4 MB) x64 (36.6 MB)

[How To] Using Windows 7 Credential Manager

Windows 7 logo

Credential Manager is a Single Sign-On (SSO) solution that Microsoft has been offering since Windows Server 2003. It was there in Windows XP, Vista and now in Windows 7 too, this with some more extended features.

Credential Manager allows a Windows user to store sensitive credentials like log on information (ex: user IDs and passwords) required for the websites you visit or for connecting with the other computers on a network. These credentials are stored in special folder called vaults. With this stored information, Windows 7 can automatically log on securely to the websites and the computers on your network automatically without requiring you to remember the credentials all the time. Credential Manager is based on a secure client-side credential-caching mechanism. Now let’s see how we can use Credential Manager in Windows 7:

You can open Windows Credential manager via Start > Control Panel > Credential Manager or alternatively go to start and type “cred” (or even “credential manager” ) and open Credential Manager from the results.

Credential manager search

Credential Manager search results

Credential Manager:

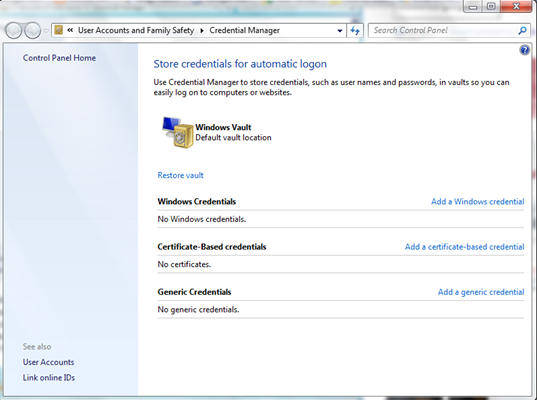
Windows Credential Manager
As you can see in the above screenshot, there are basically three types of credentials you store using Credential Manager:

1. Windows Credentials: Lets you store the network addresses, user IDs and passwords that are required while accessing intranet and SharePoint sites.

For example you can add a credentials required to connect to one of a computer in the network or you can even store the password needed to access you printer, storing upon which Windows can automatically log on to it while accessing the printer.

2. Certificate-Based Credentials: Lets you store digitally signed public key certificates like Smart Card Logon certificate or Smart Card user certificate if you are using a certificate that is used with the smart card.

3. Generic Credentials: Lets you store the URLs and the usernames and passwords associated with them.

Adding Credentials To Windows Vault:

If you want to add a new credential, just  select the type of the credential that you want to add and then click “Add a credential” link and enter the details that are needed like username, password and network address etc.
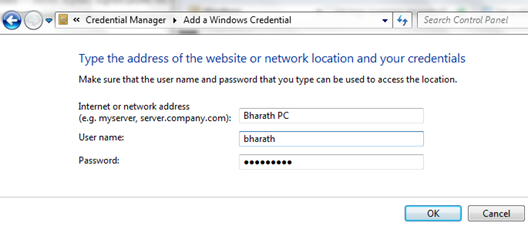
Add new Windows Credential Manager

Backing Up Windows Vault:

If you stored some credentials in your Windows vault using Windows Credential Manager, you can safely backup the Windows Vault to other places (preferably on removable media) so that you can access them even in case of any Hard disk failure.
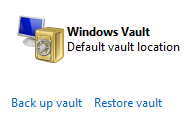
Windows vault backup

Click on the “Back up vault” link under the Windows Credential Manager. Select the location where you want to save the back up file (stored as “Credential Backup Files” with .crd extension)
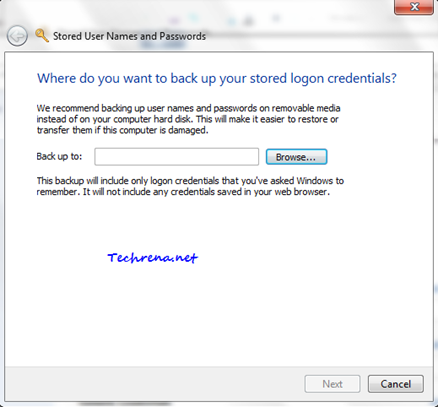
Stored user names and passwords
Press Ctrl + Alt + Delete to continue the backup process on the Secure Desktop. Finish the step and your vault backup would be ready on your computer.
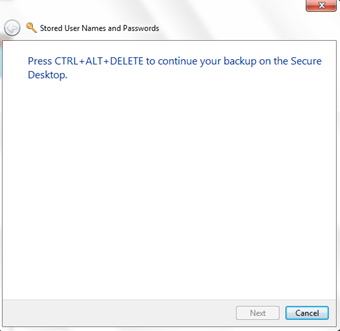
Stored user names and passwords in vault

Then you again restore your Windows vault backup using the “Restore vault’ link below the Windows Vault.
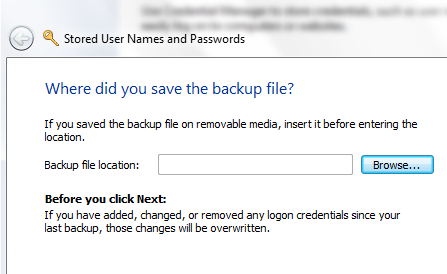
Restore vault

Note:

1. You can not store credentials of websites that you browse through browser for instance Gmail credentials, Twitter credentials or Facebook credentials etc. These credentials can only be accessed by certain Windows applications which need to go through authentication with the resource (or server). Some of the Windows applications that make use of the Windows Credential Manager in Windows 7 include Windows Live Messenger, Microsoft Word, Outlook and Windows Explorer.

2. Please note some of the above features may not work in some editions especially if you are using Windows 7 RTM (Release To Manufacturing) builds.
[How To] Windows Virtual Memory Configuration

Did you notice an alert anytime saying ”Virtual Memory Low” while running a huge application or a game?  Well all what you need about Windows Virtual Memory and its configuration is explained in detailed here.

First question in your mind will be:

What is Windows Virtual Memory?

Physical memory or you know it as RAM is the vital component of your Windows machine. But Windows is not designed to run on RAM chips alone, no matter how much physical memory you have. In addition to using physical RAM to store programs and data, Windows creates a hidden file on your primary hard disk and uses that file to manage pages of data pulled from scattered sections of the hard disk and used in physical memory when necessary. The page file acts as an extension of main memory which is known as virtual memory.

What is the default Size and File location of Virtual Memory?

Windows creates the page file in the root folder on the same drive that holds the Windows system files. The size of the page file is determined by the amount of RAM in your system. By default, the minimum size on a 32-bit (x86) system is 1.5 times the amount of physical RAM if physical RAM is less than 1 GB, and equal to the amount of physical RAM plus 300 MB if 1 GB or more is installed. The default maximum size is three times the amount of RAM, regardless of how much physical RAM is installed.
Configure Windows Virtual Memory Size and Page file Location

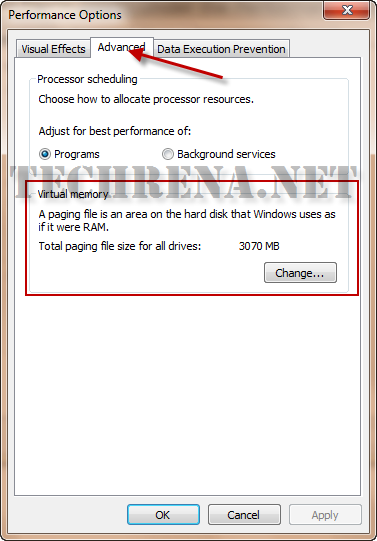
Press Start + R and type systempropertiesadvanced and press Enter. Under the Performance heading, click Settings. In the Performance Window, go to the Advanced tab. Here you will find Virtual Memory Change Option.

change virtual memory

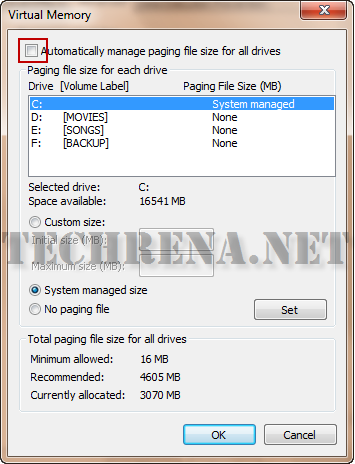
If you click on change, you can find the configuration window where you can change how the virtual memory is managed. Uncheck Automatic manage paging file size to change the virtual memory size.

virtual memory change window

You can have the following options in this window:

  • You can move the page file to a different volume if you have more than one.
  • If you have more than one volume, you can establish more than one page file.
  • For any page file, you can choose between System Managed Size and Custom Size.
  • If you choose Custom Size, you can specify an initial size and a maximum size.
  • You can remove a paging file from a volume by selecting the volume and choosing No Paging File. (You can even get rid of all paging files this way, although doing so is not recommended, even on systems with a lot of RAM.)

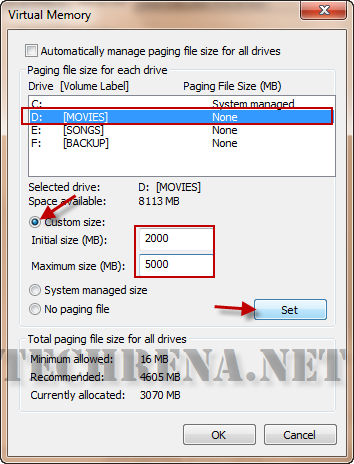
An example configuration is given below:

virtual memory custom management

Should you enlarge your page file(Virtual Memory)?

Most users won’t need to do this. But sometimes you might get a pop up warning telling “Low Virtual Memory”. This happens when you have huge applications and less RAM size. If this is the case you might consider increasing the maximum size of your page file.

[How To] Remove Virtualapp/didlogical Credentials In Windows 7

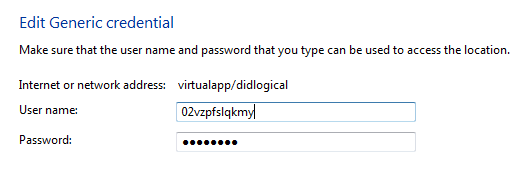
Virtualapp Didlogical user credentials

Have you noticed a suspicious entry under Credential Manager in Windows 7 ? Wondering how it could enter it without your permission ? Want to know what it’s all about and how to get rid of it? Read on..

Virtualapp/didlogical user is created in Generic credentials, when you install any particular program that requires authentication to start. Please do note that these Generic credentials are different from that of Windows credentials. These generic credential programs (or websites) would need a username and password to initialize. The user values stored in the Generic credential manager are meant for long-term use and prevent user from needing to enter these credentials too often.

However there could suspicious or unknown unknown entries at times (ex: virtualapp/didlogical) users being created under this. It is strongly advised unless you are sure about the application or software to which that user belongs, you would better off delete it from the list.

Many users who have noticed this Virtualapp/didlogical user entry under Generic credentials are not sure as how it could get into that list. Some believe that it might come up due to Windows Live applications, it is however not confirmed. Perform a thorough scan of your computer to see if you could find any suspcious/spyware/keylogging or malware programs so as to be on the safer side.

virtualapp didlogical credentials

Solution:

Option 1: The straightforward solution is to go for the kill.Delete the suspicious entry from the list by clicking “Remove from vault” the button. While this worked for some users, but for some others who had deleted this from the list were surprised to find it reappear again.

Option 2: Uninstall all the Windows Live apps from your system and this would most probably be deleted from the list as confirmed by many Windows users.

These are the two possible solutions available as of now. If you know anything better than this, do notify us through the comments below.

[Tip] All You Need To Know About Windows 7 Calculator

Windows 7 Calculator

Windows has always been coming with a default calculator for performing simple math calculations. However the users have always preferred to use other third party software for performing their day-to-day calculations as Windows calculator had limited functionalities or rather I’d say many of us weren’t aware of the full functionalities of it. The scene has changed now, Windows 7 now has the most powerful calculator with a some good new features embedded into it. Let’s look at those new features one by one:

1. Calculations History:

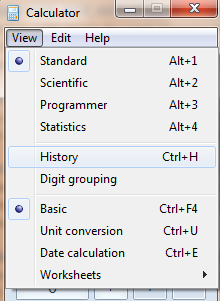
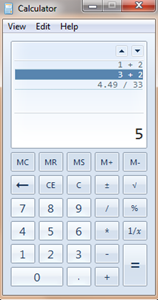
The Windows 7 promising new calculator gives for the users to view the history of calculations performed on it. Either press CTRL+H or pick “History” option from the “View” menu in the calculator.

Calculator history in Windows 7calculator_previous_calculations

Shortcut: Ctrl+H

Use Ctrl+Shift+D to cleat the calculation history or F2 to edit the calculation history.

2. Programmer mode:

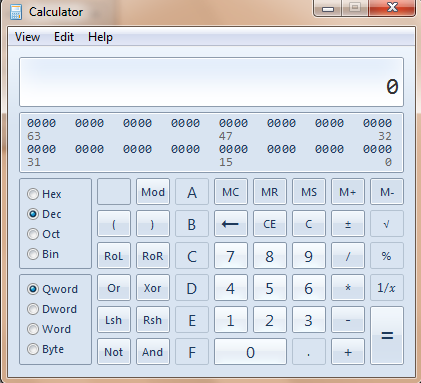
This would be the feature that you would appeal to all those IT professionals around the globe who need to often perform basic programming conversions for the programs that they are developing (For instance converting a value from Decimal to its equivalent Hex code etc.), this is where the new “Programmer Mode” option in Windows 7’s calculator could help. Go to View> select Programmer to work on this mode.

Shortcut: Alt+3

Windows 7 Calculator programmer mode

3. Statistics mode:

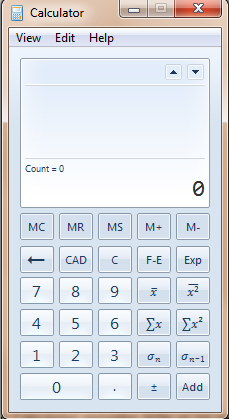
Windows 7 Calculator statistics mode

Statistics mode helps you in your day-to-day statistics calculations like finding the average of your monthly expenses, finding standard deviation, standard deviation of population etc. Use add button to first add the numbers from your data, then click on the corresponding button to let the calculations done.

Shortcut: Alt + 4

Additional Functionalities:

Apart from the above main features, there have been some enhanced functionalities built into the Windows calculator:

Date calculation:

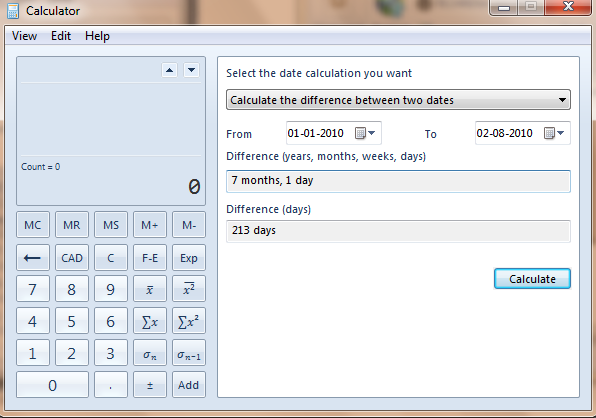
You have two basic options to perform under this: they are

1. You can calculate the difference between two dates

2. Add or subtract days to a specified date

Shortcut: Ctrl+E

Windows 7 Calculator Date Calculation

Worksheets:

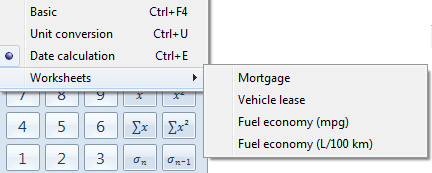
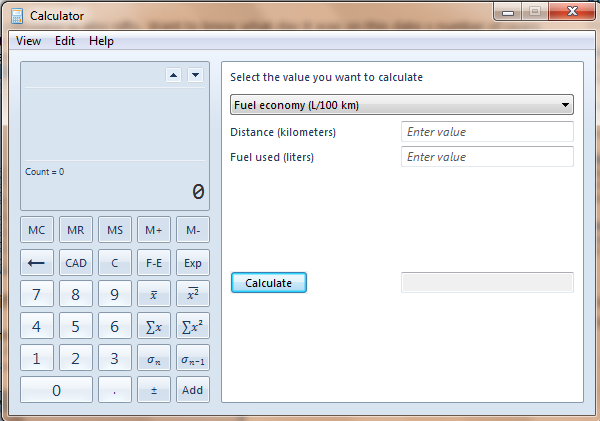
You can perform Mortgage, vehicle lease, fuel economy calculations using Worksheets option.

Windows 7 Calculator worksheets menu
Windows 7 Calculator fuel economy

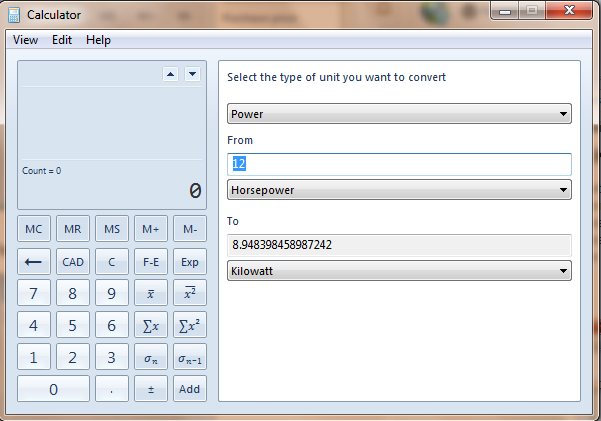
Unit Conversion:

Windows 7 Calculator unit conversion

Unit conversion lets you perform various conversions from one unit to another..the available units include: Angle, Area, Energy, Length, Power, Pressure, Temperature, Time, Velocity, Volume and Weight.

Shortcut: Ctrl + U

Windows 7 Calculator Keyboard Shortcuts:

Click here for a full list of keyboard shortcut keys that you can use with Windows 7 calculator.

For more tips and updates on Windows 7, you can subscribe to our RSS feeds via email.

[How To] Configure Windows 7 Action Centre Warning Messages

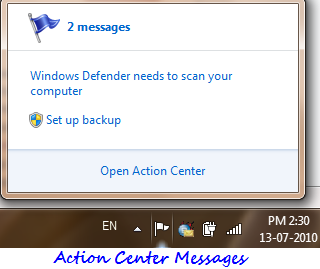
Windows 7 Action Center messages

Action Center in Windows 7 offers warning messages relating to your computer. You can find these messages in your notification area in the form of a flag. They include important security messages, virus protection alerts, Windows Update, Internet security settings, Spyware and related protection, User account control, troubleshooting, windows backup etc.

It is highly recommended that you keep these messages enabled as they include some important security issues as well. However you might not want to see Windows Backup warning messages when you are using an external third-party backup software. And you do check for updates according to your convenience. In such cases you might not want to get annoyed by warning messages about these simple things. This tutorial explains how you can configure the settings for these messages or even to completely turn off (not recommended) these action center messages in Windows 7.

Steps:

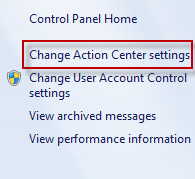
1. Click on the flag icon in your notification area or type “action center” in the start menu search box and open the Action center.

Action Center Windows 7 home

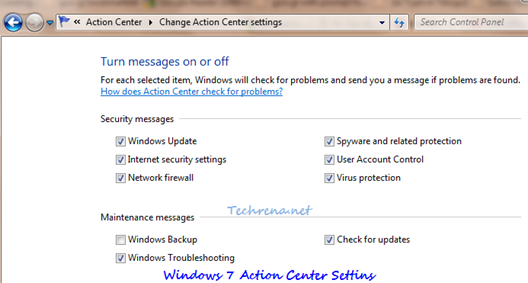
2. Under the “Action Center Settings”, you can choose for which categories Windows Action center needs to check for problems. Uncheck all to completely turn off the entire Action Center alerts which is obviously not recommended.

Windows 7 action center settings

Click OK and close the window. You will no longer receive warning messages from the categories you have unchecked in the previous step. The white flag icon however stays there without any warning messages.