WSUS Offline Update: Update Your Windows And Office Offline

Windows Update

It’s very much essential to keep your Windows OS up-to-date when it comes to securing your OS from security threats which may cause damage to your private data.Microsoft knows the importance of the same, hence release Windows update patches more often.You need to be connected to the internet to download these updates from Microsoft.

But what about those innumerable number of people who still can’t manage to get an internet connection for them? Microsoft used to offer AutoPatcher,unfortunately this service was discontinued from 2007.Luckily there are some third party software available on the internet which provide the similar offline update facility, the one which I’m going to talk about is WSUS Offline Update.

WSUS Offline Update:

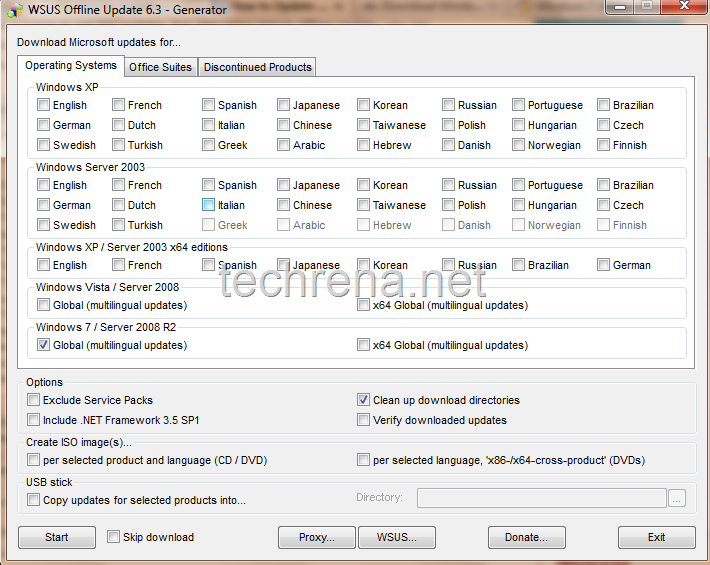
WSUS Offline Update generator

WSUS Offline Update lets you download the patches and updates for Windows and MS Office without requiring an active internet connection on the target computer.All that you need to do is go to your friend’s computer which is having an internet connection, install this WSUS Offline Update, download the Windows updates on an USB drive (or some other removable media) and transfer them to your machine and install them using WSUS Offline Update.

Features:

1. WSUS Offline Update supports: Windows XP, Windows Vista & Windows 7.

2. Supports MS Office 2003 & 2007 versions.

3.You can create an ISO of the updates.

4. Supports copying updates directly to USB

Download:

You can visit the Homepage of the WSUS developers or follow this direct link to download the WSUS Offline Update version 6.51

Delete Hiberfil.sys from Windows 7, Vista & XP By Disabling Hiberation

hibernate

Running out of space in C Drive?

If you are running out of space in C drive and if you don’t want to delete or move any data from it, you can probably try these two things:

1. Disable System restore or delete the restore points.

2. Delete hiberfil.sys file from your hard disk.

HIBERFIL.SYS is a Windows system file managed by Windows for the purpose of Hibernating the system. Hibernation mode of Windows allows you to completely save the current process and power off your computer where the system will not require any power. During Hibernation the system will write the complete status and process of your computer and save it in the hard disk which is the hiberfil.sys.

While you start your computer, the system loads the status from the hard disk which was written in hiberfil.sys file.

HIBERFIL.SYS reserves around 2.5 GB in Windows 7 and Vista. And it takes 512 MB in Windows XP.

Important Note: You can delete hiberfil.sys only if you do not want to use the hibernation feature. Even if you delete the file you can still use the sleep mode. If you want to see the hiberfil.sys file in your C drive then you need to show system hidden files.

hiberfil_sys

How to delete HIBERFIl.SYS file from the your drive?

As hiberfile.sys is a system file we cannot delete it directly. So in order to delete it we need to disable the Hibernate feature in Windows.

Disable hibernation mode in Windows 7 and Vista:

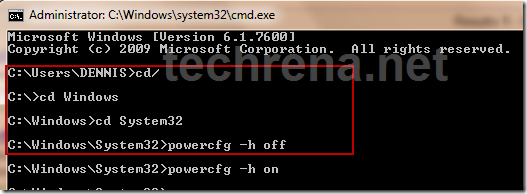
Open Command Prompt. Press Start + R. Type CMD and press Enter.

Type the following commands and Press Enter after each command:

cd/
cd Windows
cd System32
powercfg -h off

It will look like:

cmd_disable_hibernate

To turn on the Hibernate feature Type:

powercfg –h on

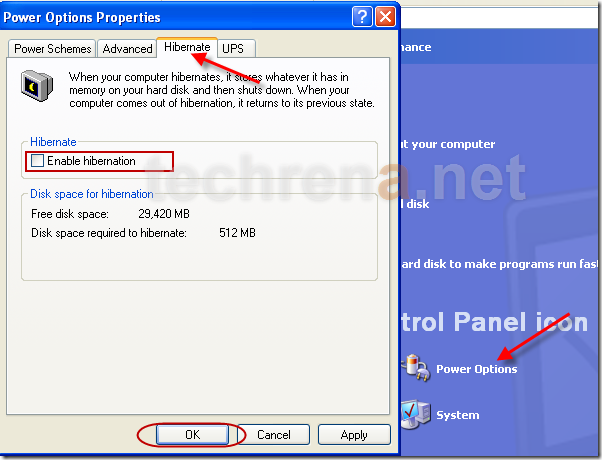
Disable hibernation mode in Windows XP:

In Windows XP it is easy. Follow the instruction below:

Open Start menu, Go to Control Panel. In control Panel, go to Performance and maintenance. Then Click Power Options

In power options windows, go to Hibernate Tab. Uncheck Enable hibernation and press OK.

disable_hibernate_xp

If you want to re enable hibernation, then check the check box and press OK.

Now after performing the steps, if you check your C drive, you will find that the hiberfil.sys file is gone.

Hope you have got some free space at least for now 🙂

Think Before Using USB Flash Drives To Run Applications or OS: Advisory

I am writing this post on an advisory note. With the extensive use of USB flash driven in our day to day activities, now we have been aiming to make even our Operating System(OS) portable by installing it in a USB Flash Drive and carrying around in our pocket. Moreover we can run applications such as Mozilla, Anti Viruses etc. from a USB pen drives. Here I am going to explain, why you need to think twice before using your USB Flash Drive to run an Operating System from it.

Why you should think twice before using a USB Flash Drive to run an OS or applications for prolonged period?

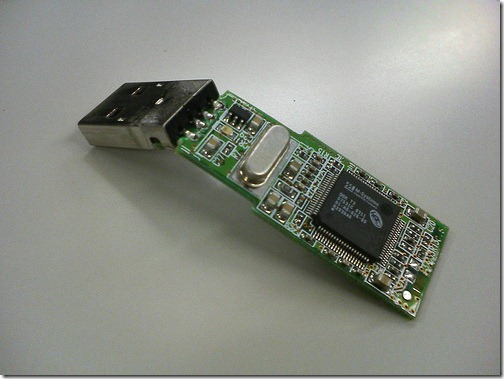
All flash memory devices can sustain only a limited number of write and erase cycles before failure. While running a normal OS or an Application from a Flash drive, the system will write and erase a huge number of files and data in the flash drive. With prolonged use, the write/erase cycles of your flash drive may come to an end and may eventually fail.

The write/erase cycle performed while running an Operating System(OS) such as Windows XP or 7 will be very much more than what we can perform manually, by copying and deleting data. So this should be a consideration as it may make your flash drive run out of Write/erase cycles much faster than expected.

a failed usb flash drive

Another usage of USB is Windows ReadyBoost. Windows 7 and Vista can make use of a USB flash drive as a cache memory to improve the performance.  In this case also the cycles are be used a high rate.

Points to be Noted:

  • Flash memory devices have a limited number of write and erase cycles before failure
  • Running an OS or an Application from a Flash drive will write and erase a huge number of files or data in the flash drive per second.
  • Running an Operating System(OS) will perform these cycles much more than what we can perform manually
  • Prolonged use will make your flash drive run out of write/erase cycles and may eventually fail much before expected

How to address this issue?

To address this, as well as space limitations, some developers have produced special versions of operating systems such as Linux in Live USB or portable applications such as Mozilla Firefox designed to run from flash drives. These are typically optimized for size and configured to place temporary or intermediate files in the computer RAM rather than store them temporarily on the flash drive.

Compared to other portable storage devices such as external hard drives, USB flash drives still have a high price per unit of storage. But Hard drives have a higher minimum price.

Alternatives:

  • Run applications or OS which are configured  for Flash Drive use only
  • For Prolonged usage, try buying an external Hard Drive
  • If you are using your USB Drive as a Cache device to improve performance, why not upgrade your RAM size?

Notes:

1. Manual usage of your USB Drive will take years to use up the Write/erase cycles available, so no need to worry.

2. Most Failures in USB Memory Devices are due to wear and tear

How to Remove Alureon rootkit To avoid BSOD Crashes in Windows

Windows Update

This is a very important note for all the Windows users especially 32-bit, that before installing the security updates that Microsoft Windows had released last week, you check if the malware known as Alureon Rootkit is present or not and remove it using the Microsoft Windows Malicious Software Removal Tool.  If the malware is present in your system and if you happen to install the security update (KB977165) then there is a high possibility that Windows may crash and it may show only a blue screen during startup (Blue Screen Of Death BSOD).

Alureon Rootkit or Win32/Alureon.gen causes problems with the way Microsoft’s patches interact with the kernel, which has led the company to include a package detection logic that prevents the installation of the security update if the rootkit is present on 32-bit systems.

Windows Crash Reported after installing Security updates:

Windows systems crashed during the latest Microsoft security update last week. According to Microsoft this happened because the systems were infected with a rootkit program that made changes to the operating system kernel and it was not due to the update patches.

“The restarts are the result of modifications the Alureon rootkit makes to Windows Kernel binaries, which places these systems in an unstable state,” Mike Reavey, director of the Microsoft Security Response Center, wrote in a blog post. “In every investigated incident, we have not found quality issues with security update MS10-015.”

Download:

Microsoft Windows Malicious Software Removal Tool

Remove Alureon rootkit To avoid BSOD Crashes in Windows

Download Windows Process Security To Find UnSafe Processes

Windows Process Security is a freeware which can be downloaded free of cost from sourceforge.net. The details are given below.

Windows Process Security is a security tool that shows comprehensible information about programs and processes running on your computer and identifies the potential threats running on your computer. The program consist on unique security risk rating for processes and ability to remove 130000 threats. Windows Process Security indicates the likelihood of a process being potential spyware, malware or a Trojan.

A regular Update of the the threat database is required for optimal performance. The update can be directly performed from Windows Process Security 1.0 Application and is free of cost.

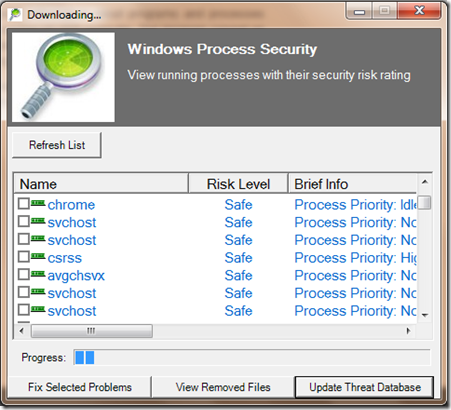
The user interface is quite simple. You can see all the safe and and unsafe processes. If any threat or unsafe process is found you can terminate the process, fix the problem and go to the containing folder to delete the threat. A screen shot of the application is given below.

Windows process security 1.0

Windows Process Security 1.0 can be downloaded from the link below:

Download Link: Windows Process Security 1.0

Size: 3.4 MB

Operating System: Windows 98/Me/2000/XP/2003/Vista/Server 2008/Windows 7/NT

Released on: 28-03-2010

Cumulative Security Update for Internet Explorer(Critical) – KB980182

Internet explorer logo

Microsoft has issued emergency patch to address 10 possible holes in Internet explorer that also includes a critical vulnerability that has been exploited in attacks.

This cumulative security update patch covers a publicly disclosed critical vulnerability (released in Security Advisory 981374) in Internet Explorer 6 and Internet Explorer 7 (Note that IE 8 is unaffected by this vulnerability addressed).However, the security bulletin MS10-108 which was released yesterday addresses 9 more additional vulnerabilities some of which also effect Internet Explorer 8 and are not disclosed publicly.

Microsoft Security Bulletin MS10-018 – Critical : Cumulative Security Update for Internet Explorer (980182) [aka Out of Band Internet Explorer Security Update]

Target platforms: Windows 7, Windows Server 2008, Windows Server 2008 R2, Windows Vista, Windows Server 2003, Windows XP, Windows 2000, Windows Internet Explorer 7 Dynamic Installer, and Windows Internet Explorer 8 Dynamic Installer.

KB980182:

Security issues have been identified that could allow an attacker to compromise a system that is running Microsoft Internet Explorer and gain control over it.You can help protect your system by installing this update from Microsoft.

All Windows users (including Windows 7) download and install the latest Windows update KB980182 to make your software more secure.

For more information, read the MS10-018 bulletin.

How To Turn On or Off System Restore In Windows PC

Windows logo

System Restore is a feature of Windows Operating Systems namely Windows 7, Vista and XP. This feature in Windows enables you to restore or rollback your system to a position in an earlier time. Windows automatically creates restore points to back up the program files, registry and system data whenever you install a new software, driver or make any changes in the system settings. You can restore the system to the restore points saved earlier if anything goes wrong in future. You can also create the restore points manually.

The only problem in System Restore is that it occupies a lot of disk space, as it has to save a lot of restore information in your system. This system restore information is stored in System Volume Information. You may be confused that all the data in your drive is showing lesser usage then the actual amount of disk usage. This is due to the System Restore Files present in the inaccessible folder System Volume Information. You can open this folder by taking Ownership in windows 7 or Vista.

Now, if you feel that System Restore is not necessary or if you want to free up disk space by deleting the earlier Restore points then refer the details below.

Open System Properties:

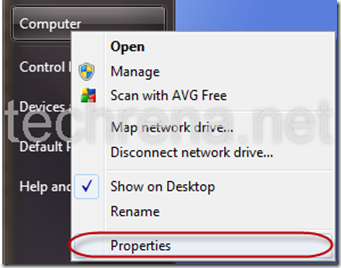
Open Start Menu, Right click on My Computer (in XP) or Computer (In Windows 7) and Select Properties

my_computer_properties

Open System Restore or System Protection:

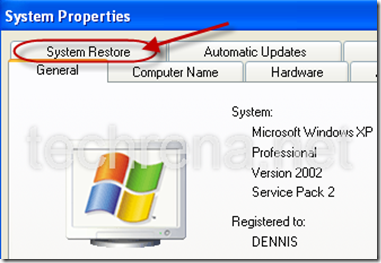
If you are using Windows XP, then Go to System Restore Tab.

system_properties

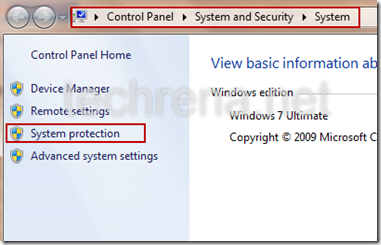
If you are Using Windows 7, Click on System protection in the left pane.

system_properties_7

Turn off or delete system restore points in Windows XP:

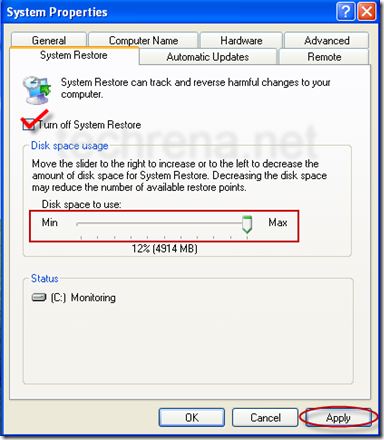
You can see the System Restore Options. Here you can change the amount of Disk space to be used for System Restore.

If you want to delete the System Restore Data then, check Turn off  System Restore and click Apply. It will delete all the related data and turn off your System Restore. Now the disk space has been freed up.

Note: If you only want to delete the system restore data but don’t want to turn off System restore then, don’t forget to turn it back on by unchecking the checkbox and applying again.

system_restore_xp

turn_off_restore_confirm_xp

Turn off or delete system restore points in Windows 7:

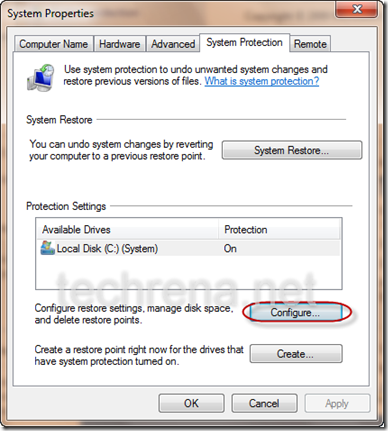
In the System Protection tab, click on Configure.

system_protection_7

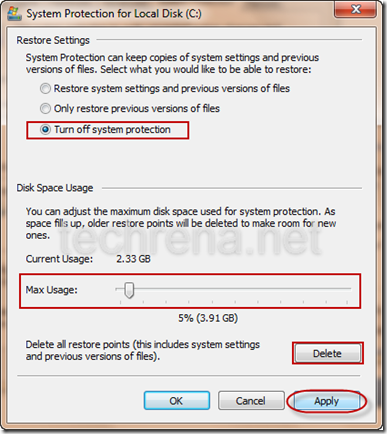
It will open System Protection for your disk. You can change Maximum Disk space Usage for System Restore. You can delete the system restore points to free up the disk. Or you can turn off the System Protection feature completely in your Windows 7 PC.

turn_off_restore

If you Click on delete it will ask for confirmation as follows. Then it will delete the restore points. Deleting the System Restore points will not Turn off System Restore in Windows 7.

confirm_delete_restore_point

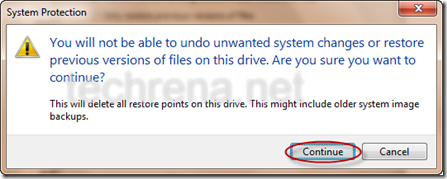
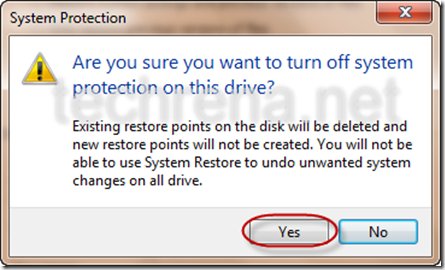
If you select Turn off System protection and click on apply, it will ask for the confirmation given below and Turn off your restore. This will also delete all your current restore points.

turn_off_restore_confirm

You can turn On the system Restore anytime by Selecting Restore system settings and previous version of files and clicking Apply.

In Windows 7 there is an option for restoring the previous version fo files or deleted files in a folder. To know more, refer the post: How to Restore Previous Versions of Files in Windows 7 Using System Restore.

Important:

1. The given procedure will also work for Windows Vista.

2. It is not recommended to Turn off or Disable System Restore in your Windows PC.

3. If you are deleting all the System Restore Points, then you will not be able to restore the system to any earlier point of time.

Install Windows XP Mode Without Hardware-Assisted Virtualization (HAV)

Windows XP and Windows7

Microsoft has announced a small but significant update to its own “Windows XP Mode” (or Windows Virtual PC), a feature that has been incorporated in Windows 7 to let the users of this new operating system take advantages of the older applications that still require Windows XP, by running them inside “Windows XP Mode”.Until now, this XP Mode has only been supported by processors having virtualization technology known has Hardware-Assisted Virtualization (HAV).

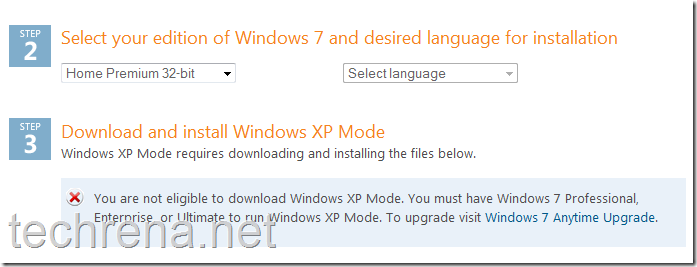
However, Windows XP Mode works only on Windows 7 Professional Enterprise, or Ultimate versions of Windows 7.

This update has been announced in Windows 7 blog, also they have made clear that Windows XP Mode will continue to make use of Intel VT and AMD-V like hardware virtualization technologies.

Windows XP Mode will no longer require hardware virtualization technology to run. This change makes it extremely easy for businesses to use Windows XP Mode to address any application incompatibility roadblocks they might have in migrating to Windows 7.

To install Windows XP mode in your PC with Windows 7 Professional or higher version, download the update from here (update KB977206 ).

Windows 7 Home users need not worry about the lack of support for their OS, as there are hacks available over the internet to install Windows XP mode in Windows 7 Home PCs (Home Basic and Home Premium) too.Hopefully we’ll cover one such hack in the upcoming posts.So stay tuned and subscribe to this blog’s RSS feeds.

Windows XP Mode download Not Eligibe

Tip: You can use VMware player to install Windows XP Mode in any computer running Windows 7.

How to Take Ownership and Grant Permissions to a File or Folder In Windows 7 or Vista

There are certain Files and folders in Windows that we cannot access, modify or delete. Such kind of files are system files which have limited access rights to the users.

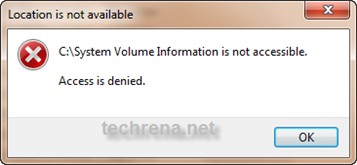
But sometimes we need to access some files or change some file according to our need. Such an example is System Volume Information. This folder is not accessible but if we want to know how much size its taking and what files are there inside, we have to take ownership and grant access to this folder. Another example is with the mfpmp.exe file of Windows Media Player which users like to delete for problems with subtitles and all.

permission denied

So, here we have given the easiest way of taking ownership and granting full access to the files and folders in Windows 7 and Vista.

Method 1: Using Command Prompt. (Preferred One – easier)

Step 1: Open Command Prompt in Administrator Mode. Press Start + R,

Type cmd and Press Ctrl+ Shift + Enter.

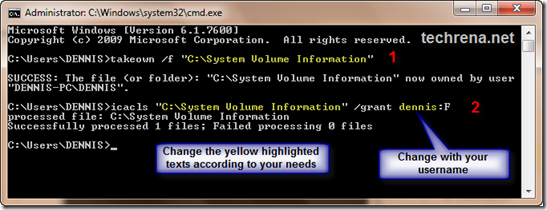
Step 2: In the Command prompt type takeown /f “location path +file name or folder name”. See the example below:

Step 3: Again type icacls “File or folder path and file name” /grant <user name>:F. Example:

This will look like:

take ownership of a folder

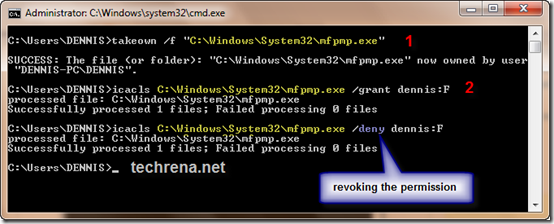
Same thing for a file. Below example is for mfpmp.exe.

take ownership of a file

To revoke the permissions just replace the grant with deny.

Note: If you have a space in Between your User name then put “”. Example:

icacls  “C:\\System Volume Information” /grant “Techrena dot Net” :F

Method 2: Using the properties menu.

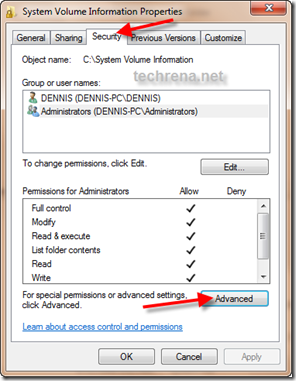
Step 1: Right Click on the File or Folder you want to own and select Properties.In the Properties go to Security Tab from General Tab. Then Click On Advance.

Take_ownership_setting_properties

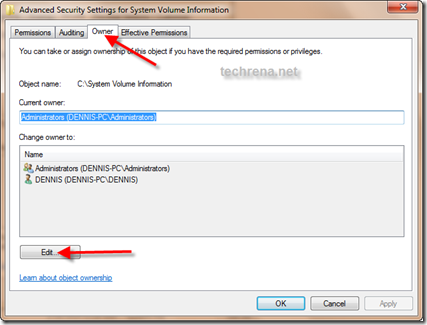
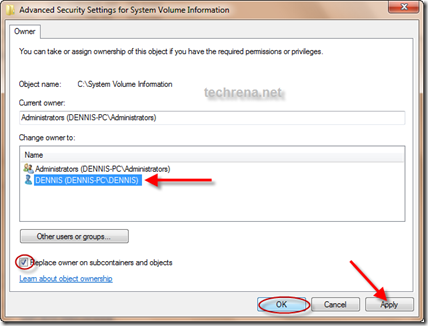
Step 2: In the advanced menu go to Owner tab, Click on Edit. Select your Username. If you want to own the Subfolders and files then Check the box. Click Apply and then OK.

edit_ownership

select_owner

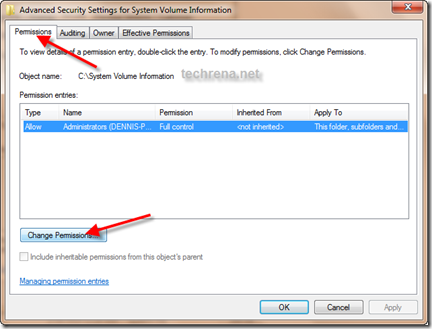
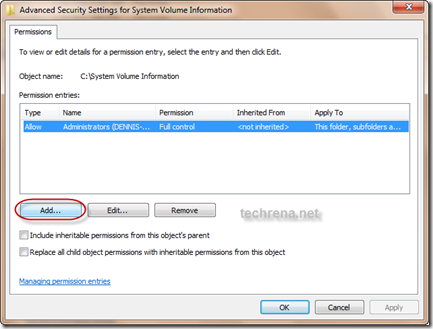
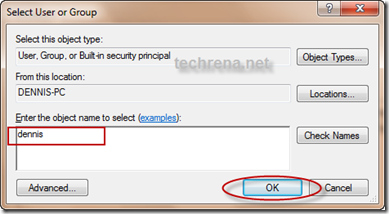
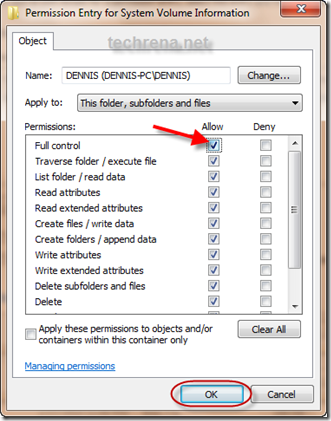
Step 3: Not to grant the permissions, Go to Permissions Tab. Click on Change Permission. Then Click on Add..Type your username and click OK. Now, it will show the Permissions Entry menu.  If you want Full control(Edit, Delete, Modify) then Check Full, else select the permissions you want. and click OK.

Chang_ File_Access_Permission

Add_user_permission

Type_username_permission

Selct_permission_type_fill_modify_read

Now you have successfully completed taking ownership of a file or a folder. You can do whatever you want with the file or folder.

Important Note: Please be careful with the System Volume Information folder. It was given here just as an example. Do not modify any permission to this folder as it contains all your system restore information. If you have changed to see the files, then please revoke the permissions after you are done. Any changes in the folder may lead to unwanted results especially in case of virus attacks,

Install and Run Windows XP in Windows 7 Using VMware Player

Windows XP has been the most famous and most useful operating system to its users till date. Well even if we are have to migrate to Windows 7, we will never forget the ability of Windows XP. There are a lot of programs which were supported by Windows XP but not in the later versions like Windows Vista and Windows 7. Now when we migrate to Windows 7, we will not be able to run such programs.

In order to solve the problem of incompatibility of software and drivers in Windows 7, we have been given the option of installing Virtual Windows XP using Microsoft Virtual PC. But the lone problem in this option is that the processor should support Virtual Machine.

Windowx XP and Windows 7

Here we have given a technique with which you will be able to run Windows XP in Windows 7 without any Virtual XP software or Virtualization Supporting Processor. Moreover you can use your own CD or ISO backup of Windows XP to create the Virtual Machine and no need of downloading the XP Virtual PC from Microsoft.

Requirements:

Windows 7 installed Machine

Minimum 1 GB RAM.

Minimum 4 GB Free Hard Disk Space

Windows XP backup either CD or ISO file

OR

If you have downloaded Microsoft Virtual XP Mode, then refer the instruction at Step 6.

Step 1: Download and Install VMware Player 3.0.1. The download Links are given below.

Size: 90.0 MB

Download VMware Player 3.0.1 from VMware

or

Download VMware Player 3.0.1 from FileHippo.com

Follow the normal instructions and install. Restart your computer after installation.

Step 2: Now we have to create a new Virtual Machine. Open VMware and click Create a New Virtual Machine as shown below.
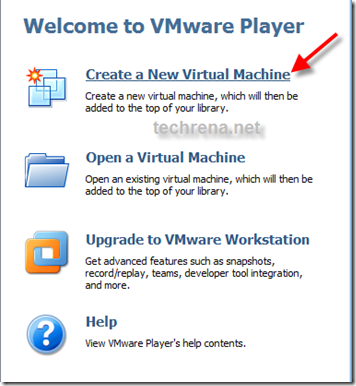
VMware-New-virtual-XP-Machine

Step 3: Select the location from which you are going to create the new Virtual Machine. If you have a CD then select the drive. If you have a back up file in an iso, then you can select the file.
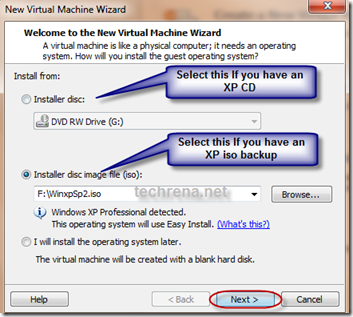
Select-disc-iso-XP-Machine

Step 4: Enter the Windows XP key and the user name and password.
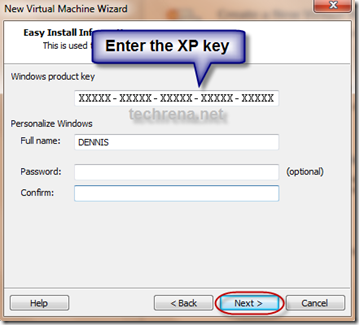
Enter-key-XP-Machine

Step 5: Then you can set the location to be installed, maximum Disk space size and the RAM size. Follow the instructions normally. Finish the setup. It will continue to install Windows XP in your Virtual Machine.
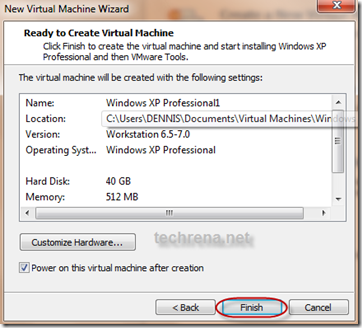
3-6-2010 12-35-50 PM

Optional Note: While installing the Virtual Machine it may ask you to download VMware Tools for Windows 200 or later. It is recommended that you download it or you can download it later also.
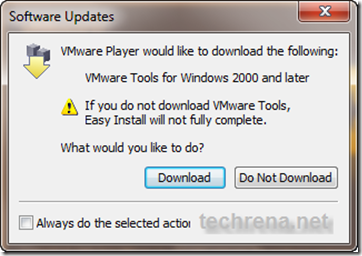
download-vmware-tools-for-Windows

After that, the installation process will continue by itself and Windows XP will start.
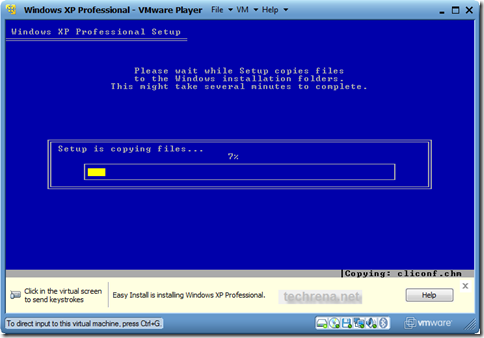
Windows Xp installation

Windows Xp installation process

After successful installation Windows XP will start and you can see the System properties as shown below. 512 MB of RAM is set when installation(you can change the size in VM settings).
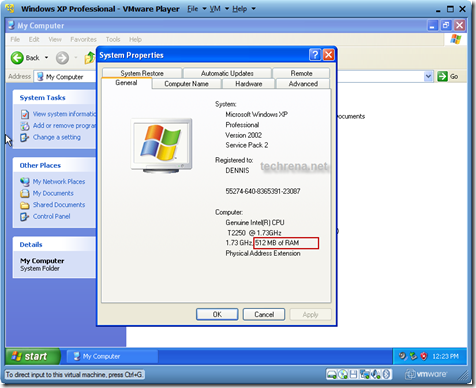
Virtual-xp-properties

Now, you have successfully installed Windows XP virtual PC using VMware player. In order to quit Windows XP you can simply shutdown and quit VMware player.

To start the Windows again in virtual mode, open VMware Player and Select Windows XP in the left pane and Click Play virtual machine.

VMware

Let us discuss some of the issues which should be known by the users.

How to Transfer Data to and from Windows XP virtual Mode?

As you are running two different machines drag and drop will not work if you have not installed VMware tools. Even if you can copy directly, it takes more time. You can either use a flash drive or Disc drive to transfer data between Windows 7 and XP virtual mode. But this is not the optimal way. You need to map network drive in Windows 7 which has been shared from Virtual XP.

To enable file and folder sharing in Windows XP virtual Mode, you need to edit the settings. Click on Virtual Machine Settings as shown above to edit the settings.

Select Options and select Shared Folders. Set Always enabled and click OK.
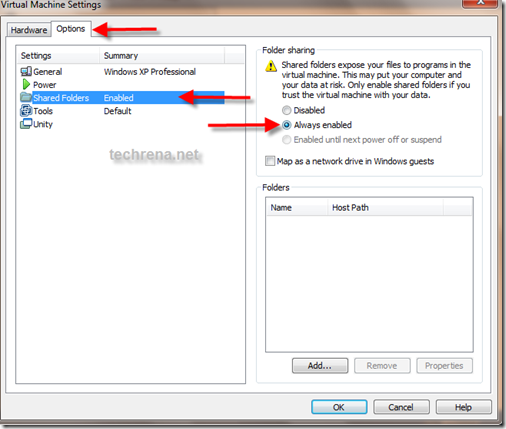
VMware-settings-folder

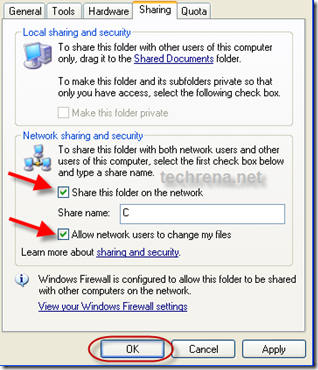
Now you need to share a folder with write permission as shown:

In Windows XP, right click on the folder or drive you want to share and select Share and Security. Do not forget to check Allow network users to change my files.
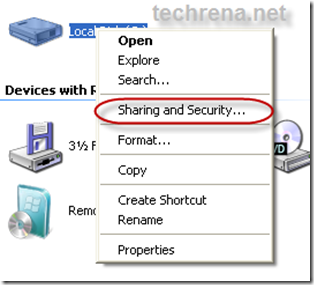
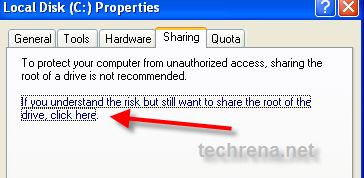
Share a folder in XP

share-folder-in-virtual-xp

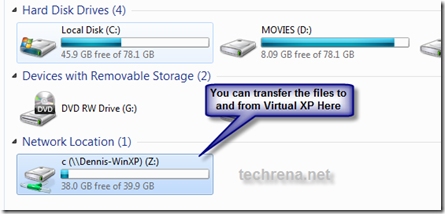
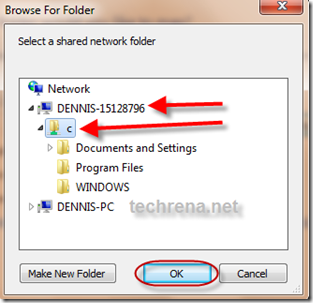
Now after sharing the folder in Virtual XP, you need to map the folder in Windows 7 as shown below:

Right Click on My Computer and Select Map network drive. Under Network search for the folder you have shared in Virtual XP Machine and click OK.
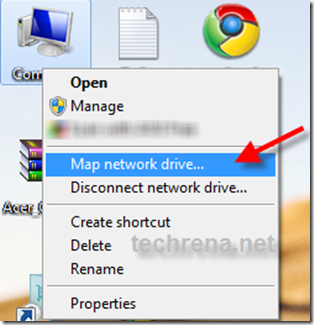
set-virtual-drive-windowsset-virtual-drive-windows-7

virtual-drive-windows-7

You can copy or paste anything from or to the network location drive in Windows 7. This is how you can transfer files between Windows 7 and Windows XP virtual mode.

Removable Devices:

Now if you want to use a removable device like a flash drive, you can connect the device using the following setting:

VMware-set-devices

You need to disconnect the device from the host in order to connect to the Virtual machine.

Step 6. Running Microsoft’s Windows XP Virtual PC:

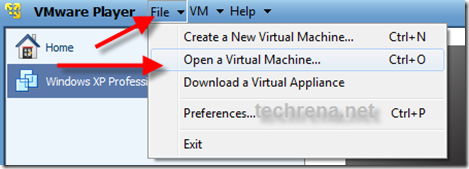
All the above installation is not done using the Microsoft’s Virtual  Windows XP PC. Above we used normal Windows XP installation CD. If you have downloaded Virtual XP PC from Download Windows XP Mode then,  install it on your PC and then you can open the Virtual Machine from the VMware Player as follows.
VMware-open-virtual-PC

Browse for the .vmx file in the folder you have installed the Virtual XP PC and  Click Open. You can run it.

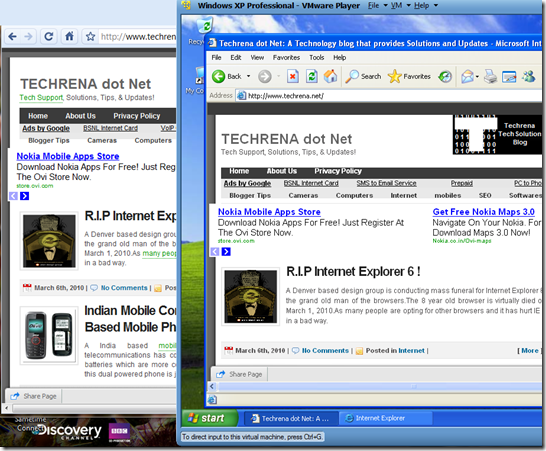
Finally, as you have successfully installed Windows XP Virtual PC in Windows 7 using VMware Player 3.0.1 you can enjoy the unbeatable features of Windows XP in Windows 7 also.
windows7-and-virtual-windows-xp

Note: No new Partition is created in your hard disk for the Virtual PC. Just a virtual disk file is created in your drive which will increase in size according to what you copy and install in your Virtual PC. The maximum size of this file is the size you have set as maximum disk size.

PS: If any problem occurs or if you are not able to follow the steps and instructions, please leave a comment below.