How To Speed Up Your Windows PC Using MSCONFIG

In Windows system configuration is done using MSCONFIG. MSCONFIG is very useful to the Windows users to configure their system properties. We can configure all the system properties from boot up, startup till services to be run in your computer. A properly configured system will have optimal performance and proper memory usage.

This tutorial is about Speeding up your PC and increasing the performance level by removing unnecessary programs from startup and stopping unused services. By doing these things you can see the difference in startup time and the amount of physical memory used and even CPU usage.

This guide consists of two main parts:

1. Removing unnecessary programs from startup.

2. Stopping unused or rarely used services in your system.

Please note that this tutorial is just a guide. You need to analyze properly by yourself which programs or services to be stopped, which are required and which are not required.

We will start with the first one:

Removing unnecessary programs from startup

Step 1: Open System Configuration. Press Start + R, Type msconfig and click OK.
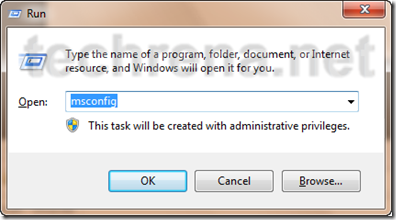
run_msconfig

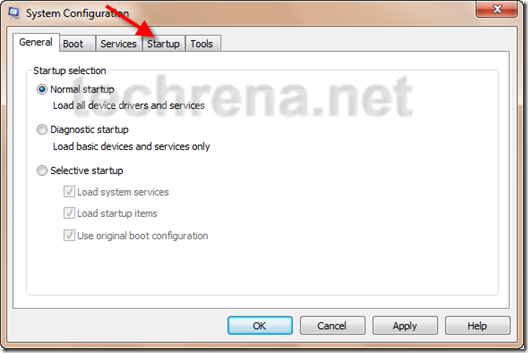
Step 2: You can see the General Tab in Systems Configuration. Go to Startup Tab.

msconfig_home

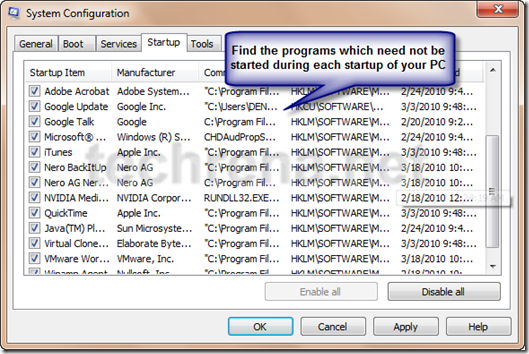
msconfig_startup

You need to study the requirement of the programs, whether you need to start them during startup or not. You need to start your Virus Protection programs compulsorily. Remove any program which doesn’t have a proper description and which you do not know the functionality of the program. IF you know some programs which you rarely use, you can remove them as well. Do not forget to remove any suspicious program which may be a virus.

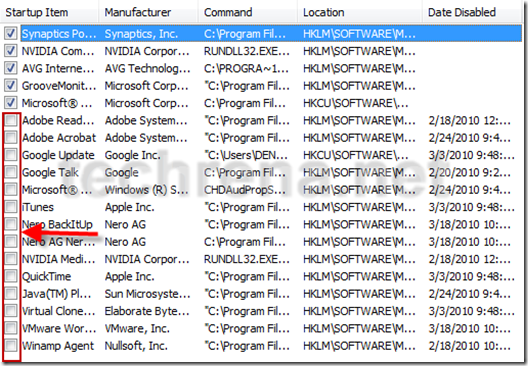
Step 3: After the analysis, uncheck the programs which you need not start during the startup of your computer.

msconfig_startup_programs

Now you have successfully configured your startup programs according to your needs.

Stopping unused or rarely used services in your system.

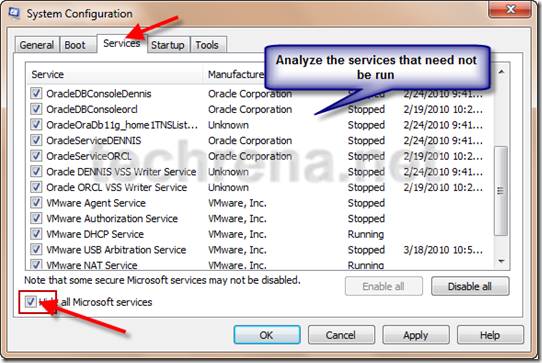
Step 1: Go to the Services tab. There you can see the various services which can run in your system. Again you need to analyze which services are not used or which are rarely used and not required.

msconfig_services_tab

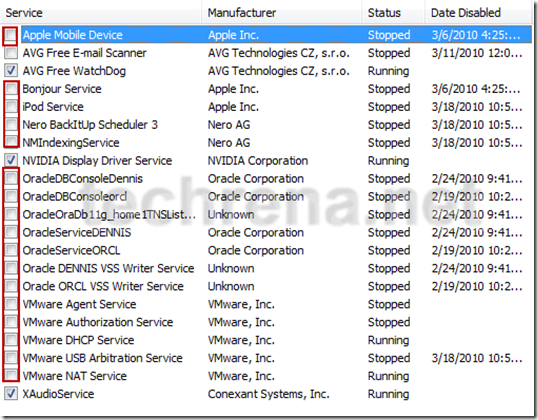
For example, I use the Oracle Database and VMware very rarely, but both of them are huge services which takes a lot of resources in the CPU and Memory. So, i choose not to start them. As I stopped these services then my Oracle Database and VMware will fail to run. So whenever I want to use any of these programs I will go to msconfig and check to start these services again. Then restart the computer and run the program. So keep in mind that you stop the services only which you rarely use.

Step 2: After detail study and analysis, you can stop the services by unchecking them in msconfig.

msconfig_services

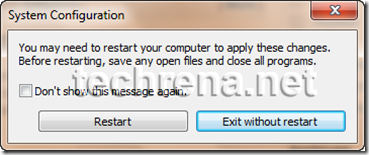
Finally you can Click Apply and OK, which will ask for restart. You need to restart if you want the changes you have made to be applied.
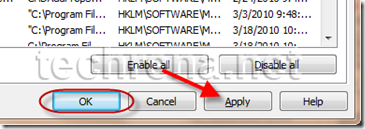
msconfig_apply_ok

msconfig_restart_exit

Important: Please note that removing a Program from startup and Stopping a service is very different. The Startup programs can be manually started, but services are not programs which can be run. Services are required to run the Programs installed in your computer. When a program which requires a services is started, only then the program’s service will be started For example, if VMware Player is started, then VMware services will also be started. But some essential services are always running in the system. Services which have been stopped by you cannot be started manually. Only by re including it in the starting services using msconfig, and upon restarting the system, the services can be started again by its programs.

You can definitely see the decrease in startup time and increase in performance of your system after applying the changes you have made using msconfig. If you have any doubt please leave a comment.

PS: The programs or services which I have removed from startup as shown above  need not be same as yours. It all depends upon your needs.

Disable Annoying “This Program Might Not Have Installed Correctly” Alerts

Windows logo

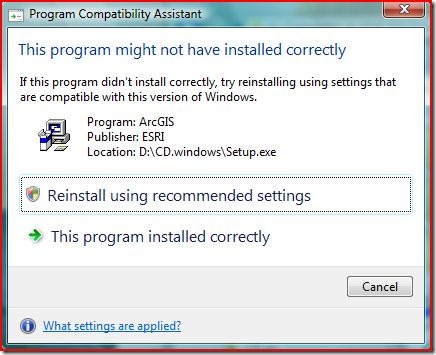
Program Compatibility Assistant is a service first introduced in Windows Vista and being continued in Windows 7.This service is intended to notify users when an installed program has some compatibility issues with the current operating system.Hence we see frequent Program Compatibility Assistant messages “This Program might not have installed correctly”.

If you install programs frequently (particularly when you install old versions of the programs) then you might be sick of these dialogue boxes and may want to disable these notifications.

This program might not have installed correctly error in Windows vista and Windows 7

There alerts are caused by a service called Program Compatibility Assistant (PCA) Service or PcaSVC in short.So stopping this windows service forever by changing the startup type to “Disabled” should serve the purpose.Follow these simple steps :

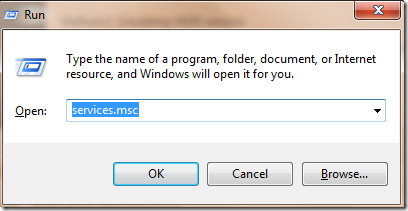
1. Press Windows + R button to start WIndows Run command.Type “services.msc” in the filed and click “ok”.

windows_run_command_services.msc

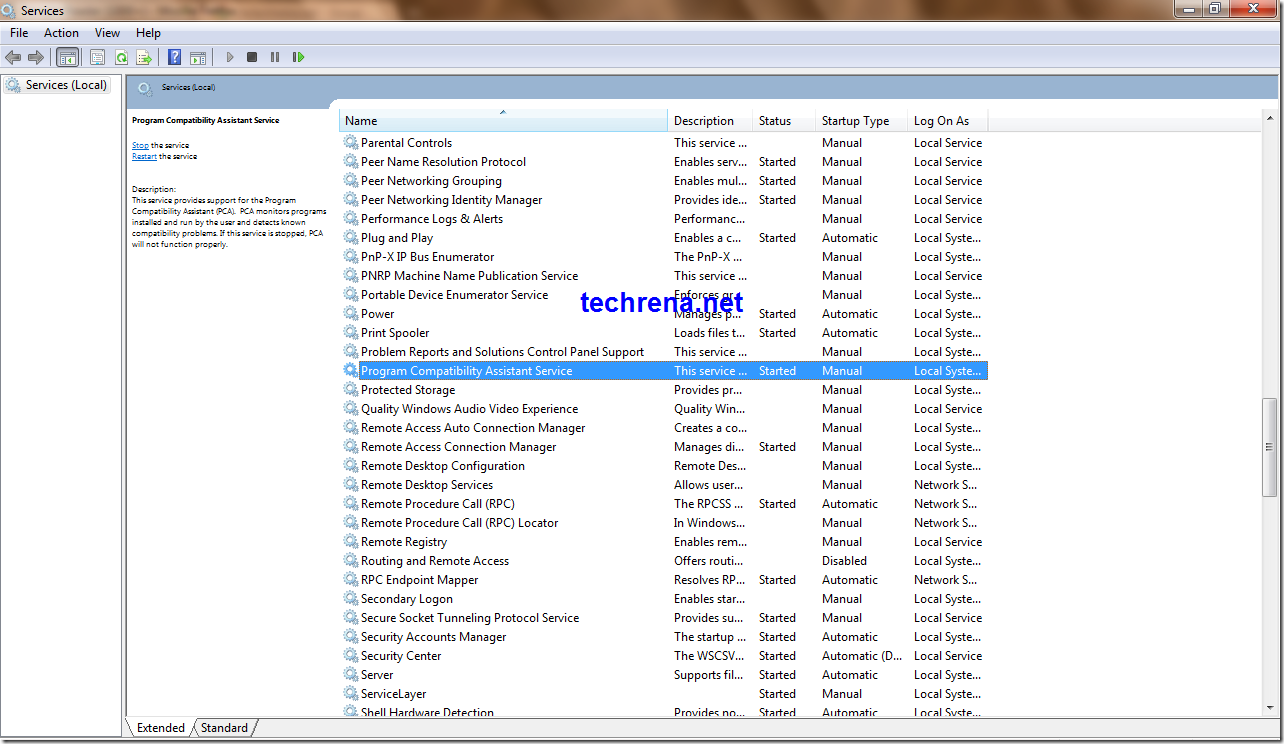
2. The Services window opens up.Find the service called “Program Compatibility Assistant Service” in the list.

Program Compatibility Assistant Service In Windows Services

Right click on the Program Compatibility Service and choose “properties” from the menu.

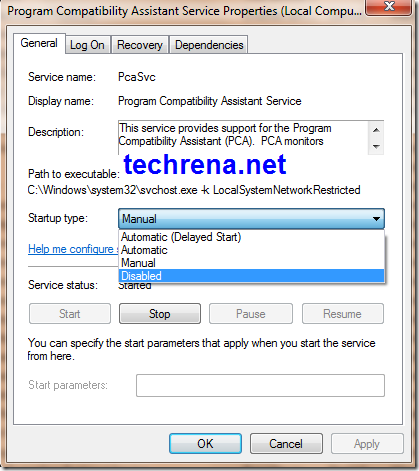
3. In the properties dialogue box, change the startup type to “Disabled” and click “Ok” to save the settings.

Program Compatibility Assistant Service Properties Window

It is that simple !! Now you have disabled the PCA service and no more annoying Program compatibility alerts for you.

Complete Tutorial: How To Disable Windows Error Reporting In Windows 7 ?

Microsoft Windows 7 Official Logo

Windows Error Reporting (WER), a technology (previously known as Dr. Watson),developed by Microsoft lets you report post-error debug information to the developer of the particular application that has just crashed or stopped responding.Windows Error Reporting has been introduced as a Windows service from Windows XP and is being continued in the later versions Windows Vista and Windows 7.By default, this Error Reporting service will be started automatically.

However for some reasons like you may get annoyed by frequent error reporting alerts or for privacy concerns etc., you may want to disable or stop Error Reporting in your Windows operating system (here it is Windows 7).If you are not sure how to stop Error Reporting in Windows 7, please do follow the steps outlined below:

Method-1: Using Action Center

1.Type “wer” in the Start menu search bar.Check the results obtained for this search in control panel (refer to the screen shots).

type wer in start menu

start menu search choose how to check solutions

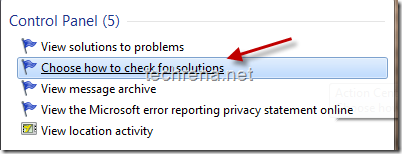
2.Click on the “Choose how to check for solutions” item in the search results.It will open up the “Problem Reporting Settings” under Windows Action Center.

problem reporting settings action center windows7

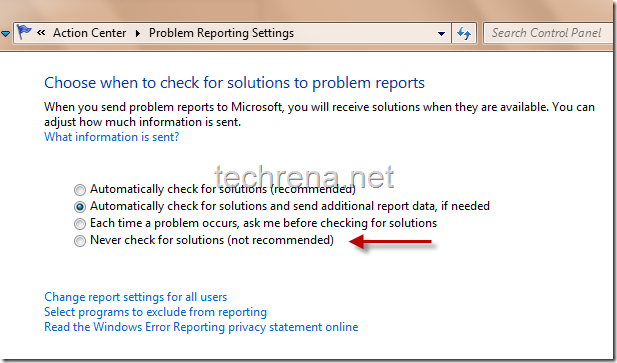
3. By default the first or second option (“Automatically check for solutions”) will be selected by your Windows.If you want Error reporting to be disabled, select the last option “Never check for solutions” for completely disabling it or select the third option “Each time a problem occurs, ask me before checking for solutions” for moderating the error reporting alerts.Click “Ok” button down the window once you have selected your option.

Method-2: Disabling WER service

Windows Error Reporting Service function:

“Allows errors to be reported when programs stop working or responding and allows existing solutions to be delivered. Also allows logs to be generated for diagnostic and repair services. If this service is stopped, error reporting might not work correctly and results of diagnostic services and repairs might not be displayed.”

We’ll try to achieve the same previous settings result but this time via disabling the Windows Error Reporting(WER) service.To do this, follow..

1. Press Windows button + R to open the Windows Run command.Type “services.msc” in the run command bar and hit ‘OK’.

windows run command services.msc

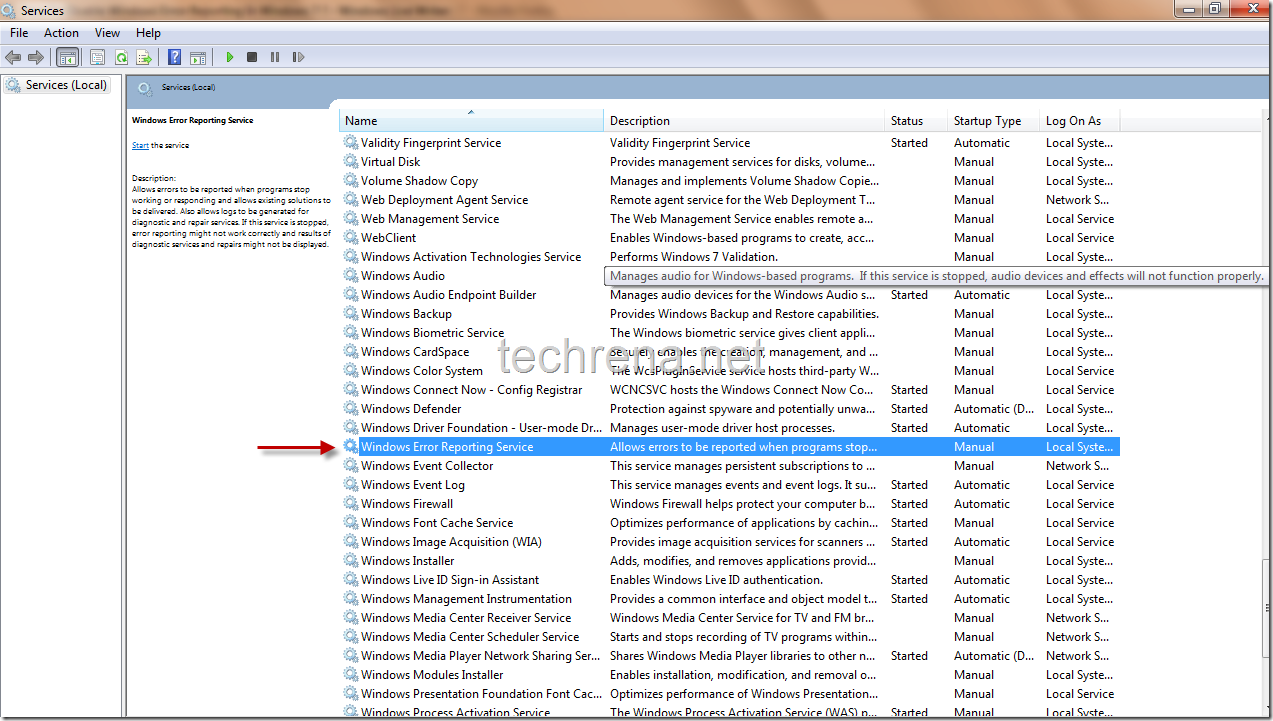
2. It will open up Services window, where you can see list of all the services that are currently available on your Windows.Find “Windows Error Reporting Service” in this list.

Windows Error Reporting Service

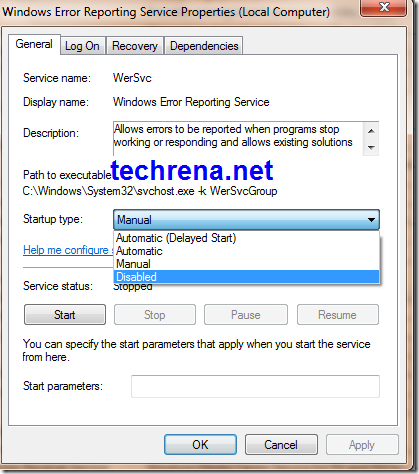
3. Right click on the Windows Error Reporting Service and choose “Properties’ that should open a new properties window.The startup type will be either in “Automatic” or “Manual” by default.To completely disable the service choose “Disabled” and press ok.

Windows Error Reporting Service Properties

That’s it, now you have disabled the Windows Error Reporting Service successfully.

Method–3: Using Registry Editor

Warning: Changing registry values without much knowledge will dump your entire Windows Operating system.Change them at YOUR OWN RISK.

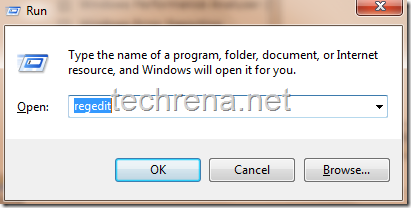
1. Type Windows + R as in the previous case to open Windows run command.Type “regedit” in the command bar.

regedit run command

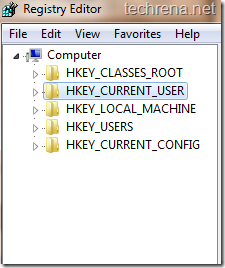
2.It will open up the Registry Editor window which will look like this.It contains three folders like navigable sub keys:

HKEY_CLASSES_ROOT ,

HKEY_CURRENT_USER,

HKEY_LOCAL_MACHINE,

HKEY_USERS,

HKEY_CURRENT_CONFIG.

Registry editor windows 7

HKEY_CURRENT_USER is the one we want.Click on it to expand the sub registry key.

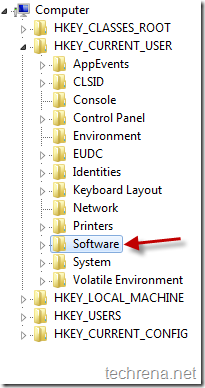
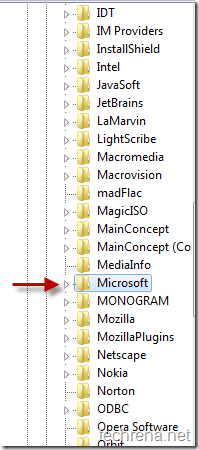
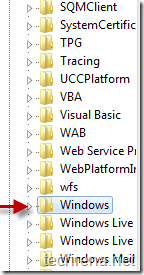
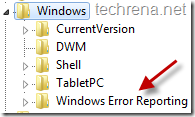
3. Navigate to HKEY_CURRENT_USER\Software\Microsoft\Windows\Windows Error Reporting sub key using the following screen shots carefully.

regedit HKCU navigation

regedit HKCU navigation 2 regedit HKCU navigation_3

regedit_HKCU_Windows_Windows_Error_Reporting_key

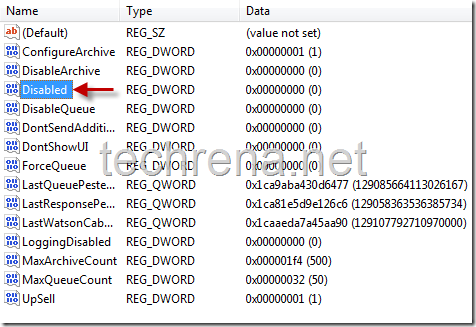
4. In the Dword list, find the registry entry by name “Disabled” (highlighted in the screen shot).By default the Date value of this dword will be “0” meaning that it is enabled.

Disabled dword in WER subkey

Right click on the “Disabled” DWORD and choose “Modify”.In the value data filed, change its value to “1” instead of “0”.Click on to reflect the changes.

Now you have successfully disabled WER.


You may also want to read our previous guides on A-Z of Installing Windows 7, Installing Windows 7 on USB stick, Activating Windows 7, Resetting Windows 7 password (when you forget it and unable to retrieve it), Creating desktop shutdown shortcut in Windows 7,Enabling GOD mode in Windows 7, Partitioning hard disk in Windows 7 , Restoring previous versions of files in Windows 7, Install and Run Windows XP in Windows 7 Using VMware Player and much more..

Feel free to leave a comment here if you find problem somewhere in following these methods.
Complete Tutorial: How To Install Windows 7

Installing an Operating System (OS) is not a very easy thing. Why? Because an OS deals directly with your computer hardware which is completely useless without a working OS. Another thing is OS installation needs to deal with your existing data in your hard drive. You need to format a drive partition for new OS installation, which is critical because your sensitive data may be lots in the process.
So in order to help you, you can just make yourself familiar with the whole installation process before actually starting the real installation. The process explained here is applicable to all the editions of Windows 7 for example, Windows 7 Ultimate, Home, Professional etc.
Before beginning the installation process decide in which partition you want to install the OS. Please back up all the critical data from the drive in which you want to install Windows 7. This tutorial is made for a fresh Windows 7 installation.

System Requirements:

1 gigahertz (GHz) or faster 32-bit (x86) or 64-bit (x64) processor
1 gigabyte (GB) RAM (32-bit) or 2 GB RAM (64-bit)
16 GB available hard disk space (32-bit) or 20 GB (64-bit)
DirectX 9 graphics device with WDDM 1.0 or higher driver

Note: We have tried installing Windows 7 in a 32-bit computer with just 512 MB RAM and it worked.

Carefully follow the step by step guide below. Click on the Screen shots to enlarge it.

Step 1: Insert to source of the Windows 7 installation to your computer(Powered Off). The source may be the Windows 7 installation DVD or a USB flash drive. If you want to install Windows 7 in a netbook then you need a flash drive.

If you need a Flash drive installation of windows 7 Click here

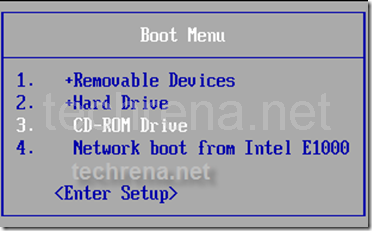
Step 2: Turn on your computer. Press the Boot menu key. (Usually Boot Menu key is the Esc Key). Select your source. If DVD then select CD-DVD Drive, flash drive then Select USB Removable Drive.

boot_menu

If it will shows Press any key to Boot, then press any key on your keyboard.

Press_any_key

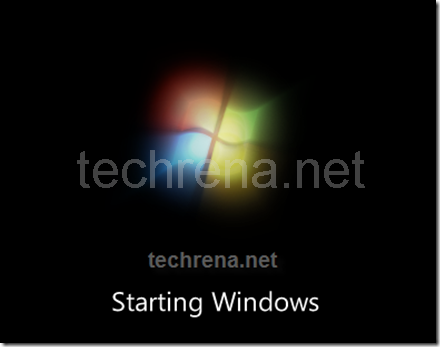
Now it will load the files and Windows will start.

loading_files

Starting Windowssetup_is_starting

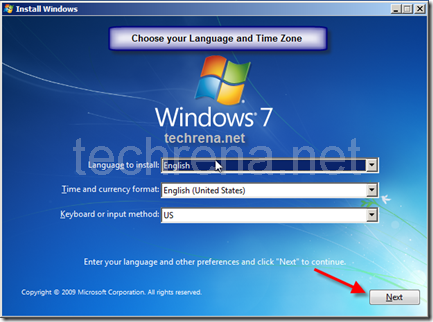
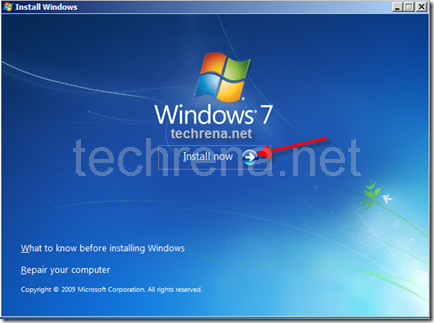
Step 3: Now select the language, time and Keyboard format. Click Next.

Install_windows_7

Click on Install Now.

Install_now_windows_7

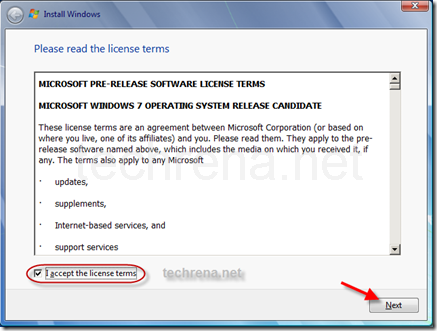
Step 4: Accept the license agreement and Click on Next.

Install_windows_7_license

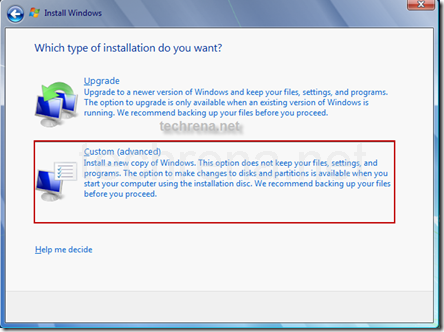
Step 5: This is a critical step. Upgrade needs to be selected if you want to keep your programs and files and upgrade to Windows 7. In a fresh installation you have to select Custom (advanced).

Install_windows_7_type

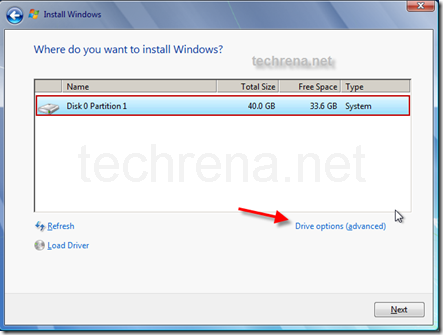
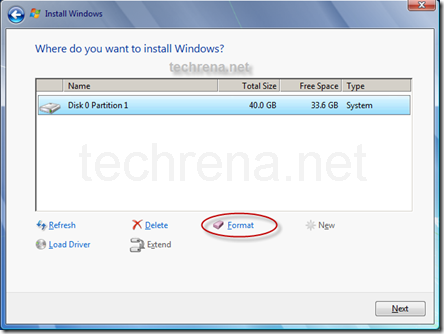
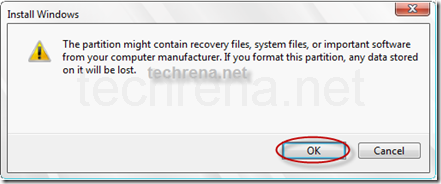
Step 6: Formatting a Hard drive partition to install Windows 7. You need to select and format the partition. You may have mare than one partition but select the one in which you want to install Windows 7. Click on Drive options to format.

Install_Select_drive_windows_7

Select the Partition you want to format and Click on Format.

Install_windows_7_format_drive

It will ask for a confirmation. Click OK to confirm format. Once format is done, Click Next.

Install_windows_7_format_drive_ok

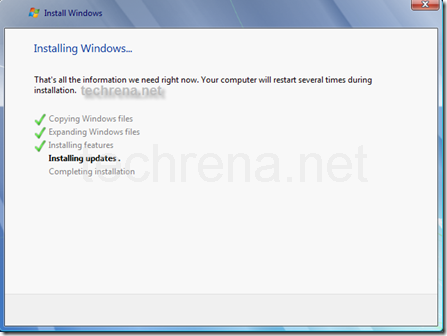
Now the Installation process starts. It may take a few minutes. The time taken varies according to your CPU and the source you are installing from(either USB or DVD). USB drive is faster.

Intallation_process_windows_7

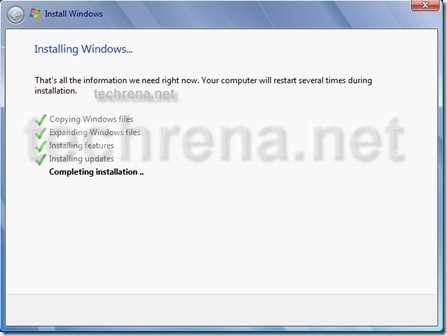
After Installing Updates the computer will restart.

Important Note: Please make sure that from this time onwards it boots from your Hard Drive.

Completing_installation

install_windows_7_starting_services

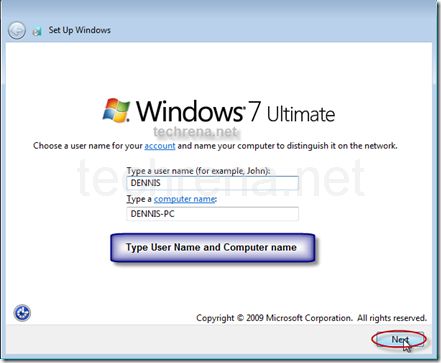
Step 7: Type the user name and Computer Name. Click Next.

enter_name_windows_7

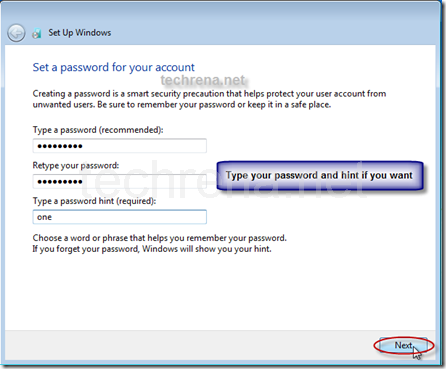
If you want you can set the password for the username. Make sure that you remember the password.

enter_password_windows_7

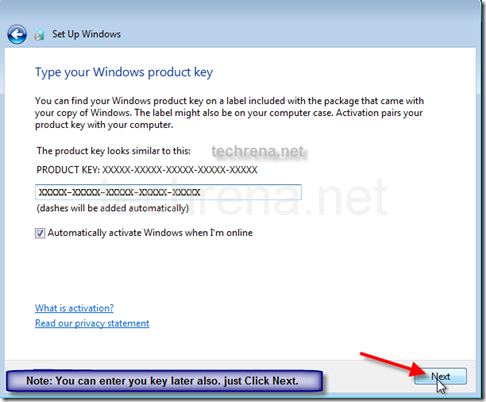
Step 8: Type your Windows 7 Product Key. This is an optional step. You can enter the key later also. If you want to do it later just leave the field blank and Click Next.

Note: Check Automatically activate Windows when I’m online if you want to activate the Windows by itself. If you want to do it manually, then uncheck it. Activation of Windows online is mandatory for Windows 7.

enter_product_key_windows_7

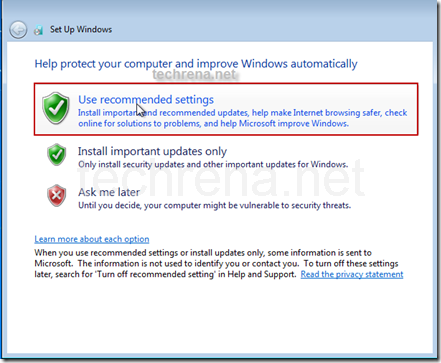
Step 9: You can select Use recommended settings. If you have a WLAN adapter, then it will ask you to select you network. Select one if you have a network.

Install_now_windows_7_settings

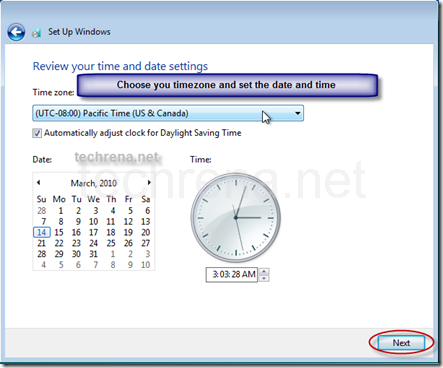
Step 10: Set the time and date. Click Next.

Install_windows_7_set_time_date

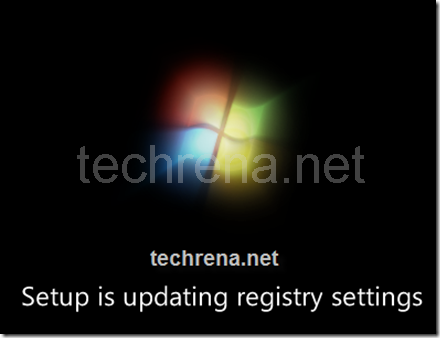
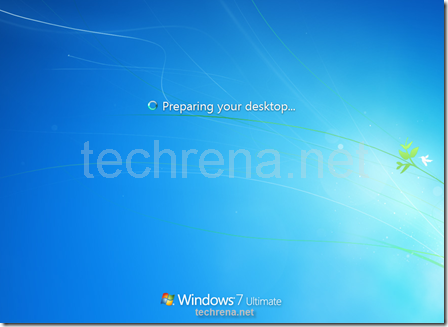
Now Windows will restart the computer, update your settings and prepare for the first use.

updating_registry

setting_up_for _first_start

Install_windows_7_prepare_desktop

Now you have successfully installed Windows 7. If you have any doubt please leave a comment. We will reply to you shortly.

You may fine the below posts interesting:

Boot And Install Windows 7 from USB Flash Drive (Pen Drive)

Install Windows XP Virtual PC in Windows 7 Using VMware Player

Windows 7 Activation Online

Moderate and Reply to Comments on WordPress Blog From Your Desktop

Moderating Comments in your Blog is also another workload for bloggers with the increase of spammers and spam comments everywhere. Yes you would have installed plugins to block spam comments. But some of the comments may slip in anytime. Or if the comment is offensive or is violating your policies you need to spam or remove those comments manually.

Another Important thing is that if you want to reply to a comment, then it will take no time and the commenter who needs a reply will be quite impressed if you reply as soon as it is commented.

The overhead of finding the comments one by one and moderating them is a big headache. Now in order to help you solve this problem, WordPress presents the Desktop Comment Notifies for Windows. Just install and configure your blog settings, the comments will be notified in your desktop as soon as it is posted.

Try this exciting Desktop Comment Notifier by WordPress and help yourself to regulate, all the comments live.

To start Download WordPress Comment Notifier from the link below:

Download WP Comment Notifier

Size: 3.30 MB

File: wp-comments-notifier-setup.0.11.exe

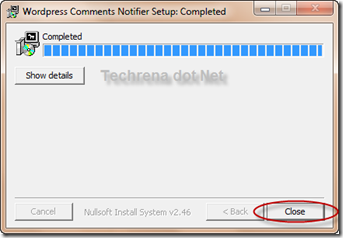
After downloading, Install it on your PC:

Wordpress_Comments_notifier

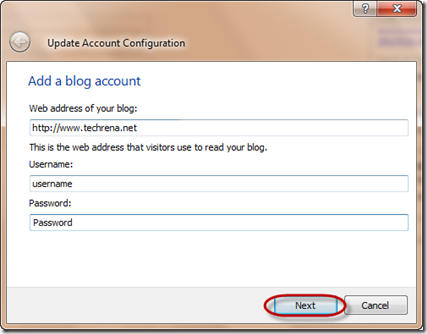
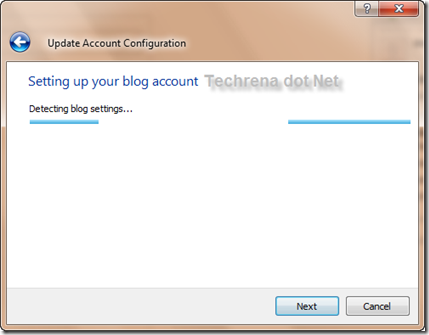
Open wp-notifier and Update your Blog settings. Enter your blog URL, Username and Password. Do not forget to put http://

Update_Blog_Account

Detect_blog_Settings

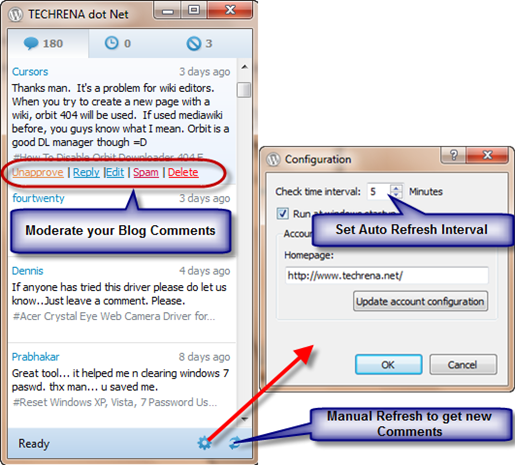
After successful Configuration you can see the Comments on your Blog. you can approve or unapprove, delete, spam, reply, edit a comment. You can set the frequency which it updates the Comments list from your blog. The Frequency is 5mins by default.

Moderate_Wordpress_Comments_from_Desktop

Now you can easily monitor all the comments you are getting live.

Saving YouTube Videos From Temp File To Your Hard Drive

You must be knowing that whenever you open a webpage, the data in the page would be first stored in your computer’s windows internet cache temporary folder and later retrieved from there.This is true in case of YouTube also.

So whenever you open a YouTube video and let it to stream fully, it will be saved in your Windows temp folders as “flaXXX.tmp” file.So now our hack will be using this concept to save YouTube (or any flash content based streaming site for that matter) directly on your hard drive without needing to install any extensions in your browser.

The Process:

1 Step 1: Go to windows temp folder from the following path:

for Windows vista/ Windows 7:

C:\>Users\>User Name\>AppData\>Local\>Temp\

2 Step 2: As said earlier, the temporary flash files would generally be of the format flaXXX.tmp.In my case the required filename is flaDEBD.tmp.This file contains the flash content from YouTube video that you have just allowed to stream fully.

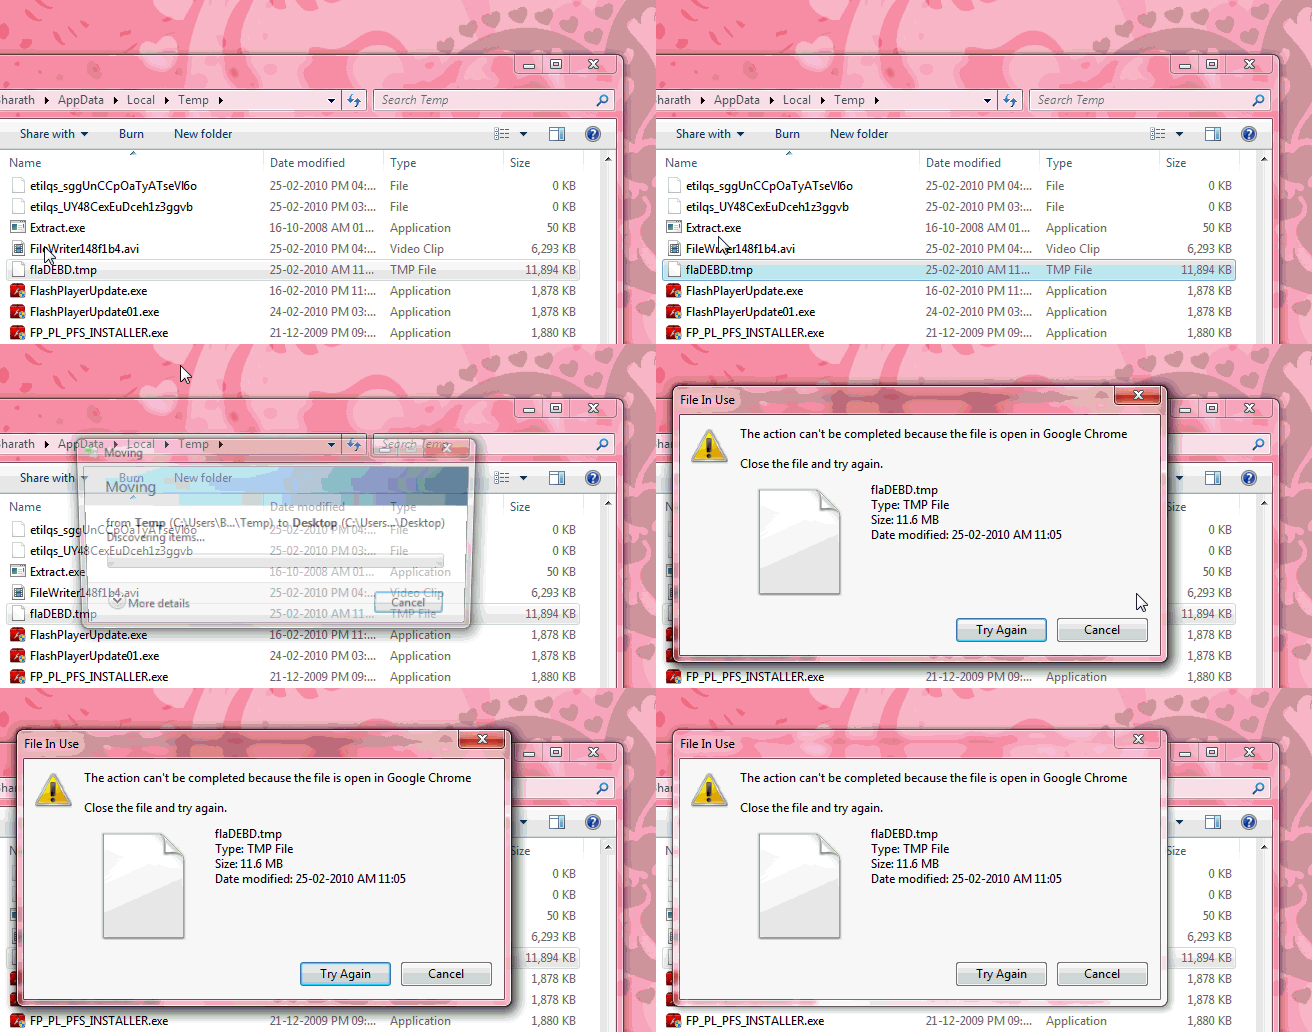
3 Step 3: This is the temp file that we are looking for.If we can copy it to some other location on your PC and rename it as *.flv file, our headache is over, but unfortunately Windows doesn’t allow you to copy a temporary file that is already in use by another application like browser for instance.

The following animated image would reflect the same situation.

Can't copy file

4 Step 4: Luckily we have a free open source program called HoboCopy that makes this copying process easier for us.Download the zip file and place HoboCopy.exe in your C:\ drive (or in any directory from where you can actually run this exe file through command prompt).

5 Step 5: Now open Administrator command prompt (Windows XP users can make type cmd in the run prompt but Windows Vista and Windows 7 users have to run cmd.exe using “Run as administrator” from the menu, you can actually figure out the difference between normal command prompt and Administrator command prompt, the window name starts with the word “Administrator” as you can see from the below screen shots.

6 Step 6: Go to C:\ and type the following commands (assuming that you have placed HoboCopy.exe in your “C” drive).

Pass the target file name that you want to copy like flaXXX.tmp at the end of the command.

C:\>hobocopy C:>Users>User Name>AppData>Local>Temp\ G:>FLV-Video> flaXXX.tmp

Replace “User Name” with your Windows administrator user name and “flaXXX.tmp” with your actual target file. In my case  the User Name is “Bharath” and the target filename is flaDEBD.tmp

C:\>hobocopy C:\Users\User Name\AppData\Local\Temp\ G:\FLV-Video\ flaDEBD.tmp

Command prompt hobocopy

Wait till the file gets copied to your target destination.

Copying windows temp file using hobocopy to another folder

7Step 7: Now that your required temporary file copied to another folder, you can change it’s extension from “.tmp” to “.flv” so that it can be opened by any player that supports FLV format files.

Temp File copying in Chrome using hobocopy

Download HoboCopy [Sourceforge.net]

Note:

1.The browser I have used here is Google Chrome, you can also refer to our guide on how to download YouTube videos in Google Chrome using greasemonkey scripts.Also make sure that you don’t use Internet explorer 6 for watching YouTube videos.

2.The above whole process has been done in my system which is running Windows 7.The procedure still remains the same for Windows Vista and Windows XP even though there may be changes in the location of Windows Temporary files.

3.HoboCopy actually intended for backing up entire folder(s).But here we are limiting it to just one file by passing the file name argument at the end of the syntax (flaDEBD.tmp in the above pics).So if you do not pass the file name at the end of the syntax, the entire temp folder gets backed up.

Restore Previous Versions of Files in Windows 7 Using System Restore

One of the exciting features in Windows 7 is that we can restore deleted files using the Windows System Restore.  If you ever delete an important file or a document unintentionally then this feature of Windows 7 is going to help you in every ways.

Windows 7 copies the image of your files everyday or when a restore point creation is triggered. This service is known as  the volume shadow copy service. The Previous Version feature is available in all editions of Windows 7.

Windows 7 logo

Now to restore your files or to explore this feature, just follow the easy steps below.

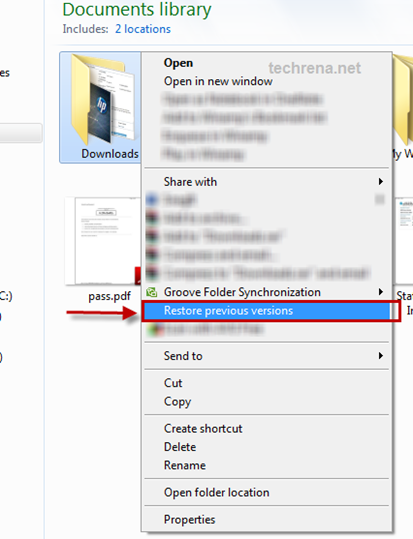
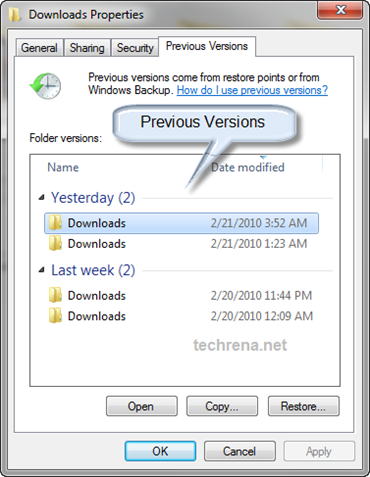
Step 1: Find out the Previous Versions of the files available. In order to do this, right click on the folder where your files are present and select Restore previous versions. All available versions of the folder is shown where the content of the folder will be Yesterday’s or Last week’s and so on.

Restore Previous Versions in Windows 7

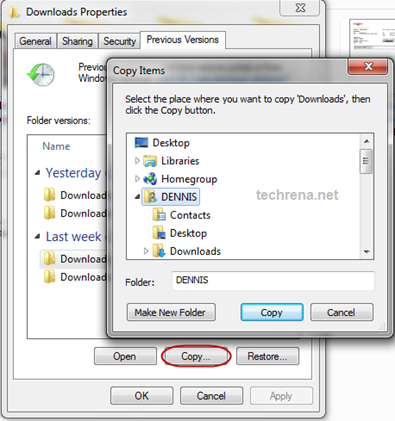
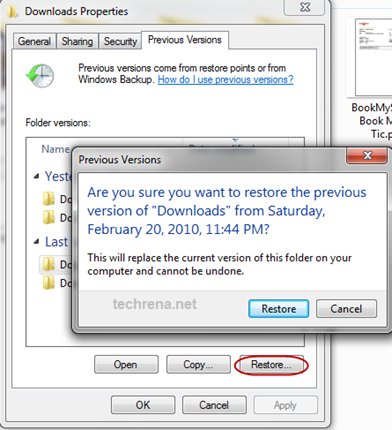
Step 2: Select which operation you need: Open, Copy or Restore. You can see three buttons Open, Copy, and Restore.

Restore Previous Versions in Windows 7

Open: Select the folder on the particular day or date which you want to open and click on Open. It will show you the files present in that folder on that day. You can simply copy the particular file you want.

Copy: Copy lets you copy the whole folder on the particular day to a different location. This will be useful if you do not want to disturb the current files present in the folder. Select the destination of the files to be copied.

Restore Previous Versions in Windows 7

Restore: This option will restore the files to the day which you have selected. It will be useful if you want to restore the folder exactly same as on the selected day. This can be used for restoring source files of an installed software which you had changed erroneously.

Restore Previous Versions in Windows 7

Now you have learnt how to restore deleted files and folders in Windows 7. I hope it was an easy one.

Note:

1. This feature is available in all versions of Windows 7.

2. If you want to have restore points of the files and folders for longer duration, you have to increase the size of the Disk Usage Space for System Restore in System Restore Properties. Follow:

My Computer—> System properties—>System protection—>Configure…—>Max usage

3. Restore Previous Versions feature will not support for Disk Drives, libraries and external drives(including the folders present in the external drives).

Vancouver Winter Olympics 2010 Wallpapers

Winter Olympics 2010 are underway in Vancouver and here’s a way you can get the Olympics feel right on your desktop.

Vancouver Olympics team has released official wallpapers for 2010 Winter Olympics.There are 3 wallpapers available in total.

All the wallpapers are available in the Vancouver Winter Olympics official site www.vancouver2010.com.

The wallpapers are available for 4 different screen resolutions 1024 x 768; 1280 x 1024; 1600 x 1200; 1600 x 1050

Desk Flags Vanccouver 2010

1024 x 768
1280 x 1024
1600 x 1200
1600 x 1050 (wide)

vancouver 2010_desk_group_thumb

1024 x 768
1280 x 1024
1600 x 1200
1600 x 1050 (wide)

vancouver 2010 winter olympic_games_desk_sports_thumb

1024 x 768
1280 x 1024
1600 x 1200
1600 x 1050 (wide)

Windows Activation Technologies Update To Detect Pirated Copies Of Windows 7

Windows Activation Technologies(WAT) is set to release a new Update for Windows 7 which will detect Pirated Windows 7 copies activated using the different Cracks and Activators available. This update (KB971033) is said to be released today at www.microsoft.com/genuine and from 17th Feb it will be available at Microsoft Download Center.

windows 7 logo

Windows Activation Technologies formerly known as Windows Genuine Advantage (WGA) will run this anti-piracy program using this Windows Update. This update will reach Windows 7 Home, Premium,Professional,  Ultimate, and Enterprise users.

According to the Genuine Windows Blog, this update will be voluntary which means, users can choose whether to install this update or not when it appears in the update list.

After installing this update, it will check for the validity of the certificates and keys in your Windows 7 installation. If found to be non-genuine, the notifications built into Windows 7 will inform the user that Windows is not genuine by displaying dialog boxes with options for the user to either get more information, or acquire genuine Windows. The desktop wallpaper will be switched to a plain desktop.

But this time Microsoft has assured that the customer will see no reduced functionality in their copy of Windows which is fount to be non-genuine.  The Update will run periodic validations (initially every 90 days).

Install Windows 7 using Microsoft USB/DVD Download Tool

We have already discussed the Installation of Windows 7 from a USB Device without using any external software. The technique we used was easy, but now a days people want automation. Just install a program, let the program handle everything. No headache, no worries. As this is the current trend, we are sharing this fully automated method of making a bootable USB device for installing Windows 7 using the Microsoft Windows 7 USB/DVD Download tool.

But we need to download a software from Microsoft store for this method. In case, if you don’t want to download any software, you can use this technique:

Install Windows 7 or Vista Using Bootable USB Disk Drive

Now to start, check the requirements and then follow the steps below.

Requirements:

1. A USB Drive of minimum 4GB space

2. Windows 7 installation ISO file

Step 1: Download Windows 7 USB/DVD Download tool from the Microsoft store

Link: Click here to download Windows 7 USB/DVD Download Tool

Password: techrena.net

Size: 2.6 MB

Step 2: Install the tool in your computer.

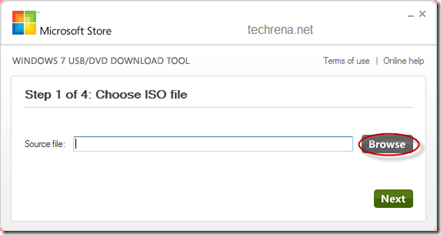
Step 3: Connect your USB Flash Drive or Pendrive. Open the program. Click on Browse to select the ISO file.

Microsoft Windows 7 USB/DVD Download tool

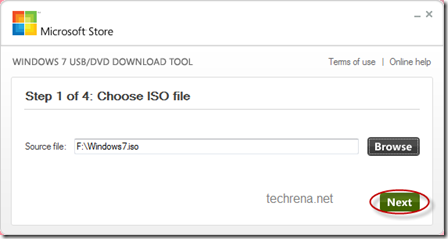
Step 4: Select the proper Windows 7 ISO file and click Open. Then Click Next.

Microsoft Windows 7 USB/DVD Download tool

Microsoft Windows 7 USB/DVD Download tool

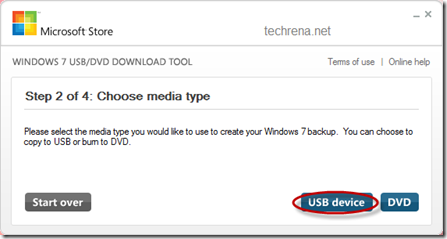
Step 5: Now Click On USB device. If you want to burn the ISO to a DVD, you can select the DVD mode.

Microsoft Windows 7 USB/DVD Download tool

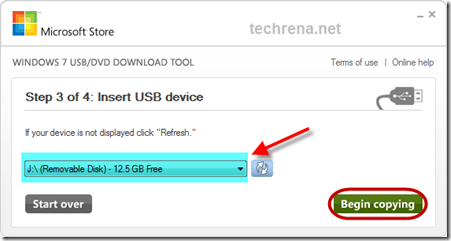
Step 6: Select the correct USB device from the drop down menu. If your Device is not seen in the menu, connect it properly and then press the refresh button which is present right next to the menu. After selection, Click on Begin copying. Note that, this will process format your USB Device. All unsaved data will be lost.

Microsoft Windows 7 USB/DVD Download tool

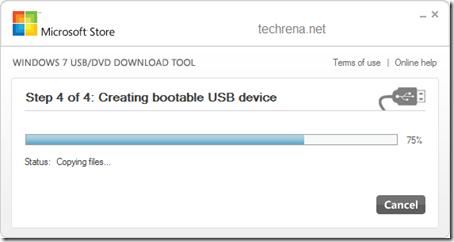
Step 7: Now the tool will make your USB disk drive Bootable and then copy the files to it. After completion of the process, you can use the USB device for installing Windows 7.

Microsoft Windows 7 USB/DVD Download tool

Note:

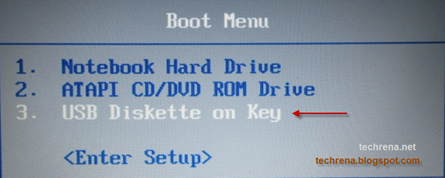
1. To start the installation you need to boot from your USB device. In order to boot from your flash drive, you have to change the boot menu. Many computers have DELETE, F10, F2, F12, ESC keys as Boot menu key (the boot menu key information is usually displayed during Start Up). In the boot menu Select USB Diskette on Key and boot it from the USB.

Windows 7 install from usb

Now the Windows 7 installation will boot,  follow the instructions to install.

2. If you do not have the ISO file or if you have only the DVD or the installation files in your hard drive, then you cannot use this tool, you need to follow the technique given here: Install Windows 7 or Vista Using Bootable USB Disk Drive

3. Windows 7 USB/DVD Download tool is a property of Microsoft. It is intended to be used according to the terms and conditions provided by Microsoft Corporation. Techrena is not responsible for any kind of misuse of this product.