Motorola Milestone Available In India @ MRP Rs 32,990

motorola logo

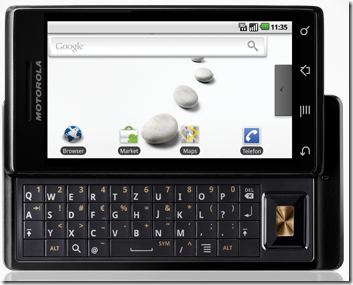
Motorola Milestone, high-end Android 2.1 powered 3G touchscreen  phone is now available in India.This also has a thinnest 13.7 mm QWERTY slider (has the tag “The world’s thinnest QWERTY slider”).Also has a 5 Megapixel camera with a flash, and with DVD-quality video recording capability.With built-in GPS enhanced with MOTONAV turn-by-turn directions.Motorola Milestone uses data from satellite as well as from cell tower for navigation.You can also install variety of applications available in Android market.

The phone is currently under pre launch booking, dispatch of this product will start from March 30, 2010.

Pictures:
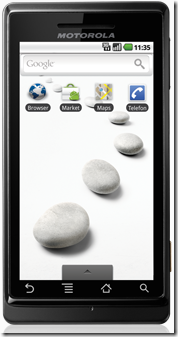
motorola milestone android

motorola milestone android slide view

Specifications:

Review these tech specs before you buy :

Processor 600 Mhz ARM Cortex A8 processor
Operating System Android 2.1 Operating system
Display TFT (Touch screen)
Size 60.00 x 115.80 x 13.70 mm
Display : 3.7"; WVGA (480 x 854 pixels); 16:9 widescreen; PPI 267
Camera 5 Megapixel
4x digital zoom
Memory Internal: 133 MB
External : Up to 32 GB expandable memory
Talk time Up to 6 hours 30 mins talk-time
350 hours stand-by time
Network 3G: WCDMA/900/2100, GSM 850/900/1800/1900, HSPA, GPRS Class 12, WiFi
Connectivity Stereo Bluetooth® Technology v2.1
WiFi
A-GPS
Micro USB 2.0
3.5 mm headset jack
Applications Digital Compass,
Accelerometer sensor,
Proximity sensor,
GOOGLE MAIL™
GOOGLE SEARCH™
GOOGLE TALK™
Battery Type 1400 mAh Li Ion

See full technical specifications at this page

Price:

Motorola Milestone Android phone’s price in India has been fixed at Rs. 32,990.

UK : £379.99

USA : $524.54 (Amazon)

Buy Online:

Indian users can buy this great phone with free shipping & 11% discount at futurebazaar page (@ Rs. 29,500 only)

You can also read about Motorola’s Android phone QUENCH

Nokia India Offering Free Extended 1 Year Warranty For Purchases Till April 13, 2010

Well, folks if you are planning to buy a brand new Nokia E-series or N-series phones in the near future, here is a one good reason why you should prepone your purchase plan !!

Nokia India is offering free extended 1 year warranty (worth Rs. 1,414) for all new Nokia E-Series and N-Series devices purchased during the period March 13, 2010 to April 13, 2010 at no extra cost.

Through this offer, according to Nokia website:

After your Nokia Limited Warranty expires, you can receive repair and support for an additional 12 months – from set-up to help with new features to repair options.

nokia care extended warranty offer

So now you can get a awesome 24 months warranty for your Nokia N-Series or E-Series device as opposed to usual 12 months warranty.

Please do note that You can ONLY avail this offer at Nokia Priority Dealers (you can find nearest priority dealer here)

Via Nokia India official release

Update: Offer expired

[How-To] Find Suspicious Activity In Your Gmail Account

Gmail is the popular mail service that is being used by huge number of users worldwide.Google (Gmail) always warns users about keeping a stronger password for their Google account, since if the hijacker manages to get your Gmail password, he can virtually access all the Google services associated to that account.

The point to make note here is that the mail services are the most hugely attacked services by the Hijackers/ hackers around the internet.So it is all our responsibility to ensure more safety to it by setting up a stronger password and not revealing this password anywhere else and to anyone else.

But sometimes, your account gets hijacked even without your notice and all your private data gets exposed.Well, they always say “Prevention is better than cure” which aptly sits here.

If your account gets hacked, there won’t be much details available so as to find who the real culprit is.However, Gmail team has come up with an option to display though which agent your account has been accessed (ex: browser), along with the country from where it was accessed (IP address with country name).

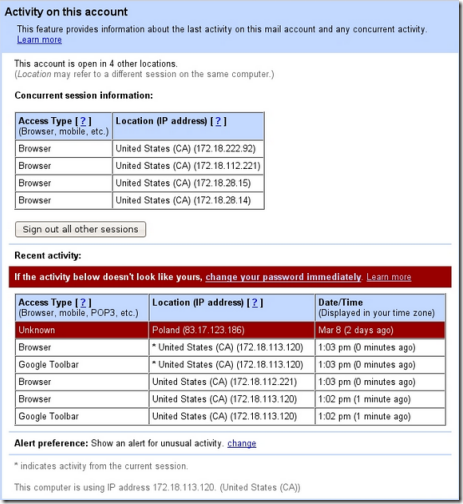
To see from where your Gmail account has been accessed in the recent few days, go to bottom of your Gmail inbox, where you can find “Last account activity” section.Click on the “Details” link to see IP addresses of the computers from where your account has been accessed.

gmail last access details

If Gmail finds any unusual/suspicious activity in your account (meaning that somebody is illegally accessing your account possibly accessing from a country where you have never been !!) it warns you change your password immediately (see the screenshots below).

gmail suspicious activity warning

So if you are at anytime concerned over your Gmail account being hijacked by someone, probably this is the first thing you should do : Open the recent activity details accessible from the bottom of your Gmail page and check out for any suspicious access of your account.

How many of you have seen “Suspicious activity” alerts in your Gmail ? Let us know through comments..

Wish Us: Techrena.net Turns 1 !!

Techrena dot Net has completed one year of providing solutions and updates successfully on 27th March, 2010. We have helped more than a million visitors to Techrena dot Net in a span of only 1 year. We are dedicated to provide quality solutions which are thoroughly tested before posting them. Moreover, we also provide technical updates and reviews and we will be providing relevant information only.

We have celebrated this special day in our style.We have visited a renowned orphanage “Sphoorti Foundation” located in the outskirts of Hyderabad (see in map)and had a wonderful time with the little kids over there.

The top 10 posts in Techrena dot Net are given below. These posts have helped a lot of our visitors and many feedbacks and queries has been solved. We want visitor satisfaction and to help as far as we can.
1. Reset Windows XP, Vista, 7 Password Using USB Drive or CD

In this post we have described one of the easiest methods available to reset your Windows password. This excellent solution is applicable to Windows XP, Vista And Windows 7 which resets your windows password in a matter of 5 minutes. You can even use a bootable USB drive to reset the Password. Till date it has helped 56550 visitors.

2. Enable Hide Inactive Icons Tray Using Registry in Windows

The hide Inactive icons feature in the taskbar may not work sometimes. You can enable this feature using the registry editor of Windows. A full detailed post with screen shots, which has helped 63305 visitors till now.

3. Install Windows XP from USB Disk Drive

This post explains how to use a USB drive to install Windows XP. This post is one of the most helpful posts to the netbook users who want to install Windows XP without the CD drive. Till date it has helped 40580 visitors and its still counting.

4. Change MAC Address or Physical Address Using Registry Editor (regedit) in Windows

Some of us may use a tool to change the MAC address of your Network Adapter which is completely unnecessary. You can easily change the MAC Address using the Windows registry editor. This is explained in this post which has 18175 visitors already.

5. Enable GreaseMonkey User Scripts in Google Chrome

Enabling GreaseMonkey user scripts in Google Chrome was a difficult one before Chrome officially supported user scripts.The post gives in detail how you can enable GreaseMonkey in your Chrome Browser. This post helped 14495 of its visitors.

6. Swapping Blogger blog title and post title -Blogger SEO tweak

If you want SEO in blogger than this is a must. You need to swap your post title ant blog title because in Blogger by default the blog title will come first. Here we have written how to do this in full detail. This has helped 7751 bloggers till now.

7. Hide Most Visited Sites from New Tab in Google Chrome in Easy Steps

Google Chrome Most visited sites is very useful. But before when Chrome did not have the facility to remove the most Visited sites, it was difficult to manage the privacy of the users. The post tells you how to hide the most visited sites and has helped 7313 visitors.

8. Create Shutdown Shortcut for Windows XP, Vista, Windows 7 on Desktop

Have you ever thought of creating a shortcut on your desktop for shutting down your Windows PC? We have explained the process of creating a Shutdown Shortcut here. This post has helped 6097 of its readers.

9. Exporting Gmail contacts to another Gmail account

It will be a headache for you to copy all the contacts you have in your Gmail account to another one. you can do the process automatically by just exporting and importing the contacts from one account to another. This has been Explained here. 4970 visitors has been helped by this post.

10. Saving YouTube Videos From Temp File To Your Hard Drive

When you stream a YouTube video, you may want to save a copy of the Video in your PC. You can do it by reading this post. This recent post has already helped 544 readers.

We at Techrena dot Net [techrena.net] will proudly offer our  help to anyone those who really need it very  much in technical context. We have given the contacts below:

Bharath, Founder, Editor-in-chief & Chief Admin : bharath[at]techrena[dot]net

Dennis, Co-founder, Editor, & Admin : dennis[at]techrena[dot]net

Or you can leave a comment below. You are free to contact us any time.

Adding Your Feed Subscriptions Windows 7 Feed Headlines Sidebar Gadget

If you are using either Windows 7 or Windows Vista, you might be knowing about a desktop sidebar widget called “Feed Headlines”.By default this gadget will show pre-loaded RSS feeds from various popular news and other websites like MSN, CNN etc.,.But have you ever thought about controlling these feeds adding your own feed subscriptions from your favorite RSS feed reader instead ??

That would be great, right? Here we are going to show how to setup your “Feed Headlines” gadget to show feeds from your feed subscriptions (using OPML file) :

Pre-requisite: An OPML file exported from your RSS feed reader

Step 1: Open your Internet Explorer (possibly Internet explorer 8), find a button called “Favorites” and click on it to expand its options.

favorites button in internet explorer

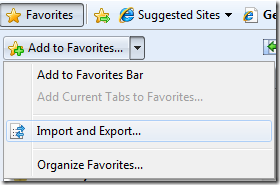
Step 2:  As shown in the following screen shot, find “Import and Export” option from the menu.

import export favorites in internet explorer

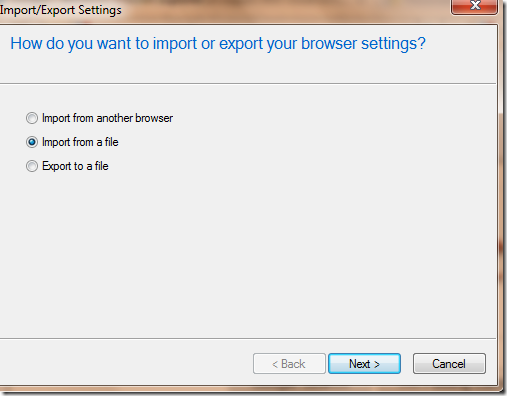
Step 3: Choose the option “Import from a file” in the next window.

import export favorites settings in internet explorer

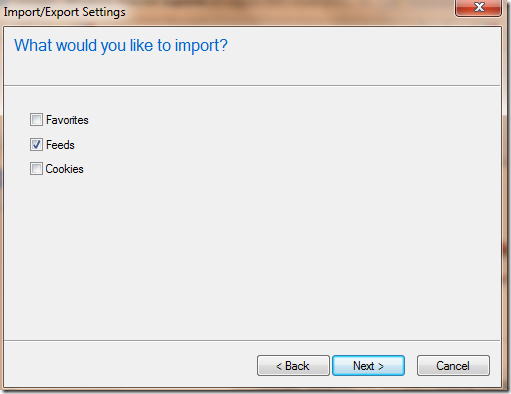
Step 4:  In the next step, you will be asked “What would you like to import? ”, select the option “Feeds”.

Import/Export settings in Favorites settings

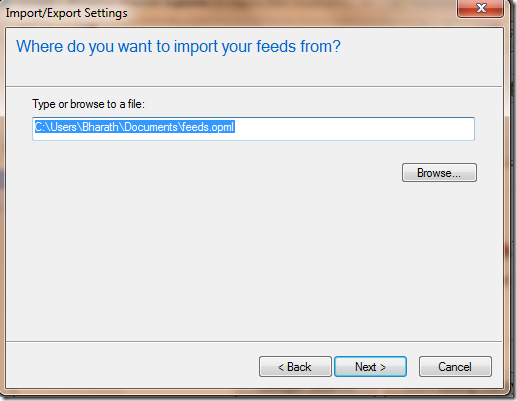
Step 5:   Now locate the “OPML” file that you have got from your favorite feed reader.(Read the guide to export as OPML from feed readers).

importing_feeds_internet_explorer_favorites

Step 6: Select a destination folder for your imported feeds and click “Next”.

selecting destination folder for feeds import ie favorites

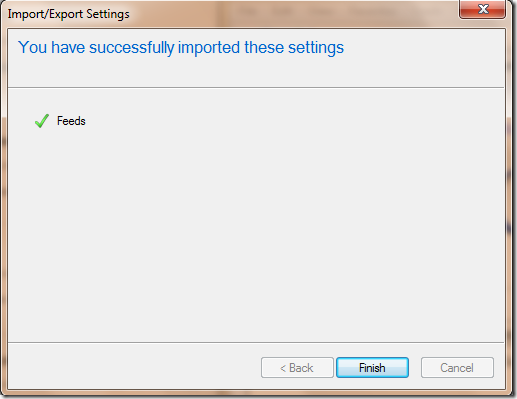
Step 7: Now you have successfully imported your feed subscriptions from a feed reader.

feeds successfully imported to internet explorer favorites

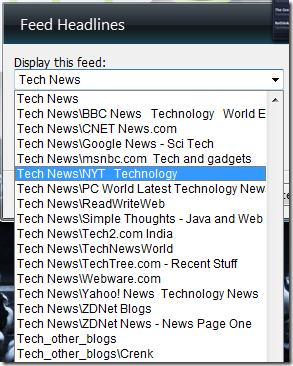
Step 8: Go to your Feed Headlines gadget and choose the feed subscriptions folders from which you want your gadget to display feeds.

Feed Headlines gadget choose feed folders

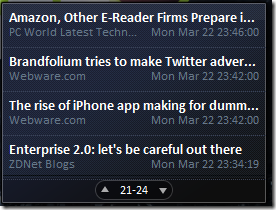
That’s it from the settings side, now go check your feed headlines gadget, which is supposed to show feeds as shown here in the following screen shot.

Feed Headlines Sidebar gadget

This is a simple and straight forward process.However if you face any difficulties while doing this, let me know through your comments.

How To Turn On or Off System Restore In Windows PC

Windows logo

System Restore is a feature of Windows Operating Systems namely Windows 7, Vista and XP. This feature in Windows enables you to restore or rollback your system to a position in an earlier time. Windows automatically creates restore points to back up the program files, registry and system data whenever you install a new software, driver or make any changes in the system settings. You can restore the system to the restore points saved earlier if anything goes wrong in future. You can also create the restore points manually.

The only problem in System Restore is that it occupies a lot of disk space, as it has to save a lot of restore information in your system. This system restore information is stored in System Volume Information. You may be confused that all the data in your drive is showing lesser usage then the actual amount of disk usage. This is due to the System Restore Files present in the inaccessible folder System Volume Information. You can open this folder by taking Ownership in windows 7 or Vista.

Now, if you feel that System Restore is not necessary or if you want to free up disk space by deleting the earlier Restore points then refer the details below.

Open System Properties:

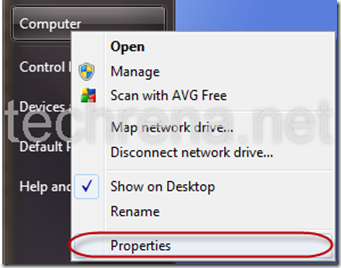
Open Start Menu, Right click on My Computer (in XP) or Computer (In Windows 7) and Select Properties

my_computer_properties

Open System Restore or System Protection:

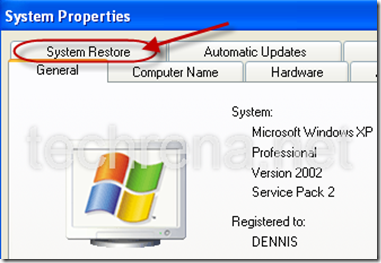
If you are using Windows XP, then Go to System Restore Tab.

system_properties

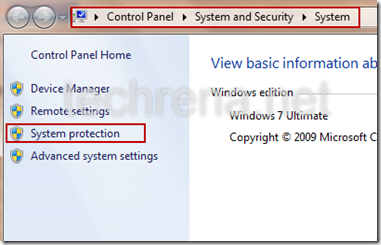
If you are Using Windows 7, Click on System protection in the left pane.

system_properties_7

Turn off or delete system restore points in Windows XP:

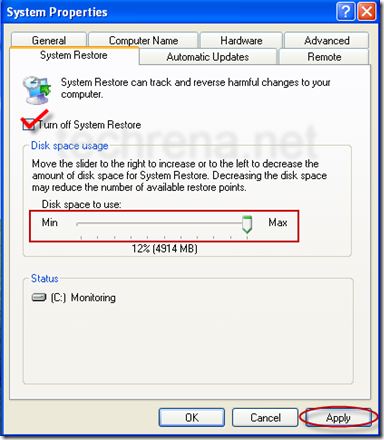
You can see the System Restore Options. Here you can change the amount of Disk space to be used for System Restore.

If you want to delete the System Restore Data then, check Turn off  System Restore and click Apply. It will delete all the related data and turn off your System Restore. Now the disk space has been freed up.

Note: If you only want to delete the system restore data but don’t want to turn off System restore then, don’t forget to turn it back on by unchecking the checkbox and applying again.

system_restore_xp

turn_off_restore_confirm_xp

Turn off or delete system restore points in Windows 7:

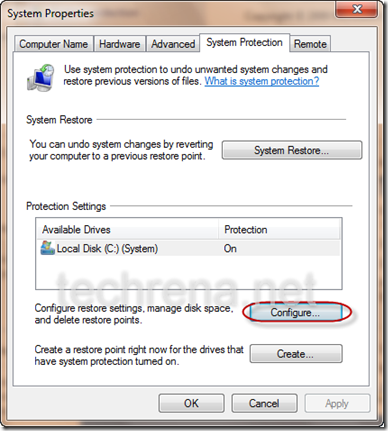
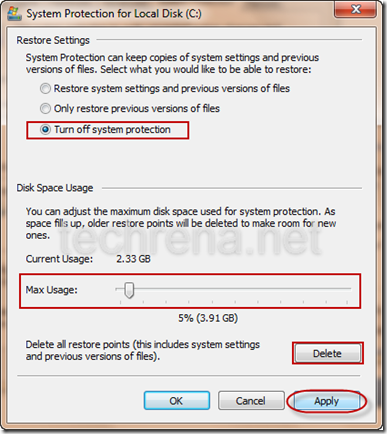
In the System Protection tab, click on Configure.

system_protection_7

It will open System Protection for your disk. You can change Maximum Disk space Usage for System Restore. You can delete the system restore points to free up the disk. Or you can turn off the System Protection feature completely in your Windows 7 PC.

turn_off_restore

If you Click on delete it will ask for confirmation as follows. Then it will delete the restore points. Deleting the System Restore points will not Turn off System Restore in Windows 7.

confirm_delete_restore_point

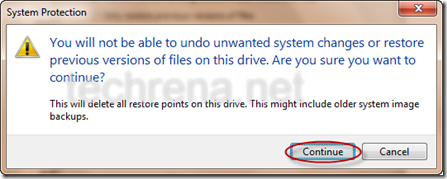
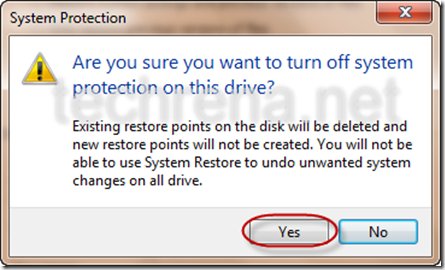
If you select Turn off System protection and click on apply, it will ask for the confirmation given below and Turn off your restore. This will also delete all your current restore points.

turn_off_restore_confirm

You can turn On the system Restore anytime by Selecting Restore system settings and previous version of files and clicking Apply.

In Windows 7 there is an option for restoring the previous version fo files or deleted files in a folder. To know more, refer the post: How to Restore Previous Versions of Files in Windows 7 Using System Restore.

Important:

1. The given procedure will also work for Windows Vista.

2. It is not recommended to Turn off or Disable System Restore in your Windows PC.

3. If you are deleting all the System Restore Points, then you will not be able to restore the system to any earlier point of time.

BlackBerry Storm2 9520 Now Available In India

blackberry logo

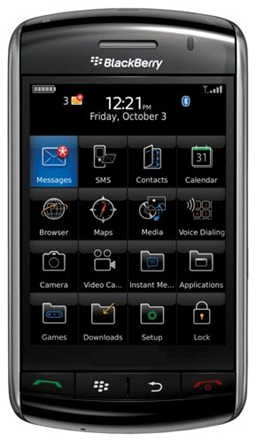
BlackBerry Storm 2 is now officially available in India. The Wi-Fi enabled Blackberry Storm2 9520 is now included in the Blackberry India website.

The BlackBerry Storm2 Smartphone runs on BlackBerry OS Version 5. This handheld device is completely made for the professionals with features like Corporate Data Access.  Storm2 features the BlackBerry Enterprise Server 5 for secure connection, remote file sharing and easy data access for its users.

blackberry storm2

A complete view of the Full Specifications and detailed features is given below:


Feature


Description

Camera 3.2 MP camera
Flash
Auto-focus
2x digital zoom
Image stabilization
Dimensions Height: 4.43 inches (112.5 mm)
Width: 2.45 inches (62.2 mm)
Depth: 0.55 inches (13.95 mm)
Weight:  160 grams
Network Quad-band: 850/900/1800/1900 MHz GSM®/GPRS/EDGE networks
Single-band: 2100 MHz UMTS/HSPA networks
Dual-band: 800/1900/ MHz CDMA/Ev-DO Rev A networks
Operating System BlackBerry OS 5
Memory 2 GB Embedded Multimedia Card
256 MB Flash Memory Included
Display High resolution 480 x 360 pixel color display
3.25” (diagonally measured)
Transmissive TFT LCD
Supports over 65,000 colors
Dynamic hardware brightness control
Input and Navigation Navigation: SurePress™ touch screen
On screen keyboard: portrait SureType®, QWERTY and multi-tap, landscape QWERTY, portrait QWERTY
Dedicated keys: Send, End, Menu, Escape, Left/right convenience keys (default voice activated dialing and camera), 2X Volume/Zoom, Power/Lock, Mute
GPS Integrated
GPS with assisted-GPS capabilities
Music 3.5mm stereo jack, Plays MP3, AAC, AAC+, eAAC+, WMA, WMA ProPlus
Connectivity Wi-Fi: 802.11b/g, 802.11d, 802.11i including EAP-TLS, PEAP, EAP-TTLS/MS-CHAPv2, PEAPv0/MS-CHAPv2,PEAPv1/EAP-GTC Bluetooth: Bluetooth v2.1+EDR1 with Stereo audio (A2DP/AVCRP)
Security Password protection and Screen lock
Battery and Talk Time Standby time: GSM: 12.7 days (305 hours), UMTS: 11.7 days (280 hours), CDMA: 11.2 days (270 hours)
Talk Time: GSM: 5 hours, UMTS: 6
hours, CDMA: 5.5 hours
Battery: 1400 mAhr removable/rechargeable cryptographic Lithium cell

blackberry storm 2

The BlackBerry Storm2 is now available in all leading mobile stores in India at a price of  Rs 31990 (INR)

Samsung Wave S8500 Smartphone Specifications and Price

samsung logo

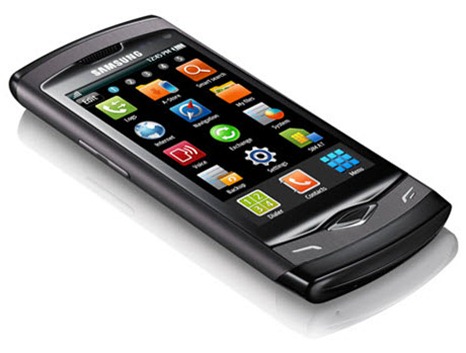
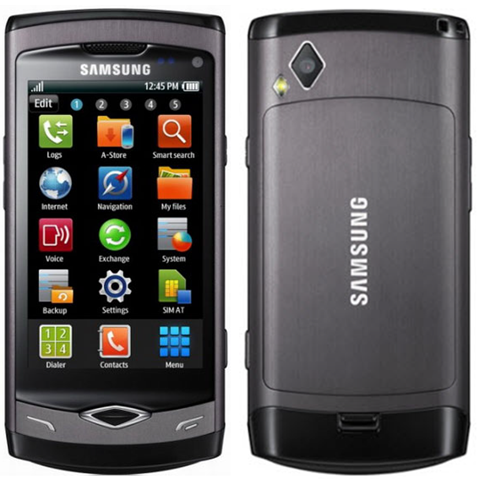
Samsung Wave S8500 is a much awaited Smartphone among the consumers which was unveiled at the Mobile World Congress last month.  The handset is powered with the Samsung’s Bada Operating System.

One of the feature this phone boast is the 3.3 inches WVGA Super AMOLED display. Powered by a 1Ghz processor, Samsung Wave S8500 has 3G Connectivity, 5 megapixel camera with HD Video recording,  TouchWiz 3.0 UI, Wi-Fi, Bluetooth 3.0, Virtual 5.1 surround sound and many more.

samsung wave

Full Specification of the Samsung Wave S8500 with Super AMOLED Smart Phone is given below:


Feature


Description

Camera Primary Camera 5 MP, 2592 x 1944 pixels, autofocus, LED flash, Geo-tagging, face, smile and blink detection
Video Recording 720p at 30fps, continuous autofocus, video light
Secondary Camera Included
Network 2G GSM 850 / 900 / 1800 / 1900
3G HSDPA 900 / 2100
Display Super AMOLED capacitive touchscreen, 16M colors
Size 480 x 800 pixels, 3.3 inches Multi-touch input, Accelerometer sensor for UI auto-rotate, Proximity sensor for auto turn-off, Scratch-resistant surface, TouchWiz UI 3.0, Handwriting recognition, Smart unlock
Dimension 118 x 56 x 10.9 mm
Weight 118 grams
Music MP3/WAV/WMA/eAAC jackDNSe (Digital Natural Sound Engine) 3.5 mm audio jack Stereo FM radio with RDS and FM recording
Connectivity GPRS    Class 10 (4+1/3+2 slots), 32 – 48 kbps
EDGE    Class 10, 236.8 kbps
3G    HSDPA at 7.2 Mbps, HSUPA at 2 Mbps Wi-Fi 802.11 b/g/n
Bluetooth v3.0 with A2DP
microUSB v2.0
Operating System Bada OS
Processor ARM Cortex A8 1GHz
Memory Internal 2GB / 8GB
External microSD (TransFlash) up to 32GB
Video Formats MP4/H.263/H.264/WMV/Xvid/DivX
Battery Li-Ion 1500 mAh
GPS Yes with A-GPS
Messaging SMS, MMS, Email, Push Email, Palringo IM
Browser WAP 2.0/xHTML, HTML
Colors Available Black

samsung wave s8500

Samsung S8500 Wave is expected to be released world wide in May this year. The Handset is already available for pre-order in Amazon Germany for 429 Euro (580 US dollars). But some of the retailers are offering a lower price of 379 Euro in Germany with a shipping date somewhere in May mid. The expected price is around Rs 26000 INR in India.

[How-To] Exporting Your RSS Reader[Google Reader & Other] Feed Subscriptions As OPML File

OPML logo

This isn’t our conventional ‘How-To’ article, but still some readers who are just beginners of RSS feed readers/ aggregators may want to know these little things about importing/ exporting feeds in OPML format.

OPML stands for Outline Processor Markup Language.This is now being used for exchanging list of web feeds between various web feed aggregators.In this small tutorial, we are going to explain how exactly this importing and exporting via OPML is done.

Importing / exporting feeds in Google Reader:

Login to your Google reader account.Click on “Reader settings” on the top right corner of your window.

reader settings

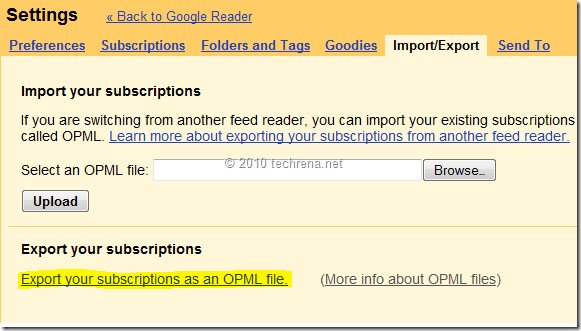
Navigate to “Import/Export” tab under settings

export reader subscriptions OPML file

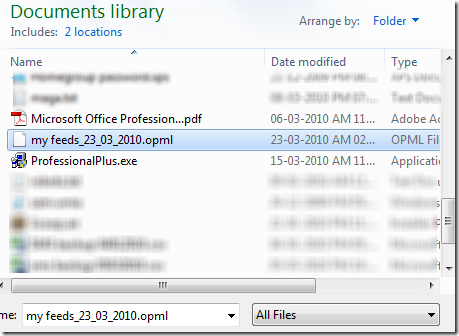
save_as_opml_file

Now here you can find options to export your subscriptions as an OPML file or import your existing subscriptions OPML file.Isn’t it simple ??

FeedDemon & RSS Bandit :

FeedDemon is the popular RSS feed aggregator for desktops which supports synchronization with Google Reader.

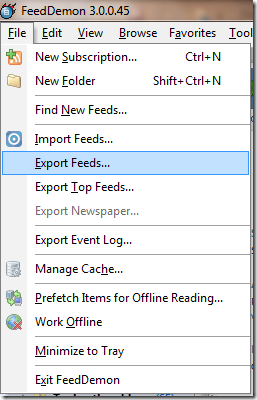
Importing and exporting feed subscriptions as OPML files is a lot easier in these readers.You can directly access “Import Feeds/ Export Feeds” options under “File” menu.

feeddemon feed import export OPML file

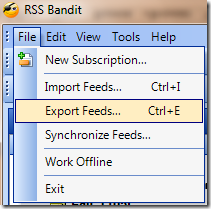
Similarly in Rss Bandit, you can Import Feed or Export feeds from the “File” menu,or suing shortcuts Ctrl + I or Ctrl + E.
Rss Bandit feeds import export

Is your operating system is Windows 7/Windows Vista? If so, you can use “Feed Headlines” gadget show feeds from your feed subscriptions.Stay tuned to this blog to know how to do it.

Google.cn Is Over, Redirects To Google.com.hk (Hong Kong)

This is breaking news coming right from the G-folks : Google has decided to redirect Google’s Chinese web users of Google.cn to its Hong Kong site Google.com.hk starting from today.

This has been posted in Google’s official blog.

earlier today we stopped censoring our search services—Google Search, Google News, and Google Images—on Google.cn. Users visiting Google.cn are now being redirected to Google.com.hk, where we are offering uncensored search in simplified Chinese, specifically designed for users in mainland China and delivered via our servers in Hong Kong.

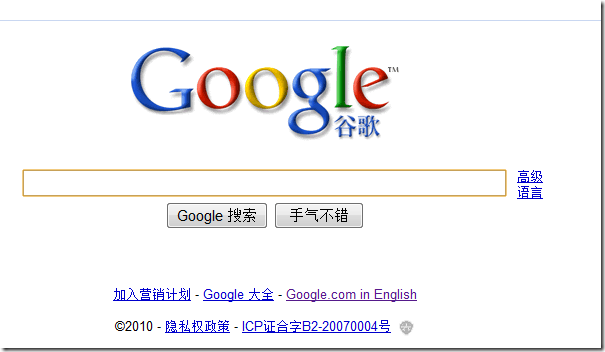
This is the Google.cn’s cached page as seen from Bing’s cache.

Google.cn china bing cached version

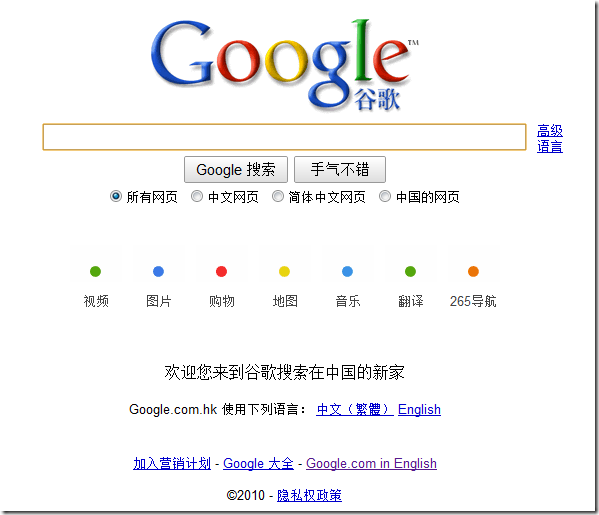
This is the new Google.com.hk site where the Google.cn users being redirected:

Google.com.hk hong kong site

Also Google is predicting that at any moment, the Chinese government may stop access to its services.

We very much hope that the Chinese government respects our decision, though we are well aware that it could at any time block access to our services.

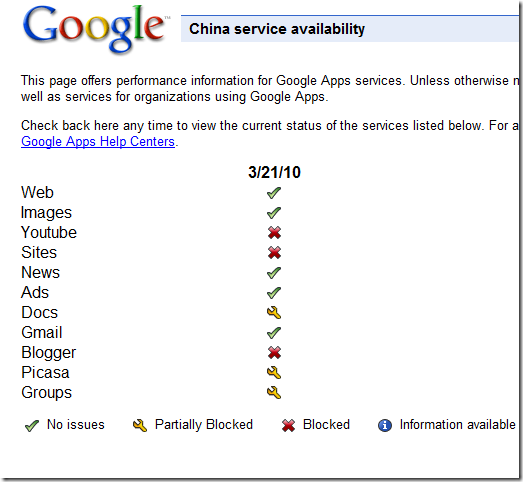
Hence to keep its users notified about any blockage of Google’s services, it has set up a new web page (China service availability), where one can see the status report of various Google’s app services.

Google china service availability

Google is also worrying about the safety of its employees in China, which is clear fro this statement:

Finally, we would like to make clear that all these decisions have been driven and implemented by our executives in the United States, and that none of our employees in China can, or should, be held responsible for them.