Install Windows XP Mode Without Hardware-Assisted Virtualization (HAV)

Windows XP and Windows7

Microsoft has announced a small but significant update to its own “Windows XP Mode” (or Windows Virtual PC), a feature that has been incorporated in Windows 7 to let the users of this new operating system take advantages of the older applications that still require Windows XP, by running them inside “Windows XP Mode”.Until now, this XP Mode has only been supported by processors having virtualization technology known has Hardware-Assisted Virtualization (HAV).

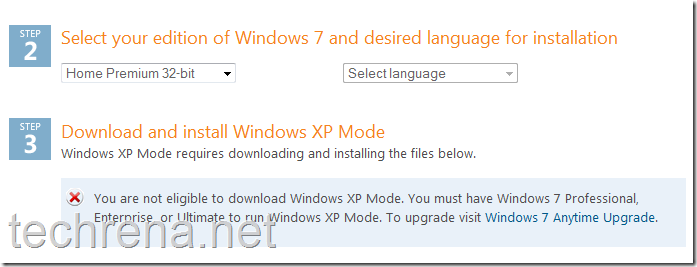
However, Windows XP Mode works only on Windows 7 Professional Enterprise, or Ultimate versions of Windows 7.

This update has been announced in Windows 7 blog, also they have made clear that Windows XP Mode will continue to make use of Intel VT and AMD-V like hardware virtualization technologies.

Windows XP Mode will no longer require hardware virtualization technology to run. This change makes it extremely easy for businesses to use Windows XP Mode to address any application incompatibility roadblocks they might have in migrating to Windows 7.

To install Windows XP mode in your PC with Windows 7 Professional or higher version, download the update from here (update KB977206 ).

Windows 7 Home users need not worry about the lack of support for their OS, as there are hacks available over the internet to install Windows XP mode in Windows 7 Home PCs (Home Basic and Home Premium) too.Hopefully we’ll cover one such hack in the upcoming posts.So stay tuned and subscribe to this blog’s RSS feeds.

Windows XP Mode download Not Eligibe

Tip: You can use VMware player to install Windows XP Mode in any computer running Windows 7.

How To Disable Recent Items in Windows 7 Start Menu

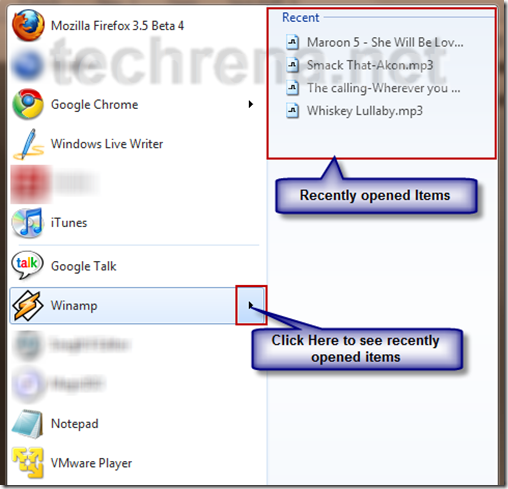
In windows 7, we can see recent items which you have opened using a specific program. This property in Windows 7 is a very good one. We can find our favorite files to be opened using a program in the start menu itself.

But, for some people it can be a trouble to their privacy. When we share a Windows 7 computer, others can easily see what files or even the programs which were opened recently by the previous user. In this case some of us may want to stop this feature from saving the recently open items or programs.

For example, I have opened some MP3 files using the Winamp player. So, if other people see then, they will come to know that these songs are some of my favorites . If I want to hide this then I need to disable this Recent items feature. This is just an example, it is more serious in case if you are handling sensitive data.

recent items start menu

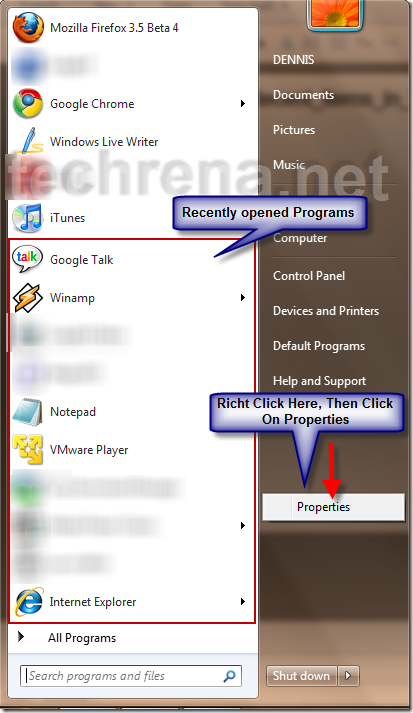
You can see the recently opened programs also. You can even hide the recently open programs if you want.

Just follow the two steps below.

Step 1: Open Start Menu. On the right pane of the menu, Right Click. Click on Properties. See the Screen Shot Below.

recent programs start menu

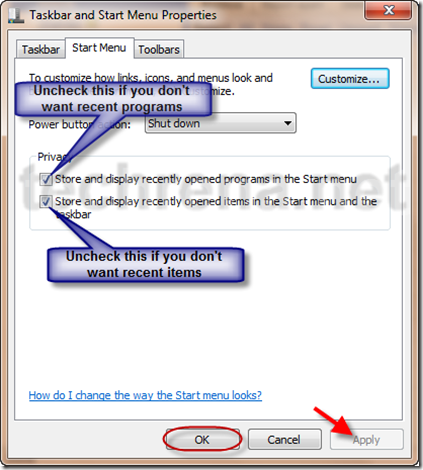
Step 2: In the Taskbar and Start menu Properties, Uncheck the features you want to disable. If you don’t want to show recently open items then Uncheck it and Click on Apply then OK.

start menu properties

Note that you may not want to disable recent programs feature as it is very useful.

So you can customize your settings according to your needs and privacy. If you need any help in any of such Windows 7 features, just leave your query in the comment.

How To Speed Up Your Windows PC Using MSCONFIG

In Windows system configuration is done using MSCONFIG. MSCONFIG is very useful to the Windows users to configure their system properties. We can configure all the system properties from boot up, startup till services to be run in your computer. A properly configured system will have optimal performance and proper memory usage.

This tutorial is about Speeding up your PC and increasing the performance level by removing unnecessary programs from startup and stopping unused services. By doing these things you can see the difference in startup time and the amount of physical memory used and even CPU usage.

This guide consists of two main parts:

1. Removing unnecessary programs from startup.

2. Stopping unused or rarely used services in your system.

Please note that this tutorial is just a guide. You need to analyze properly by yourself which programs or services to be stopped, which are required and which are not required.

We will start with the first one:

Removing unnecessary programs from startup

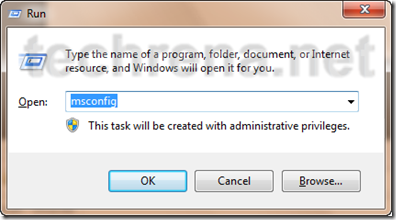
Step 1: Open System Configuration. Press Start + R, Type msconfig and click OK.

run_msconfig

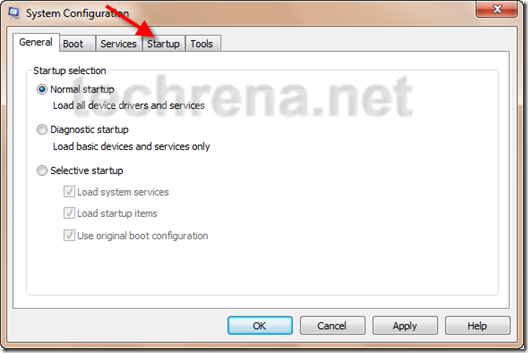
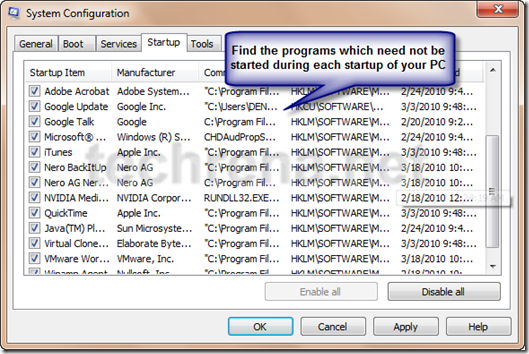
Step 2: You can see the General Tab in Systems Configuration. Go to Startup Tab.

msconfig_home

msconfig_startup

You need to study the requirement of the programs, whether you need to start them during startup or not. You need to start your Virus Protection programs compulsorily. Remove any program which doesn’t have a proper description and which you do not know the functionality of the program. IF you know some programs which you rarely use, you can remove them as well. Do not forget to remove any suspicious program which may be a virus.

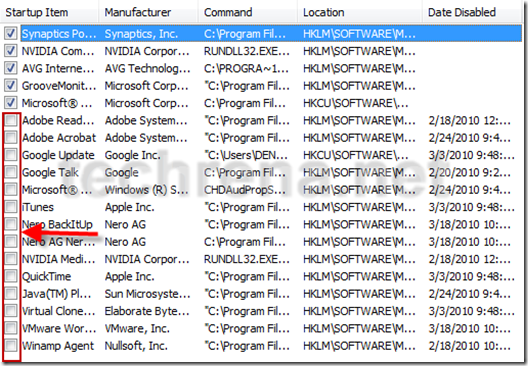
Step 3: After the analysis, uncheck the programs which you need not start during the startup of your computer.

msconfig_startup_programs

Now you have successfully configured your startup programs according to your needs.

Stopping unused or rarely used services in your system.

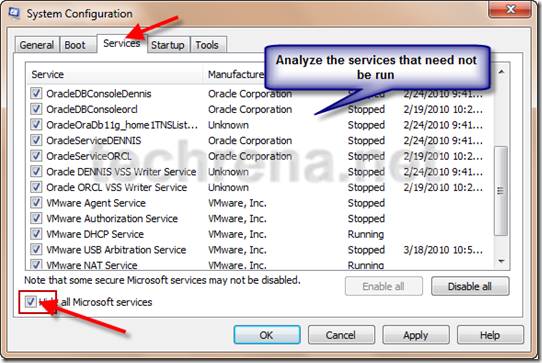
Step 1: Go to the Services tab. There you can see the various services which can run in your system. Again you need to analyze which services are not used or which are rarely used and not required.

msconfig_services_tab

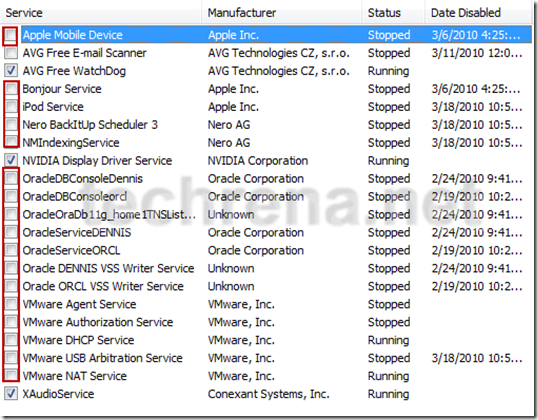
For example, I use the Oracle Database and VMware very rarely, but both of them are huge services which takes a lot of resources in the CPU and Memory. So, i choose not to start them. As I stopped these services then my Oracle Database and VMware will fail to run. So whenever I want to use any of these programs I will go to msconfig and check to start these services again. Then restart the computer and run the program. So keep in mind that you stop the services only which you rarely use.

Step 2: After detail study and analysis, you can stop the services by unchecking them in msconfig.

msconfig_services

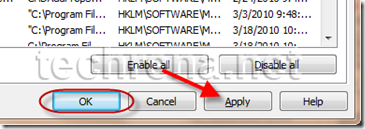
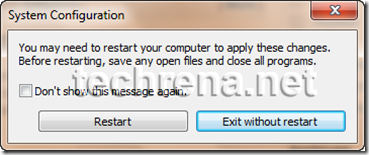
Finally you can Click Apply and OK, which will ask for restart. You need to restart if you want the changes you have made to be applied.

msconfig_apply_ok

msconfig_restart_exit

Important: Please note that removing a Program from startup and Stopping a service is very different. The Startup programs can be manually started, but services are not programs which can be run. Services are required to run the Programs installed in your computer. When a program which requires a services is started, only then the program’s service will be started For example, if VMware Player is started, then VMware services will also be started. But some essential services are always running in the system. Services which have been stopped by you cannot be started manually. Only by re including it in the starting services using msconfig, and upon restarting the system, the services can be started again by its programs.

You can definitely see the decrease in startup time and increase in performance of your system after applying the changes you have made using msconfig. If you have any doubt please leave a comment.

PS: The programs or services which I have removed from startup as shown above  need not be same as yours. It all depends upon your needs.

Disable Annoying “This Program Might Not Have Installed Correctly” Alerts

Windows logo

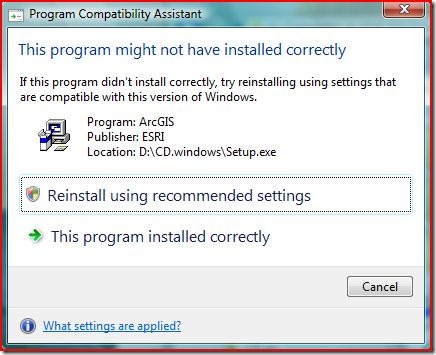
Program Compatibility Assistant is a service first introduced in Windows Vista and being continued in Windows 7.This service is intended to notify users when an installed program has some compatibility issues with the current operating system.Hence we see frequent Program Compatibility Assistant messages “This Program might not have installed correctly”.

If you install programs frequently (particularly when you install old versions of the programs) then you might be sick of these dialogue boxes and may want to disable these notifications.

This program might not have installed correctly error in Windows vista and Windows 7

There alerts are caused by a service called Program Compatibility Assistant (PCA) Service or PcaSVC in short.So stopping this windows service forever by changing the startup type to “Disabled” should serve the purpose.Follow these simple steps :

1. Press Windows + R button to start WIndows Run command.Type “services.msc” in the filed and click “ok”.

windows_run_command_services.msc

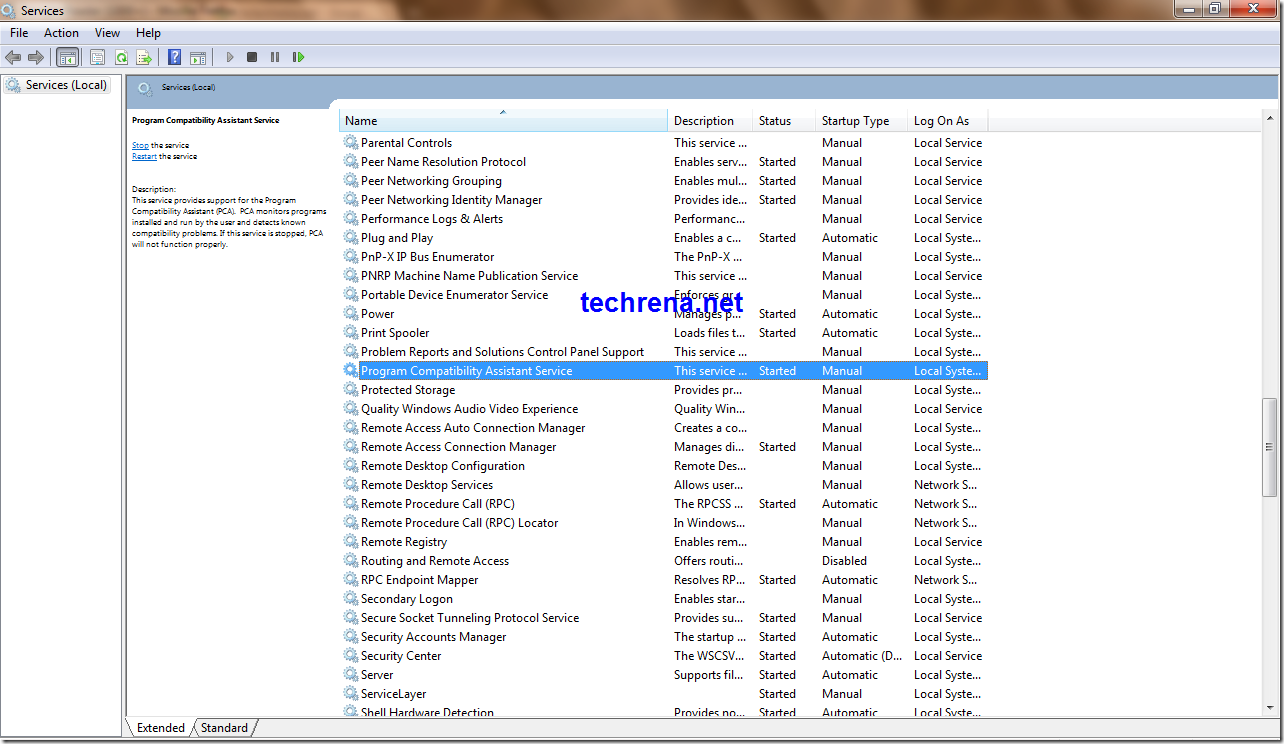
2. The Services window opens up.Find the service called “Program Compatibility Assistant Service” in the list.

Program Compatibility Assistant Service In Windows Services

Right click on the Program Compatibility Service and choose “properties” from the menu.

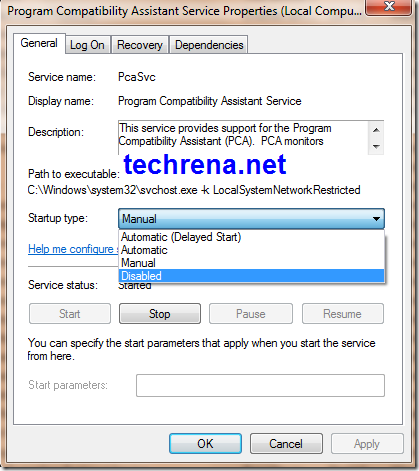
3. In the properties dialogue box, change the startup type to “Disabled” and click “Ok” to save the settings.

Program Compatibility Assistant Service Properties Window

It is that simple !! Now you have disabled the PCA service and no more annoying Program compatibility alerts for you.

Complete Tutorial: How To Disable Windows Error Reporting In Windows 7 ?

Microsoft Windows 7 Official Logo

Windows Error Reporting (WER), a technology (previously known as Dr. Watson),developed by Microsoft lets you report post-error debug information to the developer of the particular application that has just crashed or stopped responding.Windows Error Reporting has been introduced as a Windows service from Windows XP and is being continued in the later versions Windows Vista and Windows 7.By default, this Error Reporting service will be started automatically.

However for some reasons like you may get annoyed by frequent error reporting alerts or for privacy concerns etc., you may want to disable or stop Error Reporting in your Windows operating system (here it is Windows 7).If you are not sure how to stop Error Reporting in Windows 7, please do follow the steps outlined below:

Method-1: Using Action Center

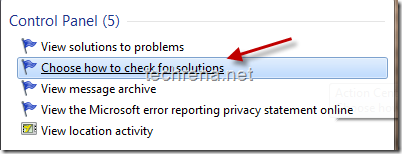
1.Type “wer” in the Start menu search bar.Check the results obtained for this search in control panel (refer to the screen shots).

type wer in start menu

start menu search choose how to check solutions

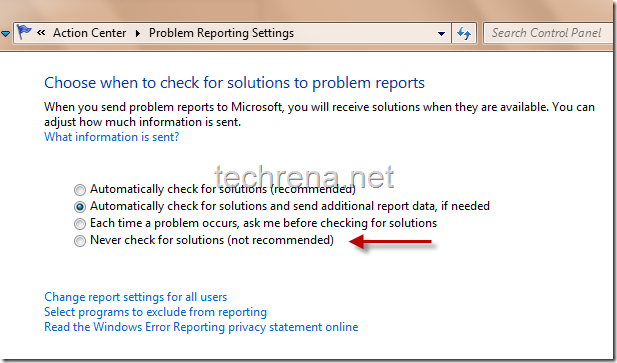
2.Click on the “Choose how to check for solutions” item in the search results.It will open up the “Problem Reporting Settings” under Windows Action Center.
problem reporting settings action center windows7

3. By default the first or second option (“Automatically check for solutions”) will be selected by your Windows.If you want Error reporting to be disabled, select the last option “Never check for solutions” for completely disabling it or select the third option “Each time a problem occurs, ask me before checking for solutions” for moderating the error reporting alerts.Click “Ok” button down the window once you have selected your option.

Method-2: Disabling WER service

Windows Error Reporting Service function:

“Allows errors to be reported when programs stop working or responding and allows existing solutions to be delivered. Also allows logs to be generated for diagnostic and repair services. If this service is stopped, error reporting might not work correctly and results of diagnostic services and repairs might not be displayed.”

We’ll try to achieve the same previous settings result but this time via disabling the Windows Error Reporting(WER) service.To do this, follow..

1. Press Windows button + R to open the Windows Run command.Type “services.msc” in the run command bar and hit ‘OK’.
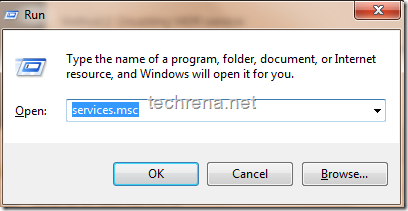
windows run command services.msc

2. It will open up Services window, where you can see list of all the services that are currently available on your Windows.Find “Windows Error Reporting Service” in this list.
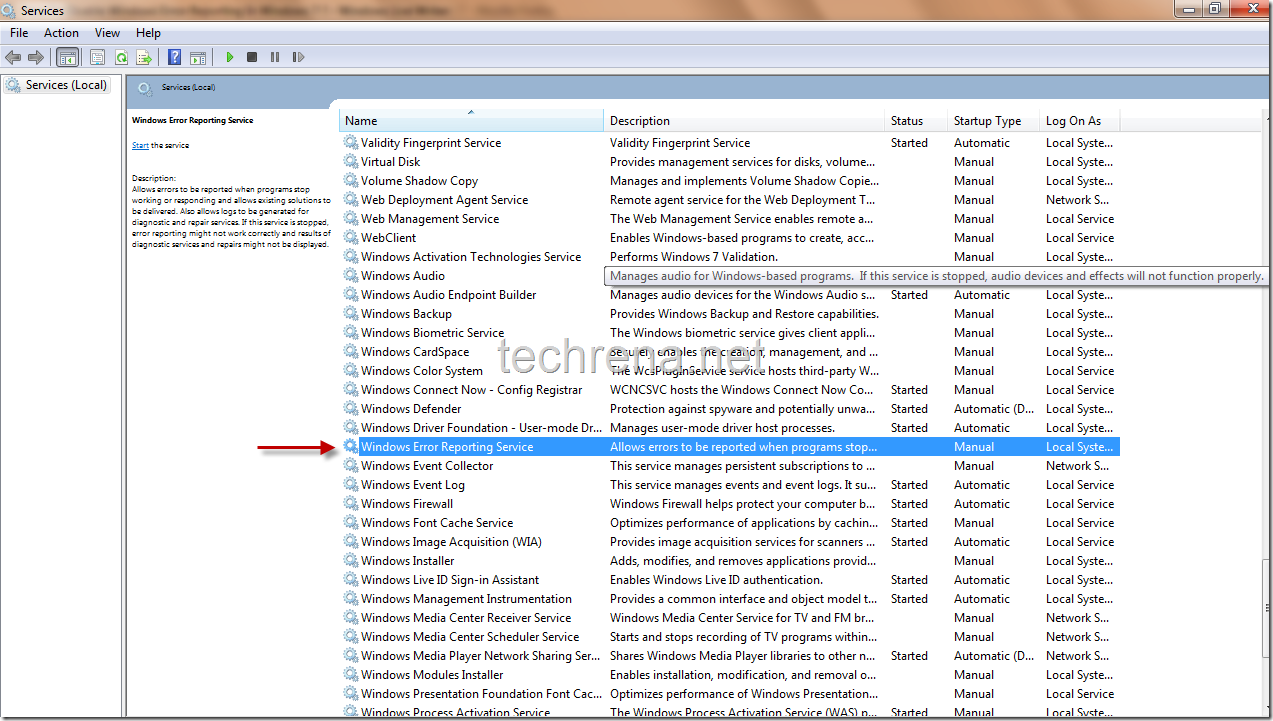
Windows Error Reporting Service

3. Right click on the Windows Error Reporting Service and choose “Properties’ that should open a new properties window.The startup type will be either in “Automatic” or “Manual” by default.To completely disable the service choose “Disabled” and press ok.
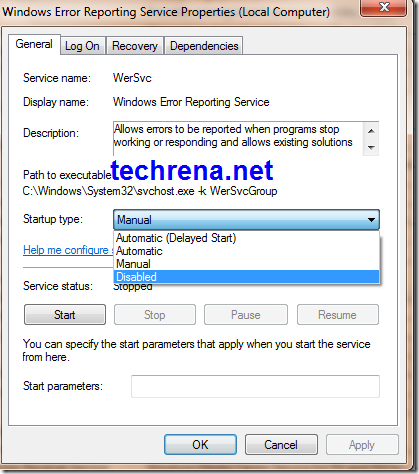
Windows Error Reporting Service Properties

That’s it, now you have disabled the Windows Error Reporting Service successfully.

Method–3: Using Registry Editor

Warning: Changing registry values without much knowledge will dump your entire Windows Operating system.Change them at YOUR OWN RISK.

1. Type Windows + R as in the previous case to open Windows run command.Type “regedit” in the command bar.
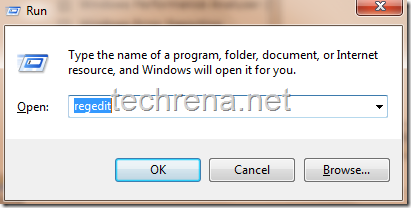
regedit run command

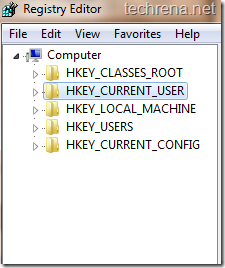
2.It will open up the Registry Editor window which will look like this.It contains three folders like navigable sub keys:

HKEY_CLASSES_ROOT ,

HKEY_CURRENT_USER,

HKEY_LOCAL_MACHINE,

HKEY_USERS,

HKEY_CURRENT_CONFIG.
Registry editor windows 7

HKEY_CURRENT_USER is the one we want.Click on it to expand the sub registry key.

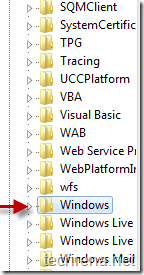
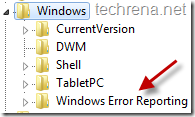
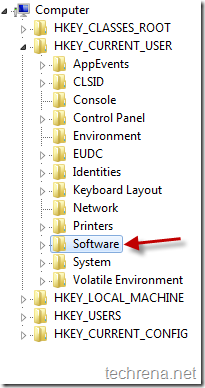
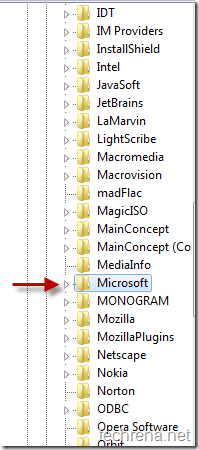
3. Navigate to HKEY_CURRENT_USER\Software\Microsoft\Windows\Windows Error Reporting sub key using the following screen shots carefully.
regedit HKCU navigation

regedit HKCU navigation 2 regedit HKCU navigation_3

regedit_HKCU_Windows_Windows_Error_Reporting_key

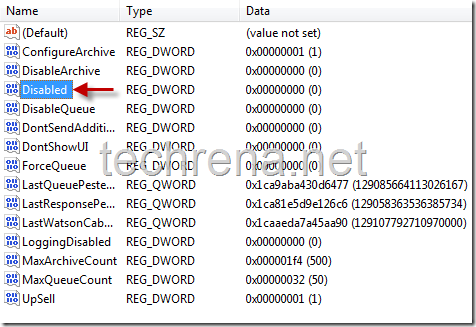
4. In the Dword list, find the registry entry by name “Disabled” (highlighted in the screen shot).By default the Date value of this dword will be “0” meaning that it is enabled.
Disabled dword in WER subkey

Right click on the “Disabled” DWORD and choose “Modify”.In the value data filed, change its value to “1” instead of “0”.Click on to reflect the changes.

Now you have successfully disabled WER.


You may also want to read our previous guides on A-Z of Installing Windows 7, Installing Windows 7 on USB stick, Activating Windows 7, Resetting Windows 7 password (when you forget it and unable to retrieve it), Creating desktop shutdown shortcut in Windows 7,Enabling GOD mode in Windows 7, Partitioning hard disk in Windows 7 , Restoring previous versions of files in Windows 7, Install and Run Windows XP in Windows 7 Using VMware Player and much more..

Feel free to leave a comment here if you find problem somewhere in following these methods.
Amayeta SWF Encrypt 4.x Free License Key Giveaway

swf encrypt version 4.0

Amayeta SWF Encrypt is a popular Flash Actionscript Encryption tool to encrypt and protect Adobe Flash SWF files from various ActionScript decompilers and other hackers.The version of the software which we are talking about in this post is version 4.x (4.0 or later ).If you are interested in SEF Encrypt version 6.0, you may read the features listed below:

SWF Encrypt 6 features:

  • Encrypt, Obfuscate 7 Protect your Flash 6, 7, 8, 9 and 10 SWF Movies
  • Updated for Flash 10/CS4, Flex 2/3 and ActionScript 1/2/3
  • Dense Actionscript Obfuscation
  • No Actionscript Line Limit
  • Available for Windows & Mac OSX

Download SWF Encrypt 6.0 trial

Steps:

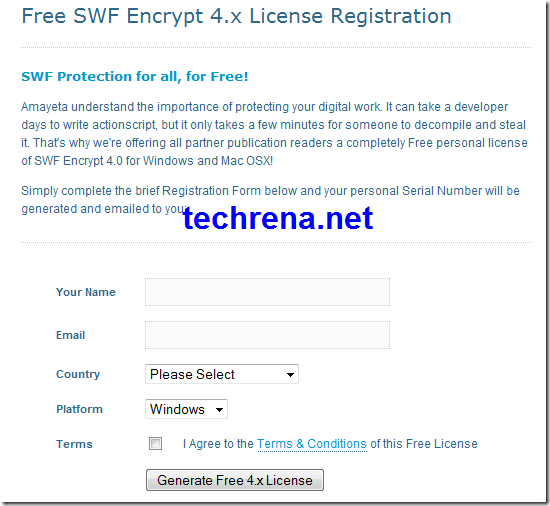
1.Visit Amayeta promotional offers page, enter your details in the registration form available in that page, select the platform as ‘Windows’  (See the screenshot below) and click ‘Generate Free 4.x License’ button.

SWF Encrypt registration page

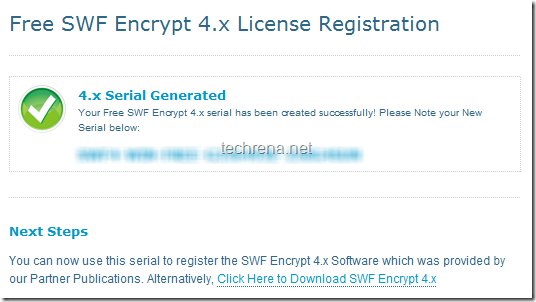
2.Now you will see your free SWF Encrypt 4.x License Registration serial (see the screenshot).Note down or copy the serial number and store it in a safe place for future reference.Then click on the link “Click Here to Download SWF Encrypt 4.x” just below your serial number.

SWF Encrypt Licence registartion

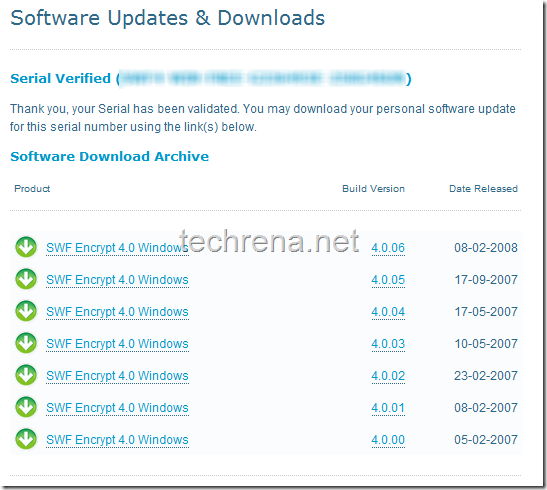
3.You’ll be now taken to download page, where you can see all variants of SWF Encrypt 4.0 version (SWF Encrypt 4.x in general).Download any version for example, you can download SWF Encrypt 4.0.06 from this direct link.

SWF Encrypt 4.0 download page

4.Install the downloaded file and enter the license key you have got.Enjoy the software !!

Google-Certified Ad Networks Made Available For All Publishers

adsense-logo

As a website publisher we always want more number of advertisers to compete for a slot in our website, the higher the competition the more beneficiary it would be for us.What if advertisers from different ad networks compete for a ad slot in your site ? It would be great, isn’t it ? Adsense , from now on will provide this platform.

Google Adsense has just announced the expansion of Google-certified third-party ad networks to all the Adsense publishers (which was initially available to the publishers in North America and Europe.

How To Allow / Block Google Certified Ad Networks In Adsense ?

allow-block-Google-certified-ad-networks

Google-certified-ad-networks-in-adsense

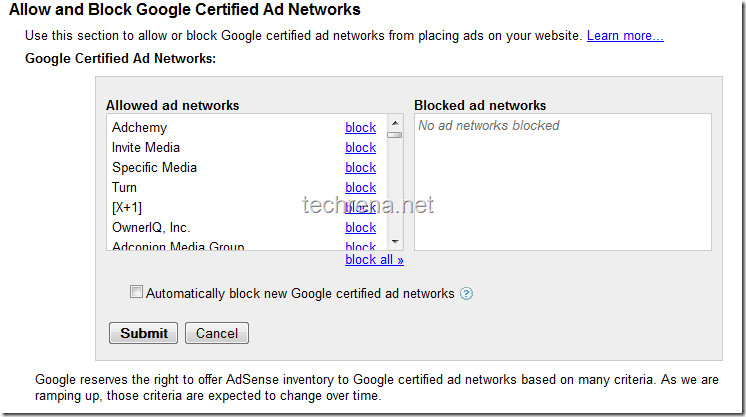
Just visit Ad Review Center under Adsense Setup tab in your Adsense, find this option Allow and Block Google Certified Ad Networks, and click “Change” to see the whole list of ad networks currently allowed for your website.You can find option to block each ad network individually or choose “block all” option to completely block all the ad networks.Check out the list of currently Google certified ad networks available.The list is huge but it will only get bigger as Google says that they are continually adding new ad networks which the publishers can see in their Ad review centre.

List of Google-certified ad networks currently supported in Adsense:

Adchemy
Invite Media
Specific Media
Turn
[X+1]
OwnerIQ, Inc.
Adconion Media Group
Adtegrity.com
AudienceScience Inc.
Dapper Inc.
Dedicated Media
FetchBack
LucidMedia
NetSeer Inc.
NextAction
QuinStreet, Inc.
ReTargeter
RichRelevance, Inc.
Teracent Corporation
ValueClick, Inc.
Aggregate Knowledge
Atrinsic
Brand.net
BrightRoll
Chitika
Collective Media
CPM Advisors, Inc
DataXu
Datran Media
Dotomi
Efficient Frontier, Inc.
InterCLICK
Media6Degrees
MediaMath
OpinMind
Quantcast Corporation
Rocket Fuel Inc.
Semantic Sugar, Inc.
Sooth Software Corporation (dba AdBuyer.com)
TellApart
Traffic Marketplace
Triggit
Acxiom Corporation
Advertise.com
Ad Pepper
AdReady
AOL Inc
Xtend Global Media LTD
Goodway Group
Innovation Interactive
Cyberplex, Inc
Didit
Announce Media
Media Innovation Group
VivaKi
AppNexus
Epic Advertising
AccountNow, Inc.
People Media, Inc
Bizo
EchoSearch
MaxPoint Interactive
Mpire
Pinnacle Dream Media
Pulse 360
Radius Marketing Inc.
Reply! Inc.
Criteo Europe
Criteo UK
Infectious Media
The Exchange Lab
Mixpo
Mexad
Adpepper Germany
ClickDistrict NL
DSNR
Hurra Germany
Criteo US
Cossette Communications
Pennyweb, Inc. (DBA Ybrant Digital)
Spongecell
OpenX Technologies
Red Aril, Inc.
Redux Media Inc.
ShareThis, Inc.
HTTPool
DQ&A
Mediaplex
Veremedia
ValueClick International Ltd
Struq Limited

Zemana AntiLogger 1.9.2.188 With 1 Year Full Version License Key Give Away

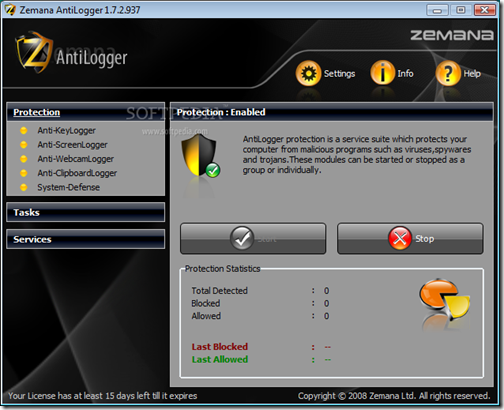
Zemana Anti-Logger basically provides protection against evil keyloggers and also deals with different kinds of malwares, protecting your net banking passwords, and your private chats and emails.

Zemana AntiLogger includes the following modules : Anti-SSL Logger, Anti-WebCam Logger and Anti-ClipBoard Logger

Zemana-AntiLogger-sshot1

Key features of Zemana AntiLogger

· Anti-SSL Logger Module that provides protection against SSL Logger
· Anti-WebCam Logger that provides protection against WebCam Logger
· Anti-Key Logger Module that provides protection against Key Logger
· Anti-Screen Logger that provides protection against Screen Logger
· Anti-Clipboard Logger that provides protection against ClipBoard Logger
· System Defence Module that protects your system

Zemana AnitLogger is now available as a free download with 1 year full license.If you purchase it, it would cost you $34 normally.But as part of promotional offer, Zemana is giving away full free 1 year Zemana AntiLogger license key that doesn’t require any registration, and doesn’t include hidden costs or bundles of third-party software.
How To Avail The Offer?

Just follow these simple steps:

Download Zemana AntiLogger (Free download, current version 1.9.2.188; AntiLogger_SOFTPEDIA_1.9.2.188.exe)

Install the Zemana program and restart your computer and follow the on-screen instructions for activating the product for 1 year full license

New Samsung S3370 Touchscreen Phone

S3370 is Samsung’s new entry-level touchscreen phone. Samsung will soon launch this new affordable touchscreen phone as the FCC has already approved it recently.

This handset is not a Corby family and will be released differently in a new category. As this handset is not yet announced we are not aware of its real feature.

Samsung Logo

Some of the known features are TouchWiz UI 2.8 inch QVGA touchscreen, Bluetooth and one main camera on is back. There are speculations that 3G will also be included in this phone.

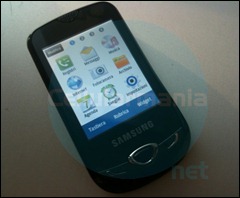
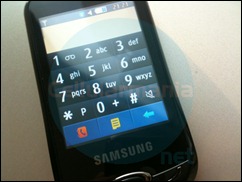
Some of the available photos of  Samsung S3370 are given below:

Samsung S3370

Samsung_S3370_1 Samsung_S3370_2

samsung_s3370_keySamsung S3370

There are no official announcements from Samsung for the release yet. The cost of the handset will be 99 Euros(Around 140$ USD) at maximum.

Source: cellularmania.net

How To Create An ISO Image File of Your Own

Sometimes we want to save a DVD or CD as a backup as the DVDs and CDs are always vulnerable to damages and scratches. We all know the lifetime of a Disc, whether it may be DVD or CD.

Making an ISO image files from a disc as a backup is a good method to save the data and store them lifelong. This is not the only reason for making an ISO file. We may save our own custom files in an ISO.

We need a tool to make our own ISO file. Lots of tools are available. Here we have used MagicISO for creating the ISO file. Follow the steps below:

Step 1: Download MagicISO from filehippo.com. Its a shareware.  Install it after download.

Download Link: Setup_MagicISO.exe

Size: 2.93 MB

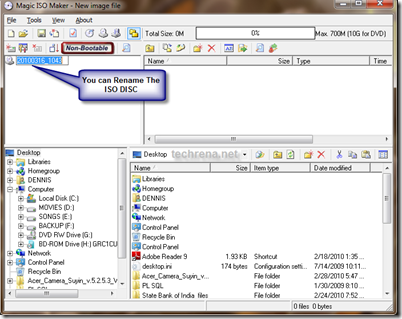
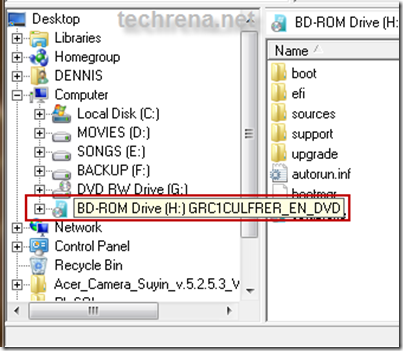
Step 2: Open MagicISO. You can rename the disc name to your choice. Then go to the location where the files are present which you want.

magic_iso

Here we have taken an example of saving Windows 7 DVD as a back up in ISO image. This example requires a bootable disc. Making the disc bootable is not mandatory if you are burning other files.

choose_the location_of_the_files

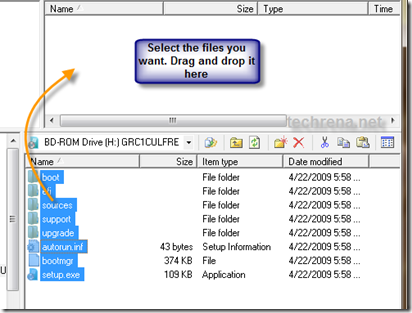
Step 3: Select the files and add it to the new disc.

select_files_drop_here

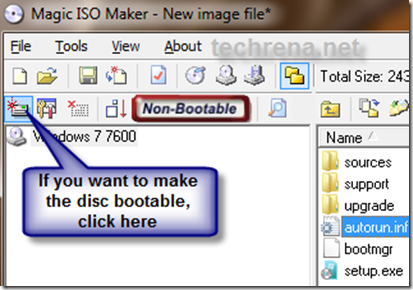
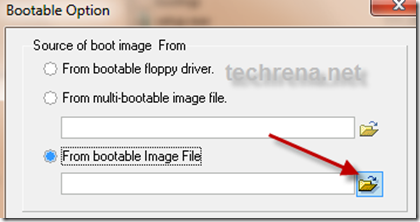
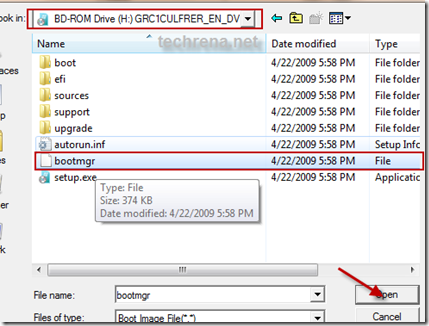
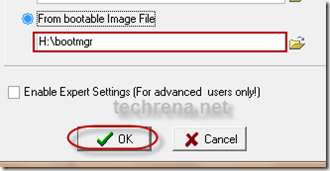
Step 4: If you want to make your disc bootable then. Click on add boot image button. Select the boot file.

make_bootable_disc

select_boot_file

select_boot_file_

boot_image_selected

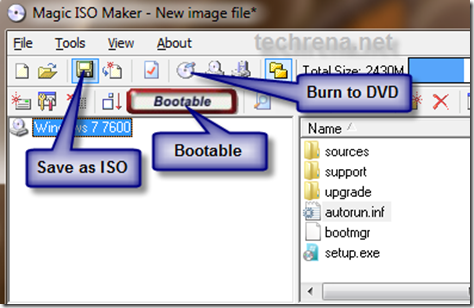
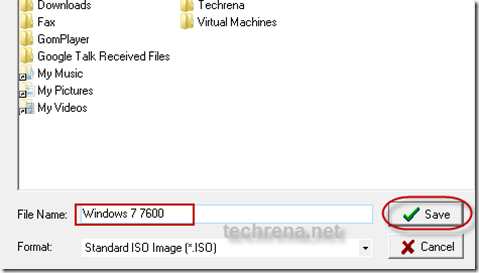
Step 5: Now you can either burn the content to a DVD or save the files to an image ISO file. To save the file, click on save, select the location to which you will save the file, and give the file name.

save_or_burn

Select_save_location_file_name

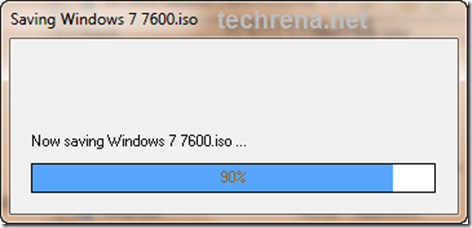
Once you have selected to save the file, the process will start. Once done, your ISO file is ready. You can load it to a Virtual Drive or burn it to a disc any time you want.

save_in_progress

Additional Information: MagicISO is a shareware which is available for buying from www.magiciso.com for full features. Using this tool, you can open, create, edit and extract CD/DVD image files, and it can convert BIN to ISO formats and back. You can use it to make ISO files from DVD/CD-ROM or hard disks, with bootable information included.