[How To] Change Computer Name In Windows 7

Computer name domain and workgroup settings

Computer names are pretty much useful to distinguish different computers when you are on a network with too many computers connected it. You would normally choose this computer name during the initial installation. Or if your system came with a pre-installed version of Windows 7 or Windows Vista, chances are that your manufacturer might have chosen a crappy computer name. It is always a good practice to have a unique computer name which is more descriptive so that you can easily identify your computer over others in the network.

Changing a computer name was relatively easy in Windows XP. When it comes to Windows 7 and Vista, you need to get through a couple of windows before you can land at the correct settings window. Here are the steps.

Steps:

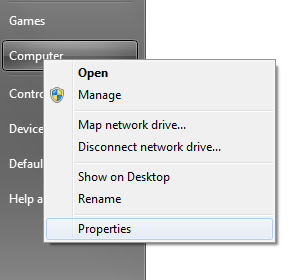
1. Go the Start Menu, right-click on the “Computer” and click “Properties”.

Computer right-click context menu from Start Menu

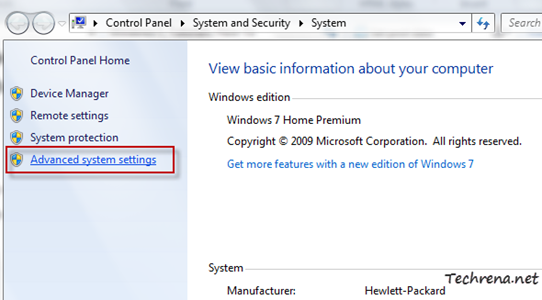
2. Click on the “Advanced system settings” link on the left hand side pane.

System settings in control panel

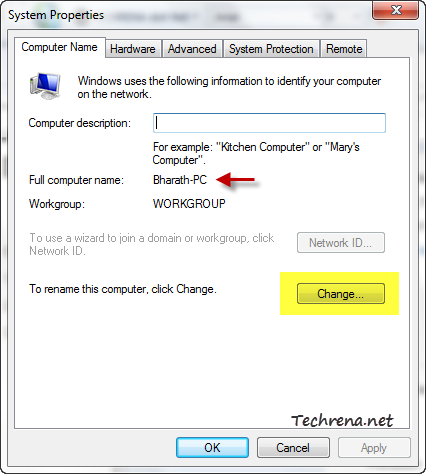
3. Go to the “Computer Name” tab in the System Properties window.

Computer Name in System Properties

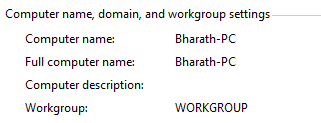
Note: In Windows 7 you can also arrive at the above settings window from the “Computer name, domain, and workgroup settings” from the step 2.

change settings in system control panel

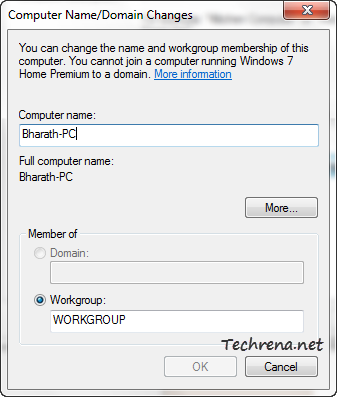
4. In the next dialog box, you can change your computer name and the workgroup membership of your computer.

Computer name and domain changes

Click OK to close the window and apply the changes. You must restart your system for the full changes to take effect.

[Download] Microsoft Security Essentials 2.0

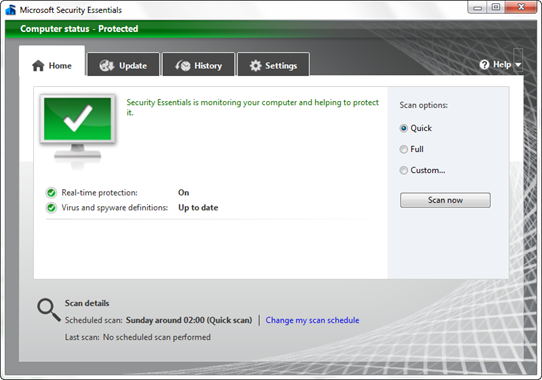
Microsoft security essentials

Microsoft Security Essentials 2.0 has just got out of beta and is available for public download. One good reason to use this antivirus and anti-spyware program is that it is coming from the Microsoft folks and even that too for free! If you are already using an earlier version of the Security Essentials, you don’t need to download the software again. Just run the program and it should automatically update itself to the latest version.

Microsoft security essentials v2

Microsoft Security Essentials runs very smoothly and efficiently in the background taking up very lesser amounts of your CPU resources.

Features of Microsoft Security Essentials 2.0 :

  • Windows Firewall integration
  • Comprehensive malware protections
  • Free to download and use
  • Automatic updates
  • Network inspection system
  • Enhanced protection for web-based threats
  • Easy to use

Microsoft Security Essential keeps itself up to date by downloading updates automatically. As long as the program is in green, your computer is running fine and you can continue working on your PC without any worries. But when it turns to red, it means that your computer is at risk and the program will show you the steps that you can follow to keep your PC secure. The interface comes with a lot of settings giving you more control over the program.

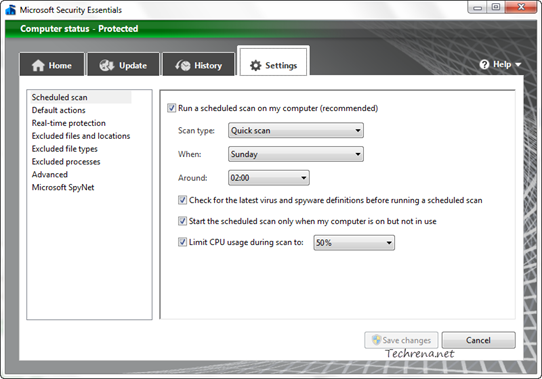
Microsoft security essentials v2 settings

You can configure various settings like:

# Scheduled scan

# Default actions

# Real-time protection

# Excluded files and locations

# Excluded file types

# Excluded processes

# Advanced

# Microsoft SpyNet

Download this free antivirus program from the following links. But please note that your PC must be running a genuine Windows to install Security Essentials.

Download Microsoft Security Essentials 2.0:

For x86 machines (7.5 MB)

For x86-64 machines (9.5 MB)

Supported OS: Windows 7, Windows Vista and Windows XP

[Tip] Restore Accidentally Deleted Contacts In Gmail

gmail logo

Have you accidentally deleted any contact in Gmail while syncing the contacts between various devices that you possess? Have you ever mistakenly deleted a wrong contact that had almost similar name to the contact that you wished to delete?

Yes, these sorts of things do happen now and then! But Gmail think-tank seems to be wary of these accidental deletions that happen to users like us. Gmail has announced highly useful “Restore Contacts” feature that lets you quickly recover contacts that you had previously deleted. With this, you can restore any deleted contact information deleted from your Gmail account in the past 30 days.

How To Use?


To use “Restore Contacts” feature in Gmail,

1. Login to your Gmail account.

2. Go to the Contacts page inside your Gmail.

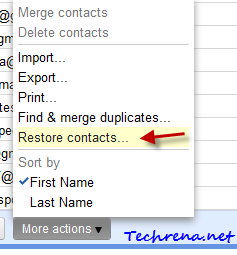
3. Click the “More Actions..” drop-down button and choose “Restore Contacts”.

restore contacts link under more actions in gmail

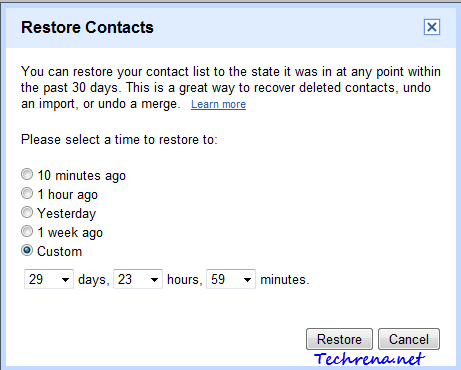
4. In the new “Restore Contacts” dialog box, choose the time stamp to where you want to restore your contacts. You can restore the contacts to any point within the past 30 days.

Restore contacts in gmail

When you restore the contacts to an earlier time frame, all the contacts added since then will be deleted. All the contacts that you had deleted will be back.

[Via] Official Gmail blog

[Download] Opera 11 Release Candidate 1 (RC)

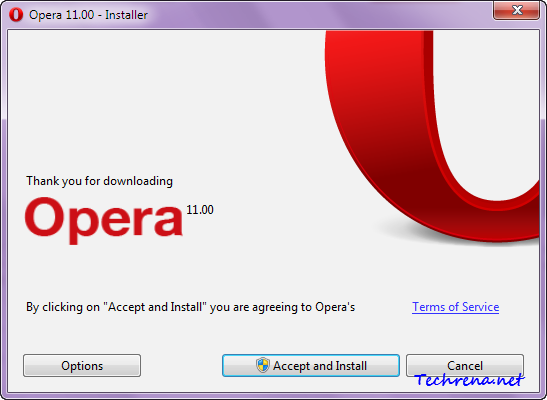
Opera 11 installer

Opera has achieved another landmark with the release of Opera 11 Release Candidate. Now that has come really quick. It was just less than a month ago that the Opera 11 Beta was released and now comes the RC version.

Opera 11 now supports adding extensions much like Google Chrome, where users can install extensions from Opera’s extensions catalog.  You don’t need to restart your browser while installing or uninstalling the extensions like you do in Google Chrome.  There are loads of other improvements. Take a look at some of them.

New features in Opera 11:

  • Tab stacking: Drag and drop a tab onto another to create a tab group.
  • Extensions support
  • Visual mouse gestures
  • Enriched HTML 5 support
  • Auto-update of extensions and Opera Unite apps
  • Google search suggestions
  • On demand loading of plug-ins
  • Enhanced email panel
  • Faster installation

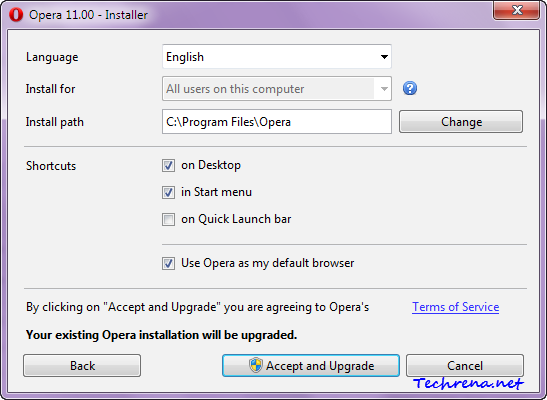
If you are installing Opera 11 with a stable version already being installed, you should note that the Opera 11 RC version gets installed in the same default installation folder as that of the stable version. To avoid this, click on “Options” in the installer window and change the settings.

opera 11 installer setup

Download the Opera 11 for your operating system from the below direct links:

Download Opera 11.00 Release Candidate 1 (RC 1):

Windows

Mac

Linux/FreeBSD

[Download] Microsoft December 2010 Security Release ISO Image

December 2010 security release iso

Microsoft has released the December 2010 Security Release ISO Image containing all the Windows security updates released via Windows Update on the December 14, 2010.

This ISO image file would be ideal for the administrators who need to download the each security update in different languages without using automatic programs such as Windows Server Update Services (WSUS). Download the ISO image file from the direct download link added below. This ISO image contains the following updates in all languages.

The DVD5 image consists of the following Windows updates:

KB2416472 / (MS10-070), KB2160841 / (MS10-077), KB979688 / (MS10-083),  KB2416400 / (MS10-090), KB2296199 / (MS10-091), KB2305420 / (MS10-092), KB2447961 / (MS10-094), KB2385678 / (MS10-095), KB2423089 / (MS10-096), KB2443105 / (MS10-097), KB2436673 / (MS10-098), KB2440591 / (MS10-099), KB2442962 / (MS10-100), KB2207559 / (MS10-101), KB2345316 / (MS10-102)

Supported OS: Windows 7, Windows XP Professional x64 & SP 3, Windows Vista (SP1, SP 2 & 64-bit SP 1), Windows Server 2008 (R2, SP 2), Windows Server 2003 (SP 2, SP 2 x64)

Download Dec’10 Security Release ISO (3.24 GB approx.)

Related: Update your Windows and Office software offline

[Download] Google Voice App For iPad & iPod Touch

Google Voice logo

Google has just added the iPad and the iPod touch support for the Google Voice iPhone app. The newly released Google Voice app version 1.1.0.636 lets you access our Google Voice account right from your iPhone, iPod touch or  iPad. With this app installed on your iPad or iPod touch, you can make use of all the features of the iPhone version of this app (except making like cellular calls) sending and receiving text messages for free.

The new “Click2Call” feature, you can can an call to any of your phones right from the iPad or iPod touch. The other improvements in the new version of the app are auto-disabling of Text forwarding when the Push Notifications are enabled (to avoid multiple alerts for the same message) and the new “Do Not Disturb” feature (available under the Settings tab)  that lets your callers directly connect to the voicemail when you are busy. Head over to iTunes App Store from link added below to download the app to your iPad or iPod touch devices running iOS 3.1 or later.

Download Google Voice App (via iTunes App Store)

[via] Google Voice blog

[Tip] Remove Skype Icon From Windows 7 Taskbar

skype logo

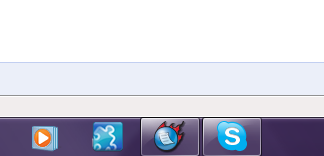
If you are using the latest version of Skype on your Windows 7 machines, you might now be very aware of the fact that Skype pins itself to the Windows 7 taskbar.

skype icon in taskbar

This is a bit annoying as you don’t want Skype to reside in the taskbar and occupy the useful space. If you are wondering how can this be removed from your taskbar, this is what you have to do:

1. Click on the Skype taskbar icon and sign into your Skype account.

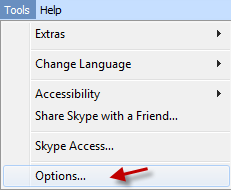
2. Click on the “Tools” menu and choose “Options” from the list.

skype options in the tools menu

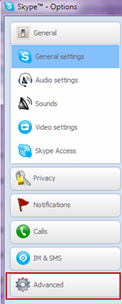
3. Click the “Advanced” button under Skype options.

Skype options list

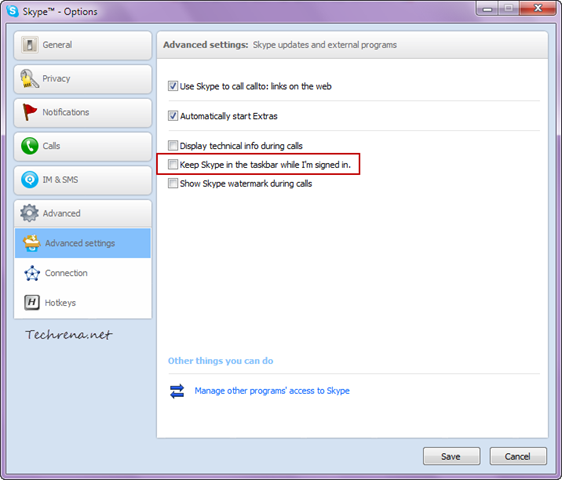
4. Under the “Advanced Settings”, uncheck against “Keep Skype in the taskbar while I’m signed in”.

Skype options advanced settings

5. Click the “Save” button to save settings and close the window.

That is it! Now, close the Skype window and it should disappear from your taskbar as well.

No Skype taskbar icon

[How To] Create A System Image Backup In Windows 7

Windows 7 logo

Backing up has been made so much easier in Windows 7. Now if you are running a Windows 7 PC, you can create and save a “System Image” (captures the current state of the system as it is) is pretty much simple and you don’t even need any third party tools like Ghost. A Windows system image will let you to quickly revert back to the state when the image was prepared. This is pretty much useful if your system crashes in future. It is always best practice to take create a system image when you install a fresh copy of Windows 7 and customise it by adding some important programs. Don’t try to add too many, as it would finally increase the file size of the system image. Let’s look into the details about how to create a system image in Windows 7.

Important: Before start, make sure that you have a safe external storage device to store your image. Although you can use another drive of the same disk, in case of a disk failure, you might loose this image as well. Also note that Windows 7 can only save system image on a storage device which is having NTFS file system.

Steps:

1. Go to Start Menu, type “backup” in the search box and click “Backup and Restore” from the search results under “Programs” section.
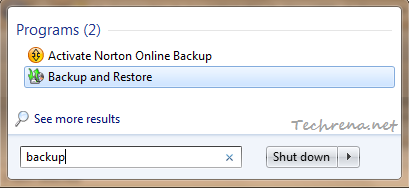
backup start menu search

2. In the Back and Restore window, click “Create a system image” link that can be found in the left hand pane of the window.
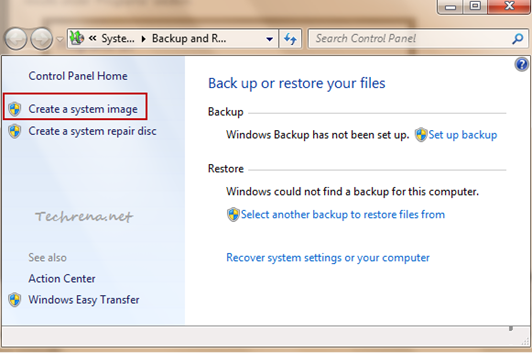
Backup and restore in windows 7

3. Now Windows will look for the available backup devices and will list them under the “On a hard disk” option.
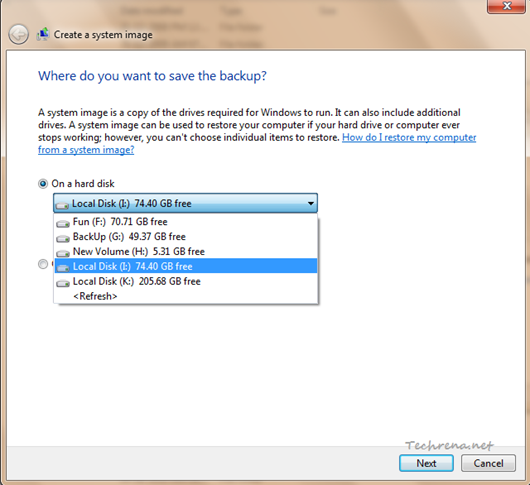
Backup devices for the system image

Here you will realise that you can’t select a drive which is not using NTFS file system. An error message will be shown up, “This drive cannot be used to store a system image because it is not formatted with NTFS”.

Error with non-NTFS formatted backup drives

Also make sure that you have enough space on our backup drive. The system image will consume space which is equal to the total amount of used spaces in the drives selected for the creating an image.

4. Choose the appropriate drive and click “Next” to proceed to the next step.

5. In the next step, you can choose the drives which you want to be included in the backup. By default, all “System” drives will be selected and you have an option to include or not to include other drives. And of course, you can not choose the drive which you are using to save the backup.
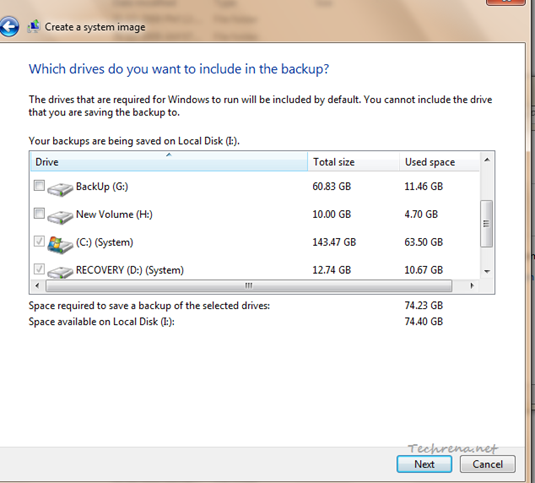
Create a system image select drives to backup

Select the drives and click “Next’ to go the next step.

6. The next window will show the backup location and the drives that you are backing up. Click “Start backup” to confirm the backup settings and start the backup process.
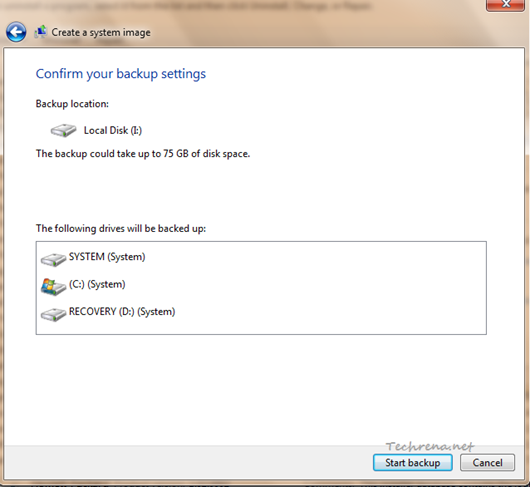
Confirm baackup settings for system image

7. Wait for few minutes for the backup process to get completed. You can stop the process at any time by creating the “Stop backup” button in the window.
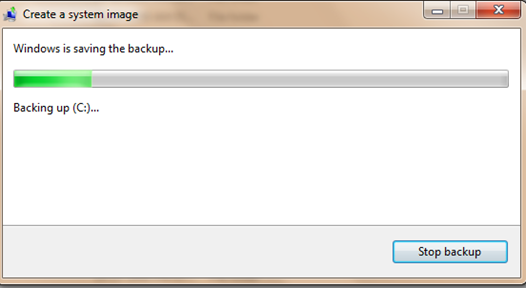
Windows is saving the backup for creating system image

8. Once the process is over, you will be asked to whether to create a system repair disc. It is your choice but we highly recommend that you go ahead and create one.
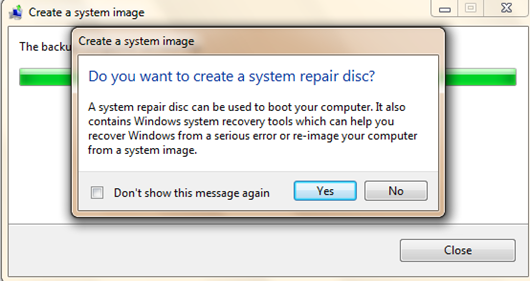
create a system repair disk after system image

Congrats! You have now successfully backed up your Windows 7 using a system image.
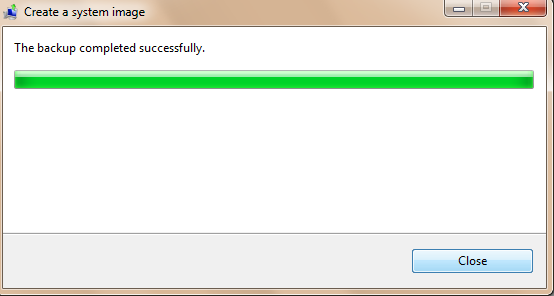
backup completed system image

You can use “Advanced recovery methods” found under the “Recovery’ section of Control Panel to restore your computer to an earlier state using the system image that you stored.
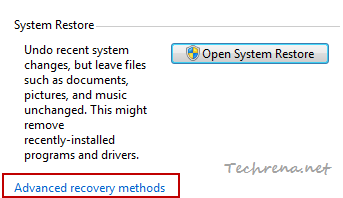
restore backup

Quick Tip: Show Or Hide Bookmarks Toolbar in Chrome

google chrome

Usage of bookmarks is surely on the rise these days, the fact that so many bookmarking related services are now increasing also explains this fact.  Google has a dedicated bookmark bar just below the address bar. Bookmarks bar in Google Chrome is pretty much useful to quickly add, or open your favorite links stored under the bookmarks folder. However you might want to have a choice whether to show the bookmarks bar or not in your Google Chrome. It’s pretty much simple and most of the Chrome users might be already knowing this tip. In case you don’t, read on..
google chrome bookmarks bar

Small tip logoTip: By default bookmarks bar is shown in Google Chrome. To toggle between enable or disable the bookmarks bar, just press Ctrl + Shift + B.

no bookmarks bar in chrome

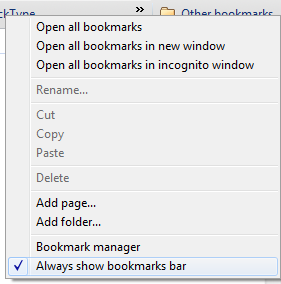
>> Alternatively, you can right-click on the bookmarks bar and choose uncheck “Always show bookmarks bar” option to hide the bookmarks bar. Once hidden, you need to use the above said keyboard shortcut to enable the bookmarks bar again.

Always show bookmarks bar in Google Chrome

[Tip] Enable Web Apps In Chrome 8

chrome web store

Google has recently launched the Chrome Web Store, where you can find number of web apps  , extensions and themes for Google Chrome. If you want to enable the web apps in the recently released Google Chrome 8 (they’ll show up when you open a new tab), follow these steps:

1. Make sure Google Chrome is not running on your computer.

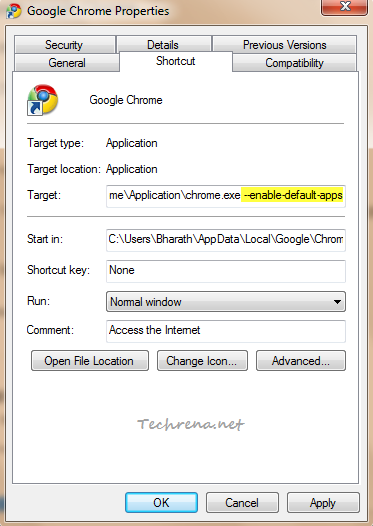
2. If you are on a Windows machine, right-click on the Chrome shortcut, and choose “Properties” from the context menu. In the “Target” filed under “Shortcut” tab, append it with   “ --enable-default-apps" (without quotes but with the initial space). In general, the target field should look like this:

C:\Users\<User Name>\AppData\Local\Google\Chrome\Application\chrome.exe --enable-default-apps

Chrome shortcut properties

3. Click “OK” to save the settings and close the properties window.

4. Click  the wrench icon, chrome tools menuTools > Extensions.

5. Expand the “Developer modeDeveloper mode iconicon.

6. Click on the “Update extensions now” button.

chrome extensions page

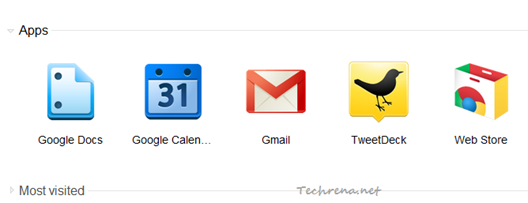
7. Open a new tab and now you must see the all the web apps that are currently enabled for your Chrome. The default web apps are Google Docs, Google Calender, Gmail etc.

Apps page in Google Chrome

This tutorial is intended for Google Chrome 8 running on Windows machine, if your are on Mac or Linux, you might want to read the original story at  Google OS blog.