[Tip] Prevent Programs From Changing Default Search Engine In IE9

IE9 beta logo

Once you have set a default search engine in your browser, it should remain as it is, right ? But it’s not always like that some programs can easily change your default search engine in your default browser just by adding some keys to your windows registry. It has always been a big problem. Imagine like you install a program like Yahoo Messenger (changes default search engine to Yahoo) or Windows Live Essentials (changes default search to Bing), are just examples of such programs. Even though many of these programs do prompt you when they are going to change your browser (Internet Explorer here), we can hardly notice it as it’ll be asked during the program installation and most of the time we does this in a hurry without exploring all the options provided during the installation.

In this post, I’m going to guide you about how to prevent programs from changing your default search engine in case of the Internet Explorer 9.

1. Open the Internet Explorer.

2. Click  on Tools icontools in IE(Found on the top right corner of the window).

3. Select “Manage add-ons” from the menu items.
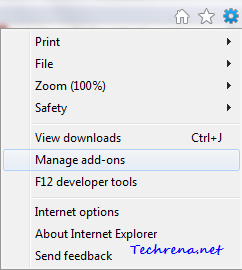
Tools menu IE9

Alternative you can access the same settings from the “Tools” sections in the IE9 menu bar.

4. In the Manage Add-ons window, click “Search Providers” in the left pane.
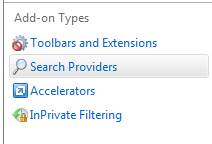
Manage addons in IE9 left pane

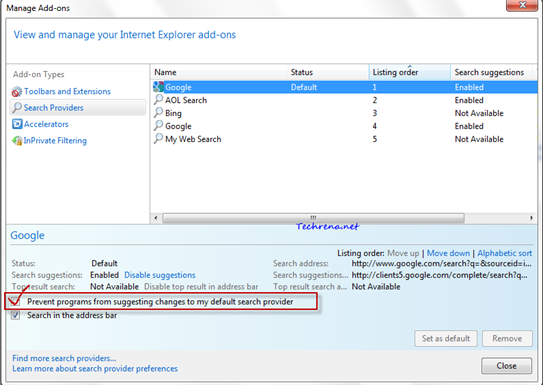
5. Select your default search engine (Google in my case), you will find an option “Prevent programs from suggesting changes to my default search provider”. Check against it and close the window.

Manage Search Providers in Manager Add-ons IE9

That is it. Now your default search engine in IE9 (& IE8) can’t be changed by any program. You might also want to read how to change the address bar search provider in Firefox.

[Offer] Get BullGuard Internet Security Free 6 Months License

BullGuard logo

BullGuard Internet Security, is one of the highly rated PC security solution from the Denmark based company. BullGuard’s current version of their Internet Security Suit is v9.0. BullGuard has recently released the upgraded BullGuard 10.0. As part of the promotion for their latest version, BullGuard has teamed up with Webuser to offer 180 days free license key for the BullGuard Internet Security 10.

BullGuard Internet Security offers a 5 GB free online storage for users to backup their documents, photos and music etc. The latest version BullGuard Internet Security 10 has come up with new features like Behavioural Detection, Safe Browsing, Password protection for the owner which means that the only BullGuard account owner can change security settings of the program, an inspector feature to let you know about the outdated software on your computer, a complete overhaul to both the Firewall and Spamfilter etc.

Promo Offer:

BullGuard is offering free six months license for their brand new version of BullGuard Internet Security 10 for a limited period of time.

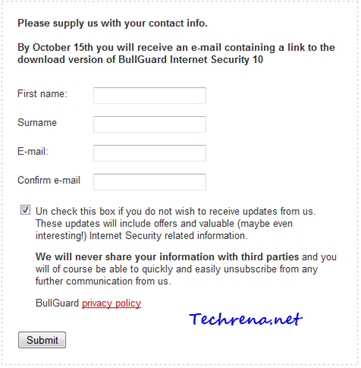
To grab this promo offer, just visit BullGuard Promo page and fill out and submit the form provided there.

BullGuard offer

BullGuard Internet Security offer form

Once you submit the form, you will get a link to download the BullGuard Internet Security 10.0 (with six months free license key) to your email by October 15.  The product otherwise costs £22.47 (~$35) without the promotional offer.

Supported Operating Systems: Windows 7, Windows Vista and Windows XP.

[Download] Sony Memory Card File Rescue To Recover Deleted Data From MC

If you delete accidentally delete pictures (or even videos and other files) from your Sony Memory Card, and if you think that it’s very difficult to get them back, you are wrong. Here is one great recovery software from Sony, “Sony Memory Card File Rescue”. But Sony by default doesn’t ship this software disk to the customers who buy Sony memory sticks. The uses have to manually download the file from the internet to use it with their Sony memory cards.

This works well to recover deleted files from your memory card. For better recoverability, one shouldn’t copy or override other files to the card immediately after the accidental deletion.

The installer file MCFileRescue.exe (~13.7 MB) can be downloaded from the Sony’s website. The procedure for download is not very straightforward, requires you to go through a number of steps.

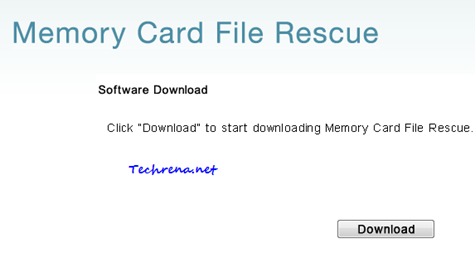
1. Go to this page and click on the “Download” button that appears toward the right-side.

2. You will be then taken to a new page, where you need fallout a form to proceed to the next level.

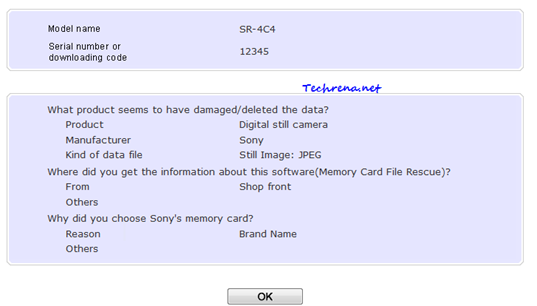
3. Here you will need to enter the model name and serial number of your memory card to be eligible to download the software.

>> The model name of the memory card might be of the following form:

MS*** –

SF-****

SR-***

USM****

Example:

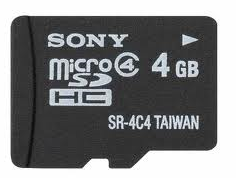
Sony MicroSD model name

The model name of the memory card (microSD type) shown in the above picture is SR-4C4.

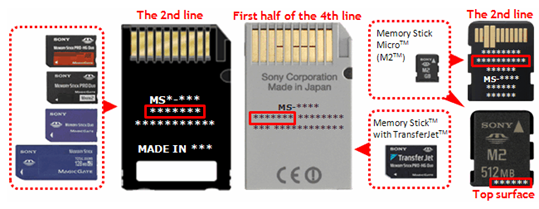
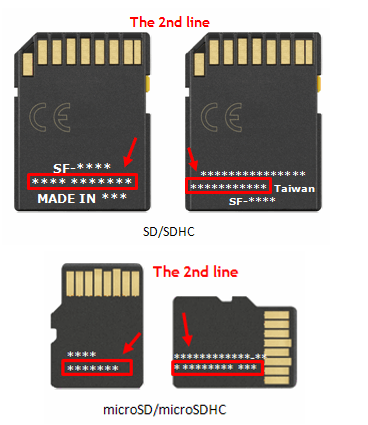
>> The next thing you need is the serial number of the memory card,  this can be found on the backside of your memory card as shown in the pictures (positioned at different places for different types of cards).

Sony Memory Card Serial numbers

Sony Memory Card Serial numbers in sd/sdhc

If you don’t want to go through this, just enter any 5 digits in the form and you should be able to download the file after entering the other details required in the submission form.

Sony Memory Card File Rescue download confirm

Memory Card File Rescue Download

4. Run the installer and let the software be installed on your pc. Run the program.

5. Select the drive to be scanned (i.e. the drive that contains memory card).

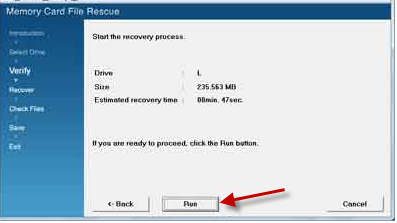
6. It’ll then show the size if of the files found and the time it’ll take to recover them.

7. Click on the “Run” button to start the recovery process. Do not remove the memory card while this action is in progress.

MCFR configuration

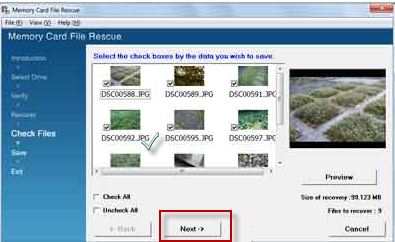
8. It will now show you the list of files that it has found. Select the check boxes against the data that you want t save or recover. Click on “Next” to continue.

Recover data using Sony Memory Card File Rescue

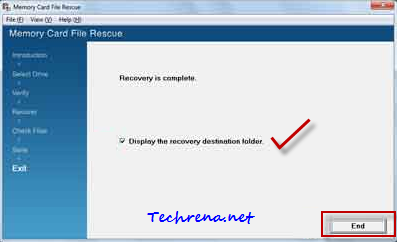
9. Provide the location on your computer, where you want to save the files that are to be recovered. Wait till the recovery process gets completed, after which you will receive a confirmation as shown:

MCFR recovery process successful

It can recover the files of the following formats:

JPG (DCF), MPEG-1, MP4, MP4 AVC file

Note:

1. If the device has been formatted using “Full Format” instead of “Quick Format’ in Windows, the data cannot be recovered from the memory card.

2. This is meant for use with memory cards manufactured by Sony, it can be used with memory card of other manufactures but there’s no guarantee that it will work in the desired manner.

[Tip] Using Goo.gl URL Shortener Without Google Toolbar

Google URL Shortener logo

Google’s goo.gl URL Shortener is now available for public via the website Goo.gl. Google released the Goo.gl URL shortener service (along with Youtu.be URL shortener) in December 2009. According to a blog post on Google Social Web blog and another post by Matt Cutts, Goo.gl URL shortening service was initially launched for the requirement of Google’s staff in their products. But it has quickly got into popularity and even some pretty good browser extensions have come in (here’s one for Chrome). Until now the service was available via Google Toolbar alone. Not anymore!  You don’t need any external add-ons or extensions or workarounds to use this service now. This is now available for public use via the website.

Google URL Shortener

To shorten any URL, go to goo.gl, enter your and click Shorten. The good thing about this is, much like Bit.ly, Goo.gl will also show you the analytics of the links that you have shortened, provided you have signed into your Googe account. Without signing in, you can still shorten the links but you can’t keep track of the clicks coming from that particular short URL.

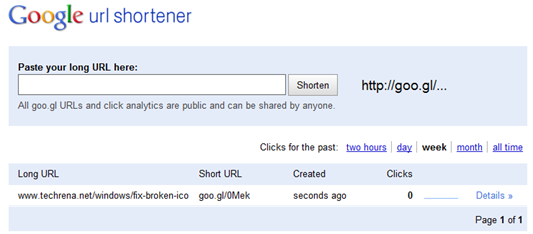
As you can see in the screenshot, the dashboard will show you the list of links that you have shortened using this too. It will also show the number of clicks received along with a “Details’ link, clicking on which will take you to the detailed analytics of your links.

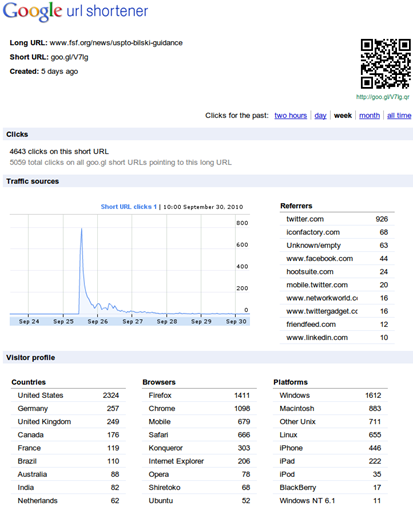
goo.gl analytics stats

The analytics shows you the clicks received against a time line, the top traffic referrers, the countries from where the visits came, the browsers used, the Operating systems (or the platforms) used etc.

You can also generate a unique QR code exclusively with Google’s URL shortener. Which looks something like this:

QR code

The only thing that might disappoint is the inability to choose custom URLs that is very much possible with the market leader in this sector, Bit.ly.

Go and give it a try at Goo.gl.

[How To] Rebuild Icon Cache To Fix Broken Icons

Sometimes when you install some program, and place its shortcut somewhere on the desktop or Start Menu, the icon of the program might appear broken (display incorrect icons) in your Windows 7. As you can see in the following screenshot:

Program icon broken in Windows 7Program icon broken in Windows 7 taskbar

It is very annoying to see such broken icons for any programs. Not only that they confuse you what program is it, particularly when you pin such a program to the taskbar. Follow this step-by-step guide to fix the broken or missing icons and show the original icons of the program, works in Windows 7 and Windows Vista.

Steps:

1. Close all the folder windows that are currently open in the Windows Explorer.

2. Launch the Task Manager either by using CTRL + SHIFT + ESC or by right-clicking on the taskbar and choosing “Start Task Manager”.

start task manager

3. Go to the processes tab, find “explorer.exe” in the list. Right-click on it, choose end process.

End explorer process

4. Go to File >  choose New Task (Run..) from the menu.

Run new task in Windows Task manager

5. In the Create New Task dialogue box, type “cmd” and click OK to open the Command Prompt window.

Create new task in task manager

6. Type the following commands* one by one in the Command Prompt (Press “Enter” after each command).

IconCache rebuild commands

CD /d %userprofile%\AppData\Local
DEL IconCache.db /a
EXIT

IconCache command prompt

7. Again go to the Task Manager, launch “New Task” from the File Menu. Type “Explorer” in the text filed and hit enter.

Explorer from Create New Task in Task Manager

Your icons should appear fine now.

Background:

This method actually rebuilds the icon cache. The first of the three commands is used to go into the directory C:\Users> username> AppData> Local. The second command will delete the hidden IconCache.db file. And then we restart the explorer.exe process to rebuild the deleted IconCahce file.

You can alternatively, set the Folder Options > Views and change the settings to Show Hidden files and then delete the IconCache.db to the Recycle bin and restart the explorer.exe process.

[Tip] Locking Google SafeSearch For Better Parental Control

A simple Google search can give you access to a wide range of information which sometimes may even included the content that is not appropriate for your age. For the same reason, Google has “SafeSearch” feature to filter out content that may not be enjoyed by the users of all age groups.

But the SafeSearch settings aren’t kind of that hack-proof stuff. It’s even easier for your kid to change turn the SafeSearch off without much effort. One way you can ensure your kid browsers search through SafeSearch only is to lock the SafeSearch option for a particular browser.

Let me guide you to lock the Google SafeSearch settings for any specific browser. Follow the steps:

1. Go go any Google search results page.

2. Click on the “Search settings” link present at the top right corner of the page.

Search Settings link in Google

3. You will now be taken to the Google Preferences page, where you can find different sections like Interface Language, Search Language, SafeSearch Filtering, Number Of Results etc.

Focus on the “SafeSearch Filtering” section.

4. You will find a “Lock SafeSearch” link at the bottom of the three options.

Lock SafeSearch

5. When you click on the “Lock SafeSearch” link, you will be asked to log into your Google account. Provide your credentials and proceed to the next step.

Google sign in page

6. When you proceed, you will be shown a warning about locking SafeSeach. Just click “Lock SafeSearch” to proceed further.

SafeSearch Filtering

Progress for locking safesearch

The SafeSearch will be locked across all Google domains, meaning all the country specific Google sites included.

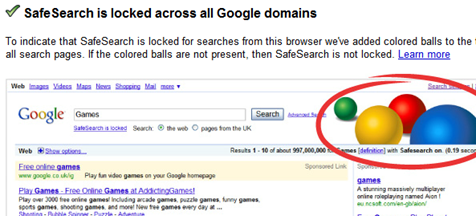
7. A message will appear saying “SafeSearch is locked across all Google domains” will be displayed along with a text that tells you that colored balls have been added to all the search pages, denoting that SafeSearch is locked.

SafeSearch locked success

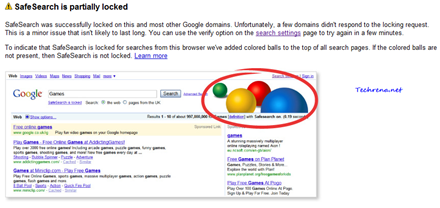
Sometimes you may get messages like “SafeSearch is partially locked”. This happens so when some of the Google’s domains don’t respond to the request sent to them from your browser. This is a minor issue and will be fixed automatically when you try the same after sometime.

SafeSearch locked partial

That is it. You have now locked the SafeSearch settings for one browser. This would still work even if you log out of your Google account.

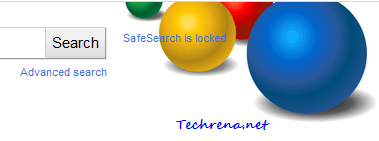
From now on, a group of colored balls will appear on search results page, to let you know that Safe search is being locked.

colored balls Google

However, this isn’t hack-proof either. As these are stored via cookies, deleting all the browser cookies will change the settings again. Also you need to setup this kind of SafeSearch lock for all the browsers that you use. Read : additional parental controls to restrict your children from using applications and other settings on your Windows 7 machine.

[Tip] Disable Threaded View In Gmail

Gmail logo

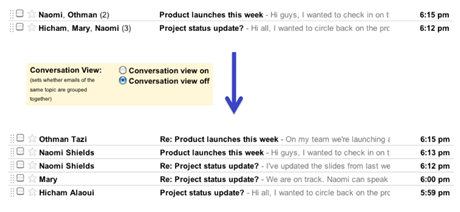
Gmail’s conversation view is without any doubt, one of the key factors that has helped Gmail emerge as the most used web based email program on the internet. While the normal users like us enjoy related email messages being grouped into threaded conversation messages thus making your inbox not to be cluttered with mails, but there have always been some people who don’t like this feature, as they like the traditional or classic way of email, the one with unthreaded messages. For those minority uses, who still want to see their mails in the traditional format, without the threaded conversation view, Google has just added the feature that lets you enable or disable this feature for their accounts.

threaded and non-threaded in gmail

Follow the steps to disable the conversation view in your Gmail:

1. Log into your Gmail account.

2. Click on the “Settings” link on the top right corner. Alternatively, you can click on this link once you are logged in, this will directly take you to the Gmail settings page.

Settings link in Gmail

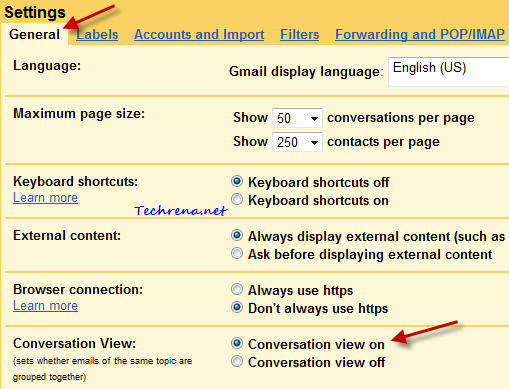
3. Under the “General” tab, find

Gmail settings for conversation view

4. By default, the conversation will be set on. To disable the threaded conversation, select “Conversation view off” button and click “Save changes” button.

Conversation view off

From now on, you won’t see the email messages being threaded to form conversation view. So any reply or related message that you get to a particular mail will be shown with the corresponding symbols as the case with any other classic email clients (for instance you will get RE:.. for any reply you get to the mail that has been sent by you).

[How To] Disable Session Restore In Firefox

firefox logo

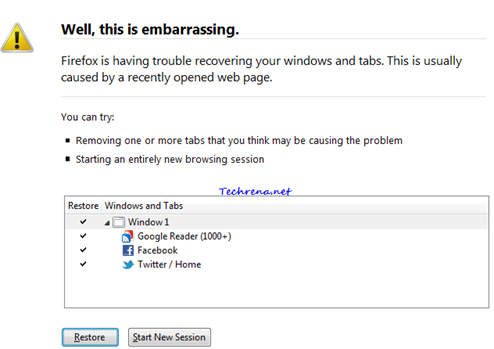
Firefox has a pretty useful “Session Restore” feature that lets you recover the opened sites when the browser crashes all of a sudden. In the latest version (Firefox 3.5+), Firefox has even allowed the users to restore only a certain number of tabs that were open just before the Firefox had crashed.

Session restore prompt in firefox

Even though highly useful and recommended, you might want to disable this feature for your very own reasons. With a little bit of effort, session restore can be disabled altogether from Firefox.

In this tutorial, let us see how to disable the session restore feature in Firefox via Firefox configuration settings page.

Steps:

1. Launch Firefox.

2. Type about:config in the address bar and press enter.

3. Accept the warning (This might void your warranty..) and proceed to the next page (click I’ll be careful, I promise!)..

This might void your warranty

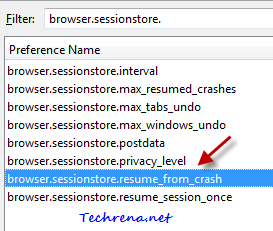
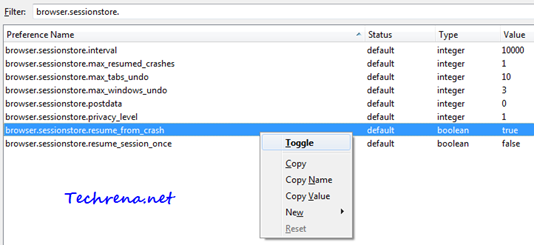
4. Type “browser.sessionstore” in the Filter and look for the entry “browser.sessionstore.resume_from_crash”.

session restore firefox settings

5. By default, the boolean value will be “true”. Right-click on the entry and choose “Toggle” to set the value to “false”. Close and restart the Firefox.

Browser session restore settings in firefox

Now you have disabled the Session Restore feature in Firefox. You will not be asked to restore the last opened tabs after the browser crash, instead the homepage will be opened.

[Tip] Clear Cookies And Cache For A Particular Domain In IE9

Internet Explorer 9

Microsoft’s latest innovation Internet Explorer 9 is slowly turning out to be the best ever browser that the Redmond based software giant has ever produced. With all the positive reviews creeping in from most of the users and experts, IE9 can now be viewed as the browser that will dominate the internet in the upcoming years. If you haven’t explored IE9 fully, yet there’s absolutely no reason why you should start doing it right away now.

There’s one useful feature in IE9 that most of us might not be aware of. Until now to delete cookies in the browser, we needed to delete the entire browser cache, in the same way, to delete cookies, we had to delete all the stored cookies. It’s not the same anymore with IE9. Thanks to IE9 developer tools, you can now clear cookies or clear cache for a particular single domain in Internet Explorer 9. It can be done if you follow the steps briefed below:

1. Open the Internet Explorer 9.

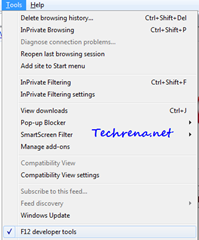
2. Press F12 to open the Developer tools. You may also access this via Tools (by pressing ALT) > F12 developer tools menu item.

Developer tools menu item

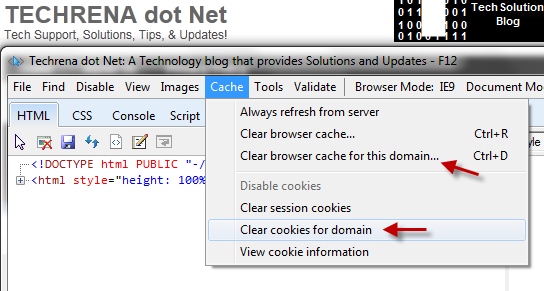
3. In the developer tools, you will see two options:

i) Clear cache for this domain

ii) Clear cookies for domain

Clear cookies and cache for this domain in IE9

These two options are very much handy especially if you are a developer.

[Download] KB2300535 Windows 7 Update

Along with KB979538, Microsoft has also released KB2300535 for Windows 7 based systems. KB2300535 addresses the issues with Windows Ribbon in certain applications running on 64-bit systems or 32-bit systems with the /3GB switch enabled.

Windows Update

When you run a certain application that uses the /largeaddressaware option (Windows Live Movie Maker for instance), on Windows 7 or Windows Server 2008 R2 systems, Windows Ribbon sometimes may not be displayed correctly and then the whole application doesn’t work on the expected lines. Microsoft released the supported Hotfix for this issue as well. Until now, users needed to download this Hotfix from Microsoft website to address this issue.

The update KB2300535 is available as Windows6.1-KB2300535-x86.msu and Windows6.1-KB2300535-x64.msu (file size: 1.8 MB for 32-bit systems and 2.9 MB for 64-bit systems). Download the file (strictly for Windows 7 systems) from the link given below. You need to restart your computer after installing this update.

Download KB2300535 [x86 link] [x64 link]