[How To] Change The Favicon In Blogger

Change default favicon in Blogger

If you have landed here while searching for changing the favicon in blogger, this itself is a indication that you know something about the favicons. Even though I assume that you know a bit about favicons, let me quickly introduce the concept of “favicon” :

Favicon (pronounced fav-eye-con) is the short name for “favorites icon” and is otherwise called as a shortcut icon. It is a 16×16 (most common) or 32×32 pixel square icon that is shown next to the URL of any webpage in a browser that supports tabs like Firefox, Google Chrome, Opera or Internet Explorer 7/8 etc. It is also shown in bookmarks or favorites, when you bookmark (in Firefox, Chrome or Opera) or when you add a site to favorites (in Internet Explorer). Many websites use well designed favicons as branding for their site and it also enables their site to be distinguished from other sites easily.

Wikipedia Favicon

If you are using Blogger blog, you might have already noticed that Blogger shows default favicon Blogger faviconnext to the URL of your blog as shown here:

blogger favicon example

Usually if you want to change the favicon of a website, you need to upload the new favicon file to the root folder of the website and the new favicon appears in your website immediately. But it’s not the same case with Blogger. As the user doesn’t have control over the files hosted on Blogger, the only way you can change the favicon in a Blogger blog is to upload that favicon to a free image host that supports uploading of .ico formats and then tell the Blogger to use this favicon instead , by specifying it in a short code inside the HTML source code of your blog template. Let’s look into the step-by-step guide on how to get this done.

Steps:

1. Design an attractive favicon for your site using many online favicon generators online. I’m quoting a few such tools here:

favicon.cc

favicon.co.uk

antifavicon.com

iconj.com

2. Once you have designed and downloaded the favicon on to your desktop, you need to upload it to a host site where you have access to upload the favicon file and retrieve it later. I suggest you try some image hosting sites that allow the uploading of .ico files. Iconj.com mentioned in the above list supports uploading and hosting your .ico files as well.

3. Now note down the URL of the file located on the image host.

4. Login to blogger.com and go to your dashboard. Click on the “Design” tab under your dashboard.

design link in blogger dashboard

5. Now click on “Edit HTML” tab found under the “Design” tab.

Edit Html under design in blogger

6. Find the <head> and </head> lines in the HTML code.

7. Copy the following code:

 <link href='http://www.your-icon-url' rel='shortcut icon' /> 
 <link href='http://www.your-icon-url' rel='icon' />

Replace “www.your-icon-url” in the above code with the actual URL pointing to the new favicon file of your site. Example:

<link href='http://www.techrena.net/favicon.ico’ rel='shortcut icon'/>
<link href='http://www.techrena.net/favicon.ico’rel='icon'/>

8. Paste the modified code anywhere in the HTML code, but it should be placed after the <head> and before </head> section [Tip: Use Ctrl + F to find these lines] in the HTML code. Click “Save Template” to save the changes to the code.

favicon code in blogger html design

9. The new favicon may take some time to appear in your browser. You may not see it until your browser clears its local cache. To see the new favicon instantly, try Ctrl + F5. If it doesn’t show up, try opening your blog in another browser and you will see the change

New favicon

If you liked this post, you might also want to read our earlier exclusive posts about Blogger : How to verify Blogger blog in Webmaster tools, Blogger title tweaks for SEO and swapping Blogger blog title and post title.

[How To] Find The MAC Address Of Your Computer

what is my mac address

Media Access Control address (wiki: MAC address), also known as physical address or hardware address is a unique identification number assigned to each of your local network adapters or network interface cards like Ethernet card, Wireless LAN card, Bluetooth device etc.

As said earlier, MAC address is unique for each of the network adapters and will not match MAC address of any other device in the world. MAC address will generally be in the form “xx-xx-xx-xx-xx-xx” (12-digit alphanumerical). The address will tell many things about the network adapter card installed in your PC. The first six digits of the MAC address belong to the manufacturer of that adapter card. Of late, MAC address are sometimes used to register your computer to your ISP.

An example for such MAC address may be of the following three forms:

0C:60:76:42:0A:3B” or “0C-60-76-42-0A-3B” or “0c6076420a3b

Here the first six digits “OC6076” denote that it is being manufactured by the vendor, a Taiwan based Hon Hai Precision Ind. limited.

[Tip: Use online MAC Address Decoder to find details about your network card after find out the MAC address following this tutorial.]

Now get into the details of how to find the MAC address for network adapters in your computer. Before proceeding, you should know that the MAC address can only be traced if that network adapter is being enabled and connected to a network.

Finding MAC Address in Windows [Windows 7 or Vista]:

You find physical address of your computer’s network adapter in the following methods:

Method ONE:

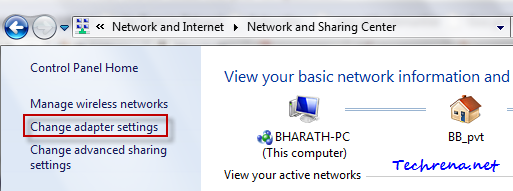
  • Open the  “Network and Sharing Center” from the Control Panel
  • Click on “Change adapter settings

network sharing change adapter settings link

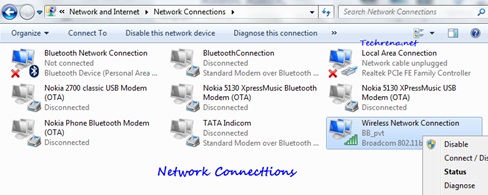
  • Now all your Network connections will be shown in the window. Those that are in grey denote that that particular network connection is currently disabled. The adapters which are currently enabled will be shown in blue. The network adapter or connection which is enabled but not connected to any network right now will be shown with a “X” mark below it.

network connections list

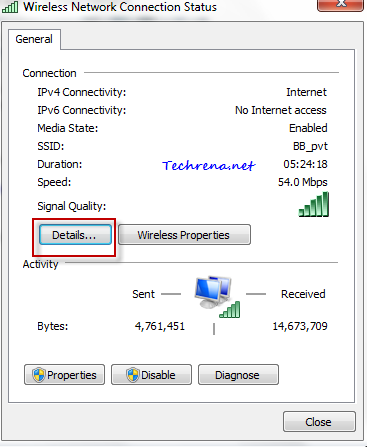
  • Right-click on the Network connection for which you want to find out the MAC or physical address. Select Statusoption from the popup. The network connection status window will open up. Click on the “Details” tab in the status window.

Wireless network connection status

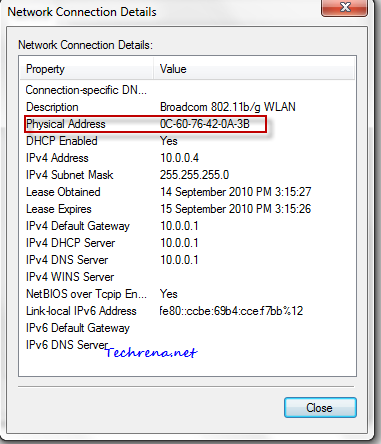
  • In the “Network Details” window, you will see the physical address as marked in the screenshot.

Physical address Network connection details

Method TWO:

Using the “ipconfig” command:

Go to Start menu(press windows start button) and type “cmd” in the search box and open cmd.exe from the results.

Cmd in start menu search

cmd.exe from start menu in programs

Type “ipconfig/all” (without quotes) and press enter.

ipconfig command

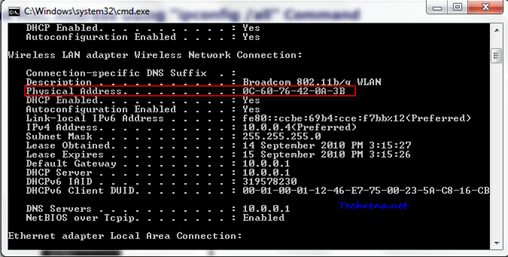
Physical address using ipconfig command

The command prompt window will show you the full list of your network adapters and their properties. Adapters that are disabled will be shown as “Media disconnected” against them. Carefully scroll the window to find the network connection for which you want to trace the physical (MAC) address (that is enabled and connected). While scrolling the window ignore all the network connections that are shown as “Media disconnected”. In my case I want to find the MAC address for my wireless network connection which is currently enabled is connected to a network. So I have scrolled the window until I could find the properties for Wireless LAN adapter and figured out the Physical address. Note down the MAC address value listed against the Physical Address (Right-click on the window, choose Mark select the physical address value and press “Enter” to copy the value to the clipboard) it as highlighted in the above screenshot.

Method THREE:

Using the getmac command:

Open the command prompt window as shown in the previous method and type “getmac” (without quotes) and press enter. Notice the MAC address of the device listed under “Physical Address” for the adapter that has not been marked as “Media disconnected” under “Transport Name”.

getmac command

You will find the mac address of the devices that are connected as well as disconnected.

Finding The Physical Address on a Mac OS X:

1. Click on the Apple Menu > Select System Preferences.

2. Select Network tab under the Internet & Network.

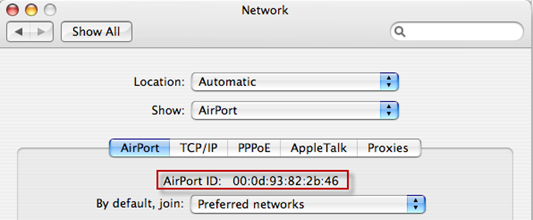
3. If you are connected to a wireless network, select “AirPort” from the drop down next to “Show” tab. The AirPort ID shown there is your physical address for that wireless adapter.

AirPort id in mac

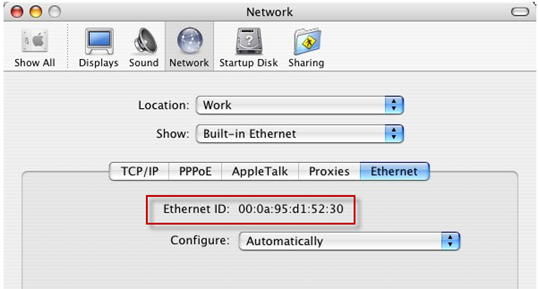
4. If you are connected via a wired connection, select “Built-in-Ethernet” from the drop down under “Show” tab. The Ethernet ID shown there is the MAC address of your Ethernet card.

Ethernet id in mac osx

Finding MAC Address in Linux or in any UNIX based systems:

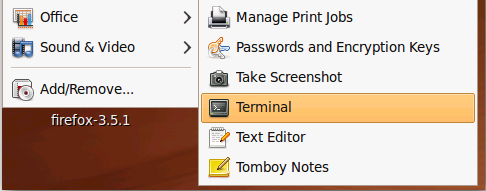
1. Launch the Terminal and type ifconfig and press enter.

Terminal in linux

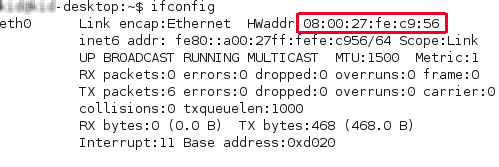
2. Now you will be shown the MAC address next to HWaddr (shortcut for Hardware address) as shown:

ipconfig command in linux

Alternatively, you may also type “/sbin/ifconfigsbin/ifconfig in linuxin the console and press Enter. You may need to provide credentials if you get “permission denied” error, by using su –c “/sbin/ifconfig” ifconfig in linuxin the console.
These are the ways you can find the MAC address without using any external software. However, there are many third party programs available to do the same, you may also use them to find our MAC address.
BTW, do you know that you can actually change the MAC address (read spoofing MAC post) to show a dummy number instead of the actual value? If you liked this post, do take time to read our earlier tutorials.

[How To] Set up Custom Domain Name For Your Blogger Blog

Blogger logo

This for those who has a Blogger (..blogspot.com) blog and want to upgrade it to use your own custom domain like www.example.com instead of your current example.blogspot.com. First up, you should know why should you migrate your blog to a custom domain. The advantages with using a custom domain instead of a Blog*Spot (..blogspot.com) subdomain are:

Your blog URL becomes reasonably short and you can choose a catchy domain name that will make your regular blog readers to remember the blog URL easily.

You can have a blog at the domain root folder (like example.com) and this has clear advantages in terms of SEO and PageRank aspects. For instance Alexa sometimes may not rank blogs that are located on subdomains like blogspot.com, it only works well with the sites that are hosted on the root folders.

Fortunately, Blogger supports publishing on a custom domain and offers free unlimited hosting and bandwidth for all of your content associated with your blog. So you don’t need to look for a hosting service and pay it for hosting. Let’s see how a naive Blogger user can start using a custom domain name for his/her Blog*Spot blog.

The Actual Process

>> To start with, login to blogger.com with your Google account and go to your Blogger dashboard.  Click on “Settings” link under your Blog entry in the dashboard.

>> Find “Publishing” tab under the Settings and click on it. You will see the following:

Publishing on blogspot.com settings

>> Click on “Custom Domain” link to get started with the custom domain.

buy domain through blogger

Now you have two options. You can either buy a domain name for your blog from Google (Blogger) itself (charges $10 per year via Google Checkout) or you can buy through some dedicated domain name/hosting registrars, for instance Yahoo Small Business.

>> If you choose to buy the domain from Google, it’s very straightforward and you need not worry about other settings like DNS settings plus you will also get Google Apps for your domain.

However, if you have bought the domain from external domain name registrar, first you need to configure DNS (Domain Name Server) settings for your domain.You must have an option to change your CNAME and A NAME records for your domain, if you find difficulty in changing these records, contact your domain name registrar.

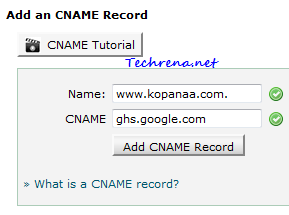
1. Creating CNAME record:

Create a CNAME record for your blog with the following CNAME:

ghs.google.com.

Adding CNAME record

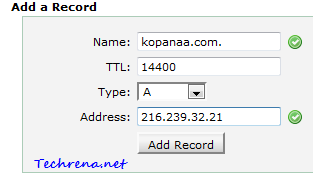
2. Creating an ‘A’ NAME record: ‘A’ NAME records are helpful in redirecting non-WWW URL (naked URL) of your domain (your-blog.com) to a WWW version of your domain (www.your-blog.com).

Create a three ‘A’ NAME records with the name of your domain without the ‘www’ as shown here:

Add the following four such records pointing your naked domain (ex:your-blog.com) to the IP addresses listed below:

216.239.32.21

216.239.34.21

216.239.36.21

216.239.38.21

add A NAME record

>> Now, click on the “Switch to advanced settings” at the top corner on your right hand side.

switch advanced settings in Blogger custom domain

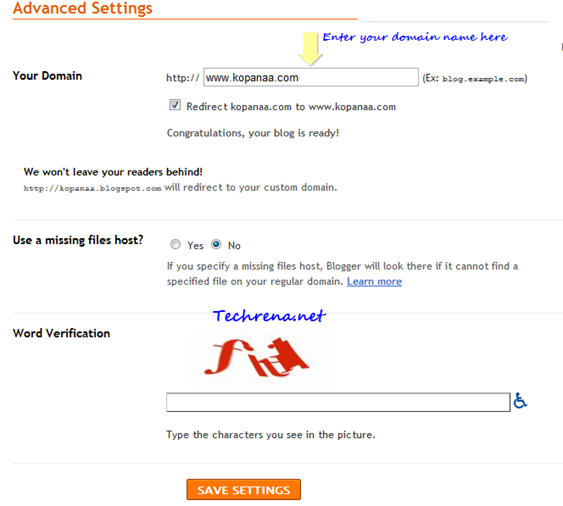
>> Enter your domain name (with www) in the “Your Domain” filed. And also select “Redirect your-blog.com to www.your-blog.com” option. You may keep the default options “No” for “Use a missing file host? ” filed.

Advanced settings for custom domain in Blogger

>> Enter the word verification and click “Save Settings” to finish the process and save your settings. Now you are done with setting up for your custom domain for your Blog*Spot blog. Now Blogger will redirect all Blog*Spot subdomain visitors to your own custom domain.

Blogger custom domain output

Initially your new domain won’t redirect itself to your blog as it takes nearly 24 hours for DNS records to be updated. Tip: Use DNS Propagation checker to check how your DNS information has been propagated around the globe in the internet.

Please note that you can only use this feature on domains or subdomains (like your-blog.com or diary.your-blog.com etc.) but not on subdirectories (your-blog.com/diary). All your existing content including images will continue to work as they used to be.

Let’s know if you find any problem while following this tutorial.

[How To] Configure Microsoft Outlook 2010 With Gmail

A tutorial for Outlook 2010 beginners:

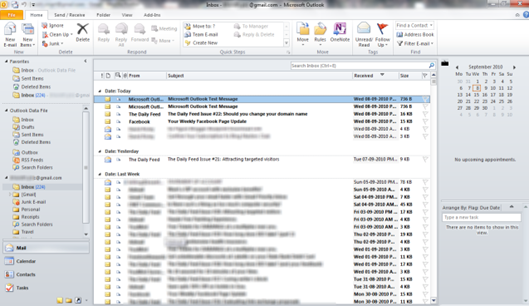
Gmail in Microsoft Outlook 2010

It’s true that Gmail’s web interface is great and feature rich and for the same reason it is gaining lot of popularity among the users when compared to other web based email services. Some of you may want to read your mails through an email client like Microsoft Outlook. With this you can not only use Gmail via your favorite email client, you can also setup and read email messages from multiple email accounts. This also gives you the convenience of added features like searching, filtering, organizing mails and offline mail storage options. Although Google of late trying hard to offer most of these features to it’s web version, the main reason that you may opt for Outlook is to handle mails from Gmail account as well as from other email services simultaneously at one place. Whatever may be the purpose, if you would like to configure Microsoft Outlook 2010 with your Gmail account, follow the steps: [There’s nothing much to do just follow the wizard]

1. Go to Start Menu and type “o l” (without quotes) and open the Microsoft Outlook 2010.

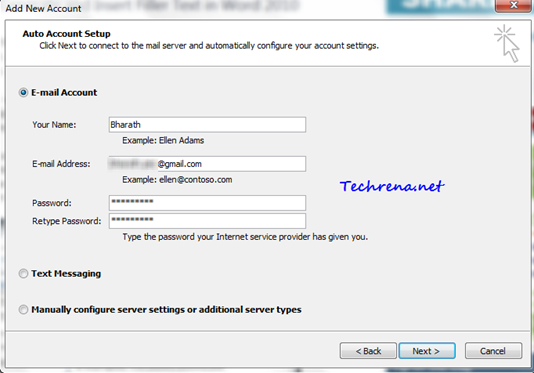
2. Start the new email account configuration wizard and in the second step you need to enter your email account details:

Add New email account in Outlook

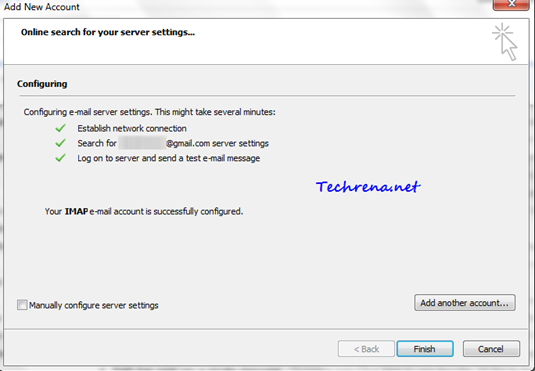
3. Click Next after entering your details. Let the Outlook configure itself properly for your email account. This may take a few minutes. Outlook automatically searches and finds server settings online.

Online search for server settings in Outlook for Gmail

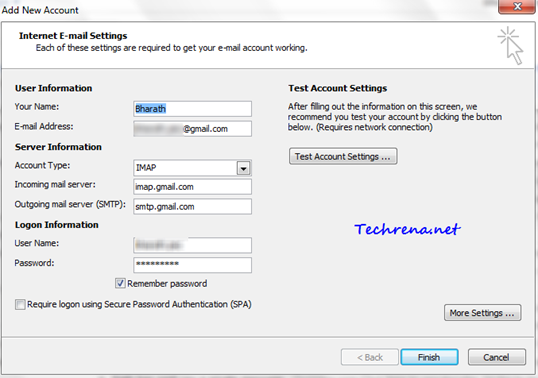
4. You are done with configuring Outlook. However you may also configure settings manually by clicking on the “Manually configure server settings” and clicking Next button.

Gmail settings in outlook

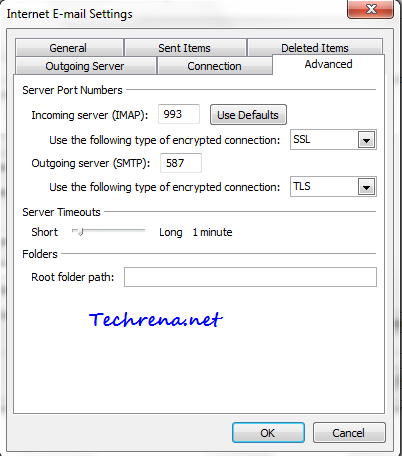
Your settings should be identical to the ones shown in the above screen shot. Click on More Settings button to find some more settings under the “Advanced” tab which should be identical to the following:

Advanced email settings in Outlook 2010

IMAP Settings for Gmail in Outlook 2010:

Incoming mail server: imap.gmail.com

Outgoing mail server: smtp.gmail.com

Server Port Numbers:

Incoming server (IMAP):  993 [Using SSL encryption]

Outgoing server (SMTP): 587 [Using TLS encryption]

[How To] Change User Account Picture In Windows 7

This is very basic, easy and straight forward Windows 7 tutorial, intended for the Windows 7 beginners.

User account pictue in Windows 7

You might have noticed that whenever you go to Start Menu or Welcome or logon screen of your Windows 7 PC, you will be shown with some thumbnail picture next to your Windows user account. Windows randomly chooses the account profile picture for you which you can change anytime though. Just follow the below steps to quickly change your user account picture in Windows 7.

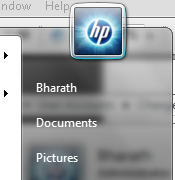
1. Click Start Menu and click on your user account profile at the top.

user account in start menu

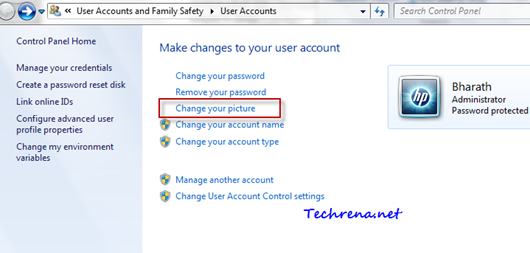
2. It will open the User account manager under control panel. Find and click on “Change your picture” link in this window.

Change your user account picture

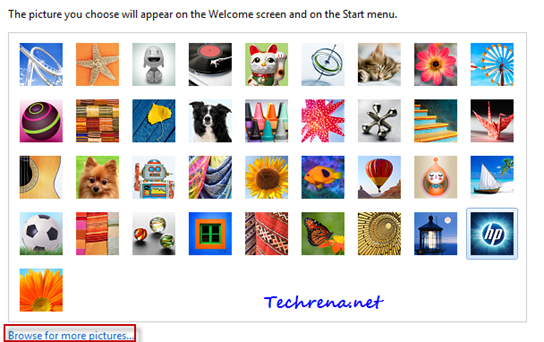
3. You will now be asked to choose your account picture. You can either select one from the handful of preloaded images listed there or you may also browse your computer for more pictures. Click on “Browser for more pictures..” link at the bottom of the window to select a picture from your computer.

Change your user account picture

4. Click on change picture to finish the process and you are done with changing your user account picture.

Although this tutorial is written keeping Windows 7 in mind, the procedure still remains the same for older versions of Windows like Windows Vista and Windows XP.

[Tip] Remove System Volume Information Folders

System Volume Information: Is it really a virus?

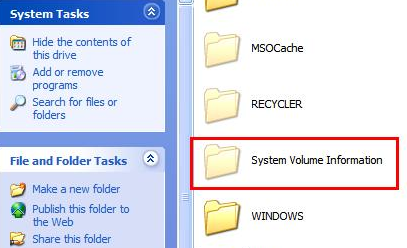
Myth: System Volume Information is a virus and it suddenly appears in your Windows XP computer and it doesn’t let you open its contents. It may have virus or suspicious files within it.

System Volume Information in Windows XP

Fact: System Volume Information (and even “Recycler”) folder is a standard Windows folder. System Volume Information folder stores the restore points data and the Recycler folder belongs to the Recycle bin. So first up, you don’t need to delete them and treat them as virus. These files do exist in later versions of Windows too. Here’s the proof: (Windows 7 screenshot)

System value information folder in Windows 7

These are system folders and are hidden by default. They will show up once you change the settings under “Folder Options’ to show the hidden system files and folders.

Thankfully Windows (Vista, Windows 7) doesn’t give you access to this folder so that averts any probable mess up if at all you access them and change the files inside it. Having said that , a virus can work around this and gain access to this folder to corrupt the restore points and create some .exe files inside it.

So to remove (actually to hide) the folder, just change the settings back in the folder options to not to show hidden system files and folders. However if you still insist on removing the System Volume Information completely (highly not recommended), here’s what you have to do:

Windows XP:

1. Right-click on My Computer and select Properties.

2. Click on the System Restore tab.

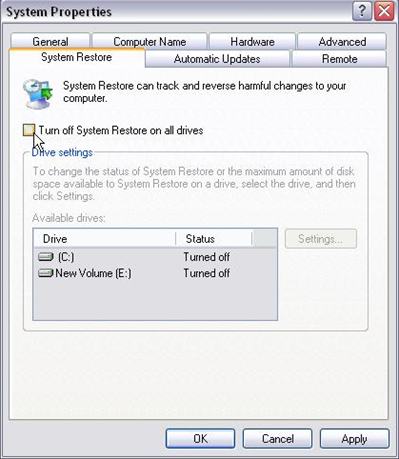
3. Click the Turn off System Restore on all drives check box and click OK.

Turn off System Restore

Windows 7 & Vista:

Read the How to disable System Restore in Windows 7 post written here at Techrena.

[How To] Remove The “Test Mode” Watermark From Windows 7

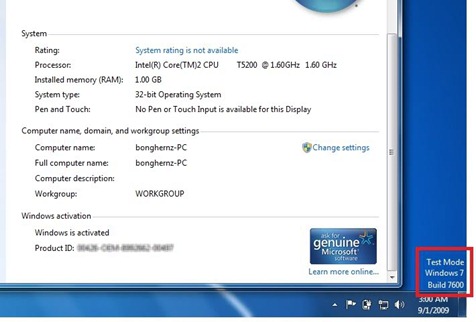
Test Mode Windows 7 Watermark

Legitimate Windows 7 users who are using the original and activated copies of Windows 7 versions are lately getting kind of weird “Test Mode Windows 7 Build 7600” watermark/message on the bottom right corner of their desktop just above the time zone area in the taskbar. This is really annoying as it appears suddenly anytime, users hardly knowing anything about the reason why it’s being showed up.

This message may appear when you follow one of the methods to disable driver signature checking in Windows 7. While implementing the method you may accidentally use the following commands

bcdedit.exe -set loadoptions DDISABLE_INTEGRITY_CHECKS

bcdedit.exe -set TESTSIGNING ON

and these commands are found to cause this problem. Having known the cause of the problem, we just need to do the reverse (enable “Integrity_checks” and set “Testsigning” off). Let’s see the full solution to disable this message on your Windows.

Solution:

1. You need to first run the command prompt as an administrator before you could proceed to the next steps. Refer to this old post at Techrena to know how you can run the command prompt program as an administrator.

2. In the command prompt window type the following command

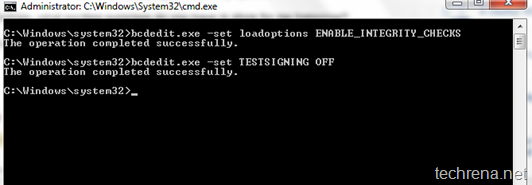
bcdedit.exe -set loadoptions ENABLE_INTEGRITY_CHECKS

and press enter and you must see “the operation completed successfully” message

now enter the following command and hit Enter again

bcdedit.exe -set TESTSIGNING OFF

and again you should get the same above success message. Refer to the screenshots posted below:

removing test mode cmd

3. Reboot your Windows and see the changes, the “Test Mode Windows 7 Build 7600” watermark disappears. That’s all.

[How To] Make Older Programs Compatible With Windows 7

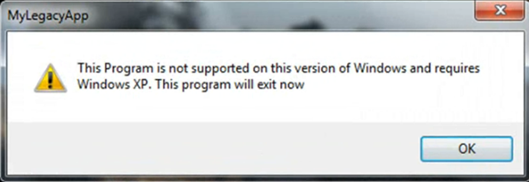
program not supported in Windows 7

Many users still use Windows XP and not upgrading it to the Windows 7, the one reason that we can think of is that they are worried about their favorite programs that they run in Windows XP without any issues might fail to run smoothly in Windows 7. While this may be true to some extent but the truth is that Windows 7 does offer a way to run these kind of programs.

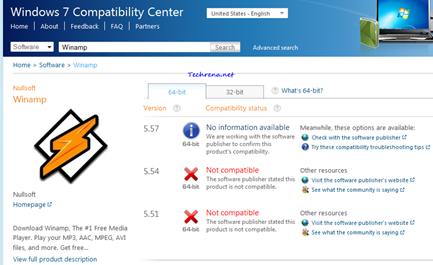
It is always suggested that you check the compatibility of the program that you want to run, at Windows 7 Compatibility Center.

Windows 7 compatibility center program check

Let us look at the alternatives that let us run older software in the newer Windows 7:

1. Run the latest version of the software: It sounds straightforward and easy, the fact that almost all the software makers who produce programs intended for Windows XP upgrade their versions to make them compatible with Windows 7. Hence you should always find the latest version of the software before you decide to run it on your Windows 7 machine.

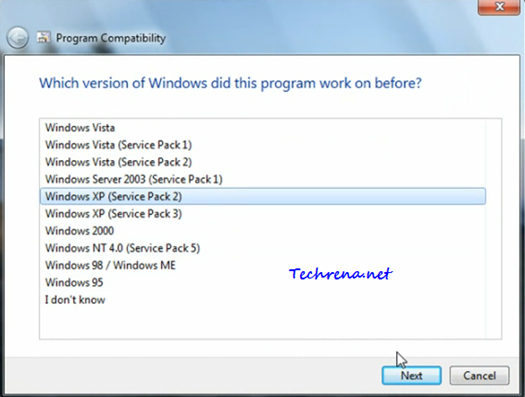
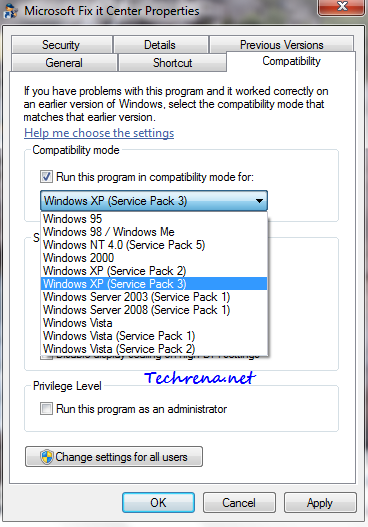
2. Using Compatibility Mode: As I said earlier, Windows 7 does have compatibility mode to run programs in compatibility mode for all the way back to Windows 95 to the Windows Vista (Service Pack. You can easily run any Windows XP based program using this feature in Windows 7.

Run windows xp compatibility mode in Windows 7

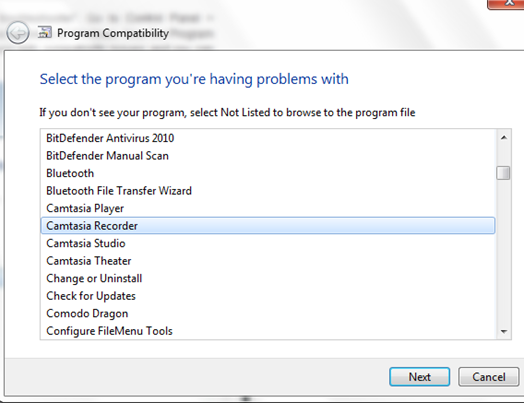
3. Another alternative is to use “Program Compatibility troubleshooter”. Go to Control Panel > Troubleshooting > Click “Run programs made for previous versions of Windows. Now the Program Compatibility wizard opens up and scans for the programs with compatibility issues and you can then select the program for which you want to changes in compatibility settings.

Program Compatibility wizard

Program compatibility in Windows 7

4. Using Windows XP inside Windows 7: Consider this option if all the above alternatives discussed fail. You can use Windows XP along with your Windows 7 in two ways: 1) Install Windows XP in another drive and dual boot it with Windows 7 2) Use Windows 7 Virtual PC and Windows XP mode in your Windows 7 PC.

[Download] Google Chrome 6 (Stable) Offline Installer

google chrome logo

Google Chrome has recently celebrated it’s second birthday and it’s has been a great journey so far for the most simplest browser in the world. Google is all proud to release Google Chrome 6 stable version of the browser. The latest version available as of the time when this post is written is 6.0.472.53.  Stable version of the Google Chrome 6 can be downloaded now from Google.com/chrome.

Google Chrome 6 poster

Google Chrome 6.0.472.53 includes the following new features and updates:

  • New Updated User Interface
  • Form Autofill
  • Extensions and Autofill data Sync
  • http:// will not be shown in the address bar
  • “Go” button Chrome_go_buttonhas been removed
  • Increased speed

Screenshots:

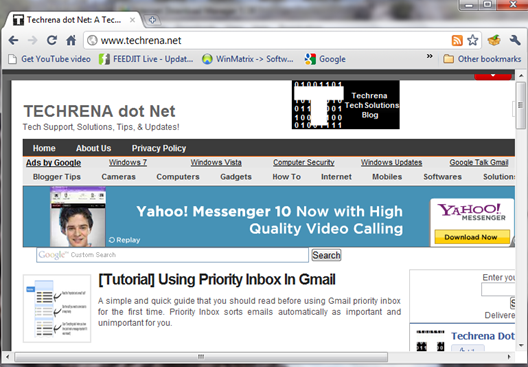
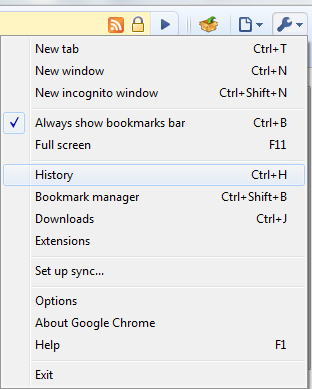
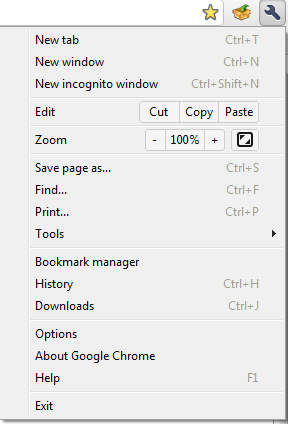
Google Chrome 6 screenshot

Settings comparison: Google Chrome 5 Vs Google Chrome 6

Chrome 5 settingsChrome 6 settings

Download Google Chrome 6.0 Full Offline Installer:

Even though this new version can be easily downloaded from the Google chrome online installer which automatically downloads and installs Chrome on your Windows and Mac, at times offline installer is what you want to use it on the other computers without needing to download again and again.

We have found a link for the Google Chrome 6 (Stable) standalone offline installer which is 19.52 MB in size. Use the direct download link included below to download it.

Google Chrome 6.0 Offline Installer

[Tutorial] Using Priority Inbox In Gmail

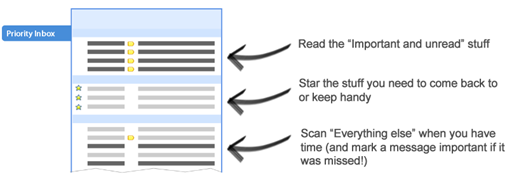
Gmail priority inbox overview

Google has just launched this brand new “Priority Inbox” feature inside their popular email service Gmail. The above an illustrative image taken from the official Gmail blog shows the quick overview of the what this new feature has to offer for you. If you are one of those who gets thousands of emails most of which are “not really” important, Gmail’s priority inbox lets you organise them in a better way by showing the emails that you should probably be reading first in a sorted manner based on your priority and on Gmail’s knowledge of picking the important mails based on your reading over the time. Without wasting much time, lets get straight into the details on making it ready for the first time for your inbox.

Steps:

Find “New! Priority InboxBeta” link in red at the top right corner of your Gmail inbox window.

New priority inbox

When you click on the link, a window with a video pops up, quickly go through the video to get to know about this new feature or you may totally skip it as well.

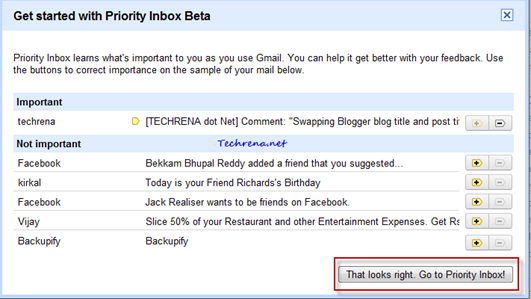
Click on “Try it now!” link at the bottom of the video and you will be shown a initial configuration window.Priority inbox beta getting started

The window will show some of your mails that Gmail thinks as “Important” or “Not Important”. If any one of the mails are shown in the wrong category, you can tell the Gmail it by clicking on the appropriate buttons : click on minus sign Priority minus signin case if the mail is wrongly placed in the “Important” category and click on plus signPriority plus signif there is any wrong mail in the “Not Important” category.

Once you have done the required changes, click on the “That looks right. Go to Priority Inbox!” link at the bottom of the window. Be patient until priority inbox gets activated for you.

Activating Priority inbox

Priority inbox first use

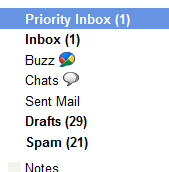
Here you go…Priority inbox has been activated and a new “Priority Inbox” label appears just above the classical “Inbox” label inside your Gmail.

Priority inbox label

And here’s how your new priority inbox should look:

Gmail Priority inbox look

It will have three sections: “Important and unread”, “Starred” and “Everything else”. You can still click on Priority plus and minus signsat the top of your mail to train Gmail work smart in choosing the important and unimportant mails for you.

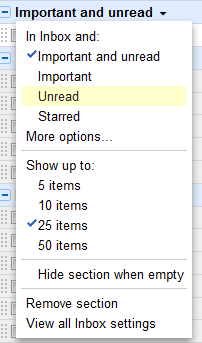
You can still customise your inbox from the pop-up window that appears when you click on any of the sections mentioned above. For instance, if you click on the down arrow present next to “Important and unread” label, you will see the following set of options:

Priority inbox pop-up options

Let us know your feedback on the new Gmail priority inbox through your comments.