Watch CES 2011 Live Online

CES 2011

The 2011 international Consumer Electronics Show (CES 2011) is scheduled for January 6 through January 9, 2011. With the kickoff just few hours away, the gadget lovers would be gearing up to watch the event live (live on CBS on TV as well as on CBS radio station in association with CNET). All the new and upcoming innovative gadgets that are slated for release this year will feature in this biggest annual tech show. CES 2011 is going to be crucial for Android as almost all the manufacturers (HTC, Samsung, LG, Motorola) are coming up with tablets and smartphones based on Android OS. The show is not just about tablets, smartphones and notebooks there are digital cameras, camcorders, gaming devices, TVs, and lots more to watch out for. If you are not able to make it to Las Vegas Convention Center (that’s where the event is happening) or not at home to watch the updates on TV, don’t worry, we have some links here for you to watch the CES 2011 proceeding online.

Live Streaming And Updates Links:

>> Watch CES 2011 updates on CNET Live

>> Stickam CES 2011 live stream:

>> Microsoft has a dedicated page for covering the Steve Ballmer keynotes and other CES 2011 updates.

>> Skype press conference at CES’11 (by Tony Bates, CEO)

>> Ford Keynote live stream (by Alan Mulally, CEO)

>> Samsung keynote live show

For live streaming of keynotes of other biggies like Sony, Panasonic, Toshiba etc. head over to ustream.tv, you might see their live broadcast videos there.

Other coverage:

Engadget

Gizmodo

UbderGizmo

www.cesweb.org (official website)

Twitter tags: #CES2011, #CES

Mobile updates: m.cnet.com

[How To] Enable The Details Pane In Windows 7 Explorer

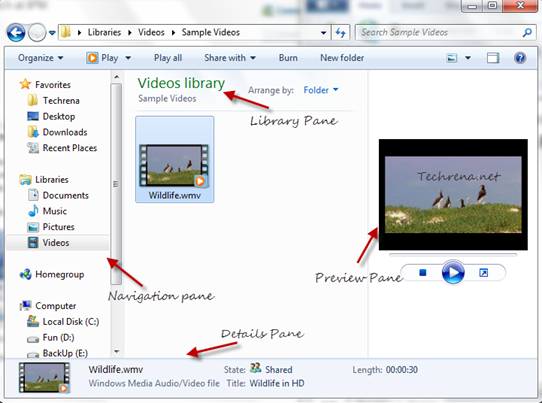
Windows 7 explorer panes

Unlike the earlier Windows versions, the Windows Explorer in Windows 7 has been revamped a bit to make it appealing to the users. Any Windows Explorer window in Windows 7 can have at least 3 panes i.e., Navigation Pane, Preview Pane and Details Pane. For Library folder, there would be an additional pane called Library Pane which would be displayed at the top just below the address bar.

For now, we are concerned about the Details Pane. It is the pane that appears at the bottom of the window and displays the important information about the file or folder selected. While it is enabled by default in Windows 7 and Vista, some may find it missing in their explorer windows. In case it is disabled, this is how you can enable the Details Pane again:
Steps:

1. Open any Windows Explorer window.

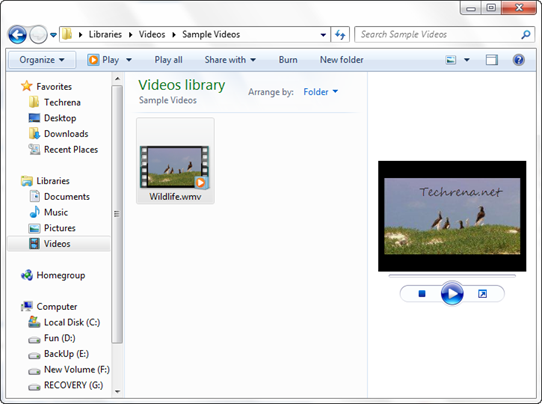
No navigation pane in Windows 7

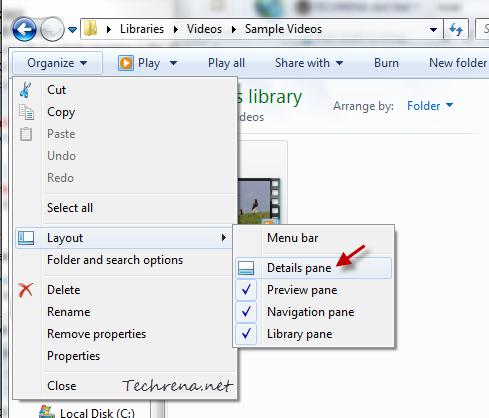
2. Click on the Organize button and from the drop down menu, roll over to the “Layout” and select “Details pane
Details pane in Windows 7 explorer settings

3. You should now see the Details Pane at the bottom of your Windows Explorer window as shown in the screenshot.

CTRL + Tab Tabs Preview Feature In Firefox

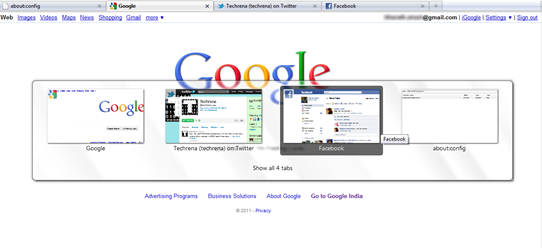
Firefox ctrl-tab feature

Firefox has changed a lot since the inception of the Firefox 3.6. A lot of features have been added since then. One such feature is previewing the opened tabs. We have already discussed how to enable all tabs preview in Firefox 4. Now  let’s see how to enable the other variant of tabs preview feature, the Ctrl + Tab tabs preview (similar to Windows 7’s Alt + Tab preview) in Firefox 3.6 or later versions. Ctrl + Tab preview is disabled by default and if you hit Ctrl + Tab without enabling this, you can just switch the tabs. With Ctrl + Tab preview enabled, you can actually see the preview of tabs which would be very much useful. Follow the steps to enable the same.

Steps:

1. Type about:config in the Firefox address bar and hit Enter.

2. Accept the warning message and proceed to the Firefox about:config page.

About:config Firefox warning

3. Type the following code in the filter and find the boolean key with the same name.

browser.ctrlTab.previews

ctrl-Tab preview firefox setting

4. By default, the value for this key would be set to “false”, meaning that the tabs preview feature has been disabled. As we want to enable this, just double click on the boolean entry to change its value to “true”.

That’s it! Just hit CTRL + Tab key to preview the thumbnails of all the tabs opened in a current Firefox page as shown in the first screenshot. Just change back the value to “false” in the step-4 to disable the tabs preview feature.

[How To] Add RSS Feed Autodiscovery To Your Site

Almost every website offers updates via RSS feeds these days. This is the fastest way to notify the readers about the updates in the site. When it comes to blogs, blogging platforms like Blogger, WordPress etc. enable RSS feeds by default and the RSS feed autodiscovery would also be enabled in most cases. But at times what can happen is the tiny code that enables the RSS autodiscovery may go missing and the RSS feed can’t be discovered automatically.

How to find whether RSS autodiscovery is enabled?

Just open your website or blog in the browser (Firefox or Internet Explorer).

Firefox:

If the RSS feed icon RSS feed iconappears in the address bar, your site has RSS autodiscovery enabled.

RSS feed icon in firefox

If you don’t see the RSS feed icon, it means that RSS autodiscovery is disabled.

No RSS icon in Firefox

Internet Explorer:

The RSS feed button will be in bright color when your site has RSS autodiscovery:

rss feed icon in IE

The feed icon will be greyed out when feed autodiscovery is not enabled:

No RSS disocery in IE

Clicking on the icon will show the available subscription options.

Enable RSS Autodiscovery:

Just add the following code to your site header to enable the RSS autodiscovery:

<link rel=”alternate” type=”application/rss+xml” title=”Site Feed” href=”Your Feed URL” />

In general, if you are using Feedburner, the code would look like:


<link rel="alternate" type="application/rss+xml" title="Feedburner Feed" href="http://feeds.feedburner.com/feedburner-id" />

Replace “feedburner-id” with your Feedburner ID.

If you are using WordPress, add the following code to your header.php file.

<link rel="alternate" type="application/rss+xml" title="RSS 2.0"href="<?php bloginfo(‘rss2_url’); ?>" />

Header edit for RSS autodiscovery

Just refresh your site after adding the code and you should now see the RSS autodiscovery being enabled:

[Download] Skype 3.0 For iOS To Make Video Calls

Skype logo

Skype has released a updated version of the popular VoIP app for the users if iOS. With the Skype 3.0 app on iPhone 4, iPhone 3GS, iPod touch or iPad, you can now make video calls to other Skye users on any client over 3G or Wi-Fi network. Video calling is going to be an exciting feature for the Skype app users on iOS, which was among the top 5 free iPhone apps downloaded according to Apple.

Skype iPhone app v3

New in Skype version 3.0:

Skype to Skype video calls over 3G and Wi-Fi

Cross platform calls between Skype users on different platforms (Windows, Mac OS X etc.)

Video call receiving only for devices without camera like iPad and iPod touch (3rd gen)

Video calls in portrait and landscape mode

If you are on iPhone and heavily rely on FaceTime feature to make video calls with other iPhone 4 users, you must checkout Skype which allows video calls between Skype users on virtually any client.

Download Skye 3.0.3.0 from iTunes App store (size 11.9 MB)

[How To] Tweak The Low Battery Notification In Windows 7

Working on your notebook which is having a pretty high battery life? And wonder why you are being notified even when you have pretty much time left to plug into an AC power supply?

Windows takes into account the average laptops with battery lives around 2-4 hours and Microsoft has accordingly set the battery levels after which the users get notified and eventually pushing Windows into Hibernate mode after reaching a critical stage. But if you consider the case of the users with long battery backups, they would still be having more than enough time to save their current work, get plugin the power supply to the laptop. So if you are once such user, you might want to change the low battery actions on your laptop. Before that, let’s see what are the different battery levels considered by your Windows OS.

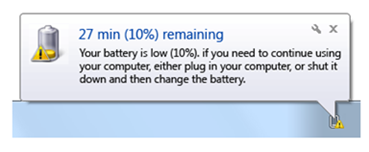
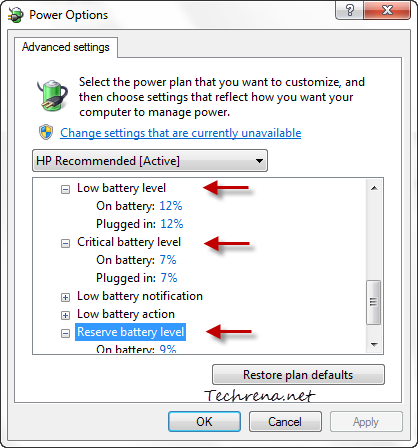
>> Low battery level is where you will laptop starts showing the first low battery notification and the low battery level usually lies in the range of 10-12%.

low battery in Windows 7

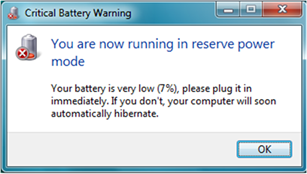
>> Reserve battery level is where your Windows starts acting and gets ready for hibernating, in most cases it will be around 7-8% lying closer to the critical battery level.

reserve battery level

>> Critical battery level is where your laptop goes into Hibernation mode immediately and it’ll be around 5% in general.

Critical battery in windows

Now that you have got the basic idea about different battery levels, let’s get into to details of changing the low battery notifications in Windows 7.

Steps:

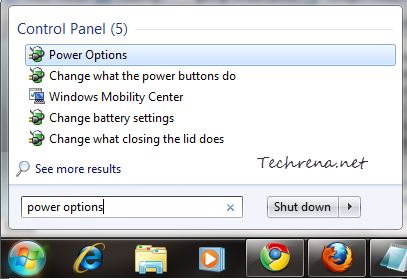
1. Type “power options” in the Start Menu search and open the first result under the Control Panel section.

Power Options search in the Start Menu

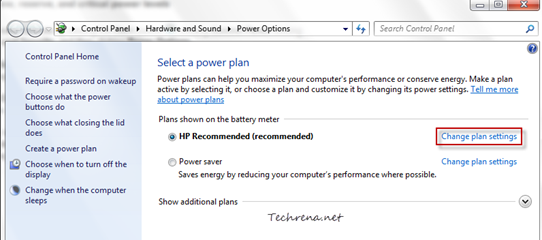
2. Now select the power plan for which you want to change the low battery notification settings, and click the “Change plan settings” link found next to the power plan.

Power options in Control Panel

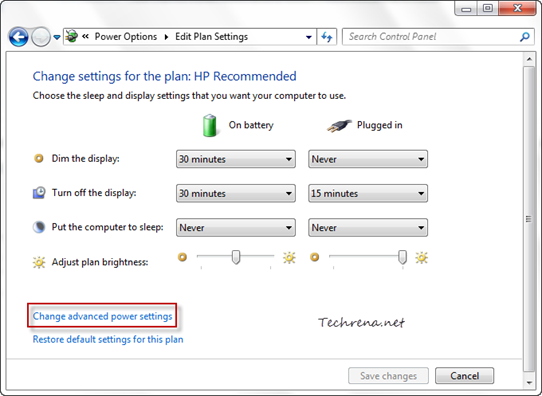
3. In the “Edit Plan Settings” window, click on the “Change advanced power settings” link found at near the bottom.

Edit power plan settings in Windows 7

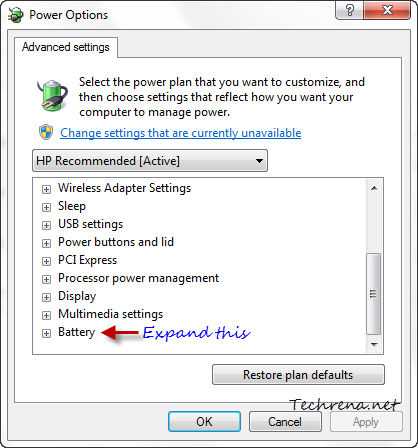
4. Scroll down to “Battery” section in the Advanced settings tab and click the “+” button to expand it.

Battery advanced power plan settings

5. You may adjust the settings for each of the battery levels i.e Low battery level, Reserve battery level and Critical battery level.

Low battery notification settings

Click “OK” once you are done to apply the settings. That’s it.

[How To] Create And Enable Mobile Version Of A Blogger Blog

blogger logo

With the growing usage of iPhones, Android devices and other smartphone devices around the world, the number of people who access the internet from their mobile devices. Considering this, it is now very essential that you create a mobile version of your website or blog just to make sure that it fits perfectly on the screens of such devices. If you are a blogger and using WordPress, it’s pretty much easy to setup a mobile version of your blog with plenty of plugins serving the purpose. But what about Blogger? If you still don’t know, the answer is Yes! now you can. Blogger has recently announced the mobile templates for Blogger. But this now is available as an opt-in functionality on Blogger in Draft.

Here’s how you setup and active a mobile version for your blogspot blog without using any hacks:

1. Log in to Blogger in Draft.

Blogger in draft

2. Click on the “Settings” link for you blog

Blog settings link on Blogger dashboard

3. Go to the “Email & Mobile” tab under “Settings”.

Email & Mobile tab under blogger blog settings

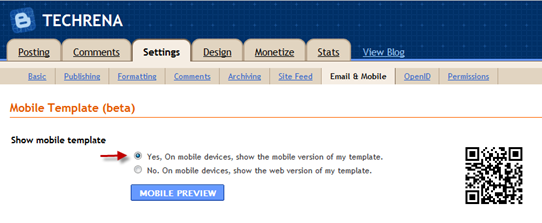
4. Under the Mobile Template, choose the first option (Yes, On mobile devices, show the mobile version of my template).

Mobile Template in Blogger

5. You can click on the “Mobile Preview” button to see a preview of how your blog will look on a mobile device

Blogger mobile preview

6. Click the “Save Settings” button at the bottom once you are done.

save settings button in blogger

You have successfully enabled the mobile template for your blog now. Test it by visiting your blogspot blog from a mobile phone or use the QR code found in the mobile template settings to directly go your site on your mobile device.

techrena QR code

[Download] WordPress 3.0.4 Important Security Update

WordPress has probably rolled out the last update for the year 2010, WordPress 3.0.4, an important security update for the popular CMS. In a blog post about the release of the update, Matt Mullenweg, founder of Automattic, the company behind WordPress, has termed the latest update as “critical”. The update apparently fixes a core security bug called KSES found in WordPress HTML sanitation library.

WordPress 3.0.4

To keep your website or blog managed by WordPress CMS, it is strongly advised that you immediately update it to the latest version. You can either choose the automatic update mode or download the file from the links below and extract to your server using an FTP client.

Download:

WordPress.zip (3 MB)

WordPrress.tar.gz (2.7 MB)

[Tip] Sort A List Alphabetically In MS Office Word 2007 & 2010

Microsoft Office 2010

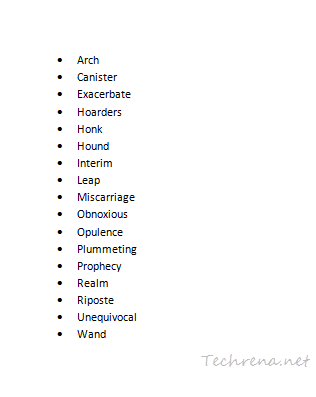
Recently I was working on a big list of words that are to be sorted alphabetically for easy use. I was checking various online sources . Yes, there are online tools available to just to that. But if you have Microsoft Office Installed on your Windows, it’d be a better way to accomplish this task. Microsoft Word can sort data according to various criterion and here we’ll just try to know how to sort the data alphabetically. Advanced users of Microsoft Office should well be aware of this but if you are a starter probably you should read the following guide to learn how you can do it in Microsoft Word 2010 or MS Word 2007.

1. Open the Microsoft Word application.

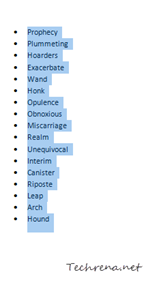
2. Paste the list that you want to sort in the new document.

List in Microsoft Word 2010

3. Select all the words using CTRL + A

Select the whole list in Office 2010

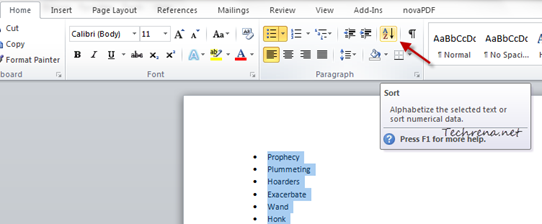
4. Now find a small sort icon Sort icon in Word 2010in the Paragraph group under the “Home” tab. Click on the icon.

Sort list in MS Office Word 2010

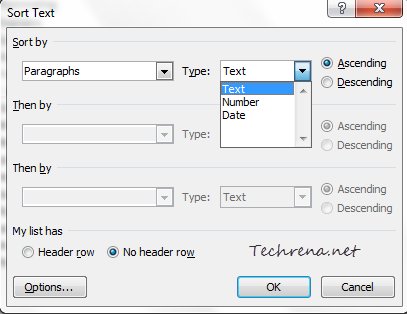
5. A new dialog box will appear inside the Word application window. Choose “Text” option from the dropdown list under the Type and choose “Ascending” radio button. Click OK.

Sort Text Dialog box in Word 2010

That is it. Your list is now sorted alphabetically as you can in the screenshot below:

Sorted list in Word 2010

[How To] Disable Aero Shake In Windows 7

If you are using Windows 7 you might have noticed the Windows Aero Shake effect. Just hold down a window on its title bar and shake it back and forth and you will notice that all the other windows will be minimized. I’m sure you must have noticed this, but chances are that you might not be aware that this is due to an special Windows 7 Aero effect called Windows Shake. Windows Shake is part of the Aero effects in Windows 7 alongside Aero Peek and Aero Snap. Watch the following video to know about Aero Shake.

For some reasons, if you want to disable Aero Shake feature for your Windows, here are the two ways in which you can do it.

Method-1: Using Registry Editor [For All Windows 7 Editions]

1. Press Windows + R button to open the RUN command.

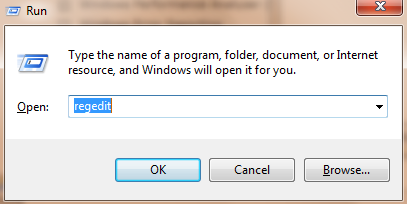
2. Type “regedit” in the text field and hit Enter to open the Registry Editor.

regedit run command

3. In the Registry Editor, navigate to the following path:

HKEY_CURRENT_USER\Software\Policies\Microsoft\Windows

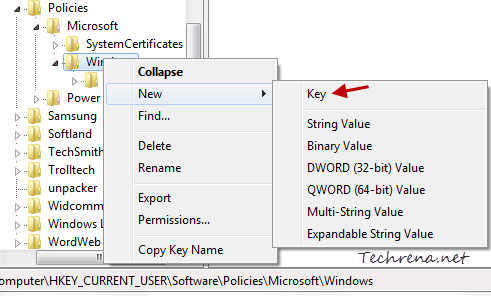
4. Right-click on the “Windows” main key and choose New > Key from the context menu to create a new key with name “Explorer”.

Create a new sub key under Windows main registry key

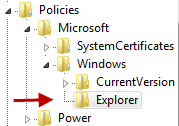
And it should look like this:

New Explorer sub key in regedit

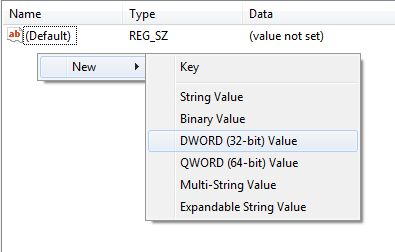
5. Now in the right hand side pane under the newly created “Explorer” key, right-click and choose “New > DWORD (32-bit) Value”.

Creating a new DWORD in regedit

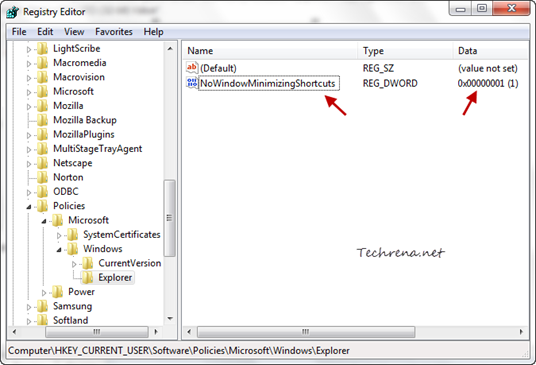
6. Name it as “NoWindowMinimizingShortcuts” and set its value to 1 as shown:

Registry setting to disable Aero Shake

That is it. Just log off from your account and log back in and you will learn that the Aero Shake has been disabled. To enable the Aero Shake again, just delete the DWORD that you have just created.

Method-2: Using GPEDIT [Only For Limited Windows 7 Editions]

If you are on Windows Professional, Enterprise or Ultimate editions you have access to the Local Group Policy Editor and it is relatively easy to achieve the same settings vis GPEDIT.

Steps:

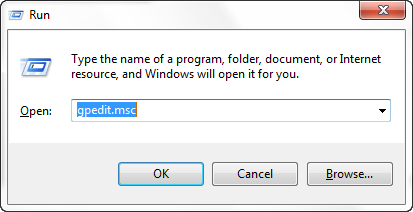
1. Press Windows button + R to open the RUN dialog box and enter “gpedit.msc” in the text field and hit enter.

Gpedit from RUN command

2. Go to User Configuration > Administrative Templates > Desktop in the local group policy editor.

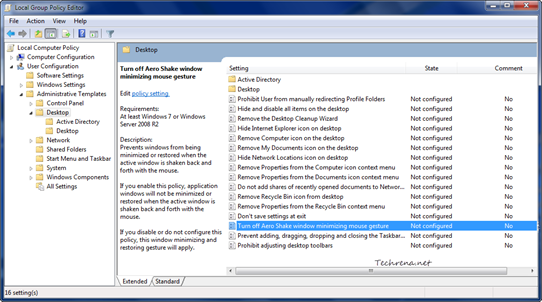
3. On the right-hand side pane, find an entry named “Turn off Aero Shake window minimizing mouse gesture”. Double-click on the entry to configure the settings.

GPEDIT settings for Aero Shake

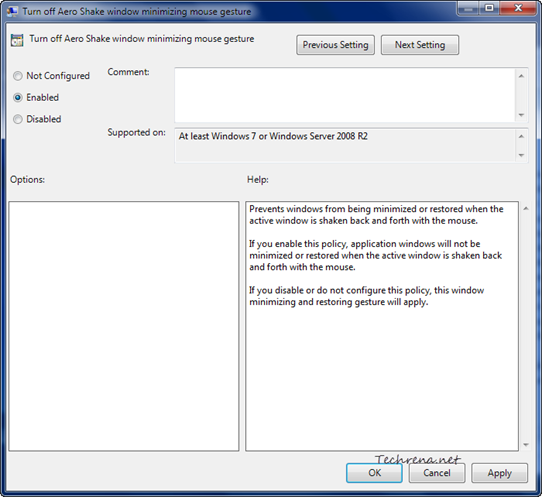
4. Select the “Enabled” option and click “OK” to apply the settings.

GPEDIT settings to disable Aero Shake

The changes will be in action immediately and the Aero Shake will be disabled.

If you are on Windows 7 Starter, Home Basic or Home Premium editions, you must use the method-1. If you are on Windows 7 editions other than the above mentioned ones, we suggest you to go with the method-2.