Speed Up Your PC Using a USB flash Drive in Windows 7 and Vista With ReadyBoost

If you have a low memory in your Windows 7 PC, your system may be slow and the performance may not be satisfactory. Microsoft Windows has introduces a new component known as ReadyBoost, to help when your PC’s memory is running low.

ReadyBoost is a component of Microsoft Windows, first introduced with Microsoft’s Windows Vista in 2006 and bundled with Windows 7 in 2009. It works by using flash memory, a USB flash drive, SD card, CompactFlash, external hard drive or any kind of portable flash mass storage system as a drive for disk cache.
ReadyBoost is also used to facilitate SuperFetch, which allows it to perform analysis of boot-time disk usage patterns and creates a cache which is used in subsequent system boots. SuperFetch is a technology that pre-loads commonly used applications into memory to reduce their load times, in a similar fashion to the preload in Linux.

Using ReadyBoost-capable flash memory (NAND memory devices) for caching allows Windows 7 and Vista to service random disk reads with performance that is typically 80-100 times faster than random reads from traditional hard drives.

Using ReadyBoost in Windows 7 and Vista:

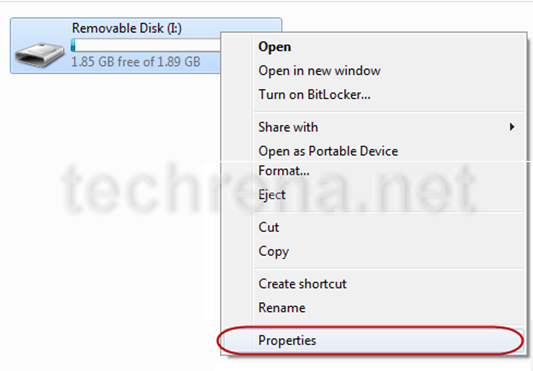
First plug in your USB flash drive. Open My Computer. You can see the Removable Disk. Right Click on it and Select Properties.

removable_disk_properties

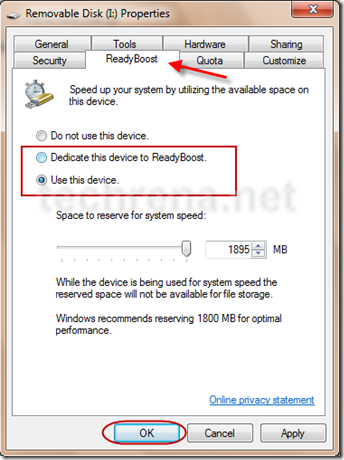
Now in the Properties window, go to ReadyBoost Tab. You can either select Dedicate this device to ReadyBoost or Use this device and set the amount of space you want to use for the process.

ReadyBoost

Now Windows will use the free space available in your flash drive for speeding up your computer.

Note that this process will not delete any data from your flash drive. It will only use the available free space in the removable disk.

Moreover if you want to speed up your boot up and startup, you need to use MSConfig.

Download Security Update for Windows 7 To Protect from Remote and Local Attacks

windows 7 logo

A series of 5 Important Security Updates for Windows 7 has been released yesterday.  According to Microsoft Windows a new security issue has been identified that could allow an unauthenticated remote attacker or authenticated local attacker to compromise your system and gain control over it. This being a serious issue and of great concern we are giving the details to install the updates as soon as possible.

The list of Security Updates are:

Security Update for Windows 7 (KB978601)    204 KB
Security Update for Windows 7 (KB979309)    99 KB
Security Update for Windows 7 (KB979683)    1.8 MB
Security Update for Windows 7 (KB980232)    229 KB
Security Update for Windows 7 (KB981332)    222 KB

The description of KB978601, KB979309, KB980232 and KB981332 is: A security issue has been identified that could allow an unauthenticated remote attacker to compromise your system and gain control over it. You can help protect your system installing this update from Microsoft.

KB979683: A security issue has been identified that could allow an authenticated local attacker to compromise your system and gain control over it. You can help protect your system installing this update from Microsoft.

All the 5 security updates are required to face this issue.

Installing the Updates:

Automatic Download:

Go to the location:

Control Panel—> System and Security—> Windows Update

In the left Side Pane Click on Check for updates.

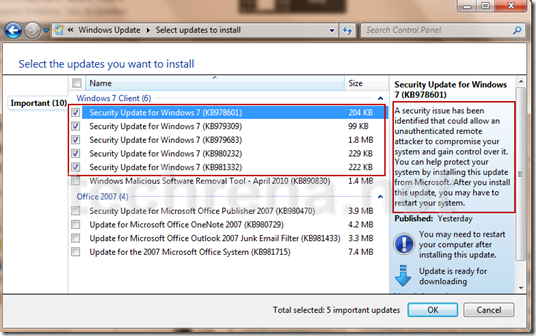
After Checking, Windows may find various updates. Select the updates you want to install and Update. See the image below.

security_update

You can check the updates you want and uncheck the ones you do not need.

Manual Download:

You can manually download the updates from the links given below from Official Microsoft site.

Security Update for Windows 7 (KB978601)
Security Update for Windows 7 (KB979309)
Security Update for Windows 7 (KB979683)
Security Update for Windows 7 (KB980232)
Security Update for Windows 7 (KB981332)

After Installing you need to restart the system to complete installation.

Download Windows Process Security To Find UnSafe Processes

Windows Process Security is a freeware which can be downloaded free of cost from sourceforge.net. The details are given below.

Windows Process Security is a security tool that shows comprehensible information about programs and processes running on your computer and identifies the potential threats running on your computer. The program consist on unique security risk rating for processes and ability to remove 130000 threats. Windows Process Security indicates the likelihood of a process being potential spyware, malware or a Trojan.

A regular Update of the the threat database is required for optimal performance. The update can be directly performed from Windows Process Security 1.0 Application and is free of cost.

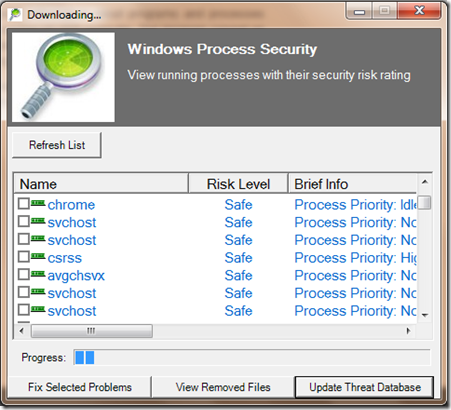
The user interface is quite simple. You can see all the safe and and unsafe processes. If any threat or unsafe process is found you can terminate the process, fix the problem and go to the containing folder to delete the threat. A screen shot of the application is given below.

Windows process security 1.0

Windows Process Security 1.0 can be downloaded from the link below:

Download Link: Windows Process Security 1.0

Size: 3.4 MB

Operating System: Windows 98/Me/2000/XP/2003/Vista/Server 2008/Windows 7/NT

Released on: 28-03-2010

Nokia C3: Qwerty Keypad Phone With Ovi Mail access and More

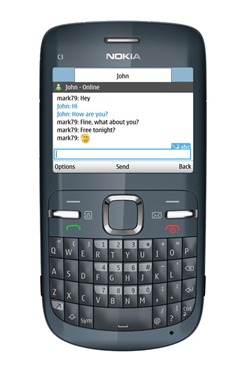
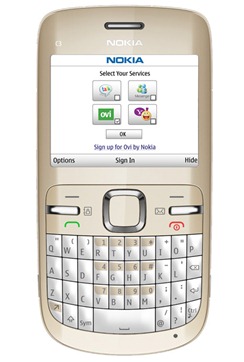
The Nokia C3 is the first Series 40 device to come with a full QWERTY keyboard. It is specially designed for messaging and social networking. You can easily create email accounts and chat with Nokia Messaging Ovi Mail access.

nokia_c3_blacknokia_C3_gold

The Nokia C3 supports conversational SMS chat and favourite contacts can be added on the homescreen.The C3 also features Wi-Fi connectivity, a two-megapixel camera, 2.4-inch screen and support for up to 8GB of storage on a microSD card.

A detailed feature and full specification is listed below.

Feature Description
Display 2.4” QVGA (320×240), up to 262k
colors
Input Type Full QWERTY keymat
Network GSM/EGSM 850/900/1800/1900
OS Series 40
Dimensions 115.5 mm x 58.1 mm x 13.6 mm
(L x W x H)
Volume: 63.2 cc
Weight: 114 grams (including battery)
Memory Up to 55 MB internal memory, support
for up to 8 GB microSD memory card
Connectivity WLAN (IEEE 802.11b/g)
EGPRS multislot class 32
Bluetooth wireless technology 2.1 with
enhanced data rates (EDR)
microUSB 2.0
Music 3.5 AV connector, FM stereo radio, MP3 and Media player
Camera 2 megapixel camera with 4 x digital zoom
Social Networking and Browsing 1-click access to email and chat via Nokia Messaging
Easy Ovi Mail and Ovi Chat account creation
Conversational SMS for chat type messaging
Favourite Contacts
Social networking made better 1-click access to social networking via Communities client
Viewing alerts and news on the home screen
Easy posting and changing of status and uploading photos
Quick navigation through your friends latest posts
Experience the Internet in new ways
Webkit based browser
Opera mini client
Web Search
Talktime Standby time: Up to 20 days
Talk time: Up to 7 hours
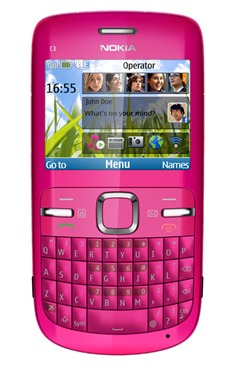
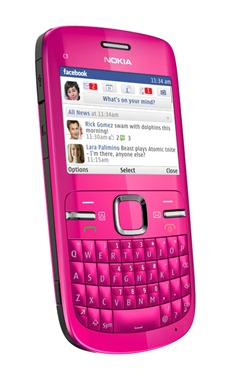
Colors Available Slate Grey, Golden White, Hot Pink

Nokia_c3_pinknokia_C3_pink_front

The C3 will be available in the second quarter of 2010 with an expected price tag of about €90 (In India INR 5400) before taxes and subsidies.

Watch the Nokia C3 Promo:

Nokia C6: Affordable 3G Touchscreen SmartPhone with Qwerty, OVI Maps and More

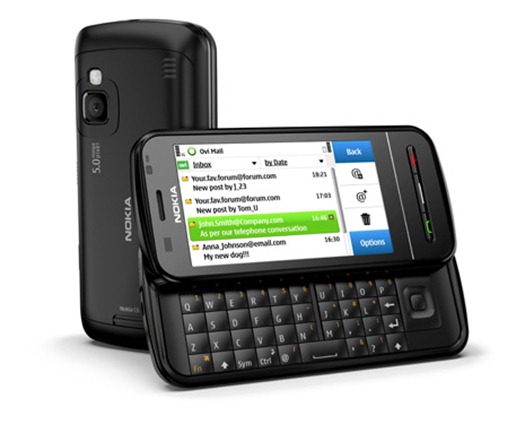
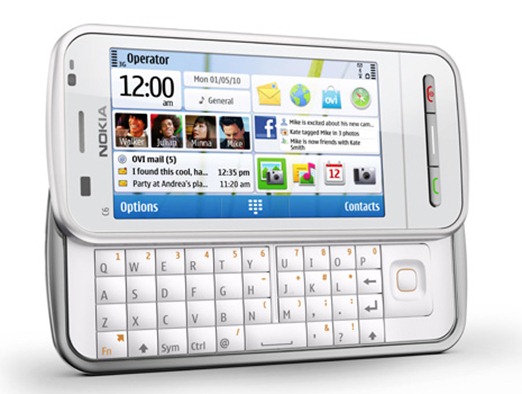
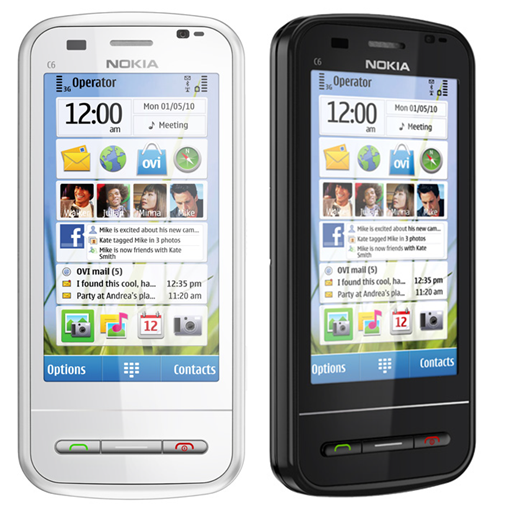
The all new Nokia C6 is equipped with a 3.2-inch HD touchscreen display and a slide out four-row QWERTY keyboard.It also comes with a five-megapixel camera, support for up to 16GB of storage on microSD and an FM stereo radio. The C6 also comes toting Ovi Maps with free walk and drive navigation.

nokia_c6_black

The new C6 promises to bring you the best of messaging together with instant access to your favorite contacts and communications. Its customizable homescreen will host your favorite contacts, your latest emails and your friends’ Facebook updates. You will have support for up to 10 email accounts from your favorite email hosts including Yahoo! Mail, Gmail, Windows Live Hotmail and Ovi Mail.

nokia_c6_qwerty

A detailed and full specification of Nokia C6 given below:

Feature Description
Display 3.2 inch HD TFT touchscreen, Supports 16M colors, Size     360 x 640 pixels
Network 2G: GSM 850 / 900 / 1800 / 1900
3G: HSDPA 850 / 900 / 1900 / 2100
Dimensions Size: 113 x 53 x 16.8 mm
Weight:150 grams
Camera Primary Camera: 5 MP, 2592 x 1944 pixels, autofocus, LED flash, Geo-tagging, face and smile detection, Video recording;
Secondary Camera included
Internal Memory 200 MB, Unlimited phone book entries and fields
Eternal Memory up to 16GB, microSD, 2GB included
Connectivity GPRS, EDGE
3G:  HSDPA 7.2 Mbps, HSUPA 5.76 Mbps
Wi-Fi 802.11 b/g
Bluetooth v2.0 with A2DP
USB:  v2.0 microUSB
Operating System Symbian OS, Series 60 release 5.0
Music and Video Music Player Formats: MP3/WMA/WAV/eAAC+
Stereo FM radio with RDS,
Video Player Formats: MP4/H.264/WMV
Messaging and Browsing Messaging: SMS, MMS, Email, Push Email, Yahoo! Messenger, Google Talk, Windows Live Messenger
Browsing: WAP 2.0/xHTML, HTML, RSS feeds
Java MIDP 2.1 Support.
GPS A-GPS, Ovi Maps with free walk and drive navigation
Documentation Word, Excel, PowerPoint, PDF
Battery and Talktime Li-Ion 1200 mAh (BL-4J),Stand-by : Up to 384 hrs (2G) / Up to 384 hrs (3G)
Talk time     Up to 7 hrs (2G) / Up to 5 hrs (3G)
Colors Available White and Black

nokia_c6

The Nokia C6 is expected to be available in the second quarter of 2010 for an estimated price of €220( In India INR 13200) before taxes and subsidies.

Watch the promo video from Nokia:

UniverCell Hyderabad IndiBlogger Meet 2010 – A Beautiful Experience

IndiBlogger

I was very much excited for this event as this was my first bloggers meet. The event was interesting in every part of it and didn’t even find a single boring moment (Which usually happens in most of the meets). It was very well organized and beautifully executed. We wholeheartedly thank the IndiBlogger team for organizing such an exciting event and we also thank UniverCell for sponsoring it.

I am putting forward my experience in the whole event below.

Hyderabad IndiBlogger Meet 2010

Image Source: Aditya

Arrival and Startup

I reached the venue at 1:50 PM, which was quite early and I was one of the first bloggers to arrive. The conference hall was almost empty. The IndiBlogger team showed a warm hospitality.

By 2:30 PM the Hall was almost full. But as we were expecting more attendees, the meet started around at 2:40 PM. The IndiBlogger team was introduced to us. We got to know the whole team and got the idea whom to catch if our blog is rejected from IndiBlogger. One of the team member even rode a bike from Mumbai to Hyderabad to attend the meet. The introductory video featuring Adolf Hitler showing his desire for attending the meet to fulfill his hunger for Hyderabadi Dum Biryani was completely superb and hilarious.

30 Seconds of Fame (The Most Exciting one)

We had to introduce ourselves in 30 seconds. I got to know a lot on new people. The blogosphere in Hyderabad included from Movie Directors, Government employees, IT professionals to Mothers, Pensioners, etc. Most of the blogs were about their personal experience, life, social problems. Some were about poetries, songs and others were about jokes, sensible bakwas, humours, nothing, everything and so on.


Some people were nervous about the introduction. And i don’t know why many people compared the intro part with a matrimonial event? It was an exciting one, grey haired people searching for other grey haired ones, jobless people searching for helpers job providers, etc.

Live & let comment

This was another fun part. Mingling with each other, getting to know new people and writing about the person whom you hardly know. Enjoyed every part of it.

My Comment chart was almost filled. So one commenter wrote:

follow@anicode: “This guy is getting a lot of comments. So I am gonna spam!”

My friend Supraja wrote: “Craziest person ever seen”. I didn’t understand why she had to express that I am crazy on the comment chart? Guess she got the guts as it was the IndiBlogger’s meet!

The UniverCell Blogger Quiz by Riyaz Usman

The quiz was an interesting and a well researched one. Many topics and discussions were covered from Wikipedia, facebook, to Tharoor’s Tweet. This part was engaging.

Mingling session / High Tea

We had a good time talking to new bloggers over a cup of coffee. Just felt that we Bloggers had constructed our own identity. As a blogger I felt really happy to see other bloggers around me.

IndiBlogger Forum: Open discussion

In this session we decided an open discussion forum for the Hyderabad Bloggers as hyderabadbloggers.in. Hope we got to meet each other in the forum soon.

At last there was a group photo session. It was fun. Everyone wanted another photo because of the reasons like I didn’t smile!

Confession and A Sincere Apology

I am really sorry that I forgot to return the sketch pen which I got for commenting. Sorry!

Jokes apart, I sincerely thank IndiBlogger and UniverCell for making this event happen. I thank you for the Hospitality and also the T-Shirt. We are looking forward for similar events in future. Our confidence and morale as a blogger has been greatly enhanced after this meet.

Thank You!

How To Install or Upgrade Your Laptop’s RAM (Physical Memory)

techrena logo

With the increasing technology day by day, our computers, laptops and every equipments are becoming obsolete. I bought my Laptop with 1GB RAM and 100 GB Hard Disk at a price with which I can buy a fully featured Tablet PC now.

So to deal with the developing technology, we need to upgrade our PCs and laptops to fit and to support the currently available software and operating system. I felt its high time that Techrena dot Net give you a tutorial to upgrade the most basic and most needed hardware upgrade –your Laptop’s Physical Memory or RAM (Random Access Memory).

What You Need to Upgrade your RAM?

  • Find out the type of RAM your Laptop PC Supports ( DDR1, DDR2, DDR3, SD, etc.)
  • Find out the Maximum amount of memory size your Laptop Supports( 2GB, 4GB, 8 GB, etc.)
  • Buy a suitable RAM for you Laptop PC
  • A suitable screwdriver (Mostly Philips Type)

How a Laptop RAM Looks Like?

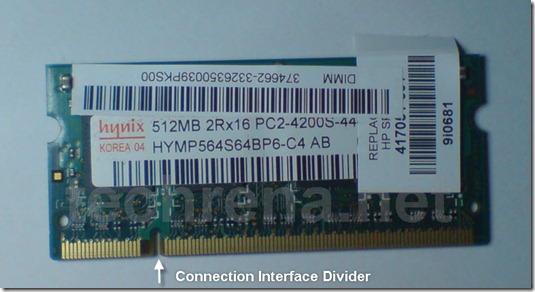
Laptop RAMs are smaller in size as compared to Desktop RAMs. A HYNIX made 512MB DDR2 RAM is shown below. As you can see it has a connector for the RAM slot in your laptop and it has a divider. This divider is to indicate the correct side while connecting it.

Click on the images to enlarge

512MB RAM

Opening your Laptop Ram Container:

Shutdown your computer and disconnect all the cables and wirings. Turn your Laptop over, be careful and keep a protection under the laptop.

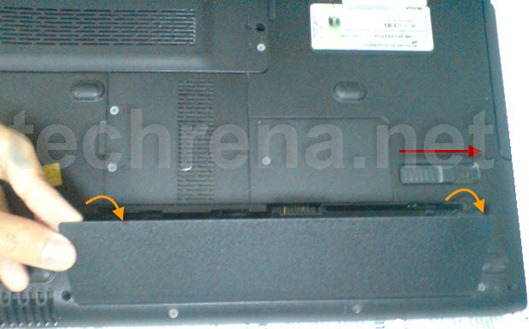
Now Remove your Laptop battery. To remove release the lock and pull the battery out.

Remove the battery

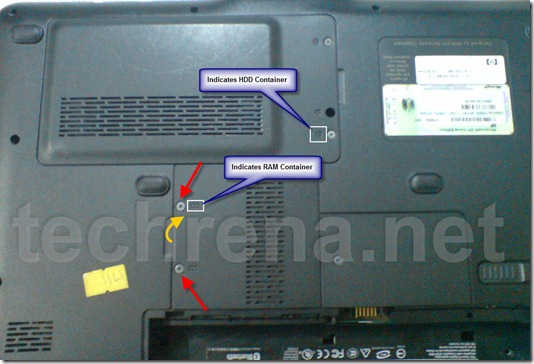
Now see which section contains the RAM in your laptop. Do not confuse with the other device containers. With a suitable screwdriver, start unscrewing the screws in the section which contains the memory devices. See the image below:

Open Container Screws

Removing the old RAM (not required if empty slot is available):

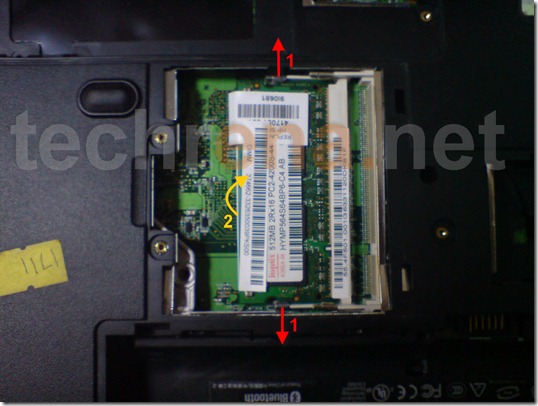
After opening the cover of the RAM container section, you need to remove the old RAM which needs to be replaced. Note that many laptops have more than one RAM slot. Which means that if you have an empty slot you can put the new one in the empty one. This will add your new RAM size to your old one.

First pull out the RAM holder as shown, the Device will come out automatically. Take it out smoothly.

Remove Old RAM

Installing a New RAM:

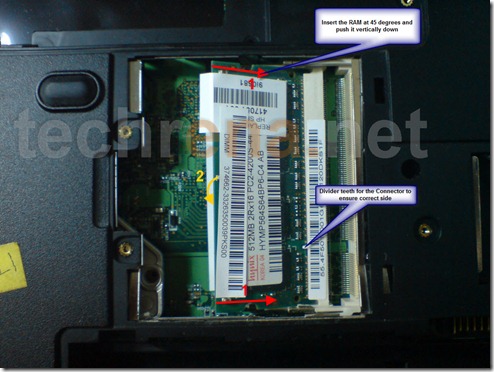
Before inserting the new one, find out the correct side to which you need to connect to. Slide in the Device smoothly to the slot. Most RAM slots need to insert the device in 45 degrees and push it vertically down after it has been inserted fully into the slot. Refer the image below:

Install New RAM

Now place the covers and screw it back. Place the battery back to the battery slot. Power it up and start the computer.

Installation of RAM has been successfully completed and you can check the Physical Memory at:

Right Click on My Computer—> Properties—> Memory or

Task Manager –> Performance—> Total Physical Memory

Important:

  • Do not try any forceful methods to remove the screws or devices.  If anything is not getting removed, do contact a professional.
  • Be careful while installing the new device. Make sure you insert it correctly and firmly.
  • The above tutorial is based on HP DV1502 TU Model. It may be different in your case.

Disclaimer: This tutorial is for your information only. Techrena dot Net is not responsible for any damage in property or lives resulting from the use of the information given here. You are responsible for all the actions you take.

LG Mini GD880: Full Specifications

LG Logo

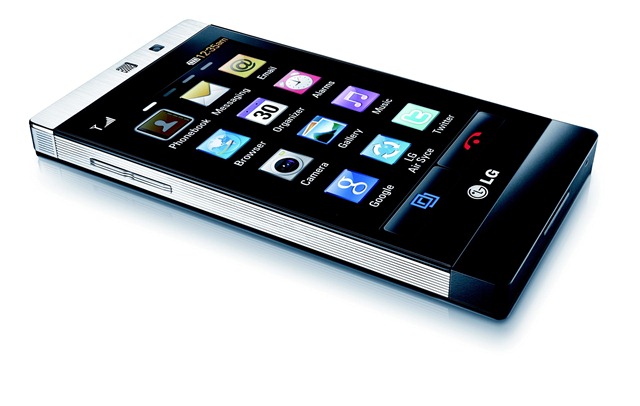
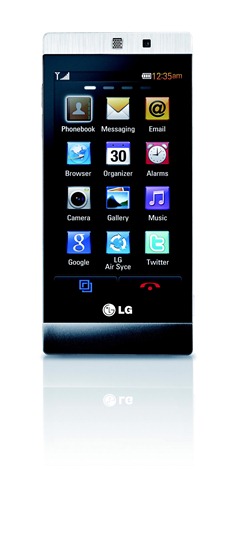
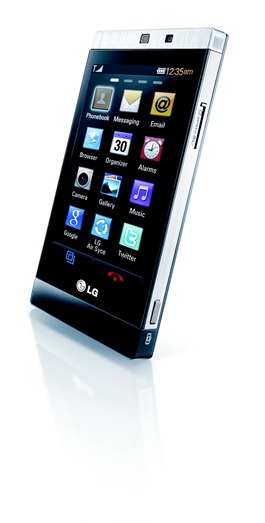
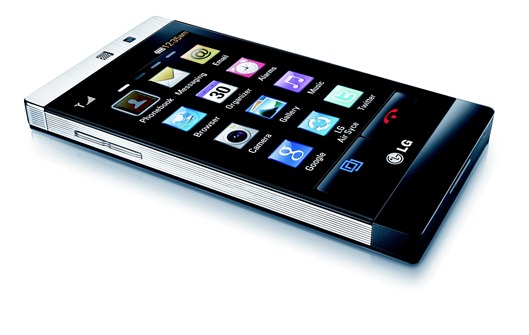
LG Mini is the first phone to use LG’s HTML5 compatible Phantom Browser, which offers a much faster and more stable internet experience. LG Mini is a 3.2-inch full touchscreen phone which also includes special internet applications and social network connection features that make keeping in touch with online friends easier than ever.

LG MINI

The Full specifications of LG GD880 Mini is given below.

Feature Description
Network 2G: GSM 850 / 900 / 1800 / 1900
3G:     HSDPA 900 / 2100
Display TFT touchscreen supporting 256K colors
Size  3.2 inches –  480 x 854 pixels, Scratch-resistant surface
Touchscreen Multi-touch input method, Accelerometer sensor for UI auto-rotate, Proximity sensor for auto turn-off
Camera 5 MP, 2592 x 1944 pixels, autofocus in Primary Camera
Video Recording at 15fps
Secondary Camera included. Geo-tagging, face and smile detection, image stabilization features available.
Music and Video Music: MP3/WMA/eAAC+, 3.5 mm audio jack,  Dolby Mobile sound enhancement, Stereo FM radio with RDS
Video Support: MP4/DivX/XviD/H.264/H.263
Connectivity GPRS: Class 10 (4+1/3+2 slots), 32 – 48 kbps
EDGE: Class 10, 236.8 kbps
3G: HSDPA 7.2 Mbps; HSUPA 2 Mbps
Wi-Fi 802.11 b/g, DLNA
Bluetooth v2.1 with A2DP
microUSB v2.0
Memory Internal Memory: 330 MB microSD Card up to 32GB
Browser and Messaging SMS, MMS, Email, Push Email
WAP 2.0/xHTML, HTML, HTML5, Social networking integration with live updates
Colors Available Black
Dimension 102 x 47.6 x 10.6 mm, Weighs 99 grams
Battery Li-Ion 900 mAh (LGIP-550N)

The LG Mini is available in Europe now. Availability will be followed by other regions. The price will vary from country-to-country.

LG GD880 Mini Launched: Maximize Your Mobile Web Experience

LG Electronics (LG) has officially launched its new LG Mini (LG GD880), a pocket-size communication hub that maximizes the mobile web experience.

LG Mini is a 3.2-inch full touchscreen phone. This is the first phone to use LG’s HTML 5-compatible Phantom Browser, which offers a much faster and more stable internet experience. Mini also includes special internet applications and social network connection features that make keeping in touch with online friends easier than ever.

As the first HTML 5-compatible feature phone, Mini fully supports Google’s Latitude, Gmail, Calendar, Google Maps and Google Buzz services, with the same functionality and speed as on a desktop PC.

LG Mini also offers push email, 5.0 megapixel camera, Wi-Fi, A-GPS, FM radio and 7.2 Mbps HDSPA

LGMINI_1LGMINI_2

LGMINI_3

The LG Mini will be available in April starting in Europe followed by other regions. The prices will differ from country-to-country.

Full Phone Specification Visit:

LG Mini GD880: Full Specifications

Google PageRank Updated on 3rd April, 2010

google_page_rank

Google PageRank has been updated on 3rd April, 2010. It was announced earlier that the next PageRank update after the January 2010 update will be in April, the update was seen yesterday. This is a happy news for all the bloggers.

techrena pagerank

Bloggers all over the world have a lot of concern for Google PageRank.As far as I am concerned, I believe that Google PageRank shows the quality of your posts, and also the reach and design of your blog. Techrena.net has got a PageRank of 3 this time which was 2 previoulsy. We are very happy with the update and consider it as a gift to techrena.net’s birthday which was on 27th March.

As far as we have observed most of the bloggers are satisfied with the page rank update and most of us take it as a catalyst to our hard work.

You  can check the PageRank of your blog using the Google Toolbar:

http://toolbar.google.com/