HP Compaq Web Cam Driver & Application For Windows 7

COMPAQ_logo

For HP Compaq Laptop users, if you are migrating to Windows 7, then you need to have some of the drivers compatible to Windows 7.

If you see, unlike Windows XP, Windows 7 supports most of the basic devices with its inbuilt drivers like the sound card. And even if it doesn’t support the device, it tries to download the driver from the internet and installs automatically.

For the Web Camera, the driver can be directly downloaded using device manager of Windows unlike in the case of Acer Laptop PC where you need a different driver download. But the Web Cam needs an additional application to run. Here we have given both how to download the driver and the Web Cam application.

Note: Connect your Compaq PC to the Internet before performing these steps.

Downloading the driver:

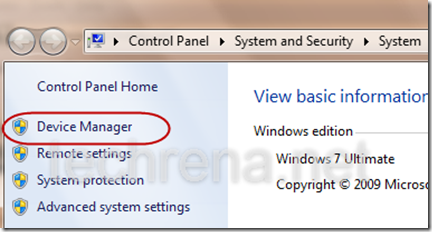
Open Device manager. Right click on Computer and select properties. In the properties click Device manager.

open_device_manager

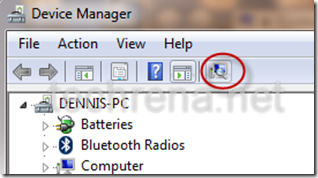
Now Click on Scan for hardware changes button as shown below:

device_manager

scanning_hardware_changes

Under the Imaging devices section if your Web cam is already present then no need to download the driver. If it shows as an unrecognized device with a yellow exclamation symbol then, right click on it and select Update Driver Software…
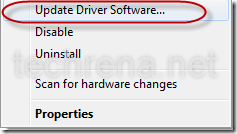
update_driver_software

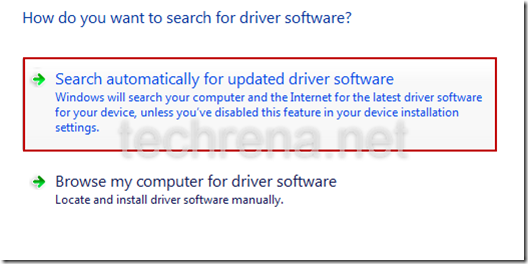
Select Search automatically.

update_driver_from_internet

It will automatically download and install the Driver software to your Compaq PC.

Install Web Cam Application Software:

You have to download the Cyberlink YouCam application software to run your Web camera. You can download it from the official hp link:

ftp://ftp.hp.com/pub/softpaq/sp37501-38000/sp37849.exe

Size: 49.5 MB

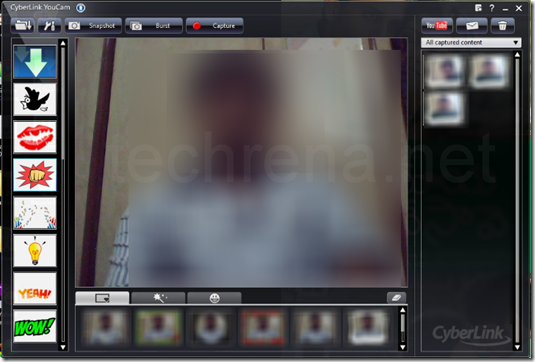
Extract it and install it. You can run your web cam and use it.

cyberlink youcam

The updating of the driver software is applicable to all the hardware devices in your computer. If any unrecognized device is found, then you can try updating the driver software.

The above given method has been tested successfully in Compaq Presario C783TU. Hope it will work for other models also. Any feedback can be posted as a comment below.

Apple iPad Fever: Much Anticipated iPad Goes on Sale in America

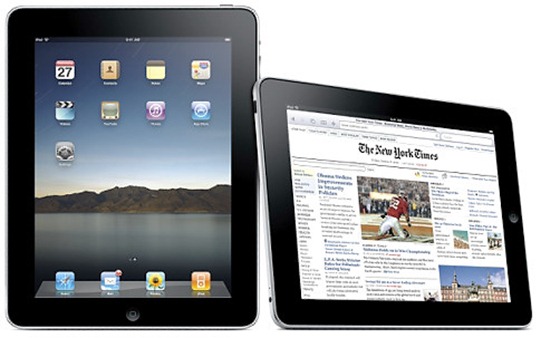
Apple’s iPad tablet computer has gone on sale in America. The first generation model has wi-fi but no 3G connectivity. It is not yet available outside the US. The price in US is $499 – $829 (£328 – £545).

apple_ipad

Reports of iPad Fever:

iPad fever
Source: BBC

Apple took pre-orders online but some early adopters began queuing outside stores the day before its release at 0900 EST (1400 BST) on 3 April. As you can see in the picture above people camped outside the Apple store in New York overnight.

Critic and user reviews of iPad:

There has been a lot of feedbacks from the consumers as well as the critics. There has been a lot of mixed reviews. Some tell that iPad may change the face of computers while some say its just a no.

Consumers Dissatisfied:

The first generation model has not included 3G connectivity which has become a hot topic of discussion. Some of the consumers are dissatisfied why 3G was not included in this world of third generation.

With the release of iPad in the US, other parts of the country like UK are also waiting impatiently for iPad’s sale.

Samsung Monte S5620 Full Specifications and Price

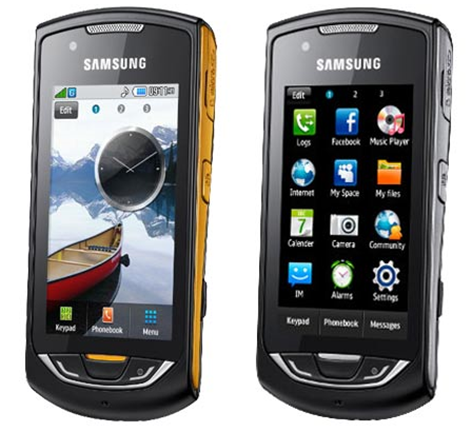
Samsung Monte S5629 is a brand new full touch mobile for the style-conscious. Samsung Monte is designed for those who appreciate beautiful design and outstanding performance and yet with an affordable price. The phone has a lot of exciting features such as social networking applications, intelligent User Interface and connectivity options to provide users with performance.

The Samsung Monte has a sleek and sophisticated design. It provides the style and performance of a high-end handset at an affordable price.  With an intuitive TouchWiz 2.0 Plus User Interface (UI), the Monte is going to become a popular full touch Samsung device.

Samsung Monte S5620

A detail specifications of Samsung Monte S5620 is given below:

Features Description
Network HSDPA 3.6Mbps UMTS (900 / 2100)
EDGE / GPRS (850 /900 / 1800 / 1900)
Display 3.0″ 262K WQVGA TFT (Capacitive Touch Screen)
Camera 3.2 Megapixel with CIF
Video H.263, H.264, MPEG4, QVGA @ 15fps
Audio Poly 64, SP-Midi, i-melody, MP3, AAC, AAC+, WMA, 3.5mm Ear jack
FM Radio with RDS
Value-added Features A-GPS, Wi-Fi, Google Map 3.0
Native SNS Application, Multi IM
TouchWiz 2.0 Plus
Connectivity Bluetooth 2.1, USB 2.0 HS
Memory Internal memory: 200MB / External memory: MicroSD (up to 16GB)
Size 108.8 x 53.7 x 12.4mm / 92g
Battery 1000mAh
Talk time: up to 298mins (On 3G mode) / up to 582mins (On 2G mode)
Standby time: up to 454hrs (On 3G mode) / up to 769hrs (On 2G mode)

The Samsung Monte is available with a stunning contrasting orange and graphite, or black and silver. The phone has been launched in India and is available for Rs.8850 INR approximately.

Google Crawling, Canonicalization and Indexing Explained

google logo

Have you ever noticed that your blog posts are indexed in blog search in few minutes but it doesn’t come so fast in the main index? Why some of the posts are indexed faster than some of the other posts? Are sitemaps really helpful for indexing? How can you get your posts indexed faster?

All the questions really hit us much of the time. The answers are explained here.

In this post we will see:
1. The Main Difference between Indexing and Crawling
2. Main Use of Sitemaps and pings
3. Which blog posts are indexed faster
4. Google Canonicalization of the Crawled Contents

1. Difference between Indexing and Crawling

When you post an new content in your blog, Google may crawl your post but may not index it in the main index. In case of blogs Google blog search may crawl your new URLs within few minutes but it may not to the main index.

Even though Google crawls your post it doesn’t mean that the post will be indexed. Google follows certain standardization process according to its policies that the crawled content is first analyzed for quality content and then sent to the main Index. You can read further how this standardization is done below. So crawling and Indexing in Google are different.

2. Main Use of Sitemaps and pings

If you think that by submitting your sitemap to Google or by pinging to Google your posts will be definitely indexed. Google uses the sitemaps submitted to it to crawl the content, new URLs and finds out the quality content to get them indexed in Google. Google does not guarantee that by submitting your sitemap your content will be indexed. Again the Canonicalization process comes in to index the contents.

3. Which blog posts are indexed faster

This is really a big question mark. Well explaining according to Google, posts or contents from well knows blogs(popular ones) and which have good quality contents will be indexed faster. Popular blogs with good contents will be will be frequently crawled and index. So if you want your posts to get indexed faster, then get your blog well known and post good content.

Now your question will be what is good content! You can find the answer below.

4. Google Canonicalization of the Crawled Contents

Google has its own set of rules and policies that are applied to the crawled contents and decides whether to index the content or not. This process is the Google Canonicalization process which is done to produce relevant and quality results. So any blog post with good content will pass this standardization process will be indexed in a short duration of time. As far as we have seen, good content is the one which has a unique style and which has more keywords that are searched frequently in Google. But the process of Canonicalization frequently changes as the policies change, so we cannot define which are Good posts permanently as far as Google is concerned.

So you have learnt that in order to get your contents indexed faster you need to:

  • Popularize your blog
  • Produce Good and Quality content
  • Use relevant Keywords
  • Have a Unique Style of your own (Do not Copy and Paste)

You can watch Google explaining the details of blog indexing below:

Disclaimer: The content above are the sole views of the author not of  www.techrena.net which is only the medium of communication.  www.techrena.net does not take any responsibility of any incident resulting from the information provided here.

How To Disable Multiple Tab Previews of Browsers in Windows 7 Taskbar

web_browsers

Tab preview feature in Windows 7 is very helpful. But sometimes if your Internet browser has the facility of tab preview for each tab opened, then it may be annoying. It is actually better to have only one preview of the tab which you were active last to avoid all kinds of confusion in selecting the tab previews. An example of multiple previews of each tab in the taskbar is shown below:

multiple_tab_preview

This kind of previews is normally seen in Internet Explorer 8 as it comes with this feature by default.

You can disable multiple tab previews for the popular web browsers like IE8, Mozilla Firefox, Chrome etc. Follow the steps below for each browser.

Internet Explorer 8

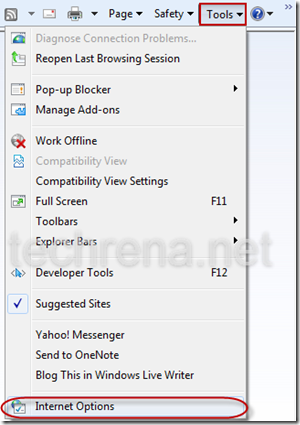
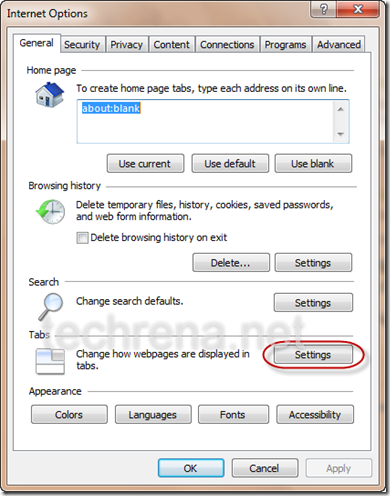
To disable tab previews IE 8 go to Tools->Internet Options->Tabs->Settings

internet_options_ie8

ie8_tab_settings

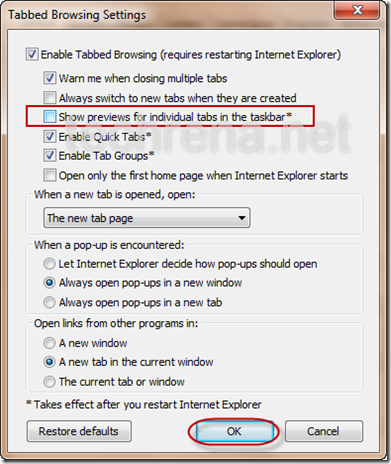
In the Tab Settings Uncheck Show previews for individual tabs in the taskbar. Click OK.

tabbed_browser_settings_ie8

Now restart the Browser, you will find the multiple previews gone.

Mozilla Firefox:

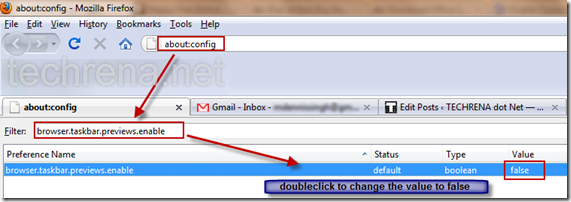
To disable tab previews in Firefox, open a new tab. Enter in the address bar as:

about:config

This will open the configuration page.Now in Filter Type:

browser.taskbar.previews.enable

Make the value to false by double clicking on it. Now your previews will be only one for the currently active tab.

mozilla_firefox_about_cofig

Google Chrome:

In Chrome there is no settings to disable multiple tab previews. But you can change the shortcut compatibility settings to disable previews.

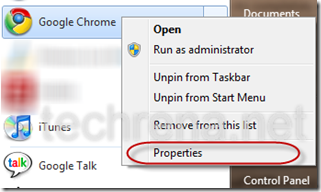
Go to any shortcut of Chrome like in the Start menu or desktop. Right click on it and select Properties.

chrome_shortcut_properties

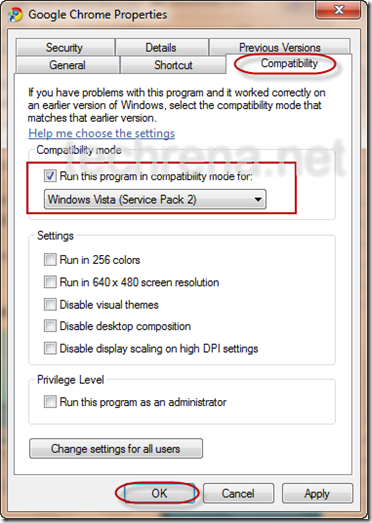
Go to Compatibility Tab and check Run this program in compatibility mode for: and select Windows Vista (Service Pack 2). Click OK.

shortcut_compatibility_chrome

Now you have learnt how to disable multiple tab previews feature in the World’s most popular browsers. If you want to enable them back, follow the reverse process.

Wish Us: Techrena.net Turns 1 !!

Techrena dot Net has completed one year of providing solutions and updates successfully on 27th March, 2010. We have helped more than a million visitors to Techrena dot Net in a span of only 1 year. We are dedicated to provide quality solutions which are thoroughly tested before posting them. Moreover, we also provide technical updates and reviews and we will be providing relevant information only.

We have celebrated this special day in our style.We have visited a renowned orphanage “Sphoorti Foundation” located in the outskirts of Hyderabad (see in map)and had a wonderful time with the little kids over there.

The top 10 posts in Techrena dot Net are given below. These posts have helped a lot of our visitors and many feedbacks and queries has been solved. We want visitor satisfaction and to help as far as we can.

1. Reset Windows XP, Vista, 7 Password Using USB Drive or CD

In this post we have described one of the easiest methods available to reset your Windows password. This excellent solution is applicable to Windows XP, Vista And Windows 7 which resets your windows password in a matter of 5 minutes. You can even use a bootable USB drive to reset the Password. Till date it has helped 56550 visitors.

2. Enable Hide Inactive Icons Tray Using Registry in Windows

The hide Inactive icons feature in the taskbar may not work sometimes. You can enable this feature using the registry editor of Windows. A full detailed post with screen shots, which has helped 63305 visitors till now.

3. Install Windows XP from USB Disk Drive

This post explains how to use a USB drive to install Windows XP. This post is one of the most helpful posts to the netbook users who want to install Windows XP without the CD drive. Till date it has helped 40580 visitors and its still counting.

4. Change MAC Address or Physical Address Using Registry Editor (regedit) in Windows

Some of us may use a tool to change the MAC address of your Network Adapter which is completely unnecessary. You can easily change the MAC Address using the Windows registry editor. This is explained in this post which has 18175 visitors already.

5. Enable GreaseMonkey User Scripts in Google Chrome

Enabling GreaseMonkey user scripts in Google Chrome was a difficult one before Chrome officially supported user scripts.The post gives in detail how you can enable GreaseMonkey in your Chrome Browser. This post helped 14495 of its visitors.

6. Swapping Blogger blog title and post title -Blogger SEO tweak

If you want SEO in blogger than this is a must. You need to swap your post title ant blog title because in Blogger by default the blog title will come first. Here we have written how to do this in full detail. This has helped 7751 bloggers till now.

7. Hide Most Visited Sites from New Tab in Google Chrome in Easy Steps

Google Chrome Most visited sites is very useful. But before when Chrome did not have the facility to remove the most Visited sites, it was difficult to manage the privacy of the users. The post tells you how to hide the most visited sites and has helped 7313 visitors.

8. Create Shutdown Shortcut for Windows XP, Vista, Windows 7 on Desktop

Have you ever thought of creating a shortcut on your desktop for shutting down your Windows PC? We have explained the process of creating a Shutdown Shortcut here. This post has helped 6097 of its readers.

9. Exporting Gmail contacts to another Gmail account

It will be a headache for you to copy all the contacts you have in your Gmail account to another one. you can do the process automatically by just exporting and importing the contacts from one account to another. This has been Explained here. 4970 visitors has been helped by this post.

10. Saving YouTube Videos From Temp File To Your Hard Drive

When you stream a YouTube video, you may want to save a copy of the Video in your PC. You can do it by reading this post. This recent post has already helped 544 readers.

We at Techrena dot Net [techrena.net] will proudly offer our  help to anyone those who really need it very  much in technical context. We have given the contacts below:

Bharath, Founder, Editor-in-chief & Chief Admin : bharath[at]techrena[dot]net

Dennis, Co-founder, Editor, & Admin : dennis[at]techrena[dot]net

Or you can leave a comment below. You are free to contact us any time.

How To Turn On or Off System Restore In Windows PC

Windows logo

System Restore is a feature of Windows Operating Systems namely Windows 7, Vista and XP. This feature in Windows enables you to restore or rollback your system to a position in an earlier time. Windows automatically creates restore points to back up the program files, registry and system data whenever you install a new software, driver or make any changes in the system settings. You can restore the system to the restore points saved earlier if anything goes wrong in future. You can also create the restore points manually.

The only problem in System Restore is that it occupies a lot of disk space, as it has to save a lot of restore information in your system. This system restore information is stored in System Volume Information. You may be confused that all the data in your drive is showing lesser usage then the actual amount of disk usage. This is due to the System Restore Files present in the inaccessible folder System Volume Information. You can open this folder by taking Ownership in windows 7 or Vista.

Now, if you feel that System Restore is not necessary or if you want to free up disk space by deleting the earlier Restore points then refer the details below.

Open System Properties:

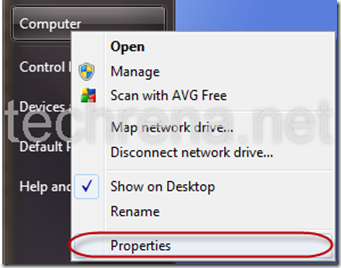
Open Start Menu, Right click on My Computer (in XP) or Computer (In Windows 7) and Select Properties

my_computer_properties

Open System Restore or System Protection:

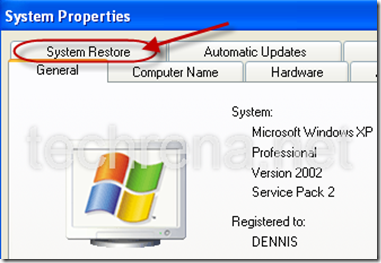
If you are using Windows XP, then Go to System Restore Tab.

system_properties

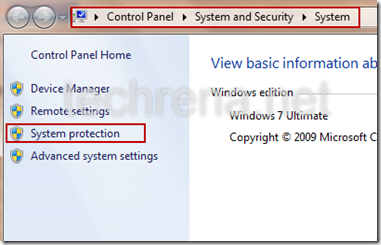
If you are Using Windows 7, Click on System protection in the left pane.

system_properties_7

Turn off or delete system restore points in Windows XP:

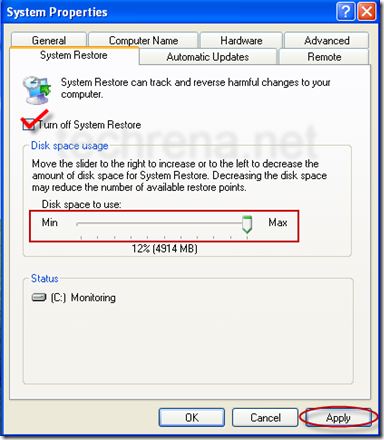
You can see the System Restore Options. Here you can change the amount of Disk space to be used for System Restore.

If you want to delete the System Restore Data then, check Turn off  System Restore and click Apply. It will delete all the related data and turn off your System Restore. Now the disk space has been freed up.

Note: If you only want to delete the system restore data but don’t want to turn off System restore then, don’t forget to turn it back on by unchecking the checkbox and applying again.

system_restore_xp

turn_off_restore_confirm_xp

Turn off or delete system restore points in Windows 7:

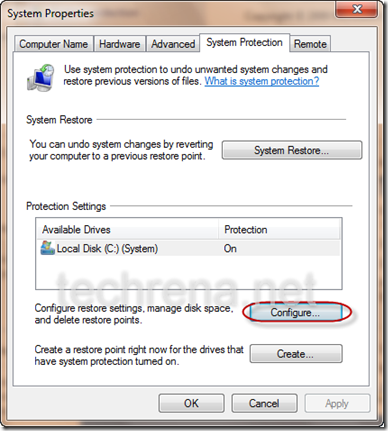
In the System Protection tab, click on Configure.

system_protection_7

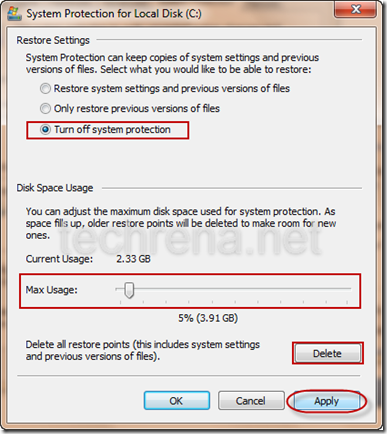
It will open System Protection for your disk. You can change Maximum Disk space Usage for System Restore. You can delete the system restore points to free up the disk. Or you can turn off the System Protection feature completely in your Windows 7 PC.

turn_off_restore

If you Click on delete it will ask for confirmation as follows. Then it will delete the restore points. Deleting the System Restore points will not Turn off System Restore in Windows 7.

confirm_delete_restore_point

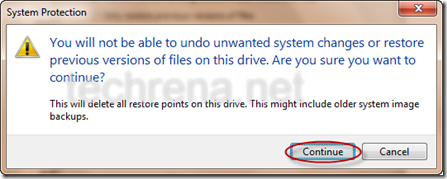
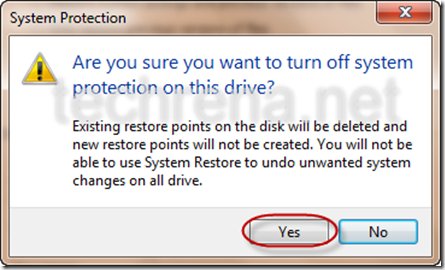
If you select Turn off System protection and click on apply, it will ask for the confirmation given below and Turn off your restore. This will also delete all your current restore points.

turn_off_restore_confirm

You can turn On the system Restore anytime by Selecting Restore system settings and previous version of files and clicking Apply.

In Windows 7 there is an option for restoring the previous version fo files or deleted files in a folder. To know more, refer the post: How to Restore Previous Versions of Files in Windows 7 Using System Restore.

Important:

1. The given procedure will also work for Windows Vista.

2. It is not recommended to Turn off or Disable System Restore in your Windows PC.

3. If you are deleting all the System Restore Points, then you will not be able to restore the system to any earlier point of time.

BlackBerry Storm2 9520 Now Available In India

blackberry logo

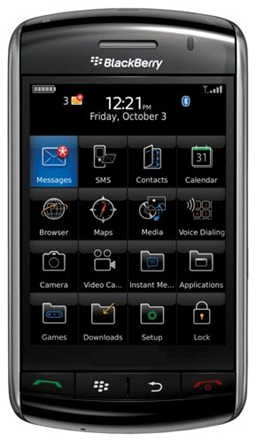
BlackBerry Storm 2 is now officially available in India. The Wi-Fi enabled Blackberry Storm2 9520 is now included in the Blackberry India website.

The BlackBerry Storm2 Smartphone runs on BlackBerry OS Version 5. This handheld device is completely made for the professionals with features like Corporate Data Access.  Storm2 features the BlackBerry Enterprise Server 5 for secure connection, remote file sharing and easy data access for its users.

blackberry storm2

A complete view of the Full Specifications and detailed features is given below:


Feature


Description

Camera 3.2 MP camera
Flash
Auto-focus
2x digital zoom
Image stabilization
Dimensions Height: 4.43 inches (112.5 mm)
Width: 2.45 inches (62.2 mm)
Depth: 0.55 inches (13.95 mm)
Weight:  160 grams
Network Quad-band: 850/900/1800/1900 MHz GSM®/GPRS/EDGE networks
Single-band: 2100 MHz UMTS/HSPA networks
Dual-band: 800/1900/ MHz CDMA/Ev-DO Rev A networks
Operating System BlackBerry OS 5
Memory 2 GB Embedded Multimedia Card
256 MB Flash Memory Included
Display High resolution 480 x 360 pixel color display
3.25” (diagonally measured)
Transmissive TFT LCD
Supports over 65,000 colors
Dynamic hardware brightness control
Input and Navigation Navigation: SurePress™ touch screen
On screen keyboard: portrait SureType®, QWERTY and multi-tap, landscape QWERTY, portrait QWERTY
Dedicated keys: Send, End, Menu, Escape, Left/right convenience keys (default voice activated dialing and camera), 2X Volume/Zoom, Power/Lock, Mute
GPS Integrated
GPS with assisted-GPS capabilities
Music 3.5mm stereo jack, Plays MP3, AAC, AAC+, eAAC+, WMA, WMA ProPlus
Connectivity Wi-Fi: 802.11b/g, 802.11d, 802.11i including EAP-TLS, PEAP, EAP-TTLS/MS-CHAPv2, PEAPv0/MS-CHAPv2,PEAPv1/EAP-GTC Bluetooth: Bluetooth v2.1+EDR1 with Stereo audio (A2DP/AVCRP)
Security Password protection and Screen lock
Battery and Talk Time Standby time: GSM: 12.7 days (305 hours), UMTS: 11.7 days (280 hours), CDMA: 11.2 days (270 hours)
Talk Time: GSM: 5 hours, UMTS: 6
hours, CDMA: 5.5 hours
Battery: 1400 mAhr removable/rechargeable cryptographic Lithium cell

blackberry storm 2

The BlackBerry Storm2 is now available in all leading mobile stores in India at a price of  Rs 31990 (INR)

Samsung Wave S8500 Smartphone Specifications and Price

samsung logo

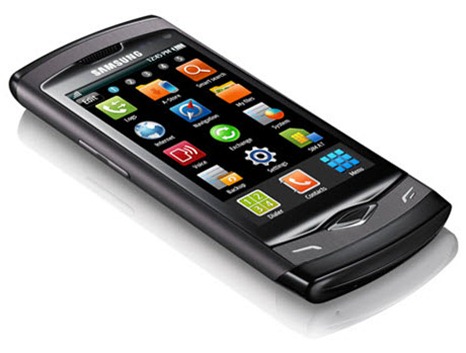
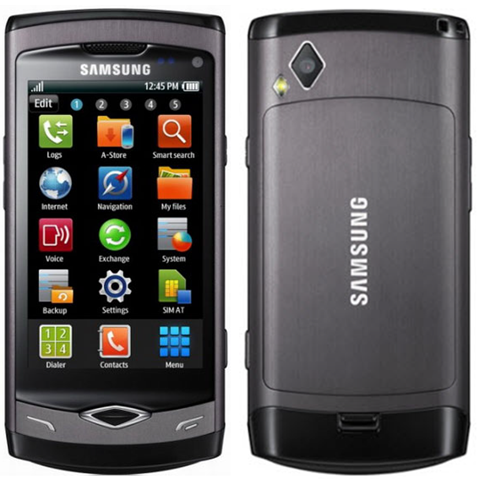
Samsung Wave S8500 is a much awaited Smartphone among the consumers which was unveiled at the Mobile World Congress last month.  The handset is powered with the Samsung’s Bada Operating System.

One of the feature this phone boast is the 3.3 inches WVGA Super AMOLED display. Powered by a 1Ghz processor, Samsung Wave S8500 has 3G Connectivity, 5 megapixel camera with HD Video recording,  TouchWiz 3.0 UI, Wi-Fi, Bluetooth 3.0, Virtual 5.1 surround sound and many more.

samsung wave

Full Specification of the Samsung Wave S8500 with Super AMOLED Smart Phone is given below:


Feature


Description

Camera Primary Camera 5 MP, 2592 x 1944 pixels, autofocus, LED flash, Geo-tagging, face, smile and blink detection
Video Recording 720p at 30fps, continuous autofocus, video light
Secondary Camera Included
Network 2G GSM 850 / 900 / 1800 / 1900
3G HSDPA 900 / 2100
Display Super AMOLED capacitive touchscreen, 16M colors
Size 480 x 800 pixels, 3.3 inches Multi-touch input, Accelerometer sensor for UI auto-rotate, Proximity sensor for auto turn-off, Scratch-resistant surface, TouchWiz UI 3.0, Handwriting recognition, Smart unlock
Dimension 118 x 56 x 10.9 mm
Weight 118 grams
Music MP3/WAV/WMA/eAAC jackDNSe (Digital Natural Sound Engine) 3.5 mm audio jack Stereo FM radio with RDS and FM recording
Connectivity GPRS    Class 10 (4+1/3+2 slots), 32 – 48 kbps
EDGE    Class 10, 236.8 kbps
3G    HSDPA at 7.2 Mbps, HSUPA at 2 Mbps Wi-Fi 802.11 b/g/n
Bluetooth v3.0 with A2DP
microUSB v2.0
Operating System Bada OS
Processor ARM Cortex A8 1GHz
Memory Internal 2GB / 8GB
External microSD (TransFlash) up to 32GB
Video Formats MP4/H.263/H.264/WMV/Xvid/DivX
Battery Li-Ion 1500 mAh
GPS Yes with A-GPS
Messaging SMS, MMS, Email, Push Email, Palringo IM
Browser WAP 2.0/xHTML, HTML
Colors Available Black

samsung wave s8500

Samsung S8500 Wave is expected to be released world wide in May this year. The Handset is already available for pre-order in Amazon Germany for 429 Euro (580 US dollars). But some of the retailers are offering a lower price of 379 Euro in Germany with a shipping date somewhere in May mid. The expected price is around Rs 26000 INR in India.

Beam Telecom Broadband Speed Upgrade: A Report

beam cable logo

Reports are coming in from the Beam Telecom Broadband users in Hyderabad that their Broadband Speed has been upgraded with no extra cost. Users report that they are getting higher speed from last 10 days. This up gradation of speed  came into light when one of the customers who wanted a new connection when contacted the Beam Cable agent, offered him with up to 768 kbps speed for Rs 600 (INR) per month whose official speed is 256 kbps.

Though the speed upgrade is not officially confirmed, the increase in speed is almost confirmed with all the users of Beam Cable Broadband known to us.

The speed upgrade is to be as follows:

Per Month Charge Rs (INR) Official Speed Upgraded Speed* (Unofficial)
600 256kbps 768kbps
850 512kbps 1Mbps
1000 1Mbps 2Mbps

*this is a report from the users which is not officially confirmed

The above given packages speed are confirmed by the users, other packages speed could not be confirmed currently.

A User Survey by Techrena dot Net Reports:

Rs 600 Package user getting 75-85KB/s Download Speed

Rs 850 Package user getting 100-110KB/s Download Speed and so on

Well as other competitive ISPs like Airtel Broadband is also upgrading their speeds for free, Beam Telecom is also expected to do so. Another hi-speed Wireless Broadband Network is Tikona WI-BRO.

The official packages taken from the Beam Official Site is given below:

Details Monthly Half-Yearly Annual Packages
Packages Speed up to Subscription Subscription Savings Subscription Savings Free Vouchers
B-Max400 128kbps 400.00 2300.00 100.00 4500.00 300.00 4500.00
B-Max600 256kbps 600.00 3300.00 300.00 6000.00 1200.00 6000.00
B-Max850 512kbps 850.00 4675.00 425.00 8500.00 1700.00 8500.00
B-Max1000 768kbps 1000.00 5500.00 500.00 10000.00 2000.00 10000.00
B-Max1500 1Mbps 1500.00 8250.00 750.00 15000.00 3000.00 15000.00
B-Max2500 2Mbps 2500.00 13750.00 1250.00 25000.00 5000.00 15000.00
B-Max5000 4Mbps 5000.00 27500.00 2500.00 50000.00 10000.00 15000.00

As we can see that till date(22-03-2010) the package speeds are not yet updated. We are expecting an official announcement from the ISP soon.

If you want a new Beam Broadband connection you can call: 040 66 27 27 27 or visit: beamtele.com

Update @ 23/03/10 : It’s now official.We have heard the announcement from Beam Tele management about the free speed upgrade through SMS, where they claim that Beam Telecom is the fastest broadband in India !!