[Tip] Disable Built-In PDF Viewer In Google Chrome

google chrome logo

Google has started shipping the Google Chrome browser with a built-in PDF viewer since the release of Chrome 8. Even when you install native PDF readers like Adobe Reader of any other applications to view the PDF files on your system, Google Chrome will automatically disable the browser PDF plugins and enable the built-in PDF viewer. But the built-in PDF viewer in Chrome has got some limitations compared to a standalone PDF viewer. If you want to disable the built-in PDF viewer in Chrome, follow these steps:

1. Type about:plugins in the Google Chrome address bar and hit Enter.
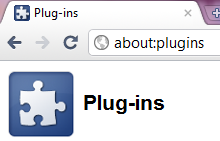
about:plugins in Chrome

2. All the plugins installed in the Google Chrome will now be shows in the window. Scroll down the list until you locate “Chrome PDF Viewer”.
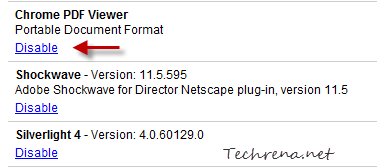
Chrome PDF Viewer plugin settings

3. Click on the “Disable” link under the “Chrome PDF Viewer”.

Google Chrome’s built-in PDF Viewer will now be disabled and all the PDF files from now on, will be opened using the external PDF reader plugin that you have installed. In case you want to activate the built-n PDF Viewer in future, just follow the step-1 and click the “Enable” link under “Chrome PDF Viewer”.

Activate 2-Step Verification Process For Your Google Account To Make It More Secure

Google 2-step verification

Google had previously announced the new 2-step verification for Google apps users. The same is now being rolled out to all the Google account users. The 2-step verification would make your Google account more secure by verifying you are the real owner of the account that you are trying to access. You can verify your authentication by using a smartphone, or via a SMS text code that you receive similar to how you do it while making online banking transactions or even you could use a landline to verify your identity through a voice call in case you don’t have a mobile phone with you.

How To Enable 2-Step Verification In My Account?

To set up the 2-step verification, login to your Google account and navigate to the Manage Account page, and if the feature has been enabled for you, you should see a “Using 2-step verification” link under Security column in your Personal Settings.

Google account personal settings

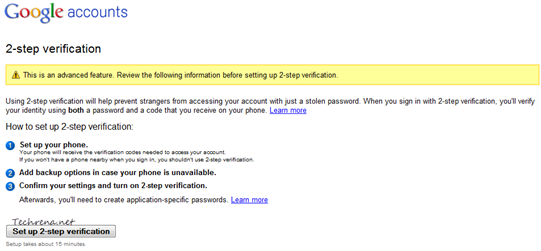
And the whole setup should take about 15 minutes. You will see this page on the next screen:

google 2-step verification setup

Click on the “Set up 2-step verification” to continue and complete the setup process. It involves 3 steps: 1. Setting up your phone 2. Adding backup option when your phone is unavailable 3. Confirm your settings

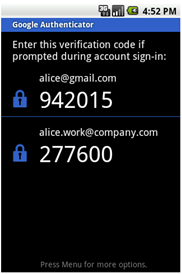
If you have a smartphone, you can install Google Authenticator application from (available for Android, iPhone and BlackBerry devices).

Google authenticator screenshot

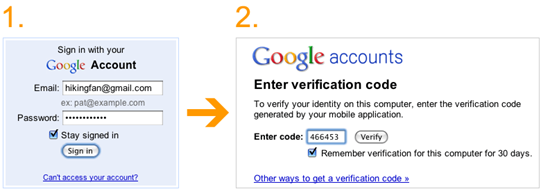
The application generates a verification code that is required in the second step during the sign in. You can also check the “Remember verification for this computer for 3 days” option and you don’t need to re-enter the code again for the next 30 days. In case you don’t have a smartphone, you can receive the verification code through a text message or through a voice call as well. You can also generate application specific passwords to sign in to non-browser based applications that use Google account like mobile Gmail, Picasa or AdWords Editor. But all these are advanced options and might confuse you. For now you have completed the 2-step verification process and you have added more security for your Google account and lets not bother too much about the advanced settings.

[via] Official Google blog

[How To] Schedule Emails in Gmail with Boomerang

I would say Google’s Gmail is the best email service. We do not need any introduction to Gmail here.

Well, if you use Gmail this is going to be an interesting post. Here, I am going to write how to schedule your emails. Means you can send or receive your mails at a particular time set by you in prior. Let me explain how it is going to be useful. Say one of your good friend’s birthday is coming and you do not want to miss wishing him. So how do you make it 100% sure that you wish him at midnight? Just write a beautiful email and schedule it to the time you want it to send using Boomerang for Gmail.

Boomerang-for-gmail

Boomerang is an add-on for Firefox and Chrome which lets you to schedule the emails in Gmail.  Follow the following steps to install it and schedule the mails.

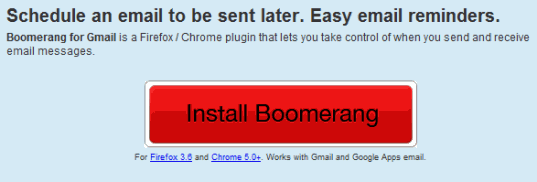
Step 1: Download Boomerang. Click the Install Boomerang button below.

download-boomerang

Step 2: Click on Allow Button to install the Add-on. If you are installing on Chrome, Click the Continue button in the left lower corner of the window. (Click to enlarge the image below).

Install-boomerang

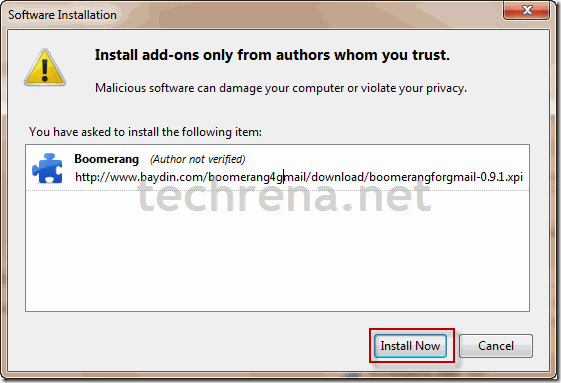
Step 3: Click on the Install Now button to install the add-on.

install-now-plugin

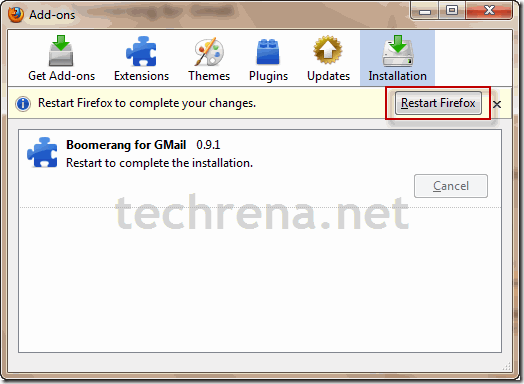
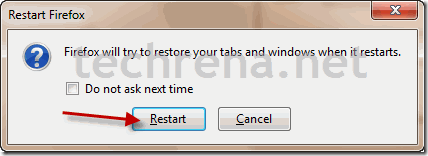
Step 4: After installation, it will ask you to restart the Browser. Restart the Browser to use the add-on.

restart-firefoxrestart-firefox-window

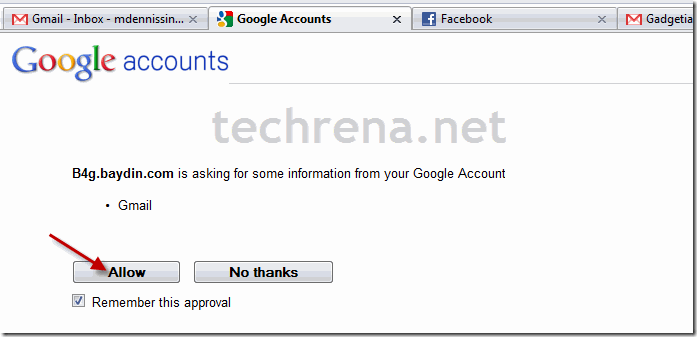
Step 5: Now after restarting the browser Google will ask you if you want to share information to  Boomerang. Click on allow.

allow-information

Step 6: Now you should be able to see Boomerang on the top right corner.

boomerang-installed

As Boomerang is finally installed you can schedule your emails. As follows:

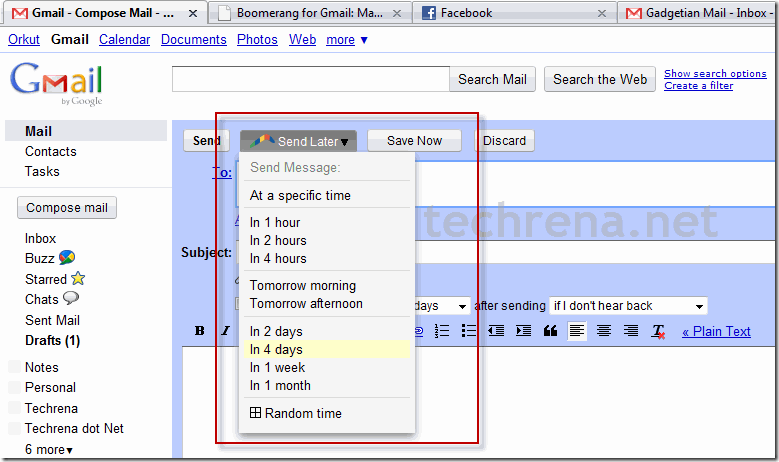
To send a mail at a scheduled time, click on Send Later Button and select any time.

send-email-later

If you select At a specific time, you can enter the exact time and date.

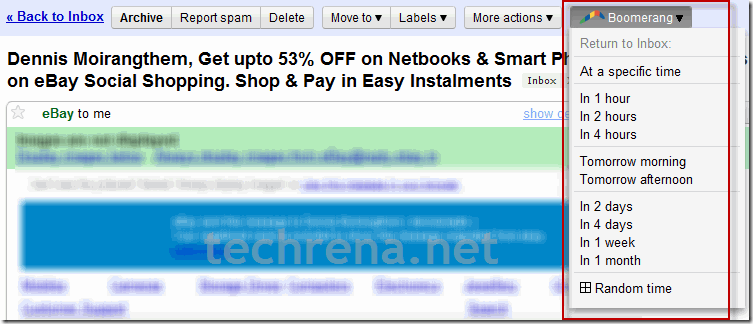
To re-receive an already received mail, click on Boomerang after opening the main and select the time you want it to return to your inbox.

return-to-inbox

I hope that this add-on will be really helpful for all of us.

[How To] Delete Cookies In Google Chrome

google chrome logo

This simple step-by-step guide is to teach how to delete individual browser cookies in the Google Chrome browser. Follow the steps carefully to clear or remove individual or all cookies in Chrome.

Steps:

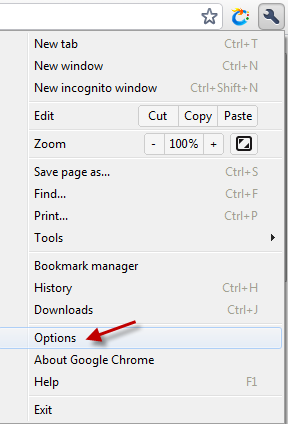
1. Click on the wrench icon Chrome wrench icon tools menu towards the left-hand side of the Chrome window and click “Options” from the list.

Chrome options in the Menu

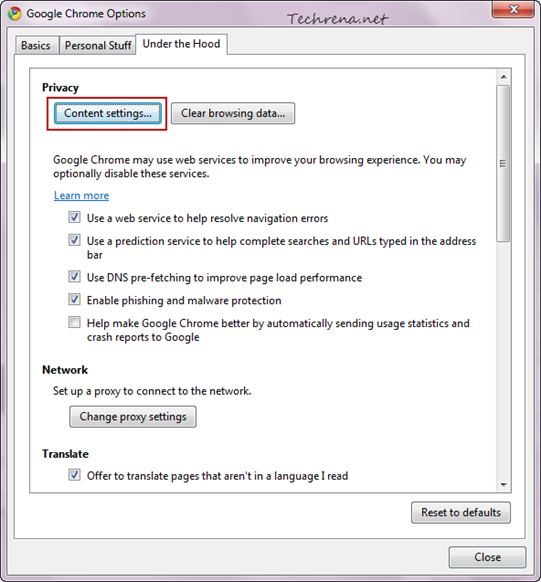
2. And in the “Under the Hood’” tab, click on the “Content settings..” button.

content-settings-chrome-options

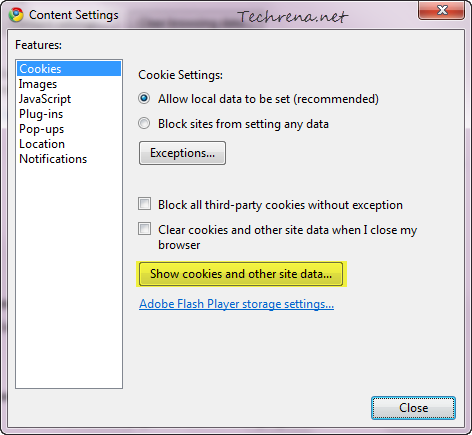
3. Click on the “Show cookies and other site data..” button.

Cookies settings in Chrome content settings

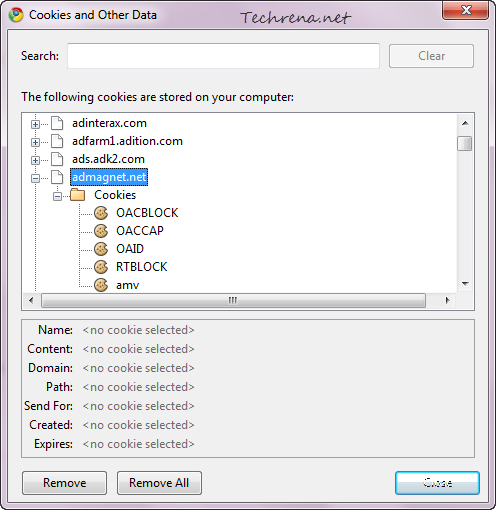
4. Now you will see all the cookies stored for different websites in Chrome

cookies-google-chrome

Select the cookies that you want to delete and click the Remove button delete that particular cookie. To delete all the cookies stored in your browser, click the “Remove All” button. The settings are almost similar on Chrome installed on other operating systems like Mac OS X, Linux etc.

[Tip] Know The File Size Before You Download It In Firefox

Firefox logo

Knowing the file size before you could actually start downloading it is good practice as you can plan your work accordingly. For instance if you want to download a relatively bigger file, you might want to postpone it to later without interrupting your current work. Most of the sites especially download portals always show the information about the size of the file before the download. However it is not the same case always. There are times when you download a file and come to know about its size only after the actual downloading begins in Firefox.

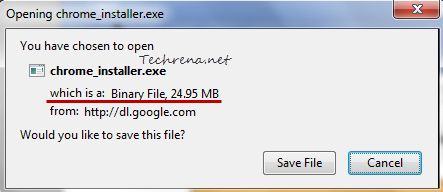
Thankfully there is a Firefox ad-on called “Show File Size” that allows us to view the file size information before you download it. Once installed, the extension show information like the type of the file and the size of the file you are downloading it in a separate row just below the name of the file row in the download window as shown:

firefox file download size

It is a basic, lightweight extension (just 4KB !) that just serves the purposes justifying the name. Show File Size add-on works fine with Firefox 3.6 to Firefox 4 versions.

Install Show File Size

[Tip] Edit The Firefox Maximum And Minimum Zoom Levels

Firefox logo

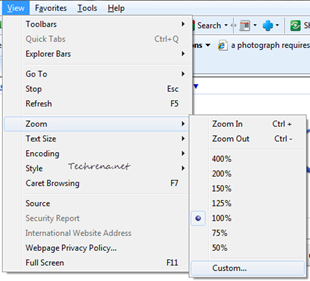
Readability level is one of the important aspect the modern day browsers stress upon. Different users need different readability levels for various elements on a webpage. The browsers let users to zoom in or zoom out of any webpage and adjusting them according to their comfort. Hence all the browsers including the Internet Explorer, Mozilla Firefox, Google Chrome, Opera etc. have incorporated the settings for adjusting zoom levels into the menu settings making them easily accessible. Firefox zoom levels range from a maximum zoom in level of 300% to a minimum zoom out level of 30%. While these are satisfactory for most users, there would still be some users who want to zoom in a page for more than 300% in order to see a particular element of a page like text, image or vide to more precisely, at which they feel comfortable reading it. Some people like web developers would want to zoom out to a level more than 30% to just see how all the elements in a web page are fitting into the screen. Whatever may be the reason, you need to have a choice. Internet Explorer allows you to enter a custom zoom level as you can see in the following screenshot:

Internet Explorer zoom levels

You can edit the Firefox default zoom levels via the about:config settings. Follow the steps to configure your Firefox.

1. Type about:config in the Firefox address bar and hit Enter.

About:config in the Firefox address bar

2. Accept the warning and continue.

Firefox this might void your warranty alert

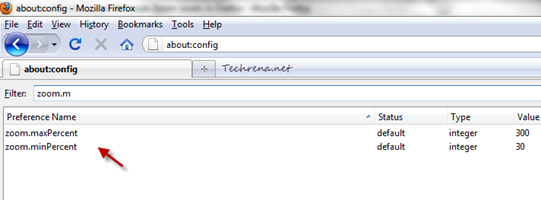
3. Now search for “zoom.maxPercent’ and “zoom.minPercent”. Both of these should appear as soon as you enter “zoom.m” as search string.

Max and min zoom level settings in Firefox

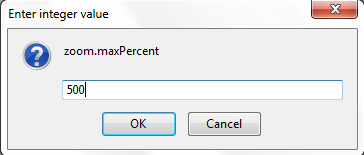
4. Double-click on each item to change the default values. For instance, you can change the maximum zoom percent to 500 from the default value of 300 p.c. Similarly you can edit the default value for minimum zoom out level as well.

Changing Firefox zoom levels

Click OK when you are done. Restart your Firefox for the changes to take effect.

[How To] Create a Shortcut To Clear Your Clipboard

Whenever you copy anything while using your computer,  the computer uses a special place known as Clipboard to place the data. Suppose you copy some text from a text file, the information(data) gets copied into the Clipboard. Then when you paste the text to your desired location, the data is transferred from your clipboard. The clipboard is used for any type of copy action done.

Now, you have copied some data and hence it is now present it in your computer’s clipboard. Suppose the data you are handling is a sensitive one and hence you don’t want to leave any trace, even in your clipboard. So how do you do it? Here is the simplest answer known.

Steps to create a shortcut to clear your clipboard:

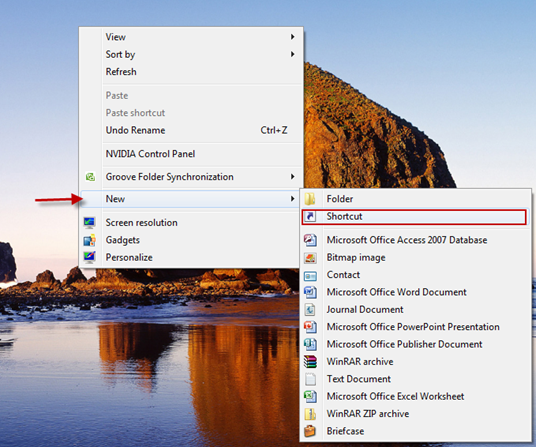
1. Right click on your desktop, go to New—>Shortcut.

Create a Shortcut

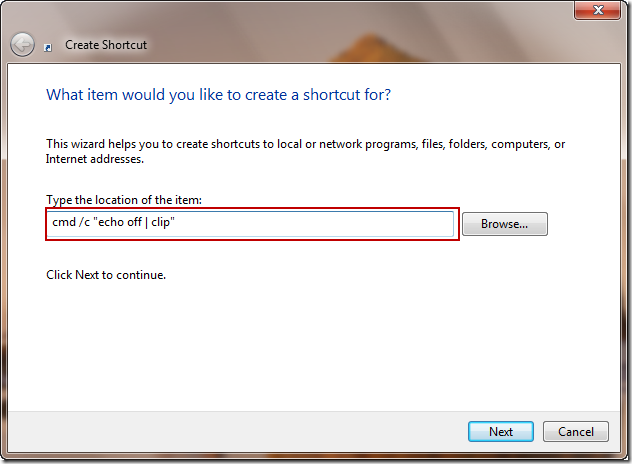
2. In the New Shortcut window, Type

cmd /c "echo off | clip"

and press Next

Clear clipboard shorcut

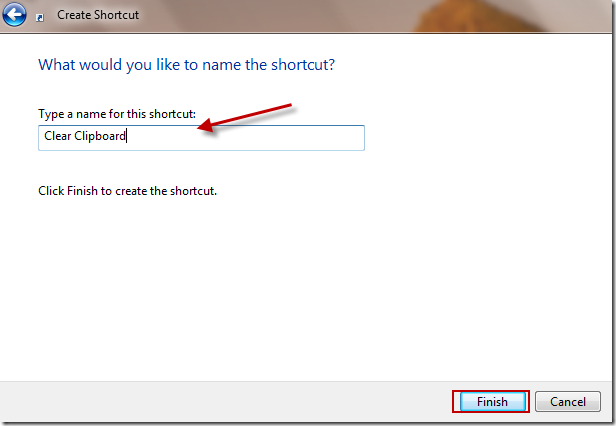
3. Type in a Shortcut Name of your choice and Finish.

Shorcut name

Now you can click on the shortcut anytime you want to clear your data off the clipboard.

[Tip] Get Warned Before Closing Multiple Tabs In Google Chrome

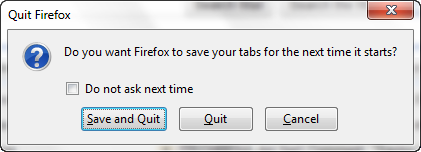
If you are used to Firefox browser for long, you might be aware of the warning message or confirmation message that appears when you try to close multiple tabs as you can see in the following screenshot:

Quit firefox confirm

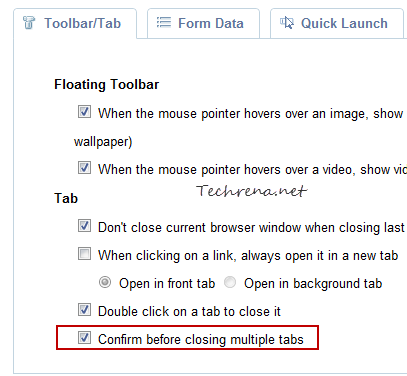
This is quite useful when you hit the close button accidentally with multiple tabs opened. Unfortunately such feature isn’t there in Google Chrome by default. But thanks to “Chrome Toolbox” extension developed by Google itself, the extension adds this missing feature and can be configured from the extension settings.

To get started, just install the Chrome Toolbox, and open the extension options. Check against the “Confirm before closing multiple tabs” and that is it. Now you will get a confirmation message like below when you try to close multiple tabs in Google Chrome.

chrome toolbox confirm before close

chrome warning before closing multiple tabs

Chrome Toolbox Options is really an interesting extension which is aimed to increase the user’s productivity. You can many find various handy options which you would otherwise feel missing in the browser. For instance when you enable “When the mouse pointer hovers an image, show image floating toolbar” options, you get additional options for each image on a page to view the original image in its natural size, or to use a magnifier or to use it as your wallpaper etc. There are plenty other useful options as well. We recommend that you install this extension from the Chrome extensions gallery to enhance your browsing experience in Chrome(link added below).

Install Chrome Toolbox

[via]

CTRL + Tab Tabs Preview Feature In Firefox

Firefox ctrl-tab feature

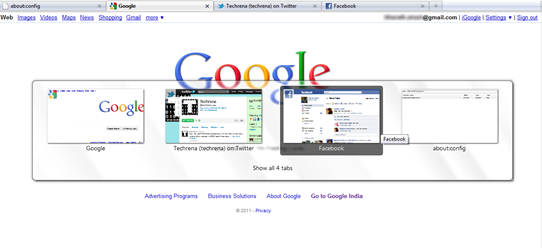
Firefox has changed a lot since the inception of the Firefox 3.6. A lot of features have been added since then. One such feature is previewing the opened tabs. We have already discussed how to enable all tabs preview in Firefox 4. Now  let’s see how to enable the other variant of tabs preview feature, the Ctrl + Tab tabs preview (similar to Windows 7’s Alt + Tab preview) in Firefox 3.6 or later versions. Ctrl + Tab preview is disabled by default and if you hit Ctrl + Tab without enabling this, you can just switch the tabs. With Ctrl + Tab preview enabled, you can actually see the preview of tabs which would be very much useful. Follow the steps to enable the same.

Steps:

1. Type about:config in the Firefox address bar and hit Enter.

2. Accept the warning message and proceed to the Firefox about:config page.

About:config Firefox warning

3. Type the following code in the filter and find the boolean key with the same name.

browser.ctrlTab.previews

ctrl-Tab preview firefox setting

4. By default, the value for this key would be set to “false”, meaning that the tabs preview feature has been disabled. As we want to enable this, just double click on the boolean entry to change its value to “true”.

That’s it! Just hit CTRL + Tab key to preview the thumbnails of all the tabs opened in a current Firefox page as shown in the first screenshot. Just change back the value to “false” in the step-4 to disable the tabs preview feature.

[How To] Add RSS Feed Autodiscovery To Your Site

Almost every website offers updates via RSS feeds these days. This is the fastest way to notify the readers about the updates in the site. When it comes to blogs, blogging platforms like Blogger, WordPress etc. enable RSS feeds by default and the RSS feed autodiscovery would also be enabled in most cases. But at times what can happen is the tiny code that enables the RSS autodiscovery may go missing and the RSS feed can’t be discovered automatically.

How to find whether RSS autodiscovery is enabled?

Just open your website or blog in the browser (Firefox or Internet Explorer).

Firefox:

If the RSS feed icon RSS feed iconappears in the address bar, your site has RSS autodiscovery enabled.

RSS feed icon in firefox

If you don’t see the RSS feed icon, it means that RSS autodiscovery is disabled.

No RSS icon in Firefox

Internet Explorer:

The RSS feed button will be in bright color when your site has RSS autodiscovery:

rss feed icon in IE

The feed icon will be greyed out when feed autodiscovery is not enabled:

No RSS disocery in IE

Clicking on the icon will show the available subscription options.

Enable RSS Autodiscovery:

Just add the following code to your site header to enable the RSS autodiscovery:

<link rel=”alternate” type=”application/rss+xml” title=”Site Feed” href=”Your Feed URL” />

In general, if you are using Feedburner, the code would look like:


<link rel="alternate" type="application/rss+xml" title="Feedburner Feed" href="http://feeds.feedburner.com/feedburner-id" />

Replace “feedburner-id” with your Feedburner ID.

If you are using WordPress, add the following code to your header.php file.

<link rel="alternate" type="application/rss+xml" title="RSS 2.0"href="<?php bloginfo(‘rss2_url’); ?>" />

Header edit for RSS autodiscovery

Just refresh your site after adding the code and you should now see the RSS autodiscovery being enabled: