Gmail Adds Automatic Message Translation Feature

Search Engine giant Google has just announced one more interesting feature (actually a Labs launch) which lets you instantly translate Gmail messages to language which you feel comfortable reading.

The new Automatic Message Translation is currently between 41 languages.This feature as Google says is mainly to woo the multi-national companies that use Gmail as their native email provider.

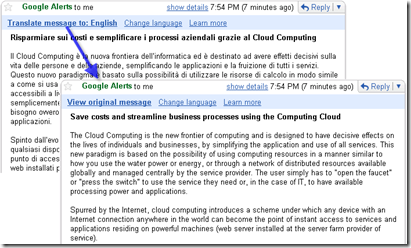
gmail auto translation screen shot

if your entire company uses Gmail, email communications between people in your company can take place in the language that’s most comfortable for them – each person can write messages in their native language and the recipients can translate the messages into their respective native languages.

This new Gmail feature is powered by Cloud Computing. To enable this feature in your Gmail, simply go to “Labs” tab under “Settings” within your Gmail and enable “Message Translation.”. And  for some reasons if you find the translation to be awkward,  you can quickly revert back to the original message just by clicking “View original message”.

How to Auto Refresh a Web Page in Firefox

Refreshing a web page in  Mozilla Firefox has always been easy in the manual way, just press F5 or CTR+R will do it for you.Let’s  say you are viewing your favourite team scores in a web page which doesn’t automatically refresh its content,then you may have to manually refresh the page so many times to be updated with the score. But what if you want your browser to do automatically for you?

This wonderful Add-on “ReloadEvery for Firefox does this for you.Just go to this add-on page and add the add-on to your Firefox[Just Click on Add to Firefox button] and restart Firefox.

ReloadEvery Firefox Add-on reloadevery from context menu in firefox

Now you can find a new function Reload Every being added to the options (a special context menu Reload Every) that you see when you right-click on the page.The same function can also be accessed from the main menu (see the second image).Through this fucntion web pages can be automatically refreshed every so many seconds or minutes.

How To Find IP Address of the Sender In Gmail Message Headers

Tracing IP address of the email sender in Gmail:

Finding out the IP address of the sender is the first step that you may have to do if you want to the find the information about the person who has sent you the mail.This IP address information will normally be included in the email headers.

Let’s see how to find the sender’s IP address in the email message headers in case of Gmail:

1.Log in to your Gmail account.

2.Open the email message for which you want to find headers.

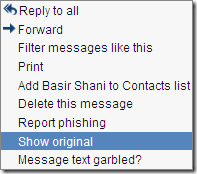
3.Click the down arrow next to reply in the right hand side of the message.(refer the image shown below)

show original message headers in Gmail

4.Select the “Show original” from the list.

Now a the original message with full headers will open up in a new tab/window.

Now search for the string using CTR+F  “Received: from” from bottom to up.The first one that you find (from the bottom) should have the IP address of the sender and it should like like the one shown below.

  Received: from [202.47.69.86] by web76702.mail.sg1.yahoo.com

So here, the IP address of the sender is 202.47.69.86, and using Who is Look up, it can be easily found out that the email has been originated from Indonesia in this case.

However this method (to trace IP )  doesn’t work for the emails that are sent from another Gmail account.

The Pirate Bay Founders Jailed and Fined for Copyright breaking

Pirate_Bay_logo

In what could be a one of the rare cases of Copy-right violation, today a court in Sweden has jailed the four main people behind the Internet’s most popular BitTorrent File-Sharing site (With an estimated 22 million users),  The Pirate Bay.

Each of the four defendants behind the Pirate Bay Site, Peter Sunde, Fredrik Neij, Gottfrid Svartholm Warg and Carl Lundstrom were each sentenced to a year in jail.They were also ordered to pay a huge amount of $3.6 million as a penalty for damage to major entertainment companies, including Warner Bros, Sony Music Entertainment, EMI and Columbia Pictures.

But the Pirate Bay founders however denied the charges against them citing that they didn’t actually hosted any files.And also posted a notice and a video in response to the court’s verdict in the Pirate Bay site

So, the dice courts judgement is here. It was lol to read and hear, crazy verdict.But as in all good movies, the heroes lose in the beginning but have an epic victory in the end anyhow. That’s the only thing Hollywood ever taught us.

And talking about the large penalty that the court has ordered, This is what one the 4 founders of Pirate Bay had to say:

“We can’t pay and we wouldn’t pay. Even if I had the money I would rather burn everything I owned, and I wouldn’t even give them the ashes.”

While Many Copyright holders around the world are cheering this Pirate Bay verdict, others feel that it may not affect the popular file-sharing over the internet.But it certainly a alarming notice to the other famous file-sharing sites like Rapidshare and other Bit-Torrent sites.

Install Google Toolbar 5.0.2009.0324b for Firefox

Google Toolbar version 5.0.2009.0324b for Firefox  2+ version users is available now for download (updated on April 13,2009).As many of us know Google Toolbar had introduced the famous Google Chrome feature viz., Most Visited Sites access in the toolbar, the same feature is obviously available in this version too.

Google Toolbar For a complete list of features of Google Toolbar, visit Google toolbar page

You can also add your custom buttons to Toolbar by choosing from Google Toolbar Button Gallery

Google Toolbar Screenshot

Firefox 2+ Users, install Google Toolbar 5.0.2009.0324 [Beta Version] from this Firefox add-on page

How to Download Video From YouTube in Google Chrome

Google Chrome is becoming popular day by day with the increasing features of customization and user scripts. Using GreaseMonkey in Google chrome is also possible in the newer Version from Google Chrome 2.0 onwards. As for now it stands in the 4th position in popularity.

We know that  to download videos from YouTube is much easier in the case of FireFox, thanks to the number of wonderful add-ons available, but how can we actually do this if you are using Chrome browser, come let’s get into it.

Here we are going to see another user script customization technique for Google Chrome. Everybody uses YouTube for video sharing and all. Now if we want to download the video from YouTube in Google Chrome, we can keep a download link for each video in YouTube. This will download the video in flv format.

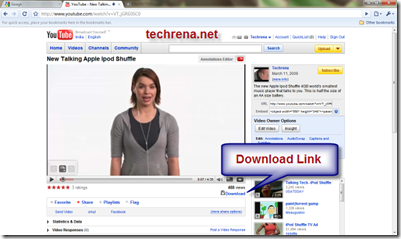
YouTube Video Download in ChromeTo Enable the Download Link in YouTube follow the steps below:

Step 1: If you have not enabled GreaseMonkey User Scripts feature in Google Chrome then Enable it using the Guide: Enable GreaseMonkey User Scripts in Google Chrome

If you have already enabled Grease Monkey then skip Step 1.

Step 2: Download the DownloadYoutube.user.js file from the link below: (Right Click and Select Save Link As)

Size: 2 KB

http://www.techrena.net/downloads/Grease%20Monkey/DownloadYoutube.user.js

Step 3: Save the DownloadYoutube.user.js file in your computer location given below:

Windows XP Users:

Documents and Settings\%userprofile%\Local Settings\Application Data\Google\Chrome\User Data\Default\User Scripts

Example: C:\Documents and Settings\DENNIS\Local Settings\Application Data\Google\Chrome\User Data\Default\User Scripts

Windows Vista and Windows 7 Users:

Users\%userprofile%\AppData\Local\Google\Chrome\User Data\Default\User Scripts

Example: C:\Users\DENNIS\AppData\Local\Google\Chrome\User Data\Default\User Scripts

YouTube Video Download in Google ChromeAfter successfully saving the file, open any YouTube Video. You should get the Download Link as shown in the image above.

Important:

1. This method is possible only if you have Google Chrome version 2.0 or higher. To install the Newer version go to: Download Google Chrome 2.0.172.2 Beta Open Source Web Browser

2. It is compulsory for you to enable GreaseMonkey User Scripts for this method to work.

3. You need to show hidden System files and folders in order to find the Application Data folders in Windows Explorer. Otherwise you cannot see them.

Hide Most Visited Sites from New Tab in Google Chrome in Easy Steps

Google Chrome is a web browser developed by Google and based on the WebKit layout engine and application framework. It was first released as a beta version for Microsoft Windows on September 2, 2008, and the public stable release was on December 11, 2008. The name is derived from the graphical user interface frame, or “chrome”, of web browsers. In March 2009, Chrome became the world’s fourth most widely-used browser, with 1.23% usage. In spite of the increasing popularity, chrome lacks user customization and control in some of its features.

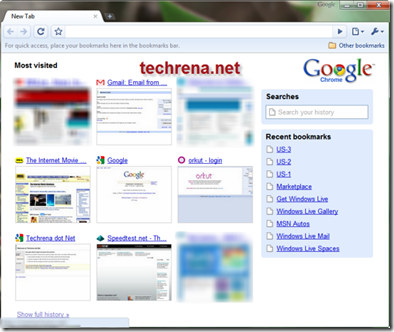
The most visited site of Google Chrome which is displayed while opening a new tab is not under our control, meaning that it will display the top most visited sites in the browser even if we do not want to display some of them as most visited. Most of the users need some privacy settings, like to display the sites which only the users want to display. But as we do not have this control in Google Chrome we are going for this custom technique by using Grease Monkey User Scripts. Till date Google Chrome lacks the feature of customizing the most visited page in new tab, even in the latest version 2.0.174.0 also.

Google Chrome Most Visited site New Tab

It is a simple process. Just follow the steps given below:

Step 1: Enable GreaseMonkey User Scripts in Google Chrome by following the Guide Enable GreaseMonkey User Scripts in Google Chrome

Step 2: Download the Java Script file given below: (Note: Right Click on the link and select Save link as)

Name: NoSpeedDial.user.js

Size: 500 Bytes

Download: http://www.techrena.net/downloads/Grease%20Monkey/NoSpeedDial.user.js

Step 3: After enabling Greasemonkey go to the location below in your computer and save the NoSpeedDial.user.js file in the User Scripts folder:

Windows XP Users:

Documents and Settings\%userprofile%\Local Settings\Application Data\Google\Chrome\User Data\Default\User Scripts

Example: C:\Documents and Settings\DENNIS\Local Settings\Application Data\Google\Chrome\User Data\Default\User Scripts

Windows Vista and Windows 7 Users:

Users\DENNIS\AppData\Local\Google\Chrome\User Data\Default\User Scripts

Example: C:\Users\~User Name~\AppData\Local\Google\Chrome\User Data\Default\User Scripts

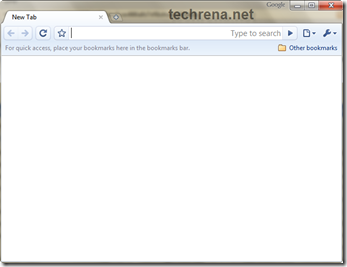
That’s it. Now when you open Google Chrome then you will not find any Most Visited Sites. It will simply show a Blank Page. Even If you click New Tab or Press Ctrl + T then it will show blank page only. No Most Visited sites

important:

1. It is compulsory for you to enable GreaseMonkey User Scripts, otherwise the method will not work.

2. This method will work for Google Chrome Version 2.0 or higher. If you are running a older version then Download the new one and Update it here Download Google Chrome Web Browser

Enable GreaseMonkey User Scripts in Google Chrome

GreaseMonkey in Google Chrome

Greasemonkey is a Mozilla Firefox add-on that allows users to install scripts that make on-the-fly changes to most HTML-based web pages. As Greasemonkey scripts are persistent, the changes made to the web pages are executed every time the page is opened, making them effectively permanent for the user running the script. Earlier versions of Google Chrome did not support Greasemonkey. But from the new version of Google Chrome 2.0, we can make it support Greasemonkey. Greasemonkey can be used for adding new functions to web pages like downloading videos form YouTube or removing the most visited sites from new tab in Google Chrome.

To Enable User Scripts follow the steps given below:

Step 1: Go to the location below in your computer:

Windows XP Users:

Documents and Settings\%userprofile%\Local Settings\Application Data\Google\Chrome\User Data\Default

Example: C:\Documents and Settings\DENNIS\Local Settings\Application Data\Google\Chrome\User Data\Default

Windows Vista and Windows 7 Users:

Users\%userprofile%\AppData\Local\Google\Chrome\User Data\Default

Example: C:\Users\DENNIS\AppData\Local\Google\Chrome\User Data\Default

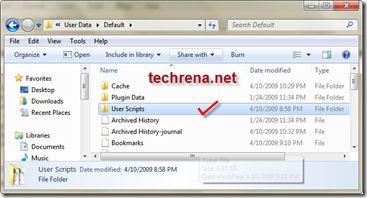
Step 2: In the Default folder Create a new folder and name it as User Scripts. User Scripts FolderStep 3: Now find the shortcuts of Google Chrome in the Start Menu, Taskbar or your Desktop. Right click on it and select properties.
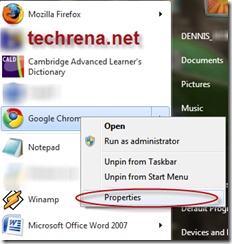
Google Chrome Properties

Step 4:  In the Properties Window go to Shortcut tab and add

--enable-user-scripts

by giving a space after chrome.exe” in the Target text box. Select OK. It is shown below.
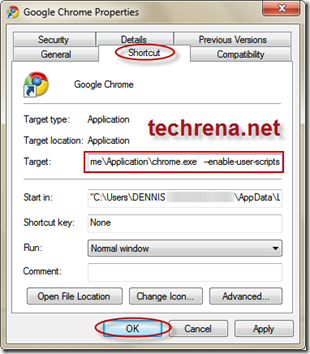
Enable Greasemonkey user scriptsNow you can simply save your Grease Monkey scripts in the User Scripts folder that you have created.

For a small test download the script given below in the User Scripts directory

To download Right click and Select Save Link As:

https://techrena.net/downloads/Grease%20Monkey/test.user.js

You should see a Hello World! dialogue when you open Google Chrome from the Start menu or Desktop shortcut. Don’t forget to delete the script after the test has been successfully completed.

Important:

1. GreaseMonkey Scripts will work on Google Chrome 2.0 or higher. To download the new version visit  Download Google Chrome Latest Version

2. You should perform Step 3 for all the Google Chrome shortcuts you have, either in Desktop, Taskbar, or Start Menu.

3. User scrips will be enabled only if you open Google Chrome from a shortcut where you have preformed “Step 3”.

4. For removing a particular Greasemonkey addon, just delete the corresponding user.js file from the User Script folder.

UPDATE on Feb 4, 2010: Google Chrome 4 now officially supports GreaseMonkey User Scripts
Inserting Images in Gmail made easy

Adding Inline Images in Your Gmail

Gmail labs today has announced a feature which allows Gmail users (Only those who enable this feature in Lab Features under Gmail) to insert images while composing mail in Gmail.It was a major development at Gmail but nobody has any idea why Google hasn’t enabled this feature by default to all Gmail users.Anyway take a look at how actually you can add images in your mails.

First Click on the tiny Gmail Labs button in Green towards left-hand side of your browser.[If you have already been using Labs features, else you have to go to Settings>>Labs]

Click on Gmail labs button in Green

Then a list of Gmail labs features available will be shown to you.Look for the following feature called “Inserting Images”

enable inserting images lab feature in Gmail

Now enable that feature.

Start composing a mail now, in your rich text editor, now you may find a small image button which allows you add images (see in picture).

Click on Insert image button in your rich text editor

Now you can either upload image from your desktop

Adding image from computer web URL

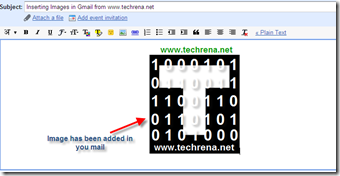
That’s it now your image will appear in your mail (see the sample image in picture)

image added in Gmail looks like this one

Note:The recipients may not the images in your mail as by default Gmail will not display images from mails so as to to prevent from spam.So the recipient must either click on “Display Images Below” or “Always Display images from…” to see the images that you have inserted in the mail.

This is the latest improvement at Gmail after last week’s addition of Five Indic Languages in Mail composer.

Driving Directions Now Available in Google Maps India

Planning a long journey to a place where you never had been in India? or just visited a big city like Mumbai and want to reach your relative’s house with minimum time of travel or with minimum fare that you can give to the cab. Now you no longer worry about this, as Google Maps India has just launched this new feature “Get Driving Directions” for Indian road routes.India Google maps Driving Directions

Apparently, Google Maps is not the first one to introduce Driving directions for maps in India ,it follows Yahoo India maps and Live Maps India to add this feature.

Google Maps directions for Google Maps India is much similar to Yahoo India Maps and Live Maps India.You just need to enter the starting point and the destination.

Comparing Google Maps, Yahoo India Maps and Live Search Maps India

Google Map Directions for Hyderabad to Bangalore

I wanted to just compare these three services (Google Maps, Yahoo India Maps and Live Maps India). In my case I tried to get driving directions for journey between Hyderabad to Bangalore (the two major IT cities of India, of course).

The results:All the three services showed a similar distance (Google-566 Km, Yahoo-572 Km, Live Maps-572 Km).All three were also similar in terms of number of turning points or intermediate stations –Google –38, Yahoo- 35, Live Maps-34 ).

But they varied considerably in terms of time of travel.Google showed about 9 hours 19 minutes , Yahoo -12 hrs 24 mins and Live Maps India-10 hr 51 min.