[How To] Block A Contact From Sending Emails To You In Gmail

Block email from sender

Sometimes you receive dozens of mails from someone whom you don’t really know personally (spammers) or there may also be instances where in you don’t want to receive mails from your ex girlfriend / boyfriend etc. Whatever may be the reason, if you wish to block a particular sender from sending an email to you in Gmail, this guide is for you!

Fact: Before beginning the guide, let me make it clear that Gmail as such doesn’t have a default mechanism to block messages from specific addresses or domains. As described in the Gmail help section, the only way to block such emails is to create a filter to route all such unwanted email messages to Trash.

Steps:

1. Sign in to your Gmail account.

2. Open the email message that you have received from the unwanted sender.

3. Towards the right hand side, click on the small down arrow next to the “Reply” button

4. Choose “Filter messages like this” from the options menu.

Filter messages like this option inside gmail

5. The “From” field automatically gets filled by the email address of the sender from whom you received the unwanted mail. Making sure that the field has been filled, click “Next Step” to proceed to the next step.

Creating filter in Gmail

6. You will see the possible actions for the filtered messages. The options are “Skip the Inbox (Archive it)”, “Mark as read”, “Start it”, “Apply the label: ”, “Forward it to: ”, “Delete it”, “Never send it to Spam”, “Always mark it as important”, “Never mark it as important”. As you to trash all the message from that sender, the best option here would be “Delete it”.

Gmail filter advanced settings

You may also choose to apply the filter to already existing conversations as well. When all is set, click “Create Filter” button.

7. The filter is now successfully configured. Once it is created, review the filter settings from the “Filters” tab under the “Settings”.

gmail filter created

All done now! Should the above sender send you any email message in future, it automatically gets deleted without showing up in your inbox. Please note that if the same sender starts  from another email address, you need to repeat all the steps starting from the beginning. If you reach a stage where in you loose patience for all the harassment by the sender, you can always complain about it to the Cyber Police in your locality.

[Tip] Enable High Quality Video Chat In Gmail

Gmail logo new

If you use Gmail video chat for making video calls to your friends, you might be pleased to know that the Google has announced a enhancements to the video quality in Gmail video chats.

Gmail video chat quality used to be very poor particularly when you switch the video to full screen mode. The new enhancements are available as a labs feature and will not be enabled by default. For this video enhancement to work, the other party with whom you are chatting must also have enabled this feature.

gmail video chat before after

Follow these steps to enable high resolution for video chat in Gmail.

Steps:

1. Open Gmail and Login with your Gmail account

2. Click on the little green labs icon towards the right top corner of the screen, next to your username. Alternatively you can open this Gmail Labs Settings link.

gmail labs settings

3. Scroll down the window until you find “Video chat enhancements” tab and choose “Enable” against it.

Gmail Video chat enhancements

4. Click “Save Changes” button to save the settings.

You can always revert back to the default video quality settings at any time by simply choosing “Disable” option for “Video chat enhancements” under the labs settings as shown in the step 3.

[Tip] Disable Threaded View In Gmail

Gmail logo

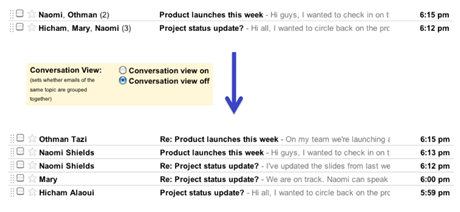
Gmail’s conversation view is without any doubt, one of the key factors that has helped Gmail emerge as the most used web based email program on the internet. While the normal users like us enjoy related email messages being grouped into threaded conversation messages thus making your inbox not to be cluttered with mails, but there have always been some people who don’t like this feature, as they like the traditional or classic way of email, the one with unthreaded messages. For those minority uses, who still want to see their mails in the traditional format, without the threaded conversation view, Google has just added the feature that lets you enable or disable this feature for their accounts.

threaded and non-threaded in gmail

Follow the steps to disable the conversation view in your Gmail:

1. Log into your Gmail account.

2. Click on the “Settings” link on the top right corner. Alternatively, you can click on this link once you are logged in, this will directly take you to the Gmail settings page.

Settings link in Gmail

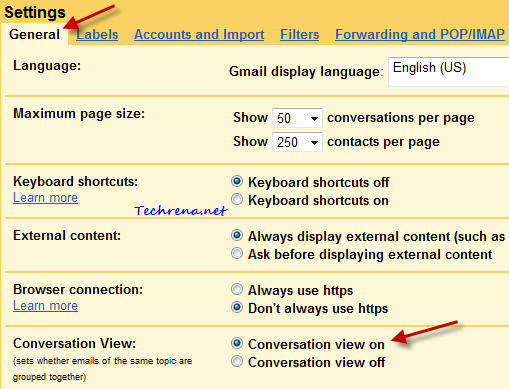
3. Under the “General” tab, find

Gmail settings for conversation view

4. By default, the conversation will be set on. To disable the threaded conversation, select “Conversation view off” button and click “Save changes” button.

Conversation view off

From now on, you won’t see the email messages being threaded to form conversation view. So any reply or related message that you get to a particular mail will be shown with the corresponding symbols as the case with any other classic email clients (for instance you will get RE:.. for any reply you get to the mail that has been sent by you).

[How To] Configure Microsoft Outlook 2010 With Gmail

A tutorial for Outlook 2010 beginners:

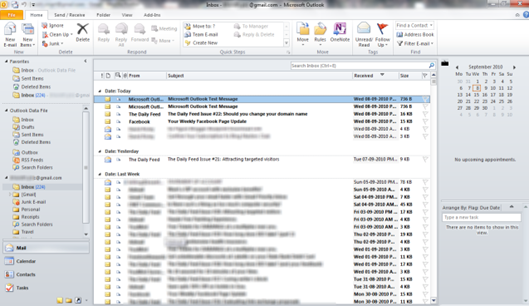
Gmail in Microsoft Outlook 2010

It’s true that Gmail’s web interface is great and feature rich and for the same reason it is gaining lot of popularity among the users when compared to other web based email services. Some of you may want to read your mails through an email client like Microsoft Outlook. With this you can not only use Gmail via your favorite email client, you can also setup and read email messages from multiple email accounts. This also gives you the convenience of added features like searching, filtering, organizing mails and offline mail storage options. Although Google of late trying hard to offer most of these features to it’s web version, the main reason that you may opt for Outlook is to handle mails from Gmail account as well as from other email services simultaneously at one place. Whatever may be the purpose, if you would like to configure Microsoft Outlook 2010 with your Gmail account, follow the steps: [There’s nothing much to do just follow the wizard]

1. Go to Start Menu and type “o l” (without quotes) and open the Microsoft Outlook 2010.

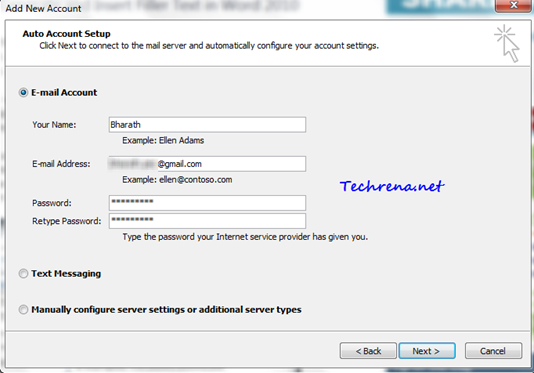
2. Start the new email account configuration wizard and in the second step you need to enter your email account details:

Add New email account in Outlook

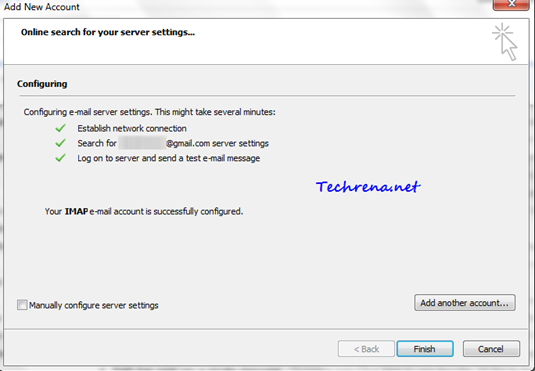
3. Click Next after entering your details. Let the Outlook configure itself properly for your email account. This may take a few minutes. Outlook automatically searches and finds server settings online.

Online search for server settings in Outlook for Gmail

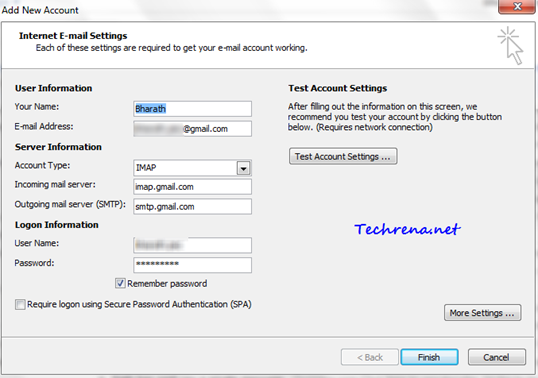
4. You are done with configuring Outlook. However you may also configure settings manually by clicking on the “Manually configure server settings” and clicking Next button.

Gmail settings in outlook

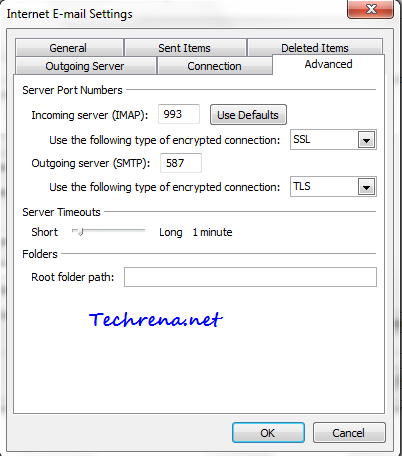
Your settings should be identical to the ones shown in the above screen shot. Click on More Settings button to find some more settings under the “Advanced” tab which should be identical to the following:

Advanced email settings in Outlook 2010

IMAP Settings for Gmail in Outlook 2010:

Incoming mail server: imap.gmail.com

Outgoing mail server: smtp.gmail.com

Server Port Numbers:

Incoming server (IMAP):  993 [Using SSL encryption]

Outgoing server (SMTP): 587 [Using TLS encryption]

[Tutorial] Using Priority Inbox In Gmail

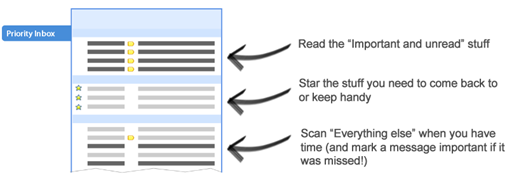
Gmail priority inbox overview

Google has just launched this brand new “Priority Inbox” feature inside their popular email service Gmail. The above an illustrative image taken from the official Gmail blog shows the quick overview of the what this new feature has to offer for you. If you are one of those who gets thousands of emails most of which are “not really” important, Gmail’s priority inbox lets you organise them in a better way by showing the emails that you should probably be reading first in a sorted manner based on your priority and on Gmail’s knowledge of picking the important mails based on your reading over the time. Without wasting much time, lets get straight into the details on making it ready for the first time for your inbox.

Steps:

Find “New! Priority InboxBeta” link in red at the top right corner of your Gmail inbox window.

New priority inbox

When you click on the link, a window with a video pops up, quickly go through the video to get to know about this new feature or you may totally skip it as well.

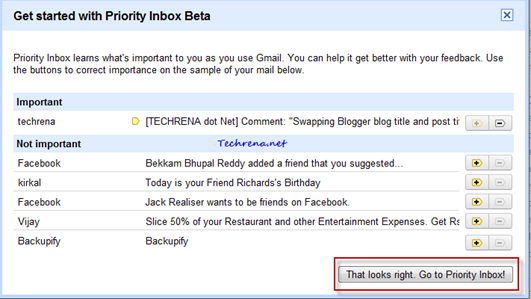
Click on “Try it now!” link at the bottom of the video and you will be shown a initial configuration window.Priority inbox beta getting started

The window will show some of your mails that Gmail thinks as “Important” or “Not Important”. If any one of the mails are shown in the wrong category, you can tell the Gmail it by clicking on the appropriate buttons : click on minus sign Priority minus signin case if the mail is wrongly placed in the “Important” category and click on plus signPriority plus signif there is any wrong mail in the “Not Important” category.

Once you have done the required changes, click on the “That looks right. Go to Priority Inbox!” link at the bottom of the window. Be patient until priority inbox gets activated for you.

Activating Priority inbox

Priority inbox first use

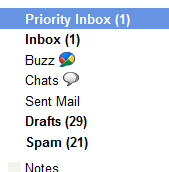
Here you go…Priority inbox has been activated and a new “Priority Inbox” label appears just above the classical “Inbox” label inside your Gmail.

Priority inbox label

And here’s how your new priority inbox should look:

Gmail Priority inbox look

It will have three sections: “Important and unread”, “Starred” and “Everything else”. You can still click on Priority plus and minus signsat the top of your mail to train Gmail work smart in choosing the important and unimportant mails for you.

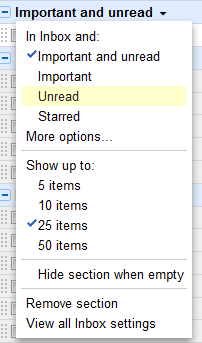
You can still customise your inbox from the pop-up window that appears when you click on any of the sections mentioned above. For instance, if you click on the down arrow present next to “Important and unread” label, you will see the following set of options:

Priority inbox pop-up options

Let us know your feedback on the new Gmail priority inbox through your comments.

[Tip] Google Talk And Google Buzz Text Formatting Tips

gtalk

Google Talk is quickly overtaking the Yahoo and MSN when it comes to instant messaging (IM). Lots of people are using Google Talk either through their native desktop version or the Gmail version of the talk client. With many features like video chat made available to the users, Google Talk is one IM client that has gained lot of popularity among the users. But not so many option to format text unlike Yahoo Messenger and other IMs is a let down for Gtalk users. But Google talk do have some lesser known  formatting styles that are in my honest opinion sound a bit difficult to implement as these have to be used manually by typing rather than to be able to select by a mouse click like in other popular IMs. Here we are listing down all the possible styling tips that you can use while you do a chat with your friends in Google talk.

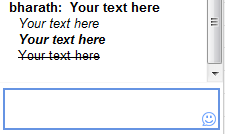
Google talk text formatting

Tip 1: Use Bold Text

To make your text bold during your chat, enclose the text inside “*” (asterisks)

*Your text here*= Your text here

Tip 2 : Use Italic Text

To italicize the any text just enclose it in “_” (underscores)

_Your text here_ = Your text here

Tip 3: Use Bold + Italic Text:

Use

_*Your text here*_ = Your text here

Tip 4:  Use Strikethrough Text

To strikethrough a text in your chat, enclose the text inside “-“ (dashes)

-Your text here- = Your text here

Bonus Tip: The good thing here is that you can use all the above tips in your Google Buzz too.

Google hasn’t yet made the underline font feature available to the Gtalk users. However, you can suggest the Google Talk team to activate this feature.

If you are an excessive Google Talk user, you will definitely find all the above tips handy.

[How To] Use Google Multiple Sign-In Feature

Google Mutiple sing-in

If you use Google products a lot and that too with different logins (may be one for personal use and other for business purpose etc.), you would be knowing there’s absolutely no way to use both accounts on the same browser. Until recently you need to go through some workarounds or use another browser and keep switching between the two windows often. Times have changed, Google has listened to users like you and enabled this glorious multiple sign-in feature for selected Google products.

You wouldn’t even be knowing that such a feature exists until you open your Google account settings page. This tutorial explains you how to enable and use Google multiple sign-in feature for your account.

To begin with, visit Google account settings page,

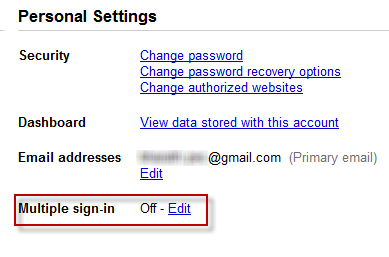
Google account personal settings

Find a “Multiple Sign-in” tab under your personal settings, by default this feature would be set to “Off”, click on the “Edit” link to change the multiple sign-in settings.

You will be taken to multiple sessions page,

multiple google accounts enable

You need to read and understand the four aspects listed there (as shown in the screenshot) before adding a “check” to each one after which you can enable the Google multiple accounts feature. After you checked the each option, the “save’ option would be enabled. Click on it to save the settings and enable the multiple sign-in feature.

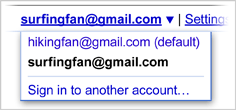
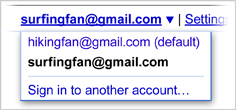
Now the Google multi-login feature gets enabled for you. Open any multiple sign-in supported Google product page(ex: Gmail) and you can figure out a drop down menu next to your Google account username. Click on it to see “Sign in to another account” link and click on it.
multilogin menu sample

You can sign in up to two additional accounts (so in essence, you can simultaneously access up to three Google accounts, while the first being your default account) and you can also open the same product in multiple tabs with different tabs.

Please note that the multiple sign-in option is currently available to only few products listed below and also it is not fully supported for use with Offline Gmail and calendar , for the same reason you wouldn’t want it to enable yet if you use offline Gmail.

Multiple-sign in feature supported Google products:

  • Code
  • Calender
  • Gmail
  • Reader
  • Sites
  • Voice
  • Docs

If you want to use multiple sing in with other products, you still need to either use tricks like using private browsing mode in supported browsers or use another browser as you have been doing all through.

[New] Drag And Drop Attachments From Gmail To Your Desktop

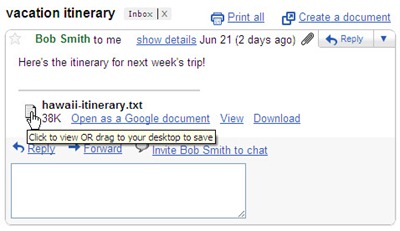
gmail drag attachment

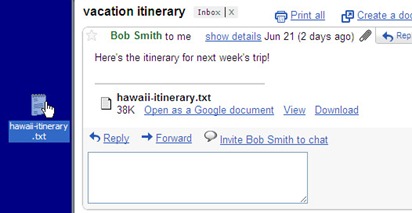
Gmail has just announced a support to drag and down the attachments from mail to your desktop. Until now we could only drag and drop attachments from the desktop to the mail while composing but the reverse was not possible. Now Gmail blog has officially announced the launch of this new feature (in Google Chrome) along with a couple of screenshots on how to do it. I have included the screenshots in this post so that you can get a brief idea about how to use this feature. When you hover the mouse over the attachment, you can see a message “Click to view OR drag to your desktop to save”. It’s pretty much straight forward, just click and hold, drag and drop the attachments from your mail to any folder on your computer. Release the mouse button once you have taken the cursor to your desired folder.

gmail_drag_attachment_2

Gmail had earlier enabled another feature that lets you drag and drop images on to your email messages while composing a mail.

Note: This works only with Google Chrome as of now

Via Gmail Blog

[Tip] Get Free Gmail Email Alerts Via SMS

Gmail via SMS logo

If you want to get all your new Gmail messages to your mobile phone via SMS text messages, there are already enough no of services and tools have been developed to serve the purpose for which you need to share your Gmail password. Even though most of these services are genuine, still you might not always want to share your Gmail personal credentials with those services for security concerns. Here I’m coming up with an alternative where you need not give access to your personal Gmail to any unreliable third-party service. All you need is an Gmail account and a Windows Live Mail (Hotmail account). If you still haven’t got an account at Live Hotmail, get a new account here. Now follow the steps mentioned below:

Steps:

1. Connect a mobile device to your Hotmail account and set up Hotmail Email SMS alerts.

2. Login to your Gmail account, go to settings page.

3. Go to Forwarding and POP/IMAP tab, find the “Forwarding” tab.

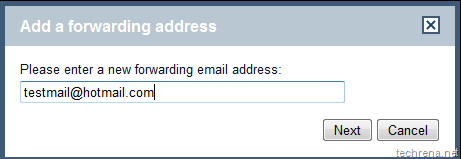
4.  Add a new email address to your forwarding list by selecting “Add new email address..” option for the drop down box. Enter the new forwarding email address. It should be something like username@hotmail.com

Add new email address Gmail forwarding

forwarding_address_gmail

5. Click Next and complete the verification process. Enter the verification code that you receive via SMS.

Verfiy forwarding mail in Gmail

6. Now that you have successfully verified your new forwarding hotmail address, you will now receive each and every mail from your Gmail inbox to the new forwarding hotmail address (we selected “keep Gmail’s copy in the inbox” option). As you had also setup your Hotmail Email alerts to be sent to your mobile via SMS, in effect you get all your new mails in your Gmail inbox directly to your mobile.

7. But some operators in India like Airtel have a limit on the number of free text messages that you can receive through Hotmail (The current limit for Airtel is 300 !). So you might want to filter out some unimportant mails to wasting these free messages count. Luckily we have “filters” in Gmail that makes this task easier for us.

8. First of all disable the forwarding under your Gmail’s “Forwarding and POP/IMAP” settings.

disable forwarding in gmail

Now go to Filter tab and create a new filter:

Filters tab in Gmail

9. Under the filter settings filter out Emails based on senders or words or based on subjects of the mail that you receive. I have chosen not to receive alerts for mails from Facebook alerts, Twitter alerts etc. You can setup your own criteria for filtering the mail.

Creating Filter in Gmail

Click on “Next Step” once you are done.

10. Now select the fifth option i.e “Forward it to:….@hotmail.com”. And click “Create Filter”.

forwarding using Gmail filter

That is it. You are done with configuring your Gmail inbox to receive SMS alerts for important mails in your Gmail.

Note:

Windows Hotmail Email SMS alerts is currently available only in few countries. This tutorial is based on the such service offered in India,and thus this trick may not work for you if you are located in a country where Hotmail SMS service is currently not available.

Add Images To Your Gmail Signatures

Gmail has recently launched a new feature that lets you add rich HTML signatures right inside your Gmail without needing to any hacks. Until now Gmail didn’t have a built-in support for rich text HTML signatures, if you had to add a signature, it used to look like something as shown below;

gmail_old_signature

Now that Gmail has official support for rich text HTML signatures, you can create a more customised signatures like the one shown below:

Gmail html signature

To start using this feature in Gmail, follow the steps:

1. Login to your Gmail and go to settings page.

2. Find the signature section under settings

3. You can see a much familiar rich text editor that you would normally see while composing a mail using Gmail.

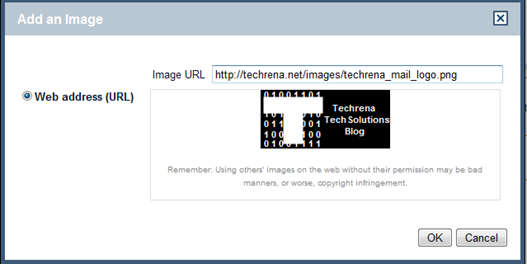
4. You can even add images and link them to your profiles on various social networking sites.Click on the “image” icon to start uploading a image.

add images in Gmail signatures

The only issue here is that you can only upload images that are already present on the web, however you can’t upload images directly from your computer. That being said, one need not bother much about it because images can be easily uploaded to Flickr or Picasa for permanent storage and faster access. You can also resize the image to three different sizes (small, medium or large).

5. You can even change your font size, style, color etc. using the rich text editor. Click on the “save changes” to save your signature.