Speed Up Windows Boot Up and Startup Using gpedit and DPS

In Windows PC, slow boot up and slow startup is one of the major problem we face. During the starting of Windows, it may take a lot of time to come to the logon screen and then to the desktop. This kind of problem is common in PCs which are older and a lot of programs are running.

One method we have already posted to speed up your Windows PC is by using MSCONFIG. Here, we will be solving the slow boot up problem using Windows Boot Performance Diagnostics of Diagnostic Policy Service(DPS).

Diagnostic Policy Service (DPS) will detect Windows Boot Performance problems and attempt to determine their root causes. These root causes will be detected and corrective actions will be taken to solve the problems.

Follow the steps below to enable Windows Boot Performance Diagnostics.

1. Open Local Group Policy Editor

Press Start + R and Type gpedit.msc and press Enter. Incase of

2. Go to Windows Boot Performance Diagnostics

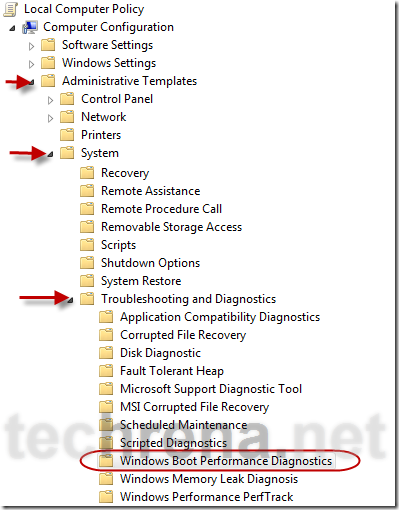
In the Left Pane of  Local Group Policy Editor go to the location:

Computer Configuration—>Administrative Templates—>System—>Troubleshooting and Diagnostics—>Windows Boot Performance Diagnostics

Windows_Boot_Diagnostics

3. Open Configure Scenario Execution Level of Windows Boot Performance Diagnostics

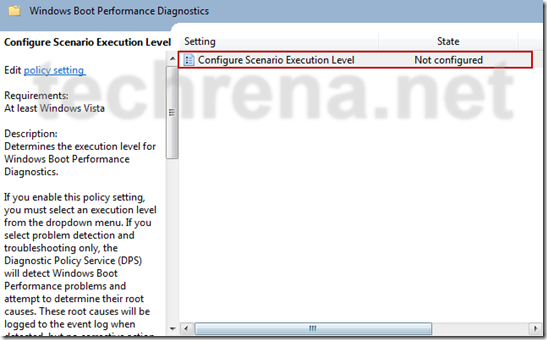
Now in the right pane Double Click on Configure Scenario Execution Level.

Configure_Scenario_Execution_Level

4. Enable Windows Boot Performance Diagnostics

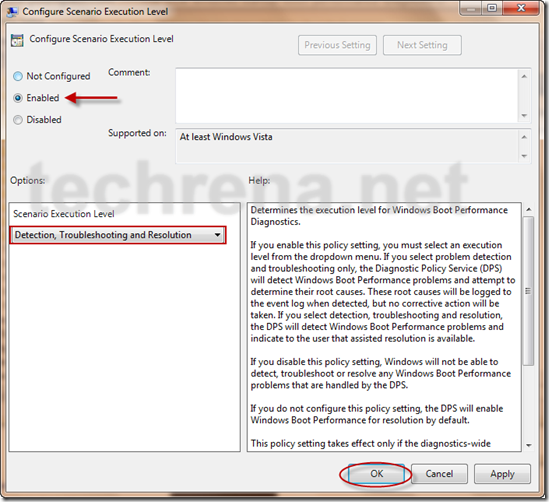
Now Click on Enable and Select Scenario Execution Level as Detection, Troubleshooting and Resolution. Click OK

Enable_Windows_Boot_Diagnostics

If you select Detection and Troubleshooting only then  the root causes will be logged to the event log when detected, but no corrective action will be taken.

Now Windows Will Diagnose your Startup problems and try to fix them for a faster boot and startup.

Important Notes:

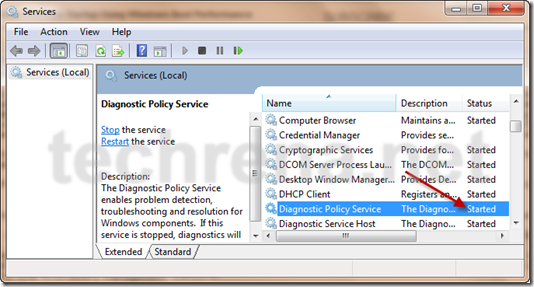
Note 1: Windows Boot Performance Diagnostics is a part of the Diagnostic Policy Service(DPS). So DPS should be running in your computer in order to successfully diagnose the problems. To check whether the service is running or not, Press Start + R and Type services.msc. Check out for Diagnostic Policy Service.

services

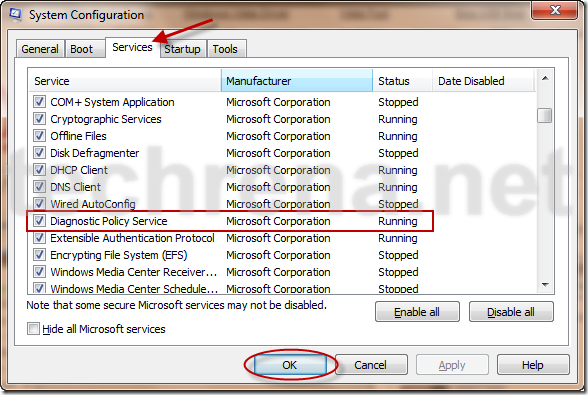
Incase if it is not started, you have to start it using MSCONFIG. To do that, Press Start + R and Type msconfig. Go to Services tab and Check Diagnostic Policy Service. Press OK.Note 1:

msconfig

Note 2: This service is available only in Windows Vista and Windows 7. And Local Group Policy Editor (gpedit.msc) may be available only with versions like Professional or higher.

You can subscribe to our RSS feed via email for more tutorials under Windows.

[How to] Pin or Unpin The Contents Of a Folder in Windows 7 Taskbar

Have you ever thought of adding a shortcut of your favorite folder in the taskbar. Well you can do it in Windows 7. Here we will show how to pin a folder in the Windows 7 taskbar.

Any folder can be pinned to the task bar as a New Toolbar in the Task bar of Windows 7 with a small or large icon and with or without text of the folder name.

Point to be noted:

When we pin a folder, we can see only the only the contents of the folder in the task bar. It is like the folder is already opened and displayed in the taskbar. So it is not that the folder’s shortcut is pinned to the task bar, but its just that the shortcut of the contents of the folder is created in the taskbar.

Now just follow the simple steps below to pin the contents of a folder to the task bar.

Pin a folder to the taskbar.

Add a new toolbar in the task bar:

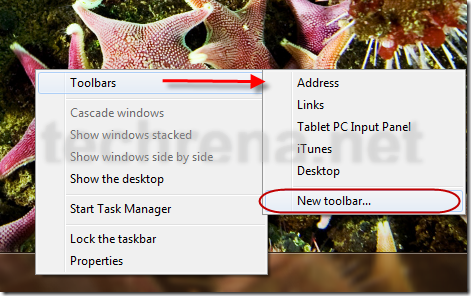
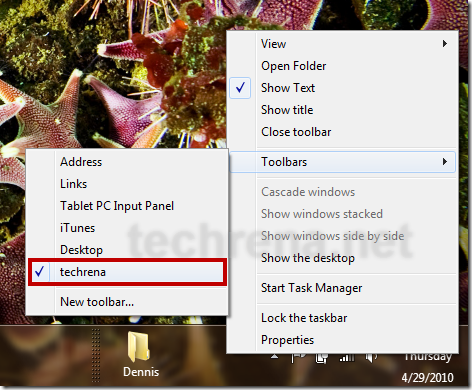
Right Click on the taskbar, go to Toolbars and select New toolbar.

Add_new_toolbar_taskbar

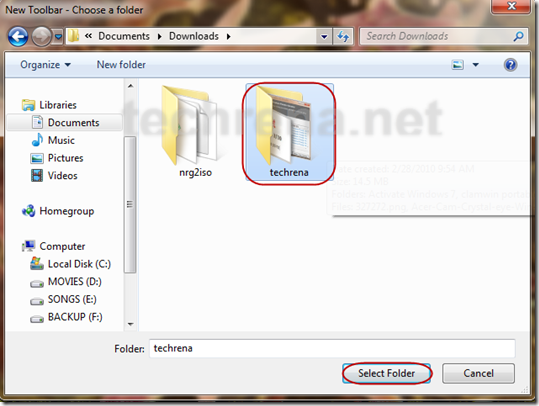
It will ask to select the folder. Select the parent folder which you want to add so that the contents of the folder is shown in the taskbar.

select_toolbar_folder

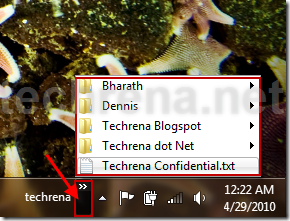
Now you can see the folder name in the taskbar with its content.

taskbar_toolbar_opened

Unlock the Taskbar to modify the positions and settings if its locked

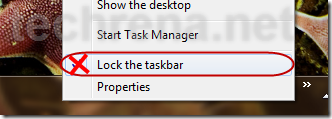
Right Click on the taskbar and select lock taskbar to uncheck it.

unlock_taskbar

Changing the settings of the toolbar:

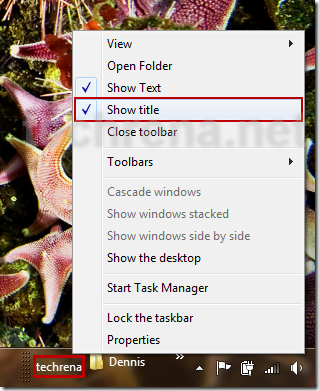
If you don’t want to name of the folder to be displayed but only the contents, then right click on the folder name in the taskbar and uncheck Show Title.

Show_Title

If you want to move the toolbar to the left side, yo have to drag the divider to extreme left to the Start menu.

Drag_divider_to_leftToolbao_divider

If you want to move it back, drag it back to right.

Now, if you want to show bigger icons of the content in the toolbar, Right click on the toolbar, go to view and select Large Icons.

View_large_icons

Now after doing all the changes you can lock the taskbar again if you wan to.

Unpin the folder from taskbar:

Now to unpin the folder, right click on the taskbar and go to Toolbars and unselect the folder name. You can also right click on the toolbar and select close Toolbar.

close_toolbar

Now you have successfully learnt how to pin and unpin a folder to the taskbar in Windows 7.

MyWebSearch Adware: Instruction to Completely Remove My Web Search Toolbar

my_web_search_uninstaller

MyWay Searchbar commonly known as MyWay Speedbar, MyWay Search Assistant, MyWebSearch, and MyWeb Searchbar is toolbar allows us to query Google, Ask.com, and Yahoo! search engines. The program were classed as adware by some websites and anti-malware applications, although they claimed not to have the adware function. The MyWay Searchbar is currently described by Sunbelt Labs as a Potentially Unwanted Program. [Source: wikipedia.org]

MyWebSearch installed on my system without permission:

How I got MyWebSearch installed on my computer without actually installing it? This happened when I was chatting with a friend in Gtalk. I received a chat as:

You just received a smiley! Go to http://buddies.smileycentral.com/ to see it!

I was curious and clicked it. Then I later found out that it had installed MyWebSearch without my consent. This is only one way of getting infected. There are lots of others also.

Why MyWebSearch is potentially unwanted?

  • My Web Search installs its own programs without any permit.
  • It is difficult to completely remove this program.
  • Even if it is removed from the Add/Remove program, the registry values still remain and tries to run.

How to find out MyWebSearch installed or not?

  • Add ons appear in Browsers like Mozilla/Internet explorer
  • Add ons can also be found in Messengers like Gtalk
  • Unwanted pop ups may come up during internet usage.

How to Remove MyWebSearch Completely from your Computer?

Step 1: Remove the program from Add/Remove programs:

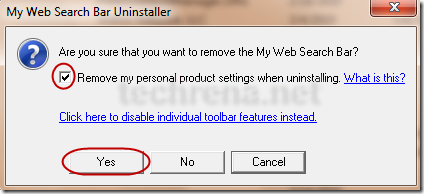
Go to Start Menu –> Control Panel –> Add/remove Programs or Uninstall a program

Search for MyWebSearch and uninstall all the programs shown.

control_panel_remove_mywebsearch

my_web_search_uninstaller

After removing the program, restart the your system.

Step 2: Use HiJackThis to remove the unwanted registry entries and running programs of My Web Search:

HiJackThis is a freeware which can scan your registry for unwanted entries. It is a stand alone program and  doesn’t require installation.

Download HiJackThis v 2.0 : http://www.techrena.net/downloads/HiJackThis_v2.exe

Size: 1.2 MB

Scan your System with the program. Remove the following entries if present:

Click Here to Open The text file containing the entries.

See the image below to see hot to remove the entries: (Click to Enlarge)

fix_registry_hijackthis

Step 3: Remove the My Web Search registry Entries present in the windows registry:

Download the BAT file from the link below:

http://www.techrena.net/downloads/remove_my_web_search.bat

Double click on remove_my_web_search.bat. It will open Command Prompt. While running the commands the command prompt will ask for confirmation to delete the entries. Press Y and enter every time it asks.

confirm_delete_cmd

Ignore if it tells cannot find the value in the path. It is because the values are already been removed.

Now you have successfully completed removing My Web Search bar components from your system.

Note:

1. In order to perform all these actions and  commands you need to have Administrator privilege.

2. If your registry editor is disabled, you cannot perform theses actions. You can refer: How to enable Registry Editor (REGEDIT) to enable it.

Install Portable Antivirus on a USB Flash Drive or an iPod

clamwin_portable

What will happen if your System is infected with viruses and the Antivirus you had installed failed to protect? In several cases, the virus may also disable any anti virus programs that you may try to run to disinfect.

Can we use a portable anti virus program which is installed in a USB Flash drive to scan our computer? The answer is a definite Yes! This is an easy way to disinfect an infected computer using a USB disk or your iPod.

ClamWin has come up with such an anti virus application. ClamWin Portable is a popular ClamWin antivirus packaged as a portable app, so you can take your antivirus with you to scan files on the go. You can place it on your USB flash drive, iPod, portable hard drive or a CD and use it on any computer, without leaving any personal information behind.

See the details below to install the free anti-virus in your portable USB device.

Requirements:

Windows XP, Vista or 7 Operating System

USB Flash Drive, Disk with Minimum 30MB free space

Step 1: Download ClamWin Portable from the link below:

Size: 6MB

Link: Click here to Download ClamWin Portable 0.95.3

Step 2: Connect your USB device. Then go to the downloaded file. Double click on the exe file.

Step 3: Start the installation process. Select the correct location where the application is to be installed. Then click on Install.

choose_location_clamwin]

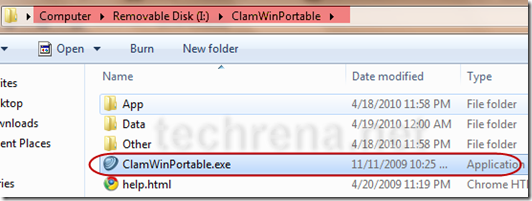
Step 4: Now after successfully installing the application, go to the location where you have installed it. Double click on ClamWinPortable.exe to start the application.

start_clamwinportable

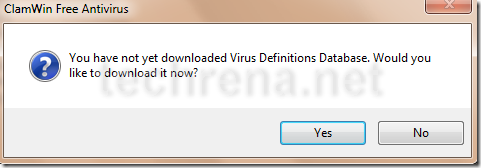
Step 5: On first startup it will ask you to download the Virus Definition database. Click on yes.

download_virus_definition_database

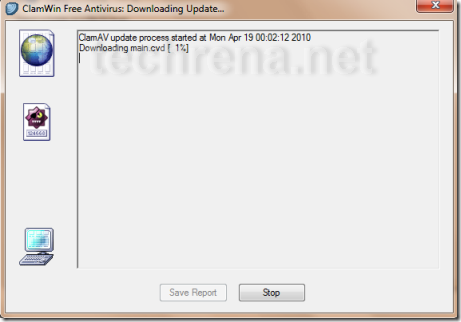
Step 6: Now it will download the update. It may take a few minutes. Note that without downloading the database update the anti-virus is useless.

Downloading_update

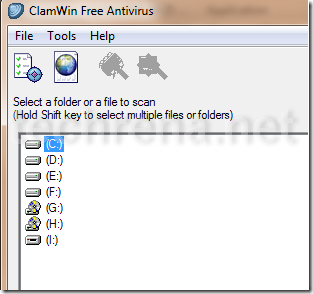
Step 7: Now you can select the drive to scan.

ClamWin_free_antivirus

Now you can easily disinfect any computer. But make sure that the virus definition database is up to date.

How to Create a Password Reset USB Disk in Windows 7 And Vista

Have you ever faced a problem of forgotten password in your Windows PC? If yes better have a backup plan now itself. Here we are going to tell you, how you can reset your Windows password using a reset password disk. This feature is available in Windows 7 and Vista only.

You can backup your user identity in a USB disk and use the disk for resetting your Windows user password in the future in case you have forgotten it. For this purpose you need not use a high capacity USB drive. You can either use your old USB which are considered obsolete or too small in size like 128MB or buy a small capacity one at lower cost. This is because the reset file if very small and you need to store the USB device in your locker or any other safer place.

Requirements:

A USB Flash Drive(Any size)

Windows 7 or Vista Operating System

Important: Once a password reset disk has been created, no matter how many times the password has been changed after that, you can reset the password using the Disk any number of times. In order to avoid misuse of the device, keep it in a safe place.

Password Forgotten Before Creating the Password Reset Disk?

Follow this link: Reset Windows XP, Vista, 7 Password Using USB Drive or CD

Follow the steps to create a Password Reset disk using Windows Forgotten Password Wizard:

Step 1: Connect the USB Flash Drive to your PC.

Step 2: Open Start Menu, click on Control Panel. In Control Panel go to:

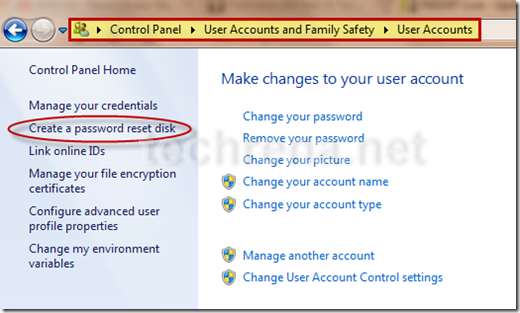
Control Panel—>User Accounts and Family Safety—>User Accounts

Step 3: In the left pane of User Accounts, click on Create a password reset disk.

User_accounts

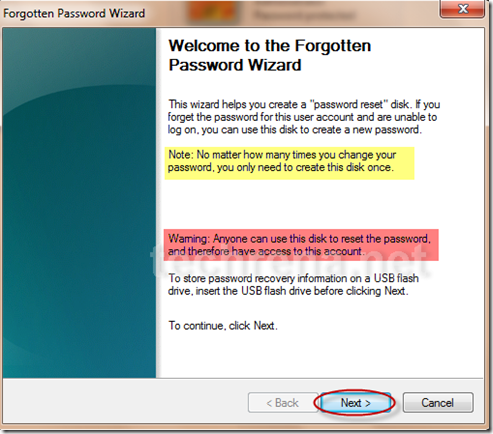
Step 4: Now in the Forgotten Password Wizard, read the Important notes and warnings and Click on next.

forgotten_password_wizard

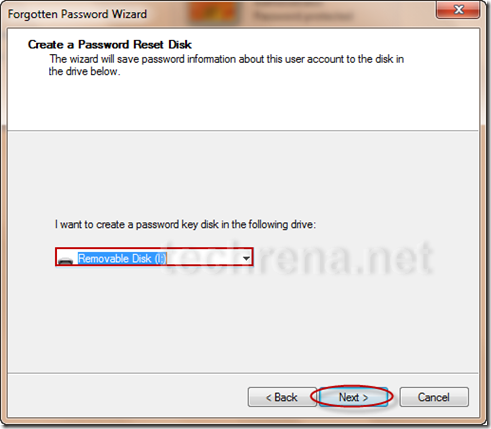
Step 5: It will ask you for the USB drive letter in which you want to store the password reset file. Select the correct drive and click on Next.

select_drive_forgotten_password_disk

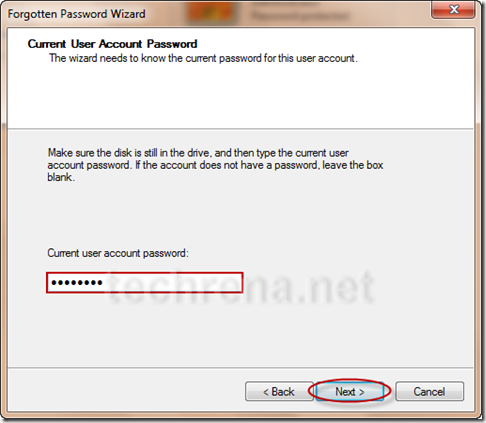
Step 6: Now it will ask for the current password. Enter the correct password and click next.

enter_current_password

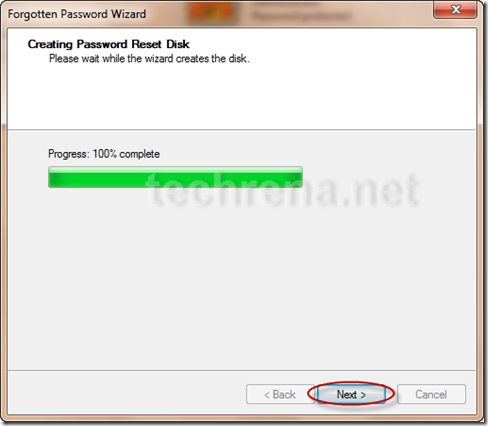
Step 7: Once it completes the creation process, click on finish.

create_password_reset_disk

What you have to do when you have forgotten your password?

Now if you have forgotten the password, you can use the Reset disk. When Windows asks you for the login password, plug in your Password Reset Disk and wait for a while. Try entering any wrong password. Now below the password field, a link as Reset Password… will come up. Click on it and enter a new password.

Note: If you do not have a Password Reset Disk, you can try: Reset Windows XP, Vista, 7 Password Using USB Drive or CD

Speed Up Your PC Using a USB flash Drive in Windows 7 and Vista With ReadyBoost

If you have a low memory in your Windows 7 PC, your system may be slow and the performance may not be satisfactory. Microsoft Windows has introduces a new component known as ReadyBoost, to help when your PC’s memory is running low.

ReadyBoost is a component of Microsoft Windows, first introduced with Microsoft’s Windows Vista in 2006 and bundled with Windows 7 in 2009. It works by using flash memory, a USB flash drive, SD card, CompactFlash, external hard drive or any kind of portable flash mass storage system as a drive for disk cache.
ReadyBoost is also used to facilitate SuperFetch, which allows it to perform analysis of boot-time disk usage patterns and creates a cache which is used in subsequent system boots. SuperFetch is a technology that pre-loads commonly used applications into memory to reduce their load times, in a similar fashion to the preload in Linux.

Using ReadyBoost-capable flash memory (NAND memory devices) for caching allows Windows 7 and Vista to service random disk reads with performance that is typically 80-100 times faster than random reads from traditional hard drives.

Using ReadyBoost in Windows 7 and Vista:

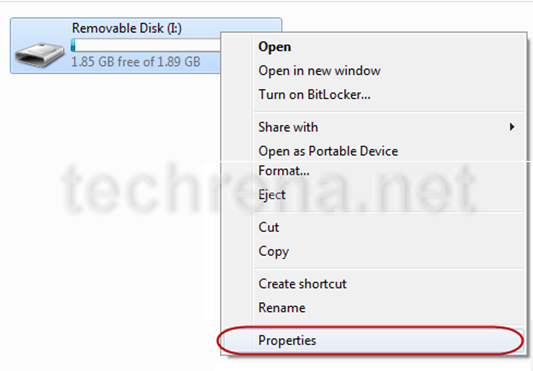
First plug in your USB flash drive. Open My Computer. You can see the Removable Disk. Right Click on it and Select Properties.

removable_disk_properties

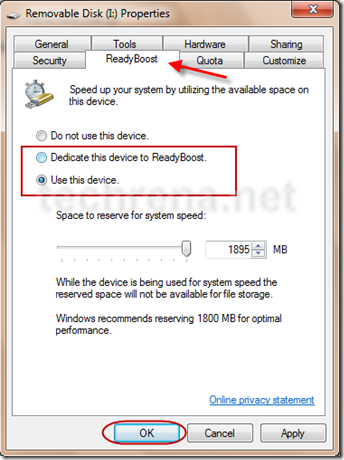
Now in the Properties window, go to ReadyBoost Tab. You can either select Dedicate this device to ReadyBoost or Use this device and set the amount of space you want to use for the process.

ReadyBoost

Now Windows will use the free space available in your flash drive for speeding up your computer.

Note that this process will not delete any data from your flash drive. It will only use the available free space in the removable disk.

Moreover if you want to speed up your boot up and startup, you need to use MSConfig.

Install Windows 7 or Vista Using Bootable USB Disk Drive

Installing an operating system to computers that don’t have an optical drive has been a problem. For example, if we want to install Windows 7 in netbooks like ASUS Eee PC, Dell Mini Netbooks, Acer Aspire One, HP Mini 1000 etc. , then we need to use a bootable pen drive to install it. With the release of the full version of Windows 7 and its gaining popularity, many people have decided to go for Windows 7 over Vista.

windows7_logo

Well the method given here is one of the easiest techniques known which does not need any kind of download and the clear screen shots have been given. The advantage of using this method is that, the whole process of installation finishes in lesser time than installing via an DVD.This method will also work for Windows Vista Installation. But if you want to install Windows XP using a flash drive then you can refer to this post: Install Windows XP from USB Disk Drive. Now lets Start.

Requirements:

1. A USB Drive of minimum 4GB space

2. Windows 7 installation DVD or ISO file (Back Up will also do)

Before starting, plug in your USB drive into your system.

Step 1: Open Command Prompt as Administrator. ( Press Start + R, then type cmd and Press Ctrl + Shift + Enter OR In the Start menu type cmd and Press Ctrl + Shift + Enter )

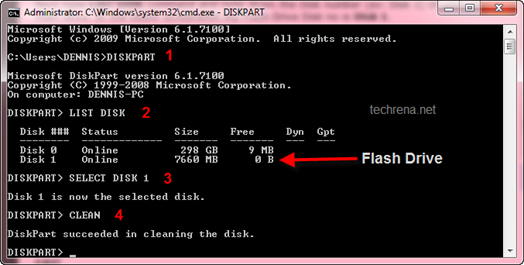
Step 2: After opening Command Prompt, Type the two commands below:

DISKPART

LIST DISK

Windows 7 install from usb

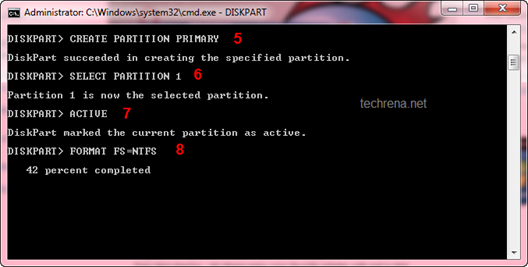
Step 3: Now you can see the disks present in your system. See the disk number for your drive. In my case the number is Disk 1. Enter the Commands below replacing the disk number with yours.

SELECT DISK 1

CLEAN

CREATE PARTITION PRIMARY

SELECT PARTITION 1

ACTIVE

Windows 7 install from usb

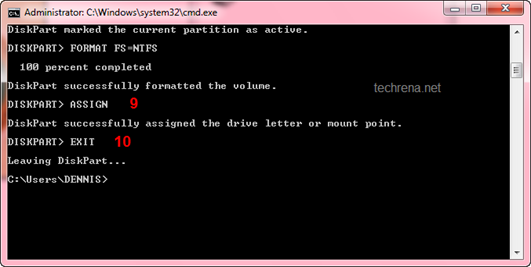
Step 4: Now we need to format the disk and then exit. It may take few minutes. Type the commands one by one:

FORMAT FS=NTFS

ASSIGN

EXIT

Windows 7 install from usb

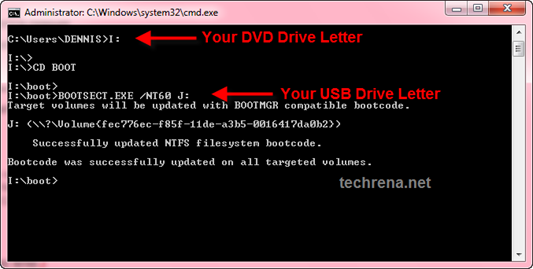
Step 5: Now insert your Windows 7 DVD to your Optical Drive or Mount your ISO file in the Virtual Drive(you can use Virtual Clone Drive ). Note the Drive letter of your DVD Drive and USB Flash Drive. Type the commands below, in the Command Prompt replacing the drive letters as yours. In my case they are I and J.

I:

CD BOOT

BOOTSECT.EXE /NT60 J:

Windows 7 install from usb

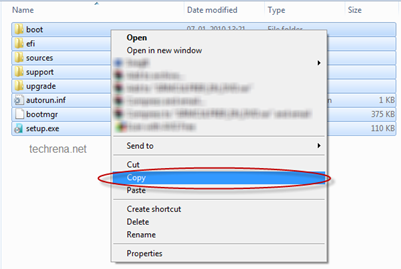
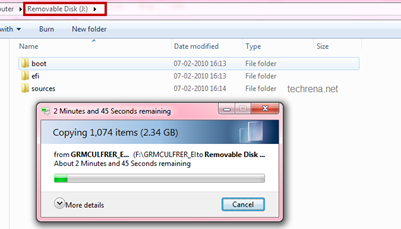
Step 6. Now copy all your Windows 7 DVD contents to the USB flash drive.

Windows 7 install from usb Windows 7 install from usb Windows 7 install from usb

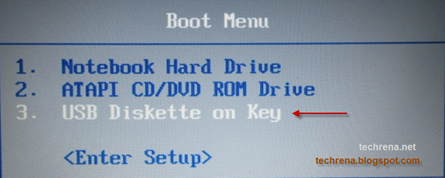
Step 7: Now your USB Drive is bootable. You can restart your computer and boot from the USB drive. In order to boot from your flash drive, you have to change the boot menu. Many computers have DELETE, F10, F2, F12, ESC keys as Boot menu key (the boot menu key information is usually displayed during Start Up). In the boot menu Select USB Diskette on Key and boot it from the USB.

Windows 7 install from usb

Now the Windows 7 installation will boot,  follow the instructions to install.

Do comment if you face any problem while executing the method.

Note:

1. If you have the installation file as a back up in your hard drive( not in the form of an ISO) then, in Step 5 execute the BOOTSECT.EXE command by changing the directory in the command prompt(use CD command) to the folder where your installation files are present.

2. You can use Microsoft USB DVD Download Tool as an alternative to this method.

3. This method will not work for Windows XP. If you want to install it then refer this post: Install Windows XP from USB Disk Drive

Install and Run Windows XP in Windows 7 Using VMware Player

Windows XP has been the most famous and most useful operating system to its users till date. Well even if we are have to migrate to Windows 7, we will never forget the ability of Windows XP. There are a lot of programs which were supported by Windows XP but not in the later versions like Windows Vista and Windows 7. Now when we migrate to Windows 7, we will not be able to run such programs.

In order to solve the problem of incompatibility of software and drivers in Windows 7, we have been given the option of installing Virtual Windows XP using Microsoft Virtual PC. But the lone problem in this option is that the processor should support Virtual Machine.

Windowx XP and Windows 7

Here we have given a technique with which you will be able to run Windows XP in Windows 7 without any Virtual XP software or Virtualization Supporting Processor. Moreover you can use your own CD or ISO backup of Windows XP to create the Virtual Machine and no need of downloading the XP Virtual PC from Microsoft.

Requirements:

Windows 7 installed Machine

Minimum 1 GB RAM.

Minimum 4 GB Free Hard Disk Space

Windows XP backup either CD or ISO file

OR

If you have downloaded Microsoft Virtual XP Mode, then refer the instruction at Step 6.

Step 1: Download and Install VMware Player 3.0.1. The download Links are given below.

Size: 90.0 MB

Download VMware Player 3.0.1 from VMware

or

Download VMware Player 3.0.1 from FileHippo.com

Follow the normal instructions and install. Restart your computer after installation.

Step 2: Now we have to create a new Virtual Machine. Open VMware and click Create a New Virtual Machine as shown below.
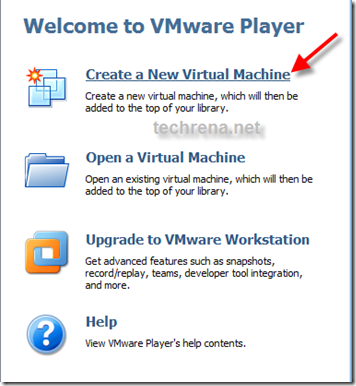
VMware-New-virtual-XP-Machine

Step 3: Select the location from which you are going to create the new Virtual Machine. If you have a CD then select the drive. If you have a back up file in an iso, then you can select the file.
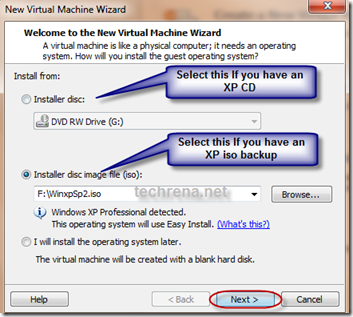
Select-disc-iso-XP-Machine

Step 4: Enter the Windows XP key and the user name and password.
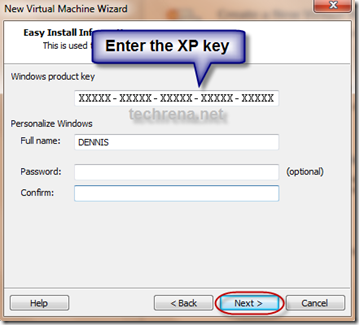
Enter-key-XP-Machine

Step 5: Then you can set the location to be installed, maximum Disk space size and the RAM size. Follow the instructions normally. Finish the setup. It will continue to install Windows XP in your Virtual Machine.
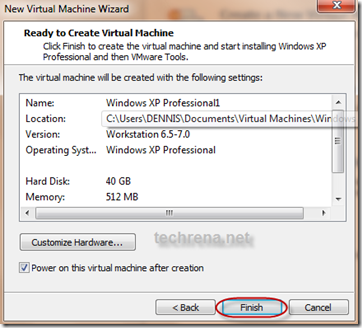
3-6-2010 12-35-50 PM

Optional Note: While installing the Virtual Machine it may ask you to download VMware Tools for Windows 200 or later. It is recommended that you download it or you can download it later also.
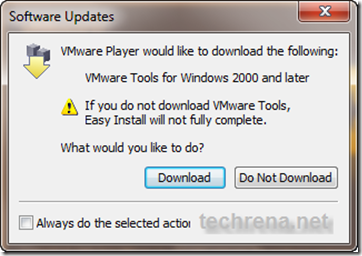
download-vmware-tools-for-Windows

After that, the installation process will continue by itself and Windows XP will start.
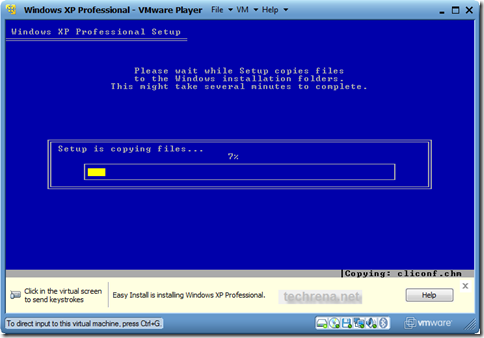
Windows Xp installation

Windows Xp installation process

After successful installation Windows XP will start and you can see the System properties as shown below. 512 MB of RAM is set when installation(you can change the size in VM settings).
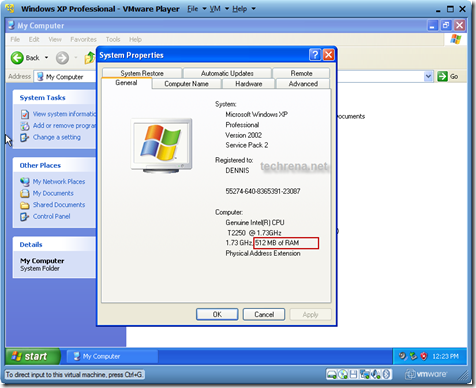
Virtual-xp-properties

Now, you have successfully installed Windows XP virtual PC using VMware player. In order to quit Windows XP you can simply shutdown and quit VMware player.

To start the Windows again in virtual mode, open VMware Player and Select Windows XP in the left pane and Click Play virtual machine.

VMware

Let us discuss some of the issues which should be known by the users.

How to Transfer Data to and from Windows XP virtual Mode?

As you are running two different machines drag and drop will not work if you have not installed VMware tools. Even if you can copy directly, it takes more time. You can either use a flash drive or Disc drive to transfer data between Windows 7 and XP virtual mode. But this is not the optimal way. You need to map network drive in Windows 7 which has been shared from Virtual XP.

To enable file and folder sharing in Windows XP virtual Mode, you need to edit the settings. Click on Virtual Machine Settings as shown above to edit the settings.

Select Options and select Shared Folders. Set Always enabled and click OK.
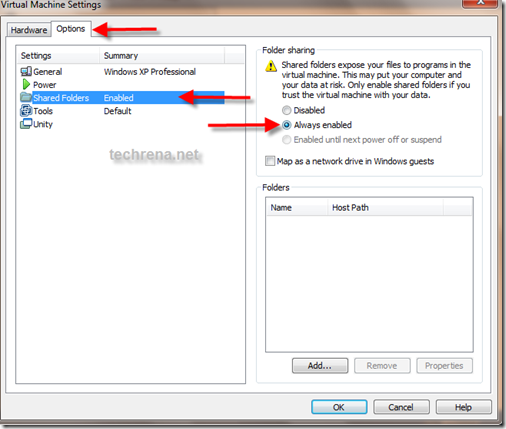
VMware-settings-folder

Now you need to share a folder with write permission as shown:

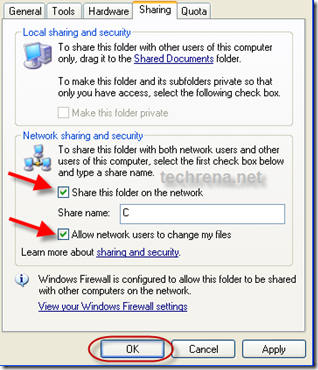
In Windows XP, right click on the folder or drive you want to share and select Share and Security. Do not forget to check Allow network users to change my files.
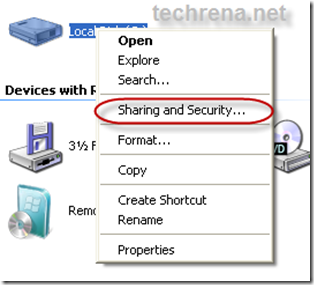
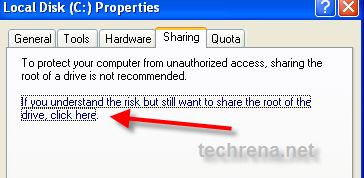
Share a folder in XP

share-folder-in-virtual-xp

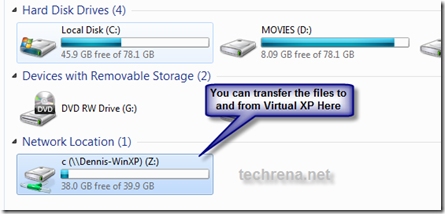
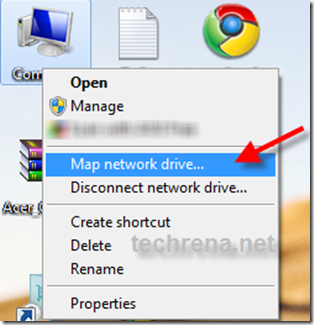
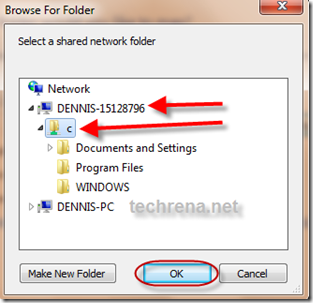
Now after sharing the folder in Virtual XP, you need to map the folder in Windows 7 as shown below:

Right Click on My Computer and Select Map network drive. Under Network search for the folder you have shared in Virtual XP Machine and click OK.
set-virtual-drive-windowsset-virtual-drive-windows-7

virtual-drive-windows-7

You can copy or paste anything from or to the network location drive in Windows 7. This is how you can transfer files between Windows 7 and Windows XP virtual mode.

Removable Devices:

Now if you want to use a removable device like a flash drive, you can connect the device using the following setting:

VMware-set-devices

You need to disconnect the device from the host in order to connect to the Virtual machine.

Step 6. Running Microsoft’s Windows XP Virtual PC:

All the above installation is not done using the Microsoft’s Virtual  Windows XP PC. Above we used normal Windows XP installation CD. If you have downloaded Virtual XP PC from Download Windows XP Mode then,  install it on your PC and then you can open the Virtual Machine from the VMware Player as follows.
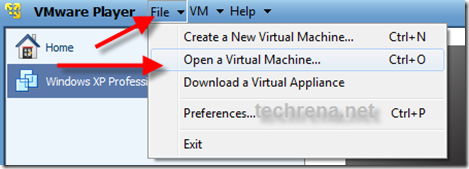
VMware-open-virtual-PC

Browse for the .vmx file in the folder you have installed the Virtual XP PC and  Click Open. You can run it.

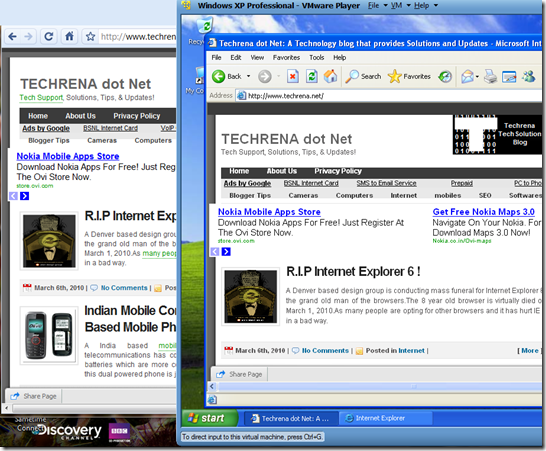
Finally, as you have successfully installed Windows XP Virtual PC in Windows 7 using VMware Player 3.0.1 you can enjoy the unbeatable features of Windows XP in Windows 7 also.
windows7-and-virtual-windows-xp

Note: No new Partition is created in your hard disk for the Virtual PC. Just a virtual disk file is created in your drive which will increase in size according to what you copy and install in your Virtual PC. The maximum size of this file is the size you have set as maximum disk size.

PS: If any problem occurs or if you are not able to follow the steps and instructions, please leave a comment below.
Acer Crystal Eye Web Camera Driver for Windows 7

There has been a lot of problem for Acer Laptop users while migrating to Windows 7. But if you see almost all of the drivers inbuilt in Windows 7 can handle the drivers for most of the devices except for devices like the Web Camera.

Today, we have faced the same problem while trying to upgrade the Acer Aspire PC to Windows 7 from XP. While, all of the other drivers will work by default and some of the drivers like the Intel Graphics Accelerator, Ethernet drivers can be seen in the Windows Update list as optional Updates which can be downloaded and installed automatically.

The only problem I faced is with the Acer Crystal Eye Web Camera driver. I have almost tried all of the available drivers but none worked. Most of the forums provided solutions to use the SUYIN NB Cam drive:

C:\\Windows\\SUYIN NB Cam\\LiveCam.exe

This one works but it was not the perfect solution.

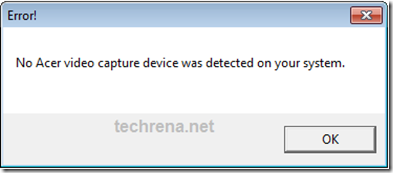
Most of the drivers and applications available gives the same error out:

No Acer video capture device was detected on your system

Acer Cam Problem

After a lot of trial and error finally i have found the perfect solution for this problem. I have got this Acer Camera Suyin v.5.2.5.3 which is made for Windows 7. After installing this, I restarted the system and it worked against all odds.

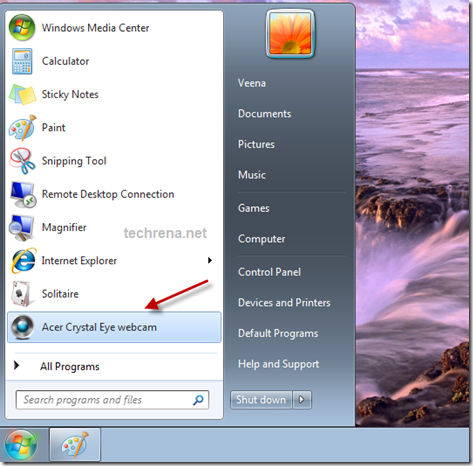
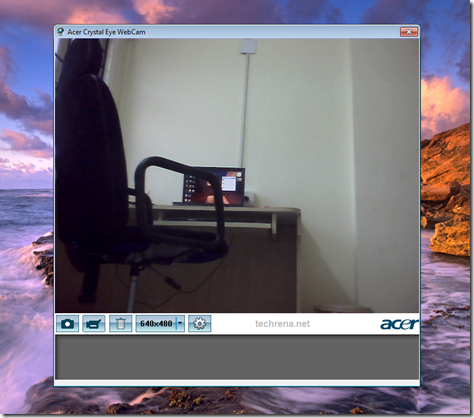
Download the Driver from the link below. Install it and restart the system. Once successfully done, start the Acer Crystal Eye webcam. It should work. No other drivers are required.

Download:

File: Acer_Camera_Suyin_v.5.2.5.3_Win7x86x64.zip

Size: 3.29 MB

Link: http://www.techrena.net/downloads/Acer_Camera_Suyin_v.5.2.5.3_Win7x86x64.zip

Screen Shots:

Acer Cam Driver Win 7

Acer Cam Crystal Eye Windows 7

We have tried this driver in Acer Aspire 5570Z and Acer Aspire 4925G and it worked successfully. I hope it will work for other models also. If any problem occurs, do comment.

Featured: Heard of the New Windows 8? You can download the Windows 8 Pro 32 or 64 Bit version from Microsoft and it is completely legit. Check out the details here.

Windows 8 Download