Enable Pin To Start Menu For Folders In Windows

Windows-logo pin_folder_start_menu[7]

Pinning items to the start menu is one great way for accessing them more quickly.By default Windows allows only programs to be pinned to the start menu.If you want to add folder to the start menu, follow this simple tutorial which will add “Pin to start menu” context menu option for folders.You can also pin any library to the start menu using this method.

Steps:

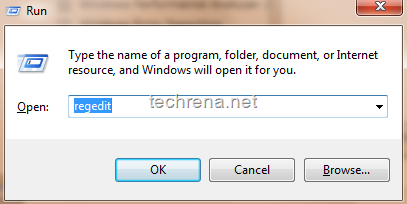
1. Open run command by pressing Windows button + R.Type regedit in the filed and click ok.

regedit run command

2. In the Registry editor (regedit), go to the following key:

pin folder registry key

HKEY_CLASSES_ROOT\Folder\shellex\ContextMenuHandlers

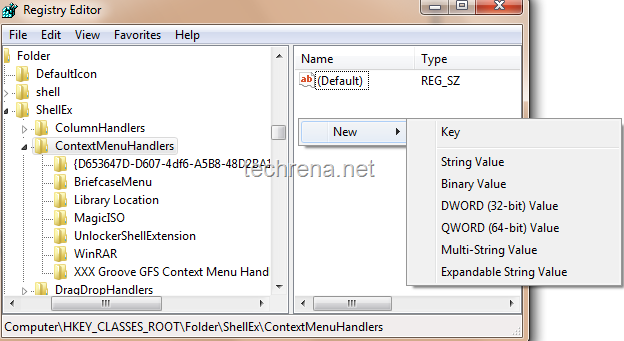
3. Right on the right pane and select New> Key (refer to the screenshot below)

pin folder to start menu add new key in regedit

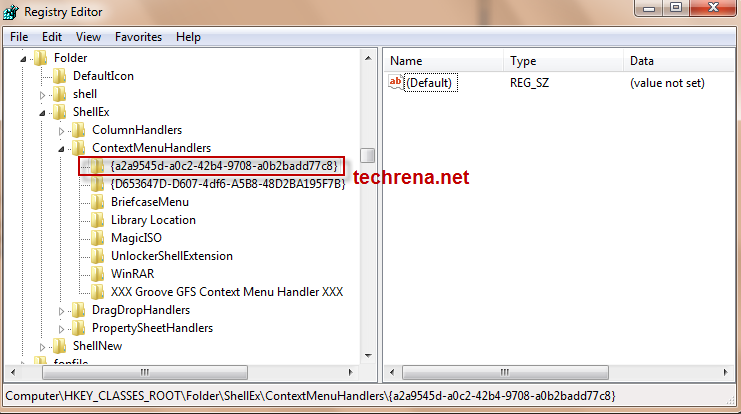
4. Copy and paste {a2a9545d-a0c2-42b4-9708-a0b2badd77c8} as the new key name like we did it in the following screenshot.

pin folder to start menu new key in regedit

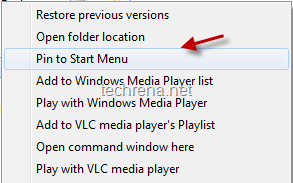
5. You are done with the tweak now.Press “SHIFT” key and right-click on any folder, you’ll see a new context menu option “Pin to Start Menu”

Pin to start menu option

if you want to rollback and undo this new change just delete the key that you have just added {a2a9545d-a0c2-42b4-9708-a0b2badd77c8}, which will remove the Pin to Start Menu context menu option from the folders.

If you want to automate the above whole process, just download the following reg entry file (.reg), and double click it, the corresponding registry entry will be automatically added.

Download

Note:

1. You can drag any folder to the start menu, hold it until you see “Pin to start menu” and then drop it.This will automatically pin that particular folder to the start menu.

2. The folders pinned to the start menu by this method will not expand if you hover the mouse over it.You need to pin them to the taskbar instead to see the expansion of the folders.

Create Keyboard Shortcuts For Programs in Windows

Windows logo

At Techrena, we always strive bring the best available tricks for making your life easier.We have been updating our blog off late with lot of interesting windows and internet tips and more.

Today we are coming up with a very easy but effective feature in Windows, adding keyboard shortcuts to the windows programs.This saves a bit of time particularly if you need to open that program too frequently.Just like our last week’s tutorial about adding keyword shortcuts to Firefox bookmarks.

Follow these steps to add Keyboard shortcuts to your favorite programs.

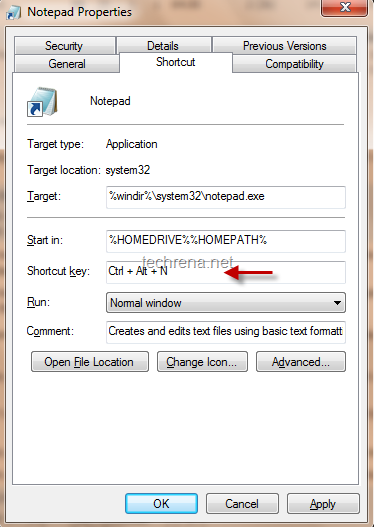
1. Right click on the program icon and select “Properties”.

2. Find the “Shortcut” tab under the properties.Look for “Shortcut key” under the tab.

keyboard shortcut for programs in windows

3. Use your keyboard to assign a shortcut key for this program.

4. Click “Apply” and press “Ok”.

Now you use the shortcut that you have set to launch the applications directly.In the above case, I have added “Ctrl + Alt + N” to launch notepad.

Display Your Custom Text On Windows Desktop

Windows logo

Few days ago we have written a brief tutorial about how to display Windows 7 current version and build number on your desktop (right above the system task tray).The natural question that comes to our mind after performing this trick successfully is :”Can we customize this text so as to display our name for instance?”.

Well, if you have been thinking that way, just stop thinking and read this tutorial and implement it to display your own name on desktop instead of Windows 7 watermark.Follow these steps carefully.

Requirements:

1. You need to know how to take ownership of a file in Windows 7 and Windows Vista.

2. You need to download a small software called “Resource Hacker”.

Download

Steps:

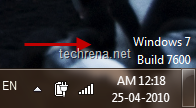
1. Refer to display Windows 7 current version and build number set the settings to display Windows 7 version and build number on your desktop.This is the first step that you need to do.You need to restart your system after this step.

windows 7 build info

2. Once you have completed the above, the remaining task is to change or customise this text.To do this we need to edit the system file called “user32.dll.mui” in  Resource Hacker.
Open windows explorer and copy and paste this in your address bar.

%windir%\System32\en-US

3. If you are using Windows 7 & Vista, the above command will open

C:\Windows\System32\en-US

folder for you.

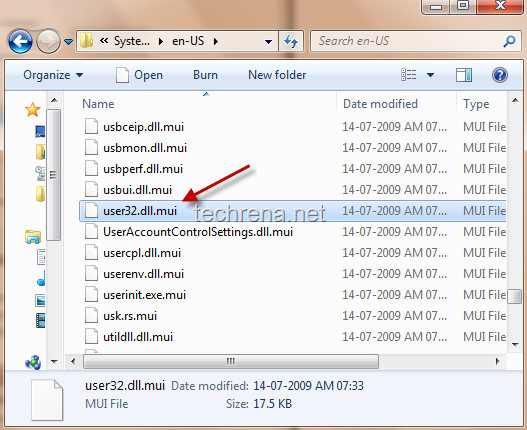
Find the system file called “user32.dll.mui” and take ownership of the files.

user32.dll.mui windows 7

4. Now that you have the ownership of the file with you, you can go ahead and open and edit it in Resource Hacker.Just drag this file into the Resource Hacker window.

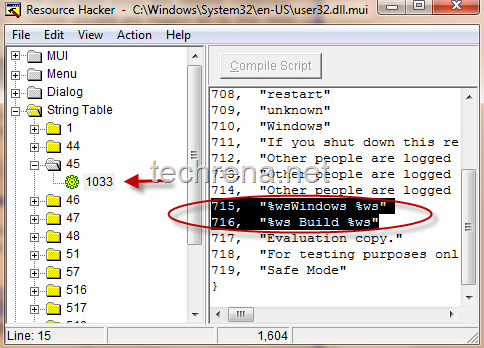
5. In the resource hacker, navigate to “String Table>45>1033”.In the right side of the window, you can see all the values running from 705 to 719.We don’t need to worry about the rest of the values, we just need to edit the values “715” and “716”.As you can see 715 (“%wsWindows %ws”) is responsible for displaying Windows version and 716 (“%ws Build %ws”) is responsible for displaying the build number if your Windows 7.

resource hacker user32.dll.mui edit

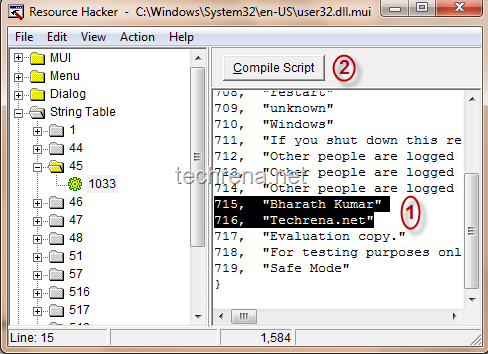
6.Now replace the text inside the quotes(“) in 715 and 716 with whatever text that you want to display on your desktop.

change string table values of user32.dll.miu in resource hacker

Once you have edited it, click “Compile Script” and then save the file (If you don’t have ownership of the file, here you will not be able to save it).

7. You are done, just restart the computer and you can see your own text being displayed instead of Windows version info.

Access Firefox Bookmarks Easily via Bookmark Keywords

If you have been using Mozilla Firefox for sometime, you will definitely love the was how Firefox makes it easier to add and manage all of your bookmarks.You can always access your bookmarks easily from the bookmarks menu present in the Firefox.If you need to open a particular webpage from your bookmarks quite often, you may wish you have a better way to open it more quicker.Well, you can do this via a a feature “Bookmark Keywords” available in Firefox.You just need to assign some short keywords, typing which in the address bar immediately gets resolved to your original webpage URL that is stored under your bookmarks.Follow these steps to know how to assign bookmark keywords in Firefox.

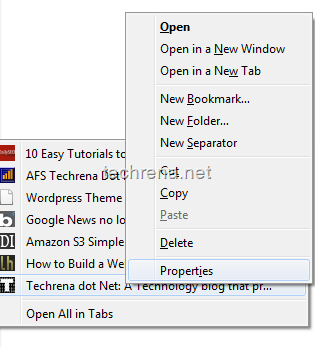
1. Open the particular bookmark for which you want to add keyword from the Bookmarks menu.Right click on the “Properties” tab.

firefox bookmarks properties

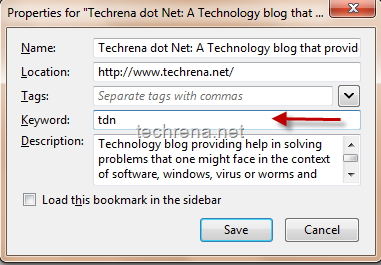
2. In the properties window, add the keyword through which you want to access this bookmark in the filed “Keyword” and click save.

Add Bookmark keywords in Forefox

3. Once you have saved this, you can access this particular webpage by just typing the keyword (“tdn” in my case) in the address bar.

Add Bookmark keywords in Forefox

That’s it, access your favorite bookmarks more quickly using this.This is actually not a new feature in Firefox, it has been there for a while in Firefox but for some reasons this is still not very much used to that extent by the users.

Install Portable Antivirus on a USB Flash Drive or an iPod

clamwin_portable

What will happen if your System is infected with viruses and the Antivirus you had installed failed to protect? In several cases, the virus may also disable any anti virus programs that you may try to run to disinfect.

Can we use a portable anti virus program which is installed in a USB Flash drive to scan our computer? The answer is a definite Yes! This is an easy way to disinfect an infected computer using a USB disk or your iPod.

ClamWin has come up with such an anti virus application. ClamWin Portable is a popular ClamWin antivirus packaged as a portable app, so you can take your antivirus with you to scan files on the go. You can place it on your USB flash drive, iPod, portable hard drive or a CD and use it on any computer, without leaving any personal information behind.

See the details below to install the free anti-virus in your portable USB device.

Requirements:

Windows XP, Vista or 7 Operating System

USB Flash Drive, Disk with Minimum 30MB free space

Step 1: Download ClamWin Portable from the link below:

Size: 6MB

Link: Click here to Download ClamWin Portable 0.95.3

Step 2: Connect your USB device. Then go to the downloaded file. Double click on the exe file.

Step 3: Start the installation process. Select the correct location where the application is to be installed. Then click on Install.

choose_location_clamwin]

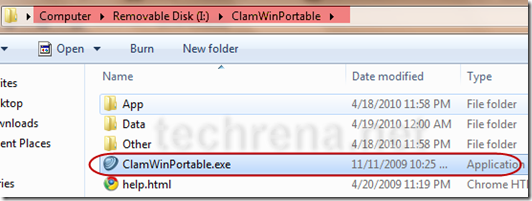
Step 4: Now after successfully installing the application, go to the location where you have installed it. Double click on ClamWinPortable.exe to start the application.

start_clamwinportable

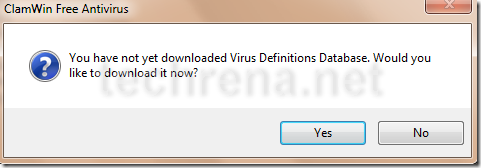
Step 5: On first startup it will ask you to download the Virus Definition database. Click on yes.

download_virus_definition_database

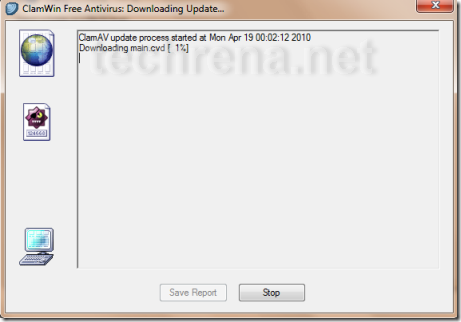
Step 6: Now it will download the update. It may take a few minutes. Note that without downloading the database update the anti-virus is useless.

Downloading_update

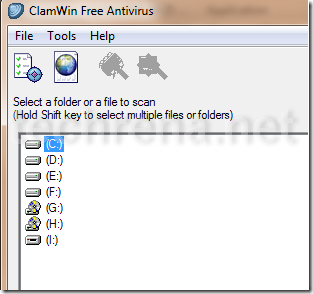
Step 7: Now you can select the drive to scan.

ClamWin_free_antivirus

Now you can easily disinfect any computer. But make sure that the virus definition database is up to date.

How to Create a Password Reset USB Disk in Windows 7 And Vista

Have you ever faced a problem of forgotten password in your Windows PC? If yes better have a backup plan now itself. Here we are going to tell you, how you can reset your Windows password using a reset password disk. This feature is available in Windows 7 and Vista only.

You can backup your user identity in a USB disk and use the disk for resetting your Windows user password in the future in case you have forgotten it. For this purpose you need not use a high capacity USB drive. You can either use your old USB which are considered obsolete or too small in size like 128MB or buy a small capacity one at lower cost. This is because the reset file if very small and you need to store the USB device in your locker or any other safer place.

Requirements:

A USB Flash Drive(Any size)

Windows 7 or Vista Operating System

Important: Once a password reset disk has been created, no matter how many times the password has been changed after that, you can reset the password using the Disk any number of times. In order to avoid misuse of the device, keep it in a safe place.

Password Forgotten Before Creating the Password Reset Disk?

Follow this link: Reset Windows XP, Vista, 7 Password Using USB Drive or CD

Follow the steps to create a Password Reset disk using Windows Forgotten Password Wizard:

Step 1: Connect the USB Flash Drive to your PC.

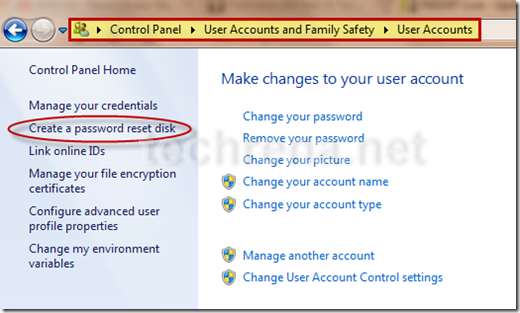
Step 2: Open Start Menu, click on Control Panel. In Control Panel go to:

Control Panel—>User Accounts and Family Safety—>User Accounts

Step 3: In the left pane of User Accounts, click on Create a password reset disk.

User_accounts

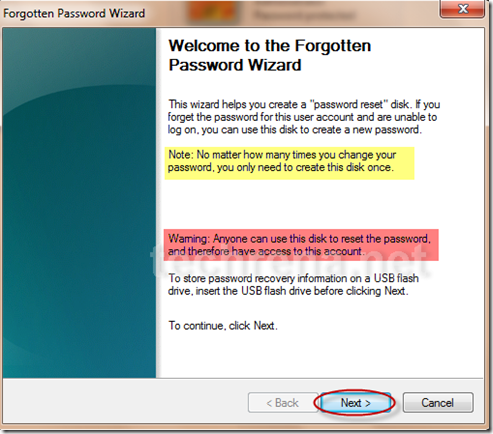
Step 4: Now in the Forgotten Password Wizard, read the Important notes and warnings and Click on next.

forgotten_password_wizard

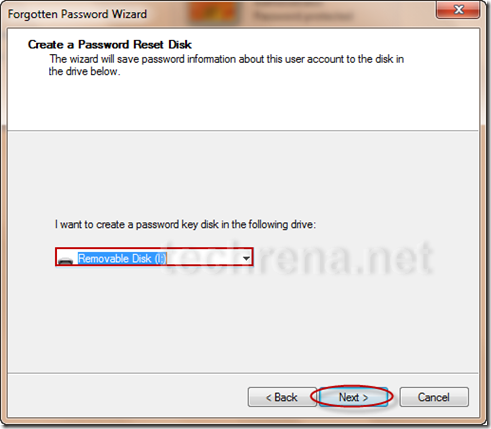
Step 5: It will ask you for the USB drive letter in which you want to store the password reset file. Select the correct drive and click on Next.

select_drive_forgotten_password_disk

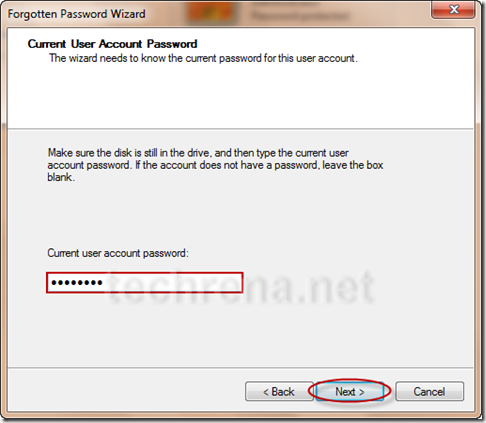
Step 6: Now it will ask for the current password. Enter the correct password and click next.

enter_current_password

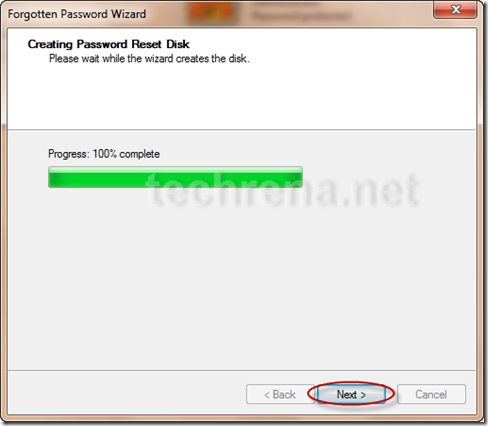
Step 7: Once it completes the creation process, click on finish.

create_password_reset_disk

What you have to do when you have forgotten your password?

Now if you have forgotten the password, you can use the Reset disk. When Windows asks you for the login password, plug in your Password Reset Disk and wait for a while. Try entering any wrong password. Now below the password field, a link as Reset Password… will come up. Click on it and enter a new password.

Note: If you do not have a Password Reset Disk, you can try: Reset Windows XP, Vista, 7 Password Using USB Drive or CD

Speed Up Your PC Using a USB flash Drive in Windows 7 and Vista With ReadyBoost

If you have a low memory in your Windows 7 PC, your system may be slow and the performance may not be satisfactory. Microsoft Windows has introduces a new component known as ReadyBoost, to help when your PC’s memory is running low.

ReadyBoost is a component of Microsoft Windows, first introduced with Microsoft’s Windows Vista in 2006 and bundled with Windows 7 in 2009. It works by using flash memory, a USB flash drive, SD card, CompactFlash, external hard drive or any kind of portable flash mass storage system as a drive for disk cache.
ReadyBoost is also used to facilitate SuperFetch, which allows it to perform analysis of boot-time disk usage patterns and creates a cache which is used in subsequent system boots. SuperFetch is a technology that pre-loads commonly used applications into memory to reduce their load times, in a similar fashion to the preload in Linux.

Using ReadyBoost-capable flash memory (NAND memory devices) for caching allows Windows 7 and Vista to service random disk reads with performance that is typically 80-100 times faster than random reads from traditional hard drives.

Using ReadyBoost in Windows 7 and Vista:

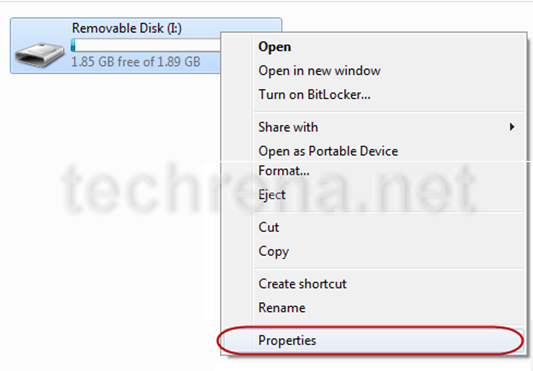
First plug in your USB flash drive. Open My Computer. You can see the Removable Disk. Right Click on it and Select Properties.

removable_disk_properties

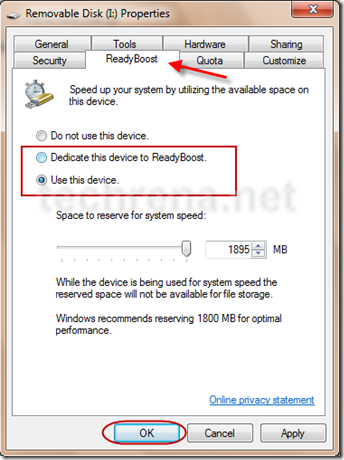
Now in the Properties window, go to ReadyBoost Tab. You can either select Dedicate this device to ReadyBoost or Use this device and set the amount of space you want to use for the process.

ReadyBoost

Now Windows will use the free space available in your flash drive for speeding up your computer.

Note that this process will not delete any data from your flash drive. It will only use the available free space in the removable disk.

Moreover if you want to speed up your boot up and startup, you need to use MSConfig.

How To Deal With “Firefox is already running..” Error ?

You might have observed this error message many times while trying to open Firefox too soon after it was closed or may be due to closing Firefox abnormally (without deleting the lock file) or not shutting down the Firefox properly or when your Mozilla can’t find profile folder in the expected location

“Firefox is already running, but is not responding. To open a new window, you must first close the existing Firefox process, or restart your system.”

Firefox not responding

An article in Firefox Knowledge Base explains why this error occurs:

This error can occur in Firefox 3 because of a delayed shutdown, if you try to reopen it too soon after it was last closed

Solution 1 : End processes

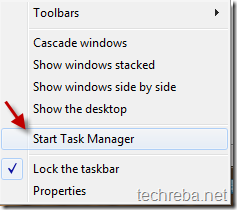
The one popular and easiest solution to this is to kill the process in the Windows task manager.To do this right click on your Windows taskbar and choose “Start Task manager”.

start task manager

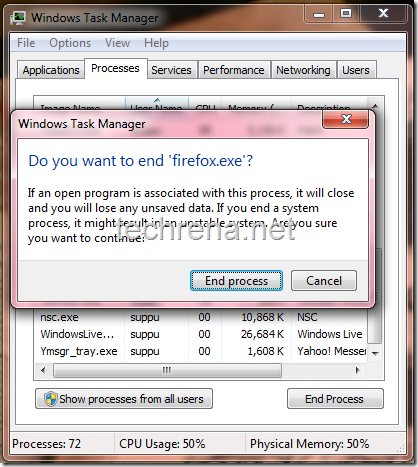
Locate the process called “firefox.exe” (each instance of Firefox when running multiple pages) in under the processes tab:

processes in Task manager

Right click on the process and choose “End Process” or simply use “delete” from your keyboard.

End a process in Task manager

And now re open Firefox browser and it’ll also recover tabs from your last session that you have just ended abruptly by stopping the firefox.exe process.

Solution 2: Remove the profile lock file

This requires finding the location of the Firefox profile in your computer and deleting the lock  files under your profile.

Step 1 :

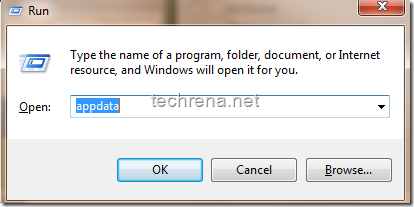
Press Windows+R button to open run command prompt, type “appdata” and click ok

appdata run command


Step 2:

Now a windows explorer window will open up then navigate to the following folder by the give paths:

C:\Users\<user name>\AppData\Roaming folder  — Windows 7 and Windows Vista

C:\Documents and Settings\<user name>\Application Data folder – Windows XP and Win 2000

Navigate to Mozilla >Firefox >Profiles from there

Step 3:

Delete the file “parent.lock” from your profile folder.

parent lock firefox profiles

via [Matt Cutts]

Note:

The methods given here are exclusively for Windows based systems.

Note that this will only solve the current issue with Firefox, however we can’t guarantee that Firefox will not behave like this in future.

How To Disable Recent Items in Windows 7 Start Menu

In windows 7, we can see recent items which you have opened using a specific program. This property in Windows 7 is a very good one. We can find our favorite files to be opened using a program in the start menu itself.

But, for some people it can be a trouble to their privacy. When we share a Windows 7 computer, others can easily see what files or even the programs which were opened recently by the previous user. In this case some of us may want to stop this feature from saving the recently open items or programs.

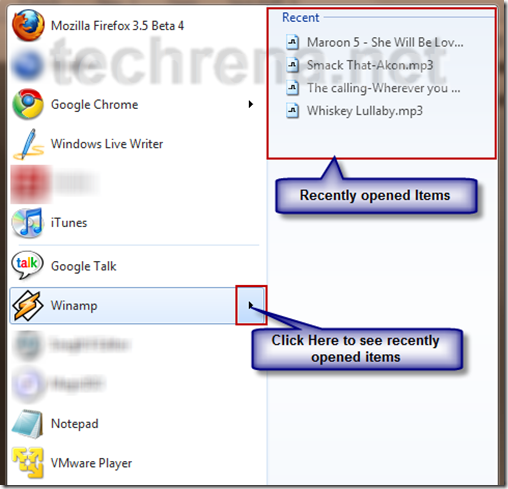
For example, I have opened some MP3 files using the Winamp player. So, if other people see then, they will come to know that these songs are some of my favorites . If I want to hide this then I need to disable this Recent items feature. This is just an example, it is more serious in case if you are handling sensitive data.

recent items start menu

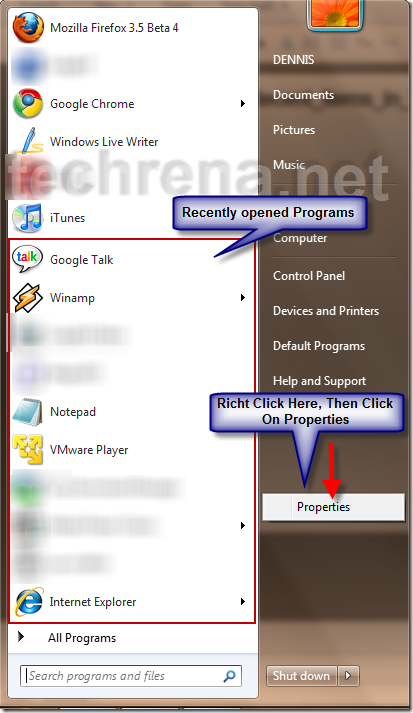
You can see the recently opened programs also. You can even hide the recently open programs if you want.

Just follow the two steps below.

Step 1: Open Start Menu. On the right pane of the menu, Right Click. Click on Properties. See the Screen Shot Below.

recent programs start menu

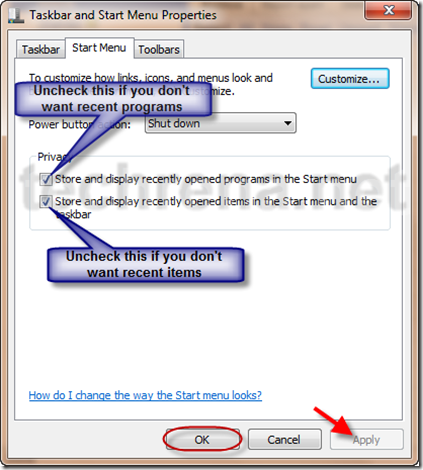
Step 2: In the Taskbar and Start menu Properties, Uncheck the features you want to disable. If you don’t want to show recently open items then Uncheck it and Click on Apply then OK.

start menu properties

Note that you may not want to disable recent programs feature as it is very useful.

So you can customize your settings according to your needs and privacy. If you need any help in any of such Windows 7 features, just leave your query in the comment.