[How to] Pin or Unpin The Contents Of a Folder in Windows 7 Taskbar

Have you ever thought of adding a shortcut of your favorite folder in the taskbar. Well you can do it in Windows 7. Here we will show how to pin a folder in the Windows 7 taskbar.

Any folder can be pinned to the task bar as a New Toolbar in the Task bar of Windows 7 with a small or large icon and with or without text of the folder name.

Point to be noted:

When we pin a folder, we can see only the only the contents of the folder in the task bar. It is like the folder is already opened and displayed in the taskbar. So it is not that the folder’s shortcut is pinned to the task bar, but its just that the shortcut of the contents of the folder is created in the taskbar.

Now just follow the simple steps below to pin the contents of a folder to the task bar.

Pin a folder to the taskbar.

Add a new toolbar in the task bar:

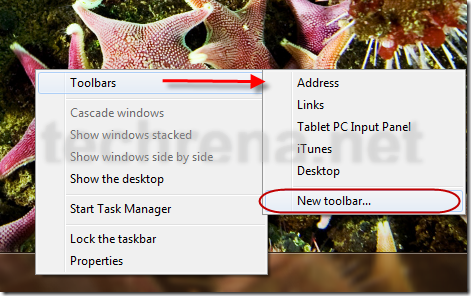
Right Click on the taskbar, go to Toolbars and select New toolbar.

Add_new_toolbar_taskbar

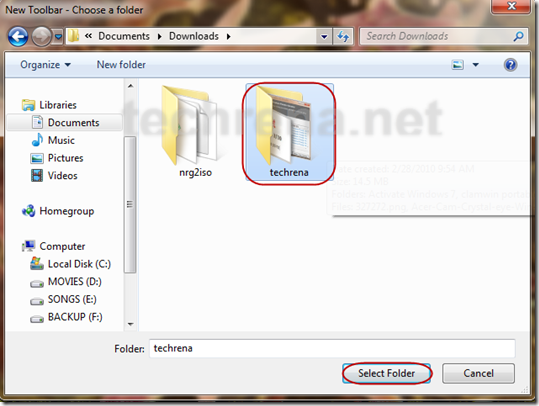
It will ask to select the folder. Select the parent folder which you want to add so that the contents of the folder is shown in the taskbar.

select_toolbar_folder

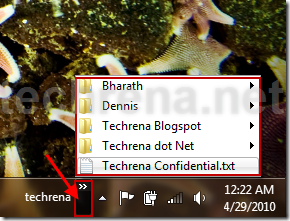
Now you can see the folder name in the taskbar with its content.

taskbar_toolbar_opened

Unlock the Taskbar to modify the positions and settings if its locked

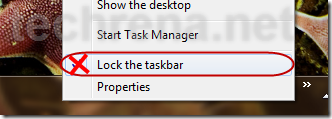
Right Click on the taskbar and select lock taskbar to uncheck it.

unlock_taskbar

Changing the settings of the toolbar:

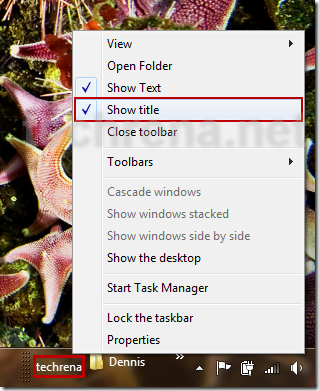
If you don’t want to name of the folder to be displayed but only the contents, then right click on the folder name in the taskbar and uncheck Show Title.

Show_Title

If you want to move the toolbar to the left side, yo have to drag the divider to extreme left to the Start menu.

Drag_divider_to_leftToolbao_divider

If you want to move it back, drag it back to right.

Now, if you want to show bigger icons of the content in the toolbar, Right click on the toolbar, go to view and select Large Icons.

View_large_icons

Now after doing all the changes you can lock the taskbar again if you wan to.

Unpin the folder from taskbar:

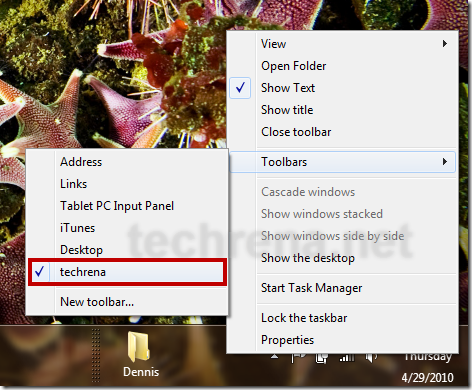
Now to unpin the folder, right click on the taskbar and go to Toolbars and unselect the folder name. You can also right click on the toolbar and select close Toolbar.

close_toolbar

Now you have successfully learnt how to pin and unpin a folder to the taskbar in Windows 7.

Enable Pin To Start Menu For Folders In Windows

Windows-logo pin_folder_start_menu[7]

Pinning items to the start menu is one great way for accessing them more quickly.By default Windows allows only programs to be pinned to the start menu.If you want to add folder to the start menu, follow this simple tutorial which will add “Pin to start menu” context menu option for folders.You can also pin any library to the start menu using this method.

Steps:

1. Open run command by pressing Windows button + R.Type regedit in the filed and click ok.

regedit run command

2. In the Registry editor (regedit), go to the following key:

pin folder registry key

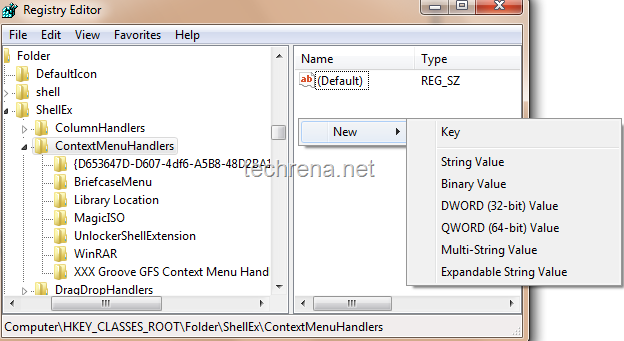
HKEY_CLASSES_ROOT\Folder\shellex\ContextMenuHandlers

3. Right on the right pane and select New> Key (refer to the screenshot below)

pin folder to start menu add new key in regedit

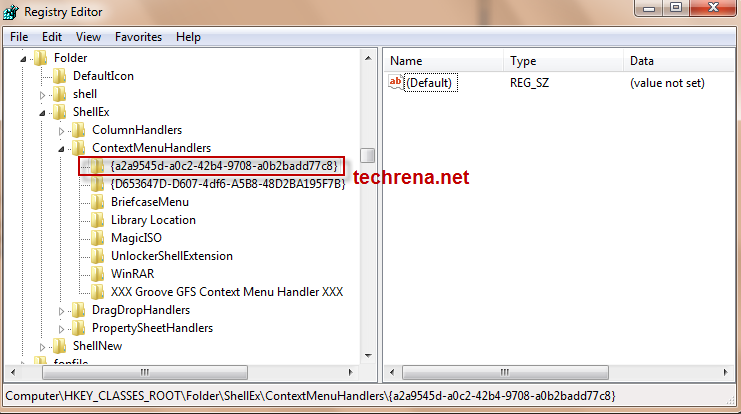
4. Copy and paste {a2a9545d-a0c2-42b4-9708-a0b2badd77c8} as the new key name like we did it in the following screenshot.

pin folder to start menu new key in regedit

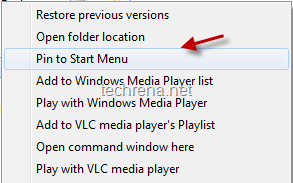
5. You are done with the tweak now.Press “SHIFT” key and right-click on any folder, you’ll see a new context menu option “Pin to Start Menu”

Pin to start menu option

if you want to rollback and undo this new change just delete the key that you have just added {a2a9545d-a0c2-42b4-9708-a0b2badd77c8}, which will remove the Pin to Start Menu context menu option from the folders.

If you want to automate the above whole process, just download the following reg entry file (.reg), and double click it, the corresponding registry entry will be automatically added.

Download

Note:

1. You can drag any folder to the start menu, hold it until you see “Pin to start menu” and then drop it.This will automatically pin that particular folder to the start menu.

2. The folders pinned to the start menu by this method will not expand if you hover the mouse over it.You need to pin them to the taskbar instead to see the expansion of the folders.

Delete Hiberfil.sys from Windows 7, Vista & XP By Disabling Hiberation

hibernate

Running out of space in C Drive?

If you are running out of space in C drive and if you don’t want to delete or move any data from it, you can probably try these two things:

1. Disable System restore or delete the restore points.

2. Delete hiberfil.sys file from your hard disk.

HIBERFIL.SYS is a Windows system file managed by Windows for the purpose of Hibernating the system. Hibernation mode of Windows allows you to completely save the current process and power off your computer where the system will not require any power. During Hibernation the system will write the complete status and process of your computer and save it in the hard disk which is the hiberfil.sys.

While you start your computer, the system loads the status from the hard disk which was written in hiberfil.sys file.

HIBERFIL.SYS reserves around 2.5 GB in Windows 7 and Vista. And it takes 512 MB in Windows XP.

Important Note: You can delete hiberfil.sys only if you do not want to use the hibernation feature. Even if you delete the file you can still use the sleep mode. If you want to see the hiberfil.sys file in your C drive then you need to show system hidden files.

hiberfil_sys

How to delete HIBERFIl.SYS file from the your drive?

As hiberfile.sys is a system file we cannot delete it directly. So in order to delete it we need to disable the Hibernate feature in Windows.

Disable hibernation mode in Windows 7 and Vista:

Open Command Prompt. Press Start + R. Type CMD and press Enter.

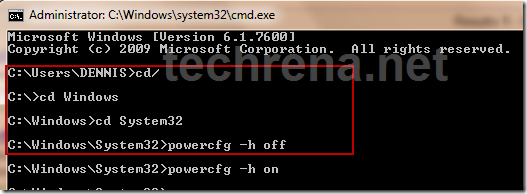
Type the following commands and Press Enter after each command:

cd/
cd Windows
cd System32
powercfg -h off

It will look like:

cmd_disable_hibernate

To turn on the Hibernate feature Type:

powercfg –h on

Disable hibernation mode in Windows XP:

In Windows XP it is easy. Follow the instruction below:

Open Start menu, Go to Control Panel. In control Panel, go to Performance and maintenance. Then Click Power Options

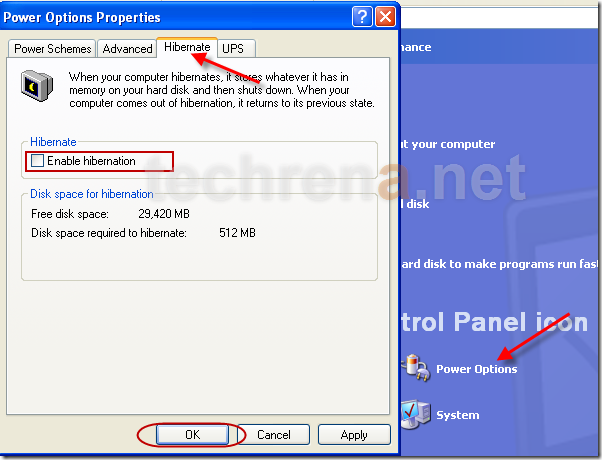
In power options windows, go to Hibernate Tab. Uncheck Enable hibernation and press OK.

disable_hibernate_xp

If you want to re enable hibernation, then check the check box and press OK.

Now after performing the steps, if you check your C drive, you will find that the hiberfil.sys file is gone.

Hope you have got some free space at least for now 🙂

How to Create a Password Reset USB Disk in Windows 7 And Vista

Have you ever faced a problem of forgotten password in your Windows PC? If yes better have a backup plan now itself. Here we are going to tell you, how you can reset your Windows password using a reset password disk. This feature is available in Windows 7 and Vista only.

You can backup your user identity in a USB disk and use the disk for resetting your Windows user password in the future in case you have forgotten it. For this purpose you need not use a high capacity USB drive. You can either use your old USB which are considered obsolete or too small in size like 128MB or buy a small capacity one at lower cost. This is because the reset file if very small and you need to store the USB device in your locker or any other safer place.

Requirements:

A USB Flash Drive(Any size)

Windows 7 or Vista Operating System

Important: Once a password reset disk has been created, no matter how many times the password has been changed after that, you can reset the password using the Disk any number of times. In order to avoid misuse of the device, keep it in a safe place.

Password Forgotten Before Creating the Password Reset Disk?

Follow this link: Reset Windows XP, Vista, 7 Password Using USB Drive or CD

Follow the steps to create a Password Reset disk using Windows Forgotten Password Wizard:

Step 1: Connect the USB Flash Drive to your PC.

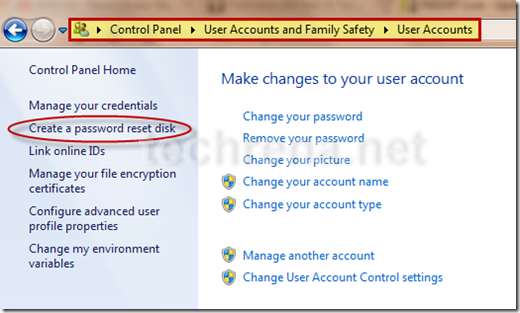
Step 2: Open Start Menu, click on Control Panel. In Control Panel go to:

Control Panel—>User Accounts and Family Safety—>User Accounts

Step 3: In the left pane of User Accounts, click on Create a password reset disk.

User_accounts

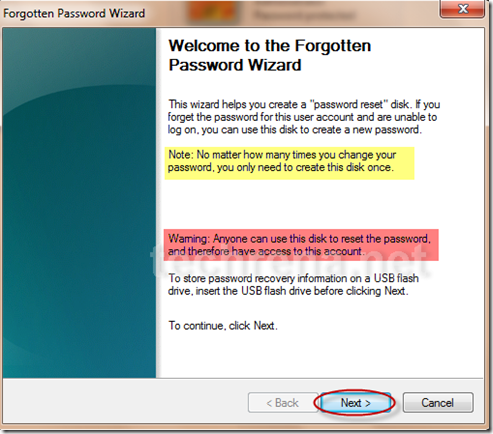
Step 4: Now in the Forgotten Password Wizard, read the Important notes and warnings and Click on next.

forgotten_password_wizard

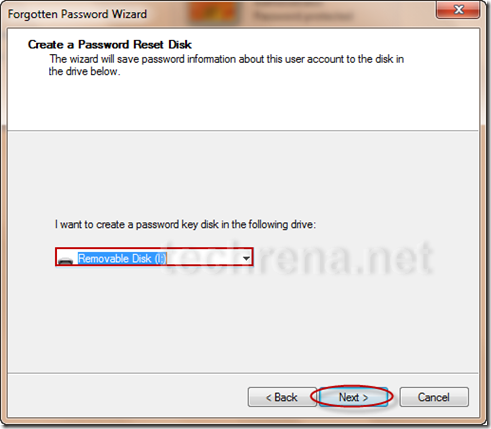
Step 5: It will ask you for the USB drive letter in which you want to store the password reset file. Select the correct drive and click on Next.

select_drive_forgotten_password_disk

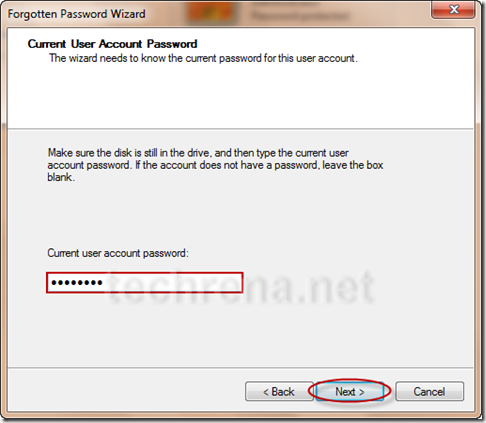
Step 6: Now it will ask for the current password. Enter the correct password and click next.

enter_current_password

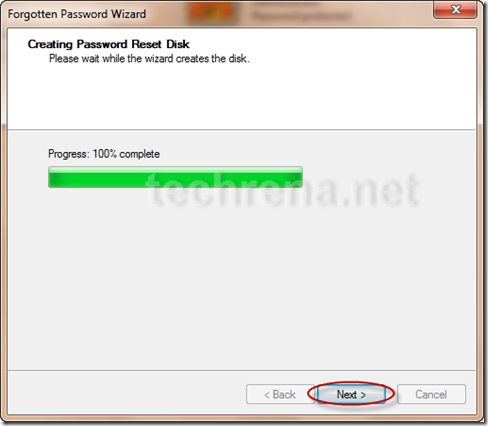
Step 7: Once it completes the creation process, click on finish.

create_password_reset_disk

What you have to do when you have forgotten your password?

Now if you have forgotten the password, you can use the Reset disk. When Windows asks you for the login password, plug in your Password Reset Disk and wait for a while. Try entering any wrong password. Now below the password field, a link as Reset Password… will come up. Click on it and enter a new password.

Note: If you do not have a Password Reset Disk, you can try: Reset Windows XP, Vista, 7 Password Using USB Drive or CD

How To Install or Upgrade Your Laptop’s RAM (Physical Memory)

techrena logo

With the increasing technology day by day, our computers, laptops and every equipments are becoming obsolete. I bought my Laptop with 1GB RAM and 100 GB Hard Disk at a price with which I can buy a fully featured Tablet PC now.

So to deal with the developing technology, we need to upgrade our PCs and laptops to fit and to support the currently available software and operating system. I felt its high time that Techrena dot Net give you a tutorial to upgrade the most basic and most needed hardware upgrade –your Laptop’s Physical Memory or RAM (Random Access Memory).

What You Need to Upgrade your RAM?

  • Find out the type of RAM your Laptop PC Supports ( DDR1, DDR2, DDR3, SD, etc.)
  • Find out the Maximum amount of memory size your Laptop Supports( 2GB, 4GB, 8 GB, etc.)
  • Buy a suitable RAM for you Laptop PC
  • A suitable screwdriver (Mostly Philips Type)

How a Laptop RAM Looks Like?

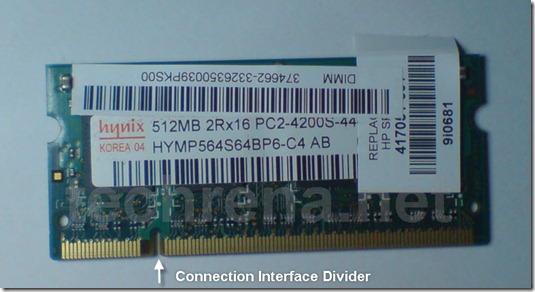
Laptop RAMs are smaller in size as compared to Desktop RAMs. A HYNIX made 512MB DDR2 RAM is shown below. As you can see it has a connector for the RAM slot in your laptop and it has a divider. This divider is to indicate the correct side while connecting it.

Click on the images to enlarge

512MB RAM

Opening your Laptop Ram Container:

Shutdown your computer and disconnect all the cables and wirings. Turn your Laptop over, be careful and keep a protection under the laptop.

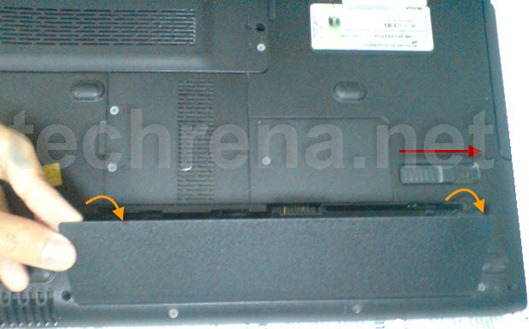
Now Remove your Laptop battery. To remove release the lock and pull the battery out.

Remove the battery

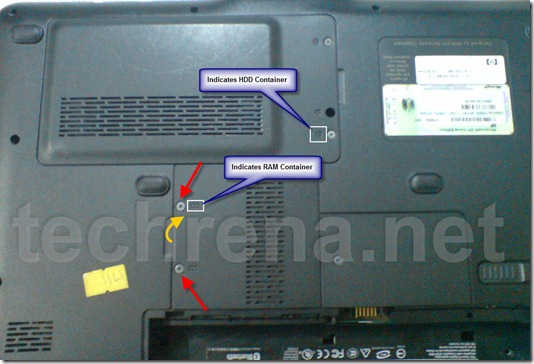
Now see which section contains the RAM in your laptop. Do not confuse with the other device containers. With a suitable screwdriver, start unscrewing the screws in the section which contains the memory devices. See the image below:

Open Container Screws

Removing the old RAM (not required if empty slot is available):

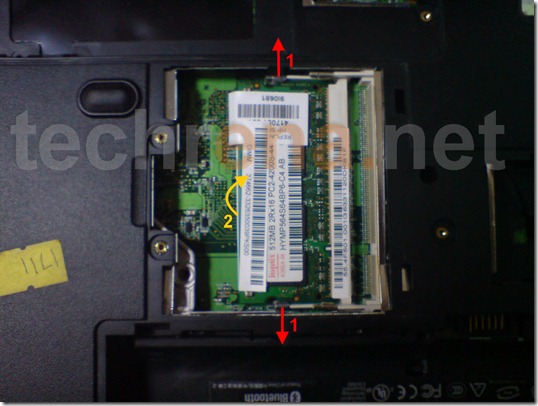
After opening the cover of the RAM container section, you need to remove the old RAM which needs to be replaced. Note that many laptops have more than one RAM slot. Which means that if you have an empty slot you can put the new one in the empty one. This will add your new RAM size to your old one.

First pull out the RAM holder as shown, the Device will come out automatically. Take it out smoothly.

Remove Old RAM

Installing a New RAM:

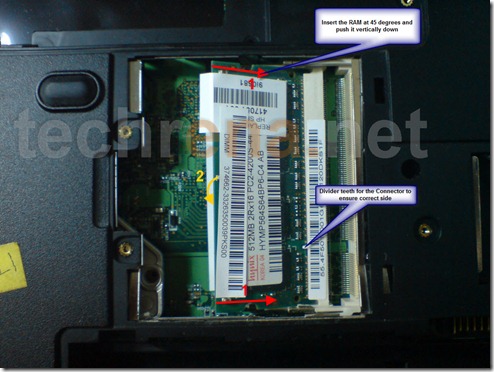
Before inserting the new one, find out the correct side to which you need to connect to. Slide in the Device smoothly to the slot. Most RAM slots need to insert the device in 45 degrees and push it vertically down after it has been inserted fully into the slot. Refer the image below:

Install New RAM

Now place the covers and screw it back. Place the battery back to the battery slot. Power it up and start the computer.

Installation of RAM has been successfully completed and you can check the Physical Memory at:

Right Click on My Computer—> Properties—> Memory or

Task Manager –> Performance—> Total Physical Memory

Important:

  • Do not try any forceful methods to remove the screws or devices.  If anything is not getting removed, do contact a professional.
  • Be careful while installing the new device. Make sure you insert it correctly and firmly.
  • The above tutorial is based on HP DV1502 TU Model. It may be different in your case.

Disclaimer: This tutorial is for your information only. Techrena dot Net is not responsible for any damage in property or lives resulting from the use of the information given here. You are responsible for all the actions you take.

Complete Tutorial: How To Disable Windows Error Reporting In Windows 7 ?

Microsoft Windows 7 Official Logo

Windows Error Reporting (WER), a technology (previously known as Dr. Watson),developed by Microsoft lets you report post-error debug information to the developer of the particular application that has just crashed or stopped responding.Windows Error Reporting has been introduced as a Windows service from Windows XP and is being continued in the later versions Windows Vista and Windows 7.By default, this Error Reporting service will be started automatically.

However for some reasons like you may get annoyed by frequent error reporting alerts or for privacy concerns etc., you may want to disable or stop Error Reporting in your Windows operating system (here it is Windows 7).If you are not sure how to stop Error Reporting in Windows 7, please do follow the steps outlined below:

Method-1: Using Action Center

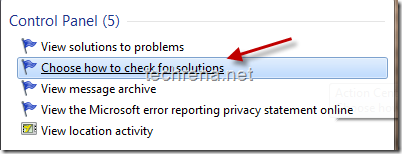
1.Type “wer” in the Start menu search bar.Check the results obtained for this search in control panel (refer to the screen shots).

type wer in start menu

start menu search choose how to check solutions

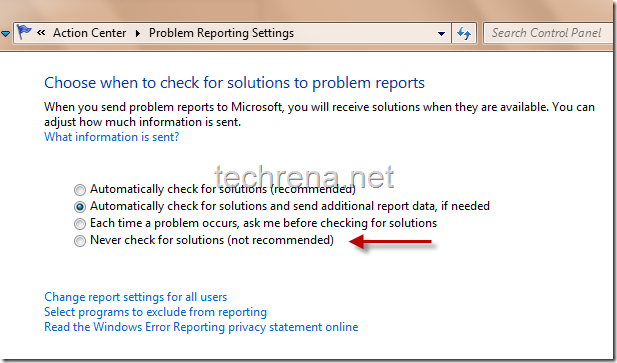
2.Click on the “Choose how to check for solutions” item in the search results.It will open up the “Problem Reporting Settings” under Windows Action Center.
problem reporting settings action center windows7

3. By default the first or second option (“Automatically check for solutions”) will be selected by your Windows.If you want Error reporting to be disabled, select the last option “Never check for solutions” for completely disabling it or select the third option “Each time a problem occurs, ask me before checking for solutions” for moderating the error reporting alerts.Click “Ok” button down the window once you have selected your option.

Method-2: Disabling WER service

Windows Error Reporting Service function:

“Allows errors to be reported when programs stop working or responding and allows existing solutions to be delivered. Also allows logs to be generated for diagnostic and repair services. If this service is stopped, error reporting might not work correctly and results of diagnostic services and repairs might not be displayed.”

We’ll try to achieve the same previous settings result but this time via disabling the Windows Error Reporting(WER) service.To do this, follow..

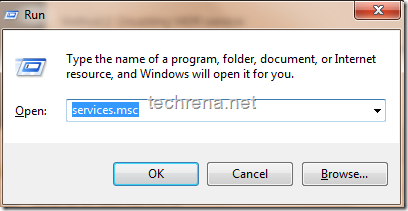
1. Press Windows button + R to open the Windows Run command.Type “services.msc” in the run command bar and hit ‘OK’.
windows run command services.msc

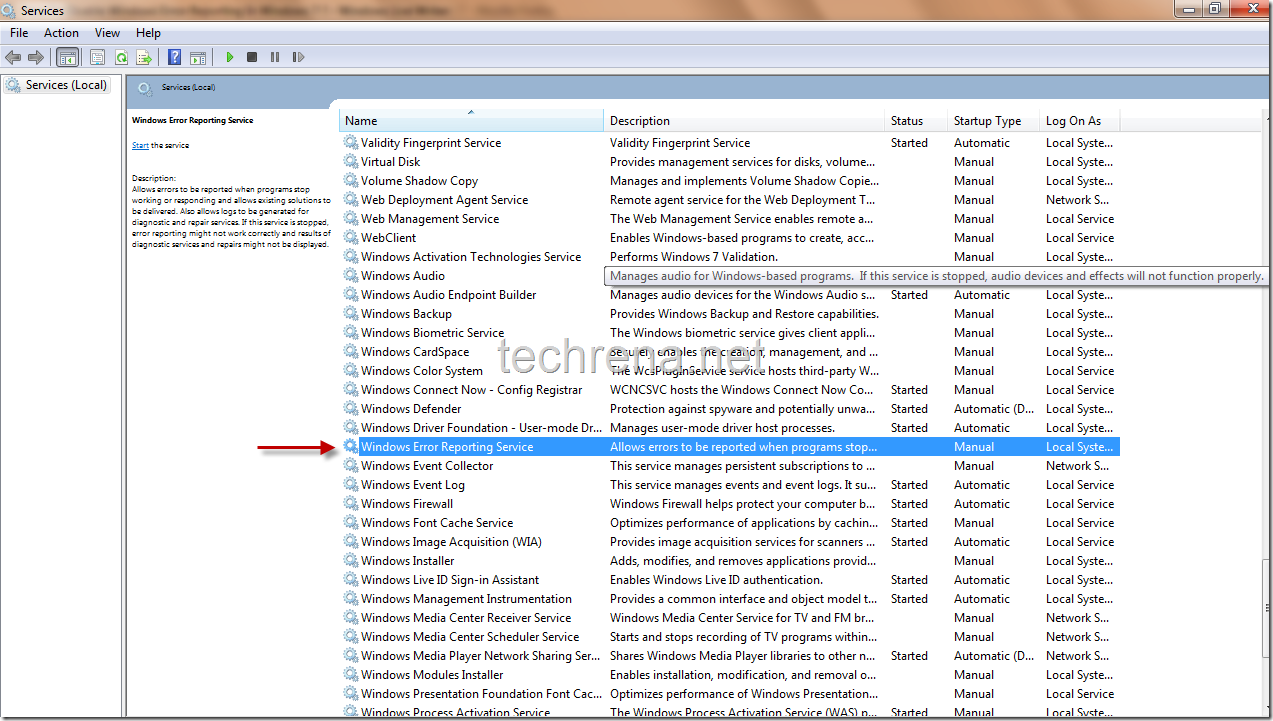
2. It will open up Services window, where you can see list of all the services that are currently available on your Windows.Find “Windows Error Reporting Service” in this list.
Windows Error Reporting Service

3. Right click on the Windows Error Reporting Service and choose “Properties’ that should open a new properties window.The startup type will be either in “Automatic” or “Manual” by default.To completely disable the service choose “Disabled” and press ok.
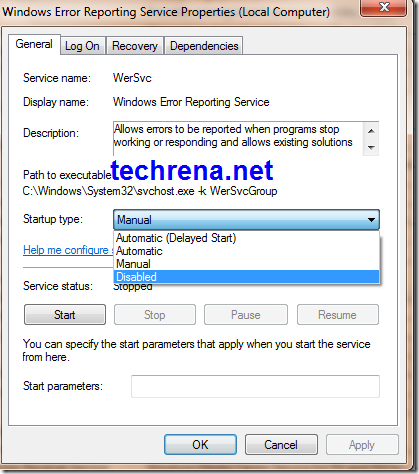
Windows Error Reporting Service Properties

That’s it, now you have disabled the Windows Error Reporting Service successfully.

Method–3: Using Registry Editor

Warning: Changing registry values without much knowledge will dump your entire Windows Operating system.Change them at YOUR OWN RISK.

1. Type Windows + R as in the previous case to open Windows run command.Type “regedit” in the command bar.
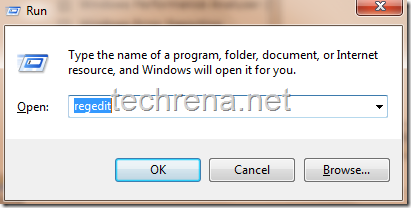
regedit run command

2.It will open up the Registry Editor window which will look like this.It contains three folders like navigable sub keys:

HKEY_CLASSES_ROOT ,

HKEY_CURRENT_USER,

HKEY_LOCAL_MACHINE,

HKEY_USERS,

HKEY_CURRENT_CONFIG.
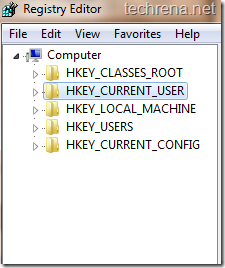
Registry editor windows 7

HKEY_CURRENT_USER is the one we want.Click on it to expand the sub registry key.

3. Navigate to HKEY_CURRENT_USER\Software\Microsoft\Windows\Windows Error Reporting sub key using the following screen shots carefully.
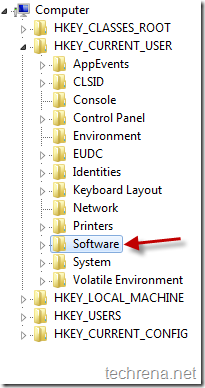
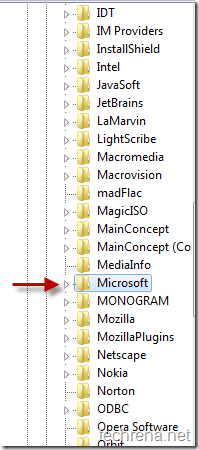
regedit HKCU navigation

regedit HKCU navigation 2 regedit HKCU navigation_3

regedit_HKCU_Windows_Windows_Error_Reporting_key

4. In the Dword list, find the registry entry by name “Disabled” (highlighted in the screen shot).By default the Date value of this dword will be “0” meaning that it is enabled.
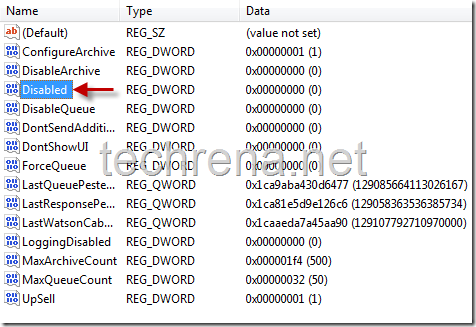
Disabled dword in WER subkey

Right click on the “Disabled” DWORD and choose “Modify”.In the value data filed, change its value to “1” instead of “0”.Click on to reflect the changes.

Now you have successfully disabled WER.


You may also want to read our previous guides on A-Z of Installing Windows 7, Installing Windows 7 on USB stick, Activating Windows 7, Resetting Windows 7 password (when you forget it and unable to retrieve it), Creating desktop shutdown shortcut in Windows 7,Enabling GOD mode in Windows 7, Partitioning hard disk in Windows 7 , Restoring previous versions of files in Windows 7, Install and Run Windows XP in Windows 7 Using VMware Player and much more..

Feel free to leave a comment here if you find problem somewhere in following these methods.