WSUS Offline Update: Update Your Windows And Office Offline

Windows Update

It’s very much essential to keep your Windows OS up-to-date when it comes to securing your OS from security threats which may cause damage to your private data.Microsoft knows the importance of the same, hence release Windows update patches more often.You need to be connected to the internet to download these updates from Microsoft.

But what about those innumerable number of people who still can’t manage to get an internet connection for them? Microsoft used to offer AutoPatcher,unfortunately this service was discontinued from 2007.Luckily there are some third party software available on the internet which provide the similar offline update facility, the one which I’m going to talk about is WSUS Offline Update.

WSUS Offline Update:

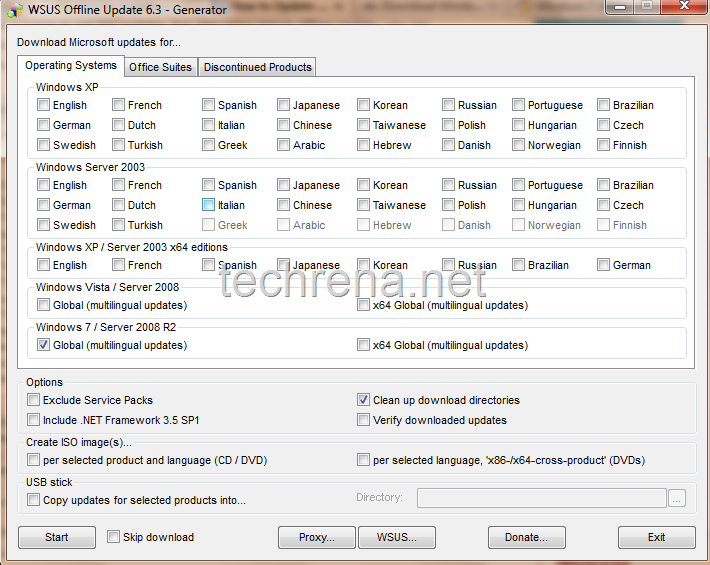
WSUS Offline Update generator

WSUS Offline Update lets you download the patches and updates for Windows and MS Office without requiring an active internet connection on the target computer.All that you need to do is go to your friend’s computer which is having an internet connection, install this WSUS Offline Update, download the Windows updates on an USB drive (or some other removable media) and transfer them to your machine and install them using WSUS Offline Update.

Features:

1. WSUS Offline Update supports: Windows XP, Windows Vista & Windows 7.

2. Supports MS Office 2003 & 2007 versions.

3.You can create an ISO of the updates.

4. Supports copying updates directly to USB

Download:

You can visit the Homepage of the WSUS developers or follow this direct link to download the WSUS Offline Update version 6.51

Backup Your Windows Registry In Simple Steps [How To]

Windows logo

It is always essential to backup a copy of the windows registry before performing any operation that involves the editing of one or more keys in the regedit.This tutorial aims at making it easier for you to do a complete registry backup in simple steps:

Method-1: Using Windows Registry Editor

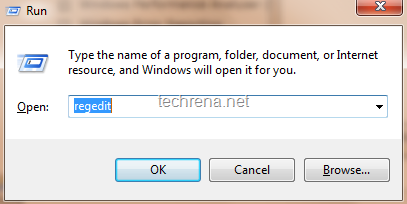
1. Open run command by pressing Start button windows start button+ R.Type regedit and click OK.

regedit run command

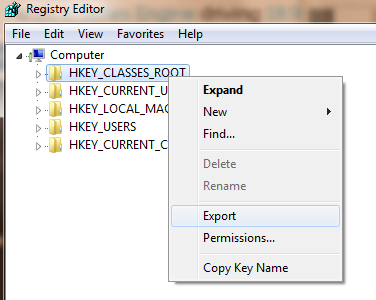
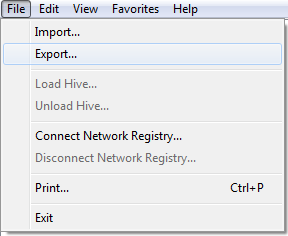
2. The Registry Editor will open up.Select the keys or sub keys which you want to export, right-click on it and choose Export.You can also export the make the backup the entire Windows registry by going to File>Export but it’ll only add to the file size.In my case, when I saved the entire registry editor backup, it was around 20 MB.

Export regedit keysexport option in regsitry editor

3. Save the registry backup to your local drive.

save regedit backup file

Method 2: Using ERUNT

ERUNT stands for The Emergency Recovery Utility for NT can be used in Windows NT/200-/2003/XP, Windows Vista & Windows 7 to backup the entire registry editor.

Download ERUNT for here and follow the following steps:

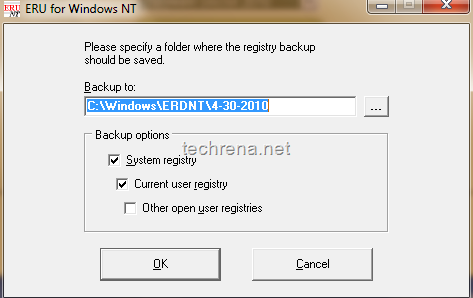
1. Run the ERUNT

ERUNT save backup

2. Set the location where you want to save the entire registry backup file and click OK.

ERUNT in action

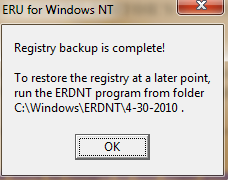
Click OK on the dialog box which you’ll see when the registry backup operation is completed.

registry backup complete in ERUNT

With this, The registry hives (Config, SAM, Security, Software, System) gets backed up on the path that you have selected.

All the 2 methods mentioned above will work on Windows XP, Windows Vista and Windows 7.

[How To] Configure AutoPlay In Windows 7

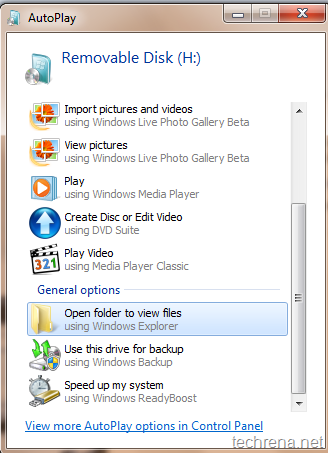
AutoPlay in Windows 7

We are here with yet another tutorial.In this tutorial, I’m going to discuss about how to disable AutoPlay in Windows 7 and Windows Vista.[AutoPlay for CDs/DVDs and AutoRun for USB flash drives or for any removable flash drives.]

AutoPlay (and AutoRun) is disabled by default in Windows 7 and Vista.That’s why Windows gives you an option to choose the possible actions that you  can take without directly playing the DVD in media player.Start reading the following tutorial to learn how to enable or disable AutoPlay .

Tutorial: How to enable/ disable AutoPlay

Covers: Windows 7/ Vista

User level: Intermediate

Complexity: Easy

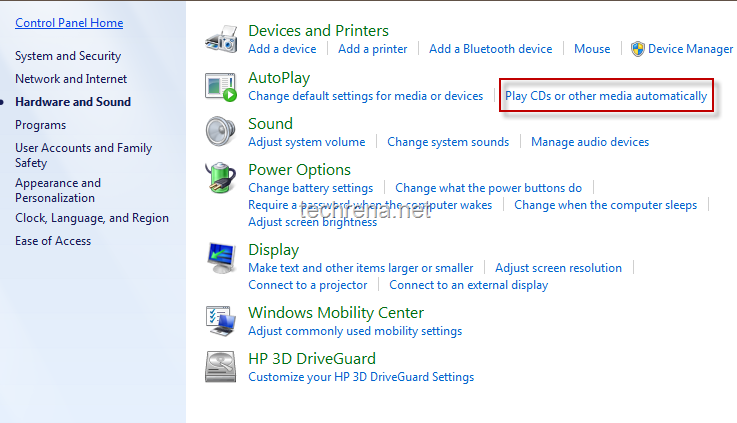
1. Go to Control Panel, and choose “Hardware and Sound” options.

Under AutoPlay, click  Play CDs or other media automatically.

Autoplay in Hardware and Sound

2. Now AutoPlay options window will open.Under uncheck under “Choose what happens when you insert each type of media or device” to completely disable AutoPlay globally for all types of devices.

choose_autoplay_options

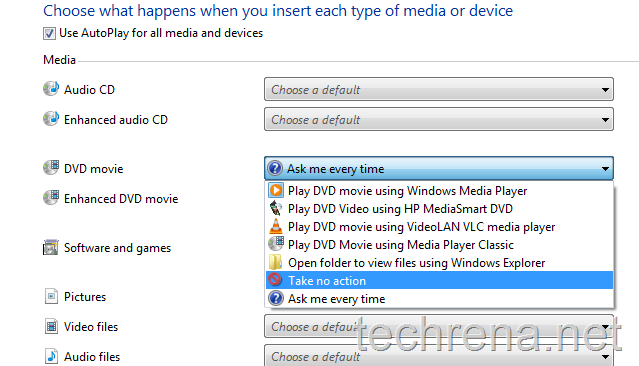
3. If you want to disable AutoPlay for particular devices like  DVD movie instance, select the “Take no action” under the DVD Movie options.

disable_autoplay_for_single_type

Likewise you can also configure auto play for USB devices and other plug and play devices.

Using Group Policy Editor [For Business/ Ultimate Editions] :

This methods works only for Business and Ultimate versions of Windows 7 and Windows Vista.

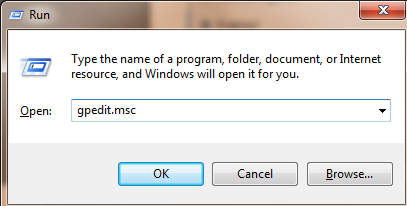
Go to run command by pressing Start button + R.Type gpedit.msc in the text field and click OK.

gpedit run command

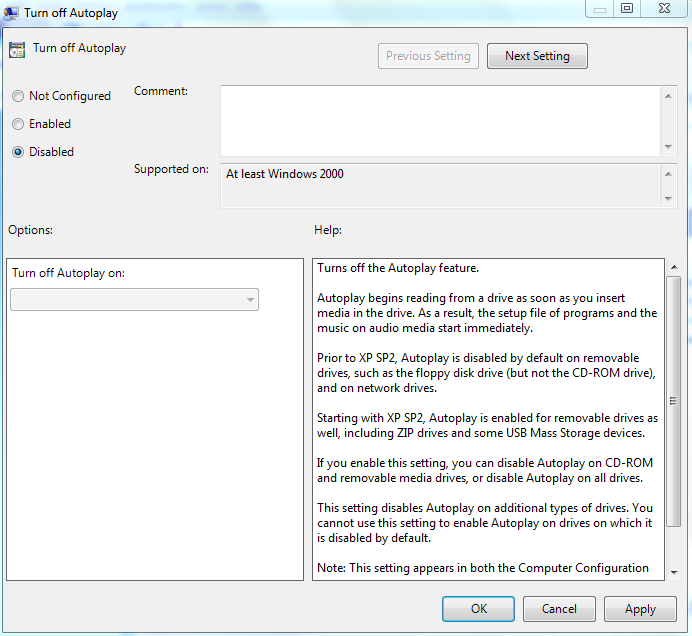
From the Group Policy Editor window, navigate to Computer Configuration\ Administrative Templates\ Windows Components\ Autoplay Policies\ Turn off Autoplay, you will see the “Turn off Autoplay” window as in the screenshot.

To enable the AutoPlay, just change the value of “Turn off Autoplay” to Disabled.

autoplay gpedit enable settings

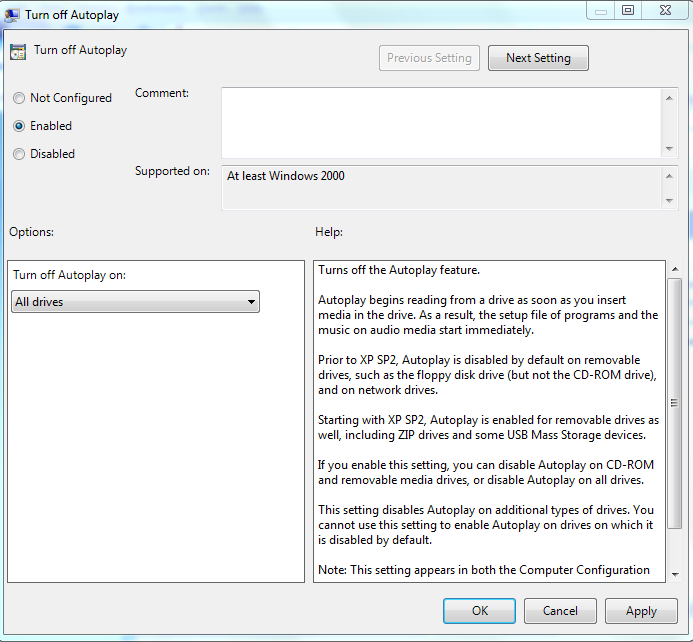
If you want to completely disable the AutoPlay for all types of devices for default, change select the value Enabled under Turn off Autoplay.

disable autoplay gpedit settings

[How To] Enable Automatic Updates In Windows 7

Windows logo

This is a small tutorial dealing on how to enable or disable automatic updates in Windows 7 or Windows Vista.This is basically intended for beginners who have just installed Windows 7 or Windows Vista in their systems and looking for assistance.

User level: Beginner

Complexity Level: Easy

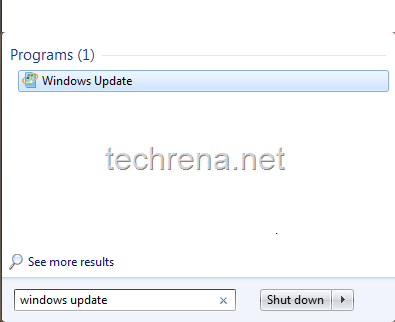
1. Go to Start menu and type windows update in the search box.Click the Windows Update program in the search result.

windows update start menu search

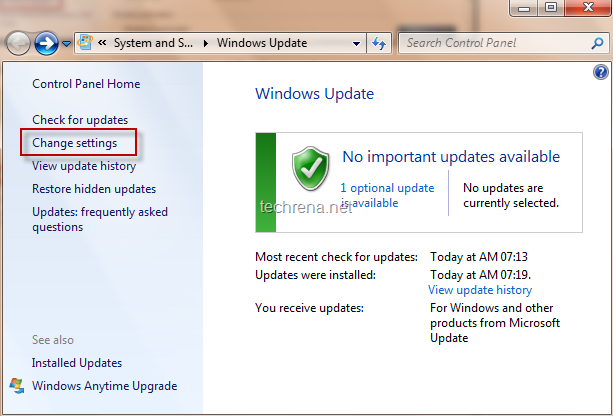
2. Now the Windows Update window will be opened.On the left pane, find “Change Settings” and click on it to open the Windows Update Settings page.

windows update page

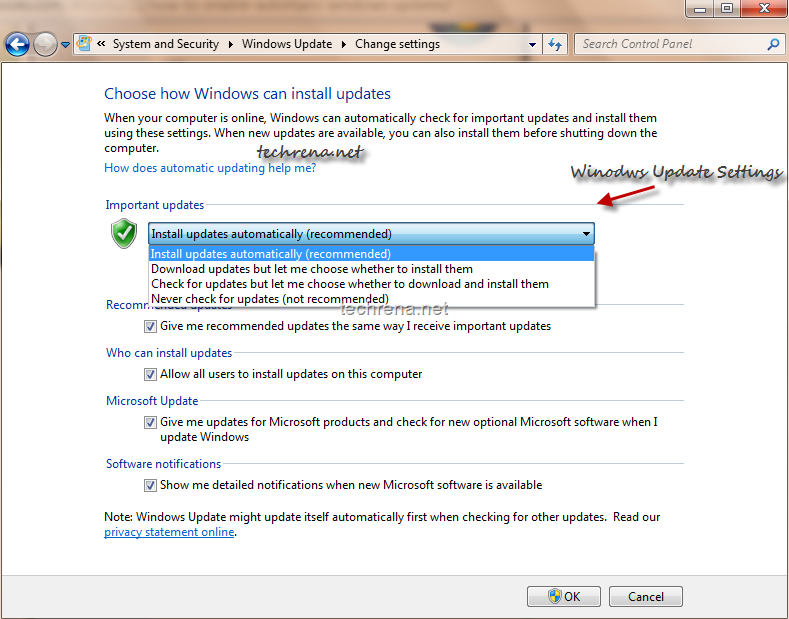
3. In the Windows Update Settings window, as you can see there are basically 4 options to choose from.

  • #1 Install updates automatically (recommended)
  • #2 Download updates but let me choose whether to install them
  • #3 Check for updates but let me choose whether to download and install them
  • #4 Never check for updates (not recommended)

change windows update settings

It is always recommended that you choose the option #1 “Install updates automatically” to install updates that address various vulnerabilities and keep your Windows up-to-date.

Option #2 is also OK, given that it makes your Windows to download the updates automatically as and when they are available but will install them without your permission.

Options #3 and #4  are recommended only if you are using an interconnection with limited data usage (like  using mobile phone to connect to internet).If these options are chosen, your Windows will not automatically download or install the updates.

Find The Last ShutDown Time Of Any Windows PC

At times may be you allow somebody, take for instance your kid to use your computer but strictly warned him or her to shut it down by midnight.But you don’t really know till what time they had used your PC as you can’t figure it out easily by just looking at your desktop Smile.

Luckily you need not worry much, if your system runs Windows.If you want to know how to do that in your PC, follow the steps briefed below:

1. Open Event Viewer in your computer:

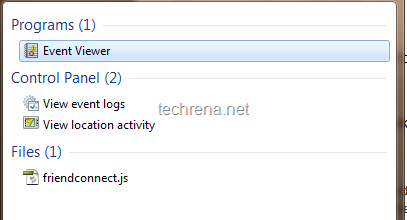
Windows 7 ot Vists users: Go to start menu and type “Event Viewer” in the search box and open the Event Viewer.

Windows XP users: Go to run command from Start> Run or by pressing Windows+R and type eventvwr.msc in the field and hit enter.

event viewer from start menu

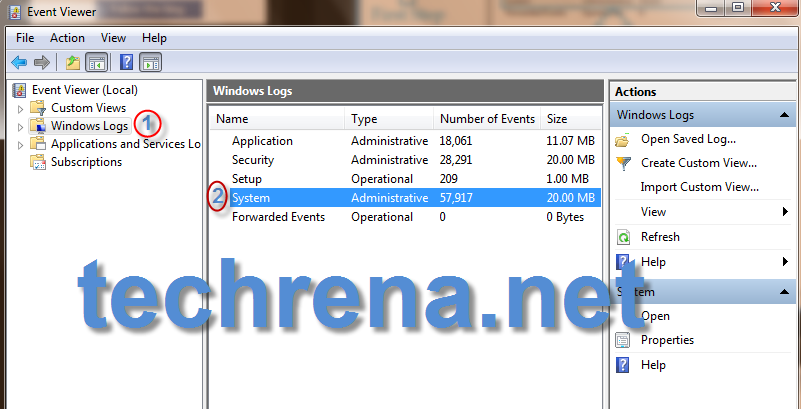
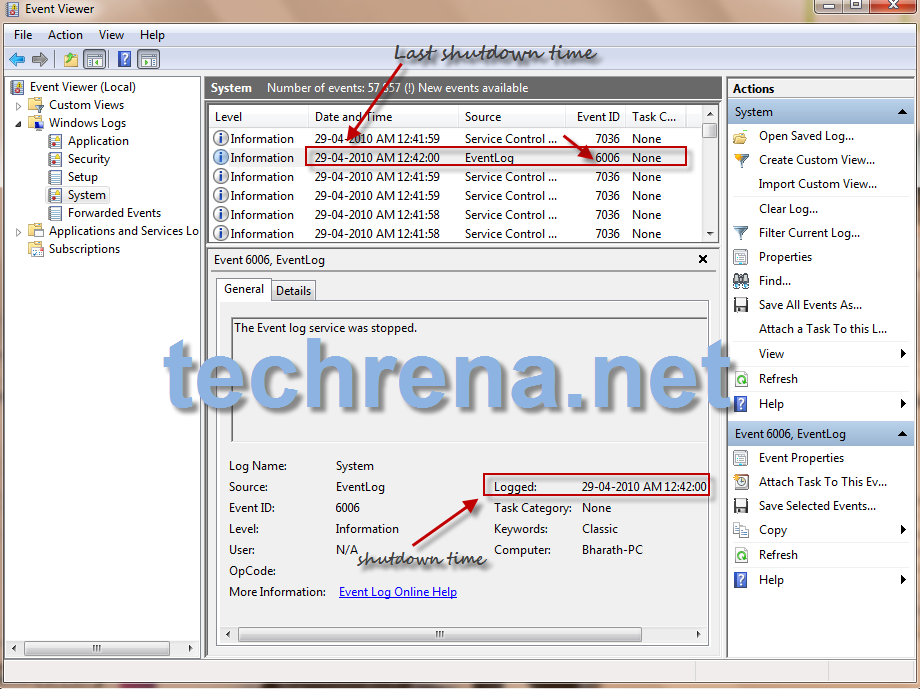
2. In the Event Viewer, On the left side pane click on “Windows Logs” and in the right pane, click on the item “System”  [See the screenshot below].

Windows Logs in Event Viewer Windows 7

3. Now on the right pane, you will find all the system logs information basically divided into 3 tabs: Information,

Date and Time,

Source,

Event ID

Find the column corresponding to the Event ID 6006, the date and time displayed in this column is when your computer was last shuttedDown.

last shutdown time in event viewer

In the above screenshot, the time shown is 29-04-2010 12:42:00 AM, so this is the last shutdown time of the PC used here.

[How to] Pin or Unpin The Contents Of a Folder in Windows 7 Taskbar

Have you ever thought of adding a shortcut of your favorite folder in the taskbar. Well you can do it in Windows 7. Here we will show how to pin a folder in the Windows 7 taskbar.

Any folder can be pinned to the task bar as a New Toolbar in the Task bar of Windows 7 with a small or large icon and with or without text of the folder name.

Point to be noted:

When we pin a folder, we can see only the only the contents of the folder in the task bar. It is like the folder is already opened and displayed in the taskbar. So it is not that the folder’s shortcut is pinned to the task bar, but its just that the shortcut of the contents of the folder is created in the taskbar.

Now just follow the simple steps below to pin the contents of a folder to the task bar.

Pin a folder to the taskbar.

Add a new toolbar in the task bar:

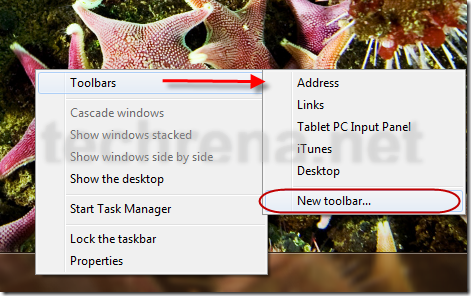
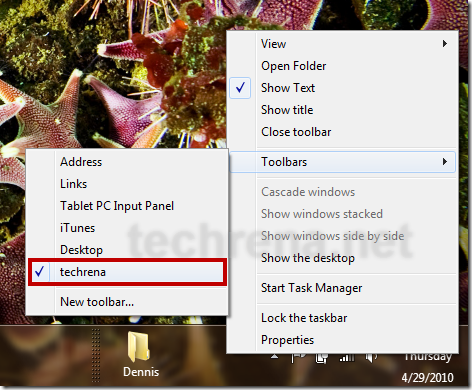
Right Click on the taskbar, go to Toolbars and select New toolbar.

Add_new_toolbar_taskbar

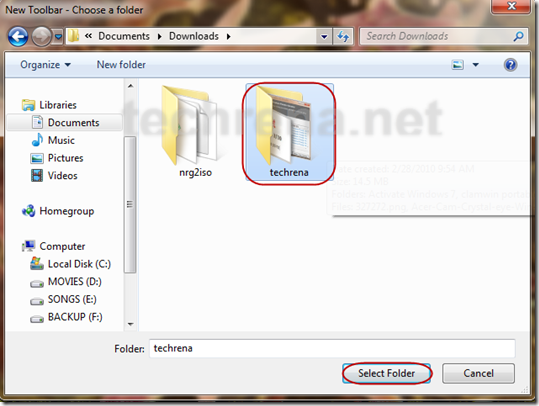
It will ask to select the folder. Select the parent folder which you want to add so that the contents of the folder is shown in the taskbar.

select_toolbar_folder

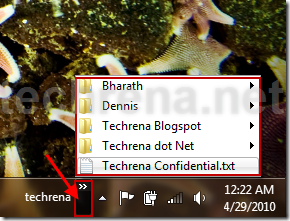
Now you can see the folder name in the taskbar with its content.

taskbar_toolbar_opened

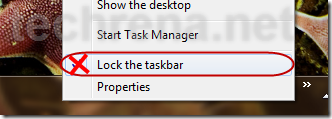
Unlock the Taskbar to modify the positions and settings if its locked

Right Click on the taskbar and select lock taskbar to uncheck it.

unlock_taskbar

Changing the settings of the toolbar:

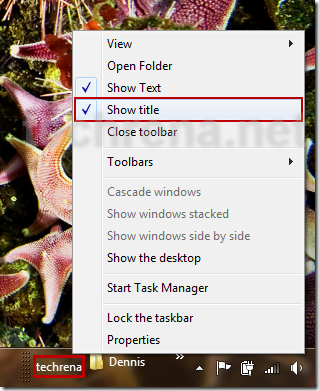
If you don’t want to name of the folder to be displayed but only the contents, then right click on the folder name in the taskbar and uncheck Show Title.

Show_Title

If you want to move the toolbar to the left side, yo have to drag the divider to extreme left to the Start menu.

Drag_divider_to_leftToolbao_divider

If you want to move it back, drag it back to right.

Now, if you want to show bigger icons of the content in the toolbar, Right click on the toolbar, go to view and select Large Icons.

View_large_icons

Now after doing all the changes you can lock the taskbar again if you wan to.

Unpin the folder from taskbar:

Now to unpin the folder, right click on the taskbar and go to Toolbars and unselect the folder name. You can also right click on the toolbar and select close Toolbar.

close_toolbar

Now you have successfully learnt how to pin and unpin a folder to the taskbar in Windows 7.

Download KB975496 Update For Windows 7

Windows 7 LogoBitLocker Drive Encryption

Microsoft has released the new KB975496 update addressing the issue while using BitLocker for system drives.If your Windows 7 PC stops responding during shutdown if BitLocker is enabled on the system drive.

Initially this update was released for Lenovo ThinkPad W510 where the issue was first noticed.Now Microsoft has decided to release this update as “recommended” update type to all x86 Windows 7 users in April 2010.

KB975496 details:

Update for Windows 7 (KB975496)

Download size: 121 KB

File name: Windows6.1-KB975496-v2-x86.msu

published: April 26, 2010

You may need to restart your computer for this update to take effect.

Update type: Recommended

More information:
http://support.microsoft.com/kb/975496

Download Link (Validation required)

Direct Download Link: KB975496-v2-x86.msu (Without validation)

Fix Frequent Windows Explorer Crashes With KB980408

Windows logo

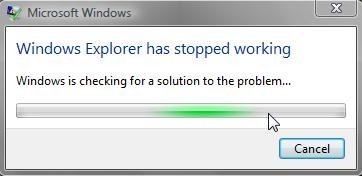
“Windows Explorer has stopped working.

Windows is searching for a solutions

Windows Explorer is restarting “

windows explorer stopped working

The most annoying errors that keep popping up in Windows 7 too many times (I already had enough of them).Normally this error could occur possibly due to missing/corrupt files in windows explorer window.Windows 7 team has had a serious look into this mess and they have decided to release April 2010 stability and reliability update KB980408 exclusively to fix these frequent windows explorer crashes in Windows 7 and Windows 2008 R2.According the release the update KB980408 fixes the following issues:

  • Windows Explorer crashes and restarts while accessing a third-party Control Panel item.
  • Issue that affects the connectivity with an instance of SQL Server Analysis Services from any application in Windows 7 or Windows 2008 R2
  • Windows Explorer stops responding for 30 seconds whenever a file or directory is created or renamed after installing some programs
  • Welcome screen hanging for 30 seconds while logging into the computer, if you had set the desktop background to a solid color.
  • You don’t get any warning when you try to delete more than 1000 files and all the files gets deleted permanently without moving to the Recycle bin.

    If you have experienced any of the above issues in your Windows 7 machine, you must download the update KB980408 from the download links below.

    Download Links:

    The April 2010 stability and reliability update for Windows 7 and Windows Server 2008 R2- Update for Windows 7 (KB980408)

    Download size: 5.3 MB

    Update type: Important

    Released: April 26, 2010

    With validation:

    Windows 7 (x86)

    Windows 7 (x64)

    Windows Server 2008 R2 (x64)

    Without validation:

    Direct download link KB980408-x86.msu for x86 Windows 7

    Direct download link KB980408-x64.msu for x64 Windows 7

  • Link for KB980408 support

    Enable Pin To Start Menu For Folders In Windows

    Windows-logo pin_folder_start_menu[7]

    Pinning items to the start menu is one great way for accessing them more quickly.By default Windows allows only programs to be pinned to the start menu.If you want to add folder to the start menu, follow this simple tutorial which will add “Pin to start menu” context menu option for folders.You can also pin any library to the start menu using this method.

    Steps:

    1. Open run command by pressing Windows button + R.Type regedit in the filed and click ok.

    regedit run command

    2. In the Registry editor (regedit), go to the following key:

    pin folder registry key

    HKEY_CLASSES_ROOT\Folder\shellex\ContextMenuHandlers

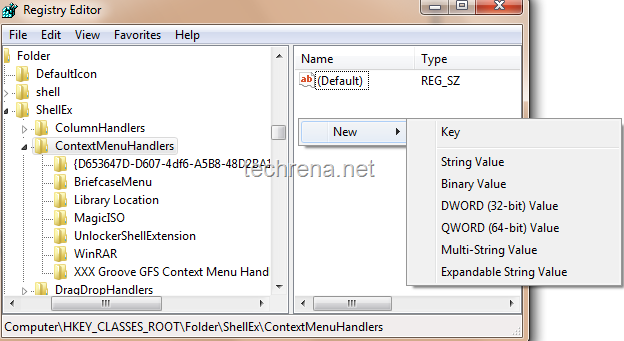
    3. Right on the right pane and select New> Key (refer to the screenshot below)

    pin folder to start menu add new key in regedit

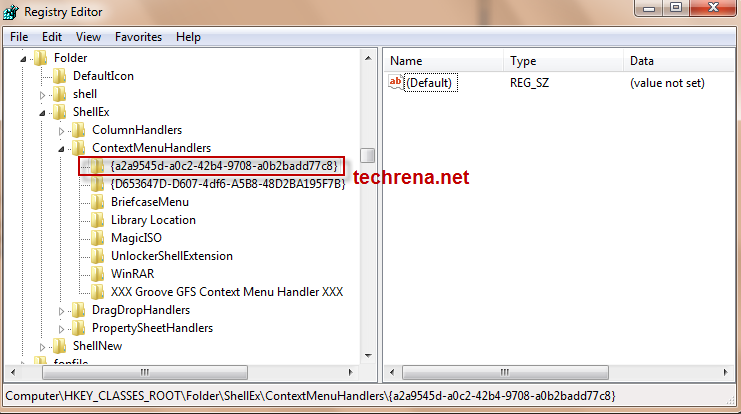
    4. Copy and paste {a2a9545d-a0c2-42b4-9708-a0b2badd77c8} as the new key name like we did it in the following screenshot.

    pin folder to start menu new key in regedit

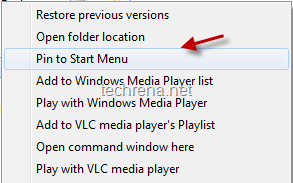
    5. You are done with the tweak now.Press “SHIFT” key and right-click on any folder, you’ll see a new context menu option “Pin to Start Menu”

    Pin to start menu option

    if you want to rollback and undo this new change just delete the key that you have just added {a2a9545d-a0c2-42b4-9708-a0b2badd77c8}, which will remove the Pin to Start Menu context menu option from the folders.

    If you want to automate the above whole process, just download the following reg entry file (.reg), and double click it, the corresponding registry entry will be automatically added.

    Download

    Note:

    1. You can drag any folder to the start menu, hold it until you see “Pin to start menu” and then drop it.This will automatically pin that particular folder to the start menu.

    2. The folders pinned to the start menu by this method will not expand if you hover the mouse over it.You need to pin them to the taskbar instead to see the expansion of the folders.

    IDT High Definition Audio CODEC Update #Fail In Windows 7

    Windows logo

    Alert: IDT HD Audio Codec Windows optional update causing problems in Windows 7

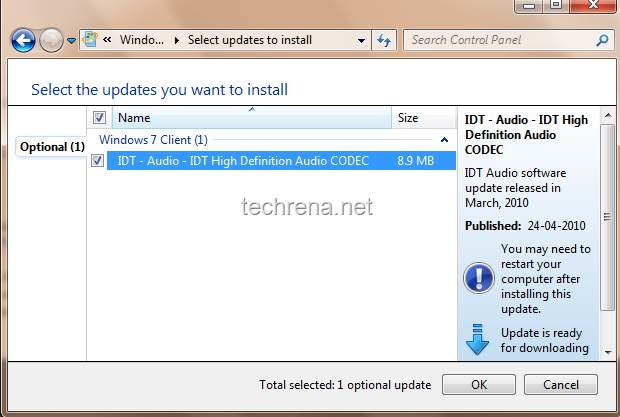
    There’s a new optional Windows update showing up in Windows update from a couple of days, “IDT – Audio – IDT High Definition Audio CODEC”.But there seems to be some problems with this particular update no please do not install this update hastily.Some users who have installed this have reported there was no sound output after installing this and rebooting the system.

    Continue reading this post if you have already installed this and facing problems.

    IDT – Audio – IDT High Definition Audio CODEC

    Download size: 8.9 MB

    You may need to restart your computer for this update to take effect.

    Update type: Optional

    IDT Audio software update released in March, 2010

    More information:
    http://winqual.microsoft.com/support/?driverid=20347177

    Help and Support:
    http://support.microsoft.com/select/?target=hub

    IDT High definition audio codec in windows update

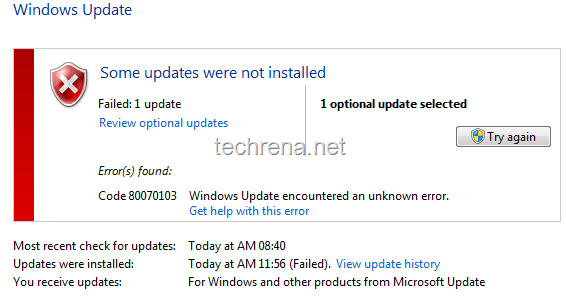
    Update failed: error 80070103 (see the below screen shot)

    IDT audio codec update fail

    Solutions:

    1. The easy way- All laptops :

    The easiest and the most worked solution for this is to rollback the default windows driver (“High definition audio device”) which was released in 2008 (12/12/08 or 06/27/08).This almost solves the problem.But if you are still getting the same problem, try downloading the latest update by following these steps:

    2. Specific Notebooks:

    HP Notebook users:

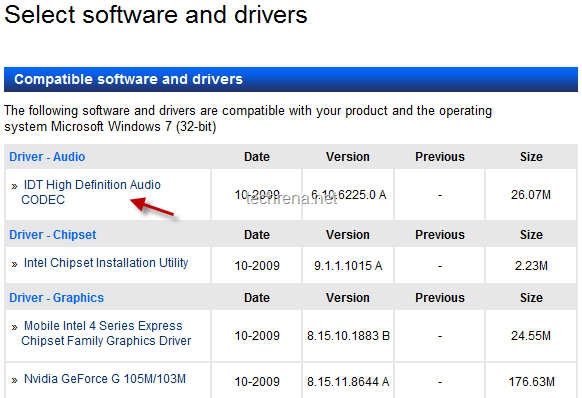
    HP IDI audio codec driver download

    Go to this HP support site, enter your product name and search for drivers and download the latest

    Dell Notebook Users:

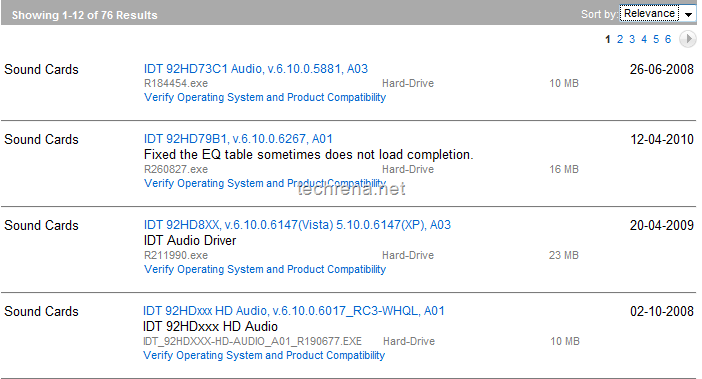
    Go to Dell.com and search for “IDT High Definition Audio Codec” in the search field and look for the latest update in the drivers section, choose and download the right update for your Windows.

    Dell IDT update

    Alternatively, Dell users can first uninstall the IDT driver from the control panel and then download “SIGMATEL driver” from the Dell.com- drivers and downloads section.Let the program automatically detect your hardware and install the right audio driver for you.

    Have you faced the same problem while installing IDT HD audio codec update? If so, how did you solve it? Tell us through comments..

    Note: The solutions listed here are the probable solutions that may work based on the opinion of a small numbers of users who faced this issue.There is no guarantee that it will work 100% even after you try all the above steps.