How to Create a Password Reset USB Disk in Windows 7 And Vista

Have you ever faced a problem of forgotten password in your Windows PC? If yes better have a backup plan now itself. Here we are going to tell you, how you can reset your Windows password using a reset password disk. This feature is available in Windows 7 and Vista only.

You can backup your user identity in a USB disk and use the disk for resetting your Windows user password in the future in case you have forgotten it. For this purpose you need not use a high capacity USB drive. You can either use your old USB which are considered obsolete or too small in size like 128MB or buy a small capacity one at lower cost. This is because the reset file if very small and you need to store the USB device in your locker or any other safer place.

Requirements:

A USB Flash Drive(Any size)

Windows 7 or Vista Operating System

Important: Once a password reset disk has been created, no matter how many times the password has been changed after that, you can reset the password using the Disk any number of times. In order to avoid misuse of the device, keep it in a safe place.

Password Forgotten Before Creating the Password Reset Disk?

Follow this link: Reset Windows XP, Vista, 7 Password Using USB Drive or CD

Follow the steps to create a Password Reset disk using Windows Forgotten Password Wizard:

Step 1: Connect the USB Flash Drive to your PC.

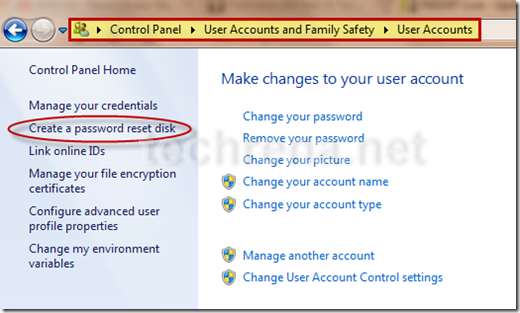
Step 2: Open Start Menu, click on Control Panel. In Control Panel go to:

Control Panel—>User Accounts and Family Safety—>User Accounts

Step 3: In the left pane of User Accounts, click on Create a password reset disk.

User_accounts

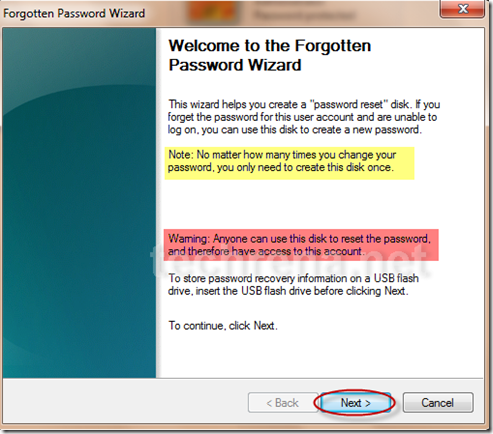
Step 4: Now in the Forgotten Password Wizard, read the Important notes and warnings and Click on next.

forgotten_password_wizard

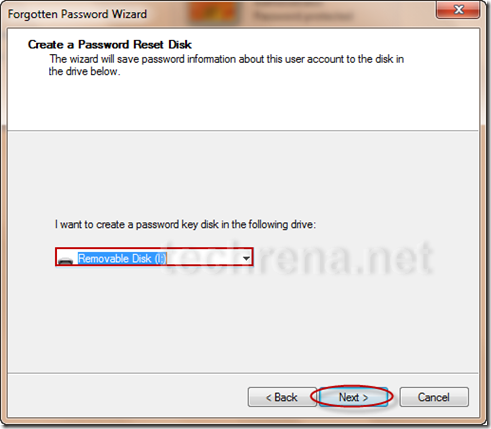
Step 5: It will ask you for the USB drive letter in which you want to store the password reset file. Select the correct drive and click on Next.

select_drive_forgotten_password_disk

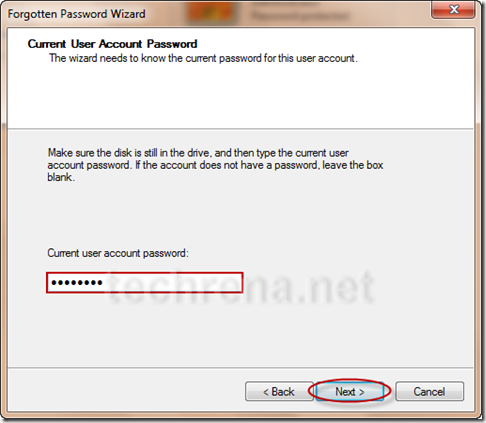
Step 6: Now it will ask for the current password. Enter the correct password and click next.

enter_current_password

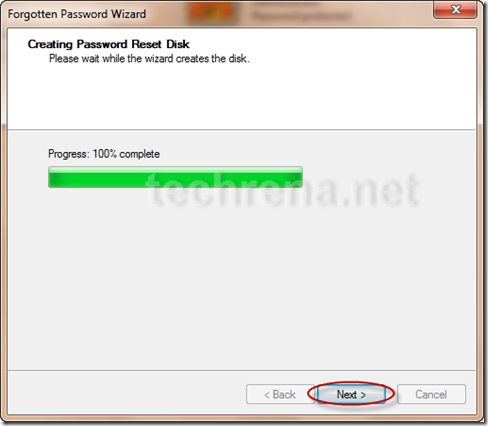
Step 7: Once it completes the creation process, click on finish.

create_password_reset_disk

What you have to do when you have forgotten your password?

Now if you have forgotten the password, you can use the Reset disk. When Windows asks you for the login password, plug in your Password Reset Disk and wait for a while. Try entering any wrong password. Now below the password field, a link as Reset Password… will come up. Click on it and enter a new password.

Note: If you do not have a Password Reset Disk, you can try: Reset Windows XP, Vista, 7 Password Using USB Drive or CD

Speed Up Your PC Using a USB flash Drive in Windows 7 and Vista With ReadyBoost

If you have a low memory in your Windows 7 PC, your system may be slow and the performance may not be satisfactory. Microsoft Windows has introduces a new component known as ReadyBoost, to help when your PC’s memory is running low.

ReadyBoost is a component of Microsoft Windows, first introduced with Microsoft’s Windows Vista in 2006 and bundled with Windows 7 in 2009. It works by using flash memory, a USB flash drive, SD card, CompactFlash, external hard drive or any kind of portable flash mass storage system as a drive for disk cache.
ReadyBoost is also used to facilitate SuperFetch, which allows it to perform analysis of boot-time disk usage patterns and creates a cache which is used in subsequent system boots. SuperFetch is a technology that pre-loads commonly used applications into memory to reduce their load times, in a similar fashion to the preload in Linux.

Using ReadyBoost-capable flash memory (NAND memory devices) for caching allows Windows 7 and Vista to service random disk reads with performance that is typically 80-100 times faster than random reads from traditional hard drives.

Using ReadyBoost in Windows 7 and Vista:

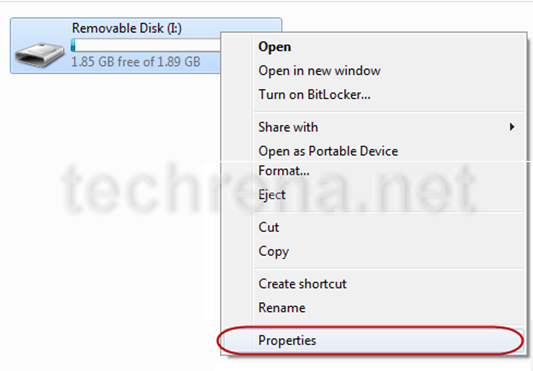
First plug in your USB flash drive. Open My Computer. You can see the Removable Disk. Right Click on it and Select Properties.

removable_disk_properties

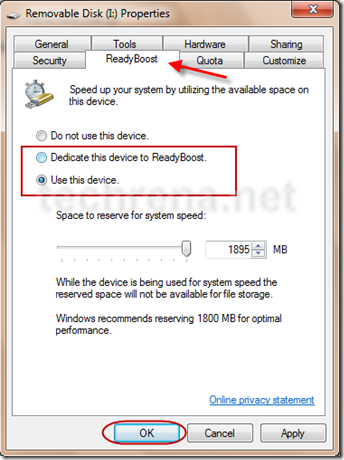
Now in the Properties window, go to ReadyBoost Tab. You can either select Dedicate this device to ReadyBoost or Use this device and set the amount of space you want to use for the process.

ReadyBoost

Now Windows will use the free space available in your flash drive for speeding up your computer.

Note that this process will not delete any data from your flash drive. It will only use the available free space in the removable disk.

Moreover if you want to speed up your boot up and startup, you need to use MSConfig.

Download Security Update for Windows 7 To Protect from Remote and Local Attacks

windows 7 logo

A series of 5 Important Security Updates for Windows 7 has been released yesterday.  According to Microsoft Windows a new security issue has been identified that could allow an unauthenticated remote attacker or authenticated local attacker to compromise your system and gain control over it. This being a serious issue and of great concern we are giving the details to install the updates as soon as possible.

The list of Security Updates are:

Security Update for Windows 7 (KB978601)    204 KB
Security Update for Windows 7 (KB979309)    99 KB
Security Update for Windows 7 (KB979683)    1.8 MB
Security Update for Windows 7 (KB980232)    229 KB
Security Update for Windows 7 (KB981332)    222 KB

The description of KB978601, KB979309, KB980232 and KB981332 is: A security issue has been identified that could allow an unauthenticated remote attacker to compromise your system and gain control over it. You can help protect your system installing this update from Microsoft.

KB979683: A security issue has been identified that could allow an authenticated local attacker to compromise your system and gain control over it. You can help protect your system installing this update from Microsoft.

All the 5 security updates are required to face this issue.

Installing the Updates:

Automatic Download:

Go to the location:

Control Panel—> System and Security—> Windows Update

In the left Side Pane Click on Check for updates.

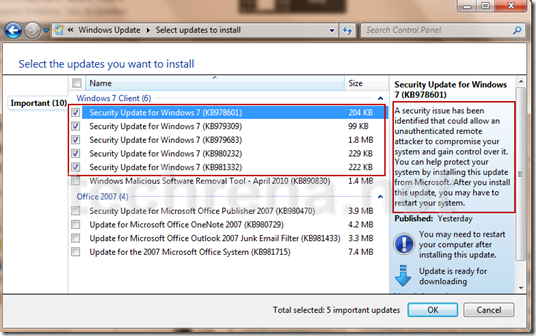
After Checking, Windows may find various updates. Select the updates you want to install and Update. See the image below.

security_update

You can check the updates you want and uncheck the ones you do not need.

Manual Download:

You can manually download the updates from the links given below from Official Microsoft site.

Security Update for Windows 7 (KB978601)
Security Update for Windows 7 (KB979309)
Security Update for Windows 7 (KB979683)
Security Update for Windows 7 (KB980232)
Security Update for Windows 7 (KB981332)

After Installing you need to restart the system to complete installation.

Download Windows Process Security To Find UnSafe Processes

Windows Process Security is a freeware which can be downloaded free of cost from sourceforge.net. The details are given below.

Windows Process Security is a security tool that shows comprehensible information about programs and processes running on your computer and identifies the potential threats running on your computer. The program consist on unique security risk rating for processes and ability to remove 130000 threats. Windows Process Security indicates the likelihood of a process being potential spyware, malware or a Trojan.

A regular Update of the the threat database is required for optimal performance. The update can be directly performed from Windows Process Security 1.0 Application and is free of cost.

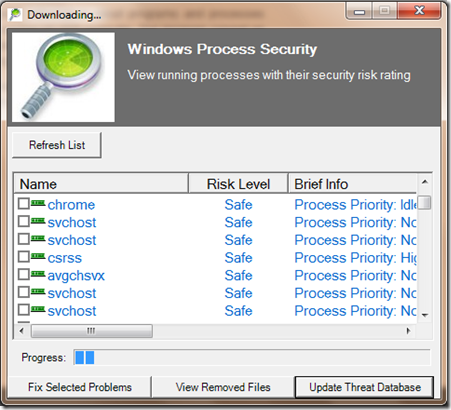
The user interface is quite simple. You can see all the safe and and unsafe processes. If any threat or unsafe process is found you can terminate the process, fix the problem and go to the containing folder to delete the threat. A screen shot of the application is given below.

Windows process security 1.0

Windows Process Security 1.0 can be downloaded from the link below:

Download Link: Windows Process Security 1.0

Size: 3.4 MB

Operating System: Windows 98/Me/2000/XP/2003/Vista/Server 2008/Windows 7/NT

Released on: 28-03-2010

HP Compaq Web Cam Driver & Application For Windows 7

COMPAQ_logo

For HP Compaq Laptop users, if you are migrating to Windows 7, then you need to have some of the drivers compatible to Windows 7.

If you see, unlike Windows XP, Windows 7 supports most of the basic devices with its inbuilt drivers like the sound card. And even if it doesn’t support the device, it tries to download the driver from the internet and installs automatically.

For the Web Camera, the driver can be directly downloaded using device manager of Windows unlike in the case of Acer Laptop PC where you need a different driver download. But the Web Cam needs an additional application to run. Here we have given both how to download the driver and the Web Cam application.

Note: Connect your Compaq PC to the Internet before performing these steps.

Downloading the driver:

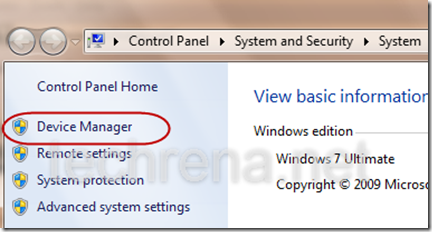
Open Device manager. Right click on Computer and select properties. In the properties click Device manager.

open_device_manager

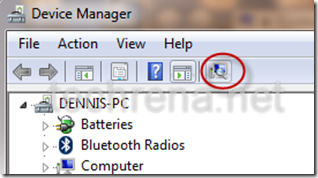
Now Click on Scan for hardware changes button as shown below:

device_manager

scanning_hardware_changes

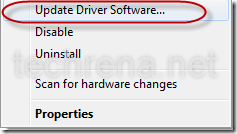
Under the Imaging devices section if your Web cam is already present then no need to download the driver. If it shows as an unrecognized device with a yellow exclamation symbol then, right click on it and select Update Driver Software…

update_driver_software

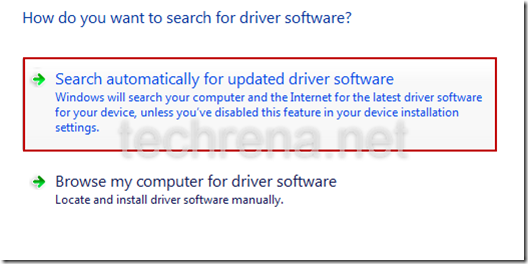
Select Search automatically.

update_driver_from_internet

It will automatically download and install the Driver software to your Compaq PC.

Install Web Cam Application Software:

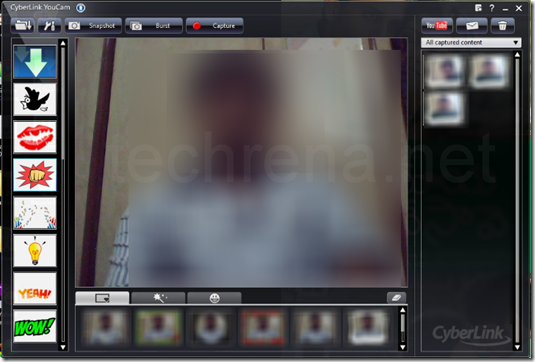
You have to download the Cyberlink YouCam application software to run your Web camera. You can download it from the official hp link:

ftp://ftp.hp.com/pub/softpaq/sp37501-38000/sp37849.exe

Size: 49.5 MB

Extract it and install it. You can run your web cam and use it.

cyberlink youcam

The updating of the driver software is applicable to all the hardware devices in your computer. If any unrecognized device is found, then you can try updating the driver software.

The above given method has been tested successfully in Compaq Presario C783TU. Hope it will work for other models also. Any feedback can be posted as a comment below.

Cumulative Security Update for Internet Explorer(Critical) – KB980182

Internet explorer logo

Microsoft has issued emergency patch to address 10 possible holes in Internet explorer that also includes a critical vulnerability that has been exploited in attacks.

This cumulative security update patch covers a publicly disclosed critical vulnerability (released in Security Advisory 981374) in Internet Explorer 6 and Internet Explorer 7 (Note that IE 8 is unaffected by this vulnerability addressed).However, the security bulletin MS10-108 which was released yesterday addresses 9 more additional vulnerabilities some of which also effect Internet Explorer 8 and are not disclosed publicly.

Microsoft Security Bulletin MS10-018 – Critical : Cumulative Security Update for Internet Explorer (980182) [aka Out of Band Internet Explorer Security Update]

Target platforms: Windows 7, Windows Server 2008, Windows Server 2008 R2, Windows Vista, Windows Server 2003, Windows XP, Windows 2000, Windows Internet Explorer 7 Dynamic Installer, and Windows Internet Explorer 8 Dynamic Installer.

KB980182:

Security issues have been identified that could allow an attacker to compromise a system that is running Microsoft Internet Explorer and gain control over it.You can help protect your system by installing this update from Microsoft.

All Windows users (including Windows 7) download and install the latest Windows update KB980182 to make your software more secure.

For more information, read the MS10-018 bulletin.

How To Disable Multiple Tab Previews of Browsers in Windows 7 Taskbar

web_browsers

Tab preview feature in Windows 7 is very helpful. But sometimes if your Internet browser has the facility of tab preview for each tab opened, then it may be annoying. It is actually better to have only one preview of the tab which you were active last to avoid all kinds of confusion in selecting the tab previews. An example of multiple previews of each tab in the taskbar is shown below:

multiple_tab_preview

This kind of previews is normally seen in Internet Explorer 8 as it comes with this feature by default.

You can disable multiple tab previews for the popular web browsers like IE8, Mozilla Firefox, Chrome etc. Follow the steps below for each browser.

Internet Explorer 8

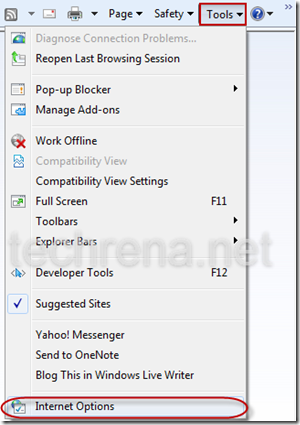
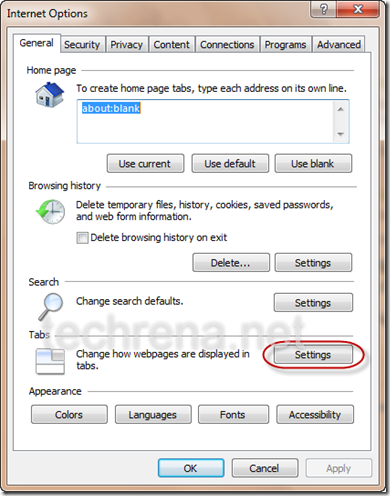
To disable tab previews IE 8 go to Tools->Internet Options->Tabs->Settings

internet_options_ie8

ie8_tab_settings

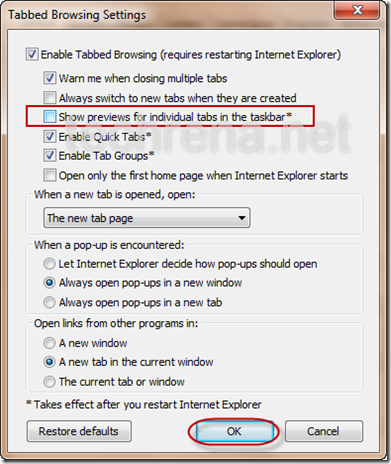
In the Tab Settings Uncheck Show previews for individual tabs in the taskbar. Click OK.

tabbed_browser_settings_ie8

Now restart the Browser, you will find the multiple previews gone.

Mozilla Firefox:

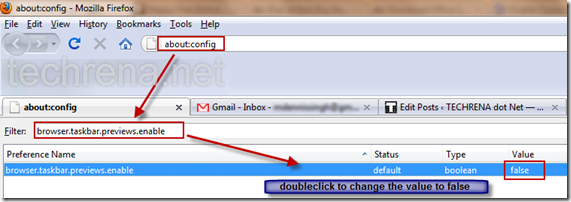
To disable tab previews in Firefox, open a new tab. Enter in the address bar as:

about:config

This will open the configuration page.Now in Filter Type:

browser.taskbar.previews.enable

Make the value to false by double clicking on it. Now your previews will be only one for the currently active tab.

mozilla_firefox_about_cofig

Google Chrome:

In Chrome there is no settings to disable multiple tab previews. But you can change the shortcut compatibility settings to disable previews.

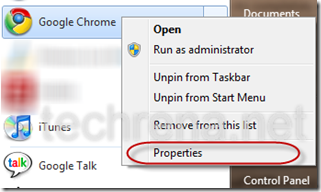
Go to any shortcut of Chrome like in the Start menu or desktop. Right click on it and select Properties.

chrome_shortcut_properties

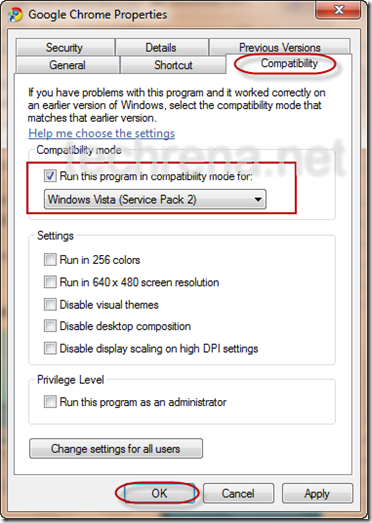
Go to Compatibility Tab and check Run this program in compatibility mode for: and select Windows Vista (Service Pack 2). Click OK.

shortcut_compatibility_chrome

Now you have learnt how to disable multiple tab previews feature in the World’s most popular browsers. If you want to enable them back, follow the reverse process.

Adding Your Feed Subscriptions Windows 7 Feed Headlines Sidebar Gadget

If you are using either Windows 7 or Windows Vista, you might be knowing about a desktop sidebar widget called “Feed Headlines”.By default this gadget will show pre-loaded RSS feeds from various popular news and other websites like MSN, CNN etc.,.But have you ever thought about controlling these feeds adding your own feed subscriptions from your favorite RSS feed reader instead ??

That would be great, right? Here we are going to show how to setup your “Feed Headlines” gadget to show feeds from your feed subscriptions (using OPML file) :

Pre-requisite: An OPML file exported from your RSS feed reader

Step 1: Open your Internet Explorer (possibly Internet explorer 8), find a button called “Favorites” and click on it to expand its options.

favorites button in internet explorer

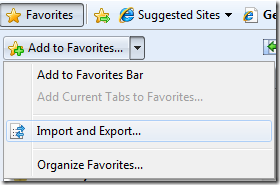
Step 2:  As shown in the following screen shot, find “Import and Export” option from the menu.

import export favorites in internet explorer

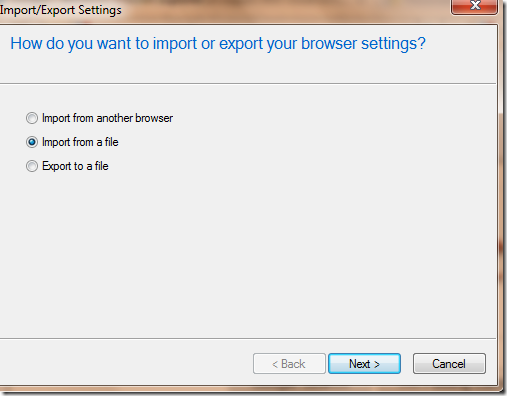
Step 3: Choose the option “Import from a file” in the next window.

import export favorites settings in internet explorer

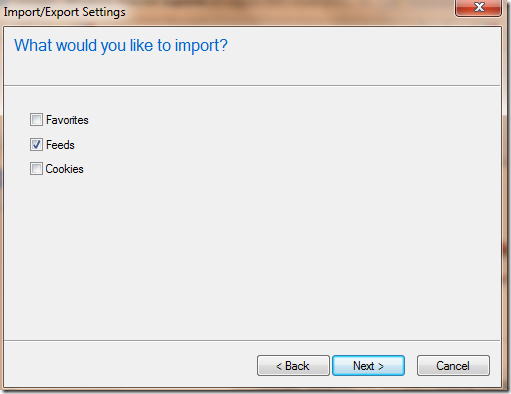
Step 4:  In the next step, you will be asked “What would you like to import? ”, select the option “Feeds”.

Import/Export settings in Favorites settings

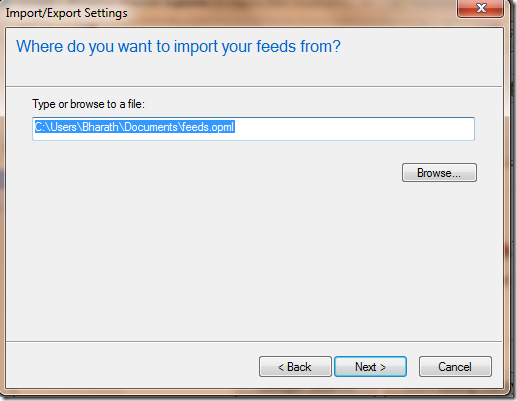
Step 5:   Now locate the “OPML” file that you have got from your favorite feed reader.(Read the guide to export as OPML from feed readers).

importing_feeds_internet_explorer_favorites

Step 6: Select a destination folder for your imported feeds and click “Next”.

selecting destination folder for feeds import ie favorites

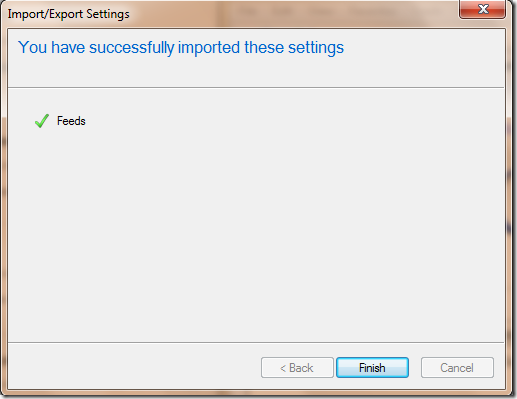
Step 7: Now you have successfully imported your feed subscriptions from a feed reader.

feeds successfully imported to internet explorer favorites

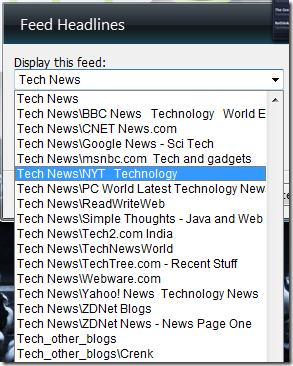
Step 8: Go to your Feed Headlines gadget and choose the feed subscriptions folders from which you want your gadget to display feeds.

Feed Headlines gadget choose feed folders

That’s it from the settings side, now go check your feed headlines gadget, which is supposed to show feeds as shown here in the following screen shot.

Feed Headlines Sidebar gadget

This is a simple and straight forward process.However if you face any difficulties while doing this, let me know through your comments.

How To Turn On or Off System Restore In Windows PC

Windows logo

System Restore is a feature of Windows Operating Systems namely Windows 7, Vista and XP. This feature in Windows enables you to restore or rollback your system to a position in an earlier time. Windows automatically creates restore points to back up the program files, registry and system data whenever you install a new software, driver or make any changes in the system settings. You can restore the system to the restore points saved earlier if anything goes wrong in future. You can also create the restore points manually.

The only problem in System Restore is that it occupies a lot of disk space, as it has to save a lot of restore information in your system. This system restore information is stored in System Volume Information. You may be confused that all the data in your drive is showing lesser usage then the actual amount of disk usage. This is due to the System Restore Files present in the inaccessible folder System Volume Information. You can open this folder by taking Ownership in windows 7 or Vista.

Now, if you feel that System Restore is not necessary or if you want to free up disk space by deleting the earlier Restore points then refer the details below.

Open System Properties:

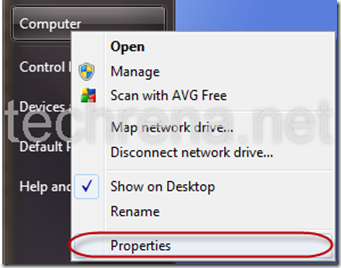
Open Start Menu, Right click on My Computer (in XP) or Computer (In Windows 7) and Select Properties

my_computer_properties

Open System Restore or System Protection:

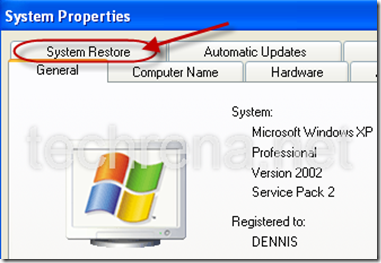
If you are using Windows XP, then Go to System Restore Tab.

system_properties

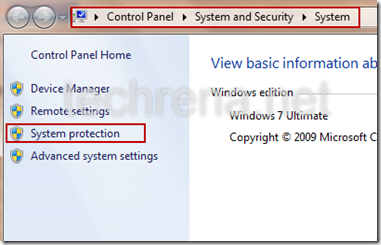
If you are Using Windows 7, Click on System protection in the left pane.

system_properties_7

Turn off or delete system restore points in Windows XP:

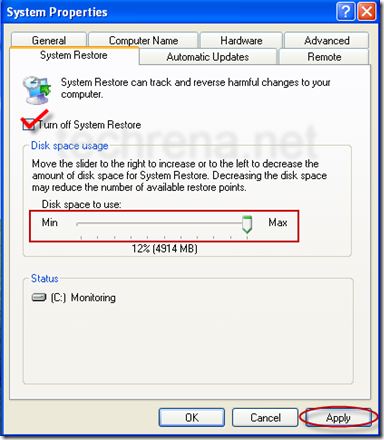
You can see the System Restore Options. Here you can change the amount of Disk space to be used for System Restore.

If you want to delete the System Restore Data then, check Turn off  System Restore and click Apply. It will delete all the related data and turn off your System Restore. Now the disk space has been freed up.

Note: If you only want to delete the system restore data but don’t want to turn off System restore then, don’t forget to turn it back on by unchecking the checkbox and applying again.

system_restore_xp

turn_off_restore_confirm_xp

Turn off or delete system restore points in Windows 7:

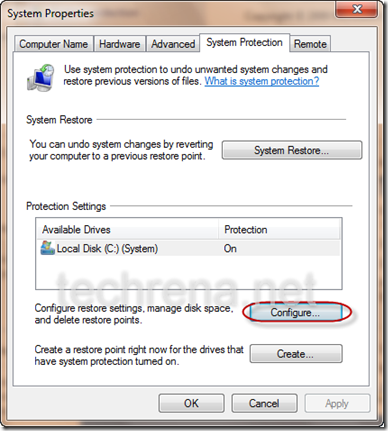
In the System Protection tab, click on Configure.

system_protection_7

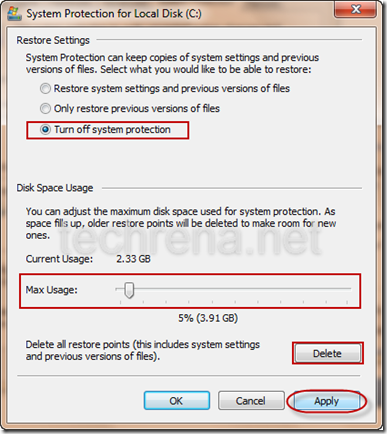
It will open System Protection for your disk. You can change Maximum Disk space Usage for System Restore. You can delete the system restore points to free up the disk. Or you can turn off the System Protection feature completely in your Windows 7 PC.

turn_off_restore

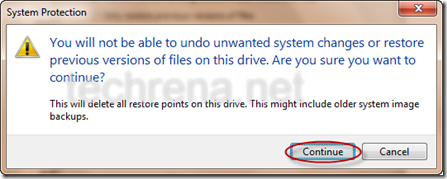
If you Click on delete it will ask for confirmation as follows. Then it will delete the restore points. Deleting the System Restore points will not Turn off System Restore in Windows 7.

confirm_delete_restore_point

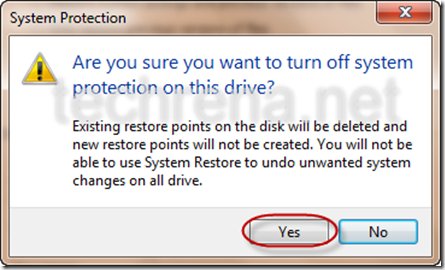
If you select Turn off System protection and click on apply, it will ask for the confirmation given below and Turn off your restore. This will also delete all your current restore points.

turn_off_restore_confirm

You can turn On the system Restore anytime by Selecting Restore system settings and previous version of files and clicking Apply.

In Windows 7 there is an option for restoring the previous version fo files or deleted files in a folder. To know more, refer the post: How to Restore Previous Versions of Files in Windows 7 Using System Restore.

Important:

1. The given procedure will also work for Windows Vista.

2. It is not recommended to Turn off or Disable System Restore in your Windows PC.

3. If you are deleting all the System Restore Points, then you will not be able to restore the system to any earlier point of time.