Install Windows XP Mode Without Hardware-Assisted Virtualization (HAV)

Windows XP and Windows7

Microsoft has announced a small but significant update to its own “Windows XP Mode” (or Windows Virtual PC), a feature that has been incorporated in Windows 7 to let the users of this new operating system take advantages of the older applications that still require Windows XP, by running them inside “Windows XP Mode”.Until now, this XP Mode has only been supported by processors having virtualization technology known has Hardware-Assisted Virtualization (HAV).

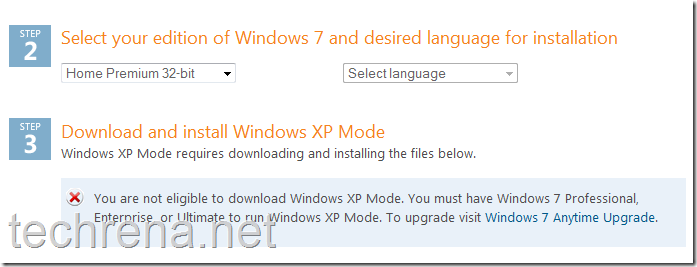
However, Windows XP Mode works only on Windows 7 Professional Enterprise, or Ultimate versions of Windows 7.

This update has been announced in Windows 7 blog, also they have made clear that Windows XP Mode will continue to make use of Intel VT and AMD-V like hardware virtualization technologies.

Windows XP Mode will no longer require hardware virtualization technology to run. This change makes it extremely easy for businesses to use Windows XP Mode to address any application incompatibility roadblocks they might have in migrating to Windows 7.

To install Windows XP mode in your PC with Windows 7 Professional or higher version, download the update from here (update KB977206 ).

Windows 7 Home users need not worry about the lack of support for their OS, as there are hacks available over the internet to install Windows XP mode in Windows 7 Home PCs (Home Basic and Home Premium) too.Hopefully we’ll cover one such hack in the upcoming posts.So stay tuned and subscribe to this blog’s RSS feeds.

Windows XP Mode download Not Eligibe

Tip: You can use VMware player to install Windows XP Mode in any computer running Windows 7.

How To Disable Recent Items in Windows 7 Start Menu

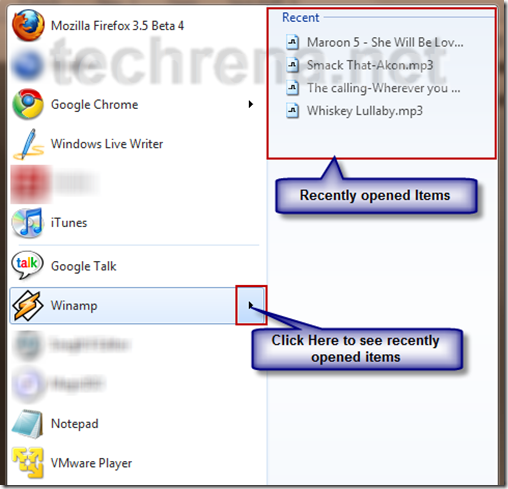
In windows 7, we can see recent items which you have opened using a specific program. This property in Windows 7 is a very good one. We can find our favorite files to be opened using a program in the start menu itself.

But, for some people it can be a trouble to their privacy. When we share a Windows 7 computer, others can easily see what files or even the programs which were opened recently by the previous user. In this case some of us may want to stop this feature from saving the recently open items or programs.

For example, I have opened some MP3 files using the Winamp player. So, if other people see then, they will come to know that these songs are some of my favorites . If I want to hide this then I need to disable this Recent items feature. This is just an example, it is more serious in case if you are handling sensitive data.

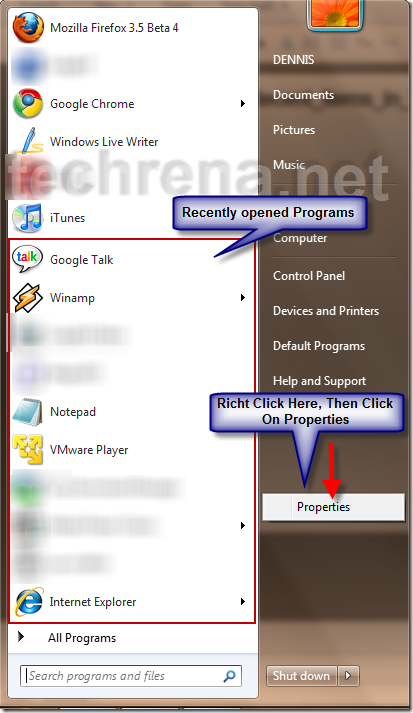
recent items start menu

You can see the recently opened programs also. You can even hide the recently open programs if you want.

Just follow the two steps below.

Step 1: Open Start Menu. On the right pane of the menu, Right Click. Click on Properties. See the Screen Shot Below.

recent programs start menu

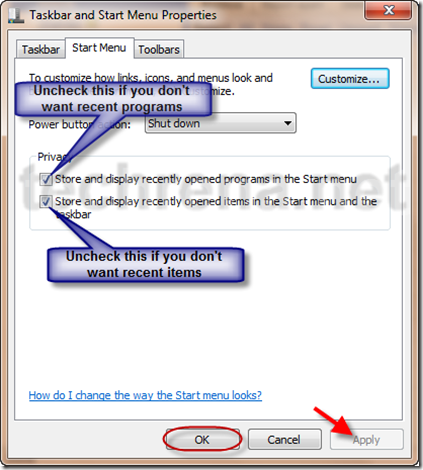
Step 2: In the Taskbar and Start menu Properties, Uncheck the features you want to disable. If you don’t want to show recently open items then Uncheck it and Click on Apply then OK.

start menu properties

Note that you may not want to disable recent programs feature as it is very useful.

So you can customize your settings according to your needs and privacy. If you need any help in any of such Windows 7 features, just leave your query in the comment.

How To Speed Up Your Windows PC Using MSCONFIG

In Windows system configuration is done using MSCONFIG. MSCONFIG is very useful to the Windows users to configure their system properties. We can configure all the system properties from boot up, startup till services to be run in your computer. A properly configured system will have optimal performance and proper memory usage.

This tutorial is about Speeding up your PC and increasing the performance level by removing unnecessary programs from startup and stopping unused services. By doing these things you can see the difference in startup time and the amount of physical memory used and even CPU usage.

This guide consists of two main parts:

1. Removing unnecessary programs from startup.

2. Stopping unused or rarely used services in your system.

Please note that this tutorial is just a guide. You need to analyze properly by yourself which programs or services to be stopped, which are required and which are not required.

We will start with the first one:

Removing unnecessary programs from startup

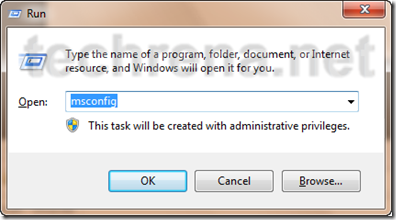
Step 1: Open System Configuration. Press Start + R, Type msconfig and click OK.

run_msconfig

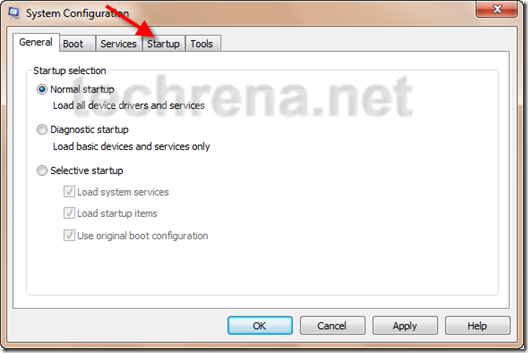
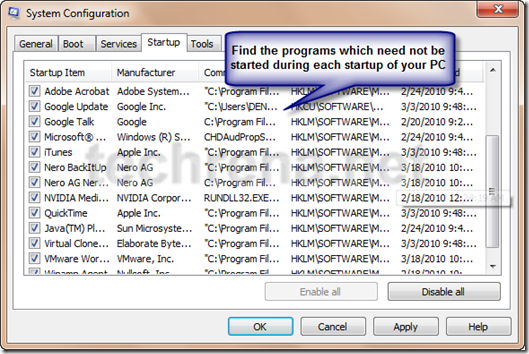
Step 2: You can see the General Tab in Systems Configuration. Go to Startup Tab.

msconfig_home

msconfig_startup

You need to study the requirement of the programs, whether you need to start them during startup or not. You need to start your Virus Protection programs compulsorily. Remove any program which doesn’t have a proper description and which you do not know the functionality of the program. IF you know some programs which you rarely use, you can remove them as well. Do not forget to remove any suspicious program which may be a virus.

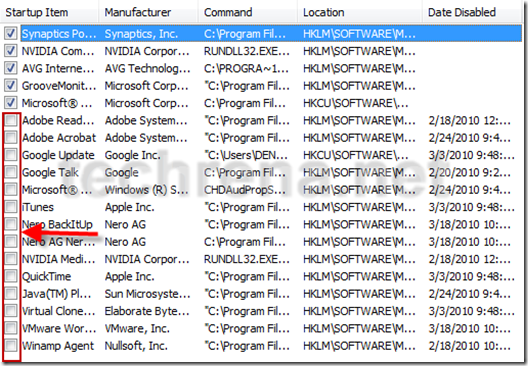
Step 3: After the analysis, uncheck the programs which you need not start during the startup of your computer.

msconfig_startup_programs

Now you have successfully configured your startup programs according to your needs.

Stopping unused or rarely used services in your system.

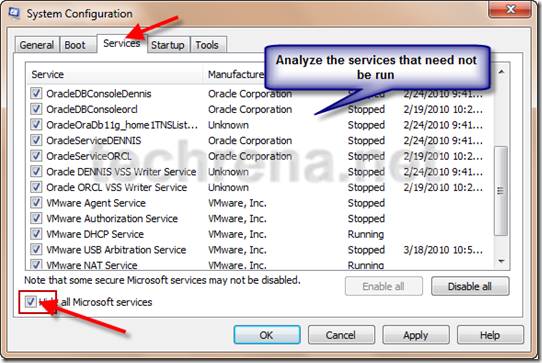
Step 1: Go to the Services tab. There you can see the various services which can run in your system. Again you need to analyze which services are not used or which are rarely used and not required.

msconfig_services_tab

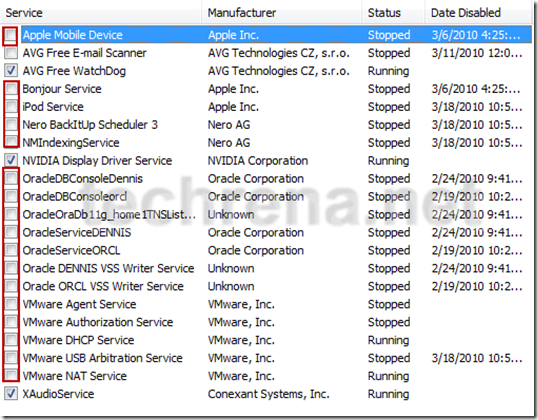
For example, I use the Oracle Database and VMware very rarely, but both of them are huge services which takes a lot of resources in the CPU and Memory. So, i choose not to start them. As I stopped these services then my Oracle Database and VMware will fail to run. So whenever I want to use any of these programs I will go to msconfig and check to start these services again. Then restart the computer and run the program. So keep in mind that you stop the services only which you rarely use.

Step 2: After detail study and analysis, you can stop the services by unchecking them in msconfig.

msconfig_services

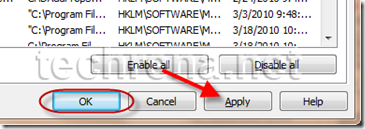
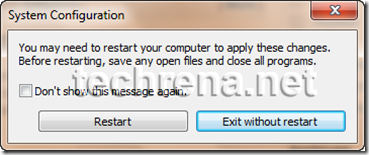
Finally you can Click Apply and OK, which will ask for restart. You need to restart if you want the changes you have made to be applied.

msconfig_apply_ok

msconfig_restart_exit

Important: Please note that removing a Program from startup and Stopping a service is very different. The Startup programs can be manually started, but services are not programs which can be run. Services are required to run the Programs installed in your computer. When a program which requires a services is started, only then the program’s service will be started For example, if VMware Player is started, then VMware services will also be started. But some essential services are always running in the system. Services which have been stopped by you cannot be started manually. Only by re including it in the starting services using msconfig, and upon restarting the system, the services can be started again by its programs.

You can definitely see the decrease in startup time and increase in performance of your system after applying the changes you have made using msconfig. If you have any doubt please leave a comment.

PS: The programs or services which I have removed from startup as shown above  need not be same as yours. It all depends upon your needs.

Disable Annoying “This Program Might Not Have Installed Correctly” Alerts

Windows logo

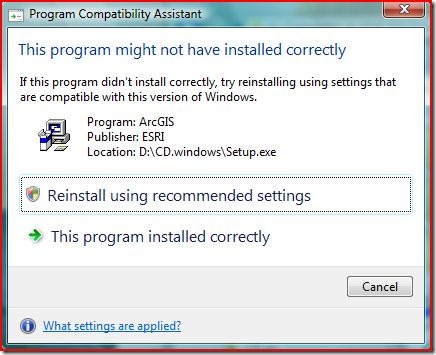
Program Compatibility Assistant is a service first introduced in Windows Vista and being continued in Windows 7.This service is intended to notify users when an installed program has some compatibility issues with the current operating system.Hence we see frequent Program Compatibility Assistant messages “This Program might not have installed correctly”.

If you install programs frequently (particularly when you install old versions of the programs) then you might be sick of these dialogue boxes and may want to disable these notifications.

This program might not have installed correctly error in Windows vista and Windows 7

There alerts are caused by a service called Program Compatibility Assistant (PCA) Service or PcaSVC in short.So stopping this windows service forever by changing the startup type to “Disabled” should serve the purpose.Follow these simple steps :

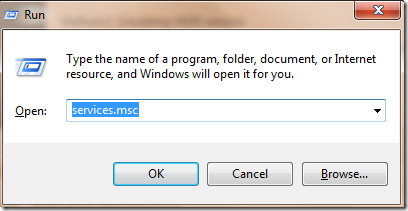
1. Press Windows + R button to start WIndows Run command.Type “services.msc” in the filed and click “ok”.

windows_run_command_services.msc

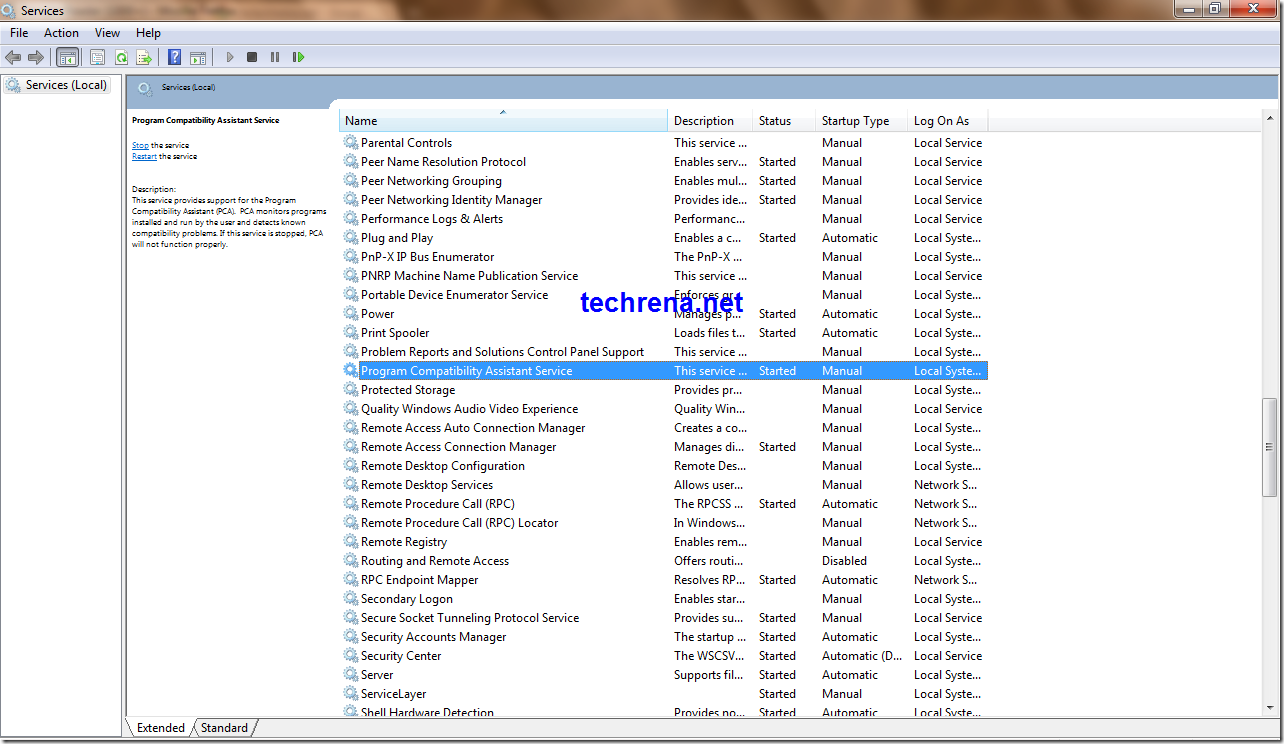
2. The Services window opens up.Find the service called “Program Compatibility Assistant Service” in the list.

Program Compatibility Assistant Service In Windows Services

Right click on the Program Compatibility Service and choose “properties” from the menu.

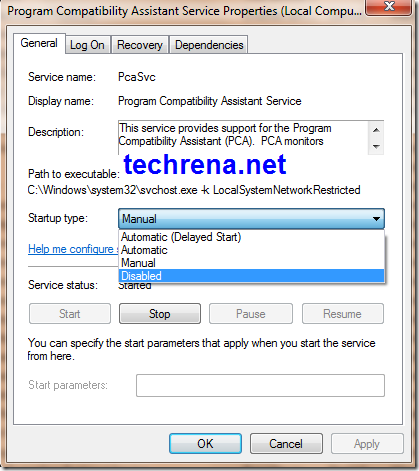
3. In the properties dialogue box, change the startup type to “Disabled” and click “Ok” to save the settings.

Program Compatibility Assistant Service Properties Window

It is that simple !! Now you have disabled the PCA service and no more annoying Program compatibility alerts for you.

Complete Tutorial: How To Disable Windows Error Reporting In Windows 7 ?

Microsoft Windows 7 Official Logo

Windows Error Reporting (WER), a technology (previously known as Dr. Watson),developed by Microsoft lets you report post-error debug information to the developer of the particular application that has just crashed or stopped responding.Windows Error Reporting has been introduced as a Windows service from Windows XP and is being continued in the later versions Windows Vista and Windows 7.By default, this Error Reporting service will be started automatically.

However for some reasons like you may get annoyed by frequent error reporting alerts or for privacy concerns etc., you may want to disable or stop Error Reporting in your Windows operating system (here it is Windows 7).If you are not sure how to stop Error Reporting in Windows 7, please do follow the steps outlined below:

Method-1: Using Action Center

1.Type “wer” in the Start menu search bar.Check the results obtained for this search in control panel (refer to the screen shots).

type wer in start menu

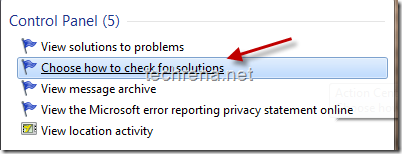
start menu search choose how to check solutions

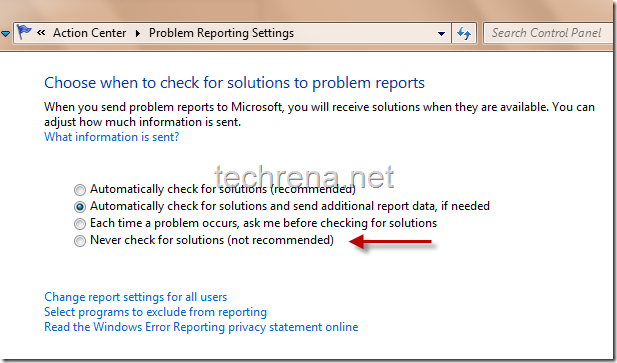
2.Click on the “Choose how to check for solutions” item in the search results.It will open up the “Problem Reporting Settings” under Windows Action Center.

problem reporting settings action center windows7

3. By default the first or second option (“Automatically check for solutions”) will be selected by your Windows.If you want Error reporting to be disabled, select the last option “Never check for solutions” for completely disabling it or select the third option “Each time a problem occurs, ask me before checking for solutions” for moderating the error reporting alerts.Click “Ok” button down the window once you have selected your option.

Method-2: Disabling WER service

Windows Error Reporting Service function:

“Allows errors to be reported when programs stop working or responding and allows existing solutions to be delivered. Also allows logs to be generated for diagnostic and repair services. If this service is stopped, error reporting might not work correctly and results of diagnostic services and repairs might not be displayed.”

We’ll try to achieve the same previous settings result but this time via disabling the Windows Error Reporting(WER) service.To do this, follow..

1. Press Windows button + R to open the Windows Run command.Type “services.msc” in the run command bar and hit ‘OK’.

windows run command services.msc

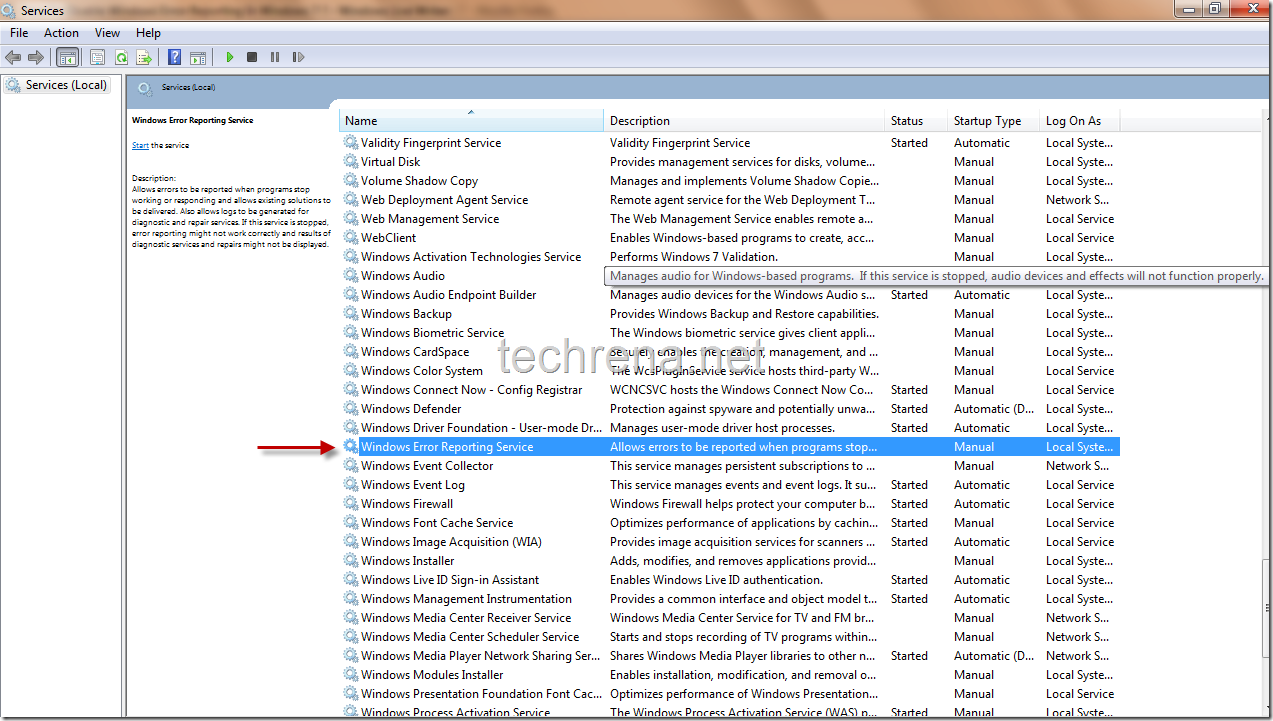
2. It will open up Services window, where you can see list of all the services that are currently available on your Windows.Find “Windows Error Reporting Service” in this list.

Windows Error Reporting Service

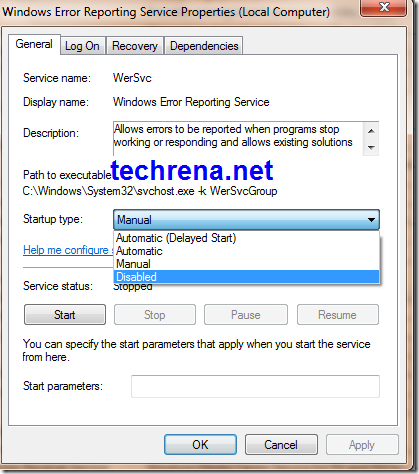
3. Right click on the Windows Error Reporting Service and choose “Properties’ that should open a new properties window.The startup type will be either in “Automatic” or “Manual” by default.To completely disable the service choose “Disabled” and press ok.

Windows Error Reporting Service Properties

That’s it, now you have disabled the Windows Error Reporting Service successfully.

Method–3: Using Registry Editor

Warning: Changing registry values without much knowledge will dump your entire Windows Operating system.Change them at YOUR OWN RISK.

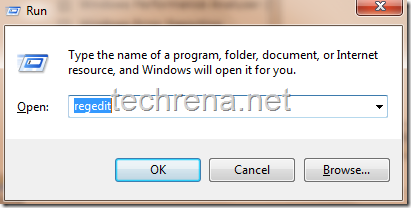
1. Type Windows + R as in the previous case to open Windows run command.Type “regedit” in the command bar.

regedit run command

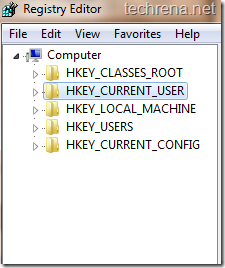
2.It will open up the Registry Editor window which will look like this.It contains three folders like navigable sub keys:

HKEY_CLASSES_ROOT ,

HKEY_CURRENT_USER,

HKEY_LOCAL_MACHINE,

HKEY_USERS,

HKEY_CURRENT_CONFIG.

Registry editor windows 7

HKEY_CURRENT_USER is the one we want.Click on it to expand the sub registry key.

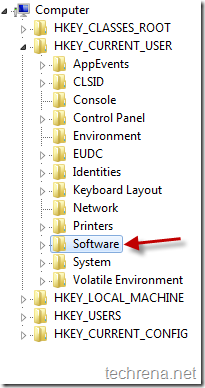
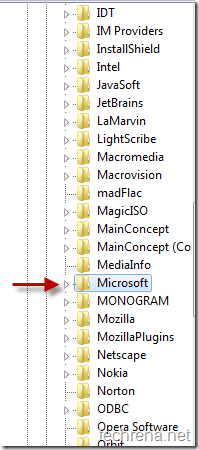
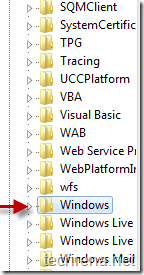
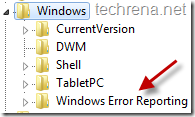
3. Navigate to HKEY_CURRENT_USER\Software\Microsoft\Windows\Windows Error Reporting sub key using the following screen shots carefully.

regedit HKCU navigation

regedit HKCU navigation 2 regedit HKCU navigation_3

regedit_HKCU_Windows_Windows_Error_Reporting_key

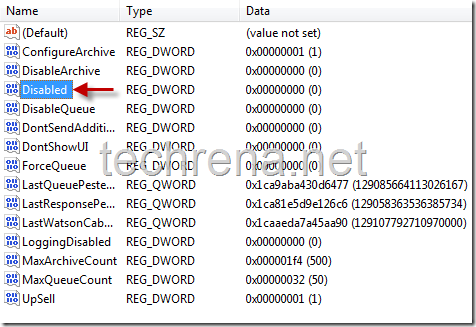
4. In the Dword list, find the registry entry by name “Disabled” (highlighted in the screen shot).By default the Date value of this dword will be “0” meaning that it is enabled.

Disabled dword in WER subkey

Right click on the “Disabled” DWORD and choose “Modify”.In the value data filed, change its value to “1” instead of “0”.Click on to reflect the changes.

Now you have successfully disabled WER.


You may also want to read our previous guides on A-Z of Installing Windows 7, Installing Windows 7 on USB stick, Activating Windows 7, Resetting Windows 7 password (when you forget it and unable to retrieve it), Creating desktop shutdown shortcut in Windows 7,Enabling GOD mode in Windows 7, Partitioning hard disk in Windows 7 , Restoring previous versions of files in Windows 7, Install and Run Windows XP in Windows 7 Using VMware Player and much more..

Feel free to leave a comment here if you find problem somewhere in following these methods.

Complete Tutorial: How To Install Windows 7

Installing an Operating System (OS) is not a very easy thing. Why? Because an OS deals directly with your computer hardware which is completely useless without a working OS. Another thing is OS installation needs to deal with your existing data in your hard drive. You need to format a drive partition for new OS installation, which is critical because your sensitive data may be lots in the process.

So in order to help you, you can just make yourself familiar with the whole installation process before actually starting the real installation. The process explained here is applicable to all the editions of Windows 7 for example, Windows 7 Ultimate, Home, Professional etc.

Before beginning the installation process decide in which partition you want to install the OS. Please back up all the critical data from the drive in which you want to install Windows 7. This tutorial is made for a fresh Windows 7 installation.

System Requirements:

1 gigahertz (GHz) or faster 32-bit (x86) or 64-bit (x64) processor
1 gigabyte (GB) RAM (32-bit) or 2 GB RAM (64-bit)
16 GB available hard disk space (32-bit) or 20 GB (64-bit)
DirectX 9 graphics device with WDDM 1.0 or higher driver

Note: We have tried installing Windows 7 in a 32-bit computer with just 512 MB RAM and it worked.

Carefully follow the step by step guide below. Click on the Screen shots to enlarge it.

Step 1: Insert to source of the Windows 7 installation to your computer(Powered Off). The source may be the Windows 7 installation DVD or a USB flash drive. If you want to install Windows 7 in a netbook then you need a flash drive.

If you need a Flash drive installation of windows 7 Click here

Step 2: Turn on your computer. Press the Boot menu key. (Usually Boot Menu key is the Esc Key). Select your source. If DVD then select CD-DVD Drive, flash drive then Select USB Removable Drive.
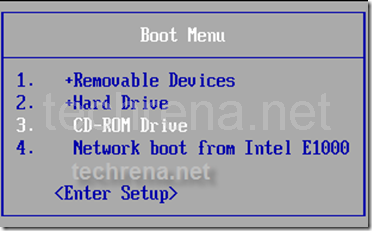
boot_menu

If it will shows Press any key to Boot, then press any key on your keyboard.

Press_any_key

Now it will load the files and Windows will start.

loading_files

Starting Windowssetup_is_starting

Step 3: Now select the language, time and Keyboard format. Click Next.
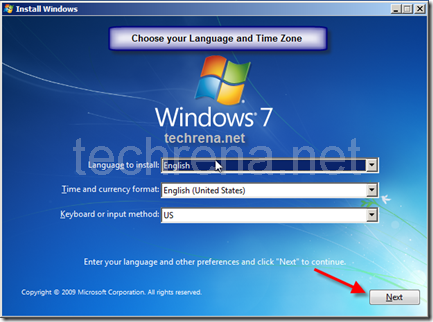
Install_windows_7

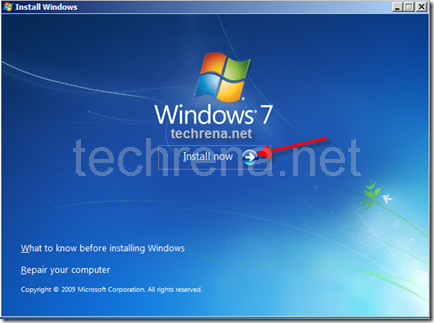
Click on Install Now.

Install_now_windows_7

Step 4: Accept the license agreement and Click on Next.
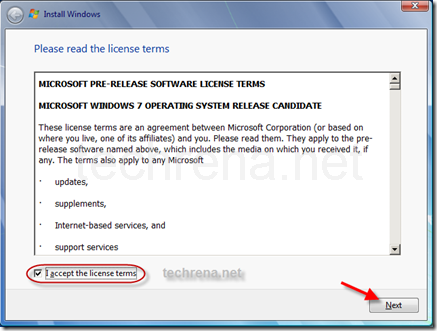
Install_windows_7_license

Step 5: This is a critical step. Upgrade needs to be selected if you want to keep your programs and files and upgrade to Windows 7. In a fresh installation you have to select Custom (advanced).
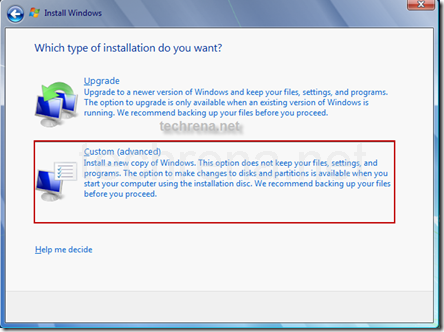
Install_windows_7_type

Step 6: Formatting a Hard drive partition to install Windows 7. You need to select and format the partition. You may have mare than one partition but select the one in which you want to install Windows 7. Click on Drive options to format.
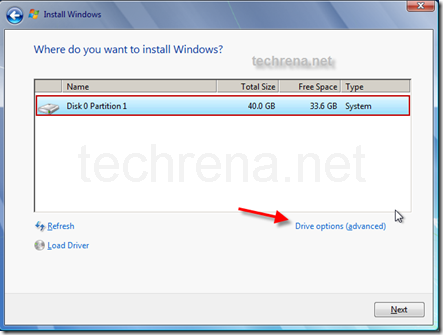
Install_Select_drive_windows_7

Select the Partition you want to format and Click on Format.
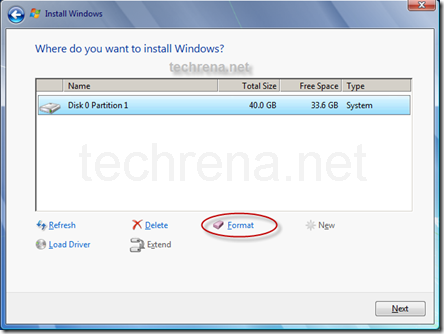
Install_windows_7_format_drive

It will ask for a confirmation. Click OK to confirm format. Once format is done, Click Next.
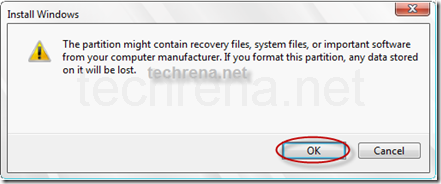
Install_windows_7_format_drive_ok

Now the Installation process starts. It may take a few minutes. The time taken varies according to your CPU and the source you are installing from(either USB or DVD). USB drive is faster.
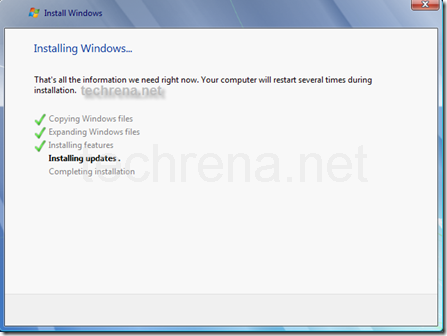
Intallation_process_windows_7

After Installing Updates the computer will restart.

Important Note: Please make sure that from this time onwards it boots from your Hard Drive.
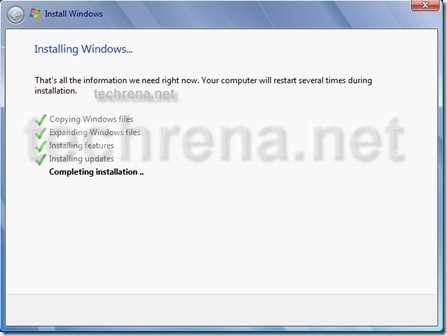
Completing_installation

install_windows_7_starting_services

Step 7: Type the user name and Computer Name. Click Next.
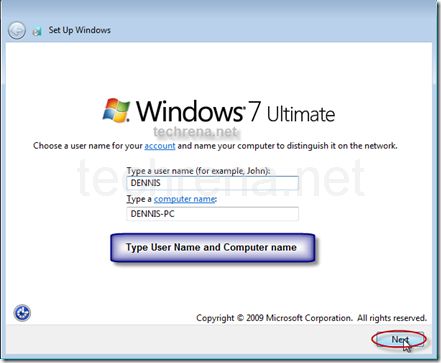
enter_name_windows_7

If you want you can set the password for the username. Make sure that you remember the password.
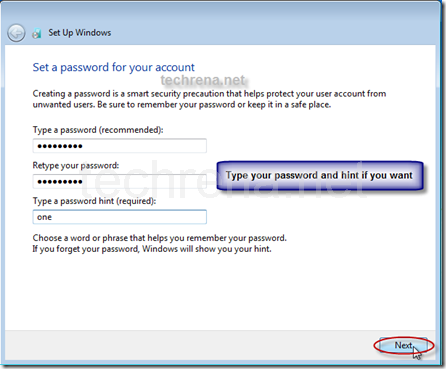
enter_password_windows_7

Step 8: Type your Windows 7 Product Key. This is an optional step. You can enter the key later also. If you want to do it later just leave the field blank and Click Next.

Note: Check Automatically activate Windows when I’m online if you want to activate the Windows by itself. If you want to do it manually, then uncheck it. Activation of Windows online is mandatory for Windows 7.
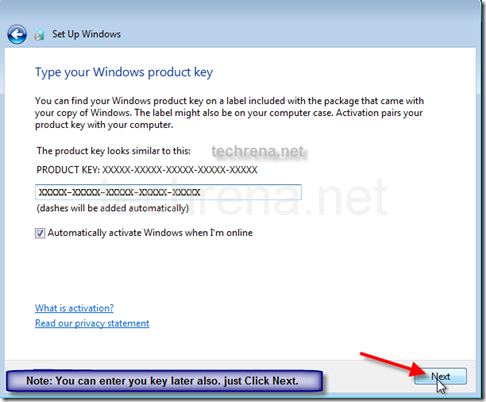
enter_product_key_windows_7

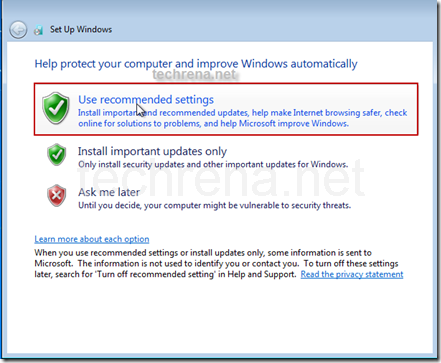
Step 9: You can select Use recommended settings. If you have a WLAN adapter, then it will ask you to select you network. Select one if you have a network.
Install_now_windows_7_settings

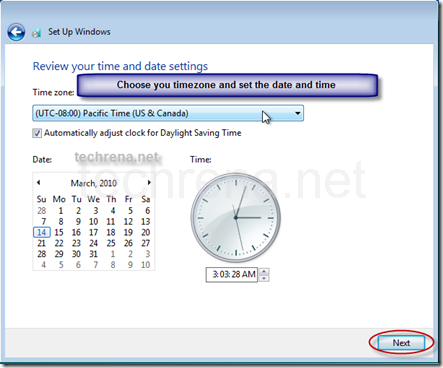
Step 10: Set the time and date. Click Next.
Install_windows_7_set_time_date

Now Windows will restart the computer, update your settings and prepare for the first use.
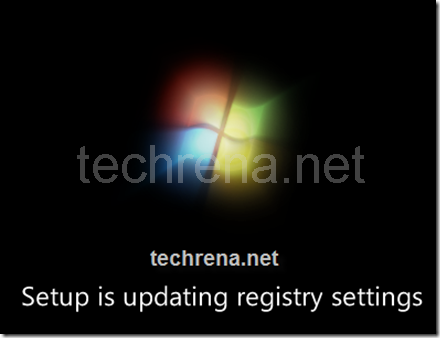
updating_registry

setting_up_for _first_start

Install_windows_7_prepare_desktop

Now you have successfully installed Windows 7. If you have any doubt please leave a comment. We will reply to you shortly.

You may fine the below posts interesting:

Boot And Install Windows 7 from USB Flash Drive (Pen Drive)

Install Windows XP Virtual PC in Windows 7 Using VMware Player

Windows 7 Activation Online
How to Activate Windows 7 Online
The new Windows 7 has an enhanced security feature. The Product Key which you enter while installing is not enough to activate Windows 7. You need to activate the key you have entered online within 30 days of the installation otherwise it will stop working.

So if you have installed Windows 7, then you need to activate Windows 7 online. This is applicable to all the editions of Windows 7 namely Starter, Home, Professional, Ultimate edition respectively.

Actually this activation process is done automatically whenever you are online. But if you had selected not to do so during installation you need to do it manually. You need not worry if you have a valid key. Just follow the simple steps below.

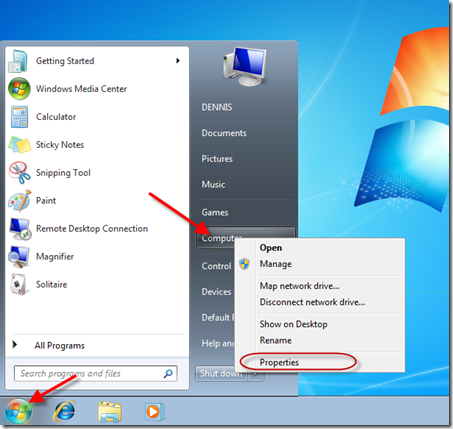
Step 1: Click on Start. In the Start Menu Right Click on Computer. Select Properties.

windows_7_computer_properties

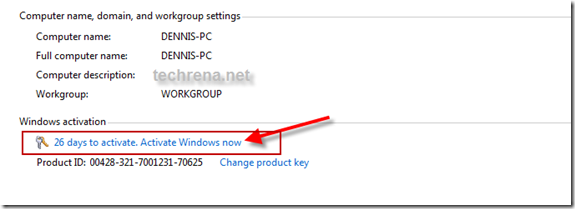
Step 2: In the System Properties Window, Click on Activate Windows now.

Activate_windows_7

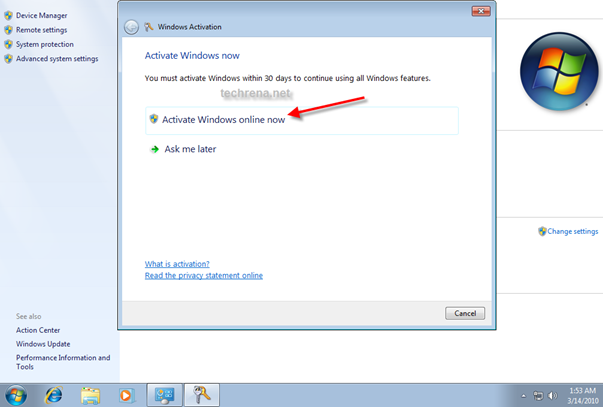
Step 3: In the Windows Activation window, Click on Activate Windows online now.

Activate_windows_7_online
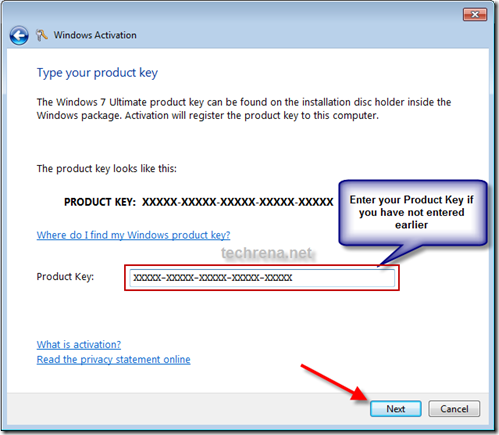
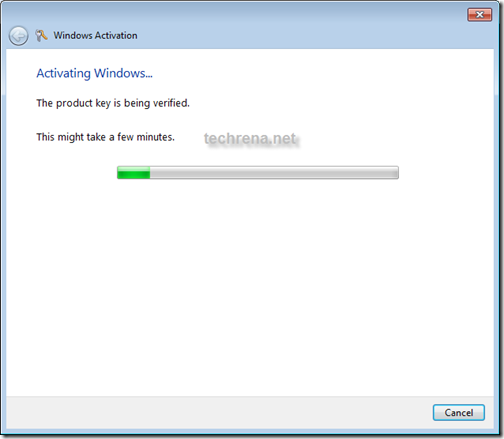
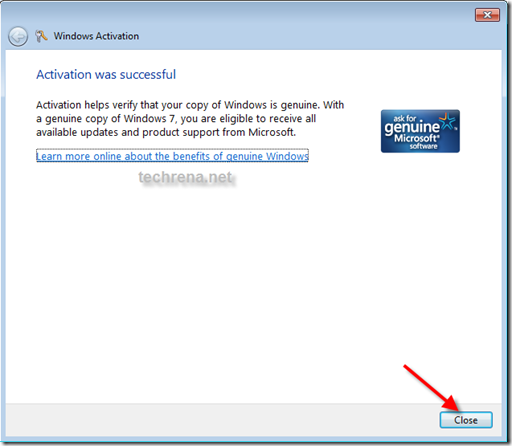
Step 4: If you had not entered the Product Key during Installation, it will ask for your key. Enter the key. Check if its correct. Now it will verify your key online and if your Product Key is valid it will show the success window.

Activate_windows_7_enter_key

Activate_windows_7_verify_product_key

windows_7_activation_successful

Now you can see the Windows Genuine Logo in you System Properties window.

Activated_windows_7

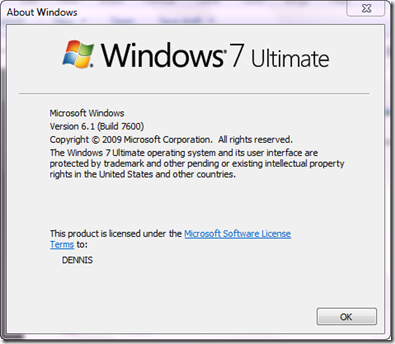
If you want to see the date of expiry of your Windows 7 then Press Start + R and type winver and press Enter. You can see the Version, Build and the Expiry Information. If your Windows is a full version then no expiry date will be present.

Windows_Version

You may find the below posts interesting:

Install Windows 7 from a Bootable USB drive or flash drive

Install and Run Windows XP in Windows 7 Using VMware Player

Windows Activation Technologies Update To Detect Pirated Copies Of Windows 7

How to Take Ownership and Grant Permissions to a File or Folder In Windows 7 or Vista

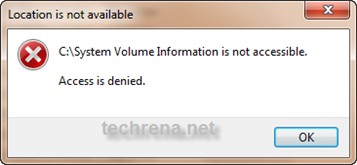
There are certain Files and folders in Windows that we cannot access, modify or delete. Such kind of files are system files which have limited access rights to the users.

But sometimes we need to access some files or change some file according to our need. Such an example is System Volume Information. This folder is not accessible but if we want to know how much size its taking and what files are there inside, we have to take ownership and grant access to this folder. Another example is with the mfpmp.exe file of Windows Media Player which users like to delete for problems with subtitles and all.

permission denied

So, here we have given the easiest way of taking ownership and granting full access to the files and folders in Windows 7 and Vista.

Method 1: Using Command Prompt. (Preferred One – easier)

Step 1: Open Command Prompt in Administrator Mode. Press Start + R,

Type cmd and Press Ctrl+ Shift + Enter.

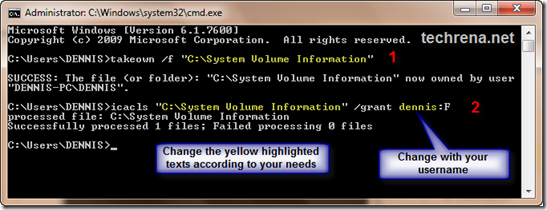
Step 2: In the Command prompt type takeown /f “location path +file name or folder name”. See the example below:

Step 3: Again type icacls “File or folder path and file name” /grant <user name>:F. Example:

This will look like:

take ownership of a folder

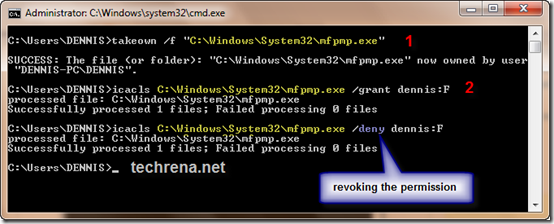
Same thing for a file. Below example is for mfpmp.exe.

take ownership of a file

To revoke the permissions just replace the grant with deny.

Note: If you have a space in Between your User name then put “”. Example:

icacls  “C:\\System Volume Information” /grant “Techrena dot Net” :F

Method 2: Using the properties menu.

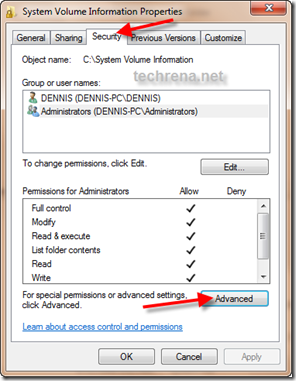
Step 1: Right Click on the File or Folder you want to own and select Properties.In the Properties go to Security Tab from General Tab. Then Click On Advance.

Take_ownership_setting_properties

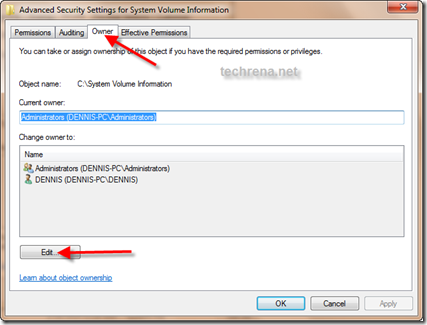
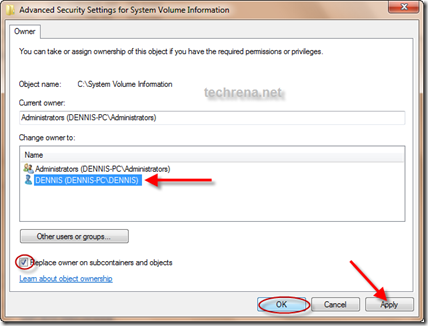
Step 2: In the advanced menu go to Owner tab, Click on Edit. Select your Username. If you want to own the Subfolders and files then Check the box. Click Apply and then OK.

edit_ownership

select_owner

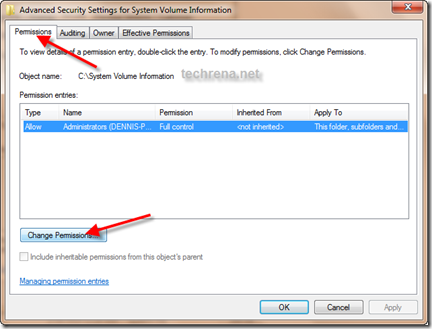
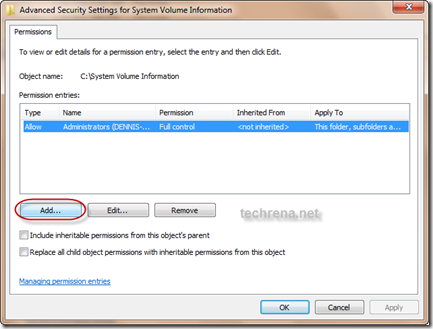
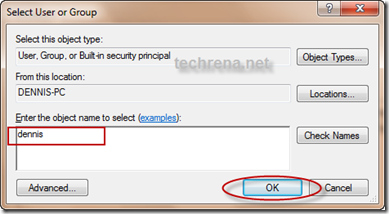
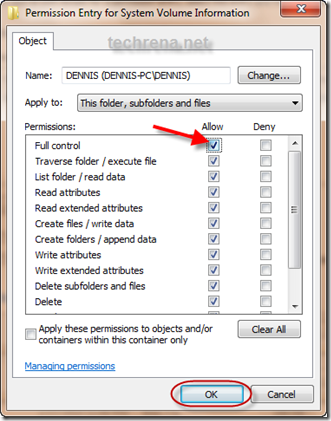
Step 3: Not to grant the permissions, Go to Permissions Tab. Click on Change Permission. Then Click on Add..Type your username and click OK. Now, it will show the Permissions Entry menu.  If you want Full control(Edit, Delete, Modify) then Check Full, else select the permissions you want. and click OK.

Chang_ File_Access_Permission

Add_user_permission

Type_username_permission

Selct_permission_type_fill_modify_read

Now you have successfully completed taking ownership of a file or a folder. You can do whatever you want with the file or folder.

Important Note: Please be careful with the System Volume Information folder. It was given here just as an example. Do not modify any permission to this folder as it contains all your system restore information. If you have changed to see the files, then please revoke the permissions after you are done. Any changes in the folder may lead to unwanted results especially in case of virus attacks,

Install Windows 7 or Vista Using Bootable USB Disk Drive

Installing an operating system to computers that don’t have an optical drive has been a problem. For example, if we want to install Windows 7 in netbooks like ASUS Eee PC, Dell Mini Netbooks, Acer Aspire One, HP Mini 1000 etc. , then we need to use a bootable pen drive to install it. With the release of the full version of Windows 7 and its gaining popularity, many people have decided to go for Windows 7 over Vista.

windows7_logo

Well the method given here is one of the easiest techniques known which does not need any kind of download and the clear screen shots have been given. The advantage of using this method is that, the whole process of installation finishes in lesser time than installing via an DVD.This method will also work for Windows Vista Installation. But if you want to install Windows XP using a flash drive then you can refer to this post: Install Windows XP from USB Disk Drive. Now lets Start.

Requirements:

1. A USB Drive of minimum 4GB space

2. Windows 7 installation DVD or ISO file (Back Up will also do)

Before starting, plug in your USB drive into your system.

Step 1: Open Command Prompt as Administrator. ( Press Start + R, then type cmd and Press Ctrl + Shift + Enter OR In the Start menu type cmd and Press Ctrl + Shift + Enter )

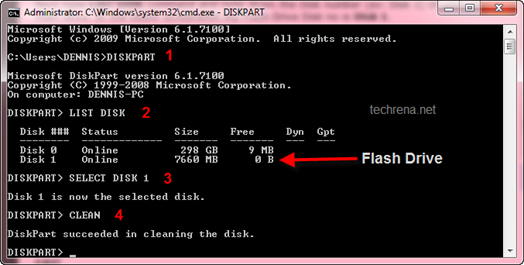
Step 2: After opening Command Prompt, Type the two commands below:

DISKPART

LIST DISK

Windows 7 install from usb

Step 3: Now you can see the disks present in your system. See the disk number for your drive. In my case the number is Disk 1. Enter the Commands below replacing the disk number with yours.

SELECT DISK 1

CLEAN

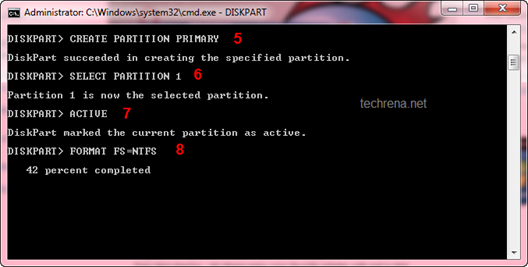
CREATE PARTITION PRIMARY

SELECT PARTITION 1

ACTIVE

Windows 7 install from usb

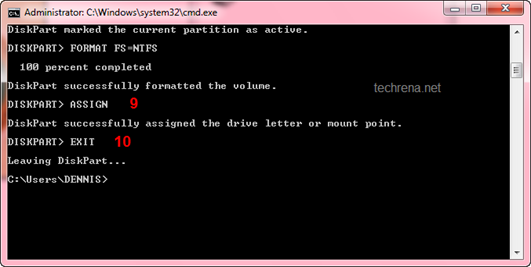
Step 4: Now we need to format the disk and then exit. It may take few minutes. Type the commands one by one:

FORMAT FS=NTFS

ASSIGN

EXIT

Windows 7 install from usb

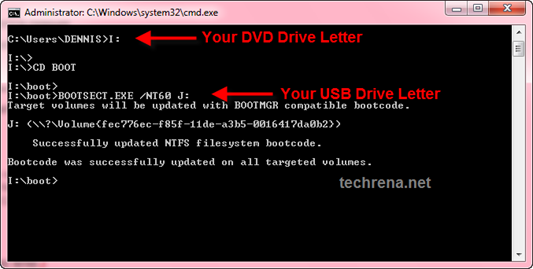
Step 5: Now insert your Windows 7 DVD to your Optical Drive or Mount your ISO file in the Virtual Drive(you can use Virtual Clone Drive ). Note the Drive letter of your DVD Drive and USB Flash Drive. Type the commands below, in the Command Prompt replacing the drive letters as yours. In my case they are I and J.

I:

CD BOOT

BOOTSECT.EXE /NT60 J:

Windows 7 install from usb

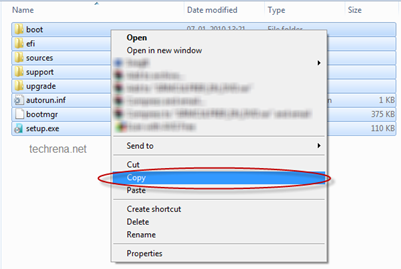
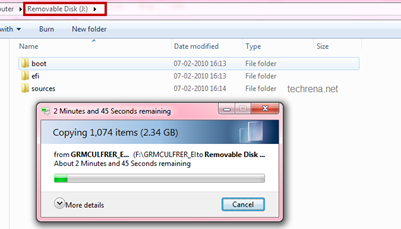
Step 6. Now copy all your Windows 7 DVD contents to the USB flash drive.

Windows 7 install from usb Windows 7 install from usb Windows 7 install from usb

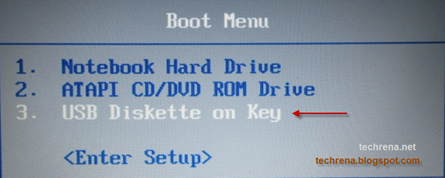
Step 7: Now your USB Drive is bootable. You can restart your computer and boot from the USB drive. In order to boot from your flash drive, you have to change the boot menu. Many computers have DELETE, F10, F2, F12, ESC keys as Boot menu key (the boot menu key information is usually displayed during Start Up). In the boot menu Select USB Diskette on Key and boot it from the USB.

Windows 7 install from usb

Now the Windows 7 installation will boot,  follow the instructions to install.

Do comment if you face any problem while executing the method.

Note:

1. If you have the installation file as a back up in your hard drive( not in the form of an ISO) then, in Step 5 execute the BOOTSECT.EXE command by changing the directory in the command prompt(use CD command) to the folder where your installation files are present.

2. You can use Microsoft USB DVD Download Tool as an alternative to this method.

3. This method will not work for Windows XP. If you want to install it then refer this post: Install Windows XP from USB Disk Drive

Install IIS Server in Windows 7

Internet Information Services (IIS) is a set of Internet based services from Microsoft. The services provided currently include FTP, FTPS, SMTP, NNTP, and HTTP/HTTPS. In Windows 7 the IIS program is already present, but it is not enabled or turned on by default when you install Windows 7.

It is now very easy to install IIS in Windows 7, without requiring to download anything. You just need to enable the Service in Control Panel.

Here we have given how to enable IIS feature in Windows 7.

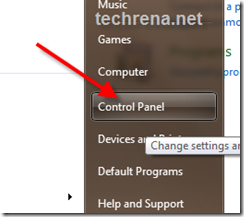
Step 1: Open Control Panel. Click on Start and click on Control Panel.

open control panel

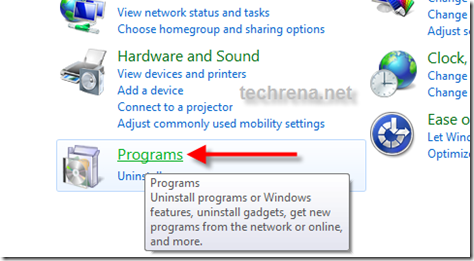
Step 2: In Control Panel look for Programs and click to open it.

programs in control panel

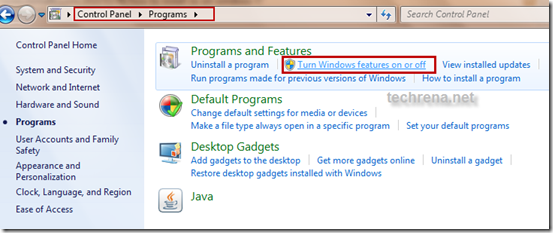
Step 3: In programs under Programs and Features you will find Turn Windows features on or off. Click on it. It will display the List of available Windows services.

Turn Windows features on or off

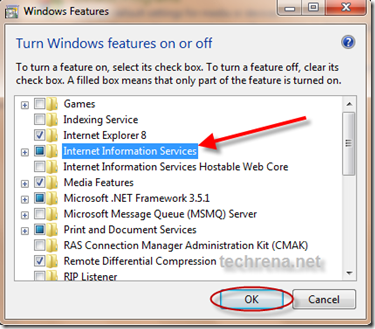
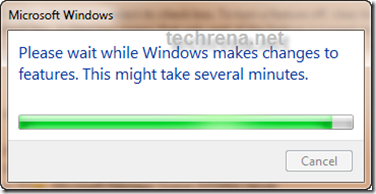
Step 4: Check the check box in Internet Information Services and Press OK. It may take some time to turn it on.

Windows features

Changing Windows features

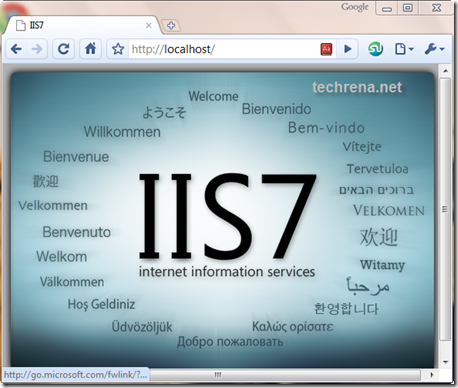
Now after successful installation Of IIS7 you can type http://localhost/ in your browser to check. It should display the IIS7 home page as shown below.

IIS7

Now as you have successfully installed IIS in your Windows you can start using the service.