Delete Hiberfil.sys from Windows 7, Vista & XP By Disabling Hiberation

hibernate

Running out of space in C Drive?

If you are running out of space in C drive and if you don’t want to delete or move any data from it, you can probably try these two things:

1. Disable System restore or delete the restore points.

2. Delete hiberfil.sys file from your hard disk.

HIBERFIL.SYS is a Windows system file managed by Windows for the purpose of Hibernating the system. Hibernation mode of Windows allows you to completely save the current process and power off your computer where the system will not require any power. During Hibernation the system will write the complete status and process of your computer and save it in the hard disk which is the hiberfil.sys.

While you start your computer, the system loads the status from the hard disk which was written in hiberfil.sys file.

HIBERFIL.SYS reserves around 2.5 GB in Windows 7 and Vista. And it takes 512 MB in Windows XP.

Important Note: You can delete hiberfil.sys only if you do not want to use the hibernation feature. Even if you delete the file you can still use the sleep mode. If you want to see the hiberfil.sys file in your C drive then you need to show system hidden files.

hiberfil_sys

How to delete HIBERFIl.SYS file from the your drive?

As hiberfile.sys is a system file we cannot delete it directly. So in order to delete it we need to disable the Hibernate feature in Windows.

Disable hibernation mode in Windows 7 and Vista:

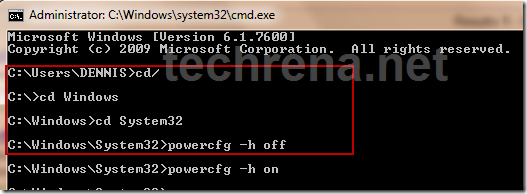
Open Command Prompt. Press Start + R. Type CMD and press Enter.

Type the following commands and Press Enter after each command:

cd/
cd Windows
cd System32
powercfg -h off

It will look like:

cmd_disable_hibernate

To turn on the Hibernate feature Type:

powercfg –h on

Disable hibernation mode in Windows XP:

In Windows XP it is easy. Follow the instruction below:

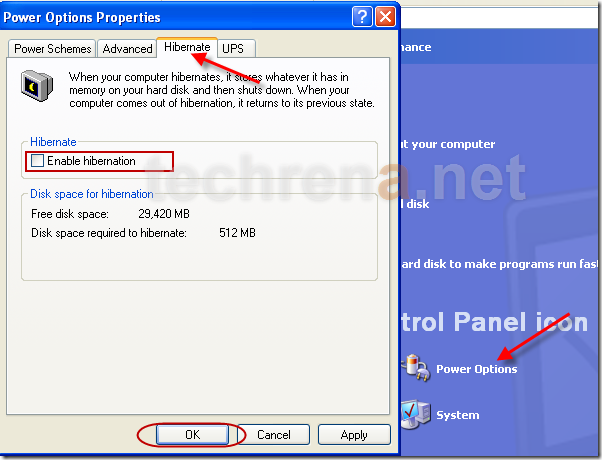
Open Start menu, Go to Control Panel. In control Panel, go to Performance and maintenance. Then Click Power Options

In power options windows, go to Hibernate Tab. Uncheck Enable hibernation and press OK.

disable_hibernate_xp

If you want to re enable hibernation, then check the check box and press OK.

Now after performing the steps, if you check your C drive, you will find that the hiberfil.sys file is gone.

Hope you have got some free space at least for now 🙂

How to Create a Password Reset USB Disk in Windows 7 And Vista

Have you ever faced a problem of forgotten password in your Windows PC? If yes better have a backup plan now itself. Here we are going to tell you, how you can reset your Windows password using a reset password disk. This feature is available in Windows 7 and Vista only.

You can backup your user identity in a USB disk and use the disk for resetting your Windows user password in the future in case you have forgotten it. For this purpose you need not use a high capacity USB drive. You can either use your old USB which are considered obsolete or too small in size like 128MB or buy a small capacity one at lower cost. This is because the reset file if very small and you need to store the USB device in your locker or any other safer place.

Requirements:

A USB Flash Drive(Any size)
Windows 7 or Vista Operating System

Important: Once a password reset disk has been created, no matter how many times the password has been changed after that, you can reset the password using the Disk any number of times. In order to avoid misuse of the device, keep it in a safe place.

Password Forgotten Before Creating the Password Reset Disk?

Follow this link: Reset Windows XP, Vista, 7 Password Using USB Drive or CD

Follow the steps to create a Password Reset disk using Windows Forgotten Password Wizard:

Step 1: Connect the USB Flash Drive to your PC.

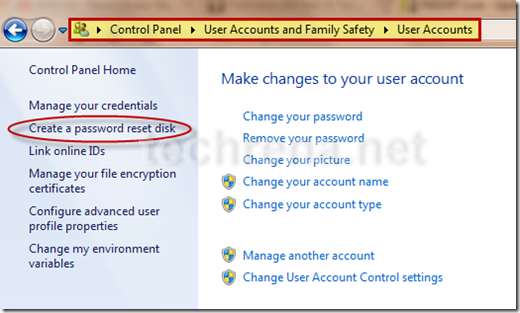
Step 2: Open Start Menu, click on Control Panel. In Control Panel go to:

Control Panel—>User Accounts and Family Safety—>User Accounts

Step 3: In the left pane of User Accounts, click on Create a password reset disk.

User_accounts

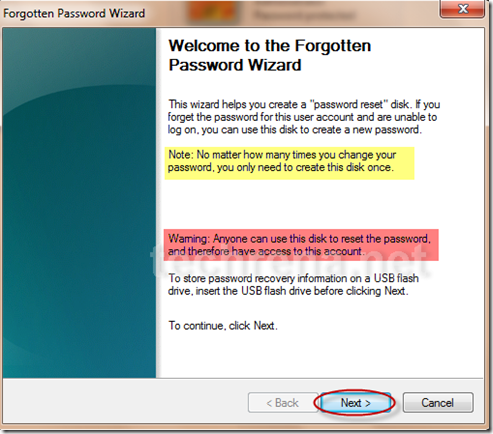
Step 4: Now in the Forgotten Password Wizard, read the Important notes and warnings and Click on next.

forgotten_password_wizard

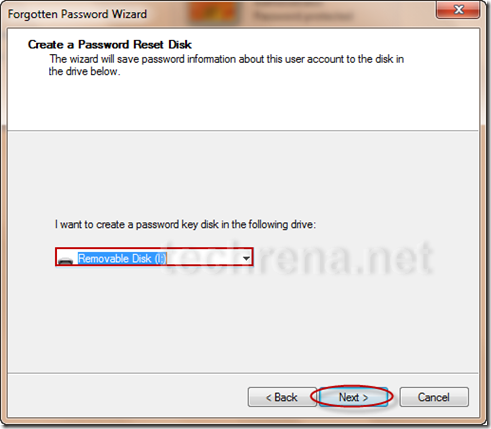
Step 5: It will ask you for the USB drive letter in which you want to store the password reset file. Select the correct drive and click on Next.

select_drive_forgotten_password_disk

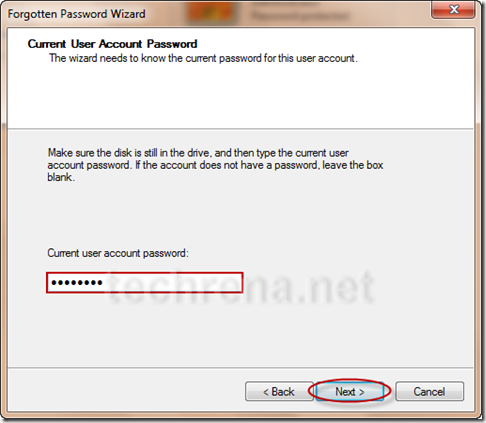
Step 6: Now it will ask for the current password. Enter the correct password and click next.

enter_current_password

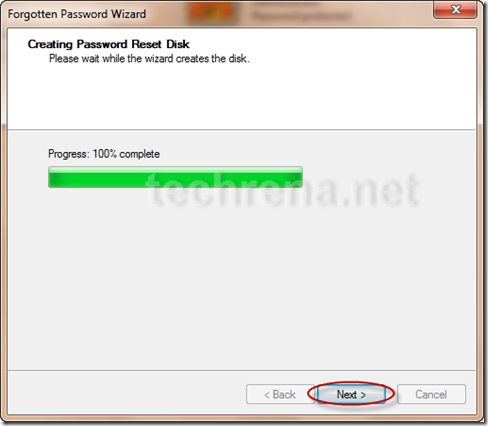
Step 7: Once it completes the creation process, click on finish.

create_password_reset_disk

What you have to do when you have forgotten your password?

Now if you have forgotten the password, you can use the Reset disk. When Windows asks you for the login password, plug in your Password Reset Disk and wait for a while. Try entering any wrong password. Now below the password field, a link as Reset Password… will come up. Click on it and enter a new password.

Note: If you do not have a Password Reset Disk, you can try: Reset Windows XP, Vista, 7 Password Using USB Drive or CD

Speed Up Your PC Using a USB flash Drive in Windows 7 and Vista With ReadyBoost

If you have a low memory in your Windows 7 PC, your system may be slow and the performance may not be satisfactory. Microsoft Windows has introduces a new component known as ReadyBoost, to help when your PC’s memory is running low.

ReadyBoost is a component of Microsoft Windows, first introduced with Microsoft’s Windows Vista in 2006 and bundled with Windows 7 in 2009. It works by using flash memory, a USB flash drive, SD card, CompactFlash, external hard drive or any kind of portable flash mass storage system as a drive for disk cache.
ReadyBoost is also used to facilitate SuperFetch, which allows it to perform analysis of boot-time disk usage patterns and creates a cache which is used in subsequent system boots. SuperFetch is a technology that pre-loads commonly used applications into memory to reduce their load times, in a similar fashion to the preload in Linux.

Using ReadyBoost-capable flash memory (NAND memory devices) for caching allows Windows 7 and Vista to service random disk reads with performance that is typically 80-100 times faster than random reads from traditional hard drives.

Using ReadyBoost in Windows 7 and Vista:

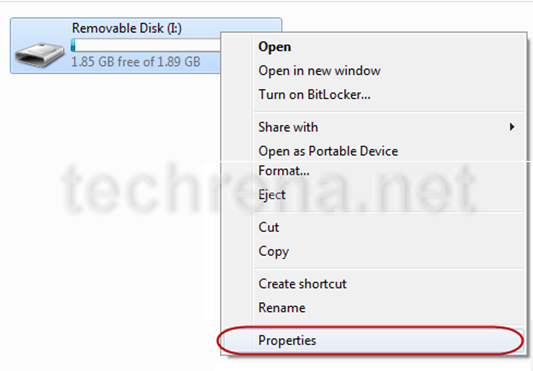
First plug in your USB flash drive. Open My Computer. You can see the Removable Disk. Right Click on it and Select Properties.

removable_disk_properties

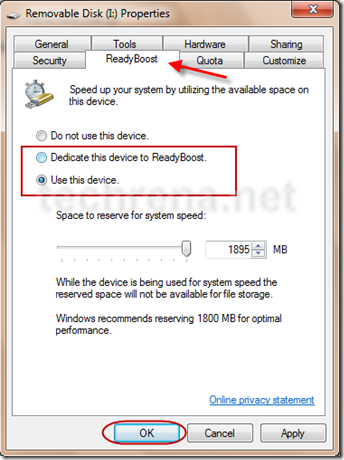
Now in the Properties window, go to ReadyBoost Tab. You can either select Dedicate this device to ReadyBoost or Use this device and set the amount of space you want to use for the process.

ReadyBoost

Now Windows will use the free space available in your flash drive for speeding up your computer.

Note that this process will not delete any data from your flash drive. It will only use the available free space in the removable disk.

Moreover if you want to speed up your boot up and startup, you need to use MSConfig.

Adding Your Feed Subscriptions Windows 7 Feed Headlines Sidebar Gadget

If you are using either Windows 7 or Windows Vista, you might be knowing about a desktop sidebar widget called “Feed Headlines”.By default this gadget will show pre-loaded RSS feeds from various popular news and other websites like MSN, CNN etc.,.But have you ever thought about controlling these feeds adding your own feed subscriptions from your favorite RSS feed reader instead ??

That would be great, right? Here we are going to show how to setup your “Feed Headlines” gadget to show feeds from your feed subscriptions (using OPML file) :

Pre-requisite: An OPML file exported from your RSS feed reader

Step 1: Open your Internet Explorer (possibly Internet explorer 8), find a button called “Favorites” and click on it to expand its options.

favorites button in internet explorer

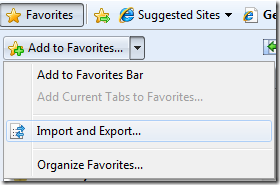
Step 2:  As shown in the following screen shot, find “Import and Export” option from the menu.

import export favorites in internet explorer

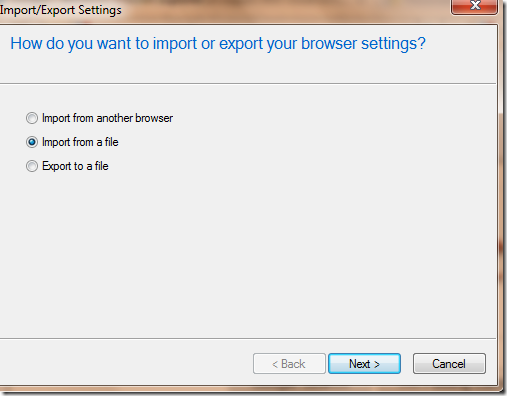
Step 3: Choose the option “Import from a file” in the next window.

import export favorites settings in internet explorer

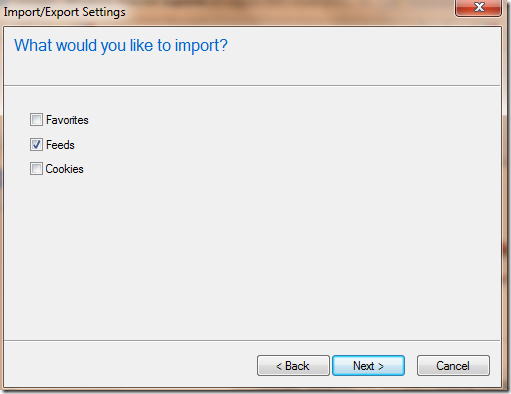
Step 4:  In the next step, you will be asked “What would you like to import? ”, select the option “Feeds”.

Import/Export settings in Favorites settings

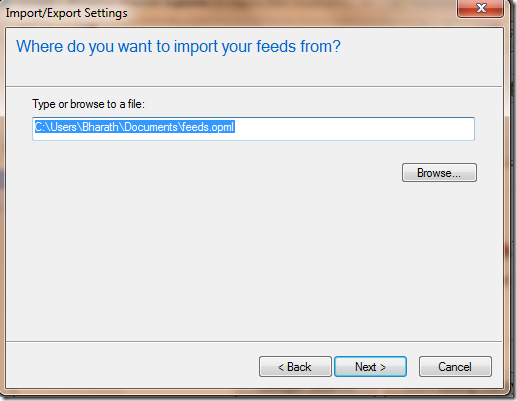
Step 5:   Now locate the “OPML” file that you have got from your favorite feed reader.(Read the guide to export as OPML from feed readers).

importing_feeds_internet_explorer_favorites

Step 6: Select a destination folder for your imported feeds and click “Next”.

selecting destination folder for feeds import ie favorites

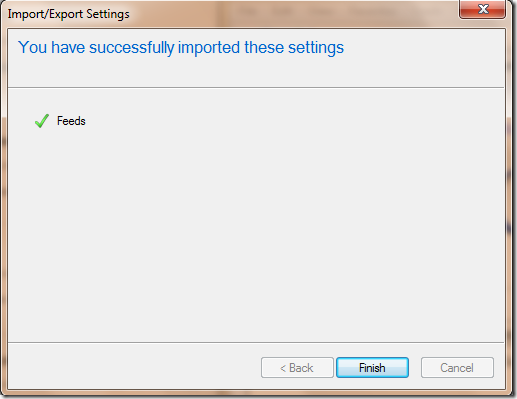
Step 7: Now you have successfully imported your feed subscriptions from a feed reader.

feeds successfully imported to internet explorer favorites

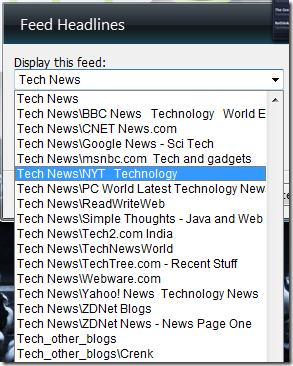
Step 8: Go to your Feed Headlines gadget and choose the feed subscriptions folders from which you want your gadget to display feeds.

Feed Headlines gadget choose feed folders

That’s it from the settings side, now go check your feed headlines gadget, which is supposed to show feeds as shown here in the following screen shot.

Feed Headlines Sidebar gadget

This is a simple and straight forward process.However if you face any difficulties while doing this, let me know through your comments.

How To Speed Up Your Windows PC Using MSCONFIG

In Windows system configuration is done using MSCONFIG. MSCONFIG is very useful to the Windows users to configure their system properties. We can configure all the system properties from boot up, startup till services to be run in your computer. A properly configured system will have optimal performance and proper memory usage.

This tutorial is about Speeding up your PC and increasing the performance level by removing unnecessary programs from startup and stopping unused services. By doing these things you can see the difference in startup time and the amount of physical memory used and even CPU usage.

This guide consists of two main parts:

1. Removing unnecessary programs from startup.

2. Stopping unused or rarely used services in your system.

Please note that this tutorial is just a guide. You need to analyze properly by yourself which programs or services to be stopped, which are required and which are not required.

We will start with the first one:

Removing unnecessary programs from startup

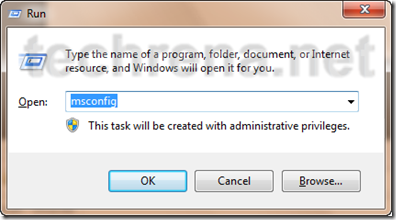
Step 1: Open System Configuration. Press Start + R, Type msconfig and click OK.

run_msconfig

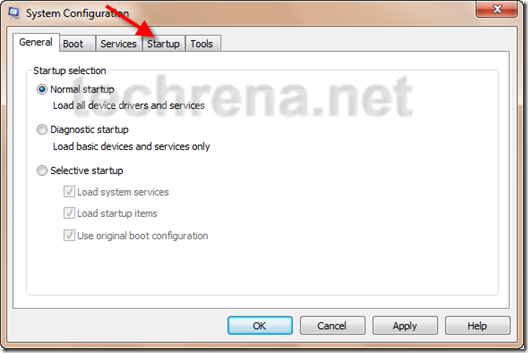
Step 2: You can see the General Tab in Systems Configuration. Go to Startup Tab.

msconfig_home

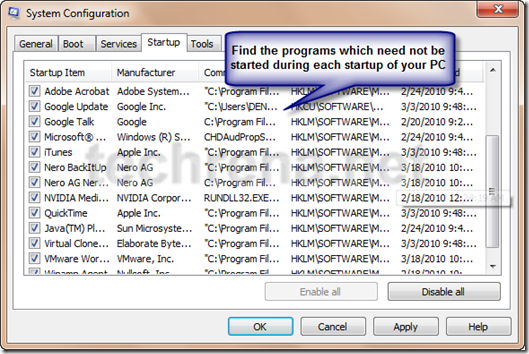
msconfig_startup

You need to study the requirement of the programs, whether you need to start them during startup or not. You need to start your Virus Protection programs compulsorily. Remove any program which doesn’t have a proper description and which you do not know the functionality of the program. IF you know some programs which you rarely use, you can remove them as well. Do not forget to remove any suspicious program which may be a virus.

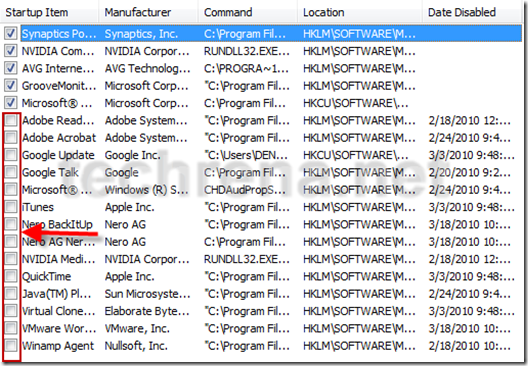
Step 3: After the analysis, uncheck the programs which you need not start during the startup of your computer.

msconfig_startup_programs

Now you have successfully configured your startup programs according to your needs.

Stopping unused or rarely used services in your system.

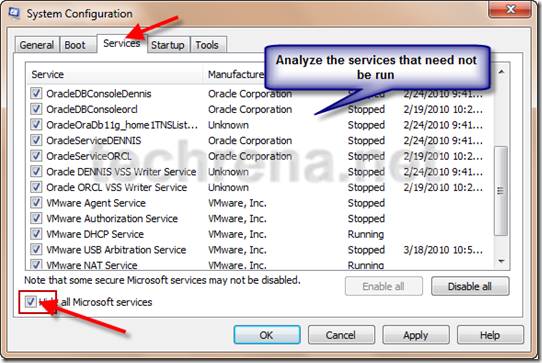
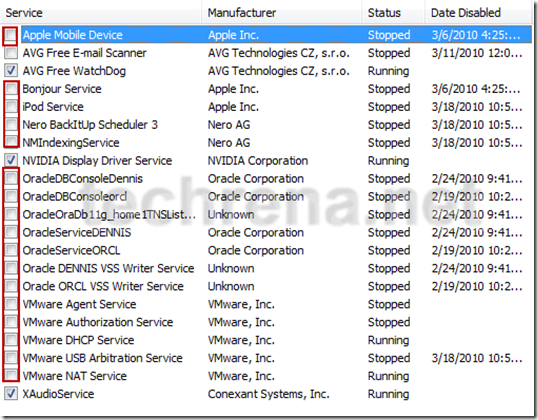
Step 1: Go to the Services tab. There you can see the various services which can run in your system. Again you need to analyze which services are not used or which are rarely used and not required.

msconfig_services_tab

For example, I use the Oracle Database and VMware very rarely, but both of them are huge services which takes a lot of resources in the CPU and Memory. So, i choose not to start them. As I stopped these services then my Oracle Database and VMware will fail to run. So whenever I want to use any of these programs I will go to msconfig and check to start these services again. Then restart the computer and run the program. So keep in mind that you stop the services only which you rarely use.

Step 2: After detail study and analysis, you can stop the services by unchecking them in msconfig.

msconfig_services

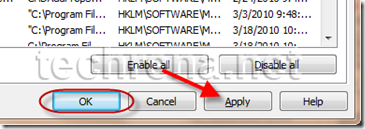
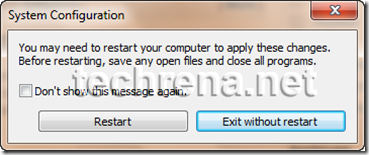
Finally you can Click Apply and OK, which will ask for restart. You need to restart if you want the changes you have made to be applied.

msconfig_apply_ok

msconfig_restart_exit

Important: Please note that removing a Program from startup and Stopping a service is very different. The Startup programs can be manually started, but services are not programs which can be run. Services are required to run the Programs installed in your computer. When a program which requires a services is started, only then the program’s service will be started For example, if VMware Player is started, then VMware services will also be started. But some essential services are always running in the system. Services which have been stopped by you cannot be started manually. Only by re including it in the starting services using msconfig, and upon restarting the system, the services can be started again by its programs.

You can definitely see the decrease in startup time and increase in performance of your system after applying the changes you have made using msconfig. If you have any doubt please leave a comment.

PS: The programs or services which I have removed from startup as shown above  need not be same as yours. It all depends upon your needs.

Disable Annoying “This Program Might Not Have Installed Correctly” Alerts

Windows logo

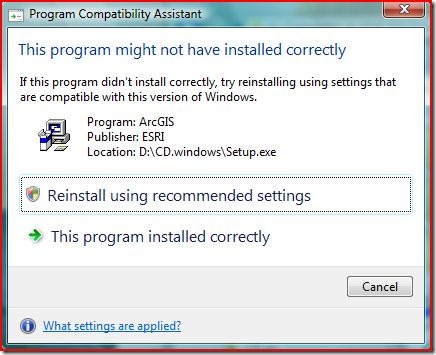
Program Compatibility Assistant is a service first introduced in Windows Vista and being continued in Windows 7.This service is intended to notify users when an installed program has some compatibility issues with the current operating system.Hence we see frequent Program Compatibility Assistant messages “This Program might not have installed correctly”.

If you install programs frequently (particularly when you install old versions of the programs) then you might be sick of these dialogue boxes and may want to disable these notifications.

This program might not have installed correctly error in Windows vista and Windows 7

There alerts are caused by a service called Program Compatibility Assistant (PCA) Service or PcaSVC in short.So stopping this windows service forever by changing the startup type to “Disabled” should serve the purpose.Follow these simple steps :

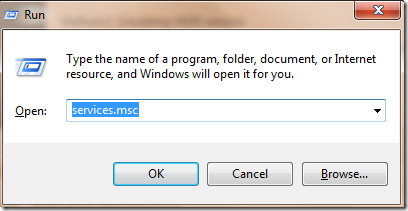
1. Press Windows + R button to start WIndows Run command.Type “services.msc” in the filed and click “ok”.

windows_run_command_services.msc

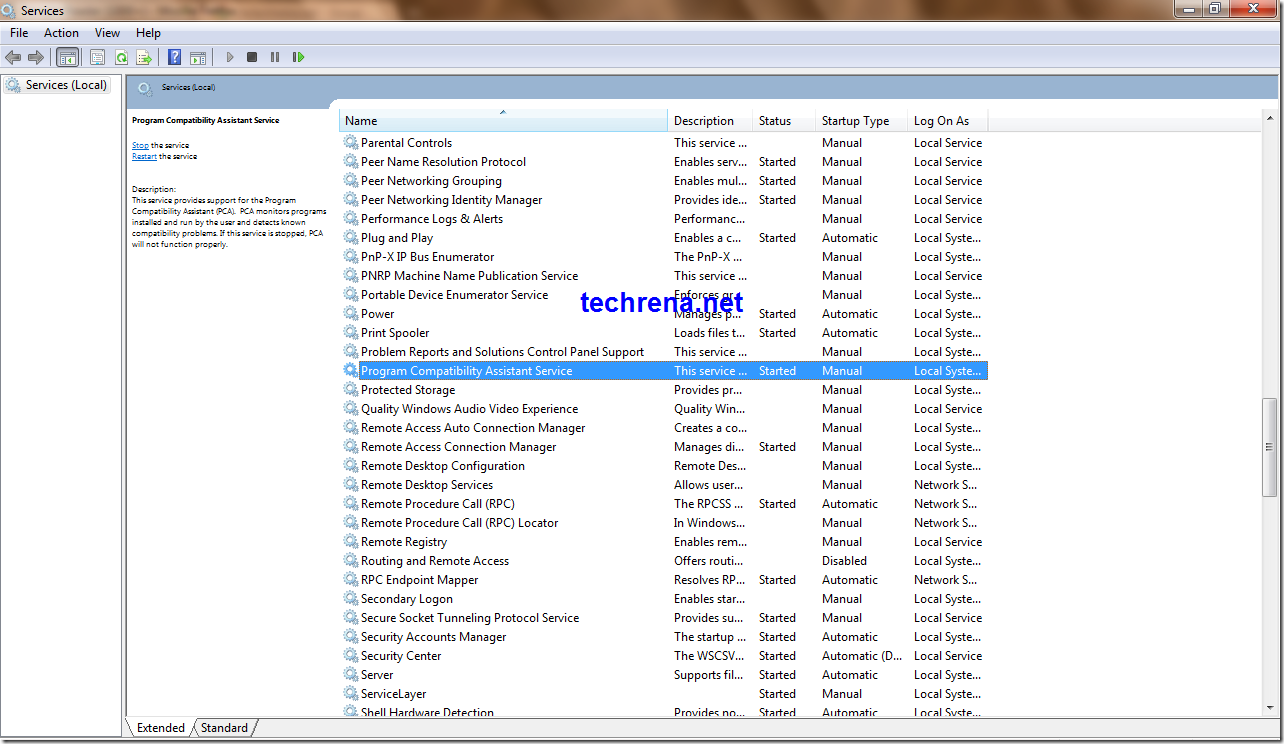
2. The Services window opens up.Find the service called “Program Compatibility Assistant Service” in the list.

Program Compatibility Assistant Service In Windows Services

Right click on the Program Compatibility Service and choose “properties” from the menu.

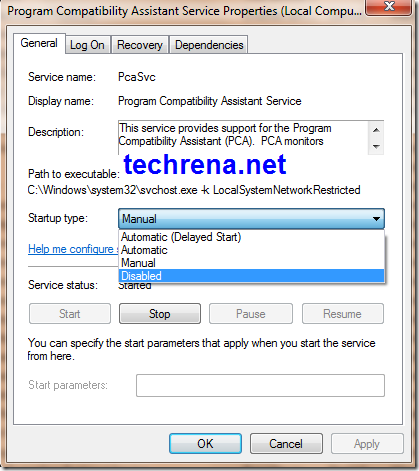
3. In the properties dialogue box, change the startup type to “Disabled” and click “Ok” to save the settings.

Program Compatibility Assistant Service Properties Window

It is that simple !! Now you have disabled the PCA service and no more annoying Program compatibility alerts for you.

How to Take Ownership and Grant Permissions to a File or Folder In Windows 7 or Vista

There are certain Files and folders in Windows that we cannot access, modify or delete. Such kind of files are system files which have limited access rights to the users.

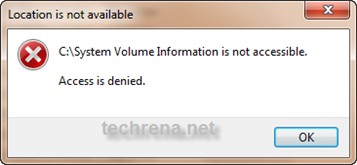
But sometimes we need to access some files or change some file according to our need. Such an example is System Volume Information. This folder is not accessible but if we want to know how much size its taking and what files are there inside, we have to take ownership and grant access to this folder. Another example is with the mfpmp.exe file of Windows Media Player which users like to delete for problems with subtitles and all.

permission denied

So, here we have given the easiest way of taking ownership and granting full access to the files and folders in Windows 7 and Vista.

Method 1: Using Command Prompt. (Preferred One – easier)

Step 1: Open Command Prompt in Administrator Mode. Press Start + R,

Type cmd and Press Ctrl+ Shift + Enter.

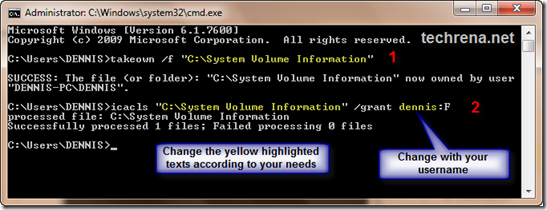
Step 2: In the Command prompt type takeown /f “location path +file name or folder name”. See the example below:

Step 3: Again type icacls “File or folder path and file name” /grant <user name>:F. Example:

This will look like:

take ownership of a folder

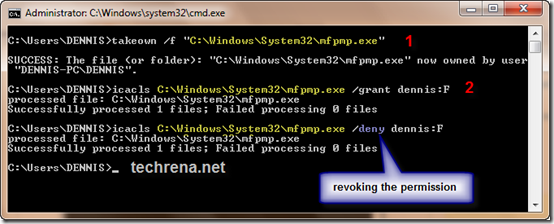
Same thing for a file. Below example is for mfpmp.exe.

take ownership of a file

To revoke the permissions just replace the grant with deny.

Note: If you have a space in Between your User name then put “”. Example:

icacls  “C:\\System Volume Information” /grant “Techrena dot Net” :F

Method 2: Using the properties menu.

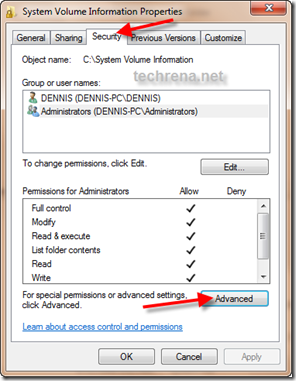
Step 1: Right Click on the File or Folder you want to own and select Properties.In the Properties go to Security Tab from General Tab. Then Click On Advance.

Take_ownership_setting_properties

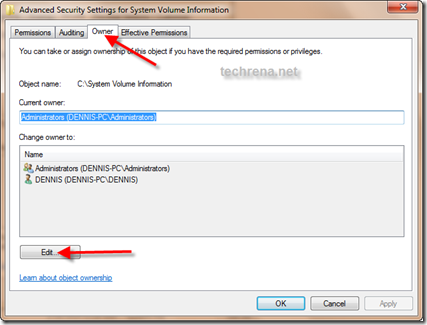
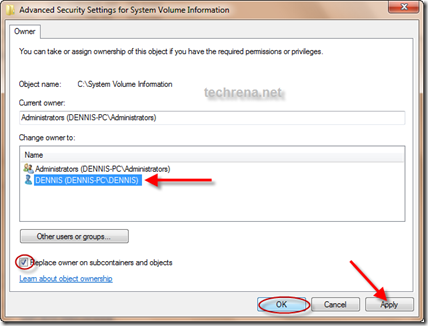
Step 2: In the advanced menu go to Owner tab, Click on Edit. Select your Username. If you want to own the Subfolders and files then Check the box. Click Apply and then OK.

edit_ownership

select_owner

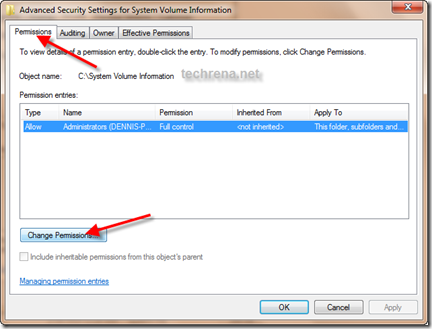
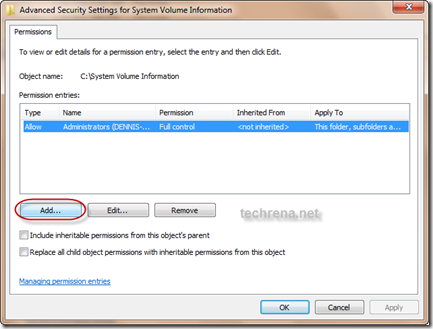
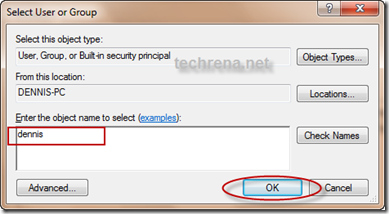
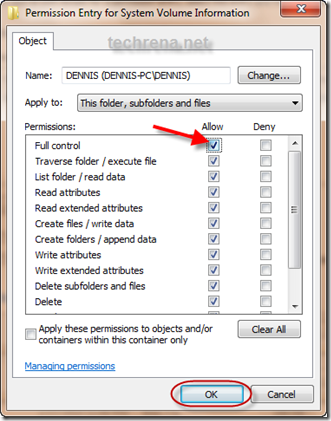
Step 3: Not to grant the permissions, Go to Permissions Tab. Click on Change Permission. Then Click on Add..Type your username and click OK. Now, it will show the Permissions Entry menu.  If you want Full control(Edit, Delete, Modify) then Check Full, else select the permissions you want. and click OK.

Chang_ File_Access_Permission

Add_user_permission

Type_username_permission

Selct_permission_type_fill_modify_read

Now you have successfully completed taking ownership of a file or a folder. You can do whatever you want with the file or folder.

Important Note: Please be careful with the System Volume Information folder. It was given here just as an example. Do not modify any permission to this folder as it contains all your system restore information. If you have changed to see the files, then please revoke the permissions after you are done. Any changes in the folder may lead to unwanted results especially in case of virus attacks,

Install Windows 7 or Vista Using Bootable USB Disk Drive

Installing an operating system to computers that don’t have an optical drive has been a problem. For example, if we want to install Windows 7 in netbooks like ASUS Eee PC, Dell Mini Netbooks, Acer Aspire One, HP Mini 1000 etc. , then we need to use a bootable pen drive to install it. With the release of the full version of Windows 7 and its gaining popularity, many people have decided to go for Windows 7 over Vista.

windows7_logo

Well the method given here is one of the easiest techniques known which does not need any kind of download and the clear screen shots have been given. The advantage of using this method is that, the whole process of installation finishes in lesser time than installing via an DVD.This method will also work for Windows Vista Installation. But if you want to install Windows XP using a flash drive then you can refer to this post: Install Windows XP from USB Disk Drive. Now lets Start.

Requirements:

1. A USB Drive of minimum 4GB space

2. Windows 7 installation DVD or ISO file (Back Up will also do)

Before starting, plug in your USB drive into your system.

Step 1: Open Command Prompt as Administrator. ( Press Start + R, then type cmd and Press Ctrl + Shift + Enter OR In the Start menu type cmd and Press Ctrl + Shift + Enter )

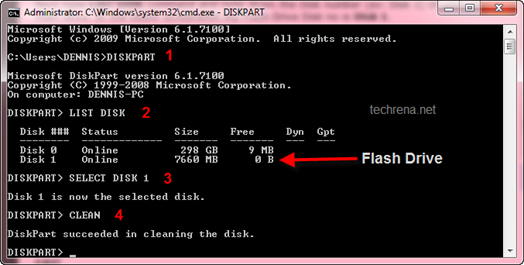
Step 2: After opening Command Prompt, Type the two commands below:

DISKPART

LIST DISK

Windows 7 install from usb

Step 3: Now you can see the disks present in your system. See the disk number for your drive. In my case the number is Disk 1. Enter the Commands below replacing the disk number with yours.

SELECT DISK 1

CLEAN

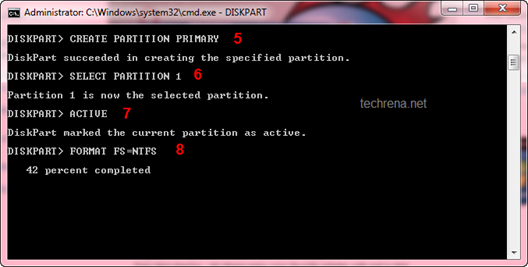
CREATE PARTITION PRIMARY

SELECT PARTITION 1

ACTIVE

Windows 7 install from usb

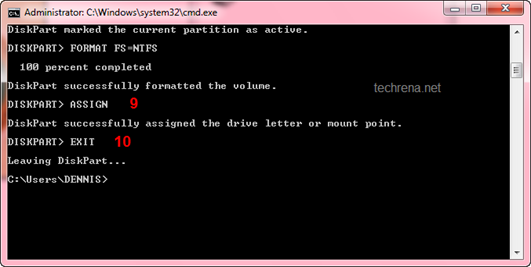
Step 4: Now we need to format the disk and then exit. It may take few minutes. Type the commands one by one:

FORMAT FS=NTFS

ASSIGN

EXIT

Windows 7 install from usb

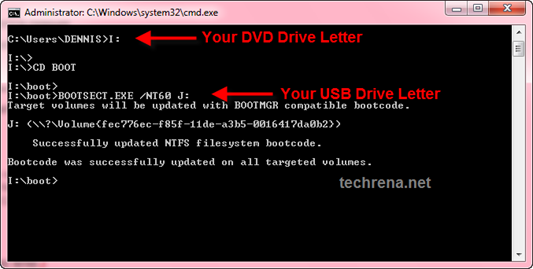
Step 5: Now insert your Windows 7 DVD to your Optical Drive or Mount your ISO file in the Virtual Drive(you can use Virtual Clone Drive ). Note the Drive letter of your DVD Drive and USB Flash Drive. Type the commands below, in the Command Prompt replacing the drive letters as yours. In my case they are I and J.

I:

CD BOOT

BOOTSECT.EXE /NT60 J:

Windows 7 install from usb

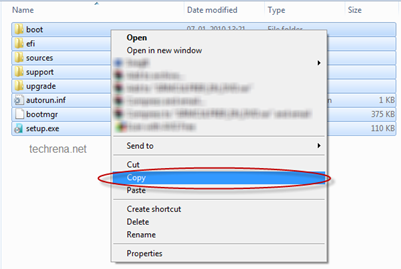
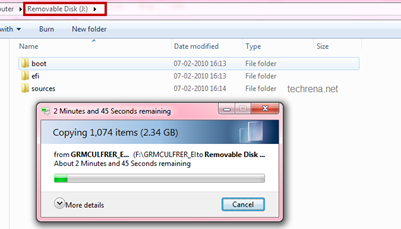
Step 6. Now copy all your Windows 7 DVD contents to the USB flash drive.

Windows 7 install from usb Windows 7 install from usb Windows 7 install from usb

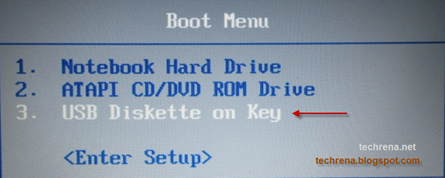
Step 7: Now your USB Drive is bootable. You can restart your computer and boot from the USB drive. In order to boot from your flash drive, you have to change the boot menu. Many computers have DELETE, F10, F2, F12, ESC keys as Boot menu key (the boot menu key information is usually displayed during Start Up). In the boot menu Select USB Diskette on Key and boot it from the USB.

Windows 7 install from usb

Now the Windows 7 installation will boot,  follow the instructions to install.

Do comment if you face any problem while executing the method.

Note:

1. If you have the installation file as a back up in your hard drive( not in the form of an ISO) then, in Step 5 execute the BOOTSECT.EXE command by changing the directory in the command prompt(use CD command) to the folder where your installation files are present.

2. You can use Microsoft USB DVD Download Tool as an alternative to this method.

3. This method will not work for Windows XP. If you want to install it then refer this post: Install Windows XP from USB Disk Drive

Partition Hard Disk Drive in Windows 7 Using Disk Management

Creating and partitioning Hard Disk Drives have become very easy in Windows 7 and Vista with its inbuilt Disk Management. We do not need any third party software to create and format Disks in Windows 7. Previously we used to rely on software like Partition Magic etc. but now it has become very easy.

For those who are completely new to partitioning Disk drives, before starting the steps understand the following example:

If you have a drive, say C drive of 200GB and you want to partition it into two more drives, then you need to shrink C drive first. Suppose you have shrunk it to 100GB, then you will have 100GB of unallocated space. Now you can create new drives from the unallocated space, say first one for 60GB drive, and then you can create the second drive for 40GB. Totally you will have three drives now of 100, 60 and 40 GB respectively, after completing the process.

Follow the steps below to shrinking existing drives and creating new partitions in Windows 7.

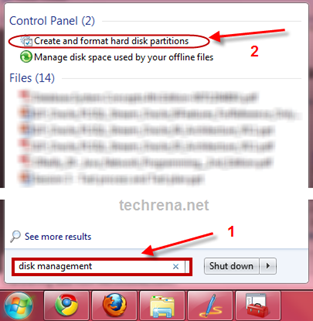
Step 1: Click Start and type DISK MANAGEMENT in the search box. Click “Create and format hard disk partitions” from the search results.

Hard Disk partition in Windows 7

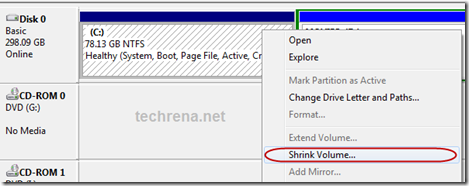
Step 2: After opening Disk Management successfully, you can see the existing drives in your system. Right click on the drive you want to shrink. Click on Shrink Volume. It may take few seconds to configure the available shrinkable volume.

Hard Disk partition in Windows 7

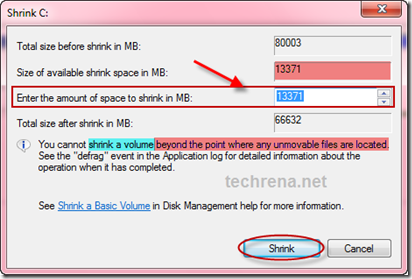
Step 3: Now type in the amount of space(in MB) you want to shrink. It should be less than or equal to the available shrink space. Then click Shrink.

Hard Disk partition in Windows 7

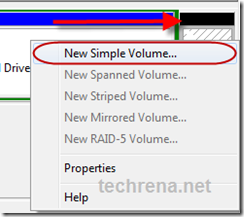
Step 4: After shrinking the volume, you will find a new volume in the right side labelled as Unallocated Space(the one with BLACK colored label). Right click on it, and select New Simple Volume.

Hard Disk partition in Windows 7

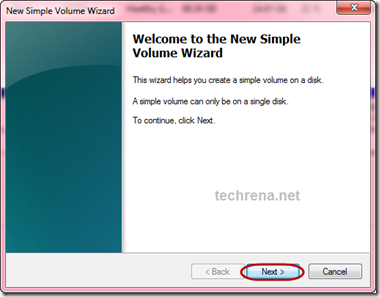
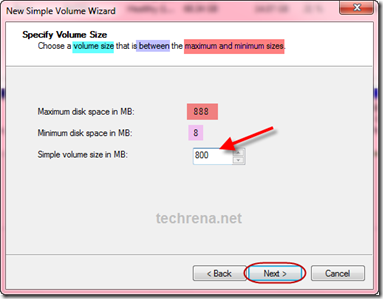
Step 5: Click next in the New Simple Volume Wizard. Then enter the size of the new partition you want to create. It should not exceed the maximum sizes.

Partition Disk Windows 7 e Hard Disk partition in Windows 7

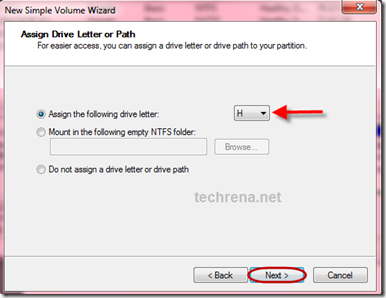
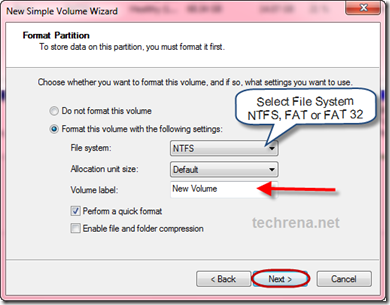
Step 6: Select the Drive letter you want to assign, then click next. Now, select the file system. Usually, we use NTFS(more common) or FAT32.  Type in the Volume label, then click next to format the partition.

Hard Disk partition in Windows 7

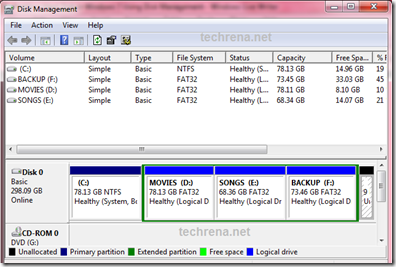
Hard Disk partition in Windows 7 After the formatting is done a new disk drive can be seen. That’s it you have successfully partitioned your hard disk drive. I have created four drives for my computer which is shown below:

Disk Management

Note: This steps will also work in Windows Vista but not in Windows XP.

How to turn off UAC in Windows 7 and Vista

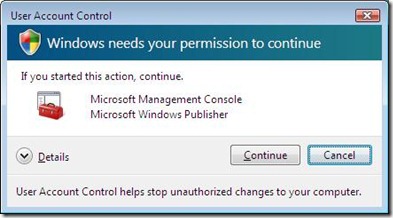
Are you getting annoyed of the permission dialogues like “Windows needs your permission to continue”?

If yes, you can easily disable these messages in Windows 7 and Vista.

This is a new security feature and can be controlled using the User Account Control(UAC) Settings.

The dialogue boxes looks like the one shown below.

You can follow the steps below and easily remove the messages every time.

Windows needs your permission to continue

If you are using Windows 7 then it is very easy.Follow the steps below:

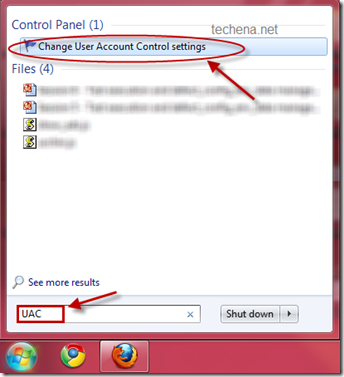
Step 1: Click Start Button. Type UAC in the search box of the Start Menu and press enter. You can see the UAC panel as shown below.

User Account Control from start menu

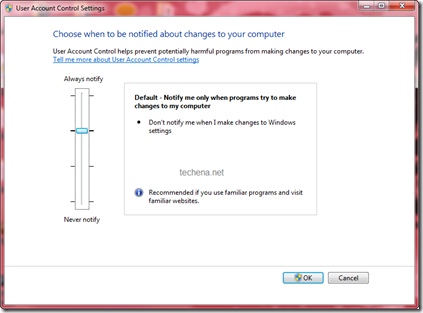
User Account Control Settings

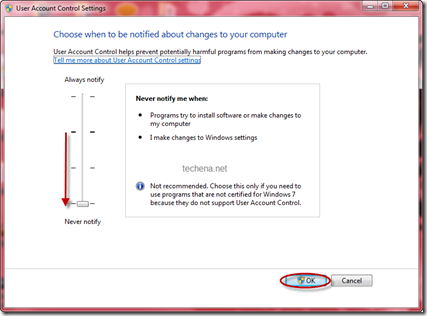
Step 2: Now drag the slide to Never notify and click OK.

User Account Control Never Notify

Now you can restart the computer and you will not see any more permission dialogues.

If you are using Windows Vista, then follow the steps below:

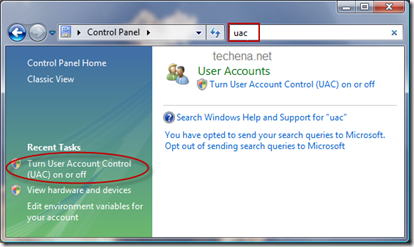
Step 1: Open Control Panel. Type UAC in the search box. Click the “Turn User Account Control (UAC) on or off” link in the left pane.

User Account Control panel

Step 2: Uncheck the “Use User Account Control (UAC)” checkbox and click OK.

User Account Control Check box

Now you can restart your Computer.

Note: Some functionalities like Windows Side Bar may stop working if you keep the UAC as Never notify. In that case you can refer this post to enable the sidebar: Enable Windows 7 Sidebar in easy steps