Display Windows 7 Build And Version Number On Desktop

Windows logo

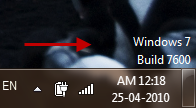
Users who have earlier used Windows 7 beta test versions, might have observed a watermark on the right extreme of their desktop showing the current Windows 7 version and build number.However this has been removed in the Windows 7 final releases that we have been using right now.

However, to display this sort of watermark on the desktop would actually help the network administrators in troubleshooting the windows errors.This is particularly true if the client is located at a farhter place from the administrator and the administrator wants to know the which version and build of the Windows that the client is using.

There’s a simple registry tweak that makes this display watermark to appear on the Windows 7 desktop right above the task tray.Just follow the simple steps briefed below to apply this trick.

This trick applies to Windows 7, Windows Vista & Windows XP based computers.

Note: Please be cautious that you are going to work on the registry editor, any errant changes to the registry editor would result in a complete mess.Do make a backup of registry editor before starting this.

Steps:

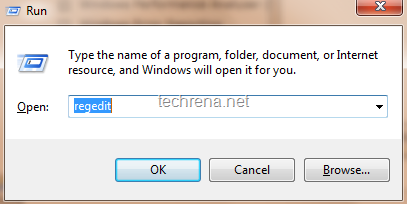
1. Open run dialog box by pressing Windows key + R and type “regedit”, click “OK”.

regedit run command

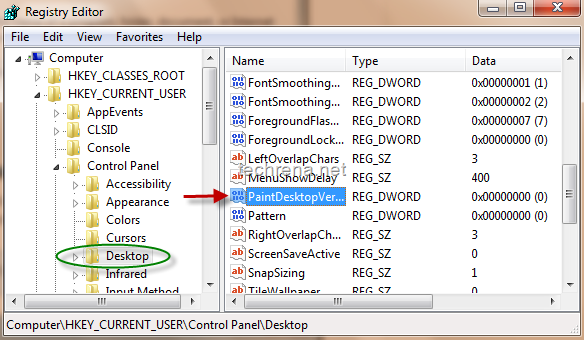
2. In the registry editor, navigate to the following path:

HKEY_CURRENT_USER\Control Panel\Desktop

paintDesktopVersion regedit Windows 7

Point to "the key “PaintDesktopVersion” , right click on it and select “Modify” (or alternatively double click on it)

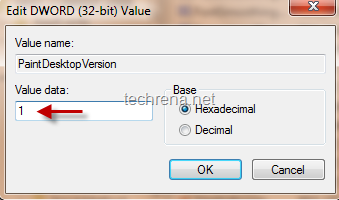
3. Change its DWORD (32-bit) value to “1” instead of “0” and click OK.

paintDesktopVersion regedit Windows 7 change value

4. You may need to restart your system to see the Windows 7 version & build number watermark on your desktop.

windows 7 build info

How to Remove Alureon rootkit To avoid BSOD Crashes in Windows

Windows Update

This is a very important note for all the Windows users especially 32-bit, that before installing the security updates that Microsoft Windows had released last week, you check if the malware known as Alureon Rootkit is present or not and remove it using the Microsoft Windows Malicious Software Removal Tool.  If the malware is present in your system and if you happen to install the security update (KB977165) then there is a high possibility that Windows may crash and it may show only a blue screen during startup (Blue Screen Of Death BSOD).

Alureon Rootkit or Win32/Alureon.gen causes problems with the way Microsoft’s patches interact with the kernel, which has led the company to include a package detection logic that prevents the installation of the security update if the rootkit is present on 32-bit systems.

Windows Crash Reported after installing Security updates:

Windows systems crashed during the latest Microsoft security update last week. According to Microsoft this happened because the systems were infected with a rootkit program that made changes to the operating system kernel and it was not due to the update patches.

“The restarts are the result of modifications the Alureon rootkit makes to Windows Kernel binaries, which places these systems in an unstable state,” Mike Reavey, director of the Microsoft Security Response Center, wrote in a blog post. “In every investigated incident, we have not found quality issues with security update MS10-015.”

Download:

Microsoft Windows Malicious Software Removal Tool

Remove Alureon rootkit To avoid BSOD Crashes in Windows

Install Portable Antivirus on a USB Flash Drive or an iPod

clamwin_portable

What will happen if your System is infected with viruses and the Antivirus you had installed failed to protect? In several cases, the virus may also disable any anti virus programs that you may try to run to disinfect.

Can we use a portable anti virus program which is installed in a USB Flash drive to scan our computer? The answer is a definite Yes! This is an easy way to disinfect an infected computer using a USB disk or your iPod.

ClamWin has come up with such an anti virus application. ClamWin Portable is a popular ClamWin antivirus packaged as a portable app, so you can take your antivirus with you to scan files on the go. You can place it on your USB flash drive, iPod, portable hard drive or a CD and use it on any computer, without leaving any personal information behind.

See the details below to install the free anti-virus in your portable USB device.

Requirements:

Windows XP, Vista or 7 Operating System

USB Flash Drive, Disk with Minimum 30MB free space

Step 1: Download ClamWin Portable from the link below:

Size: 6MB

Link: Click here to Download ClamWin Portable 0.95.3

Step 2: Connect your USB device. Then go to the downloaded file. Double click on the exe file.

Step 3: Start the installation process. Select the correct location where the application is to be installed. Then click on Install.

choose_location_clamwin]

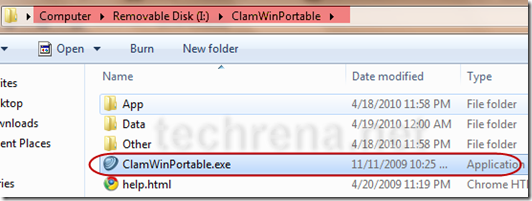
Step 4: Now after successfully installing the application, go to the location where you have installed it. Double click on ClamWinPortable.exe to start the application.

start_clamwinportable

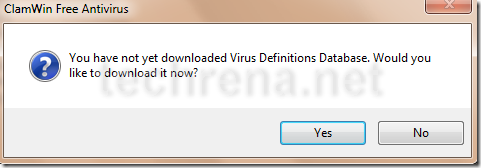
Step 5: On first startup it will ask you to download the Virus Definition database. Click on yes.

download_virus_definition_database

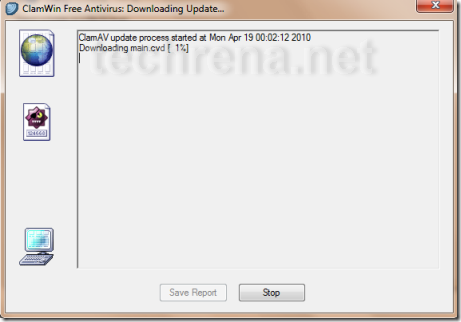
Step 6: Now it will download the update. It may take a few minutes. Note that without downloading the database update the anti-virus is useless.

Downloading_update

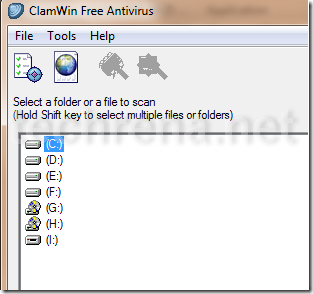
Step 7: Now you can select the drive to scan.

ClamWin_free_antivirus

Now you can easily disinfect any computer. But make sure that the virus definition database is up to date.

Microsoft .NET Framework 4.0 Download

Microsoft .Net logo

Microsoft has released .NET Framework 4 last week along with Visual Studio 2010.The latest version of the .NET Framework is now available both as a Web installer as well as a stand alone installer.If you have been following our blog off late, you must have read our post about how to find the version of the .NET Framework installed in your windows.The newer applications that require Microsoft .NET Framework 4 will automatically trigger a download of the component, if it’s not been already installed on the user’s computer.

.NET Framework consists of the core framework that goes behind all the modern windows based applications.The .NET Framework model’s downward compatibility lets it to work along side with older versions of the .NET Framework.The newer version introduces many features besides improving the performance.

.NET Framework 4 Features:

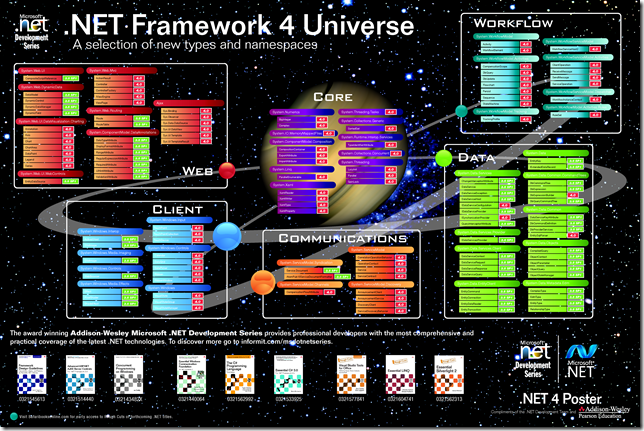
Net Framework 4 poster

.NET poster via Brad Abrams

  • Improvements in Common Language Runtime (CLR) and Base Class Library (BCL)
  • Innovations in the Visual Basic and C# languages
  • Improvements in Data Access and Modeling
  • Improvements in performance and scalability
  • significant enhancements to ASP.NET that provides more control over HTML, element IDs and custom CSS
  • Improvements in Windows Presentation Foundation (WPF)
  • New added support for Windows 7 multi-touch, ribbon controls & taskbar extensibility features.
  • Improvements to Windows Communication Foundation (WCF) (Ex: support for WCF Workflow Services)
  • Innovative new parallel-programming features (Ex:parallel loop support, Task Parallel Library (TPL), Parallel LINQ (PLINQ) etc.,)

Complete list of new features/changes is available at this page.

Download .NET Framework 4 :

Link 1: Standalone Installer

Link 2: Web Installer

Requirements : Windows XP SP3 /Windows Vista SP1 or later versions (both 32-bit and 64-bit versions)

Microsoft Windows Malicious Software Removal Tool KB890830

microsoft logo

Microsoft updates its Microsoft Windows Malicious Software Removal tool (MWMSRT) and releases the update on the second Tuesday of every month.As usual, Microsoft released updated version of this tool for the month of April (2010) as KB890830.This tool checks your computer for any malicious software and helps to remove it, once it finds the infection.Please make note of the difference between an anti-virus program and thus Malicious Software Removal Tool.

This Microsoft Malicious Software Removal Tool is no replacement to an anti-virus program.An anti-virus program blocks malicious software from running on a computer, whereas this tool only removes malicious software from a computer which is already infected.As they say “Prevention is always better than the cure”, it applies here too ! It’s always desirable to block such malicious software from running on the computer first up,

Windows Malicious Software Removal Tool – April 2010 (KB890830)

Update Released on : April 13, 2010

Update type: Important

Download Size: 9.9 MB

Platforms: Windows 7, Windows Vista, Windows Server 2003, Windows XP, or Windows 2000

Download:

Download the 890830 package now

Download link for x74 version of the software

More information:
http://go.microsoft.com/fwlink/?LinkId=39987

Previous updates : KB977206, KB980182, kb978601

Download Security Update for Windows 7 To Protect from Remote and Local Attacks

windows 7 logo

A series of 5 Important Security Updates for Windows 7 has been released yesterday.  According to Microsoft Windows a new security issue has been identified that could allow an unauthenticated remote attacker or authenticated local attacker to compromise your system and gain control over it. This being a serious issue and of great concern we are giving the details to install the updates as soon as possible.

The list of Security Updates are:

Security Update for Windows 7 (KB978601)    204 KB
Security Update for Windows 7 (KB979309)    99 KB
Security Update for Windows 7 (KB979683)    1.8 MB
Security Update for Windows 7 (KB980232)    229 KB
Security Update for Windows 7 (KB981332)    222 KB

The description of KB978601, KB979309, KB980232 and KB981332 is: A security issue has been identified that could allow an unauthenticated remote attacker to compromise your system and gain control over it. You can help protect your system installing this update from Microsoft.

KB979683: A security issue has been identified that could allow an authenticated local attacker to compromise your system and gain control over it. You can help protect your system installing this update from Microsoft.

All the 5 security updates are required to face this issue.

Installing the Updates:

Automatic Download:

Go to the location:

Control Panel—> System and Security—> Windows Update

In the left Side Pane Click on Check for updates.

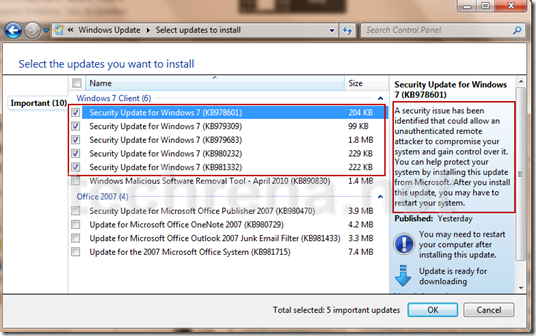
After Checking, Windows may find various updates. Select the updates you want to install and Update. See the image below.

security_update

You can check the updates you want and uncheck the ones you do not need.

Manual Download:

You can manually download the updates from the links given below from Official Microsoft site.

Security Update for Windows 7 (KB978601)
Security Update for Windows 7 (KB979309)
Security Update for Windows 7 (KB979683)
Security Update for Windows 7 (KB980232)
Security Update for Windows 7 (KB981332)

After Installing you need to restart the system to complete installation.

Download Windows Process Security To Find UnSafe Processes

Windows Process Security is a freeware which can be downloaded free of cost from sourceforge.net. The details are given below.

Windows Process Security is a security tool that shows comprehensible information about programs and processes running on your computer and identifies the potential threats running on your computer. The program consist on unique security risk rating for processes and ability to remove 130000 threats. Windows Process Security indicates the likelihood of a process being potential spyware, malware or a Trojan.

A regular Update of the the threat database is required for optimal performance. The update can be directly performed from Windows Process Security 1.0 Application and is free of cost.

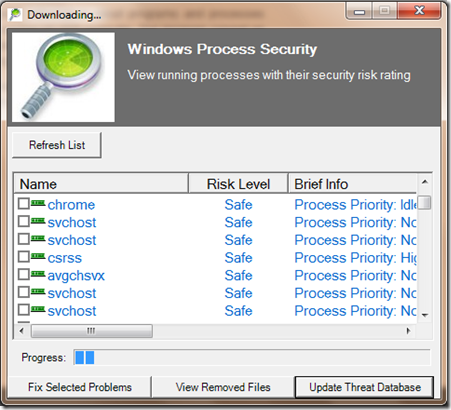
The user interface is quite simple. You can see all the safe and and unsafe processes. If any threat or unsafe process is found you can terminate the process, fix the problem and go to the containing folder to delete the threat. A screen shot of the application is given below.

Windows process security 1.0

Windows Process Security 1.0 can be downloaded from the link below:

Download Link: Windows Process Security 1.0

Size: 3.4 MB

Operating System: Windows 98/Me/2000/XP/2003/Vista/Server 2008/Windows 7/NT

Released on: 28-03-2010

nVIDIA GeForce Driver 197.41 WHQL for Windows 7, Vista & XP

nvidia

Release 197 Graphics Drivers for Windows – Version 197.41

nVIDIA has released the GeForce Driver 197.41 update for GTX 480 and GTX 470 graphics cards on April 9, 2010.Scroll down to read more about the update and also find the download links :

New features in Version 197.41 ?

  • This driver package installs NVIDIA PhysX System Software v9.10.0129.
  • NVIDIA PhysX acceleration is available on all GeForce 8‐series, 9‐series, 100‐series,and 200‐series GPUs with a minimum of 256MB dedicated graphics memory and a minimum of 32 processor cores.
  • This driver package installs the HD audio driver, version 1.0.9.1.
  • This driver adds support for the following products:
    • GeForce GTX 480
    • GeForce GTX 470

This is a WHQL-certified driver update for GeForce GTX 480 and GeForce GTX 470.

Direct Download Links:

Follow the following links to download the drivers for Windows XP/ Vista/ 7 versions :

Windows XP/ Media Centre Edition (32-bit)
Windows XP x64, Server 2003 x64
Windows 7/ Vista 32-bit
Windows 7/ Vista 64-bit

Download 3D version of the driver for Windows Vista/ Windows 7 here (16.3 MB)

Download the release notes: Win XP, Win 7 & Vista.

Find The Microsoft.NET Framework Version Installed In Your Windows PC

Microsoft .Net logo

Well, if you are using a computer running Windows operating system, you might be aware of the Microsoft .NET Framework that needs to be installed in your computer in order to let the most newer applications created for Windows run smoothly on your PC without much compatibility issues.

While it’s easier to install the .NET Framework SDK anytime by downloading the file from the Microsoft’s website, you may definitely want to know the version of the .NET Framework installed on your Windows based computer.

So here I’m trying to guide you through the various ways in which you can find the .NET version installed on your computer.

Method 1 : Using Registry Editor:

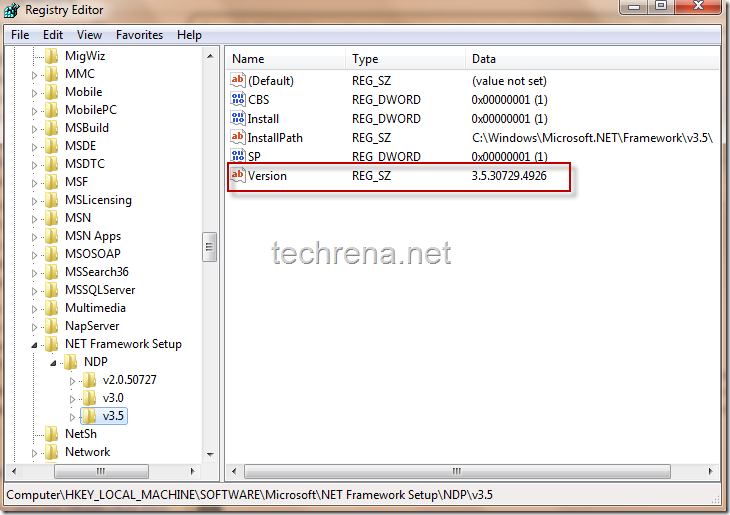
If you are familiar with Windows registry editor (by using regedit command), this should be the easier way to find the version of .NET installed.You just have to navigate to the following registry path and check the value present for the key entry “Version” (which is 3.5.30729… in my case) as shown below.

Path: HKEY_LOCAL_MACHINE\ SOFTWARE\ MICROSOFT\ NET Framework Setup\ NDP\ v3.5

Net Framework Version Registry Key

Method 2: Using IE User Agent String

Please note that this method works only with Internet explorer.

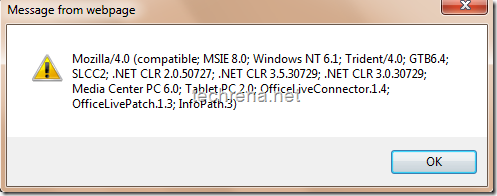
Here we are querying the user agent string of Internet Explorer.Copy the following JavaScript  in to your Internet Explorer address bar and press enter, you will now see an alert something similar to the one shown below.

javascript:alert(navigator.userAgent)

User Agent String Javascript

As shown above, querying the IE User Agent String has resulted in a pop-up alert that shows all the .NET versions installed on my Windows 7 machine (.NET 2.0.50727, .NET 3.0.30729 & the latest one being .NET CLR 3.5.30729).

Even though other browsers like Mozilla Firefox, Google Chrome & Opera also respond to the user Agent String query, they will not however show the actual versions of .NET Framework installed.

Method 3: Using Add or Remove Windows Programs/ Features

If you are using Windows XP and earlier operating systems, just go to control panel and click “Add or Remove Programs” find the version of .NET Framework in the programs installed.

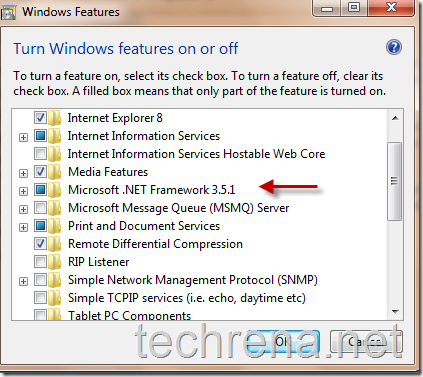
If you are using Windows 7 or Windows Vista, go to Control Panel > Programs> Turn Windows features on or off, find “Microsoft .NET Framework” in the list and note down the version number.

Windows features .Net Framework

Method 4: Using Aaron Stebner .NET Framework Detector Code

If you are a programming geek and want to detect the version of .NET Framework installed on your PC with a simple C++ code, you may want to check Aaron Stebner’s .NET Framework checker code(cpp) which you can run using your Visual Studio/Visual C++ 2005 or 2007 versions.

Method 5 : Using Windows Explorer

To see which versions of the .NET Framework are installed on your PC, locate the %systemroot%\Microsoft.NET\Framework folder by typing the same in the Windows explorer address bar you sill something like this :

  • v3.5
  • v3.0
  • v2.0.50727
  • v1.1.4322
  • v1.0.3705

.NET Framework folder windows These represent the versions of the .NET Framework installed in your computer.