How to turn off UAC in Windows 7 and Vista

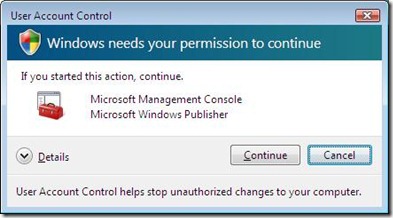
Are you getting annoyed of the permission dialogues like “Windows needs your permission to continue”?

If yes, you can easily disable these messages in Windows 7 and Vista.

This is a new security feature and can be controlled using the User Account Control(UAC) Settings.

The dialogue boxes looks like the one shown below.

You can follow the steps below and easily remove the messages every time.

Windows needs your permission to continue

If you are using Windows 7 then it is very easy.Follow the steps below:

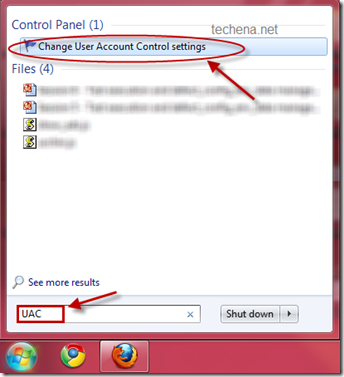
Step 1: Click Start Button. Type UAC in the search box of the Start Menu and press enter. You can see the UAC panel as shown below.

User Account Control from start menu

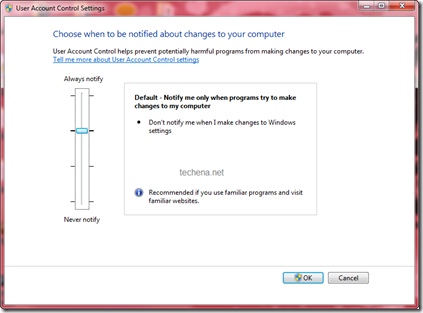
User Account Control Settings

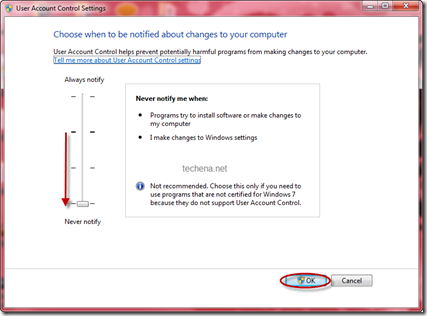
Step 2: Now drag the slide to Never notify and click OK.

User Account Control Never Notify

Now you can restart the computer and you will not see any more permission dialogues.

If you are using Windows Vista, then follow the steps below:

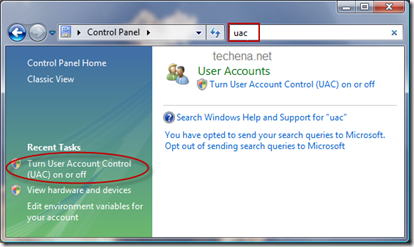
Step 1: Open Control Panel. Type UAC in the search box. Click the “Turn User Account Control (UAC) on or off” link in the left pane.

User Account Control panel

Step 2: Uncheck the “Use User Account Control (UAC)” checkbox and click OK.

User Account Control Check box

Now you can restart your Computer.

Note: Some functionalities like Windows Side Bar may stop working if you keep the UAC as Never notify. In that case you can refer this post to enable the sidebar: Enable Windows 7 Sidebar in easy steps

Blogger ‘Blog Pages’ Allows You To Create Pages In Blogger

Blogger has just rolled out another feature which has been available in blogger in Draft till now.

This one of the most requested features in Blogger.Now you can publish static information on stand-alone pages like you can create “About Us” or “Contact Us” or “Privacy Policy” pages on blogger (like you do in WordPress) easily.

You can have at most 10 pages in your Blogger blog.Writing these pages is very similar to the way you normally do in the case of posts.

This tutorial guides you to create a simple static page in you Blogger.com blog.

STEPS TO FOLLOW:

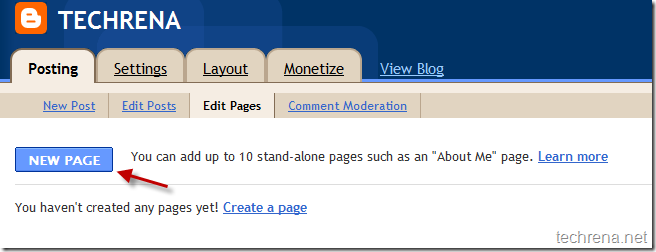
Step 1: Visit Dashboard of your blog in blogger.com and go to the “Posting” tab, under which you find “Edit Pages’ tab

new page link in dashboard

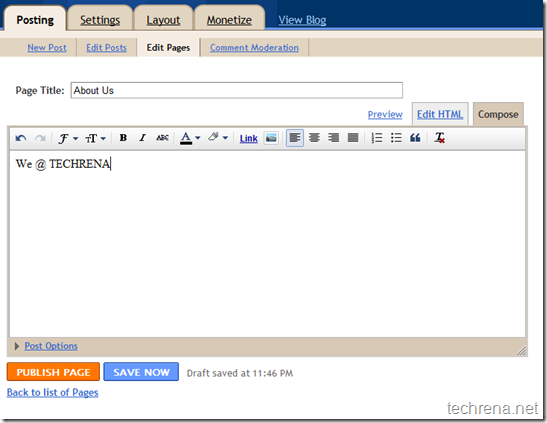
Step 2:Click on “New Page’ to start composing a new page like “About Us” for instance.Similar to writing a new post.Hit the “Publish Page” button once you are done with writing.

Composing new page in Blogger dashboard

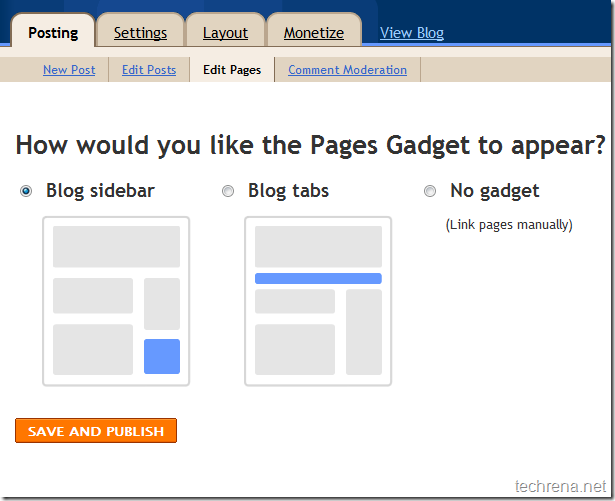
Step 3: Now choose the position where you want the Pages Gadget to appear.You can either chose it to appear along the blog sidebar or on the blog tabs.

Blogger Page Gadget

Pages Gadget in Blogger

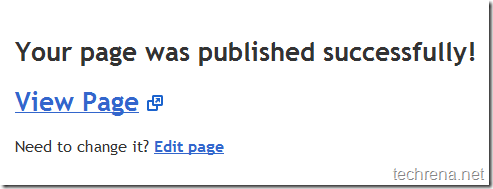
Step 4: Now you can see the page you have composed in browser.

Blogger page published

published page in Blogger test in browser

If you have liked this, why not take time to read about our guides on Optimizing Blogger blogs for better SEO.

Swapping Blogger blog title and post title -Blogger SEO tweak

How To Verify Blogger blog in Webmaster Tools

Nokia 6303i classic released

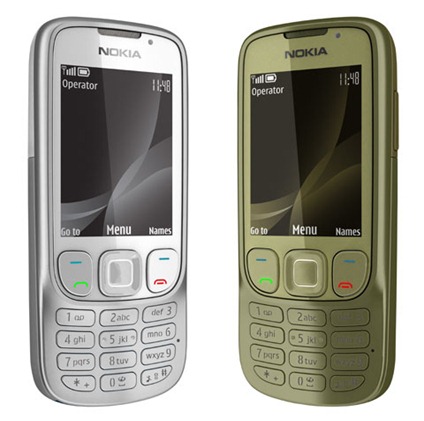
The Nokia 6303i classic has just been released today. This updated “i” version has a few enhancements and improvements to its predecessor.The main focus of this model is on its battery life. Another main thing can be its low price also, only 105 Euros.

The Nokia 6303i has  only a small update in the design to the original model which is under the bonnet. But the talk time has now been improved to eight hours and music playback up to 30 hours. And it now also supports instant messaging using the Nokia Messaging Solutions.

Nokia 6303i classic silver gold

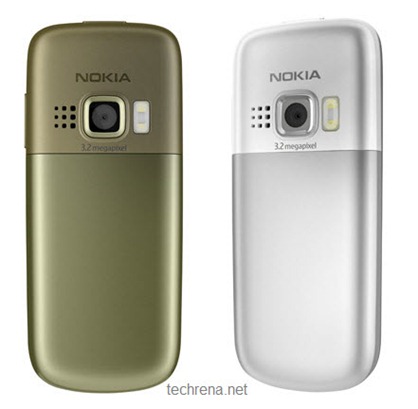
Nokia 6303i classic gold silver

Review the key enhancements and specifications below:

Specification Description
Enhanced battery life Up to 8 hours talk time, up to 3 weeks on stand-by
Built-in music player and FM radio Listen Up to 30 hours of music
Camera 3.2-megapixel camera with dual LED flash, 4x digital zoom
Design Bar, Durable stainless steel design
Headset Connector 3.5mm AV connector
Memory Card Up to8GB microSD memory card, 2GB microSD included
Bluetooth Yes, Bluetooth 2.1
USB Yes, Micro-USB connector
Display 2.2-inch QVGA, Supports 16.7 million true colors
Email & Messaging email and instant messaging combined using Nokia messaging solutions
Colors Available Silver and  Khaki gold
Lower priced 105 Euros, INR 6800

It is priced at 105 Euros and Its Indian edition may cost Rs 6800 only.

WInRAR 3.80 Free Licence Key Giveaway

Well, WinRAR is the best file archiving tool that I have ever used.WinRAR works well with RAR, ZIP archives and can also be used in unpacking ARJ,LZH,TAR,GZ,ACE,UUE,BZ2,JAR,ISO,EXE,7z, & Z archives.WinRAR started supporting Windows Vista from version 3.70 and the latest version WinRAR 3.90 support Windows 7 as well.

The WinRAR version for which you can get key through this process is ‘version 3.80’.The key obtained through this tutorial is absolutely legitimate and it is offered by a German tech magazine.

Follow These Steps:

  • Step 1: Download Winrar 3.80
  • Step 2: Visit this German proxy site, as the offer is valid only in German and hence we have to use proxy with German server and not any other proxy site like hidemyass.com.

Proxy site LINK

  • Step 3: Enter this URL ‘https://covermount.win-rar.com/pcwelt0310/’ in the form and hit  ‘GO’ button.
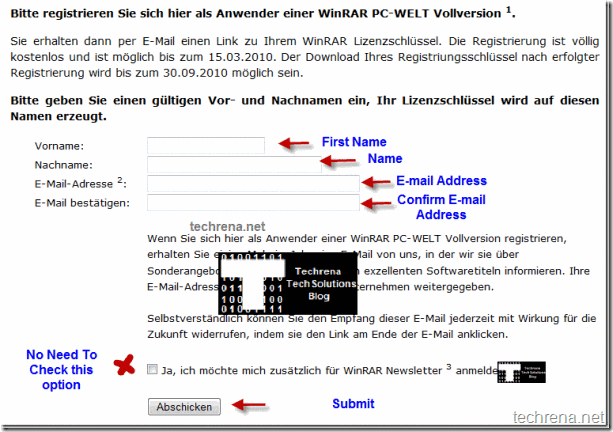
  • Step 4:  Now it’ll take you to the German website, scroll down to the registration form as shown in the screen shot

WinRar Free Licence Give away site Regsitration form in Germany

Checkout this image, which shows the same page in English if you are still finding it difficult to fill-in.

  • Step 5: Enter the your details in the form follow the above screen shot for reference and you can either check or uncheck the option below the form(that’s for subscribing to their newsletter) and click the button which reads “Abschicken” (which means ‘Submit’ in German).
  • Step 6: Check your email, and find the link similar to below:

https://covermount.win-rar.com/pcwelt0310/download.php?email=user@mail.com

[Your email address would be present in place of ‘user@mail.com’]

  • Step 7: Open the link in new tab and this open a webpage where you’ll find a download link:

Downloading WinRar key REG file

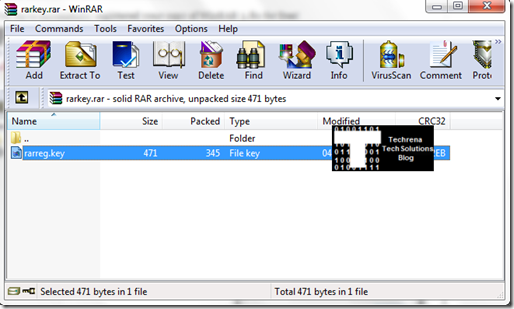
  • Step 8: You will be asked to download a file called “rarkey.rar” which contains rarreg.key which is the key that you wanted.

WinRAR key file in rarkey

Now double click the key file to install the key and now you have a full licensed WinRAR 3.80 version and this key is valid till 30.09.2010.

Leave a comment if you have any troubles while going through these steps.

GreaseMonkey Gets Official Support For Google Chrome

If you are an enthusiastic fan of  GreaseMonkey user scripts in Firefox browser and haven’t switched to Google Chrome for the only reason that Chrome doesn’t support GreaseMonkey user scripts, well probably you need to think again.

Either you have missed our elegant tutorial on how to enable GreaseMonkey user scripts in Google Chrome, or you haven’t been following the news off late.

Well, Google Chrome 4 now officially supports GreaseMonkey, according to Chrome official blog.If you still use an older version of Chrome, may be it’s the right time you should update your browser to the latest version.

Google Chrome Greasemonkey According to Aaron Boodman, Software Engineer in Chromium project, (who is also incidentally the original author of Greasemonkey Firefox add-on),  as of now there over 40,000 scripts available on userscripts.org alone.Keep in mind that Google Chrome may not yet support all the user scripts, he expects that 15%-25% of scripts may not work in Google Chrome browser.That’s understandable since Chrome is no Firefox and that most of the scripts are written for use on Firefox.Install Greasemonkey scripts normally as you do in Firefox and enjoy the browsing in your own style.
Sony Ericsson Aspen (GreenHeart) Launched

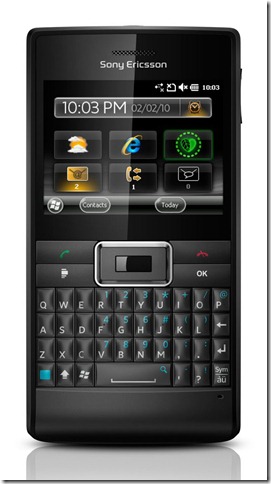
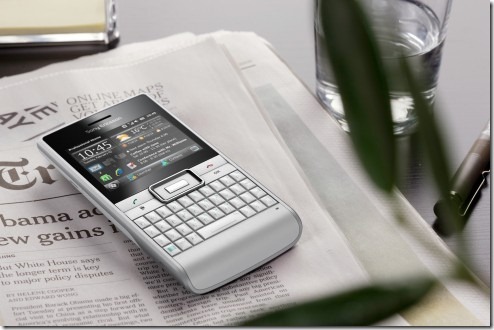
Sony Ericsson has today officially announced the launch of Sony Ericsson Aspen, Windows Mobile 6.5.3 powered Smartphone.

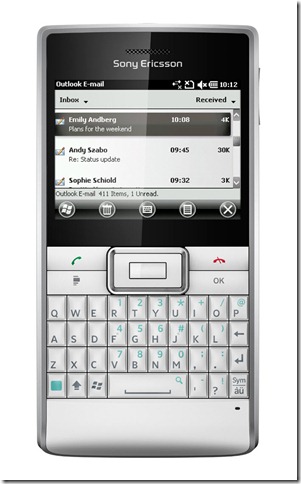
This is the latest addition to Sony Ericsson’s GreenHeart™ portfolio (focusing on reducing the impact of the mobile phones on the environment).And also this is the first SE Windows Mobile powered handset to include a ‘front facing’ QWERTY keyboard (like Nokia E72 and BlackBerry devices).

“Sony Ericsson Aspen™ is the business phone with a conscience, perfect for any consumer or company who want to make a green choice in their daily work life.” Said Quentin Cordier, Global Marketing Manager, Sony Ericsson. “An affordable GreenHeart™ phone with the latest version of Windows Phone, the Sony Ericsson Aspen™ has a rich user interface and powerful productivity tools. But it’s not all about work, stay in touch with the fun parts of life with Media Browser and PlayNow ™, with simple access to social networks and quick and easy access to media files. Find the fun with a-GPS, Google Maps™ and snap pictures with the 3.2megapixel camera.”

Aspen supports quad-band GSM/EDGE with either HSPA 900/2100 or 850/900/2100 radios, it has Wi-Fi (and of course Bluetooth).Aspen also has a built-in A-GPS support and comes with Google Maps for navigational purposes.Human curvature design makes it to fit into the palm of the hand.

SE Aspen is scheduled to be available in the markets in 2010 Q2.Specifications of Aspen are listed out in the table below.

SE Aspen PIU White Professional-

Specifications:

Size 117 x 60 x 12.45 mm
Weight 130 grams
Memory card support SanDisk microSD™, up to 16 GB
Operating system Windows Mobile® 6.5.3
Talk time GSM/GPRS Up to 10 hours
Camera 3.2 megapixel camera4x digital zoom

Multishot

Self timer

Smart contrast

Connectivity 3.5 mm audio jackA-GPS

Bluetooth™ technology

Google Maps™

Micro USB connector

Modem

Synchronisation

USB mass storage support

USB support

Wi-Fi™

Screen 65,536 colour TFT2.4 inches

240 x 320 pixels (QVGA)

Colours Iconic BlackWhite Silver

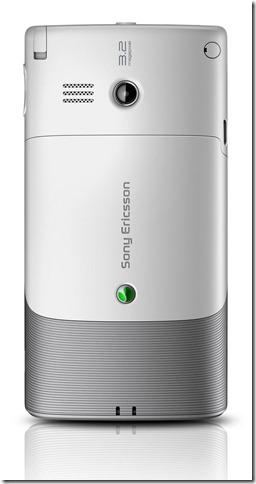
Sony Ericsson Aspen Pics:

Sony Ericsson Aspen_1

Aspen_Front_White-Latin-E-mail

Aspen_Back_White

More Pictures:Link

Price And Availability:

Sony Ericsson Aspen is released and is available in markets worldwide at $325 (e-bay) and is priced at Rs. 14,999 INR in India.

How To Disable Orbit Downloader 404 Error Redirect Page

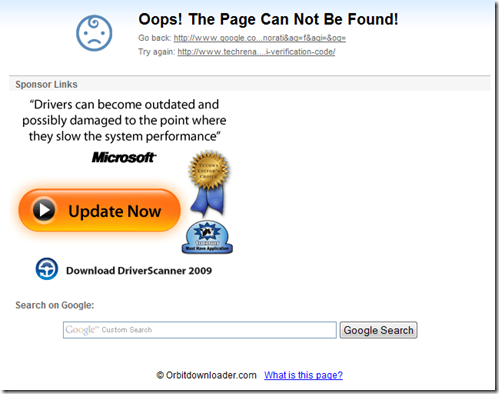
If you have installed Orbit Downloader in your browser as built-in download manager, you might have observed Orbit downloader 404 redirect page appearing whenever any webpage you open returns a 404 error.This may  be annoying at times and you may want to disable this unnecessary redirect.The redirect page automatically opens up whenever browser navigation error occurs.


Orbit Downloader 404 landing page

Let’s see how to disable this Orbit redirect page in your browser (Firefox, Chrome, Netscape,Opera, Maxthon)

Solution:

  • Open Orbit Downloader Preferences from the menu.

Prefences in Orbit menu

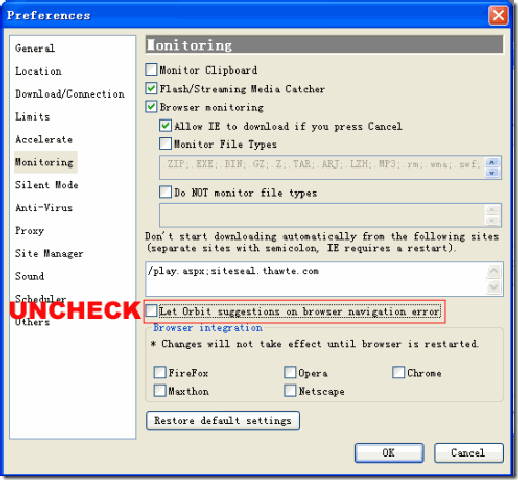
  • In The Preferences, go to "Monitoring” tab, and uncheck “Let Orbit suggestions on browser navigation error”.

Uncheck Orbit Browser navigation error

  • And Click ‘OK’ to save your preferences.

Google Chrome Gains Market Share To Stand @ #3

According to the published by web metrics company NetApplications.com, Google Chrome managed to gain market share both from Internet Explorer and Firefox.

The superfast browser from Google has a market share of 5.20% as of January, 2010 overtaking Safari (4.51%) and Opera(2.38%).Remember Chrome has a share of just 1.62% in March 2009.

The following table shows the comparison of market shares of different browsers as of March 2009 and January 2010.

Month IE Firefox Chrome Safari Opera Opera Mini Others
March 2009 68.46% 23.30% 1.62% 3.63% 2.12% 0.23% 0.65%
January 2010 62.18% 24.41% 5.20% 4.51% 2.38% 0.59% 0.72%

image

The worst affected being the IE, which lost almost 6% of market share since March 2009 to 62.18% in January 2010, whereas Firefox ended up at 24.41% even though Firefox lost its share slightly by 0.2% as compared to 24.61% in December 2009.

Full data:Link

Remove Google Analytics Tags In Your Blog Posts and Feedburner URL

Feedburner is an amazing tool for managing RSS and atom feeds. Many of us use this service for burning our own feeds, may be from our own sites and blogs.  We can also use the email subscription feature and integrate the feeds with Google Adsense.

feedburner logo

Recently Feedburner has enabled Google Analytics to analyze the feeds, clicks and track them.  But when we use this feature to track the feeds, we have found out one problem. We had enabled this feature in our Blog and the URLs of our posts included the Google Analytics tracking tags like “utm_source=feedburner &utm_medium=feed &utm_campaign=Feed%3A “ . An example of such URL can be seen below:

Original URL:

http://www.techrena.net/internet/google-nexus-one-launch-jan-5-price-530/

URL indexed in Google after enabling tracking:

http://www.techrena.net/internet/google-nexus-one-launch-jan-5-price-530/?utm_source=feedburner&utm_medium=feed&utm_campaign=Feed%3A+TechrenaDotNet+(TECHRENA+dot+Net)

There are some problems incorporated in such kind of URLs. The main problem is that the Search Engine Optimized(SEO) URL has been changed and indexed. Another thing is that duplicate URLs of the same content may be indexed and your Google ranking may decrease or may stop crawling of your posts.  It may lead to a broken link also.

SOLUTION:

The solution is very simple. Follow the steps below:

Step 1: Login to Feedburner.

Step 2: In the Analyze tab, click Configure Stats

feed burner configure stats

Step 3: Uncheck the Track clicks as a traffic source in Google Analytics Check Box

feed burner track clicks

Step 4: SAVE it.

Now you have successfully disabled Google Analytics tags in your post URLs.

If you are done with this, you can read our previous post about finding number of email subscribers to your feeds.