Download YouTube Videos Using YouTube Bookmarklet

youtube-logo

You must have read our earlier post about how to save YouTube or any flash videos from temporary internet file to your hard disk drive as FLVs.

Now, Trevor of How-To-Geek has come up with a mush simpler solution for downloading YouTube videos that doesn’t require installing any browser plugins, or any video grabbing softwares.

All you need is small Bookmarking script as looks like the one given below:

Get YouTube video – (Drag into your bookmarks- currently working to make it work)

Get YouTube video

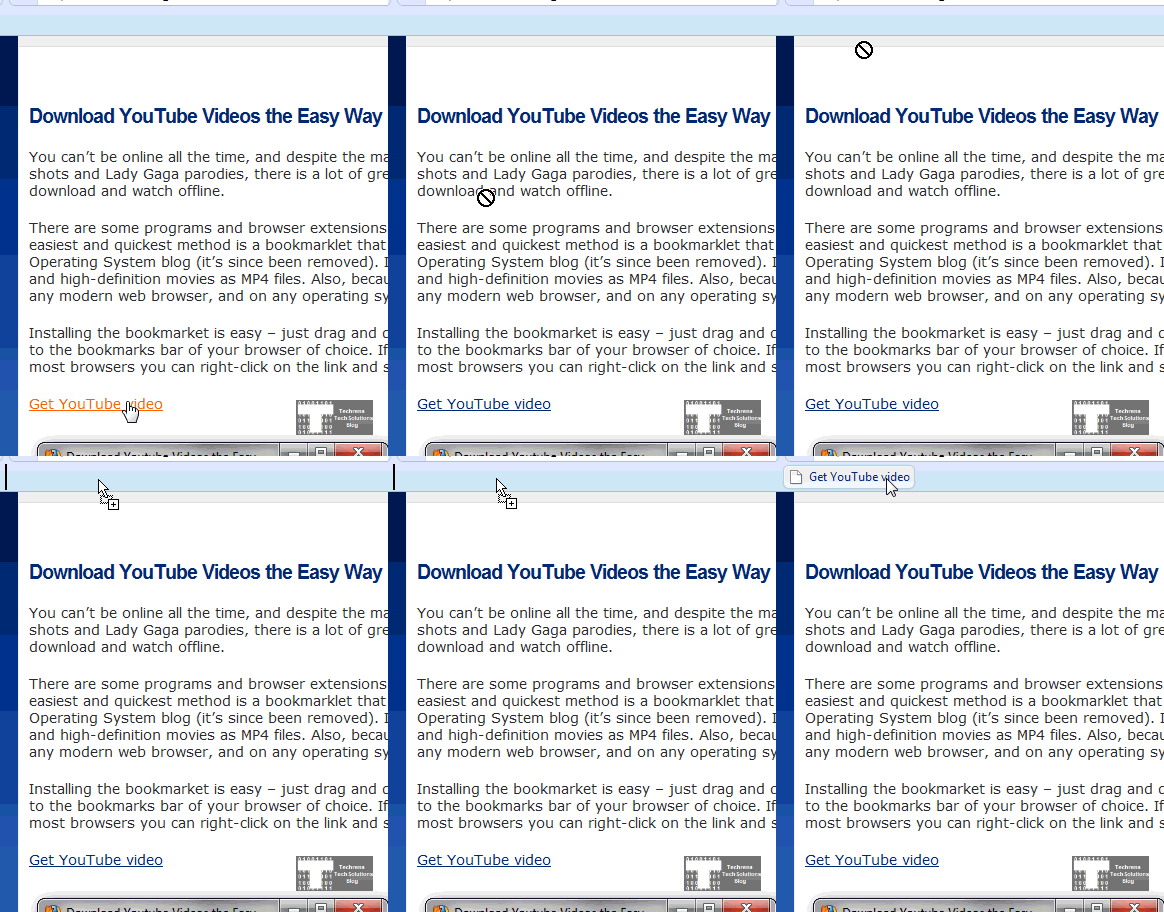
Drag this YouTube Bookmarklet grab script into your bookmarks (see the animated image below)

YouTube bookmark animation

Now open any YouTube video, and find a small links below the User profile, you can find two links in this particular case “Standard MP4” and “HD 720p”.

Watch the below video to see the overview of the whole process.

Video: YouTube Bookmarklet

The advantage of using this process is that you need not install any buggy extensions for your browser to get this feature.Also it saves time by giving a direct download link for any YouTube video.

Thanks Trevor for the tip !!

New In Buzz: Inbox Notifications Control & Easy-To-Find “Mute” Link

Google buzz Official logo

Ever since Google has launched Buzz sometime ago in last month, many voices have been raised over the privacy concerns for which at one stage Google had no other option but to reply.

Now after just surpassing the first month of the Google Buzz, Google has once again modified a feature to give users more control about Buzz posts coming in your Gmail inbox.

1.Until now, Google used to send all your buzz posts (in which you participate) directly to your inbox for better and faster accessibility.But now you have been offered the options in your buzz settings to choose which buzz posts should reach your inbox.

Visit your Buzz settings tab in your Gmail settings page,

Find “Send buzz posts to my inbox when:”

  • People comment on my posts
  • People comment on posts after I comment on them
  • People comment to posts after I am @replied on them

Select the proper option according as you wish (see the below screen shot)

Buzz-settings-Gmail

2. You’ll be notified why a particular buzz post has been sent to your inbox and also “Mute” link that you can easily find in the message.

On the top of your each post in inbox, you will see a message explaining why a particular posts ahs been there in your inbox, it’s more like a Facebook / Orkut feature, telling Mr. X has commented on your post , or you have been @replied, etc.

You can also find the “Mute from inbox” link just to left side of the explanation message that stops subsequent comments taking the conversation back again to  your inbox.

buzz-inbox-settings-example

Google says that it’s the first of the series as part of the noise reduction @ Buzz

If have liked this, you may also read our previous posts about Google Buzz counter for your website and Google Buzz desktop Apps.

Complete Tutorial: How To Install Windows 7

Installing an Operating System (OS) is not a very easy thing. Why? Because an OS deals directly with your computer hardware which is completely useless without a working OS. Another thing is OS installation needs to deal with your existing data in your hard drive. You need to format a drive partition for new OS installation, which is critical because your sensitive data may be lots in the process.

So in order to help you, you can just make yourself familiar with the whole installation process before actually starting the real installation. The process explained here is applicable to all the editions of Windows 7 for example, Windows 7 Ultimate, Home, Professional etc.

Before beginning the installation process decide in which partition you want to install the OS. Please back up all the critical data from the drive in which you want to install Windows 7. This tutorial is made for a fresh Windows 7 installation.

System Requirements:

1 gigahertz (GHz) or faster 32-bit (x86) or 64-bit (x64) processor
1 gigabyte (GB) RAM (32-bit) or 2 GB RAM (64-bit)
16 GB available hard disk space (32-bit) or 20 GB (64-bit)
DirectX 9 graphics device with WDDM 1.0 or higher driver

Note: We have tried installing Windows 7 in a 32-bit computer with just 512 MB RAM and it worked.

Carefully follow the step by step guide below. Click on the Screen shots to enlarge it.

Step 1: Insert to source of the Windows 7 installation to your computer(Powered Off). The source may be the Windows 7 installation DVD or a USB flash drive. If you want to install Windows 7 in a netbook then you need a flash drive.

If you need a Flash drive installation of windows 7 Click here

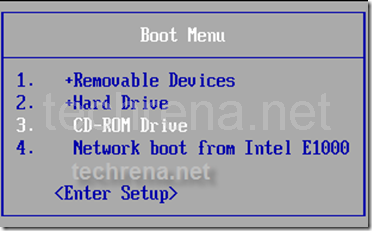
Step 2: Turn on your computer. Press the Boot menu key. (Usually Boot Menu key is the Esc Key). Select your source. If DVD then select CD-DVD Drive, flash drive then Select USB Removable Drive.
boot_menu

If it will shows Press any key to Boot, then press any key on your keyboard.

Press_any_key

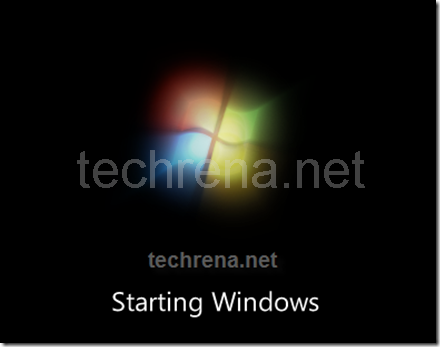
Now it will load the files and Windows will start.

loading_files

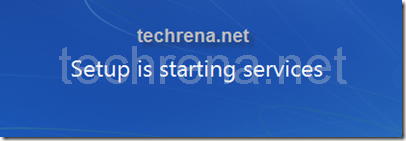
Starting Windowssetup_is_starting

Step 3: Now select the language, time and Keyboard format. Click Next.
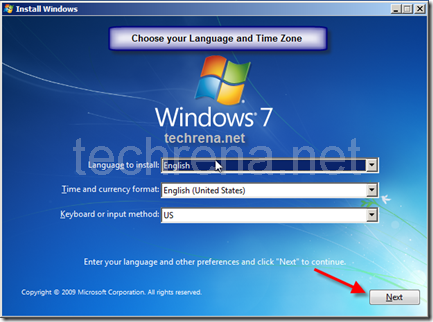
Install_windows_7

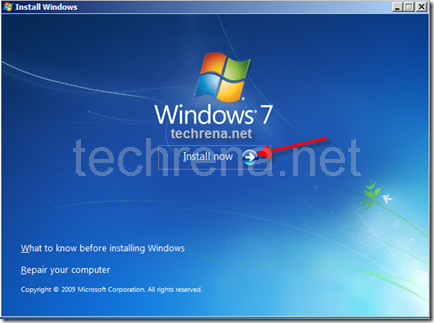
Click on Install Now.

Install_now_windows_7

Step 4: Accept the license agreement and Click on Next.
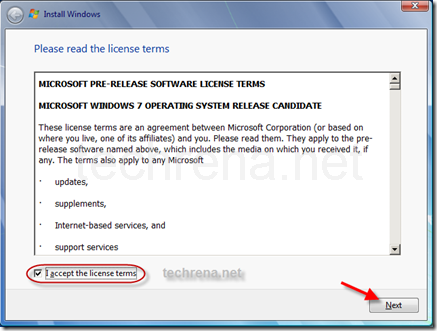
Install_windows_7_license

Step 5: This is a critical step. Upgrade needs to be selected if you want to keep your programs and files and upgrade to Windows 7. In a fresh installation you have to select Custom (advanced).
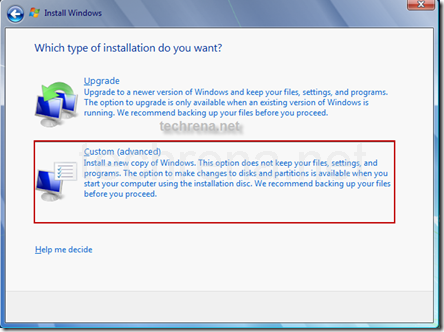
Install_windows_7_type

Step 6: Formatting a Hard drive partition to install Windows 7. You need to select and format the partition. You may have mare than one partition but select the one in which you want to install Windows 7. Click on Drive options to format.
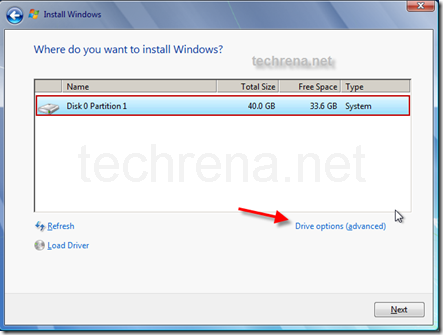
Install_Select_drive_windows_7

Select the Partition you want to format and Click on Format.
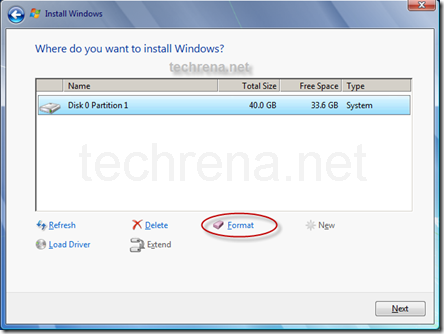
Install_windows_7_format_drive

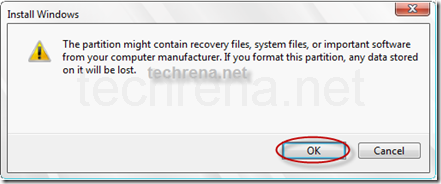
It will ask for a confirmation. Click OK to confirm format. Once format is done, Click Next.
Install_windows_7_format_drive_ok

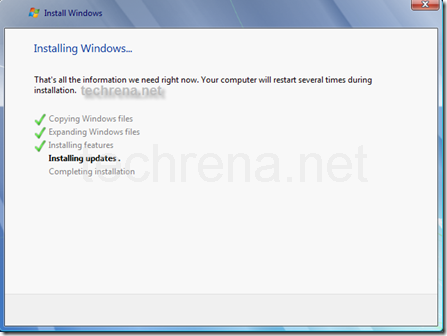
Now the Installation process starts. It may take a few minutes. The time taken varies according to your CPU and the source you are installing from(either USB or DVD). USB drive is faster.
Intallation_process_windows_7

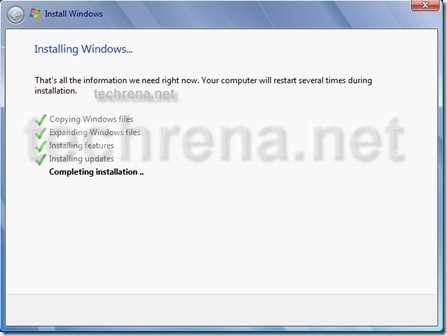
After Installing Updates the computer will restart.

Important Note: Please make sure that from this time onwards it boots from your Hard Drive.
Completing_installation

install_windows_7_starting_services

Step 7: Type the user name and Computer Name. Click Next.
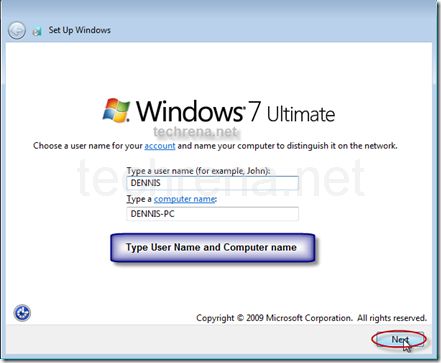
enter_name_windows_7

If you want you can set the password for the username. Make sure that you remember the password.
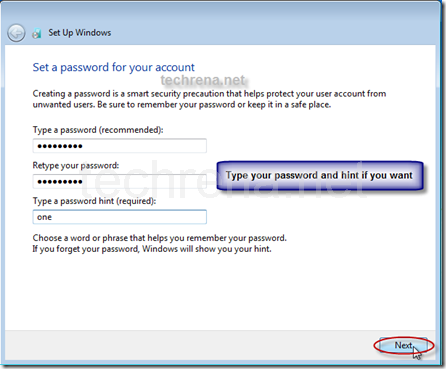
enter_password_windows_7

Step 8: Type your Windows 7 Product Key. This is an optional step. You can enter the key later also. If you want to do it later just leave the field blank and Click Next.

Note: Check Automatically activate Windows when I’m online if you want to activate the Windows by itself. If you want to do it manually, then uncheck it. Activation of Windows online is mandatory for Windows 7.
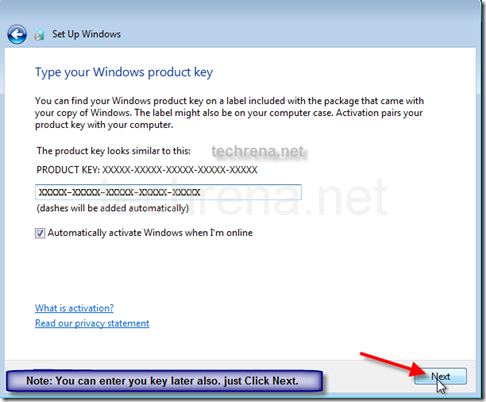
enter_product_key_windows_7

Step 9: You can select Use recommended settings. If you have a WLAN adapter, then it will ask you to select you network. Select one if you have a network.
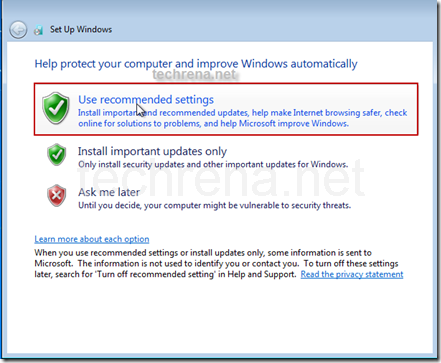
Install_now_windows_7_settings

Step 10: Set the time and date. Click Next.
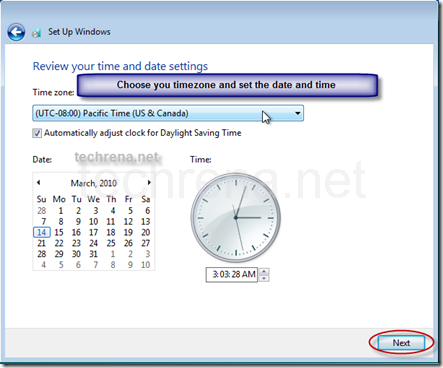
Install_windows_7_set_time_date

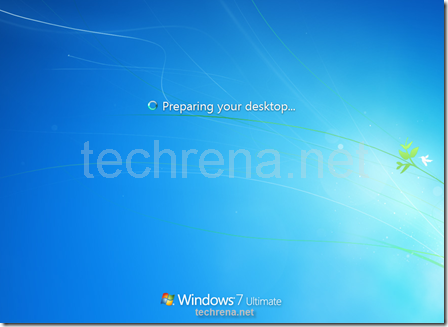
Now Windows will restart the computer, update your settings and prepare for the first use.
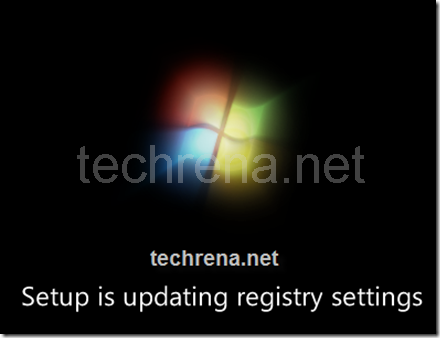
updating_registry

setting_up_for _first_start

Install_windows_7_prepare_desktop

Now you have successfully installed Windows 7. If you have any doubt please leave a comment. We will reply to you shortly.

You may fine the below posts interesting:

Boot And Install Windows 7 from USB Flash Drive (Pen Drive)

Install Windows XP Virtual PC in Windows 7 Using VMware Player

Windows 7 Activation Online

How To Auto Refresh A Web Page In Google Chrome ?

Google Chrome logo

If you have following our blog posts regularly, you must have read about the post we have written on ‘How to Auto Refresh a Web Page in Firefox’ using ReloadEvery add-on for Firefox.

Now let’s see how the same feature can be implemented in case of Google Chrome browser.

By saying auto refresh or auto reload, what we mean is that the page should automatically refresh itself at regular intervals of time.

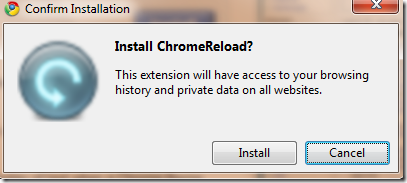
Thanks to ChromeReload extension for Google Chrome, developed by nick.lothian.The extension when installed provides the users with options for selecting various time interval for auto-reload.

install-chrome-reload-plugin

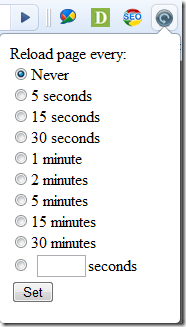
The reload interval may be from 5 seconds to 30 minutes or you can specify your own time interval in seconds if you want to enter custom reload rate for the web page.

chrome-reload-time-options

Download ChromeReload extension for Chrome.

How To Remove Google Bookmarks

Google-Bookmarks-logo

You might have read about Google star bookmarklets replacing Google SearchWiki couple of weeks ago.This a worthy feature since you can save any webpage without even visiting it, right from the Google results

Ever since then, I have seen many people asking ‘How to remove Google Star Bookmarks’ in forums.

If you don’t have an idea of the same, this one is for you then !!

First of all, removing an item from Google bookmarks is really simple, what all required is to go the Google bookmarks page (https://www.google.com/bookmarks/), find the small ‘remove’ link next to your starred bookmark entries.

remove Google star bookmarks

Clicking on the link will remove the bookmark and it will no longer shows up in your search results.

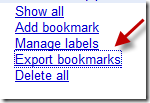
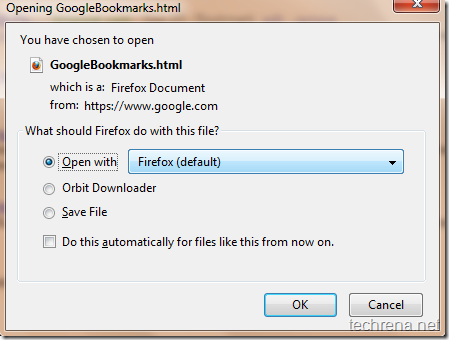
Bonus tip : You can export all your Google bookmarks to an HTML page using an option that you can find on the same page. (See the below screen shot)

export-google-bookmarks

save-GoogleBookmarjs-HTML

You can also delete all your bookmarks at once by following the link ‘delete all’

How to Activate Windows 7 Online

The new Windows 7 has an enhanced security feature. The Product Key which you enter while installing is not enough to activate Windows 7. You need to activate the key you have entered online within 30 days of the installation otherwise it will stop working.

So if you have installed Windows 7, then you need to activate Windows 7 online. This is applicable to all the editions of Windows 7 namely Starter, Home, Professional, Ultimate edition respectively.

Actually this activation process is done automatically whenever you are online. But if you had selected not to do so during installation you need to do it manually. You need not worry if you have a valid key. Just follow the simple steps below.

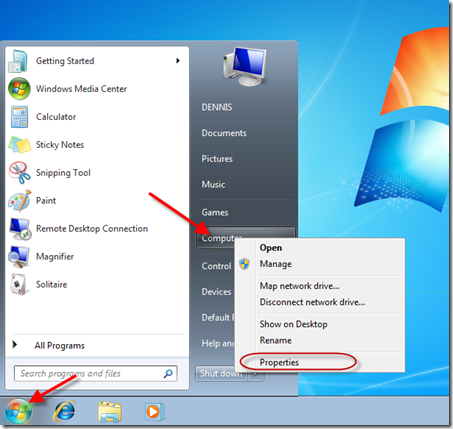
Step 1: Click on Start. In the Start Menu Right Click on Computer. Select Properties.

windows_7_computer_properties

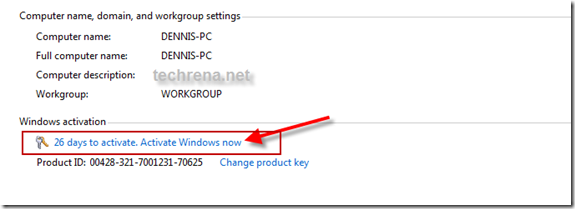
Step 2: In the System Properties Window, Click on Activate Windows now.

Activate_windows_7

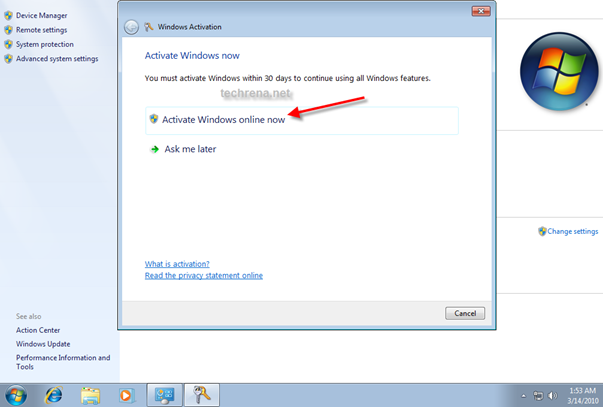
Step 3: In the Windows Activation window, Click on Activate Windows online now.

Activate_windows_7_online

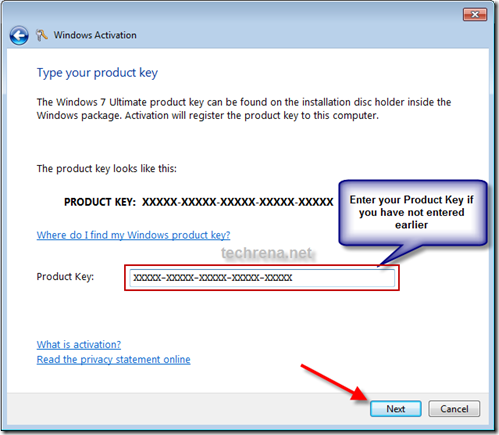
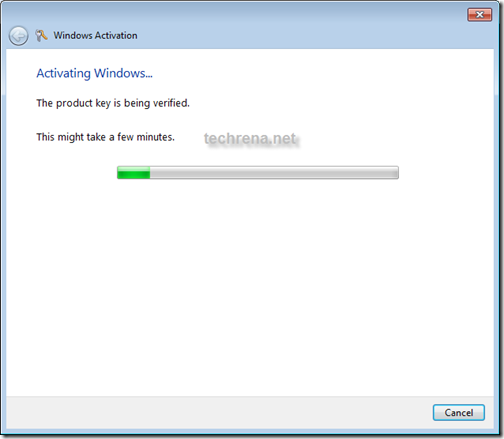
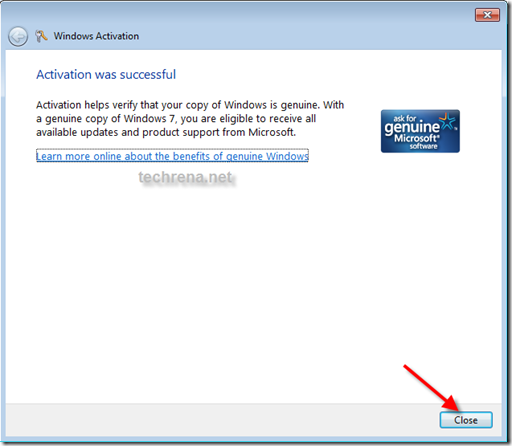
Step 4: If you had not entered the Product Key during Installation, it will ask for your key. Enter the key. Check if its correct. Now it will verify your key online and if your Product Key is valid it will show the success window.

Activate_windows_7_enter_key

Activate_windows_7_verify_product_key

windows_7_activation_successful

Now you can see the Windows Genuine Logo in you System Properties window.

Activated_windows_7

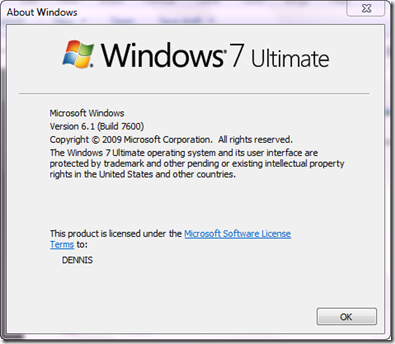
If you want to see the date of expiry of your Windows 7 then Press Start + R and type winver and press Enter. You can see the Version, Build and the Expiry Information. If your Windows is a full version then no expiry date will be present.

Windows_Version

You may find the below posts interesting:

Install Windows 7 from a Bootable USB drive or flash drive

Install and Run Windows XP in Windows 7 Using VMware Player

Windows Activation Technologies Update To Detect Pirated Copies Of Windows 7

YouTube Fails To Live Telecast IPL Online

YouTube had made a deal with the Indian Premier League (IPL) organizers that they would be telecasting the IPL season 3 cricket matches live. This deal made internet user fans of IPL to celebrate.

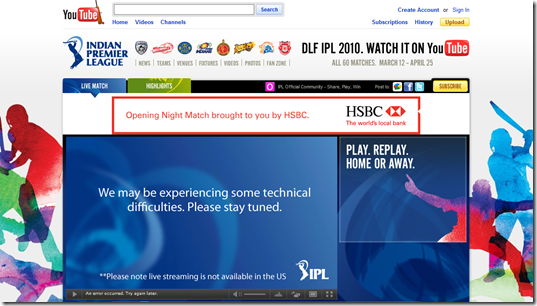
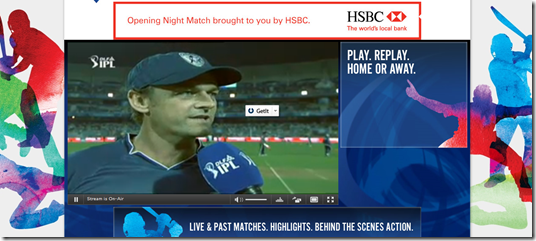
But the dreams came breaking down soon as the IPL season 3 starts. The YouTube site showed error and stopped broadcasting the matches live within few seconds of the opening ceremony.

Here are the screen shots of the YouTube page. I was disappointed and had to stick to the Television for the match.

tech probs youtube ipl inaugral match

I felt pity for the ILP fans who don’t have Cable TVs and who were hoping to watch IPL series Online.

I guess that the error was due to traffic overload. But soon I was able to see the Match Online. Here is the Toss between the two teams shown. But there was mismatch with the audio and the video.

IPL youtube toss live

Even if the live telecast did not work well you can come later to watch the match highlights. I hope the highlight matches will be working fine.

If you are a real IPL fan and want to watch the match live, book an IPL ticket. Its easy, you can book it online. Click here to Book IPL Tickets Online. For booking the tickets, you can see the IPL schedule here.

If you want to watch the IPL matches live or highlights then go to the link below:

Watch IPL Matches Online
Purchase IPL 3 Tickets Online
IPL 2010

The biggest and longest (running for 43 days) cricketing event Indian Premier League 2010 aka IPL 2010 or IPL 3 as it is called, has just started today promising the exciting cricketing action.

If you have a TV, well it’s almost easier for you to follow the live action no matter in which ever country you are (considering that IPL has deals with many broadcasters worldwide).

If you are missing live action on TV but have an active internet connection, you can still catch all the live action from YouTube.

How To Buy IPL 3 Tickets Online?

You can easily book or reserve tickets for any upcoming IPL game from the following genuine and trusted sites.Do not visit any other sites claiming to offer IPL 2010 tickets.
These are the authorised websites where you can buy IPL tickets

Link 1 – BookMyShow

Link 2 – Ticketgenie

Link 3 – Vodafone [Only if you are a Vodafone customer]
From mobile phone:

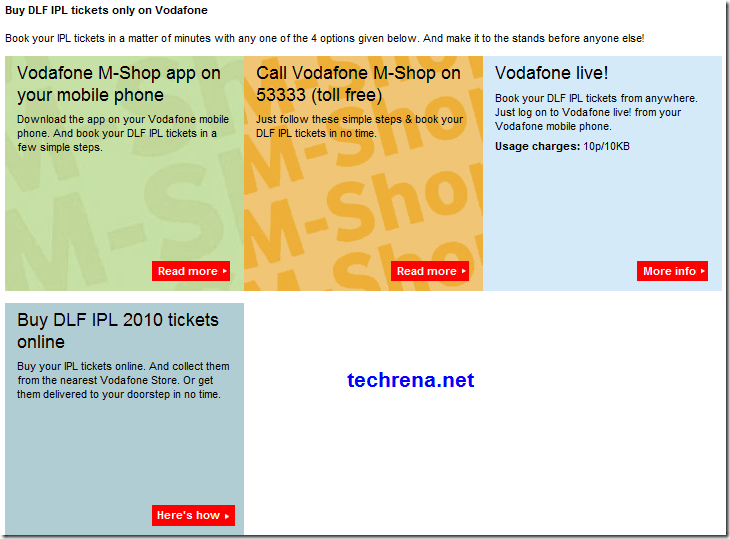
If you are a Vodafone India customer, you can buy DLF IPL 2010 tickets by accessing Vodafone M-Shop.To access M-Shop, Vodafone customers may dial Toll free number 53333 or can SMS MSHOP to 53333.

Vodafone-IPL-tickets

Using Google Reader Play For Visual Web Browsing

google-reader-logo

For all those lovers of Google’s online RSS feed reader ‘Google reader’, here’s an interesting new feature being added to reader.The new feature is being called ‘Reader Play’.

Google has announced in a blog post earlier announced the launch of ‘Google Reader Play’.Reader play offers you new way to see feeds in your browser, like a slideshow, the feed items will scroll one by one horizontally (you can use side arrows to move one by one or you can also start a slideshow).

By default, Reader play will show feed items that interests you (even if you haven’t subscribed to them), you can always tell the reader about the items you like just by clicking the like button (rectangle one) below your feed items.

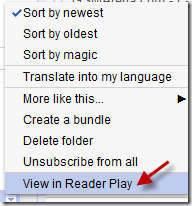
However, if you only want to read the visual display of feeds from your subscriptions, just go your reader page, scroll down to the subscriptions folder, click on the ‘Top down’ menu as shown below:reader_folder_top_down

Select the last option “View in Reader Play” to start reading that particular subscriptions folder in Reader Play.

Reader_Play_in_Google_Reader_Folders

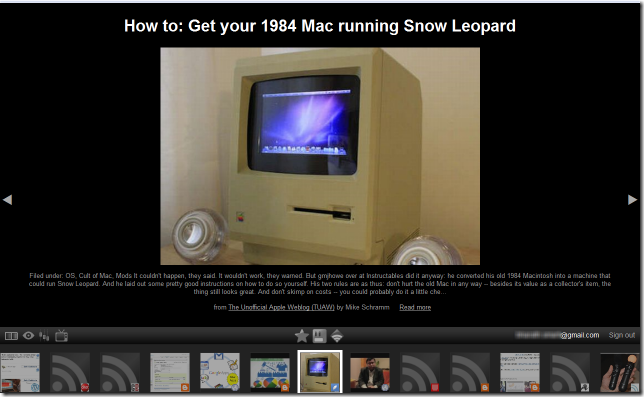
And the beautiful visual reading experience will start (as in the below picture ):

reader-play-view

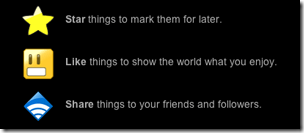
You always click on the 3 symbols below each item,

‘Star’ to mark items for later

‘Like’ items to tell the reader about what you like

‘Share’ to share the items with your followers

reader-stars-like-share

Tip : Read How to use Google reader to track changes in any website that doesn’t offer feeds.

How to Take Ownership and Grant Permissions to a File or Folder In Windows 7 or Vista

There are certain Files and folders in Windows that we cannot access, modify or delete. Such kind of files are system files which have limited access rights to the users.

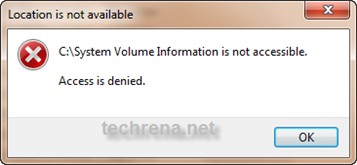
But sometimes we need to access some files or change some file according to our need. Such an example is System Volume Information. This folder is not accessible but if we want to know how much size its taking and what files are there inside, we have to take ownership and grant access to this folder. Another example is with the mfpmp.exe file of Windows Media Player which users like to delete for problems with subtitles and all.

permission denied

So, here we have given the easiest way of taking ownership and granting full access to the files and folders in Windows 7 and Vista.

Method 1: Using Command Prompt. (Preferred One – easier)

Step 1: Open Command Prompt in Administrator Mode. Press Start + R,

Type cmd and Press Ctrl+ Shift + Enter.

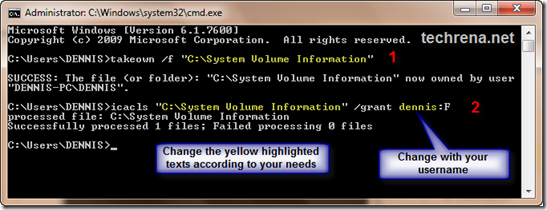
Step 2: In the Command prompt type takeown /f “location path +file name or folder name”. See the example below:

Step 3: Again type icacls “File or folder path and file name” /grant <user name>:F. Example:

This will look like:

take ownership of a folder

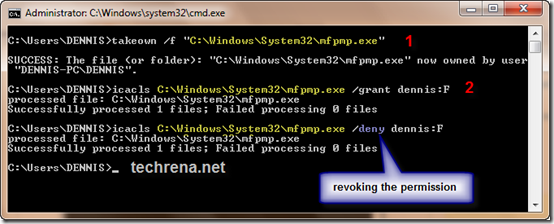
Same thing for a file. Below example is for mfpmp.exe.

take ownership of a file

To revoke the permissions just replace the grant with deny.

Note: If you have a space in Between your User name then put “”. Example:

icacls  “C:\\System Volume Information” /grant “Techrena dot Net” :F

Method 2: Using the properties menu.

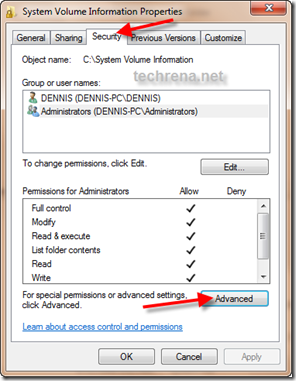
Step 1: Right Click on the File or Folder you want to own and select Properties.In the Properties go to Security Tab from General Tab. Then Click On Advance.

Take_ownership_setting_properties

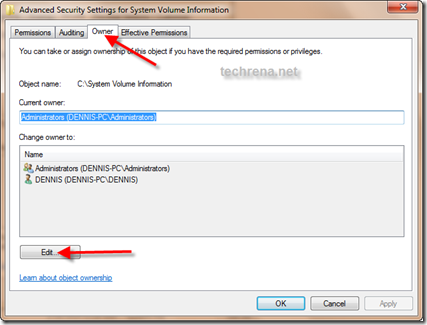
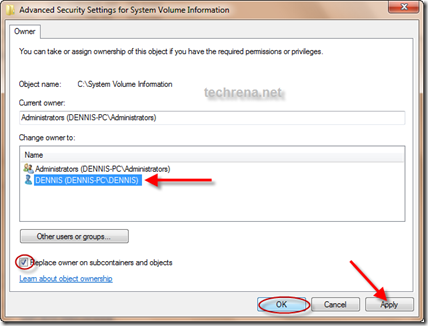
Step 2: In the advanced menu go to Owner tab, Click on Edit. Select your Username. If you want to own the Subfolders and files then Check the box. Click Apply and then OK.

edit_ownership

select_owner

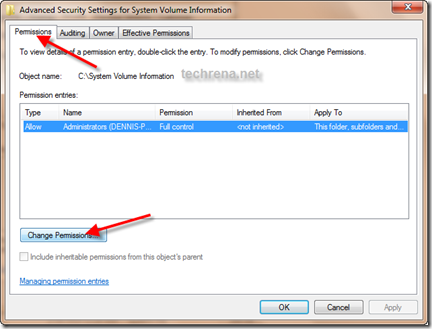
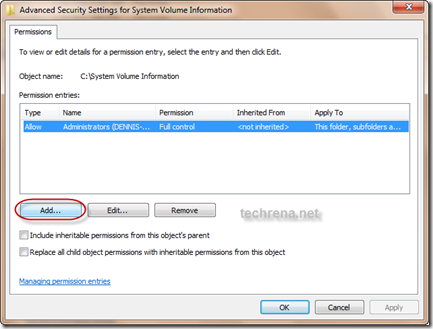
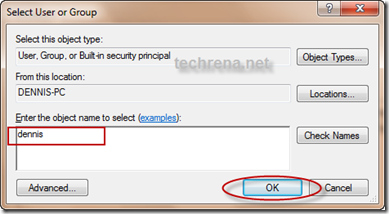
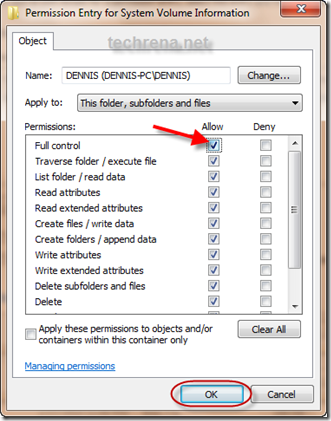
Step 3: Not to grant the permissions, Go to Permissions Tab. Click on Change Permission. Then Click on Add..Type your username and click OK. Now, it will show the Permissions Entry menu.  If you want Full control(Edit, Delete, Modify) then Check Full, else select the permissions you want. and click OK.

Chang_ File_Access_Permission

Add_user_permission

Type_username_permission

Selct_permission_type_fill_modify_read

Now you have successfully completed taking ownership of a file or a folder. You can do whatever you want with the file or folder.

Important Note: Please be careful with the System Volume Information folder. It was given here just as an example. Do not modify any permission to this folder as it contains all your system restore information. If you have changed to see the files, then please revoke the permissions after you are done. Any changes in the folder may lead to unwanted results especially in case of virus attacks,