[How To] Tweak The Low Battery Notification In Windows 7

Working on your notebook which is having a pretty high battery life? And wonder why you are being notified even when you have pretty much time left to plug into an AC power supply?

Windows takes into account the average laptops with battery lives around 2-4 hours and Microsoft has accordingly set the battery levels after which the users get notified and eventually pushing Windows into Hibernate mode after reaching a critical stage. But if you consider the case of the users with long battery backups, they would still be having more than enough time to save their current work, get plugin the power supply to the laptop. So if you are once such user, you might want to change the low battery actions on your laptop. Before that, let’s see what are the different battery levels considered by your Windows OS.

>> Low battery level is where you will laptop starts showing the first low battery notification and the low battery level usually lies in the range of 10-12%.
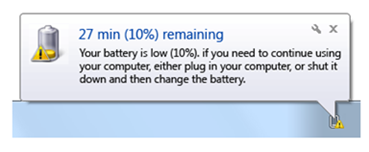
low battery in Windows 7

>> Reserve battery level is where your Windows starts acting and gets ready for hibernating, in most cases it will be around 7-8% lying closer to the critical battery level.
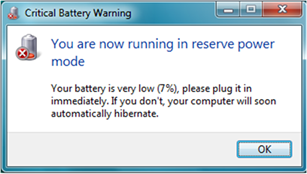
reserve battery level

>> Critical battery level is where your laptop goes into Hibernation mode immediately and it’ll be around 5% in general.

Critical battery in windows

Now that you have got the basic idea about different battery levels, let’s get into to details of changing the low battery notifications in Windows 7.

Steps:

1. Type “power options” in the Start Menu search and open the first result under the Control Panel section.
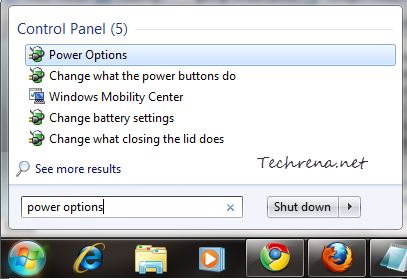
Power Options search in the Start Menu

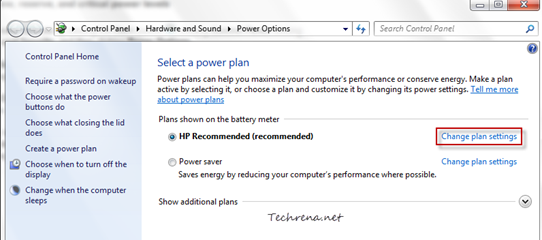
2. Now select the power plan for which you want to change the low battery notification settings, and click the “Change plan settings” link found next to the power plan.

Power options in Control Panel

3. In the “Edit Plan Settings” window, click on the “Change advanced power settings” link found at near the bottom.
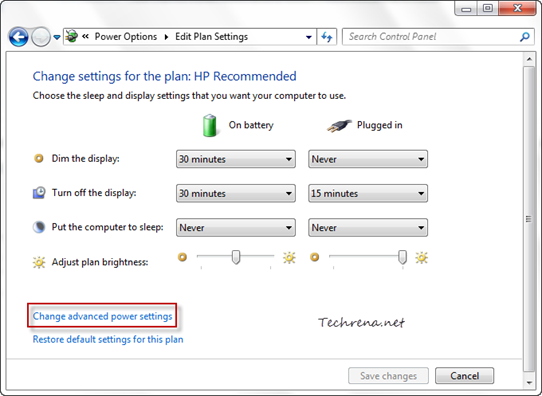
Edit power plan settings in Windows 7

4. Scroll down to “Battery” section in the Advanced settings tab and click the “+” button to expand it.
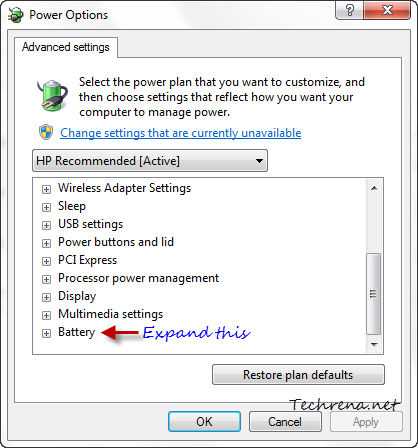
Battery advanced power plan settings

5. You may adjust the settings for each of the battery levels i.e Low battery level, Reserve battery level and Critical battery level.
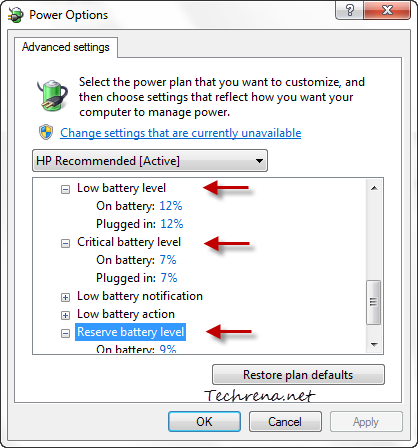
Low battery notification settings

Click “OK” once you are done to apply the settings. That’s it.

[How To] Create And Enable Mobile Version Of A Blogger Blog

blogger logo

With the growing usage of iPhones, Android devices and other smartphone devices around the world, the number of people who access the internet from their mobile devices. Considering this, it is now very essential that you create a mobile version of your website or blog just to make sure that it fits perfectly on the screens of such devices. If you are a blogger and using WordPress, it’s pretty much easy to setup a mobile version of your blog with plenty of plugins serving the purpose. But what about Blogger? If you still don’t know, the answer is Yes! now you can. Blogger has recently announced the mobile templates for Blogger. But this now is available as an opt-in functionality on Blogger in Draft.

Here’s how you setup and active a mobile version for your blogspot blog without using any hacks:

1. Log in to Blogger in Draft.

Blogger in draft

2. Click on the “Settings” link for you blog

Blog settings link on Blogger dashboard

3. Go to the “Email & Mobile” tab under “Settings”.

Email & Mobile tab under blogger blog settings

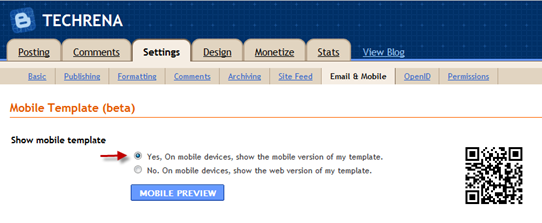
4. Under the Mobile Template, choose the first option (Yes, On mobile devices, show the mobile version of my template).

Mobile Template in Blogger

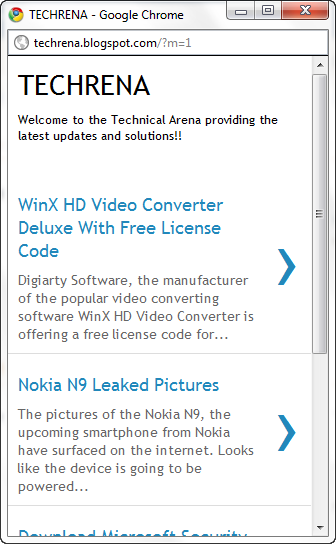
5. You can click on the “Mobile Preview” button to see a preview of how your blog will look on a mobile device

Blogger mobile preview

6. Click the “Save Settings” button at the bottom once you are done.

save settings button in blogger

You have successfully enabled the mobile template for your blog now. Test it by visiting your blogspot blog from a mobile phone or use the QR code found in the mobile template settings to directly go your site on your mobile device.

techrena QR code

[Download] WordPress 3.0.4 Important Security Update

WordPress has probably rolled out the last update for the year 2010, WordPress 3.0.4, an important security update for the popular CMS. In a blog post about the release of the update, Matt Mullenweg, founder of Automattic, the company behind WordPress, has termed the latest update as “critical”. The update apparently fixes a core security bug called KSES found in WordPress HTML sanitation library.

WordPress 3.0.4

To keep your website or blog managed by WordPress CMS, it is strongly advised that you immediately update it to the latest version. You can either choose the automatic update mode or download the file from the links below and extract to your server using an FTP client.

Download:

WordPress.zip (3 MB)

WordPrress.tar.gz (2.7 MB)

[Tip] Sort A List Alphabetically In MS Office Word 2007 & 2010

Microsoft Office 2010

Recently I was working on a big list of words that are to be sorted alphabetically for easy use. I was checking various online sources . Yes, there are online tools available to just to that. But if you have Microsoft Office Installed on your Windows, it’d be a better way to accomplish this task. Microsoft Word can sort data according to various criterion and here we’ll just try to know how to sort the data alphabetically. Advanced users of Microsoft Office should well be aware of this but if you are a starter probably you should read the following guide to learn how you can do it in Microsoft Word 2010 or MS Word 2007.

1. Open the Microsoft Word application.

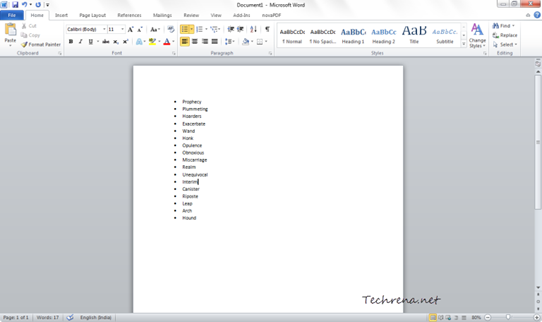
2. Paste the list that you want to sort in the new document.

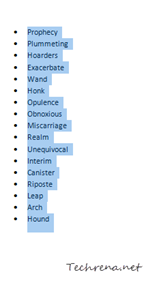
List in Microsoft Word 2010

3. Select all the words using CTRL + A

Select the whole list in Office 2010

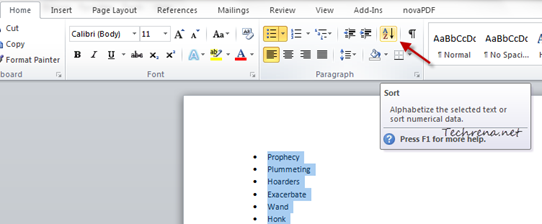
4. Now find a small sort icon Sort icon in Word 2010in the Paragraph group under the “Home” tab. Click on the icon.

Sort list in MS Office Word 2010

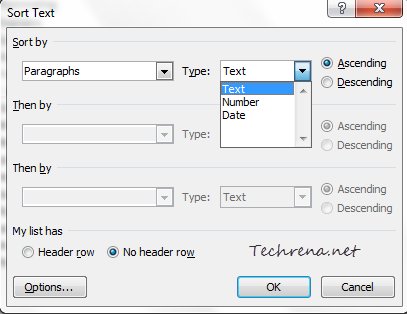
5. A new dialog box will appear inside the Word application window. Choose “Text” option from the dropdown list under the Type and choose “Ascending” radio button. Click OK.

Sort Text Dialog box in Word 2010

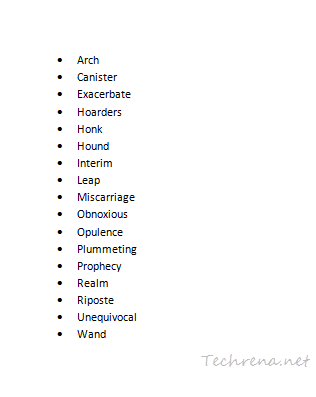
That is it. Your list is now sorted alphabetically as you can in the screenshot below:
Sorted list in Word 2010

[How To] Disable Aero Shake In Windows 7

If you are using Windows 7 you might have noticed the Windows Aero Shake effect. Just hold down a window on its title bar and shake it back and forth and you will notice that all the other windows will be minimized. I’m sure you must have noticed this, but chances are that you might not be aware that this is due to an special Windows 7 Aero effect called Windows Shake. Windows Shake is part of the Aero effects in Windows 7 alongside Aero Peek and Aero Snap. Watch the following video to know about Aero Shake.

For some reasons, if you want to disable Aero Shake feature for your Windows, here are the two ways in which you can do it.
Method-1: Using Registry Editor [For All Windows 7 Editions]

1. Press Windows + R button to open the RUN command.

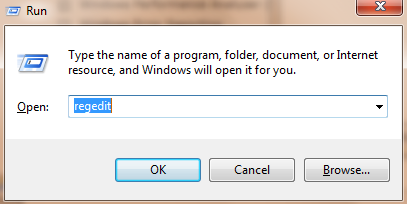
2. Type “regedit” in the text field and hit Enter to open the Registry Editor.

regedit run command

3. In the Registry Editor, navigate to the following path:

HKEY_CURRENT_USER\Software\Policies\Microsoft\Windows

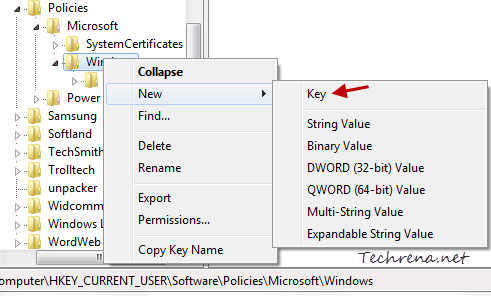
4. Right-click on the “Windows” main key and choose New > Key from the context menu to create a new key with name “Explorer”.

Create a new sub key under Windows main registry key

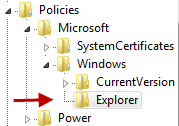
And it should look like this:

New Explorer sub key in regedit

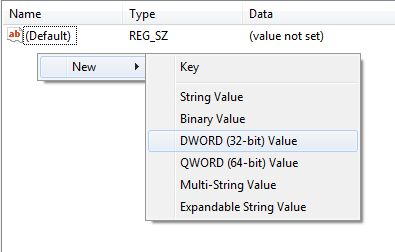
5. Now in the right hand side pane under the newly created “Explorer” key, right-click and choose “New > DWORD (32-bit) Value”.

Creating a new DWORD in regedit

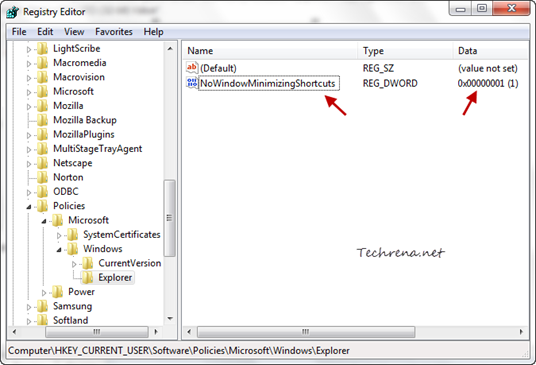
6. Name it as “NoWindowMinimizingShortcuts” and set its value to 1 as shown:

Registry setting to disable Aero Shake

That is it. Just log off from your account and log back in and you will learn that the Aero Shake has been disabled. To enable the Aero Shake again, just delete the DWORD that you have just created.

Method-2: Using GPEDIT [Only For Limited Windows 7 Editions]

If you are on Windows Professional, Enterprise or Ultimate editions you have access to the Local Group Policy Editor and it is relatively easy to achieve the same settings vis GPEDIT.

Steps:

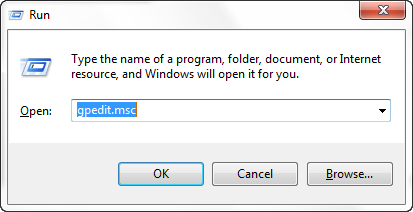
1. Press Windows button + R to open the RUN dialog box and enter “gpedit.msc” in the text field and hit enter.

Gpedit from RUN command

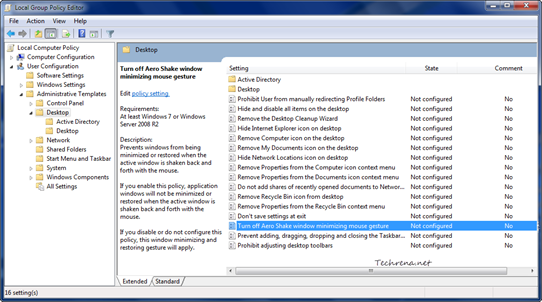
2. Go to User Configuration > Administrative Templates > Desktop in the local group policy editor.

3. On the right-hand side pane, find an entry named “Turn off Aero Shake window minimizing mouse gesture”. Double-click on the entry to configure the settings.

GPEDIT settings for Aero Shake

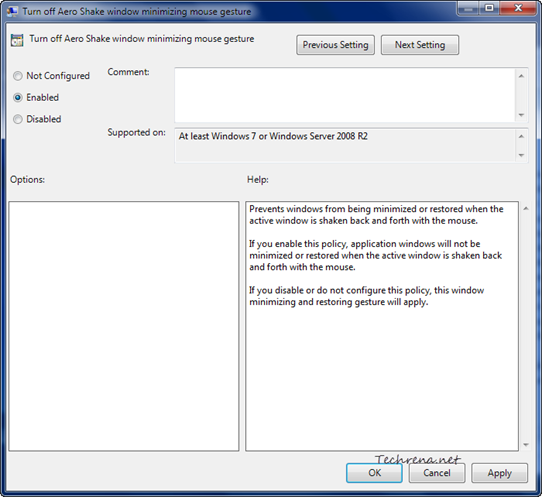
4. Select the “Enabled” option and click “OK” to apply the settings.

GPEDIT settings to disable Aero Shake

The changes will be in action immediately and the Aero Shake will be disabled.

If you are on Windows 7 Starter, Home Basic or Home Premium editions, you must use the method-1. If you are on Windows 7 editions other than the above mentioned ones, we suggest you to go with the method-2.

[Tip] Disable ‘Recently Closed Tabs’ In Firefox

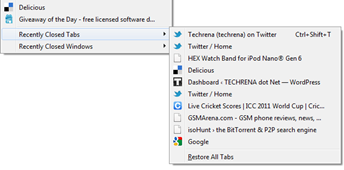
Firefox recently closed tabs

Firefox lets users to quickly reopen few of the recently closed tabs for quicker access. Even though the users can go to the history and access all of the webpages that were accessed or closed previously, the “Recently Closed Tabs” that appears under the “History” menu item is surely a timesaver for many of us. But yes, there are people who don’t like this feature. You can always configure Firefox to not to remember any of your recently closed tabs or manually configure it to remember certain number of the recently closed tabs. Here is what you have to do:

1. Type about:config in the address bar and hit enter.

2. A warnings message will be shown, accept that you would be careful while working the about:config entries.

about:config firefox warning

3. In the “Filter” filed, type the following text code and look for an entry which exactly matches with it.
browser.sessionstore.max_tabs_undo

About:config settings in Firefox

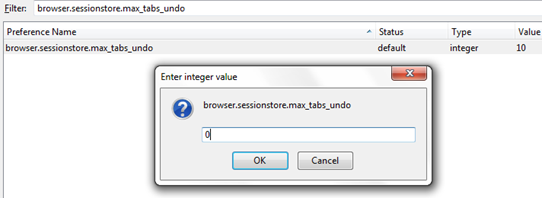
4. Double click on the entry. By default it will hold a value “10”, meaning that it will remember and show the last ten recently closed tabs. Here we want none. So change the value from 10 to 0.

Change number of tabs closed undo setting

That is it! Firefox will no longer remember your recently closed tabs. If you have entered any other non-zero value, Firefox will let you see that many number of the most recently closed tabs.

[How To] Backup And Restore Windows 7 Sticky Notes

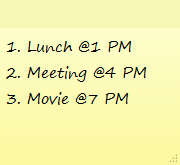
sticky-notes-windows-7

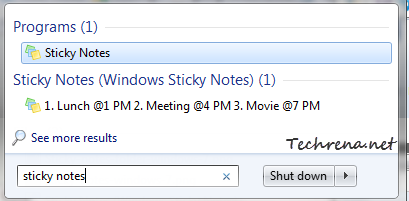
Sticky notes in Windows is a fastest way to quickly take a note or add quick reminders, the easy way. You can easily add a new sticky note by searching for “sticky notes” in the Start Menu and by launching the Sticky notes application.

Launch sticky notes from start menu

If you use sticky notes much, you might want to save and backup them so that they can be restored and used on another computer. Follow these below steps to learn how you can do this.

Steps:

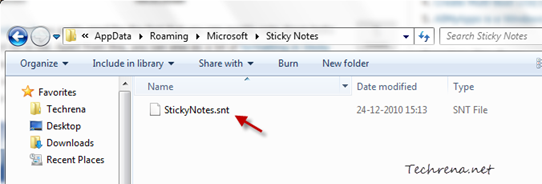
1. Navigate to the following folder in your explorer:

C:\Users\<username>\AppData\Roaming\Microsoft\Sticky Notes\StickyNotes.snt

Where <username> is the your Windows user account name through which you are logged on.

2. You need to enable the option to show hidden files and folders in order to see the “AppData” folder and  StickyNotes.snt file in your explorer.

Sticky-notes-folder-windows-7

3. Now you just need to copy the above file to another external media like USB flash drive or external Hard disk, to save the backup and later move it to the same folder (mentioned in step-1) of the target PC where you want to see these sticky notes.

You can use this tip to restore your sticky notes on a new computer or on the same computer when you reinstall your Windows 7 copy replacing the older installation.

[Download] Firefox 4 Beta 8

Mozilla has released the 8th version of the Firefox 4 beta few days back. As Mozilla had earlier finalized the features list for final version of Firefox 4, this Firefox 4.0b8 build doesn’t come with new features but have few feature improvements over the earlier beta release. The major improvements are:

>> Improved Firefox Sync,

>> Refined add-on manager

>> Speed, functionality and stability improvements to WebGL

Firefox 4 beta 8

To know about all the improvements in Firefox 4 Beta 8, read the release notes. Firefox 4 beta 8 has more than 1400 bug fixes listed.

Download Firefox 4 Beta 8 [7.7 MB]

[How To] Use The Reliability History In Windows 7

Windows 7 has many lesser-known features and “Reliability Monitor” is one such feature. Reliability Monitor, a handy tool for diagnosing when a particular event was first occurred. It usually monitors five types of events:

>> Application failures

>> Windows failures

>> Miscellaneous failures

>> Warnings

>> Information

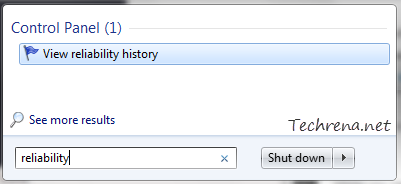
To see the Reliability History for your Windows, go to Start Menu and type “reliability” in the search box and click “View reliability history” from the results under “Control Panel” section.

reliability history in start menu

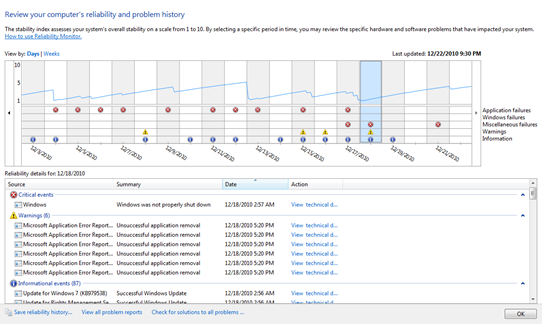
You will see a graph divided into weeks (or days) showing the all the different types of events that are recorded.

reliability monitor

Critical errors are displayed with critical error in windowsicon , Warnings with warning in windowsand information messages with information icon in windows.

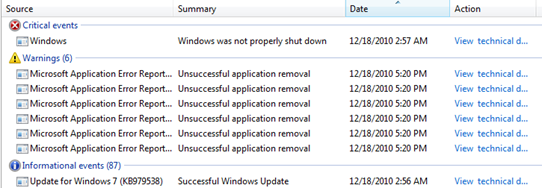
While you can safely ignore the information messages, you should look deeply into the critical errors and warnings. If you are encountering any serious issue with your Windows, and decide to trouble shoot it, the first place you should visit is this as you can get an idea of exactly when the problem has started. The monitored events mostly include processes that stopped working, errors when windows was not properly shut down, unsuccessful application installations and driver installations etc.

Events in reliability history

Check solution for a critical event

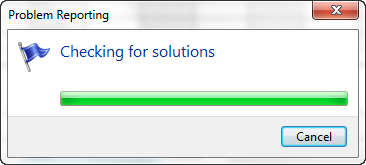
You can right-click on any critical event to check for a solution for that event. If you are connected to internet Windows will automatically look for a solution and will save it in the Windows 7 action center.

Checking for solution in Windows 7

If you view the technical details of the problem, you will get some important details like error code for the issue with which is pretty much useful in troubleshooting the problems.

Reliability monitor and reliability history is also available in Windows Vista.

Do you use this tool much? How far has this tool been useful to you? Do let us know though comments..

Make Phone Calls From Gmail For Free All Through 2011

Gmail logo small

If you are located in US and Canada, Google has some very good news for you. You can now make free phone calls to all your pals till the end of 2011. When this feature was launched initially in August 2010, Google said that it would offer free phone calls service to the U.S. and Canada till the rest of 2010. According to a recent blog post at Official Gmail blog, the free service has been extended through 2011.

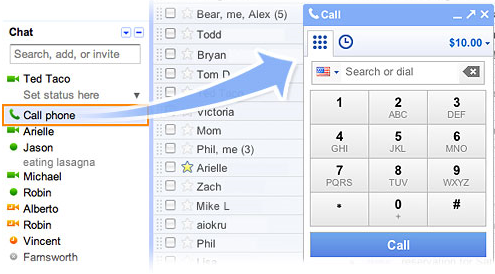
gmail phone call free

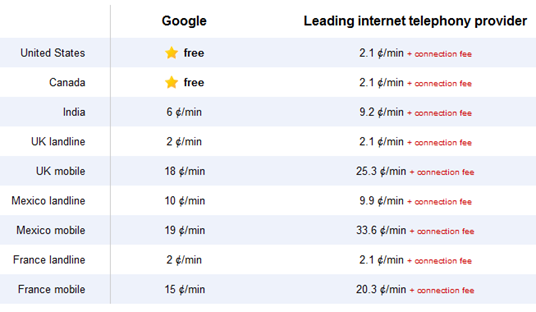
To get started with calling phone numbers in Gmail, get the Gmail voice and video chat plugin click on the “Call Phone” that appears at the top of your chat list and you will see the dial pad. You can either dial the phone number or enter a contact name to start a voice phone call. If you have a Google Voice phone number, you can even display it as the outbound caller ID and receive calls made to this number inside Gmail as well. It may not be as good as other leading VOIP solutions like Skype but still a decent one.While calls to the U.S. and Canada are free, calls to phones outside the United States are charged as per the following rates list.

gmail phone call rates

For more information, go visit gmail.com/call.