[Tip] Disable “This device can perform faster” Message In Windows 7

This device can perform faster

Sometimes when you insert an older flash drive or any other drive into USB port of your PC, a message may appear saying “This device can perform faster”. This message appears because there are two USB standards namely USB 1.1 and USB 2.0, the later one being the standard that supports high speed performance with USB devices.

But it may seem annoying when this notifications pops up each and every time you connect the flash drive to the USB port. If you don’t want to see this message anymore, follow these steps below to completely disable this notification:

For Windows XP Users:

device_can_perform_faster_xp

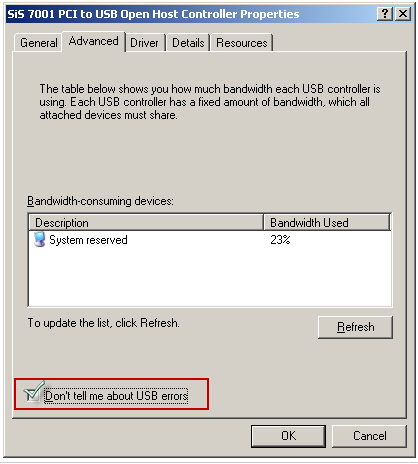
1. When you see the balloon message, just click on it and it will open a new window:

USB host controller properties

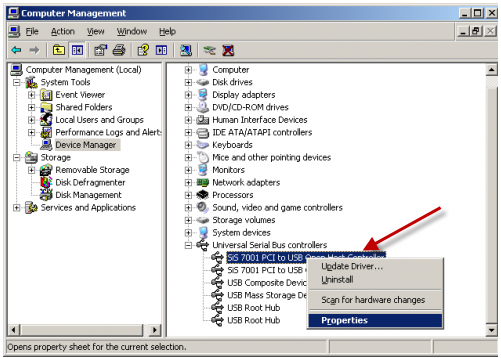
Alternatively, you can open the same window in a different way. First right click on My Computer > Select Manage > and Computer Management window will open up:

computer management in windows xp

right click on the USB device that is connected and click “Properties”, you will still land on the same window. But by this way, you can even disable settings for the other USB ports as well.

2. Now check against “Don’t tell me about USB errors” and click OK.

You will no longer see the remainder balloon when you connect this device to the USB port

For Windows 7 and Windows Vista Users:

When it comes to Windows 7, the newest Windows OS has got better option than disabling USB errors. In Windows 7, you can choose not to notify even if the device attached to the USB port can perform better.

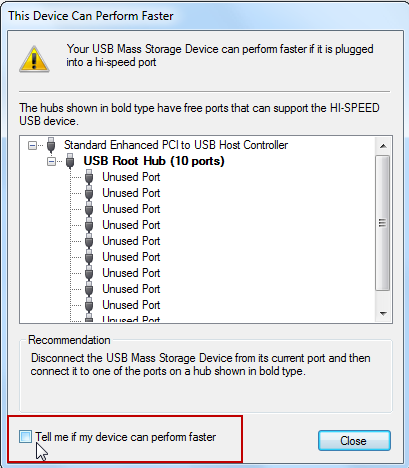
Click on the balloon message, it will show a window listing all available USB 2.0 ports. Uncheck “Tell me if  my device can perform faster” option at the bottom and click Close.

This device can perform faster options in Windows 7

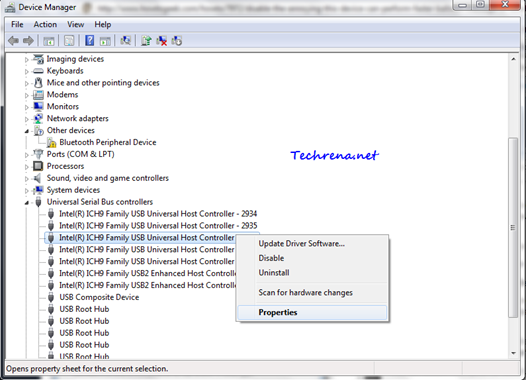
Alternate method: You can disable this option for other USB ports also via Device Manager > Universal Bus Controllers,

Device Manager and USB controllers

right click on the USB port and select properties.

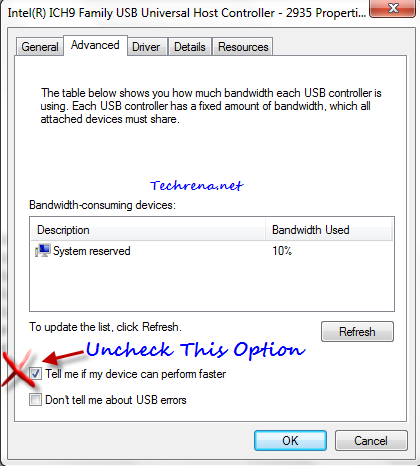
Now go to Advanced in the properties window. Uncheck against “Tell me if my device can perform faster” option and click OK.

USB_host_controller_properties_win7

From now on, you won’t see the balloon notification message when you connect a USB drive into your computer.

[How To] Fix Missing “Show Hidden Files And Folders” Option In Windows 7

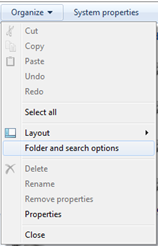
Windows comes with an option to either disable or enable the hidden files and folders. This option can be usually found via Windows Explorer > Organize > Folder and search options as shown here:

Folder and search options in windows 7

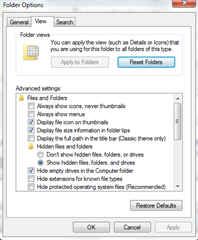
Folder options windows 7

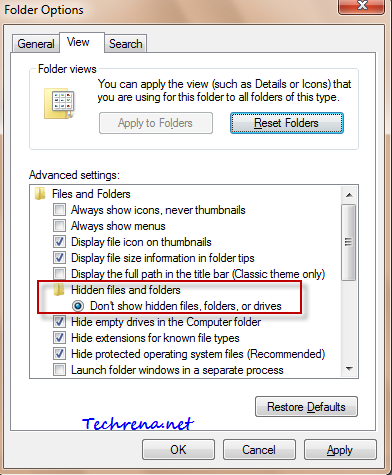
Under the View tab, you must see two options:

  • Don’t show hidden files, folders or drives
  • Show hidden files, folders and drives

Hidden files and folders items

But when your computer is infected by a virus or malware, it can change your default settings to not show hidden files and folders and more often it can even remove the “Show hidden files, folder and drives” option completely, as you can see in this screenshot:

Show hidden folders missing

Even if you scan your computer with any antivirus program and remove the virus, these settings will not be reverted back to default. Hence you must enable them manually. We had previously posted solution to similar problem but it was for showing hidden files and folders in virus affected system in case of Windows XP.

And now let me guide you on how to enable this missing option in your Windows 7 (or even in Windows Vista) folder options.

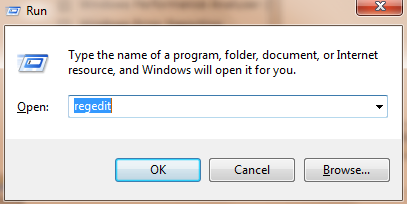
1. Press “Stat button + R” to open the run command tool.

2. Type “regedit” in the text filed and press enter to open the registry editor.

Regedit from run command

3. Follow the following path and carefully navigate to the same in the registry editor:

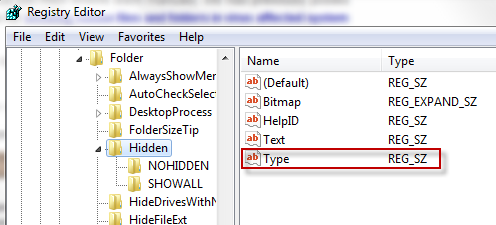
HKEY_LOCAL_MACHINE > SOFTWARE > Microsoft > Windows> CurrentVersion> Explorer> Advanced> Folder> Hidden

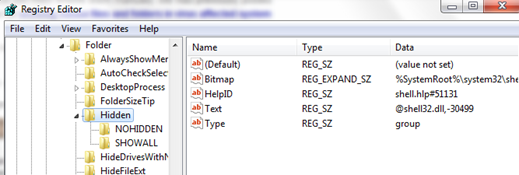
4. In the right hand side, look for a key with name “Type”. It should have a vale “group” under data column. If it doesn’t show this value, then follow:

registry editor

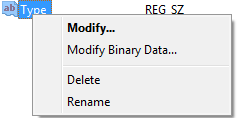
5. Right click on the key Type and chose modify.

Modify regedit

And change the value data to “group”. If the key “Type” doesn’t exist at all, just right click on right hand side pane and select New > String Value and enter the data value as group.

Registry editor vaules

Now open Task Manager (right click on taskbar and choose Task manager), go to processes tab, find explorer.exe, right click on it and choose “End Process”. Don’t get frightened when you see all the windows explorer windows getting closed leaving you with just the windows of the opened programs.

Just go to File > New Task (Run..) from the Task Manager and enter “explorer” in the filed and click OK, Windows Explorer will be back.

Now go back to the folder options and the “show hidden folder..” option should be visible again.

[Download] Lock Folders In Windows 7 With Secure Folder

Lock folder

Folder lock softwares are one of the most sought -after programs for many computer users to keep their personal folders safe and secure by adding a password protection to the folders. Many of my friends still keep asking me whether any such free folder lock software available on the internet. Of course there are too many available already, but the one I’m going to talk here about is a freeware called “Secure Folder” that works on Windows computers including Windows 7, Windows Vista and Windows XP.

Setting up a password for any folder is pretty much easy and straightforward With Secure Folder. Download the installer from the links added below this post and install it on your Windows PC.

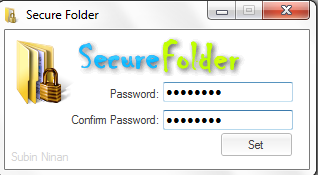
When you launch the application for the first time, it’ll ask you to set a password for the program.

Set password for Secure Folder

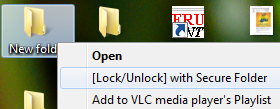
Once you have done that, it’ll add a quick item to the right click context menu for any folder.

Lock/Unlock Menu With Secure Folder

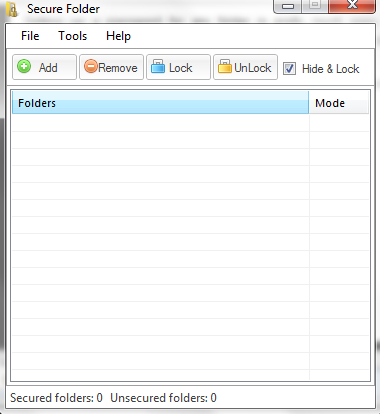
You can also add folders to the Secure Folder program window and click “Lock” button to lock the folder.

Secure folder program

When you lock any folder, you need to right click on it and select “[Lock/unlock] with secure folder”. and then enter the program password that you had entered during the setup.

[Tip] Find Facebook Last Login Time & Location Details

facebook logo

Facebook is undoubtedly the no#1 fastest growing websites in the world and no wonder it has made to the top 3 websites in terms of number of daily visits worldwide. It has evolved as such a nice platform for social networking, connecting with friends, sharing with friends and with those wonderful apps, the ease of using the site is just growing in a phenomenal manner. Popularity always brings envies too. The result: increasing number of phishing attacks on Facebook to get your login details. The only way you can save your account from being exploited is to never share Facebook account details on any where else. Even if you does this regularly, you would still be doubtful if someone else finds your login details without your knowledge and gain access to your profile. The only way you can sense a suspicious activity on your account is to monitor your account to see if there’s an unauthorised access from any where and from any device which might not have used by you.  Here’s the tutorial on how to check your last login time and location on Facebook.

Find last accessed time & location of Facebook account:

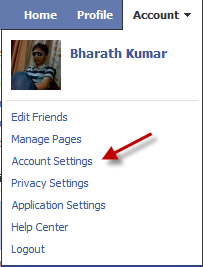
1. Login to Facebook and click on “Account” dropdown menu on the top right corner of your screen. Click on “Account Settings”.

Facebook account settings

2. You will be taken to the Facebook “My account” page, where you will a number of tabs, each account for settings for different sections of Facebook. Click on Settings tab.

Facebook my account

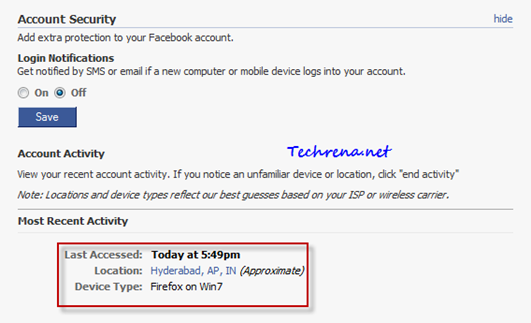
3. Find the “Account Security tab “under settings, you will have the account activity details listed under “Most Recent Activity

Facebook most recent acitvity

You can find the last accessed time, location and the device from where your account has been accessed. You can even enable SMS or email notifications whenever your account is accessed from a new computer or mobile device, just select “On” radio button under “Login Notifications” and click Save button.

You might also want to read how to disable Facebook notification emails.

[Download] Windows 7 Hotfix Update KB2028560

kb2028560 update

Microsoft has released an important hotfix update KB2028560 for Windows 7 and Windows 2008 server. This particular update is intended to provide performance improvements for the graphics platform (i.e to improve the performance of DirectX 11 in Windows 7 & Windows Server 2008 R2). This update also addresses the issue with Windows Live products when you have installed the Windows Internet Explorer 9 beta or preview build version on your computer. Instead of uninstalling IE9 when you face issues with Live products, I suggest you to download and install this hotfix and it should solve the issue for you. In fact Microsoft has also said that this update KB2028560 must be installed in order to support features in “upcoming release of an IE 9 platform preview build”.

Although the update is supposed to be an update for DirectX 11, it only includes files that are related to DirectX 10.1, DirectWrite and Direct2D. The gamers who have installed this update have reported no major improvements in DirectX 11 though they seem to have noticed a good fps increase in DirectX10 or DirectX10.1 based games.

KB2028560 Download Link:

Windows 7 (Windows6.1-KB2028560-v2-x86.msu- 1.4 MB) – Validation required

[Tip] Remove Unnecessary Items In Firefox Right-Click Context Menu

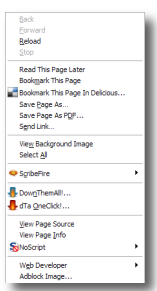
Firefox context menu

One main reason for Mozilla Firefox to get popularity among the internet audience is the comfort ability of adding our favorite add-ons from a host of add-ons available at Mozilla add-ons gallery. But sometimes when you install an add-on, they also add some items to your context menu in Firefox. When you go on installing more add-ons, the number of context menu (which appears when you right-click on any webpage inside the browser) items will become so huge that you can’t even spot the correct menu item at the first sight.

Wouldn’t it be good if we have a control over this context menu items and customize it and remove the unnecessary items from the context menu ? You can actually do it for yourself in two ways. The first and easy option would be to grab an add-on that lets you manage your context menu items. The second way of working around this needs a more of your effort and time. I’m here briefing both the methods, but I strongly suggest you to use the first method, second method is only for those enthusiasts out there who don’t like simple solutions Smile

Method-1:

1. Download Menu Editor Firefox add-on (currently works with Firefox 2 &3) , click “Add to Firefox” and allow it to be installed on your Firefox and restart the browser.

Add to firefox

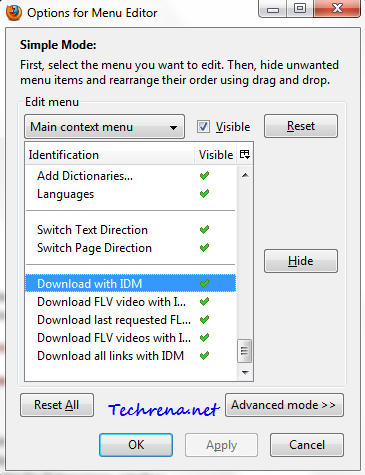
2. Hit Ctrl + Shift + S button to open the Menu Editor options dialog.

Menu editor options

3. Change the items in the menu editor options as you wish (you can click “Hide” button to remove it from the context menu). Alternatively you can rearrange the items to change their order. You can make use of this to Chrome-like options menu for context menu. In Chrome as you know, “Open link in new tab” comes ahead of “Open link in new window” option (reverse in case  of Firefox). You can use this add-on to change your Firefox context menu look similar to that of Chrome and other browsers.

Firefox new tab optionsFirefox new tab options after using addon

4. Click Apply to apply the changes and click OK to close the dialog box.

You will see the changes once you restart your Firefox.

Method-2:

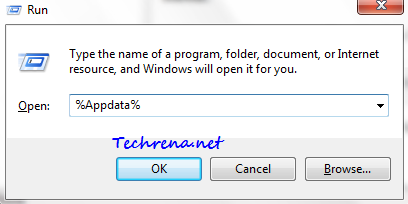
1. Press Start button + R to open “Run” command window and key in %Appdata% in the field and press Enter.

Run command

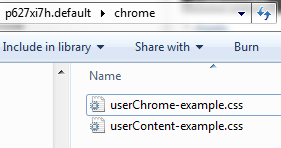
2. A new window will open containing a lot of folders. Navigate to Mozilla > Firefox > Profiles > <default profile folder> > chrome folder.

userChrome.css examples

3. Create a new file called userChrome.css (notice the uppercase ‘C’)inside the chrome folder.

userChrome.css file

4. Open the file userChrome.css in any text editor and add the following lines to it:

#id1, #id2 { display:none !important; }

5. Replace each of the identifiers #id1, #id2,.. with one of the selectors from this Firefox context menus list.

For instance, if you want to disable “View Page Source” and “View Page Info” items from your context menu, you should use the following code:

#context-viewsource,
#context-sep-viewinfo {
  display: none !important;
}

Similarly if you want to remove “Set As Wallpaper…” and “Set as Desktop Background…” menu item in the context menu, that appears when you hover on any image on a webpage, you should use the following code:

#context-setWallpaper,
#context-setDesktopBackground {
  display: none !important;
}

To remove the “Open Link in New Window” menu item, use:

#context-openlink {
  display: none !important;
}

And you can use your custom based on the selectors from the Firefox context menus list.

If something goes wrong just close the browser and delete the userChrome.css file from the chrome folder.

[Download] Internet Explorer 9 Beta

Internet explorer 9 beta

Microsoft has made the public beta of Internet Explorer 9 available for download. It has been a year-and-half since the release of Internet Explorer 8 and the internet world has since been eagerly waiting for the next version of the world’s most widely used browser.

IE 9 is available for download for users using 32-bit or 64-bit versions of either Windows Vista or Windows 7 only. Windows XP users won’t be able to install this version of the Internet explorer.

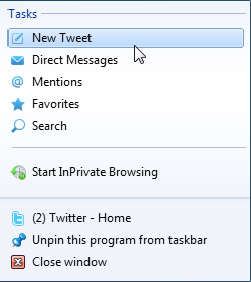
IE9 integrates perfectly well with Windows 7. With IE 9, users can easily pin their favorite websites to the taskbar with custom jump lists for each site. For instance, when you pin “Twitter” to the taskbar in IE 9, you will see the following jump lists which will directly take you to whatever page you want to see on Twitter (like direct messages, @ mentions, search etc.). This might well be a handy one specially when you pin sites like Gmail etc.

Twitter jump lists in IE 9

IE9 screen shot

There are a lot more features to speak about, for the same reason Microsoft has launched an official website beautyoftheweb.com dedicated to the Internet Explorer 9. For a full list of features, see what’s new in IE 9. IE 9 is available in many languages, choose the one as per your choice based on your current Windows language or simply whatever language in which you want to see IE 9 from the download links below.

Download:

Direct Download Links: Windows 7        32-bit 64-bit [Link expired]

Windows Vista 32-bit 64-bit [Link expired]

Note: Please note that Internet Explorer 9 will be installed as a Windows update and if you want to uninstall it in future, read How to uninstall IE 9.

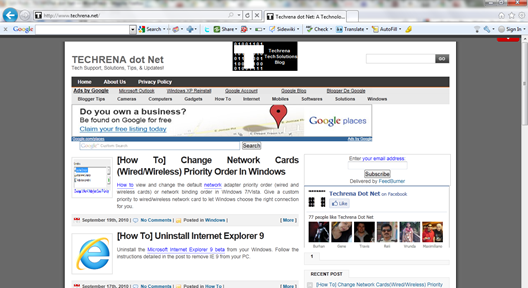
[How To] Change Network Cards(Wired/Wireless) Priority Order In Windows

change network interface card priority

Consider this scenario: You have both wireless network and wired LAN network available at your place and assume that you have enabled your wireless card and connected to the wired LAN network as well. Which one do you think your Windows will choose? Have you ever thought about it?

If you haven’t, here’s what you should know: There is a default priority order (or network binding order) that would be set for each of your network cards. You might not be knowing about this because it’s so hidden in the windows. You can only see it via a “netstat” command or through some advanced settings in the network connections.

Note: All the following operations are done in Windows 7 and they should also work in Windows Vista as well.

Checking Your Network Cards Priority:

Go to Start menu and type “cmd” in the search box and open cmd.exe from the programs list to open the command prompt.

cmd.exe from start menu

And then type the following command in the window and press enter:

 netstat -rn | more

Nestat command in command prompt

You will now see “Interface List” in the results as shown (click on the image to view the bigger image):

Network interface metrics list in cmd

I tried to represent the above result that I got in the command prompt in a text format below:

Interface List

14...00 xx xx xx xx xx ......Bluetooth Device (Personal Area Network)

12...xx xx xx xx xx xx ......Broadcom 802.11b/g WLAN

11...00 xx xx xx xx xx ......Realtek PCIe FE Family Controller

1...........................Software Loopback Interface 1

17...00 00 00 00 00 00 00 e0 Microsoft ISATAP Adapter

19...00 00 00 00 00 00 00 e0 Microsoft ISATAP Adapter #2

15...00 00 00 00 00 00 00 e0 Microsoft 6to4 Adapter

18...00 00 00 00 00 00 00 e0 Microsoft ISATAP Adapter #3

16...00 00 00 00 00 00 00 e0 Microsoft 6to4 Adapter #2

22...00 00 00 00 00 00 00 e0 Teredo Tunneling Pseudo-Interface

As you can see in the above screenshot (highlighted in red), the numbers against the network card interfaces (called “interface metrics”)represent the priority of that network according to Windows. The lower the number, the higher is the priority. In my case Software Loopback 1 (representing Microsoft Loopback adapter) is assigned the highest priority (lowest number #1), followed by Realtek Ethernet adapter (number #11), Wireless LAN adapter (number #12).

So to sum up, my wired network card has been set a higher priority than my wireless network card by Windows. Now let’s assume that my wireless network gives me a faster internet access than what my ISP through the wired network card does. So I’d be keen to connect to the ISP via wireless network card that is offering a faster internet access. But if you are connected to both the wired network & the wireless network, according to the priority assigned, Windows will gives you access to the internet via wired network card by default. So we need to find a way to instruct Windows to let you access the network via wireless network by default, when you are connected to both the wired and wireless networks at the same time. Read on to find out how to do this:

Warning-: You may not want to change the default priority order unless you see some real problem with how Windows is prioritizing the network interface cards.

Changing Network Cards Priority in Windows:

You can change the network card priority in two ways in Windows:

Method #1:

To start with, I’ll introduce you the easier method first:

1. Go to Control Panel > Network and Internet (View network status and tasks)> Change adapter settings and now you will now be in “Network Connections” window.
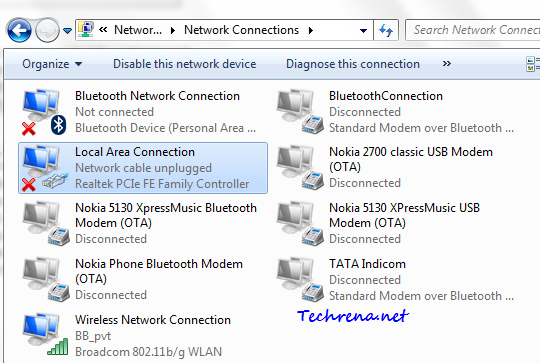
network connections in windows 7

2. Now press Alt button and a hidden menu will appear beneath the location bar.

hidden menu

3. Under the Advanced menu, click “Advanced Settings”.
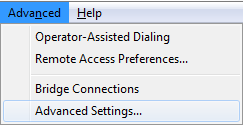
advanced settings in network connections

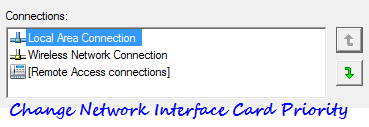
4. You can now see the order of preference in which the connections are accessed by network services.
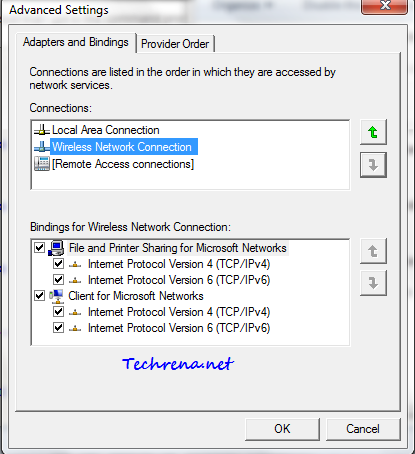
advanced settings for network priority

Use “Up” and “Down” buttons to move a network connection either up or down and thus changing the order of priority of connections.

Method #2:

And now let me introduce you the second alternative method, which is a bit laborious when compared to the first one:

1. Go to the “Network Connections” window by following the step 1 as detailed in the above step.

2. Right-click on the network connections for which you want to change the priority order and choose “Properties”. In my case, I wanted to change the interface metric for my wireless network card and hence I will proceed with the changing priority order for Wireless Network Connection under my network connections.
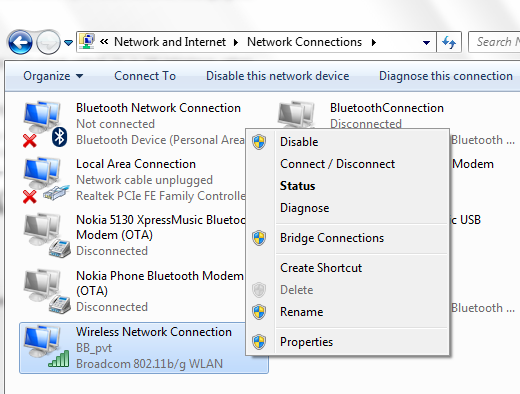
Context menu on network connection

3. Now choose “Internet protocol Version 4 (TCP/IPv4)” and click on “Properties” button.
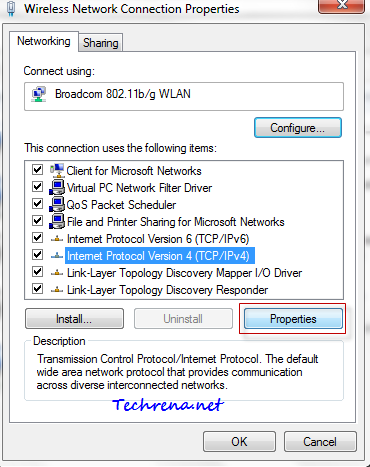
Wireless network connection properties

IPv4 properties

Click on “Advanced..” button in the IPv4 properties window.

4. Look for the “Automatic metric” option in the advanced TCP/IP settings window.
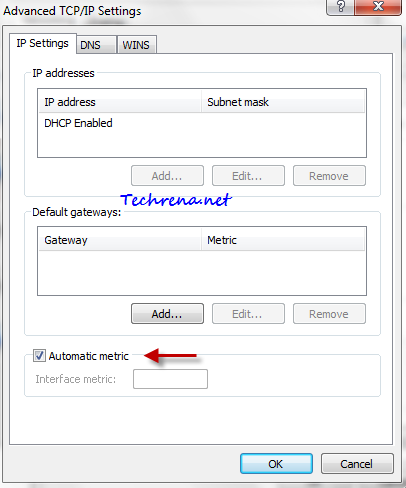
Advanced tcp/ip settings

5. Uncheck against the “Automatic metric” option and enter some value other than 1 in the filed against “Interface metric” (as 1 will always be assigned to Microsoft Loopback adapter always) as shown:
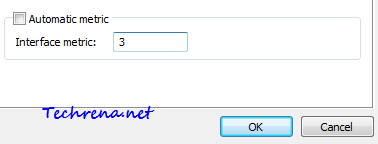
Automatic metric/interface metric value

Click OK and close all the windows.

You have now changed the priority of your network card interfaces.
[How To] Uninstall Internet Explorer 9

Internet Explorer 9

Recently I have downloaded and installed Internet Explorer 9 beta on my laptop to see what Microsoft is up to with their new browser. But since then I had problem while opening some programs like Windows Live Writer (it is the older version of WLW of course), which was getting crashed even before it could start. I was quite sure that the IE 9 could be the culprit and in fact an article at Windows support knowledge base suggested me that I was right. Ok, all I need to do is to uninstall the Internet Explorer 9 from my PC. I followed the usual routine: Control Panel > Programs> and clicked Turn Windows features on or off.

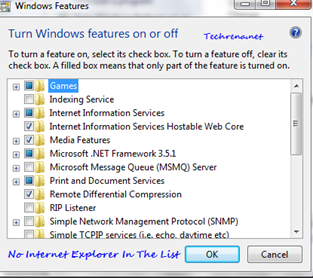
But I was rather surprised to see that there’s no Internet Explorer in the list !

IE 9 missing in Windows features

The fact is that when you choose to install Internet Explorer 9 beta, it’s going to be installed as an windows update. So if you want to uninstall this program, you need to uninstall from the installed windows updates list.

Steps:

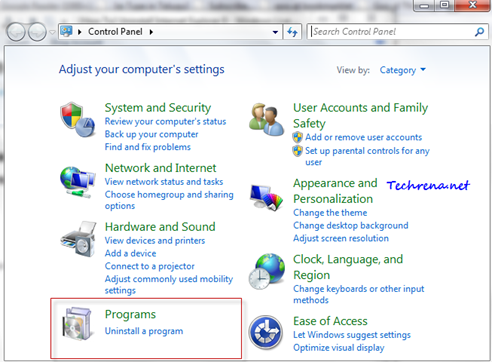
1. Go to Control Panel > Programs > Click “Uninstall a program”.

Uninstall program in control panel

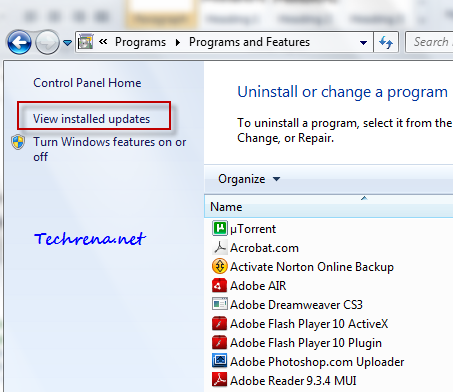
2. And yes, you don’t find it under the installed programs list. Click on “View installed updates” link.

Programs and features and installed updates

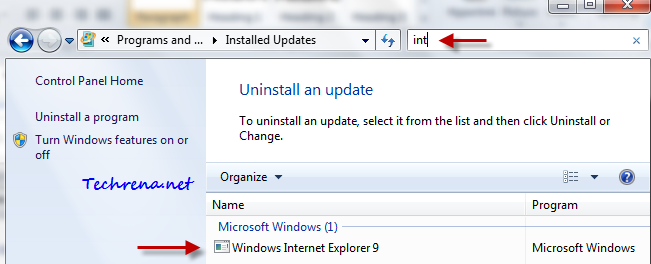
3. Now search for “internet explorer” in the installed updates list.

ie 9 uninstall

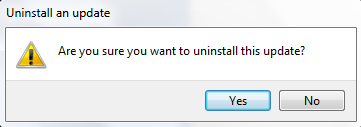
4. Just right-click and choose “uninstall” and accept the confirmation.

IE9_uninstall_confirm

Just restart the computer once the uninstallation is over and there you go, you have Internet Explorer 8 back on your PC instead of Internet Explorer 9.

This marks our 500th post at Techrena.net. To receive the updates from our site subscribe to Techrena’s RSS feeds via email.

[Tip] Paste Text Minus Formatting In Google Chrome

This might have happened to all of us- You are writing an email and you want to quote something from a webpage, you try to copy text and paste it in the email editor, you will see the original fonts, colors, spacing and styling attached to it, but you are just concerned about the plain text and you don’t want any sort of styling attached to it.

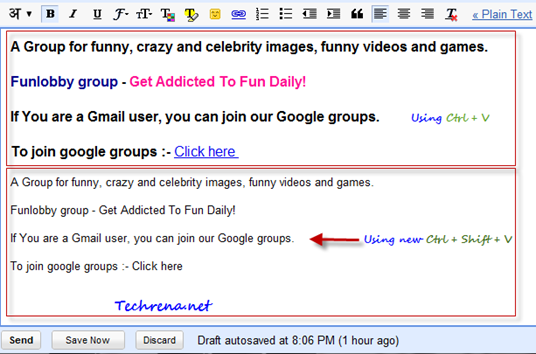
When the traditional Ctrl + V command just pastes the text with all formatting, Google Chrome team has developed an easy shortcut Ctrl + Shift + V command (Command + Shift + Option + V on Mac OS) to just “paste as plain text”.

Ctrl shift v chrome

Take a look at the following screenshot which highlights the advantage of this particular shortcut while writing an email in Google Chrome.

Chrome Shortcut for pasting text without formatting

You can use this keyboard shortcut for any rich editor like Gmail’s compose mode, or even in editing documents in Google docs etc. to remove all the unwanted formatting and styling from the text from webpages.

Via Google Chrome blog