[How To] Save Office 2010 Document As A PDF File

Microsoft Office 2010

It’s quite common nowadays that we convert any document into a PDF file , as PDF files are really portable and can be opened on any computer running on any OS with light weight and free software (like Foxit reader for instance). PDF is also the standard file format that is mostly being used for e-books, other official release and taking printout of the documents as the elements inside the PDF file can’t be edited and will uphold their properties unlike other documents which can be easily edited or sometimes even render in a different way in different computers.

After assessing the quick popularity that the PDF file format is getting among the users, Microsoft was supposed to include a direct “Save as PDF/XPS” option in Microsoft 2007 itself, but Microsoft was apparently chose not to do so because of threat of lawsuit from Adobe. However, they were offering such feature in Office 2007 via “Save to PDF” & “Save to XPS” add-in.

Now I guess many of the users like me has already started using Microsoft Office 2010. The good news is that you no longer need to install any add-on for your Office 2010 as, Microsoft has officially included an option to save any document as an PDF / XPS file.

There are two ways in which you can save a file in Microsoft Office Word 2010 into an PDF or XPS file.

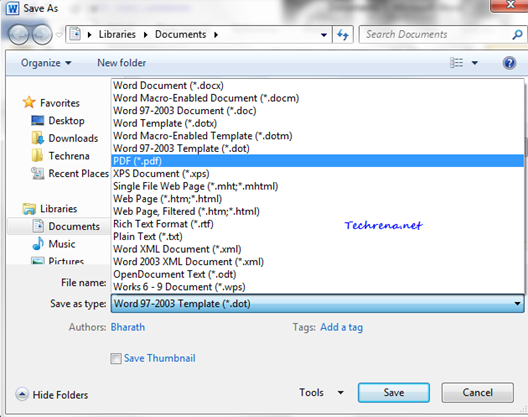
Option 1: Just open the file that you want to save it as PDF and click Save (or Save As) button.

Save_file_office_2010

Once you click on Save button, you will be asked to choose the location where you want to save it and the type of file you want it to be. Choose the PDF (*.pdf) from the drop down and click Save.Save file as PDF in Word 2010

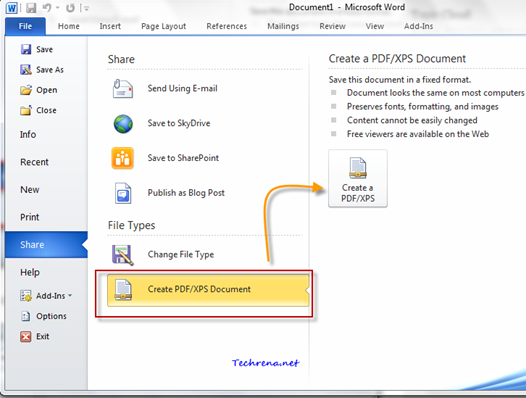
Option 2: Open the file that you want to convert, click on the “File” icon and click on the “Share” button in the menu. Now click on “Create PDF/XPS document “ and click on “Create a PDF/XPS” button on the right hand side.

Share as PDF or XPS document in office 2010

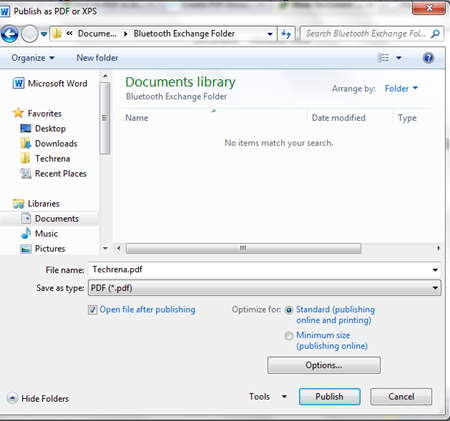
In the next step, choose the location where you want it to be saved.

Save as PDF in Word 2010

PDF saved with office 2010

Bonus Tip:

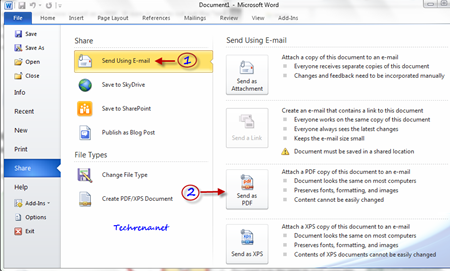
To convert the document into PDF and send it as an email attachment in MS Office 2010 (via Outlook 2010), just click File > Share > Send Using Email and then select Send as PDF option.

Send Email as PDF in office 2010

In this way you can convert any document to PDF file using in MS Office 2010 (Word 2010 and Excel 2010 have this Save As PDF option built-in).

[Tip] Google Talk And Google Buzz Text Formatting Tips

gtalk

Google Talk is quickly overtaking the Yahoo and MSN when it comes to instant messaging (IM). Lots of people are using Google Talk either through their native desktop version or the Gmail version of the talk client. With many features like video chat made available to the users, Google Talk is one IM client that has gained lot of popularity among the users. But not so many option to format text unlike Yahoo Messenger and other IMs is a let down for Gtalk users. But Google talk do have some lesser known  formatting styles that are in my honest opinion sound a bit difficult to implement as these have to be used manually by typing rather than to be able to select by a mouse click like in other popular IMs. Here we are listing down all the possible styling tips that you can use while you do a chat with your friends in Google talk.

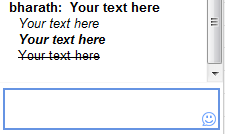
Google talk text formatting

Tip 1: Use Bold Text

To make your text bold during your chat, enclose the text inside “*” (asterisks)

*Your text here*= Your text here

Tip 2 : Use Italic Text

To italicize the any text just enclose it in “_” (underscores)

_Your text here_ = Your text here

Tip 3: Use Bold + Italic Text:

Use

_*Your text here*_ = Your text here

Tip 4:  Use Strikethrough Text

To strikethrough a text in your chat, enclose the text inside “-“ (dashes)

-Your text here- = Your text here

Bonus Tip: The good thing here is that you can use all the above tips in your Google Buzz too.

Google hasn’t yet made the underline font feature available to the Gtalk users. However, you can suggest the Google Talk team to activate this feature.

If you are an excessive Google Talk user, you will definitely find all the above tips handy.

[Tip] Create A Lock Down Computer Shortcut

Lockdown my PC

We have previously covered how to create desktop shortcuts for shutdown and hibernation here at Techrena. Many readers of our site found them to be useful. We thought like when we could have shortcuts for shutting down and hibernation, why can’t we have shortcut for locking the computer user ? To begin with, if you don’t know yet, there is a much simpler Win + L (press Start key while holding “L” button your keyboard) shortcut already available to do the same and is easier as well.

We are just writing this tip to let you know that you can create shortcut for locking down your computer as well. It’s up to you to use this or the most preferred Win + L short key. Follow the steps below to add the shortcut to your desktop.

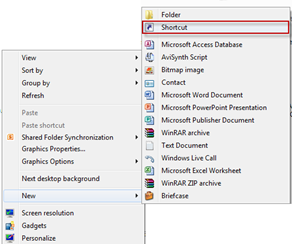
1. Right-click on your desktop (on any blank area) and select New > Shortcut.

create new shortcut

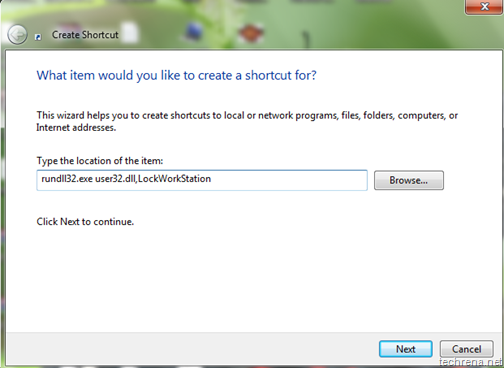
2. Type rundll32.exe user32.dll,LockWorkStation in the “Type the location of the item” filed in the window and click next.

Type shortcut location

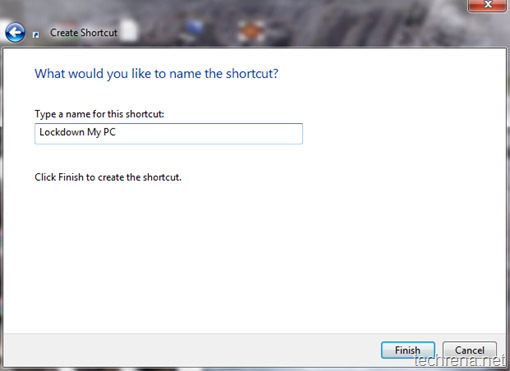
3. Give a name to the shortcut (something like Lockdown My PC) and click “Finish” to complete the setup.

Lockdown shortcut name

4. Now the shortcut for locking down your computer appears on desktop. You can even customize it by adding some colourful icon to it.

Lockdown shortcut on desktop

Clicking on it will lockdown the computer. This works well on Windows XP, Windows Vista and even on Windows 7. You need to login back to your computer by providing your credentials if you need to unlock it again. Of course I still prefer to use Win + L shortcut (to which I got used much to) than this, anyway it’s always good to explore and find new things, even if they had alternatives Smile.

[How To] Use Google Multiple Sign-In Feature

Google Mutiple sing-in

If you use Google products a lot and that too with different logins (may be one for personal use and other for business purpose etc.), you would be knowing there’s absolutely no way to use both accounts on the same browser. Until recently you need to go through some workarounds or use another browser and keep switching between the two windows often. Times have changed, Google has listened to users like you and enabled this glorious multiple sign-in feature for selected Google products.

You wouldn’t even be knowing that such a feature exists until you open your Google account settings page. This tutorial explains you how to enable and use Google multiple sign-in feature for your account.

To begin with, visit Google account settings page,

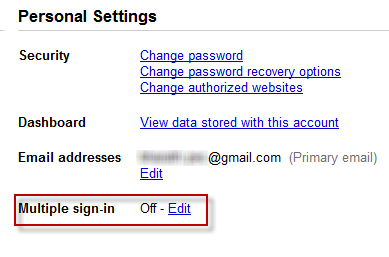
Google account personal settings

Find a “Multiple Sign-in” tab under your personal settings, by default this feature would be set to “Off”, click on the “Edit” link to change the multiple sign-in settings.

You will be taken to multiple sessions page,

multiple google accounts enable

You need to read and understand the four aspects listed there (as shown in the screenshot) before adding a “check” to each one after which you can enable the Google multiple accounts feature. After you checked the each option, the “save’ option would be enabled. Click on it to save the settings and enable the multiple sign-in feature.

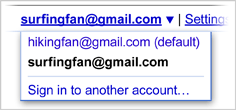
Now the Google multi-login feature gets enabled for you. Open any multiple sign-in supported Google product page(ex: Gmail) and you can figure out a drop down menu next to your Google account username. Click on it to see “Sign in to another account” link and click on it.
multilogin menu sample

You can sign in up to two additional accounts (so in essence, you can simultaneously access up to three Google accounts, while the first being your default account) and you can also open the same product in multiple tabs with different tabs.

Please note that the multiple sign-in option is currently available to only few products listed below and also it is not fully supported for use with Offline Gmail and calendar , for the same reason you wouldn’t want it to enable yet if you use offline Gmail.

Multiple-sign in feature supported Google products:

  • Code
  • Calender
  • Gmail
  • Reader
  • Sites
  • Voice
  • Docs

If you want to use multiple sing in with other products, you still need to either use tricks like using private browsing mode in supported browsers or use another browser as you have been doing all through.

Cumulative Security Update for Internet Explorer KB2183461

Windows Update

Cumulative Security Update for Internet Explorer KB2183461: [Released: August 10, 2010]

The security update KB2183461 fixes the issues addressed in the security bulletin MS10-053. This update applies to Internet Explorer with the operating systems Windows 7, Windows Vista and Windows XP.

Security update KB2183461 addresses issues that have been identified in Windows systems running Internet Explorer, that could allow an attacker to compromise the computer and gain control over it. Download and install the update to protect your system from this issue. If you have enabled automatic Windows Updates in your system, the computer should be able to download the updates by itself. If you haven’t enabled (not recommended) the Windows Updates on your Windows, you can download and install the update KB2183461 from the links given below . Choose the correct Operating system and the architecture of your OS (x86 or x64).

Download Links:

Windows 7 x86 (7.9 MB) x64 (6.2 MB)
Windows Vista x86 (9.2 MB) x64 (17.8 MB)
Windows XP x86 (3.4 MB) x64 (36.6 MB)

[How To] Install WordPress On Your Local Computer

wordpress logo

Are you a web developer or admin of a network of blogs with WordPress as CMS? Want to test some new features offline before implementing them on your original server online ?

If your answer is “yes” to the above questions, perhaps you have landed on the right page. WordPress is an amazing Content Management System for blogs and it makes everything easy even for not so tech-savvy people. However if you own blogs, you might well be knowing the importance of testing the features like testing some enhancements to your current themes, testing plugins or even testing some third-party scripts on your WordPress blog. At Techrena, which is set to become a network of blogs sooner or later, we understand the importance of this testing. We do a lot of testing on our local computers before finally taking them online. We thought it would be useful if we share how actually we do this kind of testing on our local systems using WordPress. Here we are coming up with a detailed tutorial on installing WordPress on localhost via two methods.

1. Using Xampp Server

2. Using IIS server (on Windows only)

Before we start, while we try to give every detail while posting this please do note that in some cases, we do take things for granted in the sense that we assume that you know some basic things if not more. Let’s get started…

Using Xampp Server:

Requirements: i) PHP latest version (check here) ii) MySQL Database latest version (check here)

Although, PHP 4.3+ version and MySQL 4+ version is sufficient enough to run WordPress, we recommended you to use the latest versions always. One good thing with WordPress is that, it always notifies users when their database version is outdated. So this helps you keeping the updated database version.

Step 1:

Download the XAMPP local server. Run the installer and make sure that the XAMPP server is running on your tray.

Step 2:

Open the XAMPP Control Panel from the system tray, check the first box (Apache) and click on the “Start” button to start the Apache web server on your local machine.
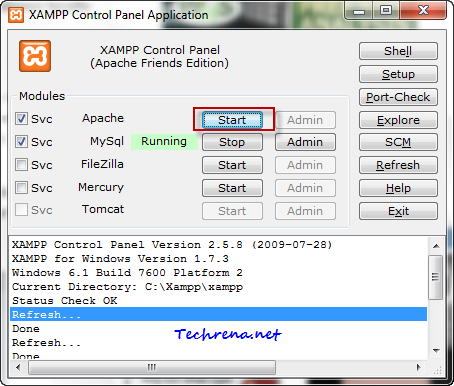
Xampp control panel start Apache

Step 3:

Now that the local server has been installed we are now left with installing WordPress on our server. Download the latest WordPress zip file and extract the “WordPress” folder to the htdocs folder inside the “xampp” server installation folder.
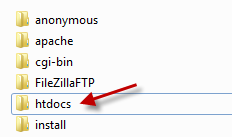
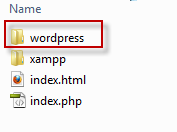
htdocs in xamppWordPress in htdocs

Step 4:

Now you need to create a database table which can be used by WordPress. Go to http://localhost/phpmyadmin/ and create a new database. If you are not able to login to the phpMyAdmin page, go to http://localhost/security/xamppsecurity.php page and edit the MySql SuperUser details and try again.

Enter the new database name (something like “wordpress”) and click “Create” and the new database will be created. Now we need to notify WordPress about this database in the next step.
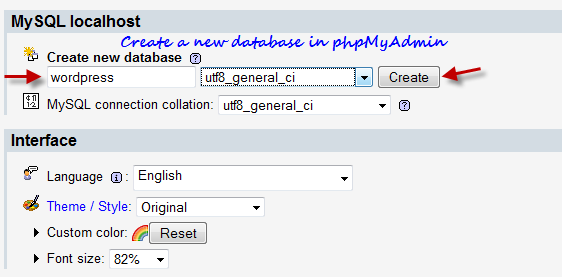
New database in phpMyAdmin

Step 5:

Go to WordPress folder and open the file called “wp-config-sample.php” in any text editor.
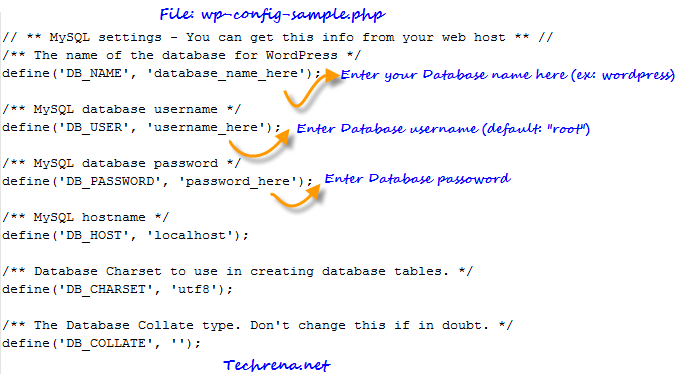
editing wp-config-sample.php file

Make the changes to the file and rename it as “wp-config.php” and close the editor.

Step 6:

Now type http://localhost/wordpress/wp-admin/install.php (the path of the URL may change depending on what name you chose for site or the name of the folder under “htdocs”)
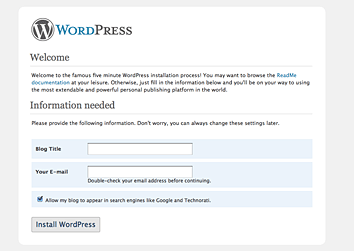
WordPress install page

Choose your local WordPress blog title and leave your email address in there start page and click “Install WordPress”. You will now be given username and password to login to your new blog.

2. Using IIS Server:


Microsoft has made it easier to install WordPress on your Windows based computer just like installing Windows apps, all you need to do is to do a few clicks.

Requirement: You need to enable and run IIS server on your computer.  Read our tutorial on how to activate IIS on your computer.

Step 1:

Download and run Microsoft Web Platform Installer. This is a free software from Microsoft developed to make installing web apps easy for Windows users.

Step 2:

Go to Web Applications > Blogs > click “Most Popular”, select “WordPress” and click Install button. Other tools that are required by  WordPress like PHP and MySQL will automatically be included in the download. You need to accept the licence agreement and then proceed to the download. The total download size should be less than 90 MB in most cases.
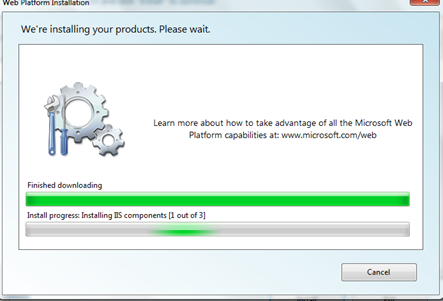
Web platform installer for wordpress

Step 3:

Once the download and installation gets over, you will be asked to enter information about your site in a series of steps:

i) Admin Password for MySQL: By default the database administrator username would be “root” and you need to select a password for the administrator, click “Continue” button once you are done.
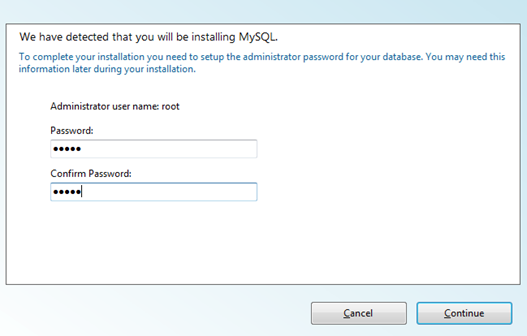
MySQL dayabase admin password web platform

After you enter this, the download resumes for sometime and you will be then asked for some more information about the site.

ii) Application information: You need to enter the Database admin password (which you have set in the above step) and WordPress database password. You will also be asked to enter passphrases to secure your passwords, but the default option here is to leave them blanks and in any case this is not mandatory. You can however change it if you would like to change it.
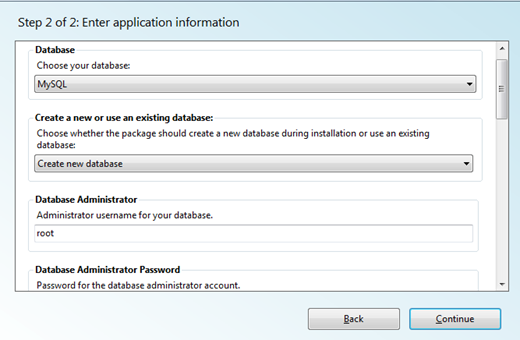
WordPress IIS application info

ii) Site information: In this step you just need to enter the WordPress application name. You might not want to change the other details which are set to default already. Click “Continue” button and let the Web Platform installer install the application for you.

Step 4:

This is the last step of the installation. You will be shown the list of product installed on the window.
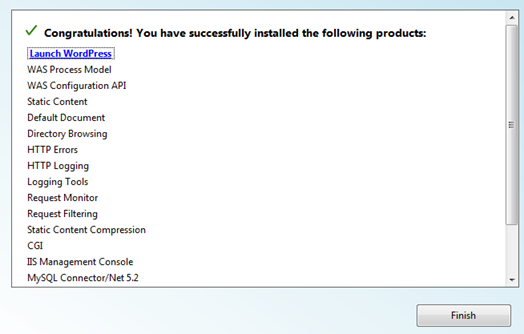
WordPress_web_platform_install_done

Click “Launch WordPress” to launch your WordPress blog. You can alternatively access it via http://localhost/wordpress/. You can find the WordPress installtion usually inetpub> wwwroot folder.

Still facing any problems during the installation ? Let us know through the comments.

Note:

1. The above two methods have been tested and found to be working well on Windows 7 machines.

2. While the method 2 is relatively simpler and quicker, we have however found that if you delete some sites from your IIS Manager, the WordPress installation getting corrupted. It may not be the same case for all but surely for some. We hence advise you to not to touch anything inside Internet Information Service(IIS) Manager unless you are sure about what you are doing.
[How To] Using Windows 7 Credential Manager

Windows 7 logo

Credential Manager is a Single Sign-On (SSO) solution that Microsoft has been offering since Windows Server 2003. It was there in Windows XP, Vista and now in Windows 7 too, this with some more extended features.
Credential Manager allows a Windows user to store sensitive credentials like log on information (ex: user IDs and passwords) required for the websites you visit or for connecting with the other computers on a network. These credentials are stored in special folder called vaults. With this stored information, Windows 7 can automatically log on securely to the websites and the computers on your network automatically without requiring you to remember the credentials all the time. Credential Manager is based on a secure client-side credential-caching mechanism. Now let’s see how we can use Credential Manager in Windows 7:

You can open Windows Credential manager via Start > Control Panel > Credential Manager or alternatively go to start and type “cred” (or even “credential manager” ) and open Credential Manager from the results.

Credential manager search

Credential Manager search results

Credential Manager:

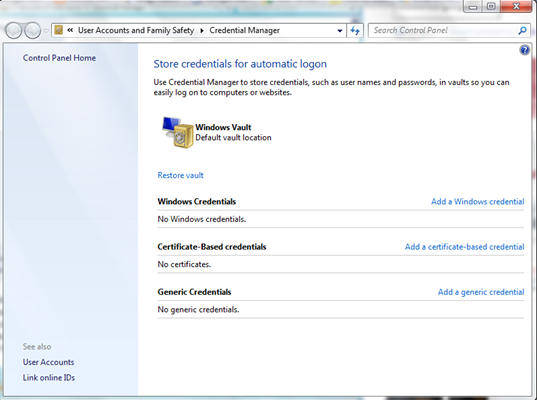
Windows Credential Manager
As you can see in the above screenshot, there are basically three types of credentials you store using Credential Manager:

1. Windows Credentials: Lets you store the network addresses, user IDs and passwords that are required while accessing intranet and SharePoint sites.

For example you can add a credentials required to connect to one of a computer in the network or you can even store the password needed to access you printer, storing upon which Windows can automatically log on to it while accessing the printer.

2. Certificate-Based Credentials: Lets you store digitally signed public key certificates like Smart Card Logon certificate or Smart Card user certificate if you are using a certificate that is used with the smart card.

3. Generic Credentials: Lets you store the URLs and the usernames and passwords associated with them.

Adding Credentials To Windows Vault:

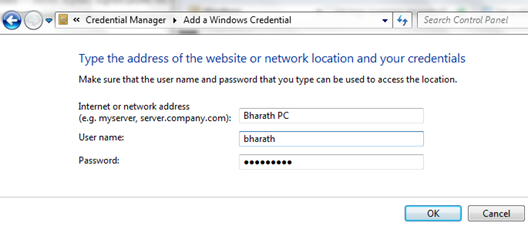
If you want to add a new credential, just  select the type of the credential that you want to add and then click “Add a credential” link and enter the details that are needed like username, password and network address etc.

Add new Windows Credential Manager

Backing Up Windows Vault:

If you stored some credentials in your Windows vault using Windows Credential Manager, you can safely backup the Windows Vault to other places (preferably on removable media) so that you can access them even in case of any Hard disk failure.

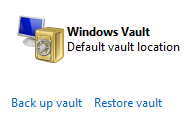
Windows vault backup

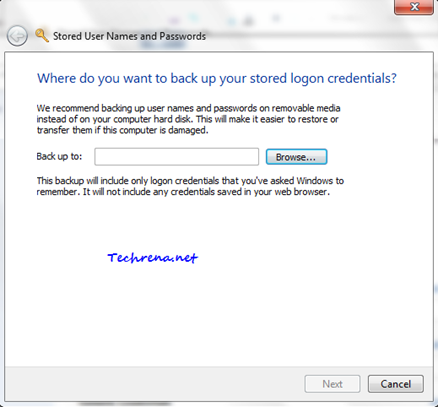
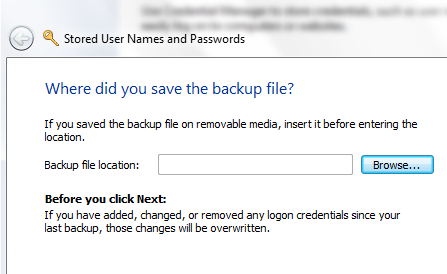
Click on the “Back up vault” link under the Windows Credential Manager. Select the location where you want to save the back up file (stored as “Credential Backup Files” with .crd extension)

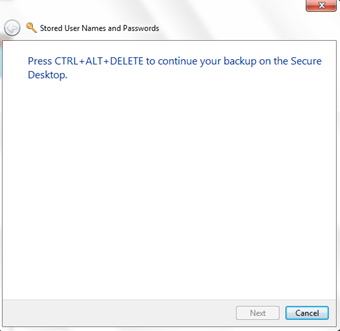
Stored user names and passwords
Press Ctrl + Alt + Delete to continue the backup process on the Secure Desktop. Finish the step and your vault backup would be ready on your computer.

Stored user names and passwords in vault

Then you again restore your Windows vault backup using the “Restore vault’ link below the Windows Vault.

Restore vault

Note:

1. You can not store credentials of websites that you browse through browser for instance Gmail credentials, Twitter credentials or Facebook credentials etc. These credentials can only be accessed by certain Windows applications which need to go through authentication with the resource (or server). Some of the Windows applications that make use of the Windows Credential Manager in Windows 7 include Windows Live Messenger, Microsoft Word, Outlook and Windows Explorer.

2. Please note some of the above features may not work in some editions especially if you are using Windows 7 RTM (Release To Manufacturing) builds.

[Download] Microsoft Indic Language Input Tool

Microsoft Indic language input tool logo

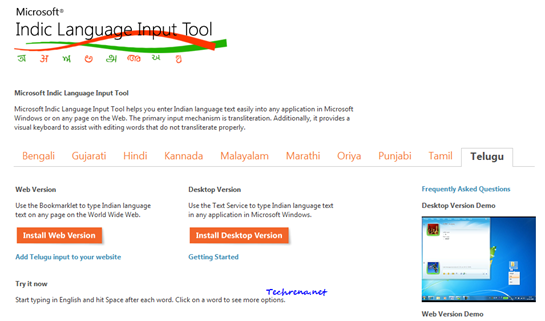
If you are from India and want to use your own language in various application on your computer, you can select any of the various tools available online. We had earlier covered about Google Transliteration IME. You might have already tried tools like Baraha, Lekhini or Aksharamala etc. In this post we are going to tell you about the lesser known Microsoft Indic Language Input Tool.

Microsoft Indic Language Input Tool:

This tool works with any application in Microsoft Windows or on any webpage. Like Google’s transliteration IME, this too works  on transliteration mechanism with an additional virtual keyboard.

Microsoft Indic Language Input Tool is available in 2 versions:

1) Web Version

2) Desktop Version

The web version like Google IME bookmarklet works on bookmarklet and let you type text on any webpage. The desktop version can be used to input text in Indian languages in any Windows application.

This tool currently supports 10 languages: Bengali, Gujarati, Hindi, Kannada, Malayalam, Marathi, Oriya, Punjabi, Tamil and Telugu.

Microsoft Indic Language input tool

Find the download link for both the web and desktop versions below.

Download:

Microsoft Indic Language Input Tool

[New] Drag And Drop Attachments From Gmail To Your Desktop

gmail drag attachment

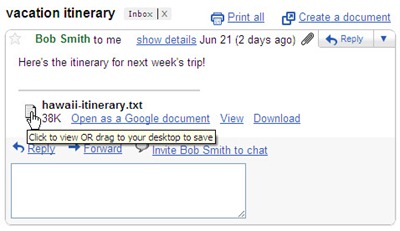
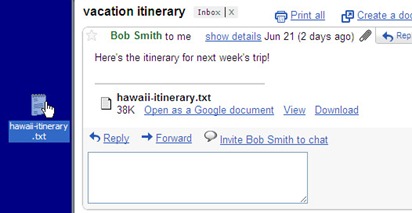
Gmail has just announced a support to drag and down the attachments from mail to your desktop. Until now we could only drag and drop attachments from the desktop to the mail while composing but the reverse was not possible. Now Gmail blog has officially announced the launch of this new feature (in Google Chrome) along with a couple of screenshots on how to do it. I have included the screenshots in this post so that you can get a brief idea about how to use this feature. When you hover the mouse over the attachment, you can see a message “Click to view OR drag to your desktop to save”. It’s pretty much straight forward, just click and hold, drag and drop the attachments from your mail to any folder on your computer. Release the mouse button once you have taken the cursor to your desired folder.

gmail_drag_attachment_2

Gmail had earlier enabled another feature that lets you drag and drop images on to your email messages while composing a mail.

Note: This works only with Google Chrome as of now

Via Gmail Blog

[Download] µTorrent 2.2 Beta

utorrent logo

When it comes BitTorrent and P2P software, µTorrent has been a revelation as it is free, lightweight (less than 1 MB) and works faster and smoother than most other software.

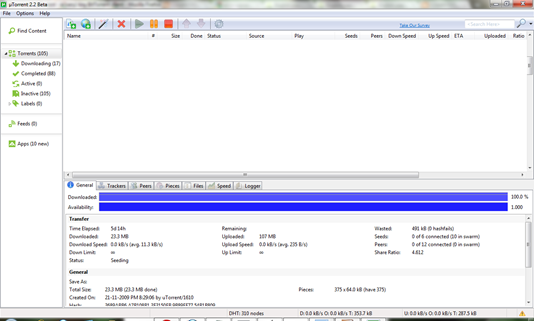
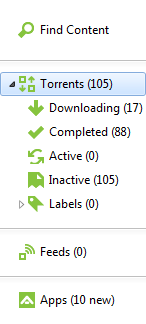
The most recent version µTorrent 2.2 Beta sports a revamped new look as you can see in the following screenshot, drop-down menus have been added to the sidebar. You can also add labels to your torrents much like you do in your RSS feed readers. And oh, yeah! utorrent has a built-in RSS feed support so you can use it as a feed reader if you want.

utorrent 2.2 beta

utorrent 2.2 beta side

The new beta version includes an option to directly launch the files from the µTorrent. Clicking on the “play” button of a torrent will launch that particular file in the default application that had been associated with that file type that you have downloaded.
utorrent 2.2 beta play

µTorrent apps:

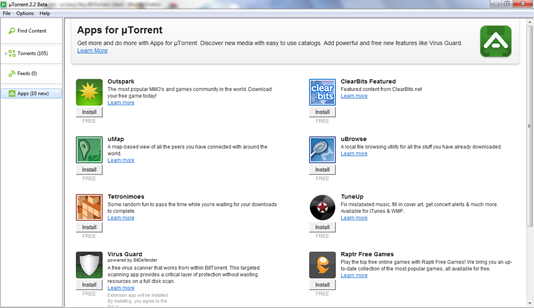
utorrent apps is the newest addition to the software, courtesy Project Griffin. You can install apps from the Apps section accessible from the “Apps” menu in the sidebar. If you are a developer, you can participate in the App Developers Challenge and test your luck to see if you could win the $1000 contest.

utorrent apps

Download:

µTorrent Direct download link (Windows- 383 KB – µTorrent 2.2 Beta build 20813)