[Tip] Turn Off The Clicking Navigation Sound In Internet Explorer

IE9 logo

If you use Internet Explorer frequently, you might be aware of the annoying click sound that the browser generates whenever you click a link in the webpage, use back or forward buttons or when you type a URL and press enter. If you observer closely, this is the same sound that comes when you are browsing the Windows explorer windows as well. This happens so because whenever you click something in Internet Explorer or Windows explorer, it will trigger the “System Navigation” event of the system sounds. As always, you can completely disable this sound both for Windows explorer and Internet Explorer. But let’s confine ourselves to the Internet Explorer for now, in the wake of the latest IE9 release. Follow the steps briefed below to disable the clicking navigation sound in the Internet Explorer 9.

Steps:

1. Click on the settings icon IE9 settings iconfound on the top right corner of the Internet Explorer. Choose “Internet options” from the menu.

IE9 settings menu

2. A new “Internet Options” window opens up. Go to the “Advanced” tab in the window. Uncheck against “Play system sounds” under the settings for “Accessibility”.
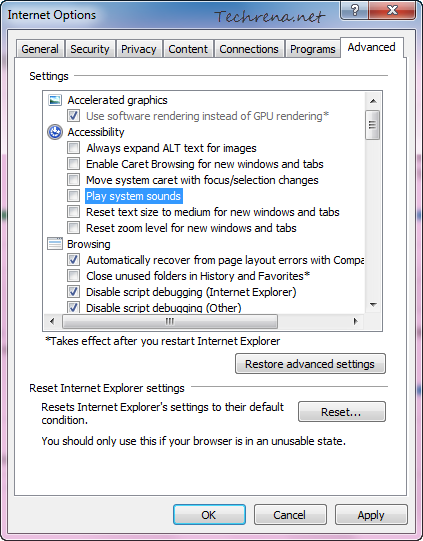
System sounds from internet options in IE9

Click “Ok” to apply the changes and close the window. Now the click navigation sound in the Internet Explorer gets disabled (If you to enable it back, just choose the option shown in the above screenshot and save the settings). However, the clicking navigation sound in the Windows explorer will still continue to exist. We’ll see how to completely turn off or mute these navigation sounds for Windows explorer completely in the upcoming posts.


Watch The Apple iPad 2 Event Online

iPad 2 event

Apple is all set to launch the sequel to its highly popular iPad, the iPad 2 (we believe it’d be the name) today. We are now just an hour ahead of the scheduled iPad 2 launch event, which will start sharply at 10 AM PDT at the Yerba Buena Center for Arts Theater in San Francisco.

Not just Apple fans, I’m sure the whole of the gadget lovers community will be wanting to witness the event live. Also the fact that the iPad has been a huge success and rules almost 93% of the tablet market is just adding to curiosity. Taking into account the huge craze, almost all of the popular blogs will be live blogging the event live from San Francisco. We also expect that Apple will telecast the keynote event live online (Update: Looks like they are not live streaming the event today). We are also hearing news that Apple Store is currently down in preparation for the launch. If you want to follow the event live like us, hit the following links:

Live Blogging:

Engadget

Gizmodo

Gdgt

Macworld

Mobile Crunch

Event Video Coverage (Not Live):

Apple

Covert Word Documents To PDF Using Google Docs

These days, most of the users including organizations prefer to save or export their office documents created using various Office suites like Microsoft Office or OpenOffice etc. as PDF (Portable Document Format) files. This is because when you save it in other typical document formats, some of the elements in the document may not render properly when you open it with Office suit other than the one using which it is made, so it may not look the same on all the computers running on different platforms or using different types of office suits. There are plenty of tools available both online and offline to export the documents into PDF format. In fact, we had earlier written about how to covert Word and Excel documents into PDF using Microsoft Office 2010.

Now let’s me introduce you a not-so-known feature in Google Docs that lets you save any document as PDF.

1. Upload your Word document to Google Docs.

2. Open the document and you click on the “File” in the menu bar.

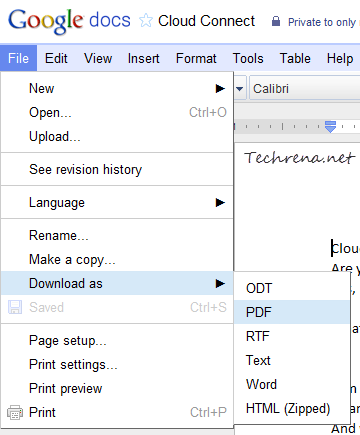
3. Under File > Download as ; choose PDF to save the document as PDF and download to your computer.

Google docs download as PDF option

See Your Facebook Friends Locations On Google Maps

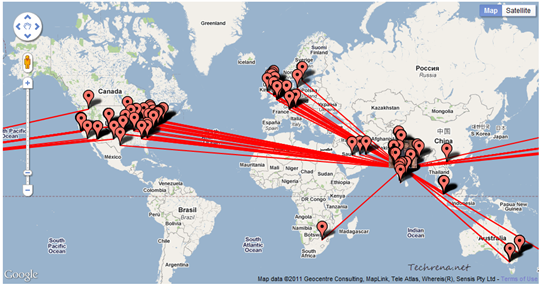
With the growing popularity of Facebook daily, there has been noticeable surge in Facebook related mobile and web applications. Developers are coming up with innovative ideas to build their apps. Once such app that I found lately is, WhereMyFriendsBe, a web based application that shows the locations of your Facebook friends around the world on Google maps. We had earlier covered about Bing Facebook for similar purpose. However, the subtle difference between Bing Facebook app and WhereMyFriendsBe is in grouping the friends map. While Bing app shows your friends profile pictures on their location in the map, the later will list the names of your friends located in a particular area.

WhereMyFriends Be map

As you can see the app will visualise your Facebook friends on Google maps, based on their location in Facebook profile. If you hover over any of the pins, names of all of your Facebook friends located in that city/location will be displayed. That said, I would still prefer using Bing Facebook map because once you use the WhereMyFriends app, your friends map becomes public. It’s rather surprising that not too many apps exist in this category.

via Labnol

Sync Microsoft Office To Google Docs

Office Google Docs Sync

Google Docs has got into much fame because of its cloud based approach it has adopted. Advantage with cloud based services (when it comes to working on documents in particular) is that you can increase your productivity by means of collaboration, meaning that all of your project mates can work on the document simultaneously syncing each others’ piece of work on the same document collectively to complete the document. Google Docs is very much about increasing the work efficiency by offering collaboration. What if this kind of collaboration comes to the world’s most popular office suit, the Microsoft Office? It can’t get any better, right?

Yes, Google is now offering a plugin called Google Clod Connect for Microsoft Office which lets you collaborate with other editors of your Office document, directly from the Microsoft Office. The plugin allows you to quickly share, backup and sync Microsoft Word, PowerPoint and Excel documents with other co-workers. If the co-workers also install this plugin, they can also directly work from their MS Office document and it will be synced automatically with the other workers.

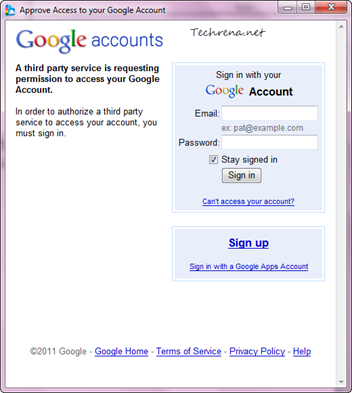
>> Once you download and install the plugin, a new toolbar will be added to your Microsoft Office document. Click on the “Login” button to sign in with your Google account.

Google cloud connect toolbar

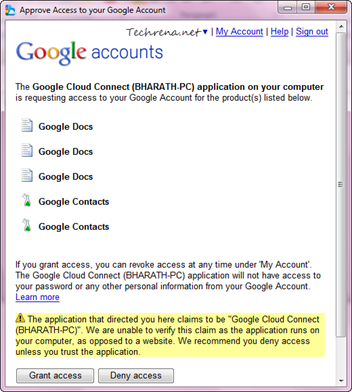
Approve access to Google account

Approve access Google account settings

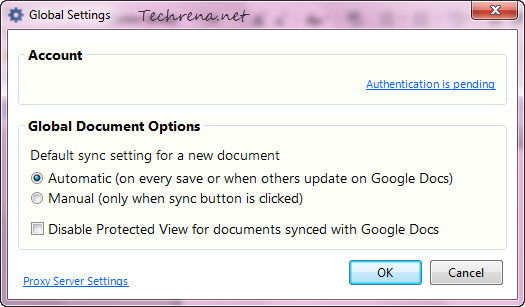
>> You can also choose the default sync settings for a new document:

Global settings for google cloud connect

>> And once you have granted the permissions, you will see a green “Success” icon

Login success cloud connect icon

inside your Office document. You can now work on your document simultaneously with other workers directly from the Microsoft Office.

Google cloud connect toolbar options

Watch the below video to see how the plugin works in Microsoft Office.

[via]

[Tip] Disable Delete Confirmation Dialog Box In Windows 7

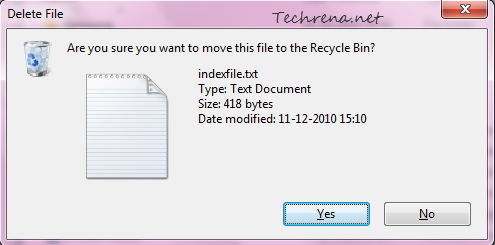
Windows alerts users in the form of various prompts including various confirmation dialogs. These are actually pretty much handy in making sure that you are performing the action that you are actually intended to do. Delete confirmation dialog box is one such prompt, asking you to confirm that you really want to delete that particular file.

Delete file confirmation in Windows 7

Though highly useful, sometimes when you are deleting a large set of files, these dialogs could annoy you and you might want to disable them till you complete the task. Here’s what you need to do to disable the delete confirmation dialogs on your Windows 7 or Windows Vista based PC.

Steps:

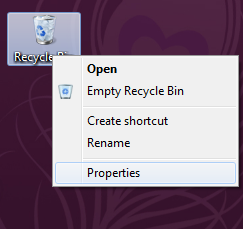
1. Right-click on the “Recycle Bin” icon on your desktop and choose “Properties”.

Recycle bin properties link

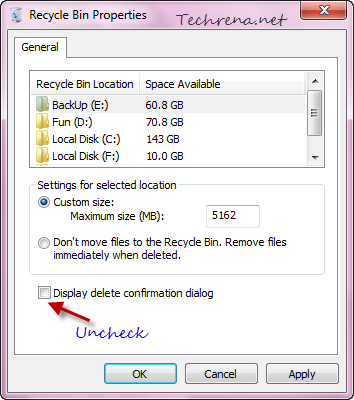
2. In the Recycle Bin Properties window, you will see this option: “Display delete confirmation dialog”.

Display delete confirmation dialog

Just uncheck this option and click OK to apply the settings.

Recycle bin properties delete confirmation

That is all you need to do. You will not be shown the delete confirmation dialogs anymore. But I strongly advise you to change this settings only if you are desperate to get rid of these prompts for a while.

Order Free Windows 7 SP1 DVD [US And Canada Only]

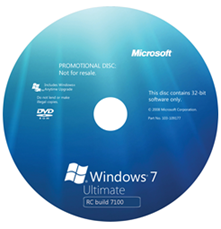
Windows 7 DVD

Last week, Microsoft has released the Windows 7 Service Pack 1 final RTM for the Windows 7 users. It can either be downloaded manually from the Microsoft official website or users can also opt also for automatic installation via Windows Update. However, if you can’t afford to use your network bandwidth to download the SP1 update files, you might want a way around to get the Service Pack 1 using traditional methods. For the same purpose, Microsoft is now providing a free Windows 7 SP1 DVDs for the users in Canada and the United States. If you stay in US or Canada, you can follow the following steps to order Windows 7 SP1 physical media DVDs.

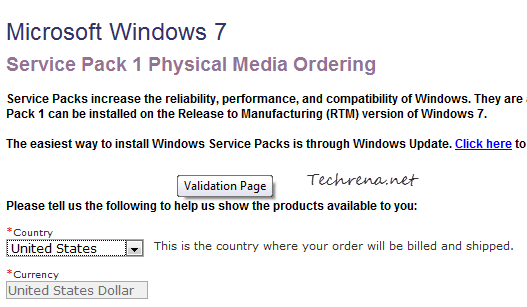
1. Open this link and choose you country and click the “Continue” button.

Windows 7 SP1 Physical Media Order

2. Choose the language of the Windows 7 SP1 installation and click Add To Cart.

Windows 7 SP1 Physical Media Shipment

As you can see, the DVD is free of charge ($0.00).

Click the Checkout button in the next step and enter your shipment address to where you want the DVD to be delivered. And please note that there’s no option to use PayPal for checking out.

Note:

# A customer can order only 1 copy of the physical media DVD.

# Even though the DVD is offered for free, there are shipment and handling charges around $6.

[Tip] Turn Off Sounds In Gmail Chat

Gmail-logo-small

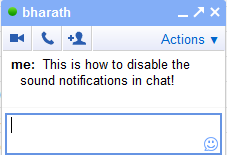
If you frequently chat with your friends using Gmail chat, I’m sure there would have been times you might have definitely thought you would be better off disabling the notification sounds or alerts whenever a new chat message arrives for various reasons. We can draw many cases so as to why someone would want to turn off or mute these sounds in Gmail chat, but then at the end of the day we would just like to be have a choice. Follow the below steps to disable the sound notifications for chat in Gmail.

Gmail chat screenshot

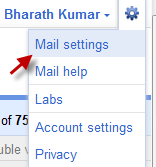
1. Login to Gmail and open the chat settings (hit the link, you will be directly take to the page). Alternatively, you can open the same page this way: Click on the dropdown button next to your name (if you are seeing the new Gmail navigation bar) and then choose “Mail settings”.

Gmail settings link at navigation bar

And then go to “Chat” tab under the settings page.

gmail settings for chat

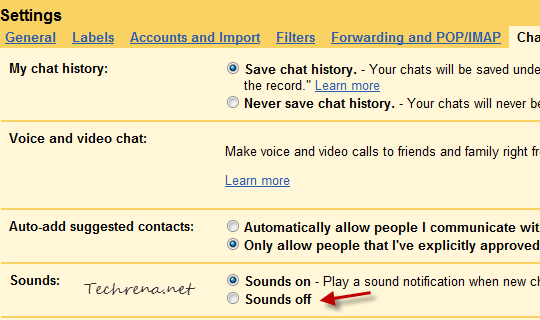
2. Under the “Chat” tab, locate the settings for “Sounds”. Now, to disable the sounds for chat notifications,

gmail chat sounds settings

Choose “Sounds off” radio button to completely disable the sound notification for new chat messages.

That it it! Just revert back to “Sounds on”, to enable the sound alerts again.

[via]

Related reading: Schedule emails in Gmail

Picasa Web Albums Multiple File Uploader

Picasa web albums logo

Google’s Picasa web albums is popular among the online community as a tool to quickly upload photos and videos to store and share them with others. But the problem with the online upload tool was that you were not allowed to upload multiple photos at once and you could only upload up to five photos at once. If you have some hundreds of photos to upload, this could be really tiresome process and wastes a lot of time. The only workaround this problem for all these days has been to install and use the Picasa desktop software which allows you to upload bulk pictures at once to Picasa Web Albums. But then, we have always wanted the web uploader to handle the multi-upload so as to possibly avoid the installation of another software just to get this missing tiny feature.

You no longer need to worry as Google has just lifted the five-at-a-time limitation to the image uploader in Picasa Web Albums, meaning that you can choose multiple photos and upload all of them at once (but be aware that a maximum of 1000 photos are allowed per album) to your album on the Picasa Web Albums.

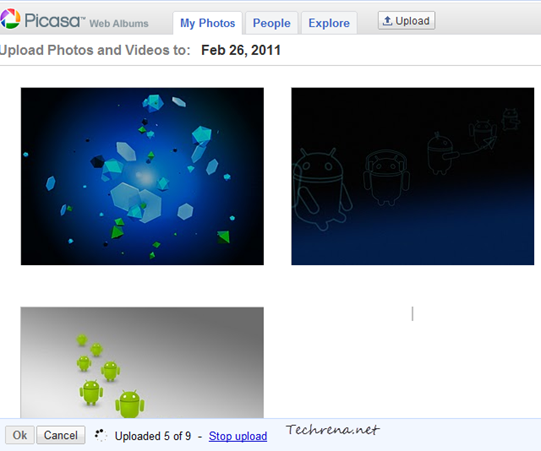
To get started, open the Picasa Web Albums and login with your Google account. and click the “Upload” button if your are using Firefox, Google Chrome or Safari. You will now be asked to enter the album details and then in the next page you will be asked to choose the photos to upload. Once all get uploaded, you will see their thumbnails. You can then add captions, zoom in or delete from the upload screen.

Upload photos to picasa

Picasa web albums uploading photos

If you are using Internet Explorer, you can use the Upload Control plug-in in IE besides using the basic uploader.

Enable Reading Levels In Google Search

Google reading level is a feature that lets you adjust the reading level in Google search results so that you get the most appropriate results based on your reading level so that you get webpages that you can read and understand easily. To get a better understanding, consider the scenario which Google mentioned in the help article (linked at the bottom of the post) about the reading level: A student or second-language learner might need a webpages more of basic reading levels when compared to a research scholar who might want to webpages of advanced reading levels. If you think, reading level matters for you, here’s how you can change

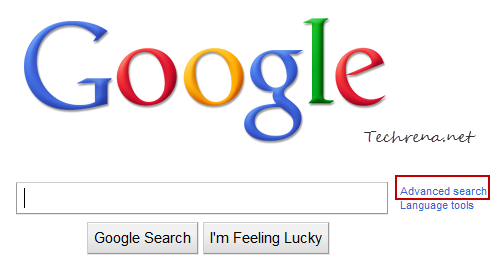
Go to Google homepage and click on the “Advanced Search” link found next to the search bar.

Advanced search link in Google

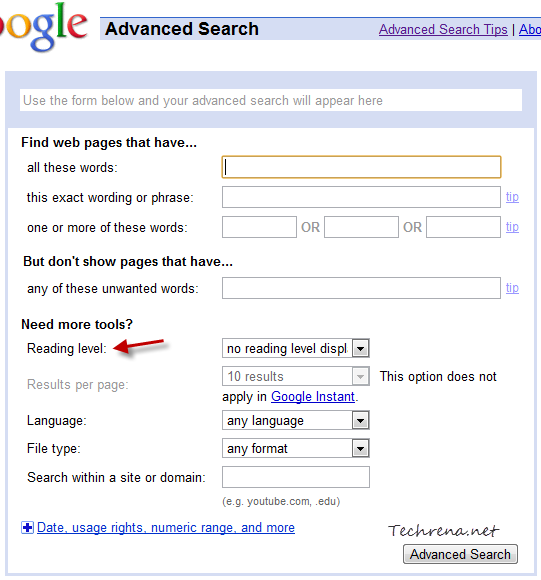
Locate the “Reading level” settings in the advanced search page:

Advanced search options in Google

Basically there are three reading levels to choose from: Basic, Intermediate and Advanced.

reading level options

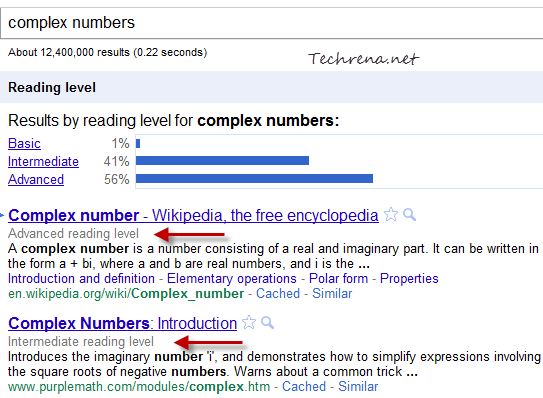
You can either choose one of the three levels or you can also choose “annotate results with reading levels” and the reading level of the webpages will be displayed in the search results as shown:

reading levels in Google search

You can then choose to read the webpages that are at your desired reading level.

These reading levels have been compiled by based on data provided by number of teachers hired by Google for the same purpose.

Source: Google Help article